NE59R6631SG - Cooker SAMSUNG - Free user manual and instructions
Find the device manual for free NE59R6631SG SAMSUNG in PDF.
Download the instructions for your Cooker in PDF format for free! Find your manual NE59R6631SG - SAMSUNG and take your electronic device back in hand. On this page are published all the documents necessary for the use of your device. NE59R6631SG by SAMSUNG.
USER MANUAL NE59R6631SG SAMSUNG
Electric Range User manual NE59*663*** NE59N6630S_AA_DG68-01050A-02_EN+MES+CFR.indb 1 2018-12-18 7:17:272 English Memo Anti-tip device WARNING To reduce the risk of tipping the range, the range must be secured by a properly installed Anti-Tip device. AFTER THE RANGE HAS BEEN INSTALLED, CONFIRM THAT THE ANTI-TIP DEVICE HAS BEEN PROPERLY INSTALLED AND VERIFY THAT THE ANTITIP DEVICE IS PROPERLY ENGAGED. Refer to the installation manual for instructions. a) If the anti-tip device is not installed, a child or adult can tip the range and be killed. b) Verify that the anti-tip device has been properly installed and engaged at the rear right (or rear left) of the range bottom. c) If you move the range and then move it back into place, ensure the antitip device is re-engaged at the right or left rear of the range bottom. d) Do not operate the range without the anti-tip device in place and engaged. e) Failure to do so can result in death or serious burns to children or adults. WARNING Do not step, lean, or sit on the doors of the range. You can cause the range to tip, resulting in burns or serious injuries. Conrm that the Anti-Tip device is installed properly. Then, to verify that the Anti-Tip device is engaged, grasp the top rear edge of the range and carefully attempt to tilt it forward. The Anti-Tip device should prevent the range from tilting forward more than a few inches. If you pull the range out from the wall for any reason, make sure the antitip device is properly engaged when you push the range back against the wall. If it is not, there is a risk of the range tipping over and causing injury if you or a child stand, sit, or lean on the open door. Never completely remove the leveling legs. If you remove the leveling legs, the range will not be secured to the anti-tip device properly. NE59N6630S_AA_DG68-01050A-02_EN+MES+CFR.indb 2 2018-12-18 7:17:27English 3 Contents Contents Important safety instructions 4 Introducing your new range 16 Overview 16 What’s included with your range 16 Before you begin 17 Energy saving tips 17 Cooktop cooking 17 About cooktop cooking 17 How to set the appliance for cooktop cooking 19 Using the proper cookware 20 Choosing the proper cookware 21 Protecting the smoothtop 21 Operating the oven 22 The oven control panel 22 Setting the clock 23 Setting the kitchen timer 23 Timed cooking 24 Delay start 24 Turning the oven light on and off 25 Minimum and maximum settings 25 Using the oven racks 25 Baking 26 Convection baking 27 Convection roasting 28 Broiling 28 Using the bread proof feature 29 Using the favorite cook feature 30 Using the keep warm feature 30 Using the sabbath feature 31 Extra features 32 Maintaining your appliance 34 Self-cleaning 34 Steam-cleaning 36 Care and cleaning of the oven 36 Care and cleaning of the glass cooktop 38 Removing and replacing the oven door 40 Removing and replacing the storage drawer 41 Changing the oven light 41 Troubleshooting 42 Troubleshooting 42 Information codes 46 Warranty (U.S.A) 47 Warranty (CANADA) 48 NE59N6630S_AA_DG68-01050A-02_EN+MES+CFR.indb 3 2018-12-18 7:17:274 English Important safety instructions Important safety instructions Read and follow all instructions before using your oven to prevent the risk of re, electric shock, personal injury, or damage when using the range. This guide does not cover all possible conditions that may occur. Always contact your service agent or manufacturer about problems that you do not understand.
WHAT YOU NEED TO KNOW ABOUT
SAFETY INSTRUCTIONS Warnings and Important Safety Instructions in this manual do not cover all possible conditions and situations that may occur. It is your responsibility to use common sense, caution, and care when installing, maintaining, and operating your oven. Important safety symbols and precautions What the icons and signs in this user manual mean: WARNING Hazards or unsafe practices that may result in severe personal injury or death. CAUTION Hazards or unsafe practices that may result in minor personal injury or property damage. CAUTION To reduce the risk of re, explosion, electric shock, or personal injury when using your oven, follow these basic safety precautions. Do NOT attempt. Do NOT disassemble. Do NOT touch. Follow directions explicitly. Unplug the power plug from the wall socket. Make sure the machine is grounded to prevent electric shock. Call the service center for help. Note These warning signs are here to prevent injury to you and others. Please follow them explicitly. After reading this section, keep it in a safe place for future reference.
When using electrical appliances, you should follow basic safety precautions, including the following: CAUTION
- Use this appliance only for its intended purpose as described in this Owner’s Manual.
- Potentially hot surfaces include the cooktop, areas facing the cooktop, oven vent opening, surfaces near the opening, crevices around the oven door. Be sure your appliance is properly installed and grounded by a qualied technician. User servicing - Do not repair or replace any part of the appliance unless specically recommended in this manual. All other servicing should be referred to a qualied technician. Always disconnect the power to the appliance before servicing by removing the fuse or switching off the circuit breaker.
- Do not enter the oven.
- Do not store items of interest to children in cabinets above a range or on the back guard of a range. Children climbing on the range to reach items could be seriously injured.
- Do not leave children alone. Never leave children alone or unattended in an area where this appliance is in use. They should never be allowed to sit or stand on any part of the appliance.
- Never use your appliance for warming or heating the room.
- Do not use water on grease res. Turn off the oven to avoid spreading the ames. Smother the re or ames by closing the door or use a dry chemical, baking soda, or foam-type extinguisher.
- Avoid scratching or impacting glass doors, cooktops or control panels. Doing so may lead to glass breakage. Do not cook on a product with broken glass. Shock, re, or cuts may occur.
- If there is a re in the oven during self cleaning, turn the oven off and wait for the re to go out. Do not force the door open. Introducing fresh air at self-cleaning temperatures may lead to a burst of ame from the oven. Failure to follow this instruction may result in severe burns.
- If the oven is heavily soiled with oil, self clean the oven before using the oven again. Leaving the oil in place creates a risk of re.
- Wipe up heavy soil on the oven bottom with a paper tower or rag before self cleaning. Self cleaning the oven when there is heavy soil on the oven bottom requires longer cleaning cycles and produces more smoke.
- Do not lean on the range as you may turn the control knobs inattentively. NE59N6630S_AA_DG68-01050A-02_EN+MES+CFR.indb 5 2018-12-18 7:17:286 English Important safety instructions Important safety instructions
- Storage in or on the appliance. Do not store ammable materials in the oven or near the surface units. Be sure all packing materials are removed from the appliance before operating it. Keep plastics, clothes, and paper away from parts of the appliance that may become hot.
- Wear proper apparel. Never wear loose-tting or hanging garments while using the appliance.
- Use only dry potholders. Placing moist or damp potholders on hot surfaces may result in burns from steam. Do not let the potholder touch hot heating elements. Do not use a towel or other bulky cloth.
- Teach children not to play with the controls or any other part of the range.
- For your safety, do not use high-pressure water cleaners or steam jet cleaners.
- If the power cord is damaged, it must be replaced by the manufacturer, its service agent, or similarly qualied persons to avoid creating a hazard.
- The appliance is not intended for use by persons (including children) with reduced physical, sensory or mental capabilities, or those who lack of experience and knowledge, unless they have been given supervision or instruction concerning use of the appliance by a person responsible for their safety.
SURFACE COOKING UNITS
- Never leave surface units unattended at high heat settings. Boilovers cause smoking and greasy spillovers that may ignite.
- Protective Liners – Do not use aluminum foil to line surface unit drip bowls or oven bottoms, except as suggested in this manual. Improper installation of these liners may result in a risk of electric shock or re.
- To avoid oil spillover and re, use a minimum amount of oil when shallow pan-frying and avoid cooking frozen foods with excessive amounts of ice.
- Do not lift the cooktop. Lifting the cooktop can damage the range and cause the range to malfunction.
- Do not operate the cooktop without cookware. If the cooktop operates without cookware, the control knobs will become hot.
- Never use the glass cooktop surface as a cutting board. NE59N6630S_AA_DG68-01050A-02_EN+MES+CFR.indb 6 2018-12-18 7:17:28English 7 Important safety instructions
- Use care when touching the cooktop. The glass surface of the cooktop will retain heat after the controls have been turned off.
- Be careful when placing spoons or other stirring utensils on the glass cooktop surface when it is in use. They may become hot and could cause burns.
- Use proper pan sizes. This appliance is equipped with surface units of different sizes. Select pots and pans that have at bottoms large enough to cover the surface area of the heating element. Using undersized cookware will expose a portion of the heating element to direct contact and may result in the ignition of clothing. Matching the size of the pot or pan to the burner will also improve efciency.
- Utensil Handles Should Be Turned Inward and Not Extend Over Adjacent Surface Units – To reduce the risk of burns, ignition of ammable materials, or spillage due to unintentional contact with utensils, position utensil handles so that they are turned inward and do not extend over adjacent surface units.
- Glazed cooking utensils. Only certain types of glass, glass/ ceramic, ceramic, earthenware, or other glazed cookware can be used for rangetop service without breaking due to sudden changes in temperature.
- Cleaning. Read and follow all instructions and warnings on the cleaning cream labels.
- Be sure you know which control knob operates each surface unit. Make sure you have turned on the correct surface unit.
- Always turn the surface units off before removing cookware.
- When preparing aming foods under the hood, turn the fan on.
- Keep an eye on foods being fried at high or medium high heat settings.
- Do not store heavy items above the cooktop surface that could fall and damage it.
- Do not Use Decorative Surface Element Covers – If an element is accidentally turned on, the decorative cover will become hot and possibly melt. Burns will occur if the hot covers are touched. Damage may also be done to the cooktop. NE59N6630S_AA_DG68-01050A-02_EN+MES+CFR.indb 7 2018-12-18 7:17:288 English Important safety instructions Important safety instructions ELECTRICAL SAFETY
- Proper Installation - Be sure your appliance is properly installed and grounded by a qualied technician.
- The appliance should be serviced only by qualied service personnel. Repairs carried out by unqualied individuals may cause injury or a serious malfunction. If your appliance is in need of repair, contact a Samsung authorized service center. Failure to follow these instructions may result in damage and void the warranty.
- Flush - mounted appliances may be operated only after they have been installed in cabinets and workplaces that conform to the relevant standards. This ensures that the appliances are installed in compliance with the appropriate safety standards.
- If your appliance malfunctions or if fractures, cracks, or splits appear: - switch off all cooking zones - unplug the range from the AC wall outlet - contact your local Samsung service center. WARNING If the surface is cracked, switch off and unplug the appliance to avoid the possibility of electrical shock. Do not use your cooktop until the glass surface has been replaced. WARNING
- Ensure that the appliance is switched off before replacing the lamp to avoid the possibility of electric shock.
- The range should not be placed on a base. CHILD SAFETY WARNING
- This appliance is not intended for use by young children or inrm persons without the adequate supervision of a responsible adult.
- Young children should be supervised to ensure that they do not play with the appliance.
- Keep children away from the oven door when opening or closing it as they may bump themselves on the door or catch their ngers in the door.
- The cooking zones will become hot when you cook. To keep small children from being burned, always keep them away from the appliance while you are cooking.
- During self cleaning, the surfaces may get hotter than usual. Keep small children away from the range when it is in the self-cleaning mode. WARNING Accessible parts may become hot during use. To avoid burns, young children should be kept away. NE59N6630S_AA_DG68-01050A-02_EN+MES+CFR.indb 8 2018-12-18 7:17:28English 9 Important safety instructions OVEN
- DO NOT TOUCH THE HEATING ELEMENTS OR INTERIOR SURFACES OF THE OVEN. Heating elements may be hot even though they are dark in color. Interior surfaces of an oven become hot enough to cause burns. During and after use, do not touch or let clothing or other ammable materials contact the heating elements or interior surfaces of the oven until they have had sufcient time to cool. Other surfaces of the appliance may become hot enough to cause burns. Among these surfaces are oven vent openings and surfaces near these openings, the oven door, and the window of the oven door.
- Do not heat unopened food containers. The build-up of pressure may cause the container to burst and result in injury.
- Do not use the oven to dry newspapers. If overheated, newspapers can catch on re.
- Do not use the oven for a storage area. Items stored in an oven can ignite.
- Use care when opening the oven door. Let hot air or steam escape before you remove food from or put food into the oven.
- Protective liners. Do not use aluminum foil to line the oven bottom, except as suggested in this manual. Improper installation of these liners may result in a risk of electric shock or re.
- Keep oven vent ducts unobstructed. The oven vent is located above the right rear surface unit. This area could become hot during oven use. Never block this vent or place plastic or heat-sensitive items on it.
- Placement of oven racks. Always place oven racks in the desired location while the oven is cool. If the rack must be moved while the oven is hot, use potholders. Do not let the potholders come in contact with the hot heating element in the oven.
- Do not allow aluminum foil or a meat probe to contact the heating elements.
- During use, the appliance becomes hot. Care should be taken to avoid touching heating elements inside the oven.
- Do not use harsh abrasive cleaners or sharp metal scrapers to clean the oven door glass. They can scratch the surface which may result in the glass shattering. CAUTION Do not attempt to operate the oven during a power failure. If the power fails, always turn the oven off. If the oven is not turned off and the power returns, the oven may begin to operate again. Food left unattended could catch re or spoil. NE59N6630S_AA_DG68-01050A-02_EN+MES+CFR.indb 9 2018-12-18 7:17:2810 English Important safety instructions Important safety instructions SELF-CLEANING OVENS Do not clean the door gasket. The door gasket is essential for a good seal. Care should be taken not to rub, damage, or move the gasket.
- Never keep pet birds in the kitchen. Birds are extremely sensitive to the fumes released during an oven self-cleaning cycle. Fumes may be harmful or fatal to birds. Move birds to a well-ventilated room.
- Clean only the parts listed in this manual in the self-cleaning cycle. Before self-cleaning the oven, remove the partition, rack, utensils, and any food.
- Before operating the self-cleaning cycle, wipe grease and food soils from the oven. Excessive amounts of grease may ignite, leading to smoke damage to your home.
- Do not use any commercial oven cleaner or oven liner protective coating of any kind in or on the outside of the oven.
- Remove the nickel oven shelves from the oven before you begin the self cleaning cycle or they may discolor.
- If the self-cleaning mode malfunctions, turn the oven off and disconnect the power supply. Have it serviced by a qualied technician.
- Excess spillage must be removed before you run the self cleaning cycle. VENTILATING HOOD
- Clean ventilating hoods frequently. Do not let grease accumulate on the hood or lter.
- When aming foods under the hood, turn the fan on.
GLASS/CERAMIC COOKING SURFACES
- DO NOT TOUCH SURFACE UNITS OR AREAS NEAR UNITS. Surface units may be hot even though they are dark in color. Areas near surface units may become hot enough to cause burns. During and after use, do not touch, or let clothing or other ammable materials contact the surface units or areas near the units until they have had sufcient time to cool. Among these areas are the cook-top and the facing of the cook-top.
- Do not cook on a broken cooktop. If the cooktop should break, cleaning solutions and spillovers may penetrate the broken cook-top and create a risk of electric shock. Contact a qualied technician immediately. Clean the cooktop with caution. If a wet sponge or cloth is used to wipe spills on a hot cooking area, be careful to avoid steam burns. Some cleaners can produce noxious fumes if applied to a hot surface. NE59N6630S_AA_DG68-01050A-02_EN+MES+CFR.indb 10 2018-12-18 7:17:28English 11 Important safety instructions
- This appliance must be installed by a qualied technician or service company. - Failing to have a qualied technician install the range may result in electric shock, re, an explosion, problems with the product, or injury.
- Unpack the oven, remove all packaging material and examine the oven for any damage such as dents on the interior or exterior of the oven, broken door latches, cracks in the door, or a door that is not lined up correctly. If there is any damage, do not operate the oven and notify your dealer immediately.
- Plug the power cord into a properly grounded outlet with the proper conguration. Your oven should be the only item connected to this circuit.
- Keep all packaging materials out of the reach of children. Children may use them for play and injure themselves.
- Install your appliance on a hard, level oor that can support its weight. - Failing to do so may result in abnormal vibrations, noise, or problems with the product.
- This appliance must be properly grounded.
- Do not ground the appliance to a gas pipe, plastic water pipe, or telephone line. - This may result in electric shock, re, an explosion, or problems with the product
- Do not cut or remove the ground prong from the power cord under any circumstances.
- Connect the oven to a circuit that provides the correct amperage.
- Do not install this appliance in a humid, oily or dusty location, or in a location exposed to direct sunlight or water (rain drops). - This may result in electric shock or re.
- Do not use a damaged power cord or loose wall socket. - This may result in electric shock or re.
- Do not pull or excessively bend the power cord.
- Do not twist or tie the power cord.
- Do not hook the power cord over a metal object, place a heavy object on the power cord, or insert the power cord between objects. - This may result in electric shock or re. If the power cord is damaged, contact your nearest Samsung service center. NE59N6630S_AA_DG68-01050A-02_EN+MES+CFR.indb 11 2018-12-18 7:17:2812 English Important safety instructions Important safety instructions
- If the appliance is ooded by any liquid, please contact your nearest Samsung service center. Failing to do so may result in electric shock or re.
- If the appliance produces a strange noise, a burning smell, or smoke, unplug the power plug immediately and contact your nearest Samsung service center. - Failing to do so may result in electric shock or re
- In the event of a gas leak (such as propane gas, LP gas, etc.), ventilate the area immediately. Do not touch the power cord. Do not touch the appliance. - A spark may result in an explosion or re.
- Take care not to contact the oven door, heating elements, or any of the other hot parts with your body while cooking or just after cooking. - Failing to do so may result in burns.
- If materials inside the oven should ignite, keep the oven door closed, turn the oven off and disconnect the power cord, or shut off power at the fuse or circuit breaker panel. If the door is opened, the re may spread.
- Always observe safety precautions when using your oven. Never try to repair the oven on your own - there is dangerous voltage inside. If the oven needs to be repaired, contact an authorized Samsung service center near you.
- If you use the appliance when it is contaminated by foreign substances such as food waste, it may result in a problem with the appliance.
- Take care when removing the wrapping from food taken out of the appliance. - If the food is hot, hot steam may be emitted abruptly when you remove the wrapping and this may result in burns.
- Do not attempt to repair, disassemble, or modify the appliance yourself. - Since a high voltage current enters the product chassis, it may result in electric shock or re. - When a repair is needed, contact your nearest Samsung service center. If any foreign substance such as water has entered the appliance, contact your nearest Samsung service center. - Failing to do so may result in electric shock or re.
- Do not touch the power cord with wet hands. - This may result in electric shock.
- Do not turn the appliance off while an operation is in progress. - This may cause a spark and result in electric shock or re. NE59N6630S_AA_DG68-01050A-02_EN+MES+CFR.indb 12 2018-12-18 7:17:29English 13 Important safety instructions
- Keep all packaging materials well out of the reach of children, as packaging materials can be dangerous to children. - If a child places a plastic bag over his or her head, the child can suffocate.
- Do not let children or any person with reduced physical, sensory, or mental capabilities use this appliance unsupervised.
- Make sure that the appliance’s controls and cooking areas are out of the reach of children. - Failing to do so may result in electric shock, burns, or injury.
- Do not touch the inside of the appliance immediately after cooking. The inside of the appliance will be hot. - Failing to do so may result in burns.
- Do not use or place ammable sprays or objects near the oven. - Flammable items or sprays can cause res or an explosion.
- Do not insert ngers, foreign substances, or metal objects such as pins or needles into inlets, outlets, or holes. If foreign substances are inserted into any of these holes, contact your product provider or nearest Samsung service center.
- Do not tamper with or make any adjustments or repairs to the door. Under no circumstances should you remove the door or outer shell of the oven.
- Do not store or use the oven outdoors.
- Never use this appliance for purposes other than cooking. - Using the appliance for any purpose other than cooking may result in re.
- Open the cap or stopper of sealed containers (herb tonic tea bottle, baby bottle, milk bottle and so on) before heating them. Make a hole in food items that have shells (eggs, chestnuts, etc) with a knife before cooking them. - Failing to do so may result in burns or injury.
- Never heat plastic or paper containers and do not use them for cooking. - Failing to do so may result in re.
- Do not heat food wrapped in paper from magazines, newspapers, etc. - This may result in re.
- Do not open the door when the food in the oven is burning. - If you open the door, it causes an inow of oxygen and may cause the food to ignite.
- Do not apply excessive pressure to the door or the inside of the appliance. Do not strike the door or the inside or the appliance. - Hanging on to the door may result in the product falling and cause serious injury. - If the door is damaged, do not use the appliance. Contact a Samsung service center. NE59N6630S_AA_DG68-01050A-02_EN+MES+CFR.indb 13 2018-12-18 7:17:2914 English Important safety instructions Important safety instructions
- Do not hold food in your bare hands during or immediately after cooking. - Use cooking gloves. The food may be very hot and you could burn yourself. - After cooking, use a cooking glove or gloves when you open the oven door. The oven handle and oven surfaces may be hot enough to cause burns after cooking is complete. USAGE CAUTIONS CAUTION
- If the surface is cracked, turn the appliance off. - Failing to do so may result in electric shock.
- Dishes and containers can become hot. Handle with care.
- Hot foods and steam can cause burns. Carefully remove container coverings, directing the steam away your hands and face.
- Remove lids from baby food jars before heating. After heating baby food, stir well to distribute the heat evenly. Always test the temperature by tasting before feeding the baby. The glass jar or the surface of the food may appear to be cooler than the interior, which can be hot enough to burn an infant’s mouth.
- Take care as beverages or food may be very hot after heating. - Especially when feeding a child. Conrm that the food or beverage has cooled sufciently.
- Take care when heating liquids such as water or other beverages. - Make sure to stir during or after cooking. - Avoid using a slippery container with a narrow neck. - Wait at least 30 seconds after heating before removing the heated liquid. - Failing to do so may result in an abrupt overow of the contents and cause burns.
- Do not stand on top of the appliance or place objects (such as laundry, an oven cover, lighted candles, lighted cigarettes, dishes, chemicals, metal objects, etc.) on the appliance. - Items, such as a cloth, may get caught in the door. - This may result in electric shock, re, problems with the product, or injury.
- Do not operate the appliance with wet hands. - This may result in electric shock.
- Do not spray volatile substances such as insecticide onto the surface of the appliance. - As well as being harmful to humans, it may also result in electric shock, re, or problems with the product.
- Do not put your face or body close to the appliance while cooking or when opening the oven door just after cooking. - Take care that children do not come too close to the appliance. - Failing to do so may result in children burning themselves. NE59N6630S_AA_DG68-01050A-02_EN+MES+CFR.indb 14 2018-12-18 7:17:29English 15 Important safety instructions
- Do not place food or heavy objects over the edge of the oven door. - If you open the door, the food or object may fall and this may result in burns or injury.
- Do not abruptly cool the door, the inside of the appliance, or a dish by pouring water over it during or just after cooking. - This may result in damage to the appliance. The steam or water spray may result in burns or injury.
- Do not operate while empty except for self-cleaning.
- Do not defrost frozen beverages stored in narrow-necked bottles. The bottles can break.
- Do not scratch the glass of the oven door with a sharp object. - This may result in the glass being damaged or broken.
- Do not store anything directly on top of the appliance when it is in operation.
- Do not cook food or beverages stored in sealed containers. Remove seals and lids before cooking. Sealed containers can explode due to a build up of pressure even after the oven has been turned off.
- Take care that food you are cooking in the oven does not come into contact with the heating element. - This may result in re.
- Do not over-heat food. - Overheating food may result in re.
CRITICAL CLEANING WARNINGS
- Do not clean the appliance by spraying water directly on to it.
- Do not use benzene, thinner, or alcohol to clean the appliance. - This may result in discoloration, deformation, damage, electric shock, or re.
- Take care not to hurt yourself when cleaning the appliance (externally or internally). - You may hurt yourself on the sharp edges of the appliance.
- Do not clean the appliance with a steam cleaner. - This may result in corrosion.
- Keep the inside of the oven clean. Food particles or spattered oils stuck to the oven walls or oor can cause paint damage and reduce the efciency of the oven. NE59N6630S_AA_DG68-01050A-02_EN+MES+CFR.indb 15 2018-12-18 7:17:2916 English Introducing your new range Introducing your new range Overview
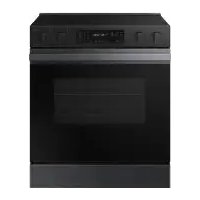
01 Oven control panel (See page 22 for more information) 02 Glass surface 03 Oven door 04 Storage drawer 05 * Surface control knobs (See page 18 for more information) 06 Self/steam clean latch 07 Automatic oven light switch 08 * Oven light 09 Convection fan 10 Shelf position 11 Gasket What’s included with your range
- Wire racks (3) NOTE If you need an accessory marked with a *, you can buy it from the Samsung Contact Center (1-800-726-7864). NE59N6630S_AA_DG68-01050A-02_EN+MES+CFR.indb 16 2018-12-18 7:17:29English 17 Before you begin Before you begin Clean the oven thoroughly before using it for the rst time. Then, remove the accessories, set the oven to bake, and then run the oven at 400 °F for 1 hour. There will be a distinctive odor. This is normal. Ensure your kitchen is well ventilated during this conditioning period. Energy saving tips
- During cooking, the oven door should remain closed except when you turn food over. To maintain the oven temperature and to save energy, do not open the door frequently during cooking.
- If cooking time is more than 30 minutes, you can switch the oven off 5-10 minutes before the end of the cooking time to save energy. The residual heat will complete the cooking process.
- To save energy and reduce the time needed for re-heating the oven, plan oven use to avoid turning the oven off between cooking one item and the next.
- Whenever possible, cook more than one item at a time. Cooktop cooking About cooktop cooking CAUTION BEFORE COOKING
- Do not use the glass cooktop surface as a cutting board.
- Do not place or store items that can melt or catch re on the glass cooktop, even when it is not being used.
- Turn the surface units on only after placing cookware on them.
- Do not store heavy items above the cooktop surface. They could fall and damage it. CAUTION DURING COOKING
- Do not place aluminum foil or plastic items such as salt and pepper shakers, spoon holders, or plastic wrappings on the range when it is in use. The hot air from the vent could melt plastics or ignite ammable items.
- Make sure the correct surface unit is turned on.
- Never cook directly on the glass. Always use cookware.
- Always place the pan in the center of the surface unit you are cooking on.
- Never leave surface units unattended while using a high heat setting. Boilovers cause smoking and greasy spillovers that may catch on re.
- Turn the surface units off before removing cookware.
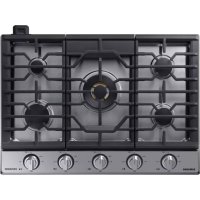
- Do not use plastic wrap to cover food. Plastic may melt onto the surface and be very difcult to remove. NE59N6630S_AA_DG68-01050A-02_EN+MES+CFR.indb 17 2018-12-18 7:17:2918 English Cooktop cooking Cooktop cooking Location of the radiant surface elements and controls The radiant control knobs operate the radiant surface elements on the cooktop as shown below.
- Do not touch the surface units until they have cooled down.
- The surface may be still be hot and burns may occur if you touch the glass surface before it has cooled down sufciently.
- Immediately clean spills on the cooking area to prevent a tough cleaning chore later.
- If cabinet storage is provided directly above the cooking surface, make sure that the items are infrequently used and can be safely stored in an area subjected to heat. Temperatures may be unsafe for items such as volatile liquids, cleaners, or aerosol sprays. About the radiant surface elements The temperature rises gradually and evenly. As the temperature rises, the radiant element will glow red. To maintain the selected setting, the element will cycle on and off. The heating element retains enough heat to provide a uniform and consistent heat during the off cycle. For efcient cooking, turn off the element several minutes before cooking is complete. This will allow residual heat to complete the cooking process. NOTE Radiant elements have a limiter that allows the element to cycle ON and OFF, even at the HI setting. This helps to prevent damage to the ceramic cooktop. Cycling at the HI setting is normal and can occur if the cookware is too small for the radiant element or if the cookware bottom is not at. NE59N6630S_AA_DG68-01050A-02_EN+MES+CFR.indb 18 2018-12-18 7:17:30English 19 Cooktop cooking Hot surface indicator
- Comes on when the unit is turned on or hot to the touch.
- Stays on even after the unit is turned off.
- Glows until the unit is cooled to approximately 150 °F. Cooking areas
- The cooking areas on your range are identied by permanent circles on the glass cooking surface. For the most efcient cooking, t the pan size to the element size.
- Pans should not extend more than ½” to 1” beyond the cooking area.
- When a control is turned on, a glow can be seen through the glass cooking surface. The element will cycle on and off to maintain the preset heat setting, even at high settings.
- For more information on selecting proper types of cookware, refer to the section “Using the proper cookware” on page 20. How to set the appliance for cooktop cooking CAUTION
- The surface elements may be hot and burns may occur. Do not touch the surface elements until they have cooled down sufciently.
- At high or medium-high settings, never leave food unattended. Boilovers cause smoking and greasy spillovers may catch on re.
- Be sure you turn the control knob to OFF when you nish cooking. Surface unit control knob
2. Turn in either direction to the setting you want.
3. For the Dual and Triple burners, you need to select the number of burners you
- Position A : Turns on a Single burner on the Dual or Triple burner.
- Position B : Turns on two burners of the Dual burner or Triple burner.
- Position C : Turns on the 3 burners of the Triple burner. CAUTION The area between the high and off settings is not appropriate for cooking. Recommended settings
SETTING TYPE OF COOKING
HIGH Starting most foods, bringing water to a boil, pan broiling MEDIUM HIGH Continuing a rapid boil, frying, deep fat frying MEDIUM Maintaining a slow boil, thickening sauces and gravies, steaming vegetables MEDIUM LOW Keeping foods cooking, poaching, stewing LOW Keeping food warm, melting, simmering NE59N6630S_AA_DG68-01050A-02_EN+MES+CFR.indb 19 2018-12-18 7:17:3020 English Cooktop cooking Cooktop cooking Using the proper cookware Using the right cookware can prevent many problems, such as uneven cooking or extended cooking times. Using the proper pans will reduce cooking times and cook food more evenly. Check for atness by rotating a ruler across the bottom of the cookware. CORRECT INCORRECT Flat bottom and straight sides.
- Weight of handle does not tilt pan.
- Pan is well balanced.
- Pan size matches the amount of food to be prepared and the size of the surface element.
- Made of a material that conducts heat well. Always match pot diameter to element surface diameter. Curved and warped pan bottoms. Pan overhangs element by more than one-half inch. Pan is smaller than element. Heavy handle tilts pan. Using the warming center The Warming Center, located in the back center of the glass surface, will keep hot, cooked food at serving temperature. NOTE The surface warmer will not glow red like the cooking elements. CAUTION
- Do not warm food on the warming center for more than two hours.
- U se only cookware and dishes recommended as safe for oven and cooktop use.
- Always use potholders or oven mitts when removing food from the warming center as cookware and plates will be hot.
- When warming pastries and breads, the cover should have an opening to allow moisture to escape.
- Always start with hot food. Eating uncooked or cold food placed on the warming center could result in illness.
1. Turn the warming center on. Press the Warming Center On/Off pad.
2. Select the power setting you want. Pressing the Warming Center Level pad
once will set it to the Lo setting. Press the pad twice for the Med setting, 3 times for Hi.
3. Turn the warming center off. Press the Warming Center On/Off pad.
- Pressing the Clear or OVEN OFF pad does not turn the warming center off.
- For best results, all foods on the warming center should be covered with a lid or aluminum foil. When warming pastries or breads, the cover should be vented to allow moisture to escape. Recommended settings
Lo Breads/Pastries, Casseroles, Gravies, Eggs Med Dinner plate with food, Soups (cream), Vegetables, Sauces, Stews, Meats Hi Fried foods, Soups (liquid), Hot beverages NE59N6630S_AA_DG68-01050A-02_EN+MES+CFR.indb 20 2018-12-18 7:17:31English 21 Cooktop cooking Choosing the proper cookware What your cookware is made of determines how evenly and quickly heat is transferred from the surface element to the pan bottom.
- ALUMINUM - Excellent heat conductor. Some types of food will cause the aluminum to darken. (Anodized aluminum cookware resists staining & pitting.). If aluminum pans are slid across the ceramic cooktop, they may leave metal marks that resemble scratches. Remove these marks as soon as the cooktop cools down.
- COPPER - Excellent heat conductor but discolors easily. May leave metal marks on ceramic glass (see above).
- STAINLESS STEEL - Slow heat conductor with uneven cooking results. Is durable, easy to clean and resists staining.
- C AST IRON - A poor conductor; retains heat very well. Cooks evenly once cooking temperature is reached. Not recommended for use on ceramic cooktops.
- ENAMELWARE - Heating characteristics will vary depending on the base material. Porcelain enamel coating must be smooth to avoid scratching ceramic cooktops.
- GLASS - Slow heat conductor. Not recommended for ceramic cooktop surfaces because it may scratch the glass. Protecting the smoothtop Cleaning
- Clean the cooktop before using it for the rst time.
- Clean your cooktop daily or after each use. This will keep your cooktop looking good and can prevent damage.
- If a spillover occurs while you are cooking, immediately clean the spill from the cooking area while it is hot to prevent a tough cleaning chore later. Using extreme care, wipe the spill with a clean dry towel.
- Do not allow spills to remain on the cooking area or the cooktop trim for a long period of time.
- Do not use abrasive cleansing powders or scouring pads which will scratch the cooktop.
- Do not use chlorine bleach, ammonia, or other cleansers not specically recommended for use on a glass-ceramic surface. Preventing marks and scratches
- Do not use glass cookware. It may scratch the cooktop.
- Do not place a trivet or wok ring between the cooktop and the pan. These items can mark or scratch the cooktop.
- Make sure the cooktop and the pan bottom are clean.
- Do not slide metal pans across the cooktop. Preventing stains
- Do not use a soiled dish cloth or sponge to clean the cooktop surface. A lm will remain, which may cause stains on the cooking surface after the area is heated.
- Continuously cooking on a soiled surface can result in a permanent stain. Preventing other damage
- Do not allow plastic, sugar, or foods with high sugar content to melt onto the hot cooktop. Should this happen, clean immediately.
- Do not let a pan boil dry as this will damage the cooktop and the pan.
- Do not use the cooktop as a work surface or cutting board.
- Do not cook food directly on the cooktop. Always use the proper cookware. NE59N6630S_AA_DG68-01050A-02_EN+MES+CFR.indb 21 2018-12-18 7:17:3122 English Operating the oven 09 Favorite Cook: Use to save or recall a favorite cooking mode. 10 Steam Clean: Use to select the steam cleaning function of the oven. 11 Self Clean 2/3/5h: Use to select the self-cleaning function of the oven. 12 Temp.: Use to set temperature of the oven. 13 Timer On/Off: Use to set or cancel the minute timer. The minute timer does not start or stop cooking. 14 Cook Time: Press, and then use the number pad to set the amount of time you want your food to cook. The oven will shut off when the cooking time has run out. 15 Delay Start: Press to set the oven to start and stop automatically at a time you set. (Bake, Convection Bake, Convection Roast, Cook Time, and Self Clean only.) 16 Clock: Use to set the time of day. 17 Clear: Use to reset the number pad. 18 Lamp: Press to turn the oven light on or off. 19 OVEN OFF: Press to cancel all oven operations except the clock and timer. 20 START/SET: Press to start any cooking or cleaning function in the oven. Operating the oven The oven control panel READ THE INSTRUCTIONS CAREFULLY BEFORE USING THE OVEN. For satisfactory use of your oven, become familiar with the various features and functions of the oven as described below. Detailed instructions for each feature and function follow later in this user manual.
01 Display: Shows the time of day, oven temperature, whether the oven is in the bake, broil or self-cleaning mode, and the time set for the timer or automatic oven operations.
: When the oven is pre-heating, this icon appears in the display. 02 Number pad: Use to set any function requiring numbers such as the time of day on the clock, the timer, the oven temperature, the start time, and length of operation for timed baking. 03 Convection Bake: Use to select the convection bake function of the oven. 04 Convection Roast: Use to select the convection roast function of the oven. 05 Bake: Use to select the bake function of the oven. 06 Broil: Use to select the broil function of the oven. 07 Bread Proof: Use to select the bread proof function of the oven. 08 Keep Warm: Use to select the keep warm function of the oven to keep cooked foods warm. NE59N6630S_AA_DG68-01050A-02_EN+MES+CFR.indb 22 2018-12-18 7:17:31English 23 Operating the oven Setting the clock The clock must be set to the correct time of day for the automatic oven timing functions to work properly.
- The time of day cannot be changed during a timed cooking, a delay-timed cooking, or a self-cleaning cycle.
- You can choose between a 12-hour or 24-hour display. The default is 12-hour. How to set the clock
2. Enter the current time in hours and minutes on the number pad, eg.
How to change between a 12-hour and 24-hour display
1. Press Broil and 4 on the number pad at the same time for 3 seconds.
The display will show the present mode (eg. 12 hour).
2. Press 0 on the number pad to select 12 hour or 24 hour.
3. Press START/SET to save changes.
Setting the kitchen timer The kitchen timer serves as an extra timer that will beep when the set time has elapsed. It does not start or stop cooking functions. You can use the kitchen timer with any of the other oven functions. How to set the timer
1. Press Timer On/Off.
2. Enter the amount of time you want. Enter the amount of time you want using
the number pad, eg. 1, 5. The timer can be set for any amount of time from 1 minute to 9 hours and 59 minutes. If you make a mistake, press Timer On/Off and enter the amount of time again.
3. Press Timer On/Off to start the timer.
4. When the set time has elapsed, the oven will beep and the display will show
"End" until you press Timer On/Off pad. You can cancel the timer at any time by pressing Timer On/Off. NE59N6630S_AA_DG68-01050A-02_EN+MES+CFR.indb 23 2018-12-18 7:17:3124 English Operating the oven Operating the oven Delay start In a delay timed cooking, the oven’s timer turns the oven on and off at times you select in advance.
- You can use the delay start feature only with another cooking operation
Bake, Convection bake, Convection roast, or Favorite cook
- You can set the oven for a delay start before setting other cooking operations.
- The clock must be set to the current time. How to set the oven for delay start
1. Position the oven rack(s) and place the food in the oven.
2. Press the pad for the cooking operation you want, eg. Bake. The default
temperature is 350 °F.
You can set the cooking time for any amount of time from 1 minute to 9 hours and 59 minutes.
6. Press Delay Start.
7. Enter the time you want the oven to turn on, eg. 4:30, using the number pad.
You can change AM/PM to press Delay Start.
8. Press START/SET. At the set time, a short beep will sound. The oven will begin
to bake. Timed cooking In timed cooking, the oven turns on immediately and cooks for the length of time you select. At the end of the cooking time, the oven turns off automatically.
- You can use the timed cooking feature only with another cooking operation (Bake, Convection bake, Convection roast, or Favorite cook). How to set the oven for timed cooking
1. Press the pad for the cooking operation you want, eg. Bake. The default
temperature is 350 °F.
You can set the cooking time for any amount of time from 1 minute to 9 hours and 59 minutes.
5. Press START/SET to begin cooking. The temperature display will start to
change once the oven temperature reaches 175 °F. The oven will continue to cook until the set amount of time has elapsed, then turn off automatically unless you set the keep warm feature. (Refer to the section on the keep warm feature on page 30.)
6. You can cancel a cook time at any time by setting cook time 0 min.
(Press Cook Time -> enter 0 -> press START/SET) When the timed cooking is done, the range will beep several times. CAUTION Use caution with the Timed cooking or Delay start features. Use these features to cook cured or frozen meats and most fruits and vegetables. Foods that can easily spoil, such as milk, eggs, sh, meat, or poultry, should be chilled in the refrigerator rst. Even when chilled, they should not stand in the oven for more than 1 hour before cooking begins, and should be removed promptly when cooking is completed. Eating spoiled food can result in sickness from food poisoning. NE59N6630S_AA_DG68-01050A-02_EN+MES+CFR.indb 24 2018-12-18 7:17:31English 25 Operating the oven Turning the oven light on and off
- The oven light turns on automatically when the door is opened.
- The oven light turns off automatically when the door is closed.
- You can turn the oven light on and off manually by pressing the pad. NOTE If you turn on the oven light using the pad, the oven light will stay turn on until you press the pad again. Minimum and maximum settings All of the features listed in the table below have minimum and maximum time or temperature settings. A beep will sound each time a pad on the control panel is pressed and the entry is accepted. An error tone will sound in the form of a long beep if the entered temperature or time is below the minimum or above the maximum setting for the feature.
Recommended rack position for cooking Type of food Rack Position Broiling hamburgers 7 Broiling meats or small cuts of poultry, Fish 4-6 Bundt cakes, Pound cakes, Frozen pies, Casseroles 3-4 Angel food cakes, Small roasts
Turkey, Large roasts, Hams, Fresh pizza
- This table is for reference only. NE59N6630S_AA_DG68-01050A-02_EN+MES+CFR.indb 25 2018-12-18 7:17:3226 English Operating the oven Operating the oven Rack and Pan placement
Centering the baking pans in the oven as much as possible will produce better results. If baking with more than one pan, place the pans so each has at least 1˝ to 1½˝ of air space around it. When baking on a single oven rack, place the oven rack in position 3 or 4. See the gure on the left.
Multiple Oven Racks When baking cakes and cookies on multiple racks, place the oven racks in positions 3 and 5. See the gure on the left. Using Multiple Oven Racks Type of Baking Rack Position Cakes and Cookies 3 and 5 Before using the racks The oven has two racks. Each rack has stops that need to be placed correctly on the supports. These stops will keep the rack from coming completely out.
1. Pull the rack straight out until it stops.
2. Lift up the front of the rack, and then pull it out.
1. Place the end of the rack on the support.
2. Tilt the front end up and push the rack in.
- Do not cover a rack with aluminum foil or place aluminum foil on the oven bottom. This will hamper heat circulation, resulting in poor baking, and may damage the oven bottom.
- Arrange the oven racks only when the oven is cool. Baking The oven can be programmed to bake at any temperature from 175 °F to 550 °F. Baking temperature and time will vary depending on the ingredients and the size and shape of the baking pan used. Dark or nonstick coatings may cook faster with more browning. How to set the temperature
1. Press Bake. The default temperature is 350 °F.
2. Enter the temperature you want on the number pad, eg. 3, 7, 5.
3. Press START/SET. The temperature display will start to change once the oven
temperature reaches 175 °F.
4. If you want to cancel baking or if baking has nished, press OVEN OFF.
Place food in the oven after preheating if the recipe calls for it. Preheating is very important for good results when baking cakes, cookies, pastry, and breads. After the oven has reached the desired temperature, the range will beep several times. NOTE
- For performance reasons, the convection fan may be turned on or off during baking.
- If you are using an oven thermometer in the oven cavity, the temperature registered by the thermometer may differ from the actual set oven temperature. How to adjust the temperature while cooking
3. Complete the entry by pressing START/SET.
By using the convection bake feature, you will be able to cook faster. You can program the oven for convection baking at any temperature between 175 °F and 550 °F. Convection baking uses a fan to circulate the oven’s heat evenly and continuously within the oven. This improved heat distribution allows for even cooking and excellent results using multiple racks at the same time. Foods cooked on a single oven rack will generally cook faster and more evenly with convection baking. Multiple oven rack cooking may slightly increase cook times for some foods, but the overall result is time saved. Breads and pastries brown more evenly. Tips for convection baking The amount of time you save will vary depending on the amount and type of food you are cooking. When baking cookies or biscuits, you should use pans with no sides or very low sides to allow the heated air to circulate around the food. Using a pan with a dark nish will allow faster cooking times. When using convection baking with a single rack, place the oven rack in position 3 or 4. If cooking on multiple racks, place the oven racks in position 3 and 5. When baking a cake, using the bake mode will produce better results. How to set the oven for convection baking
1. Start the convection bake mode.
Press Bake. The default temperature is 350 °F.
2. Enter the temperature you want, eg. 400 °F, using the number pad.
3. Press START/SET to begin convection baking.
Convection Bake and the adjusted oven temperature, eg. 400 °F, will appear in the display for 2 seconds. The temperature display will start to change once the oven temperature reaches 175 °F. The range will beep several times when the oven reaches the adjusted oven temperature.
4. To turn off or cancel convection bake, press OVEN OFF.
The convection oven fan shuts off when the oven door is opened. DO NOT leave the door open for long periods of time while using convection cooking or you may shorten the life of the convection heating element. NOTE
- For performance reasons, the convection fan may be turned on or off during the operation.
- If you are using an oven thermometer in the oven cavity, the temperature registered by the thermometer may differ from the actual set oven temperature. NE59N6630S_AA_DG68-01050A-02_EN+MES+CFR.indb 27 2018-12-18 7:17:3228 English Operating the oven Operating the oven Broiling Broil mode is best for meats, sh, and poultry up to 1” thick. Broiling is a method of cooking tender cuts of meat by direct heat under the broil element of the oven. The high heat cooks quickly and gives a rich, brown outer appearance. Broil stop position Broil stop position Leave the door open at the broil stop position. The door will stay open by itself, yet the proper temperature is maintained in the oven. CAUTION Should an oven re occur, close the oven door and turn the oven off. If the re continues, throw baking soda on the re or use a foam-type re extinguisher. Do not put water or our on the re. Flour can explode and water can cause a grease re to spread and cause personal injury. How to set the oven for broiling
1. Press Broil once for Hi or twice for Lo.
Use Lo to cook foods such as poultry or thick cuts of meat thoroughly without over-browning them.
Broil one side until the food is browned. Turn it over, and then broil the other side.
3. Press OVEN OFF once you have nished cooking or if you want to cancel
broiling. Convection roasting Convection roasting is good for cooking large tender cuts of meat, uncovered. Heat comes from the top heating element. The convection fan circulates the heated air evenly over and around the food. Meat and poultry are browned on all sides as if they were cooked on a rotisserie. The heated air seals in juices quickly for a moist and tender product while, at the same time, creating a rich golden brown exterior. How to set the oven for convection roasting
Roast. The default temperature is 350 °F.
2. Enter the temperature you want, eg. 400 °F, using the number pad.
3. Press START/SET to begin convection roasting.
Convection Roast and the adjusted oven temperature, eg. 400 °F, will appear in the display for 2 seconds. The temperature display will start to change once the oven temperature reaches 175 °F. The range will beep several times when the oven reaches the adjusted oven temperature.
4. To turn off or cancel convection roast, press OVEN OFF.
The convection oven fan shuts off when the oven door is opened. DO NOT leave the door open for long periods of time while using convection cooking or you may shorten the life of the convection heating element. NOTE
- For performance reasons, the convection fan may be turned on or off during the operation.
- If you are using an oven thermometer in the oven cavity, the temperature registered by the thermometer may differ from the actual set oven temperature. NE59N6630S_AA_DG68-01050A-02_EN+MES+CFR.indb 28 2018-12-18 7:17:32English 29 Operating the oven Broiling Recommendation Guide The size, weight, thickness, starting temperature, and your doneness preference will affect broiling times. This guide is based on meats at refrigerator temperature. Always use a broiler pan and its grid when broiling. Always preheat the oven for 5 minutes before broiling. Food Doneness Size Thickness Broil setting Rack position Cooking time (min.) 1st side 2nd side Hamburgers Medium 9 patties 1” Hi 7 3:40 2:40 Medium 9 patties ¾” Hi 7 3:20 2:20 Toast - 9 slices - Hi 7 0:32 0:30 - 9 slices - Hi 6 1:00 0:45 Beef steaks Rare - 1” Hi 7 3:00-3:30 2:00-2:30 Medium - 1” Hi 6 4:30-5:00 3:30-4:00 Well done - 1” Hi 5 8:00-9:00 6:00-7:00 Rare - 1½” Hi 7 3:30-4:00 2:30-3:00 Medium - 1½” Hi 6 5:30-6:00 4:30-5:00 Well done - 1½” Hi 5 12:00-14:00 10:00-12:00 Chicken pieces Well done 4.5 lbs. ¾”-1” Lo 4 18:00-20:00 16:00-18:00 Well done 2-2½ lbs. ¾”-1” Lo 4 15:00-18:00 13:00-16:00 Pork chops Well done 1 lb. ½” Hi 5 8:00-8:30 6:30-7:00 Lamb chops Medium 10 oz. 1” Lo 4 5:00-6:00 4:00-5:00 Well done 1 lb. 1½” Lo 4 7:00-8:00 6:00-7:00 Fish llets Well done - ¼-½” Lo 5 5:00-7:00 4:00-5:00 Ham slices (precooked) - - 1½” Hi 4 4:00-5:00 3:00-4:00 Using the bread proof feature The Bread Proof function automatically provides the optimum temperature for the bread proof process, and therefore does not have a temperature adjustment. If you press Bread Proof when the oven temperature is above 100 °F, Hot will appear in the display. Because these functions produce the best results when started while the oven is cool, we recommend that you wait until the oven has cooled down and Hot disappears from the display.
3. Press OVEN OFF at any time to turn off the Bread Proof feature.
NOTE Use rack position 3 for bread proong. NE59N6630S_AA_DG68-01050A-02_EN+MES+CFR.indb 29 2018-12-18 7:17:3330 English Operating the oven Operating the oven Using the keep warm feature The keep warm feature will keep cooked food warm for serving up to 3 hours after cooking has nished. After 3 hours, the feature will shut the oven off automatically. The feature may be used without any other cooking operations or may be set to activate after a timed or delay timed cooking operation. You should not use this feature to reheat cold foods. How to use the keep warm feature
3. Press OVEN OFF at any time to turn the feature off.
How to set the oven to activate the keep warm mode after a timed cooking
1. Set up the oven for Timed cooking.
(Refer to the section on the time cooking feature on page 24.)
2. Press Keep Warm before pressing START/SET to begin cooking.
3. Press OVEN OFF at any time to turn the feature off.
Using the favorite cook feature The favorite cook feature lets you record up to 3 different recipe settings. You can use the favorite cook feature for baking, convection baking, or convection roasting. It will not work with any other function, including the delay start feature. How to record a recipe setting
1. Press the pad for the cooking operation you want to store, eg. Bake. The
5. You can store a recipe setting in one of three favorite cook position.
Press Favorite Cook the number of times that corresponds to the position in which you want to store the setting. eg. for Favorite Cook position 2, press Favorite Cook twice. Recipe settings can be stored at position 1, 2, or 3.
How to recall a setting
1. Press Favorite Cook the number of times that corresponds to the position in
which the recipe setting is stored, eg. for Custom Cook position 2, press Favorite Cook twice.
For further assistance, guidelines for proper usage, and a complete list of models with the Sabbath feature, please visit the web at http:\\www.star-k.org. You can use the Sabbath feature with baking only. The oven temperature may be set higher or lower after setting the Sabbath feature. (The oven temperature adjustment feature should be used only during Jewish holidays.) The display, however, will not change and tones will not sound when a change occurs. Once the oven is properly set for baking with the Sabbath feature active, the oven will remain continuously on until the Sabbath feature is cancelled. This will override the factory preset 12 hour energy saving feature. If the oven light is needed during the Sabbath, press before activating the Sabbath feature. Once the oven light is turned on and the Sabbath feature is active, the oven light will remain on until the Sabbath feature is turned off. If the oven light needs to be off, be sure to turn the oven light off before activating the Sabbath feature. How to use the Sabbath feature
1. Press Bake. The default temperature is 350 °F.
2. Enter the temperature you want, eg. 375 °F, by using the number pad.
3. Press START/SET. The temperature display will start to change once the oven
temperature reaches 175 °F.
4. Press Bake and 1 at the same time for 3 seconds. The display will show SAb.
Once SAb appears in the display, the oven will not beep or display any further changes. You may change the oven temperature once baking has started. Remember that the oven will not beep or display any further changes once the Sabbath feature is engaged.
5. You can turn the oven off at any time by pressing OVEN OFF. This will turn
only the oven off. If you want to deactivate the Sabbath feature, hold down Bake and 1 at the same time for 3 seconds. SAb will disappear from the display. Do not to attempt to activate any other program feature except Bake while the Sabbath feature is active. ONLY the following key pads will function correctly with the Sabbath feature on: NUMBER, Bake, START/SET and OVEN OFF. ALL OTHER KEYPADS should not be used once the Sabbath feature is activated. You can change the oven temperature, but the display will not change and tones will not sound when a change occurs. (The oven temperature adjustment feature should be used only on Jewish holidays.) After changing the temperature while the unit is in Sabbath mode there is a 15 seconds delay before the unit will recognize the change. You can set the Cook time function before activating the Sabbath feature. Should you experience a power failure or interruption, the oven will shut off. When power is returned, the oven will not turn back on automatically. SAb will be displayed in the oven control display, but the oven will not operate. Food may be safely removed from the oven while it is still in the Sabbath mode, however the oven cannot be turned back on until after the Sabbath/ Holidays. After the Sabbath observance, turn OFF the Sabbath mode. Press and hold both Bake and 1 for at least 3 seconds simultaneously to turn the Sabbath mode off. The oven may then be used with all normal functions. Do not open the oven door or change the oven temperature for about 30 minutes after you have started Sabbath mode to allow the oven to reach the set temperature. Note that, for best performance, the oven fan operates only when the oven temperature is rising. Do not use the cooktop when the oven is in the Sabbath MODE. NE59N6630S_AA_DG68-01050A-02_EN+MES+CFR.indb 31 2018-12-18 7:17:3332 English Operating the oven Operating the oven Extra features Thermostat adjustment The temperature in the oven has been preset at the factory. When rst using the oven, be sure to follow recipe times and temperatures. If you think the oven is too hot or too cool, the temperature in the oven can be adjusted. Before adjusting, test a recipe by using a temperature setting that is higher or lower than the recommended temperature. The baking results should help you to decide how much of an adjustment is needed. The oven temperature can be adjusted ±35 °F (±19 °C). How to adjust the oven temperature
1. Press Broil and 1 at the same time for 3 seconds.
You can adjust the temperature so that it is lower than the factory setting by pressing Broil.
NOTE This adjustment will not affect the broiling or the self-cleaning temperatures. The adjustment will be retained in memory after a power failure. Fahrenheit or Celsius temperature selection The oven control can be programmed to display temperatures in Fahrenheit or Centigrade. The oven has been preset at the factory to display in Fahrenheit. How to change the display from Fahrenheit to Centigrade or from Centigrade to Fahrenheit
1. Press Broil and 2 at the same time for 3 seconds.
The display shows F (Fahrenheit) or C (Centigrade). The default is F.
2. Press 0 to select F or C.
Pressing 0 changes the display between F and C.
Convection auto conversion feature When you use the auto conversion feature, the convection auto conversion feature will automatically convert entered regular baking temperatures to convection baking temperatures. If this feature is activated, the display will show the actual converted (reduced) temperature. For example, if you enter a regular recipe temperature of 350 °F and press START/SET, the display will show the converted temperature of 325 °F. How to disable or enable the auto conversion feature
1. Press Broil and 3 at the same time for 3 seconds.
Pressing 0 changes the mode between Con On and Con OFF.
NE59N6630S_AA_DG68-01050A-02_EN+MES+CFR.indb 32 2018-12-18 7:17:33English 33 Operating the oven 12 hour energy saving With this feature, should you forget and leave the oven on, the control will automatically turn off the oven after 12 hours during baking functions or after 3 hours during a broil function. How to turn 12 hour energy saving feature on or off
1. Press Broil and 5 at the same time for 3 seconds.
The display will show 12 Hr (12 hour shut-off) or -- Hr (No shut-off). The default is 12 Hr.
2. Press 0 to select --Hr (Shut off Off) or 12 Hr (Shut off On).
Pressing 0 changes the mode between 12 Hr and -- Hr.
Sound on/off By using this feature, you can set the oven controls to operate silently. How to turn the sound on or off
1. Press Broil and 6 at the same time for 3 seconds.
The display will show Snd On (Sound on) or Snd OFF (Sound off). The default setting is Snd On.
2. Press 0 to select Snd OFF or Snd On.
Pressing 0 changes the mode between Snd On and Snd OFF.
Demo mode This option is for use by retail establishments for display purposes only. (The heating element does not operate.) How to enable or disable the demo mode
1. Press Broil and 7.
2. Pressing 0 changes the mode between On and OFF.
NOTE When enable the demo mode, is showed at display. Control lockout This feature lets you lock the buttons on the touch pad so they cannot be activated accidentally. How to activate the control lockout feature
1. Press START/SET for 3 seconds.
Loc and the Loc icon appear in the display, as well as the current time. All functions must be cancelled before the control lockout is activated. This function is available when the oven temperature is under 400 °F. How to unlock the controls
1. Press START/SET for 3 seconds.
Loc and the lock icon will disappear from the display. NE59N6630S_AA_DG68-01050A-02_EN+MES+CFR.indb 33 2018-12-18 7:17:3334 English Maintaining your appliance Maintaining your appliance Self-cleaning This self-cleaning oven uses high temperatures (well above cooking temperatures) to burn off leftover grease and residue completely or to reduce them to a nely powdered ash that you can wipe away with a damp cloth. CAUTION
- During the self-cleaning cycle, the outside of the range will become very hot to the touch. Do not leave small children unattended near the appliance.
- Some birds are extremely sensitive to the fumes given off during the self- cleaning cycle of any range. Move birds to another well-ventilated room.
- Do not line the oven walls, racks, bottom, or any other part of the range with aluminum foil. Doing so will result in poor heat distribution, poor baking results, and cause permanent damage to the oven interior. Aluminum foil will melt and adhere to the interior surface of the oven.
- Do not force the oven door open while the oven is self-cleaning. This can damage the automatic door locking system. Use care when opening the oven door after the self-cleaning cycle is complete. Stand to the side of the oven when opening the door to allow hot air or steam to escape. The oven may still be VERY HOT. Before a self-cleaning cycle Fig. 1
- We recommend venting your kitchen with an open window or using a ventilation fan or hood during the self- cleaning cycle.
- Remove the wire rack, broil pan, broil pan insert, all cookware, and any aluminum foil from the oven.
- Wipe up debris from the oven bottom. (Fig. 1)
- The silver-colored oven racks can be self-cleaned, but they will darken, lose their luster, and become hard to slide. Don’t hand clean the oven door gasket. You may hand clean the door. Fig. 2
- Residue on the front frame of the range and outside the gasket on the door will need to be cleaned by hand. Clean these areas with hot water, soap- lled steel-wool pads, or cleansers such as Soft Scrub. Rinse well with clean water and dry.
- Do not clean the gasket. The berglass material of the oven door gasket cannot withstand abrasion. It is essential for the gasket to remain intact. If you notice it becoming worn or frayed, have it replaced. (Fig. 2)
- Make sure the oven light bulb cover is in place and the oven light is off. NOTE Remove oven racks and accessories before starting the self-clean mode. NE59N6630S_AA_DG68-01050A-02_EN+MES+CFR.indb 34 2018-12-18 7:17:33English 35 Maintaining your appliance How to run a self-cleaning cycle
1. Select the length of time for the self-cleaning operation, eg. 3 hours.
Press Self Clean once for a 3 hour clean time, twice for a 5 hour clean time, or 3 times for a 2 hour clean time. The default setting is 3 hours.
2. Press START/SET. The motor-driven door lock will engage automatically.
- You will not be able to start a self-cleaning cycle if the control lockout feature is activated or if the oven’s temperature is too hot.
- The oven door locks automatically. The display will show the clean time remaining. You will not be able to open the oven door until the self- cleaning operation is complete and the temperature drops to a safe/cool temperature.
- The self-cleaning feature will not operate when the warming center is on.
3. When the self-cleaning cycle is done, "End" will appear in the display and the
range will beep several times. How to delay the start of self-cleaning
1. Select the desired self-clean time by pressing Self Clean. (See Step 1 above.)
2. Press Delay Start.
3. Enter the time you want the clean cycle to start. You can change AM/PM to
4. Press START/SET. The display will show Delay Start, Self clean, and the Lock
icon. The motor-driven door lock will engage automatically.
5. The self-cleaning cycle will turn on automatically at the set time.
How to turn off the self-cleaning feature You may nd it necessary to stop or interrupt a self-cleaning cycle due to smoke in the oven.
2. You will be able to open the oven door once the oven has cooled for
approximately 1 hour. After a self-cleaning cycle
- You may notice some white ash in the oven. Wipe it up with a damp cloth after the oven cools. (If white spots remain, remove them with a soap-lled steel wool pad and rinse thoroughly with a vinegar and water mixture.)
- If the oven is not clean after one cycle, repeat the cycle.
- You cannot set the oven for cooking until the oven is cool enough for the door to unlock. NE59N6630S_AA_DG68-01050A-02_EN+MES+CFR.indb 35 2018-12-18 7:17:3436 English Maintaining your appliance Maintaining your appliance Steam-cleaning How to set the oven for steam-cleaning For light cleaning, the Steam-cleaning function saves time and energy. For heavier- duty cleaning, use the self-cleaning function.
1. Remove all accessories from the oven.
2. Pour approximately 10 oz. (300 ml) of
water onto the bottom of the empty oven and close the oven door. Use tap water only, not distilled water.
When the operation is complete, the display will blink and a beep will sound.
There will be a signicant amount of water remaining on the bottom of the oven after a steam-cleaning cycle. Remove the residual water with a sponge or soft dry cloth. When steam-cleaning, use exactly 10 oz. of water since this produces the best results. NOTE If you press Steam Clean when the oven temperature is above 100˚F, Hot will appear in the display. Because these functions produce the best results when started while the oven is cool, we recommend that you wait until the oven has cooled down and Hot disappears from the display. After a steam-cleaning cycle
- Take care when opening the door after a steam-cleaning procedure has ended. The water on the bottom is hot.
- Open the oven door and remove the remaining water with a sponge. Do not leave the residual water in the oven for any length of time. Wipe the oven clean and dry with a soft cloth. Do not forget to wipe under the oven door seal.
- Use a detergent-soaked sponge, a soft brush, or a nylon scrubber to wipe the oven interior. Remove stubborn residue with a nylon scourer. You can remove lime deposits with a cloth soaked in vinegar.
- If the oven remains dirty, you can repeat the procedure once the oven has cooled.
- For heavy residue, such as grease left over from roasting, we recommend that you rub detergent into the residue before activating the steam-cleaning function.
- After cleaning, leave the oven door ajar at a 15° angle to allow the interior enamel surface to dry thoroughly. Care and cleaning of the oven WARNING
- Be sure all controls are OFF and all surfaces are COOL before cleaning any part of the range.
- If your range is moved for cleaning, servicing, or any reason, be sure the Anti-Tip device is re-engaged properly when the range is replaced. If you fail to reengage the Anti-Tip device, the range could tip and cause serous injury. NE59N6630S_AA_DG68-01050A-02_EN+MES+CFR.indb 36 2018-12-18 7:17:34English 37 Maintaining your appliance Oven vent Oven vent
- The oven vent is located above the right rear surface unit.
- This area could become hot during oven use.
- It is normal for steam to come out of the vent.
- The vent is important for proper air circulation. Never block this vent. Cleaning painted parts and decorative trim
- For general cleaning, use a cloth with hot and soapy water.
- For more difcult residue and built-up grease, apply a liquid detergent directly onto the area and leave for 30 to 60 minutes. Wipe with a damp cloth and dry. Do not use abrasive cleaners on any of these surfaces. They can scratch. Cleaning stainless steel surfaces
1. Shake a bottle of Stainless Steel Appliance Cleaner or Polish well.
2. Place a small amount of stainless steel appliance cleaner or polish on a damp
cloth or damp paper towel.
3. Clean a small area, rubbing with the grain of the stainless steel if applicable.
4. Dry and buff with a clean, dry paper towel or soft cloth.
5. Repeat as necessary.
- Do not use a steel-wool pad. It will scratch the surface.
- If a mineral oil-based stainless steel appliance cleaner has been used before to clean the appliance, wash the surface with dishwashing liquid and water prior to using the Stainless Steel Appliance Cleaner or Polish. Oven racks
- If the racks are left in the oven during a self-cleaning cycle, their color will turn slightly blue and the nish will be dull. After the self-cleaning cycle is complete and the oven has cooled, rub the sides of the racks with wax paper or a cloth containing a small amount of oil. This will help the racks glide more easily in their tracks. Oven door Don’t hand clean the oven door gasket. You may hand clean the door.
- Use soap & water to thoroughly clean the top, sides, and front of the oven door. Rinse well. You may use a glass cleaner on the outside glass of the oven door. DO NOT immerse the door in water. DO NOT spray or allow water or the glass cleaner to enter the door vents. DO NOT use oven cleaners, cleaning powders, or any harsh abrasive cleaning materials on the outside of the oven door.
- DO NOT clean the oven door gasket. The oven door gasket is made of a woven material which is essential for a good seal. Care should be taken not to rub, damage, or remove this gasket. NE59N6630S_AA_DG68-01050A-02_EN+MES+CFR.indb 37 2018-12-18 7:17:3438 English Maintaining your appliance Maintaining your appliance Care and cleaning of the glass cooktop Normal daily use cleaning Use only a ceramic cooktop cleaner. Other creams may not be as effective. By following these steps, you can maintain and protect the surface of your glass cooktop.
1. Before using the cooktop for the rst time, clean it with a ceramic cooktop
cleaner. This helps protect the top and makes cleanup easier.
2. Daily use of a ceramic cooktop cleaner will help keep the cooktop looking new.
3. Shake the cleaning cream well. Apply a few drops of cleaner directly to the
4. Use a paper towel or a cleaning pad for ceramic cooktops to clean the entire
5. Use a dry cloth or paper towel to remove all cleaning residue. No need to
rinse. WARNING DAMAGE to your glass surface may occur if you use scrub pads other than those recommended. Removing burned-on residue
1. Allow the cooktop to cool.
2. Spread a few drops of ceramic cooktop
cleaner on the entire burned residue area.
3. Using a cleaning pad for ceramic
cooktops, rub the residue area, applying pressure as needed.
4. If any residue remains, repeat the steps
listed above as needed.
5. For additional protection, after all
residue has been removed, polish the entire surface with ceramic cooktop cleaner and a paper towel. NE59N6630S_AA_DG68-01050A-02_EN+MES+CFR.indb 38 2018-12-18 7:17:34English 39 Maintaining your appliance Removing heavy, burned-on residue
1. Allow the cooktop to cool.
2. Use a single-edge razor-blade scraper
at approximately a 45° angle against the glass surface and scrape the soil. It will be necessary to apply pressure to remove the residue.
3. After scraping with the razor scraper,
spread a few drops of ceramic cooktop cleaner on the entire burned residue area. Use the cleaning pad to remove any remaining residue. (Do not scrape the seal.)
4. For additional protection, after all
residue has been removed, polish the entire surface with the cooktop cleaner and a paper towel. Preventing metal marks and scratches
- Be careful not to slide pots and pans across your cooktop. It will leave marks on the cooktop surface. You can remove these marks by applying ceramic cooktop cleaner with a cleaning pad for ceramic cooktops.
- If pots with a thin overlay of aluminum or copper are allowed to boil dry, the overlay may leave black discoloration on the cooktop. You should remove this discoloration immediately or it may become permanent. WARNING Carefully check the bottoms of pans for roughness that may scratch the cooktop. Cleaning the cooktop seal To clean the seal around the edges of the glass, lay a wet cloth on it for a few minutes, then wipe clean with a nonabrasive cleaner. Potential for permanent damage to the glass surface
- Sugary spillovers (such as jellies, fudge, candy, syrups) or melted plastics can cause pitting of the surface of your cooktop. This is not covered under the warranty. You should clean the spill while it is still hot. Take special care when removing hot substances. Refer to the following section.
- When using a scraper, be sure it is new and the razor blade is still sharp. Do not use a dull or nicked blade. Cleaning sugary spills and melted plastic
1. Turn off all surface units. Remove hot pans.
2. Wearing an oven mitt, use a single-edge razor-blade scraper to move the spill
to a cool area of the cooktop. Remove the scraped portion of the spill with paper towels.
3. Any remaining spillover should be left until the surface of the cooktop has
4. Don’t use the surface units again until all of the residue has been completely
removed. NOTE If pitting or indentations in the glass surface have already occurred, the cooktop glass will have to be replaced. In this case, service will be necessary. NE59N6630S_AA_DG68-01050A-02_EN+MES+CFR.indb 39 2018-12-18 7:17:3440 English Maintaining your appliance Maintaining your appliance Removing and replacing the oven door How to remove the door CAUTION
- The door is very heavy. Be careful when removing and lifting the door. Do not lift the door by the handle.
- Turn the power OFF before removing the door. Hinge lock Locked position Unlocked position
1. Open the door completely.
2. Pull the hinge locks down toward the door frame to the unlocked position.
3. Firmly grasp both sides of the door at
4. Close the door to the door removal
position, which is approximately 5 degrees from vertical (Fig. 1). Fig. 2
5. Lift the door up and out until the hinge
arm is clear of the slot (Fig. 2). How to replace the door Hinge arm Bottom edge of slot Indentation
1. Firmly grasp both sides of the door at the top.
2. With the door at the same angle as the removal position, slide the indentation
of the hinge arm into the bottom edge of the hinge slot. The notch in the hinge arm must be fully inserted into the bottom of the slot. NE59N6630S_AA_DG68-01050A-02_EN+MES+CFR.indb 40 2018-12-18 7:17:35English 41 Maintaining your appliance Hinge lock Locked positionUnlocked position
3. Open the door fully. If the door will not open fully, the indentation is not
inserted correctly in the bottom edge of the slot.
4. Push the hinge locks up against the front frame of the oven cavity to the
5. Close the oven door.
Removing and replacing the storage drawer HookHook How to remove the storage drawer
1. Pull the drawer out until it stops.
2. Tilt the front of the drawer and pull out
3. Lift and pull the drawer out.
How to replace the storage drawer
1. Put the left side of the drawer over the
left hook and the right side over the right hook.
2. Push the drawer until it stops.
3. Tilt and lift the drawer.
4. Push the drawer in.
Changing the oven light The oven light is a standard 40-watt appliance bulb. It will come on when the oven door is open. When the oven door is closed, press the pad to turn it on or off. It will not work during a self-cleaning cycle. Bulb Remove Replace Glass bulb cover
1. Make sure the oven and the bulb are
2. Unplug the range or disconnect the
3. Turn the glass bulb cover in the back of
the oven counterclockwise to remove.
4. Turn the bulb counterclockwise to
remove it from its socket.
5. Insert a new 40 watt appliance bulb,
and then turn it clockwise to tighten. Replace the bulb cover by turning clockwise.
6. Plug in the range or reconnect the
power. CAUTION Before changing your oven light bulb, disconnect the electrical power to the range at the main fuse or circuit breaker panel. Make sure the oven and the bulb are cool. NE59N6630S_AA_DG68-01050A-02_EN+MES+CFR.indb 41 2018-12-18 7:17:3542 English Troubleshooting Troubleshooting Troubleshooting Samsung works hard to ensure that you don’t have problems with your new electric range. If you run into unexpected trouble, look rst for a solution in the table below. If, after trying the suggested solution, you’re still having trouble, call Samsung at 1-800-SAMSUNG (1-800-726-7864). Installtion Problem Possible cause Solution The range is not level. The appliance has been installed improperly.
- Place the oven rack in the center of the oven. Place a level on the oven rack. Adjust the leveling legs at the base of the range until the oven rack is level.
- Ensure the oor is level and strong and stable enough to adequately support the range. The oor is sagging or sloping. Contact a carpenter to correct the situation. The kitchen cabinets are not properly aligned and make the range appear to be not level. Ensure the cabinets are square and provide sufcient room for installation. The appliance must be accessed for servicing and cannot be moved easily. The kitchen cabinets are not square and too close to the appliance. Contact a builder or installer to make the appliance accessible. Carpet is interfering with movement of the range. Provide sufcient space so the range can be lifted over the carpet. CONTROL DISPLAY Problem Possible cause Solution The Display goes blank. A fuse in your home may be blown or the circuit breaker tripped. Replace the fuse or reset the circuit breaker. The Display ashes. There was a power failure. Reset the clock. COOKTOP Problem Possible cause Solution The surface units will not maintain a rolling boil or will not cook fast enough. You may be using inappropriate cookware. Use pans which are at and match the diameter of the surface unit selected. In some areas, the power (voltage) may be low. Cover the pan with a lid until the desired heat is obtained. The surface units will not turn on. A fuse in your home may be blown or the circuit breaker tripped. Replace the fuse or reset the circuit breaker. The cooktop controls are set improperly. Check if the correct control is set for the surface unit you are using. Areas of discoloration on the cooktop. Food spillover was not cleaned. Refer to the section on the care and cleaning of the glass cooktop on pages 38-39. The surface is hot and the model features a light- colored cooktop. This is normal. The surface may appear discolored when it is hot. This is temporary and will disappear as the glass cools. NE59N6630S_AA_DG68-01050A-02_EN+MES+CFR.indb 42 2018-12-18 7:17:35English 43 Troubleshooting Problem Possible cause Solution The surface unit frequently cycles on and off. The surface unit stops glowing when changed to a lower setting. The element will cycle on and off to maintain the power setting. This is normal operation and not a system failure. Use the cooktop as usual. Scratches or abrasions on the cooktop surface. The cooktop is being cleaned improperly. Scratches are not removable. Tiny scratches will become less visible in time as a result of cleaning. Use ceramic glass top cleaning cream. Do not use chemical or corrosive agents. These agents may damage the surface of the product. Cookware with rough bottoms was used on the cooktop or there were coarse particles (eg. salt or sand) present between the cookware and the surface of the cooktop. To avoid scratches, use the recommended cleaning procedures. Make sure cookware bottoms are clean before use, and use cookware with smooth bottoms. Cookware has been slid across the cooktop surface. Problem Possible cause Solution Brown streaks or specks. Boilovers have been cooked onto the surface.
- Wait until the surface cools down. Then, use a scraper to remove those impurities. Use the blade scraper to remove soil.
- See the section on the care and cleaning of the glass cooktop on pages 38-39. Areas of discoloration with metallic sheen. Mineral deposits from water and food have been left on the surface of the cooktop.
- Remove using a ceramic-glass cooktop cleaning cream.
- Use cookware with clean, dry bottoms. Clean the cooktop with a ceramic cleaning agent regularly every week. “Cracking” or “popping” sound. This is the sound of the metal heating and cooling during both the cooking and self-cleaning functions. This is normal operation and not a system failure. Use the oven as usual. NE59N6630S_AA_DG68-01050A-02_EN+MES+CFR.indb 43 2018-12-18 7:17:3544 English Troubleshooting Troubleshooting OVEN Problem Possible cause Solution The oven will not turn on. The range is not completely plugged into the electrical outlet. Make sure the electrical plug is inserted into a live, properly grounded outlet. A fuse in your home may be blown or the circuit breaker tripped. Replace the fuse or reset the circuit breaker. The oven controls have been set improperly. See the chapter on operating the oven. The oven is too hot. Allow the oven to cool. Incomplete service wiring. Call for service. Power outage. Check to see if the house lights will turn on. If required, call your local electric company for service. The oven light will not turn on. The light bulb is loose or defective. Tighten or replace the bulb. The switch operating the light is broken. Call for service. Problem Possible cause Solution Oven smokes excessively during broiling. The control has not been set properly. Refer to the section on setting oven controls. The meat has been placed too close to the element. Reposition the rack to provide proper clearance between the meat and the element. Preheat the broil element for searing. The meat has not been properly prepared. Remove the excess fat from the meat. Cut away fatty edges that may curl, leaving the lean intact. Grease has built up on oven surfaces. Regular cleaning is necessary when broiling frequently. Food does not bake or roast properly. The oven controls have not been set correctly. See the chapter on operating the oven. The oven rack has been positioned incorrectly or is not level. See the section on using the oven racks on pages 25-26. Incorrect cookware or cookware of improper size is being used. The oven sensor needs to be adjusted. See the section on adjusting the thermostat on page 32. NE59N6630S_AA_DG68-01050A-02_EN+MES+CFR.indb 44 2018-12-18 7:17:35English 45 Troubleshooting Problem Possible cause Solution Food does not broil properly. The serving size may not be appropriate. Refer to the cooking guide for serving sizes and try again. The rack has not been properly positioned. See the broiling recommendation guide on page 29. Cookware not suited for broiling. Use suitable cookware. In some areas, the power (voltage) may be low.
- Preheat the broil element for 10 minutes.
- See the broiling recommendation guide on page 29. The oven temperature is too hot or too cold. The oven sensor needs to be adjusted. See the section on adjusting the thermostat on page 32. The oven will not self-clean. The oven temperature is too high to start a self- clean operation. Allow the range to cool, and then reset the controls. The oven controls have been set incorrectly. See the section on self- cleaning on page 34. A self-cleaning cycle cannot be started if the oven lockout feature has been activated or if a radiant surface element is on. Deactivate the oven lockout (see page 33). Make sure all surface elements are turned off. Problem Possible cause Solution Excessive smoking during a self- cleaning cycle. There is excessive soiling in the oven. Press OVEN OFF. Open the windows to rid the room of smoke. Wait until the self- cleaning cycle is cancelled. Wipe up the excess soil, and then start the self- cleaning cycle again. The oven door will not open after a self-cleaning cycle. The oven is too hot. Allow the oven to cool. The oven is not clean after a self- cleaning cycle. The oven controls were not set correctly. See the section on self- cleaning on page 34. The oven was heavily soiled. Wipe up heavy spillovers before starting the self- cleaning cycle. Heavily soiled ovens may need to be self-cleaned again or for a longer period of time. Steam is coming out of the vent. When using the convection feature, it is normal to see steam coming out of the oven vent. This is normal operation and not a system failure. Use the oven as usual. As the number of racks or amount of food being cooked increases, the amount of visible steam will increase. NE59N6630S_AA_DG68-01050A-02_EN+MES+CFR.indb 45 2018-12-18 7:17:3546 English Troubleshooting Troubleshooting Problem Possible cause Solution A burning or oily odor is coming from the vent. This is normal in a new oven and will disappear in time.
- To speed the process, set a self-cleaning cycle for a minimum of 3 hours.
- See the section on self-cleaning on page
Strong odor. An odor coming from the insulation around the inside of the oven is normal for the rst few times the oven is used. Operate the oven at the bake setting at 400 °F for 1 hour. Fan noise. A convection fan may automatically turn on and off. This is normal operation, and not a system failure. Use the oven as usual. Oven racks are difcult to slide. The shiny, silver-colored racks were cleaned in a self-cleaning cycle. Apply a small amount of vegetable oil to a paper towel and wipe the edges of the oven racks with the paper towel. DRAWER Problem Possible cause Solution The Drawer does not slide smoothly or drags. The drawer is out of alignment. Fully extend the drawer and push it all the way in. See the page 41. The drawer is over-loaded or the load is unbalanced. Reduce weight. Redistribute drawer contents. Information codes OVEN Problem Possible cause Solution C-20 The oven sensor is open when the oven is operating. Press OVEN OFF and restart the oven. If the problem persists, disconnect all power to the range for at least 30 seconds and then reconnect the power. If this does not solve the problem, call for service. The oven sensor is short when the oven is operating. C-21 This code occurs if the internal temperature rises abnormally high. C-d1 This code occurs if the door lock is mispositioned. C-d0 This code occurs if the Control key is short for 1 minute. Press OVEN OFF and restart the oven. If the problem persists, disconnect all power to the range for at least 30 seconds and then reconnect the power. If this does not solve the problem, call for service. C-30 The PCB sensor is open when the oven is operating. The PCB sensor is short when the oven is operating. C-31 This code occurs if the PCB temperature rises abnormally high. Call for service. NE59N6630S_AA_DG68-01050A-02_EN+MES+CFR.indb 46 2018-12-18 7:17:35English 47 Warranty Warranty (U.S.A) PLEASE DO NOT DISCARD. THIS PAGE REPLACES THE WARRANTY PAGE IN THE
LIMITED WARRANTY TO ORIGINAL PURCHASER WITH PROOF OF PURCHASE This SAMSUNG brand product, as supplied and distributed by SAMSUNG ELECTRONICS AMERICA, INC. (SAMSUNG) and delivered new, in the original carton to the original consumer purchaser, is warranted by SAMSUNG against manufacturing defects in materials or workmanship for the limited warranty period, starting from the date of original purchase, of: One (1) Year Parts and Labor This limited warranty is valid only on products purchased and used in the United States that have been installed, operated, and maintained according to the instructions attached to or furnished with the product. To receive warranty service, the purchaser must contact SAMSUNG at the address or phone number provided below for problem determination and service procedures. Warranty service can only be performed by a SAMSUNG authorized service center. The original dated bill of sale must be presented upon request as proof of purchase to SAMSUNG or SAMSUNG’s authorized service center to receive warranty service. SAMSUNG will provide in-home service within the contiguous United States during the warranty period at no charge, subject to availability of SAMSUNG authorized servicers within the customer’s geographic area. If in-home service is not available, SAMSUNG may elect, at its option, to provide transportation of the product to and from an authorized service center. If the product is located in an area where service by a SAMSUNG authorized servicer is not available, you may be responsible for a trip charge or required to bring the product to a SAMSUNG authorized service center for service. To receive in-home service, product must be unobstructed and accessible to the service agent. During the applicable warranty period, a product will be repaired, replaced, or the purchase price refunded, at the sole option of SAMSUNG. SAMSUNG may use new or reconditioned parts in repairing a product, or replace the product with a new or reconditioned product. Replacement parts and products are warranted for the remaining portion of the original product’s warranty or ninety (90) days, whichever is longer. All replaced parts and products are the property of SAMSUNG and you must return them to SAMSUNG. This limited warranty covers manufacturing defects in materials or workmanship encountered in normal household, noncommercial use of this product and shall not cover the following: damage that occurs in shipment, delivery, installation, and uses for which this product was not intended; damage caused by unauthorized modication or alteration of the product; product where the original factory serial numbers have been removed, defaced, changed in any way, or cannot be readily determined; cosmetic damage including scratches, dents, chips, and other damage to the product’s nishes; damage caused by abuse, misuse, pest infestations, accident, re, oods, or other acts of nature or God; damage caused by use of equipment, utilities, services, parts, supplies, accessories, applications, installations, repairs, external wiring or connectors not supplied or authorized by SAMSUNG; damage caused by incorrect electrical line current, voltage, uctuations and surges; damage caused by failure to operate and maintain the product according to instructions; in-home instruction on how to use your product; and service to correct installation not in accordance with electrical or plumbing codes or correction of household electrical or plumbing (i.e., house wiring, fuses, or water inlet hoses). In addition, damage to the glass cooktop caused by (i) use of cleaners other than the recommended cleaners and pads or (ii) hardened spills of sugary materials or melted plastic that are not cleaned according to the directions in the use and care guide are not covered by this limited warranty. The cost of repair or replacement under these excluded circumstances shall be the customer’s responsibility. Visits by an authorized servicer to explain product functions, maintenance or installation are not covered by this limited warranty.Please contact SAMSUNG at the number below for assistance with any of these issues. NE59N6630S_AA_DG68-01050A-02_EN+MES+CFR.indb 47 2018-12-18 7:17:3648 English Warranty
EXCLUSION OF IMPLIED WARRANTIES
IMPLIED WARRANTIES, INCLUDING THE IMPLIED WARRANTIES OF MERCHANTABILITY OR FITNESS FOR A PARTICULAR PURPOSE, ARE LIMITED TO ONE YEAR OR THE SHORTEST PERIOD ALLOWED BY LAW. Some states do not allow limitations on how long an implied warranty lasts, so the above limitations or exclusions may not apply to you. This warranty gives you specic rights, and you may also have other rights, which vary from state to state.
LIMITATION OF REMEDIES
YOUR SOLE AND EXCLUSIVE REMEDY IS PRODUCT REPAIR, PRODUCT REPLACEMENT, OR REFUND OF THE PURCHASE PRICE AT SAMSUNG’S OPTION, AS PROVIDED IN THIS LIMITED WARRANTY. SAMSUNG SHALL NOT BE LIABLE FOR SPECIAL, INCIDENTAL OR CONSEQUENTIAL DAMAGES, INCLUDING BUT NOT LIMITED TO TIME WAY FROM WORK, HOTELS AND/OR RESTAURANT MEALS, REMODELING EXPENSES, LOSS OF REVENUE OR PROFITS, FAILURE TO REALIZE SAVINGS OR OTHER BENEFITS REGARDLESS OF THE LEGAL THEORY ON WHICH THE CLAIM IS BASED, AND EVEN IF SAMSUNG HAS BEEN ADVISED OF THE POSSIBILITY OF SUCH DAMAGES. Some states do not allow exclusion or limitation of incidental or consequential damages, so the above limitations or exclusions may not apply to you. This warranty gives you specic rights, and you may also have other rights, which vary from state to state. SAMSUNG does not warrant uninterrupted or error-free operation of the product. No warranty or guarantee given by any other person, rm, or corporation with respect to this product shall be binding on SAMSUNG. To obtain warranty service, please contact SAMSUNG at: Samsung Electronics America, Inc. 85 Challenger Road Ridgeeld Park, NJ 07660 1-800-SAMSUNG (726-7864) and www.samsung.com/us/support Warranty (CANADA) PLEASE DO NOT DISCARD. THIS PAGE REPLACES THE WARRANTY PAGE IN THE
This SAMSUNG brand product, as supplied and distributed by SAMSUNG ELECTRONICS CANADA, INC. (SAMSUNG) and delivered new, in the original carton to the original consumer purchaser, is warranted by SAMSUNG against manufacturing defects in materials and workmanship for a limited warranty period of: One (1) Year Parts and Labor, One (1) Year Parts Warranty For Glass Cooktop and Radiant Heater This limited warranty begins on the original date of purchase, and is valid only on products purchased and used in the CANADA. To receive warranty service, the purchaser must contact SAMSUNG for problem determination and service procedures. Warranty service can only be performed by a SAMSUNG authorized service center. The original dated bill of sale must be presented upon request as proof of purchase to SAMSUNG or SAMSUNG’s authorized service center. Samsung will provide in-home service during the warranty period at no charge subject to availability within the contiguous CANADA. In home service is not available in all areas. To receive in home service product must be unobstructed and accessible to the service agent. If service is not available Samsung may elect to provide transportation of the product to and from an authorized service center. Warranty (U.S.A) NE59N6630S_AA_DG68-01050A-02_EN+MES+CFR.indb 48 2018-12-18 7:17:36English 49 Warranty SAMSUNG will repair or replace this product, at our option and at no charge as stipulated herein, with new or reconditioned parts or products if found to be defective during the limited warranty period specied above. All replaced parts and products become the property of SAMSUNG and must be returned to SAMSUNG. Replacement parts and products assume the remaining original warranty, or ninety (90) days, whichever is longer. This limited warranty covers manufacturing defects in materials and workmanship encountered in normal, noncommercial use of this product and shall not apply to the following: damage which occurs in shipment; delivery and installation; applications and uses for which this product was not intended; altered product or serial numbers; cosmetic damage or exterior nish; accidents, abuse, neglect, re, water, lightning or other acts of nature; use of products, equipment, systems, utilities, services, parts, supplies, accessories, applications, installations, repairs, external wiring or connectors not supplied or authorized by SAMSUNG which damage this product or result in service problems; incorrect electrical line voltage, uctuations and surges; customer adjustments and failure to follow operating instructions, maintenance and environmental instructions that are covered and prescribed in the instruction book; product removal and reinstallation; problems caused by pest infestations, and overheating or overcooking by user. This limited warranty shall not cover cases of incorrect electric current, voltage or supply, light bulbs, house fuses, house wiring, cost of a service call for instructions, or xing installation errors. Furthermore, damage to the glass cooktop caused by the use of cleaners other than the recommended cleaners and pads, damage to the glass cook top caused by hardened spills of sugary materials or melted plastic that are not cleaned according to the directions in the use and care guide are not covered. SAMSUNG does not warrant uninterrupted or error-free operation of the product. EXCEPT AS SET FORTH HEREIN THERE ARE NO WARRANTIES ON THIS PRODUCT EITHER EXPRESS OR IMPLIED AND SAMSUNG DISCLAIMS ALL WARRANTIES INCLUDING, BUT NOT LIMITED TO, ANY IMPLIED WARRANTIES OF MERCHANTABILITY, INFRINGEMENT OR FITNESS FOR A PARTICULAR PURPOSE. NO WARRANTY OR GUARANTY GIVEN BY ANY PERSON, FIRM OR CORPORATION WITH RESPECT TO THIS PRODUCT SHALL BE BINDING ON SAMSUNG. SAMSUNG SHALL NOT BE LIABLE FOR LOSS OF REVENUE OR PROFITS, FAILURE TO REALIZE SAVINGS OR OTHER BENEFITS, OR ANY OTHER SPECIAL, INCIDENTAL OR CONSEQUENTIAL DAMAGES CAUSED BY THE USE, MISUSE OR INABILITY TO USE THIS PRODUCT, REGARDLESS OF THE LEGAL THEORY ON WHICH THE CLAIM IS BASED, AND EVEN IF SAMSUNG HAS BEEN ADVISED OF THE POSSIBILITY OF SUCH DAMAGES. NOR SHALL RECOVERY OF ANY KIND AGAINST SAMSUNG BE GREATER IN AMOUNT THAN THE PURCHASE PRICE OF THE PRODUCT SOLD BY SAMSUNG AND CAUSING THE ALLEGED DAMAGE. WITHOUT LIMITING THE FOREGOING, PURCHASER ASSUMES ALL RISK AND LIABILITY FOR LOSS, DAMAGE OR INJURY TO PURCHASER AND PURCHASER’S PROPERTY AND TO OTHERS AND THEIR PROPERTY ARISING OUT OF THE USE, MISUSE OR INABILITY TO USE THIS PRODUCT. THIS LIMITED WARRANTY SHALL NOT EXTEND TO ANYONE OTHER THAN THE ORIGINAL PURCHASER OF THIS PRODUCT, IS NONTRANSFERABLE AND STATES YOUR EXCLUSIVE REMEDY. Some states do not allow limitations on how long an implied warranty lasts, or the exclusion or limitation of incidental or consequential damages, so the above limitations or exclusions may not apply to you. This warranty gives you specic legal rights, and you may also have other rights which vary from state to state. To obtain warranty service, please contact SAMSUNG at: Samsung Electronics Canada Inc. 2050 Derry Road West, Mississauga, Ontario L5N 0B9 Canada 1-800-SAMSUNG (726-7864) and www.samsung.com/ca/support (English) www.samsung.com/ca_fr/support (French) NE59N6630S_AA_DG68-01050A-02_EN+MES+CFR.indb 49 2018-12-18 7:17:36Memo NE59N6630S_AA_DG68-01050A-02_EN+MES+CFR.indb 50 2018-12-18 7:17:36Memo NE59N6630S_AA_DG68-01050A-02_EN+MES+CFR.indb 51 2018-12-18 7:17:36Please be advised that the Samsung warranty does NOT cover service calls to explain product operation, correct improper installation, or perform normal cleaning or maintenance. QUESTIONS OR COMMENTS? COUNTRY CALL OR VISIT US ONLINE AT U.S.A Consumer Electronics 1-800-SAMSUNG (726-7864) www.samsung.com/us/support CANADA 1-800-SAMSUNG (726-7864) www.samsung.com/ca/support (English) www.samsung.com/ca_fr/support (French) DG68-01050A-02 Scan the QR code* or visit www.samsung.com/spsn to view our helpful How-to Videos and Live Shows
On/Off (Activation/Désactivation).
On/Off (Activation/Désactivation). REMARQUE