Skate Sharpener 3 - Sports accessory Sparx - Free user manual and instructions
Find the device manual for free Skate Sharpener 3 Sparx in PDF.
Download the instructions for your Sports accessory in PDF format for free! Find your manual Skate Sharpener 3 - Sparx and take your electronic device back in hand. On this page are published all the documents necessary for the use of your device. Skate Sharpener 3 by Sparx.
USER MANUAL Skate Sharpener 3 Sparx
1. Before operating the Sparx" Skate Sharpener, you should
familiarize yourself with the product and read and understand all applicable instructions and warnings in this manual.
2. Use personal protective equipment. Always wear eye protection
and a dust mask while operating the sharpener.
3. For emergencies: press the @ Cancel Button two times. This will
stop the Grinding Ring in its place. Do not stop the Grinding Ring unless it is an emergency, as this may damage the skate blade.
4. We do not recommend that children under 13 years of age be
permitted to use the Sparx" Skate Sharpener.
5. The Sparx" Skate Sharpener is not intended for use by persons
Gincluding children 13 years and over) with reduced physical, sensory or mental capabilities, or lack of experience and knowledge, unless they have been given supervision or instruction concerning use of the Skate Sharpener by a qualified adult.
6. Children should be supervised to ensure that they do not play
with the Sparx"* Skate Sharpener.
7. The Sparx"* Skate Sharpener may only be used for sharpening skates.
8. Only Sparx"* Grinding Rings may be used with this machine.
9. Set up the product securely on a stable surface and in a protected
location. lt must be placed where no one can step on or trip over the Power Cord and where the Power Cord cannot be damaged
10. Always use the Sparx"* Skate Sharpener in a dry, well-lit and non-
condensing environment. To avoid the risk of electric shock, do not use the Sparx"* Skate Sharpener in wet or damp conditions:
11. To avoid injury, always use caution when operating the Sparx"
Skate Sharpener or when changing the Grinding Ring
12. Do not attempt to touch the Grinding Ring, Carriage, or Skate
Clamp while the Grinding Ring is moving. Wait for the Carriage and Grinding Ring to come to a complete stop before attempting any adjustments or Grinding Ring replacement.
13. Make sure that the Thumb Nut is tightened down onto the
Grinding Ring before starting any grinding operation
14. Do not leave the Sparx" Skate Sharpener running unattended
15. Never disconnect the Power Cord by pulling the wire to
disconnect it from the socket.
16. Store the Sparx"* Skate Sharpener in a dry place, out of the reach
17. Maintain the sharpener according to the Maintenance section
of this manual. Cleaning the Sharpener Base and Replacing the Air Filter, at specified intervals, are necessary steps for performance and safety.
18. 1f at any time the product does not operate normally, see the
Troubleshooting section of this manual.
19. There are no user-serviceable parts on the sharpener. The
sharpener should only be repaired by a professional Sparx" Hockey technician, using only original spare parts. Unauthorized repairs could lead to hazardous conditions for the user and/or void the warranty.
20. For any further questions about the sharpener, please contact
Sparx" Hockey Support at 1-855-SPARXHQ (1-855-772-7947) or by email at help@sparxhockey.com.
Warning: Please see the manual for operating instructions.
Caution: Pinch point hazard. Keep hands, hair and other body parts clear of the Skate Clamp area. SAFETY
FCC NOTICE (FOR U.S. CUSTOMERS) This device complies with Part 15 of the FCC Rules: Operation is subject to the following conditions:
1. This device may not cause harmful interference, and
2. This device must accept any interference received, including
interference that may cause undesired operation Changes and Modifications not expressly approved by Velasa Sports, Inc. can void your authority to operate this equipment under Federal Communications Commissions rules. ISED RSS-GEN NOTICE: This device contains license-exempt transmitter(s)/receiver(s) that comply with Innovation, Science and Economic Development Canada's licence-exempt RSS(s). Operation is subject to the following two conditions: (1) This device may not cause interference. (2) This device must accept any interference, including interference that may cause undesired operation of the device ENVIRONMENTAL PROTECTION Waste electrical products should not be disposed of with household waste. Please recycle where facilities exist. Check with your Local Authority or retailer for recycling advice.
CONFORMITY WITH DIRECTIVES
This product is CE marked to denote conformity with: Low Voltage Directive 2014/35/EC, EMC Directive 2014/30/EU, RoHS Directive 2015/863, Radio Equipment Directive 2014/53/EU, WEEE Directive 2012/19/EU SAFETY
Hockey Skates Goalie Skates Figure Skates* ‘requires an additional adapter, hich is sold separat
Ê3 DIMENSIONS AND WEIGHT
Width: 26.5 Inches / 673 mm Heïght: 5.0 inches / 127 mm Depth: 11.9 inches / 303 mm Weight: 22.1 Pounds / 10 kg @ ELECTRICAL Line Voltage: 100-240 Volts AC (50-60 Hz single phase) Maximum Power Consumption: 140 W For detailed videos on the individual steps of the sharpening process, head to: sparxhockey.com/howto INTRODUCTION
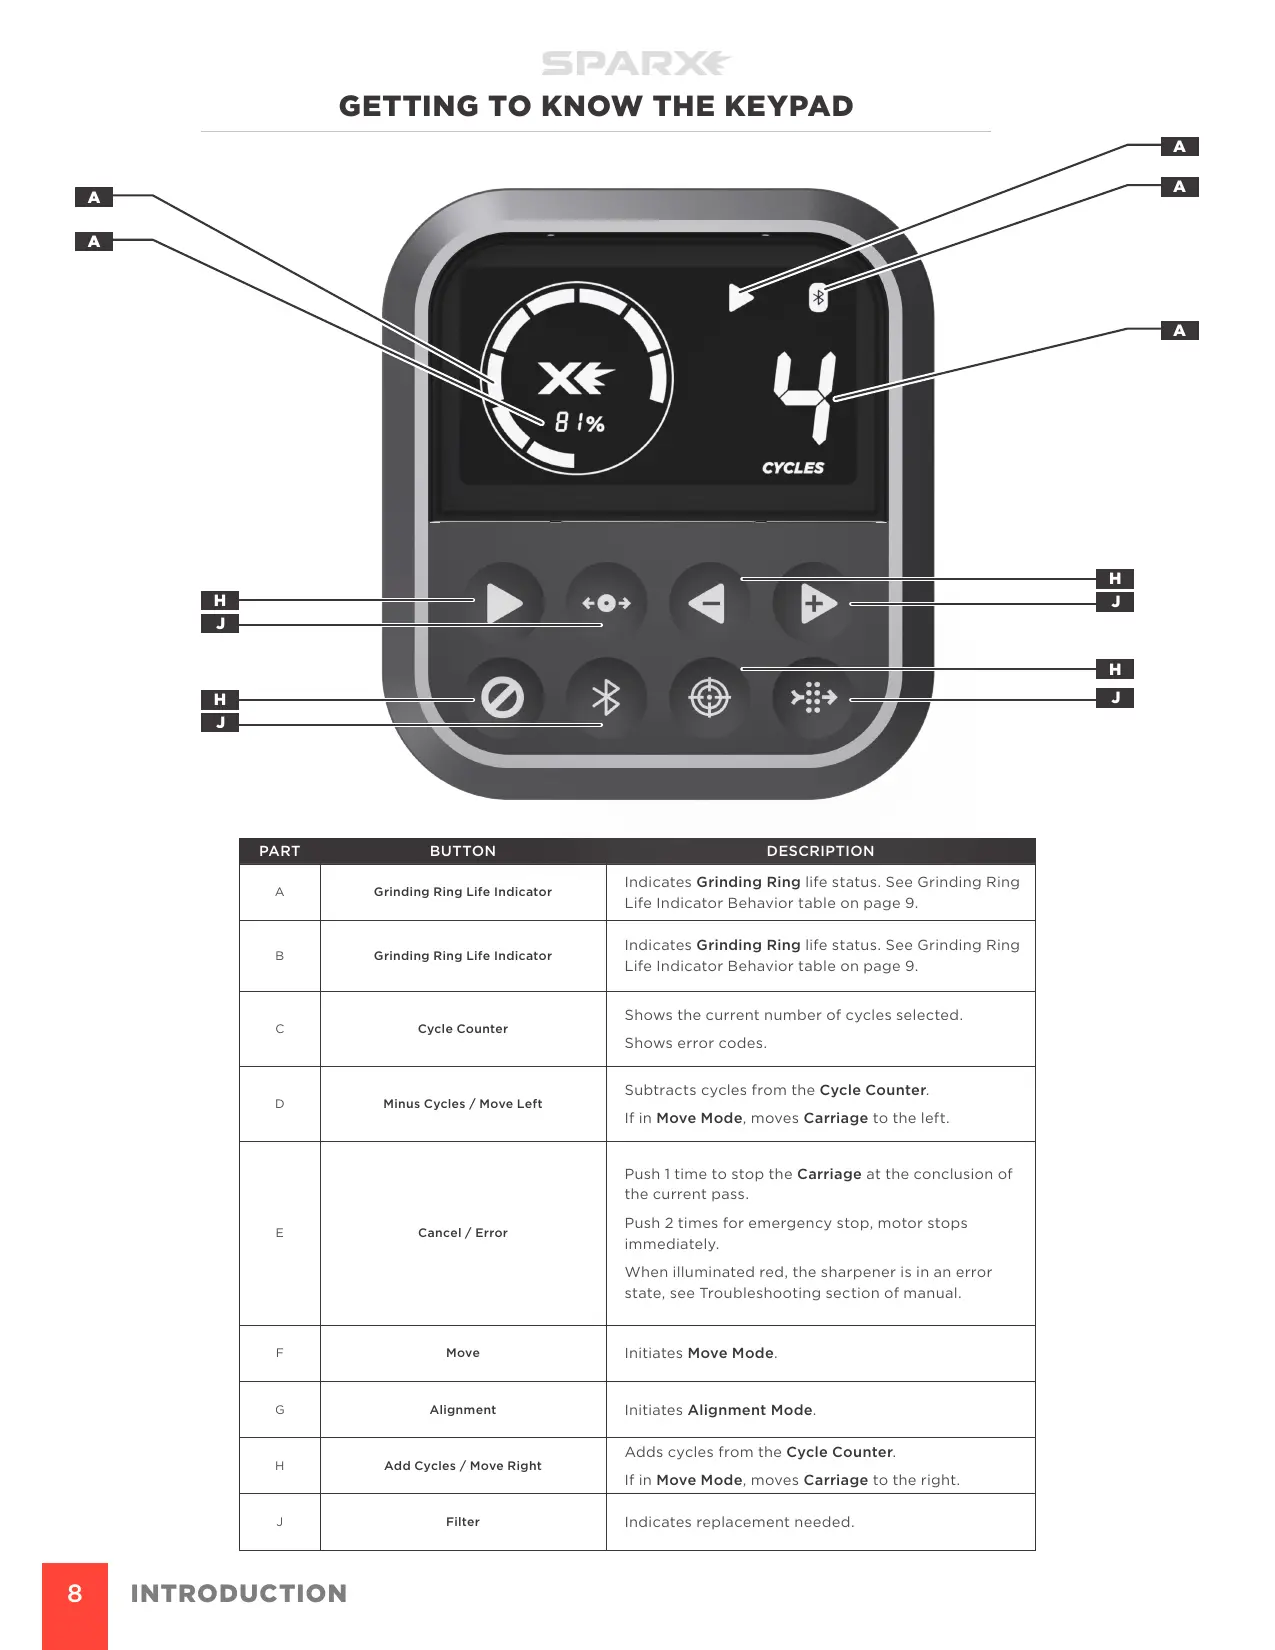
à Grinding Ring Life Indicator Indicates Grinding Ring life status. See Grinding Ring Life Indicator Behavior table on page 9 Indicates Grinding Ring life status. See Grinding Ring 8 Grinding Ring Life Indicator Life Indicator Behavior table on page 9 Shows the current number of cycles selected c Cycle Counter Shows error codes Subtracts cycles from the Cycle Counter. D Minus Cycles / Move Left If in Move Mode, moves Carriage to the left. Push 1 time to stop the Carriage at the conclusion of the current pass. : Cancel / Error Push 2 times for emergency stop, motor stops immediately. When illuminated red, the sharpener is in an error state, see Troubleshooting section of manual F Move Initiates Move Mode. & Alignment Initiates Alignment Mode. Adds cycles from the Cycle Counter. H Add Cycles / Move Right If in Move Mode, moves Carriage to the right. J Filter Indicates replacement needed INTRODUCTION
In no] Grin total right onth has The diffei f life emaining. kplacement ckey.com Mode while a as less than hat the user isiting Circle half red/half white - alternate blinking. User has attempted to sharpen with a cycle count greater than the number of cycles remaining on the Grinding Ring INTRODUCTION
SETUP In order to begin setup of the sharpener, you must retrieve the included accessories that are stored within the Sharpener Base. To gather the accessories and begin setup you must lift the head unit as explained below.
© To watch the How-To video, visit sparxhockey.com/howto
1 LOCATE THE TRIGGERS
Located on the top of the sharpener head unit are two Triggers CA), one on each side of the sharpener. 2 SLIDE THE TRIGGERS AND LIFT HEAD UNIT Slide the triggers down as shown below. SETUP With the triggers slid down, raise the head unit
3 CLOSE THE HEAD UNIT
Slide the triggers down and place the head unit back into position.
© To watch the How-To video, visit sparxhockey.com/howto
1 INSTALL THE CLAMP LEVER
Slide the Clamp Lever (A) onto the Lever Dock (B). Press the lever down until it clicks into place. When the Clamp Lever is engaged, it will lay at a slight angle.
2 REMOVE THE TRAVEL GUARD
Open the Skate Clamp by pressing and holding down the Clamp Lever. Remove the Travel Guard. Release the Clamp Lever. Transporting or moving the Sharpener without the Travel Guard installed voids your Warranty and/or Extended Service Plan. Always remove the Travel Guard before operating the Sparx Sharpener.
PLUG IN THE POWER CORD
Plug the Power Cord into the Power Input Port on the side of the sharpener. Plug the other end into a wall outlet. Toggle the switch on the Power Input Port to the on position (I=on, O=off) ALIGNMENT © To watch the How-To video, visit sparxhockey.com/howto The Alignment process is required when you first receive your Sparx Sharpener. Be sure to inspect the alignment after every time the sharpener is moved and/or travels.
INSTALL THE ALIGNMENT RING
Lift the Head Unit. The Carriage will automatically move into the install position, and the sharpener will play à “ready” tone. While holding the Grinding Ring Arbor (C), unscrew the Thumb Nut (A). Slide the Alignment Ring (B) onto the Grinding Ring Arbor (C), with the label facing out. Replace and tighten the Thumb Nut until hand-tight. Close the Head Unit.
INSTALL THE OPTICAL ALIGNMENT TOOL
Press down on the Clamp Lever to open the Skate Clamp. Place the Optical Alignment Tool (with Sparx” logo facing towards the user) into the Skate Clamp. Place the Optical SETUP
Alignment Tool into the slot and let it fall into place. Release the Clamp Lever.
INITIATE ALIGNMENT MODE
Press the @ Alignment Button to send the Carriage to its alignment position. When the Carriage is in place, a tone will sound and the case will illuminate white.
LOCATE THE TAB AND GROOVE
Look through the eyepiece of the Optical Alignment Tool and locate the indicator tab (A) of the Optical Alignment Tool and the groove (B) on the Alignment Ring Ensure you are looking straight through the eyepiece directly above the indicator tab and groove. If you see the indicator tab side wall (C) when looking through the eyepiece, you are not directly above the indicator tab and groove. Adjust your line of sight until you can no longer see the indicator tab side wall SETUP
INSPECT THE ALIGNMENT
If the indicator tab of the Alignment Tool is not aligned with the groove on the Alignment Ring (as shown below), move to step 6: If the indicator tab of the Alignment Tool is aligned with the groove on the Alignment Ring (as shown below), end Alignment Mode by pressing the @ Alignment Button and move to step 7.
ALIGN USING THE ADJUSTMENT DRIVER
Locate the Driver Slot and place your Adjustment Driver in and begin to adjust your alignment as needed. Turning to the right moves the Alignment Ring towards the back, while turning to the left moves the ring to the front. Adjust until the indicator tab is aligned with the groove on the Alignment Ring. End Alignment Mode by pressing the @ Alignment Button
Press down on the Clamp Lever to open the Skate Clamp. Remove the Optical Alignment Tool
REMOVE THE ALIGNMENT RING
Lift the Head Unit. The Carriage will automatically move into the install position and the sharpener will play à “ready” tone. While holding the Grinding Ring Arbor, unscrew the Thumb Nut and remove the Alignment Ring.
INSTALL THE GRINDING RING
While holding the Grinding Ring Arbor (C), slide the Grinding Ring (B) on the Grinding Ring Arbor (C), label facing out, and replace and tighten the Thumb Nut (A) until hand-tight. Close the Head Unit.
re skates see the end of t For loading goalie skates and f © To watch the How-To video, visit sparxhockey.com/howto
Press and hold down the Clamp Lever to open the Skate Clamp. With the skate toe pointing right and the laces tucked into the skate, set the skate into the Skate Clamp slot letting the plastic blade holder rest on top of the clamps. Center the skate blade in the Skate Clamps. Release the Clamp Lever. We recommend inserting the skate into the Skate Clamp with the toe pointing to the right. For most skate blades, this orientation allows for the greatest flexibility in Grinding Ring height adjustment. it is, however, acceptable to insert the skate with the toe facing in either direction. 2 CLOSE THE SLOT COVERS Move each Slot Cover (A) in toward the skate until they touch the blade holder. OPERATION