
PARTYBOX 710 - Pregnant JBL - Free user manual and instructions
Find the device manual for free PARTYBOX 710 JBL in PDF.
Download the instructions for your Pregnant in PDF format for free! Find your manual PARTYBOX 710 - JBL and take your electronic device back in hand. On this page are published all the documents necessary for the use of your device. PARTYBOX 710 by JBL.
USER MANUAL PARTYBOX 710 JBL
For all products: . Read these instructions. . Keep these instructions. . Heed all warnings. . Follow all instructions. . Do not block any ventilation openings. Install this apparatus in accordance with the manufacturer's instructions.
6. Do not install this apparatus near any heat sources such as
radiators, heat registers, stoves or other apparatus (including amplifiers) that produce heat.
7. Donot defeat the safety purpose ofthe polarized or grounding-
type plug. À polarized plug has two blades with one wider than the other. A grounding-type plug has two blades and a third grounding prong. The wide blade or the third prong is provided for your safety. lf the provided plug does not fit into your outlet, consult an electrician for replacement of the obsolete outlet.
8. Protect the power cord from being walked on or pinched,
particularly at plugs, convenience receptacles and the point where they exit from the apparatus.
9. Use only attachments/accessories specified by the
10. Use only with the cart, stand, tripod, bracket or
table specified by the manufacturer or sold with the apparatus. When a cart is used, use caution when moving the cart/apparatus combination to avoid injury from tip-over. 11.Unplug this apparatus during lightning storms or when unused for long periods of time.
12. To disconnect this apparatus from the AC mains completely,
disconnect the power-supply cord plug from the AC receptacle.
13. The mains plug of the power-supply cord shall remain readily
14. This apparatus is intended to be used only with the power
supply and/or charging cable provided by the manufacturer. CAUTION RISK OF ELECTRIC SHOCK. DO NOT OPEN. op & ND = THE LIGHTNING FLASH WITH AN ARROWHEAD SYMBOL, WITHIN AN EQUILATERAL TRIANGLE, IS INTENDED TO ALERT THE USER TO THE PRESENCE OF UNINSULATED “DANGEROUS VOLTAGE" WITHIN THE PRODUCT'S ENCLOSURE THAT MAY BE OF SUFFICIENT MAGNITUDE TO CONSTITUTE A RISK OF ELECTRIC SHOCK TO PERSONS. THE EXCLAMATION POINT WITHIN AN EQUILATERAL TRIANGLE 1S INTENDED TO ALERT THE USER TO THE PRESENCE OF IMPORTANT OPERATING AND MAINTENANCE (SERVICING) INSTRUCTIONS IN THE LITERATURE ACCOMPANYING THE PRODUCT.
WARNING: TO REDUCE THE RISK OF FIRE OR ELECTRIC SHOCK, DO NOT EXPOSE THIS
APPARATUS TO RAIN OR MOISTURE. Caution FCC and IC statement for users (USA and Canada only) This device complies with part 15 of the FCC Rules. Operation is subject to the following two conditions: (1) This device may not cause harmful interference, and (2) this device must accept any interference received, including interference that may cause undesired operation. CAN ICES-3(B)/NMB-3(B) Federal Communication Commission Interference Statement This equipment has been tested andfoundtocomplywiththelimits for a Class B digital device, pursuant to Part 15 of the FCC Rules. Theselimits are designed to provide reasonable protection against harmiul interference in a residential installation. This equipment generates, uses and can radiate radio frequency energy and, if not installed and used in accordance with the instructions, may cause harmful interference to radio communications. However, there is no guarantee that interference will not occur in a particular installation. If this equipment does cause harmful interference to radio or television reception, which can be determined by turning the equipment off and on, the user is encouraged to try to correct the interference by one or more of the following measures: +__Reorient or relocate the receiving antenna. + __ Increase the separation between the equipment and receiver. + Connect the equipment into an outlet on a circuit different from that to which the receiver is connected. + Consult the dealer or an experienced radio/TV technician for help. Caution: Changes or modifications not expressly approved by HARMAN could void the user's authority to operate the equipment. For Products That Transmit RF Energy
FCC AND IC INFORMATION FOR USERS
This device complies with Part 15 of the FCC rules and Industry Canada license-exempt RSS standard(s). Operation is subject to the following two conditions: (1) This device may not cause harmful interference; and (2) this device must accept any interference received, including interference that may cause undesired operation. FCC/IC Radiation Exposure Statement This equipment complies with FCC/IC RSS-102 radiation exposure limits set forth for an uncontrolled environment. FCC Caution: High power radars are allocated as primary users of the 5.25 to
5.85 GHz and 5.65 to 5.85 GHz bands. These radar stations
can cause interference with and/or damage this device. No configuration controls are provided for this wireless equipment allowing any change in the frequency of operations outside the FCC grant of authorization for US operation according to Part
15.407 of the FCC rules.
IC Caution: User should also be advised that: {i) The device for operation in the band 5150-5250 MHz is only for indoor use to reduce the potential for harmful interference to co-channel mobile satellite systems; (ii) the maximum antenna gain permitted for devices in the bands 5250-5350 MHz and 5470-5725 MHz shall comply with the ei.rp. Limit: and (ii) The maximum antenna gain permitted for devices in the band 5725-5825 MHz shall comply with the e.i.r.p. Limits specified for
point-to-point and non-point-to-point operation as appropriate. (iv) Users should also be advised that high-power radars are allocated as primary users (i.e. priority users) of the bands 5250- 5350 MHz and 5650-5850 MHz and that these radars could cause interference and/or damage to LE-LAN devices. Exposure of humans to RF fields (RSS-102) The computers employ low gain integral antennas that do not emit RF field in excess of Health Canada limits for the general population, consult Safety Code 6, obtainable from Health Canada's Website at http://www.hc-sc.gc.ca/ The radiated energy from the antennas connected to the wireless adapters conforms to the IC limit of the RF exposure requirement regarding IC RSS-102, Issue 5 clause 4. SAR tests are conducted using recommended operating positions accepted by the FCC/ RSS with the device transmitting at its highest away from the body. Non-compliance with the above restrictions may result in a violation of FCC RF exposure guidelines. Use Restriction: Attention in France, the operation is limited to indoor use within the band 5150-5350 Mhz. For Products with Radio Receivers That Can Use an External Antenna (USA ONLY) CATV (Cable TV) or Antenna Grounding If an outside antenna or cable system is connected to this product, be certain that it is grounded so as to provide some protection against voltage surges and static charges. Section 810 of the National Electrical Code (NEC), ANSI/NFPA No. 700- 1984, provides information with respect to proper grounding of the mast and supporting structure, grounding of the lead-in wire to an antenna discharge unit, of grounding conductors, location of antenna discharge unit, connection to grounding electrodes and requirements of the electrode. Note to CATV System Installer This reminder is provided to call the CATV(cable TV) system installer's attention to article 820-40 of the NEC, which provides guidelines for proper grounding and, in particular, as close to the point of cable entry as possible.
FOR ALL EU COUNTRIES
For products that include audio out Prevention of hearing loss Caution: Permanent hearing loss may occur if earphones or headphones are used at high volume for prolonged periods of time. For France, the products have been tested to comply with Sound Pressure Level requirement laid downin the applicable NF EN 50332 L.5232-1. Note: — To prevent possible hearing damage, do not listen to high volume levels for long periods. WEEE Notice The Directive on Waste Electrical Equipment (WEEE), which entered into force as European law on 14/02/2014, resulted in a major change in the treatment of electrical equipment at end- of-life. The purpose of this Directive is, a first priority, the prevention of WEEE, and in addition, to promote the reuse, recycling and other forms of recovery of such wastes as so as to reduce disposal. The WEEE logo on the product or on its box indicating collection for electrical and electronic equipment consists of the crossed- out wheeled bin, as shown below. This product must not be disposed of or dumped with your other household waste. You are liable to dispose of all your electronic or electrical waste equipment by relocating over to the specified collection point for M ;ecyciing of such hazardous waste. Isolated collection and proper recovery of your electronic and electrical waste equipment at the time of disposal will allow us to help conserving natural resources. Moreover, proper recycling, and collection points, please contact your local city center, household waste disposal service, shop from where you purchased the equipment, or manufacturer of the equipment. RoHS Compliance This product is in compliance with Directive 2011/65/EU of the European Parliament and of the Council of 8 June 2011 on the restriction of the use of certain hazardous substances in electrical and electronic equipment. For All Products Except Those with Wireless Operation HARMAN International hereby declares that this equipment is in compliance with EMC 2014/30/EU Directive, LVD 2014/35/EU Directive. The declaration of conformity may be consulted in the support section of our Web Site, accessible from www.jbl.com. For All Products with Wireless Operation HARMAN International hereby declares that this equipment is in compliance with the essential requirements and other relevant provisions of Directive 2014/538/EU. The declaration of conformity may be consulted in the support section of our Web Site, accessible from www.jbl.com. EPILEPSY WARNING A few people may experience epileptic seizures when viewing flashing lights.
Congratulations on your purchase! This manual includes information about PartyBox 710 speakers. We encourage you to take a few minutes to read this manual, which describes the product and includes step-by-step instructions to help you to set up and get started. Read and understand all the safety instructions before using your product. If you have any questions about these products, their installation or their operation, please contact your retailer or customer service, or visit us at www.jbl.com.
3) Quick Start Guide, Safety Sheet, Warranty Card
“Power cord quantity and plug type vary by regions.
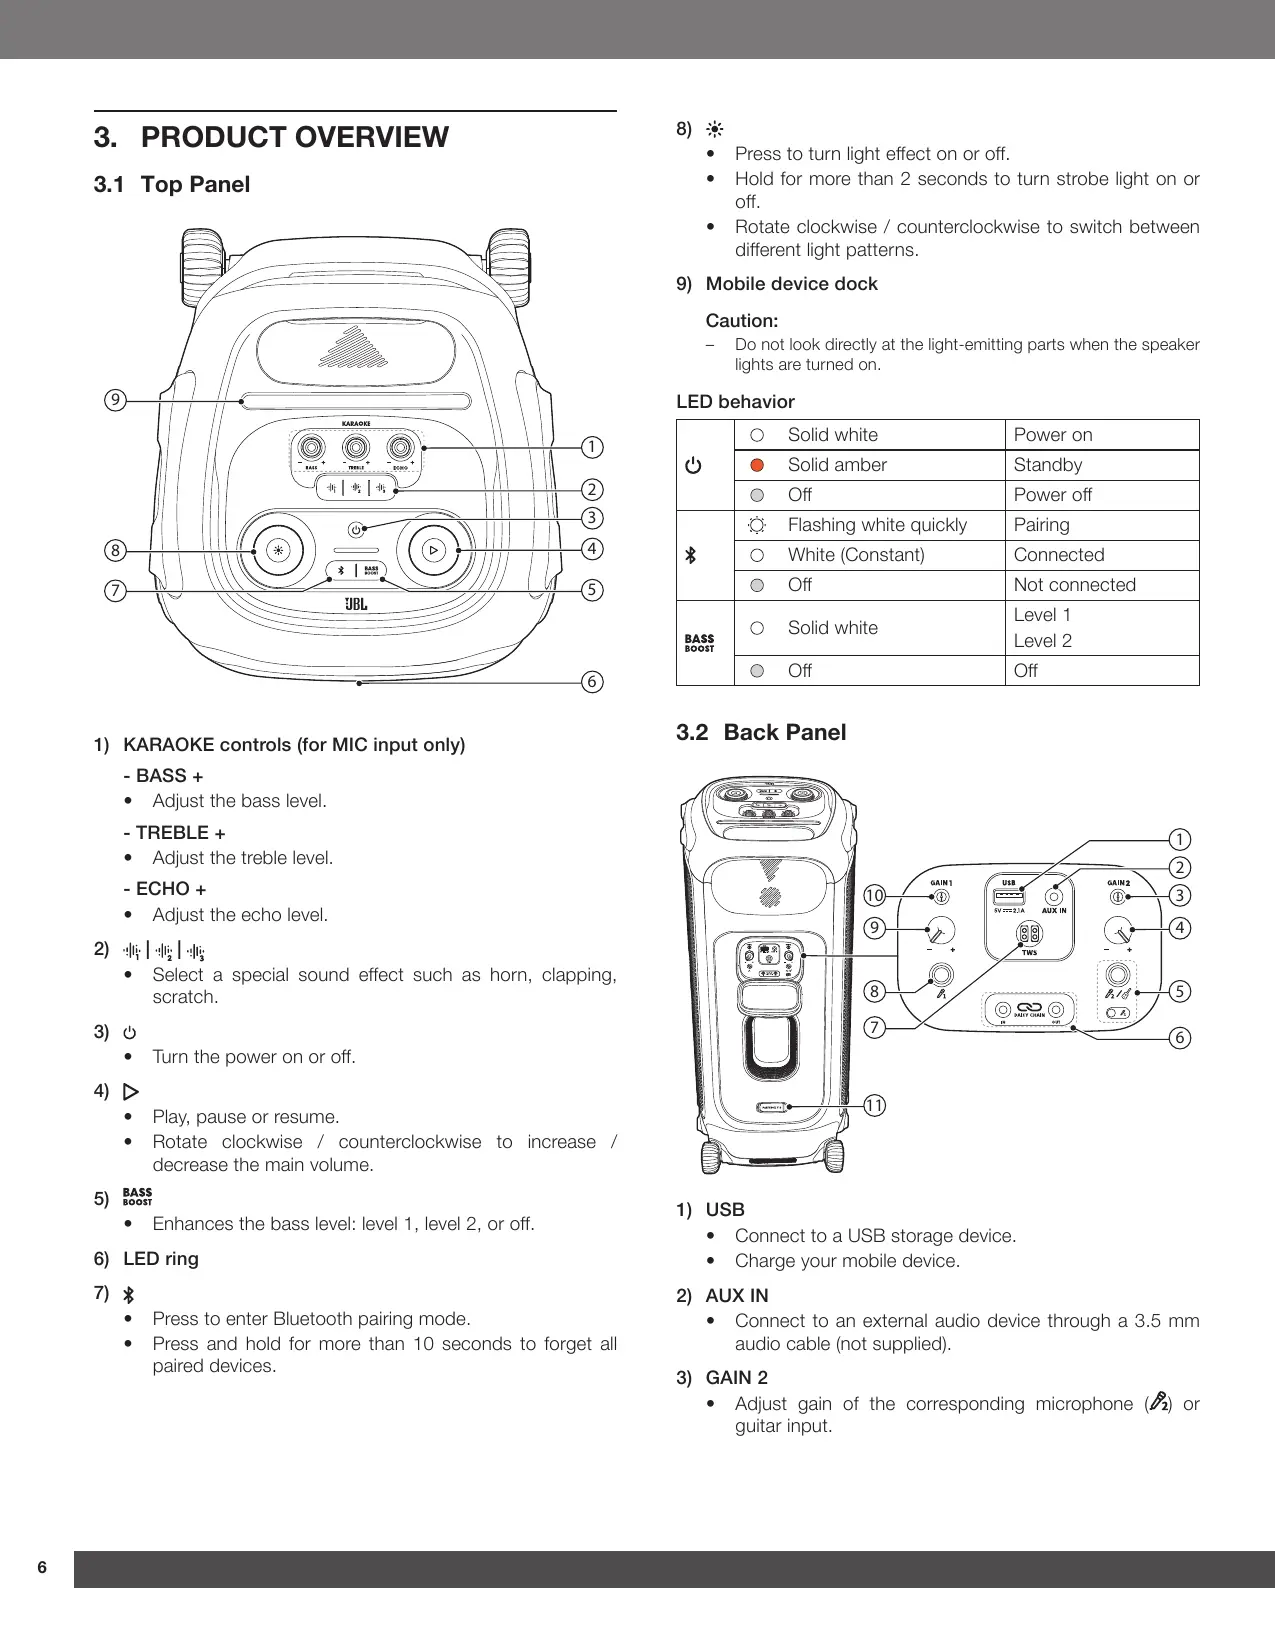
|| @ec We “[#| +__ Press to turn light effect on or off. + Hold for more than 2 seconds to turn strobe light on or off. + Rotate clockwise / counterclockwise to switch between different light patterns.
9) Mobile device dock
Caution: — Do not look directly at the light-emitting parts when the speaker lights are turned on. LED behavior O Solid white Power on Ô @ Solid amber Standby © Of Power off © Flashing white quickly Pairing » © White (Constant) Connected © of Not connected L Level 1 pass O Solid white Level 2 © of Off
1) KARAOKE controls (for MIC input only)
- BASS + + Adjust the bass level. - TREBLE + + Adjust the treble level. - ECHO + + Adjust the echo level.
ARE + Select a special sound effect such as horn, clapping, scratch.
+ Turn the power on or off. 4D> + Play, pause or resume. + Rotate clockwise / counterclockwise to increase / decrease the main volume.
+ Enhances the bass level: level 1, level 2, or off.
D % + Press to enter Bluetooth pairing mode. + Press and hold for more than 10 seconds to forget all paired devices.
+ Connect to a USB storage device. + Charge your mobile device.
+ Connect to an external audio device through a 8.5 mm audio cable (not supplied).
+ Adjust gain of the corresponding microphone (À) or guitar input.
4) Microphone/guitar volume knob (for Ad) 4. PLACEMENT
+__Adjust volume of the corresponding microphone (À) or guitar (if connected). Caution:
5) PAZ — Do not sit or lean on the speaker or push it sideways to avoid tip-
+ Connect to a microphone or guitar. over and possible damages.
6) sien INOUT . Place the speaker on a flat, stable surface and ensure that the
+ Daisy-chain multiple PartyBox speakers through 3.5 mm rubber feet side is down. audio cables (not supplied).
+ Press to enter True Wireless Stereo (TWS) pairing mode. 8 À + Connect to a microphone.
+ Adjust volume of the corresponding microphone (3) (if connected).
+__ Adjust gain of the corresponding microphone (4) input. 11)AC + Connect to AC power supply.
Cautions: Notes: — Use the provided power cords only. — Only one sound source can be played at a time. The priority order is USB -> BLUETOOTH -> AUX. — Starting a source with higher priority will always interrupt a source with lower priority. — To start a source with lower priority, stop the source with higher priority first.
6.1 Bluetooth Connection
You can use the speaker with your Bluetooth enabled smartphone or tablet.
1. Connect AC power.
2. Press O to power on.
Tip: — The speaker switches to standby mode automatically after 20 minutes of inactivity. You can press & on the speaker to switch to normal operation com este Bluetooth Naucow GE D } DEVICES JBL PartyBox 710
1. Press % on the speaker to enter Bluetooth pairing mode.
2. Choose “JBL PartyBox 710" on your Bluetooth device to
3. Once successfully connected, you can stream audio from
your Bluetooth device to this speaker. Notes: — This speaker can memorize a maximum of 8 paired devices. The ninth paired device will replace the first one. — Enter “0000” if a PIN code is requested for connection to a Bluetooth device. — Bluetooth performance can be affected by the distance between this product and your Bluetooth device and the environment of operation. To terminate the Bluetooth-enabled device: + Turn off this speaker, or +__Disable Bluetooth on your device.
To reconnect the Bluetooth enabled device: 6.3 Music Control + When you turn on this speaker next time, it tries to reconnect the last connected device automatically. +__lfnot, manually select “JBL PartyBox 710” on your Bluetooth device to connect.
+ Press D once to pause or resume playback. + Press D twice to skip to the next track. + Press D three times to skip to the previous track. + Rotate the volume knob clockwise or counterclockwise to increase or decrease main volume. Press BASS BOOST to enhance the bass level: level 1, level 2, or off. Note: — The skip operation is unavailable in AUX mode. Plug a USB storage device that contains playable audio contents into the USB port of the speaker. — The speaker switches to the USB source automatically. — Audio playback will start automatically. Tip: — The speaker plays audio files on the USB storage device from the root folder to the last level of subfolders in alphabetical sequence. Up to 8 levels of subfolders are supported. Supported audio formats Extension | Codec Sample rate Bitrate WAVE PCM 44.1KHz - 192KHz | < 5Mbps LPCM 44.1KHz - 192KHz | < 5Mbps IMA_ 44.1KHz - 192KHz | < 5Mbps ADPCM MPEG 44.1KHz - 192KHz | < 5Mbps MULAW 44.1KHz - 192KHz | < 5Mbps MP3 MPEG1 32KHz - 48KHz 32Kbps - layer1/2/3 320Kbps MPEG2 16KHz - 24KHz 8Kbps - layer1/2/3 160Kbps MPEG2.5 | 8KHz -12KHz 8Kbps - layers 160Kbps WMA < 320Kbps 8Kbps - 48Kbps
6.4 AUX Connection 6.5.1 Connecting a Microphone
1. Connect a microphone to the À or À /# socket.
2. When connecting a microphone to the Ad socket, switch
the slider to show À.
6.5.2 Connecting a Guitar
1. Connect an external audio device to the speaker through a
8.5 mm audio cable (not supplied).
2. After stopping playback from any other source, start audio
playback on the external device.
6.5 Mixing Sound with a Microphone and /
or Guitar By using a microphone or electric guitar (not supplied), you can mix sound with an audio source. Notes: — Always set the guitar or microphone volume to the minimum level before guitar or microphone connection / disconnection. — Always disconnect the guitar or microphone when you are not using them
1. Connect a guitar to the Atd socket.
2. Switoh the slider to show #.
55:83 Mixing Sound 7. CARRYING YOUR PARTYBOX Sing through the microphone or play guitar. + To adjust the volume of the audio source, rotate the volume Cautions: knob clockwise or counterclockwise. — Before carrying the speaker, ensure that all the cords are disconnected. — To avoid personal injury and/or property damage, hold the product firmiy while carrying. + To adjust the volume of the microphone or guitar, rotate the corresponding microphone or guitar volume knob. + To adjust the gain of the wired microphone or guitar, rotate the corresponding GAIN 1 or GAIN 2 control respectively. The PartyBox 710 is designed with a handle to help you move +__To adjust the echo, treble and bass level of the microphone, the speaker around easily. rotate the ECHO, TREBLE and BASS knob respectively.
. You can connect two PartyBox speakers to each other via TWS
8.1 Light Effect mode.
Press TWS on both speakers. To exit TWS mode: Power off or press TWS on either speaker. Tip: ve — By default, the speaker connected to your Bluetooth device acts as the primary speaker (left channel), while the other one acts as the secondary speaker (right channel). + Press # to turn light effect on or off. for more than 2 seconds to turn strobe light on or off. + Rotate the knob clockwise / counterclockwise to switch between different light patterns: Rock, Flow, Cross, Ripple, or Flash.
Download and install the JBL PartyBox App to get more from the product. Press «li | +1; | «15 to select a special sound effect such as horn, clapping, scratch.
8.5 Daisy Chain 8.7 IPX4
Caution: — Always keep the port dry before connecting AC power. = To ensure splash resistance, always keep the protective covers closed securely. The speaker is IPX4 splash resistant. oe eme) (o0em0
To restore the factory settings, hold :$ and > for more than 10 seconds.
A2DP V1.3, AVRCP V1.6
Caution: — Never try to repair the product by yourself. If you have any problems while using this product, check the following points: before you request service. System The speaker will not turn on. + Check the AC power connection. No response from some buttons + The product may be in demo mode. In demo mode, all the input sources and buttons, except D / :# / B$5 and the volume and light pattern knobs, are disabled. Hold D and 8 simultaneously for more than 5 seconds to exit. Sound No sound from the speaker. + Ensure that the speaker is powered on. + Adjust volume. + Ensure that a sound source is active and not muted. Bluetooth A device cannot connect with the speaker. + Ensure that the Bluetooth function of the device is enabled. + _ The speaker is already connected with another Bluetooth device. Hold # on the speaker for more than 20 seconds to disconnect and pair with a new device. Poor audio quality from a connected Bluetooth device + __ The Bluetooth reception is poor. Move the device closer to the speaker, or remove any obstacle between the device and speaker.
The product is in compliance with the European Union energy legislation. Bluetooth connection mode The product is intended to be used for streaming music via Bluetooth connection. À consumer can stream Bluetooth audio to the speaker. When the product is connected through Bluetooth, the Bluetooth connection must remain active at all times to ensure proper operation. The product will enter sleep mode (networked standby) after 20 minutes without operation. The power consumption in sleep mode is less than 2.0 Watts, after which it can be re-activated via Bluetooth connection. Bluetooth disconnection mode The product will enter standby mode after 20 minutes without operation. The power consumption in standby mode is less than
Q Bluetooth The Bluetooth® word mark and logos are registered trademarks owned by Bluetooth SIG, Inc. and any use of such marks by HARMAN International Industries, Incorporated is under license. Other trademarks and trade names are those of their respective owners. Made for iPhone 12 Pro Max, iPhone 12 Pro, iPhone 12, iPhone 12 mini, iPhone SE (2nd generation), iPhone 11 Pro Max, iPhone 11 Pro, iPhone 11, iPhone XS Max, iPhone XS, iPhone XR, iPhone X, iPhone 8 Plus, iPhone 8, iPhone 7 Plus, iPhone 7, iPhone SE, iPhone 6s Plus, and iPhone 6s. Use of the Made for Apple badge means that an accessory has been designed to connect specifically to the Apple product(s) identified in the badge and has been certified by the developer to meet Apple performance standards. Apple is not responsible for the operation of this device or its compliance with safety and regulatory standards. Apple, and iPhone are trademarks of Apple Inc. registered in the US. and other countries. The trademark “Phone” is used in Japan with a license from Aiphone K.K.