HWO60SM5B9B - Four HAIER - Free user manual and instructions
Find the device manual for free HWO60SM5B9B HAIER in PDF.
Download the instructions for your Four in PDF format for free! Find your manual HWO60SM5B9B - HAIER and take your electronic device back in hand. On this page are published all the documents necessary for the use of your device. HWO60SM5B9B by HAIER.
USER MANUAL HWO60SM5B9B HAIER
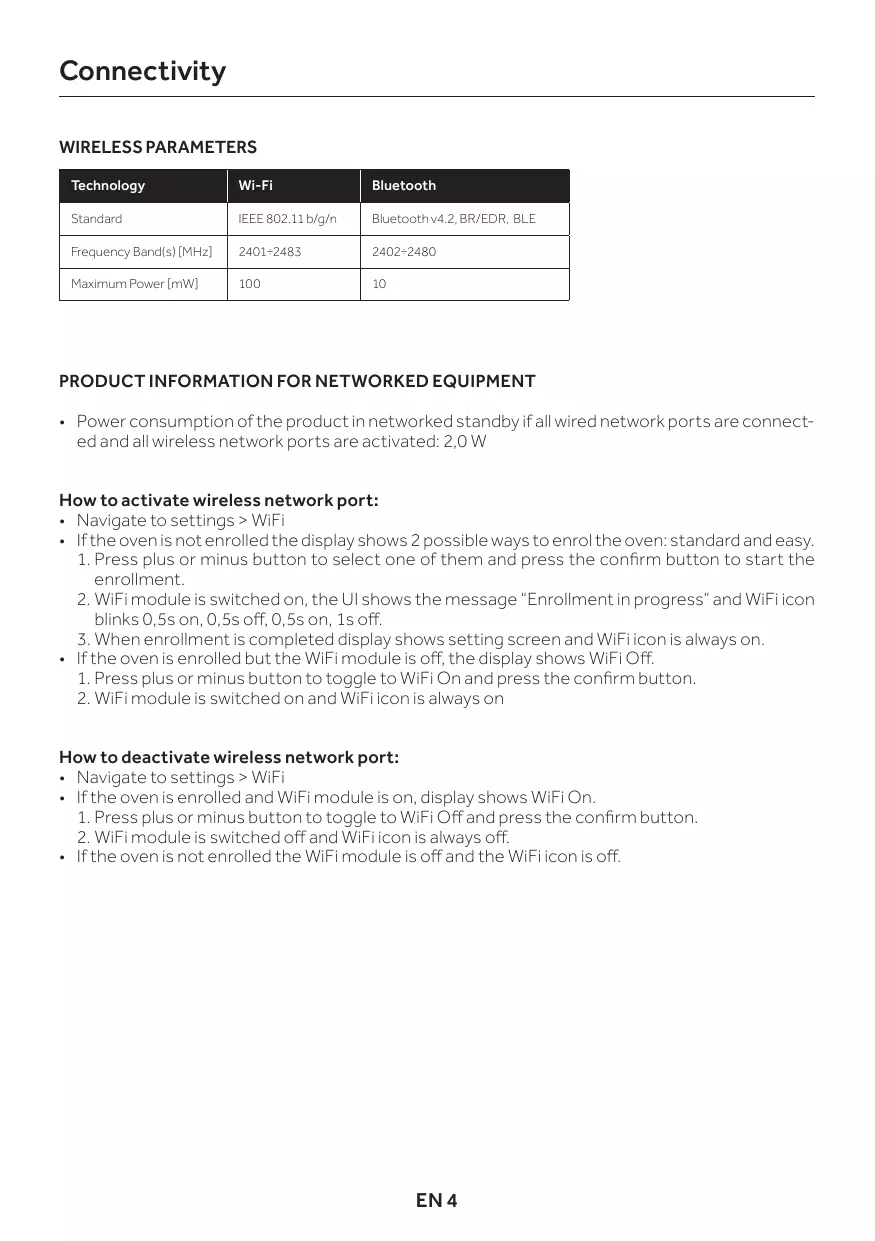
Bluetooth v4.2, BR/EDR, BLE Frequency Band(s) [MHz]
PRODUCT INFORMATION FOR NETWORKED EQUIPMENT • Power consumption of the product in networked standby if all wired network ports are connected and all wireless network ports are activated: 2,0 W How to activate wireless network port: • Navigate to settings > WiFi • If the oven is not enrolled the display shows 2 possible ways to enrol the oven: standard and easy. 1. Press plus or minus button to select one of them and press the confirm button to start the enrollment. 2. WiFi module is switched on, the UI shows the message “Enrollment in progress” and WiFi icon blinks 0,5s on, 0,5s off, 0,5s on, 1s off. 3. When enrollment is completed display shows setting screen and WiFi icon is always on. • If the oven is enrolled but the WiFi module is off, the display shows WiFi Off. 1. Press plus or minus button to toggle to WiFi On and press the confirm button. 2. WiFi module is switched on and WiFi icon is always on How to deactivate wireless network port: • Navigate to settings > WiFi • If the oven is enrolled and WiFi module is on, display shows WiFi On. 1. Press plus or minus button to toggle to WiFi Off and press the confirm button. 2. WiFi module is switched off and WiFi icon is always off. • If the oven is not enrolled the WiFi module is off and the WiFi icon is off.
Oven enrollment on app ON THE SMARTPHONE Step 1 • Download hOn app
Step 2 • Log in or sign up.
Step 3 • Add new appliance
Step 4 • Scan the QR code or insert the serial number
Write here your serial number for future reference.
ON THE APPLIANCE Step 5 • Scroll the menù and select the option SETTINGS with the button
Recipes Cleaning Settings
Step 6 • In the same way select the option WIFI with the button
Step 7 • OPTION 1: Set the oven on ENROLLMENT EASY with the button and confirm the selection with (the oven will beep)
• OPTION 2: Set the oven on ENROLLMENT STANDARD with the button and confirm the selection with (the oven will beep)
Step 8 • The WIFI icon will blink
Enrollment in progress
NOTE: • Make sure to have minimum a 2.4GHz Home Wi-Fi network. • Make sure to have your Home Wi-Fi password and name ready. You will need them later. • Make sure your appliance is in a place where there is an excellent Home Wi-Fi signal. • And yes, stay close to your appliance.
Remote control mode Step 1 • Scroll the menù and select the option SETTINGS with the button
Recipes Cleaning Settings
Step 2 • From settings menu, select the option Remote Control with the button
Lamp Remote control Wifi
Step 3 • Set the oven on Remote Control ON with the button
Step 4 • confirm the selection with
Remote control active
NOTE: To activate, deactivate or reset the WiFi see info on page EN 4 of this document.
Hereby, Candy Hoover Group Srl declares that the radio equipment is in compliance with Directive 2014/53/EU. The full text of the EU declaration of conformity is available at the following internet address: www.candy-group.com
Recipes Cleaning Settings
Enrollment in progress
Recipes Cleaning Settings
Remote control active
Recipes Cleaning Settings
Enrollment in progress
Recipes Cleaning Settings
Remote control active
Con la presente, Candy Hoover Group Srl dichiara che le apparecchiature radio sono conformi alla Direttiva 2014/53/UE. Il testo completo della dichiarazione di conformità UE è disponibile al seguente indirizzo Internet: www.candy-group.com
EN This leaflet is an integrative part of the user manual of the appliance, keep it together with the user manual.