
ART26LI - String trimmers BOSCH - Free user manual and instructions
Find the device manual for free ART26LI BOSCH in PDF.
Download the instructions for your String trimmers in PDF format for free! Find your manual ART26LI - BOSCH and take your electronic device back in hand. On this page are published all the documents necessary for the use of your device. ART26LI by BOSCH.
USER MANUAL ART26LI BOSCH
d.c. Bosch Power Tools
F016 L70 510 | (15.11.07)
F016 L70 510 | (15.11.07) Bosch Power Tools
F016 L70 510 | (15.11.07) Bosch Power Tools Deutsch | 7 Bosch Power Tools Bosch Power Tools F016 L70 510 | (15.11.07) 10 | Deutsch Dr. Eckerhard Strötgen Head of Product Certification Bosch Power Tools Bosch Power Tools Bosch Power Tools Bosch Power Tools Schneidmesser wechseln
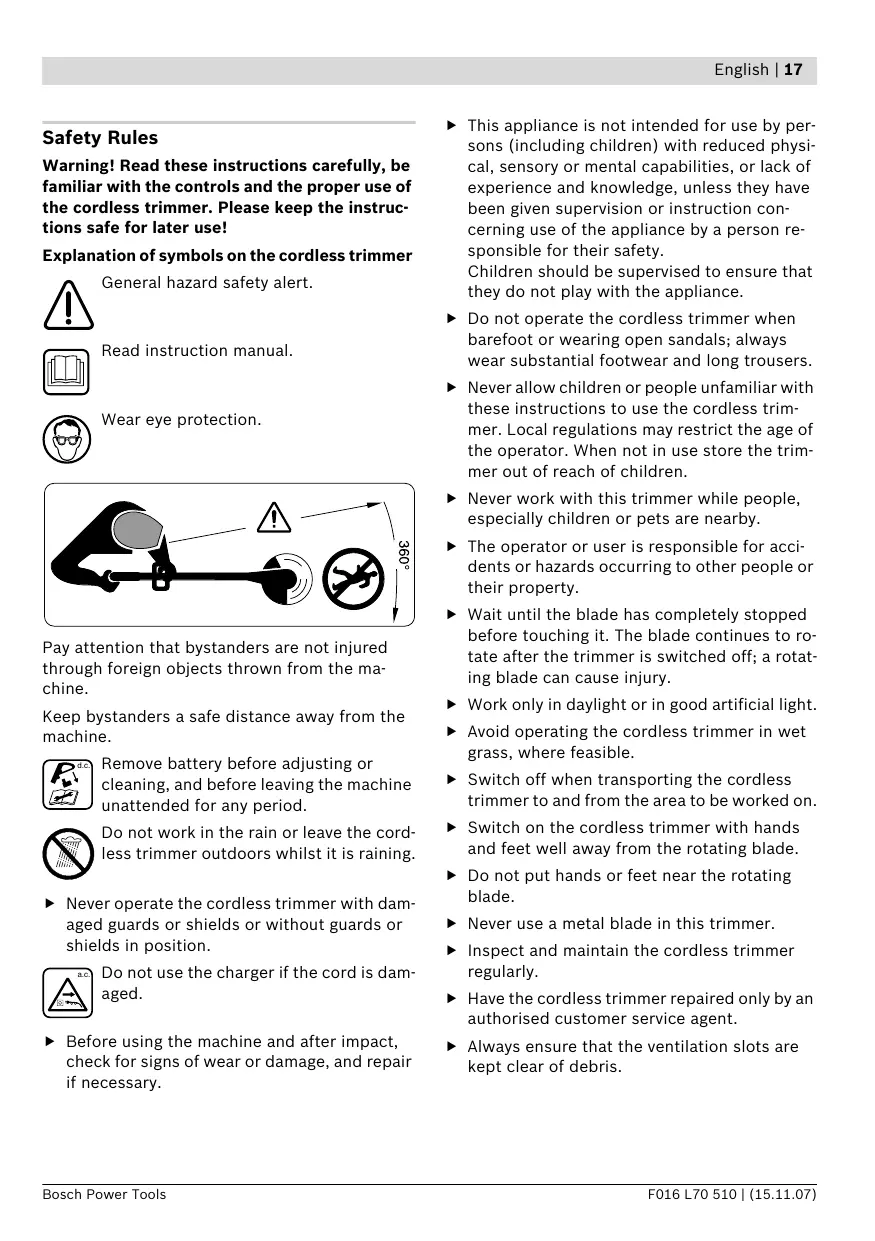
Bosch Power Tools Deutsch | 15 Symptome Mögliche Ursache Abhilfe Bosch Power Tools Bosch Power Tools English | 17 Safety Rules Warning! Read these instructions carefully, be familiar with the controls and the proper use of the cordless trimmer. Please keep the instructions safe for later use! Explanation of symbols on the cordless trimmer General hazard safety alert. Read instruction manual. Wear eye protection. f This appliance is not intended for use by persons (including children) with reduced physical, sensory or mental capabilities, or lack of experience and knowledge, unless they have been given supervision or instruction concerning use of the appliance by a person responsible for their safety. Children should be supervised to ensure that they do not play with the appliance. f Do not operate the cordless trimmer when barefoot or wearing open sandals; always wear substantial footwear and long trousers. f Never allow children or people unfamiliar with these instructions to use the cordless trimmer. Local regulations may restrict the age of the operator. When not in use store the trimmer out of reach of children. f Never work with this trimmer while people, especially children or pets are nearby. f The operator or user is responsible for accidents or hazards occurring to other people or their property. Pay attention that bystanders are not injured through foreign objects thrown from the machine. Keep bystanders a safe distance away from the machine. d.c. Remove battery before adjusting or cleaning, and before leaving the machine unattended for any period. Do not work in the rain or leave the cordless trimmer outdoors whilst it is raining. f Never operate the cordless trimmer with damaged guards or shields or without guards or shields in position. a.c. Do not use the charger if the cord is damaged. f Before using the machine and after impact, check for signs of wear or damage, and repair if necessary. Bosch Power Tools f Wait until the blade has completely stopped before touching it. The blade continues to rotate after the trimmer is switched off; a rotating blade can cause injury. f Work only in daylight or in good artificial light. f Avoid operating the cordless trimmer in wet grass, where feasible. f Switch off when transporting the cordless trimmer to and from the area to be worked on. f Switch on the cordless trimmer with hands and feet well away from the rotating blade. f Do not put hands or feet near the rotating blade. f Never use a metal blade in this trimmer. f Inspect and maintain the cordless trimmer regularly. f Have the cordless trimmer repaired only by an authorised customer service agent. f Always ensure that the ventilation slots are kept clear of debris. F016 L70 510 | (15.11.07) 18 | English f Switch off and remove the battery: - whenever you leave the machine unattended for any period - before replacing the blade - before cleaning or working on the cordless trimmer. Intended Use The machine is intended for the cutting of grass and weeds under bushes, as well as on slopes and edges that can not be reached with the lawn mower. f Store the machine in a secure dry place out of the reach of children. Do not place other objects on top of the machine. Intended use is related to operation within 0 °C and 40 °C ambient temperature. f Replace worn or damaged parts for safety. Delivery Scope f Ensure replacement parts fitted are Bosch approved. Carefully remove the machine from its packaging and check if the following parts are complete: f Ensure the switch is in the off position before inserting battery pack. Inserting the battery pack into machines that have the switch on invites accidents.
f Recharge only with the charger specified by the manufacturer. A charger that is suitable for one type of battery pack may create a risk of fire when used with another battery pack. f Use only battery packs intended specifically for the machine. Use of any other battery packs may create a risk of injury and fire. Cordless trimmer Blade guard Adjustable handle (fitted) Cutting disc Blade Battery Charger Operating instructions When parts are missing or damaged, please contact your dealer. f When battery pack is not in use, keep it away from other metal objects like paper clips, coins, keys, nails, screws, or other small metal objects that can make a connection from one terminal to another. Shorting the battery terminals together may cause burns or a fire. f Under abusive conditions, liquid may be ejected from the battery; avoid contact. If contact accidentally occurs, flush with water. If liquid contacts eyes, additionally seek medical help. Liquid ejected from the battery may cause skin irritation or burns. Functional Description Read all safety warnings and all instructions. Failure to follow the warnings and instructions may result in electric shock, fire and/or serious injury. F016 L70 510 | (15.11.07) Bosch Power Tools English | 19 Product Features The numbering of the components shown refers to the representation of the machine on the graphic pages. 1 On/Off switch 2 Lock-off button for On/Off switch 3 Handle 4 Handle screw 5 Adjustable handle 6 Adjusting collar 7 Shaft 8 Ventilation slots 9 Trimmer head 10 Blade 11 Blade guard 12 Foot pedal for trimmer-head angle adjustment 13 LED indicator 14 Battery charger 15 Battery 16 Cutting disc 17 Pin 18 Plant protector 19 Serial number The accessories illustrated or described are not included as standard delivery. Technical Data Cordless Trimmer ART 23 Li ART 26 Li 3 600 H78 K.. 3 600 H78 L..
Trimmer-head angle adjustment/edging adjustment
Article number No-load speed Cutting diameter Weight according to EPTA-Procedure 01/2003 Serial number rpm See serial number 19 (type plate) on the machine Battery Article number Rated voltage Capacity Charging period (battery discharged)
Battery Charger Article number AL 2204 CV AL 2204 CV
Allowable charging temperature range
0 – 45 0 – 45 Weight according to EPTA-Procedure 01/2003
Bosch Power Tools F016 L70 510 | (15.11.07) 20 | English Noise/Vibration Information Measured values determined according to 2000/14/EG (1.60 m height, 1.0 m clearance) and EN 28 662. Typically the A-weighted noise levels of the product are: Sound pressure level 80 dB(A); Sound power level 88 dB(A). Uncertainty K =5 dB. Wear hearing protection! Assembly Battery Charging Observe correct mains voltage: The voltage of the power source must agree with the voltage specified on the nameplate of the unit. Equipment marked with 230 V can also be connected to 220 V or 240 V. The hand-arm acceleration is typically below
2.5 m/s2.
Use only the charging unit supplied. Only this charging unit is matched to the lithium-ion battery used in the product. Declaration of Conformity The battery is equipped with temperature monitoring that allows charging only in the temperature range between 0 °C and 45 °C. In this manner, a high battery service life is achieved. We declare under our sole responsibility that this product is in conformity with the following standards or standardization documents: EN 786, EN 60 335 according to the provisions of the directives 89/336/EWG, 98/37/EG, 2000/14/EC. 2000/14/EC: The guaranteed sound power level LWA is lower than 94 dB (A). Conformity assessment procedure according to Annex VI. Notified body: SRL, Sudbury England Notified body identifications number: 1088 Note: The battery is supplied partially charged. To ensure full capacity of the battery, completely charge the battery in the battery charger before using your power tool for the first time. The lithium ion battery can be charged at any time without reducing its service life. Interrupting the charging procedure does not damage the battery. Removing the Battery A Dr. Egbert Schneider Senior Vice President Engineering Charging Procedure Dr. Eckerhard Strötgen Head of Product Certification For Your Safety Switch off and remove battery from machine before adjusting or cleaning. The blade continues to rotate for a few seconds after the cordless trimmer is switched off. Caution – do not touch the rotating blade. Press the battery unlocking button and pull out the battery 15 toward the rear. The charging procedure starts as soon as the mains plug is plugged into the socket and the battery is then inserted into the battery charger Firstly, place the battery 15 as shown in the figure onto the front of the battery charger (n) and then press the battery 15 down at the rear (o). To remove the battery, proceed in reverse order. Due to the intelligent charging method, the charging condition of the battery is automatically detected and the battery is charged with the optimum charging current, depending on battery temperature and voltage. This gives longer life to the battery and always leaves it fully charged when kept in the charger for storage. F016 L70 510 | (15.11.07) Bosch Power Tools English | 21 Note: The charging procedure is only possible when the battery temperature is within the allowable charging temperature range, see section “Technical Data”. Flashing Battery Charge Indicator 13 The charging procedure is signalled by a flashing battery charge indicator 13. Continuous Lighting of the Battery Charge Indicator 13 Continuous lighting of the battery charge indicator 13 indicates that the battery is fully charged or that the temperature of the battery is not within the allowable charging temperature range, and cannot be charged for this reason. The battery is charged as soon as the allowable charging temperature range is reached. When the battery is not inserted, continuous lighting of the battery charge indicator 13 indicates that the mains plug is inserted in the socket and that the battery charger is ready for operation. Charging Advice With continuous or several repetitive charging cycles without interruption, the charger can warm up. This is not meaningful and does not indicate a technical defect of the battery charger. A significantly reduced working period after charging indicates that the battery is used and must be replaced. Product Assembly Do not insert the battery until the cordless trimmer is completely assembled. Ensure that the cordless trimmer is assembled in the following order: Mounting the Blade Guard B Place the blade guard 11 on the trimmer head 9. nHook the blade guard onto the trimmer head and push it toward the rear. oPress the blade guard downward until securely latched (click). Mounting the Cutting Disc/Blade C Press the cutting disc 16 onto the drive shaft (click). D Position the blade 10 onto the pin 17, push it down and pull it outward until it engages. Operation Starting Remove stones, loose pieces of wood and other objects from the cutting area. The blade continues to rotate for a few seconds after the cordless trimmer is switched off. Allow the motor/blade to stop rotating before switching “on” again. Do not rapidly switch off and on. The Electronic Cell Protection (ECP) protects the lithium ion battery against deep discharging. When the battery is run down or discharged, the machine is shut off by means of a protective circuit: The blade no longer rotates. Inserting the Battery f Do not continue to press the On/Off switch after an automatic shut-off of the machine. The battery can become damaged. Press the lock-off button 2 and hold while actuating the On/Off switch 1. Bosch Power Tools Insert the battery into the machine as shown. The battery must be felt to engage. Switching On Release the lock-off button 2 again. F016 L70 510 | (15.11.07) 22 | English Switching Off Release the On/Off switch 1. Note: There is a short delay in the motor starting after engaging the on/off switch 1. Adjustment Working Advice Protect the battery from heat, for example, also the continuous exposure to sun radiation and fire. Product will not function if temperature is below 0 °C or above 45 °C! Using the Adjustable Handle E Cutting Grass J The adjustable handle 5 can be set in various positions: Move the cordless trimmer left and right, keeping it well away from the body. nTo change the position, loosen the handle screw 4 and move the adjustable handle 5. The trimmer can efficiently cut grass up to a height of 15 cm. Cut higher grass in stages. oTighten the handle screw 4 securely to fix the adjustable handle 5 in the adjusted position. Trimming Edges Adjusting the Trimmer Length F nTurn the adjusting collar 6 by 90°. oPull the shaft out to increase the height, or push the shaft in to decrease the height. Re-tighten the adjusting collar 6. Guide the cordless trimmer along the edge of the lawn. Avoid contact with paved surfaces, stones or garden walls, as this will wear the blade rapidly. K For better control, use the plant protector 18 (accessory) as a guide. Adjusting the Trimmer-head Angle G Cutting Around Trees and Bushes L To change the cutting angle, press the foot pedal 12 down and move the shaft 7 to the requested position. Carefully cut around trees and bushes so that they do not come into contact with the blade. Plants can die if you damage the bark. Release the foot pedal 12. K For better control, use the plant protector 18 Adjusting for Edging Mode H Adjusting the trimmer-head angle: nPress the foot pedal 12 down. oMove the shaft 7 to the lowest position. Release the foot pedal 12 again. I Moving the trimmer head: (accessory) as a guide. Battery Duration The battery duration is dependent on the working conditions: Light conditions: up to 800 metres (ART 23 Li) up to 1000 metres (ART 26 Li) nLoosen the adjusting collar 6. oTurn the shaft 7 by 90° to adjust the trimmer head 9 for trimming/edging as shown. Re-tighten the adjusting collar 6. Medium conditions: up to 350 metres (ART 23 Li) up to 440 metres (ART 26 Li) Tough conditions: up to 60 metres (ART 23 Li) up to 75 metres (ART 26 Li) F016 L70 510 | (15.11.07) Bosch Power Tools English | 23 Changing the Blade
Before any work on the machine itself, remove the battery from the machine. To remove the worn blade 10, push it inward until it snaps off of the pin 17. Clean the pin 17 of any residual plastic/debris with a sharp knife. To mount a new blade 10, place the blade 10 onto the pin 17, push it down and pull it outward until it engages. Note: Only use Bosch replacement blades. They have been developed specially for improved cutting and feed performance. The use of other blades will lead to a deterioration in performance. Bosch Power Tools F016 L70 510 | (15.11.07) 24 | English Troubleshooting The following chart lists problem symptoms, possible causes and corrective action, if your machine does not operate properly. If these do not identify and correct the problem, contact your service agent.
Warning: Switch the machine off and remove the battery prior to any troubleshooting.
Problem Possible Cause Corrective Action Blade guard can not be mounted Incorrect assembly over cutting disc Remove cutting disc and mount blade guard again; also see "Assembly" Trimmer fails to operate Recharge battery; also see "Battery Charging" Allow to cool/warm Battery discharged Battery too hot/cold Trimmer runs intermittently Internal wiring of machine damaged On/Off switch defective Contact Service Agent Excessive vibrations/noise Machine defective Blade broken Contact Service Agent Replace the blade Cutting time per battery charge too low Battery has not been used for long period or only for short terms Grass too high Battery dead or defective Fully charge battery; also see "Battery Charging" Battery discharged Recharge battery; also see "Battery Charging" Contact Service Agent Blade will not move Machine defective Machine does not cut Blade broken Battery not fully charged Grass entangled around cutting disc Continuous lighting of the batBattery not (properly) inserted tery charge indicator 13 No charging prodedure possible Battery contacts contaminated Battery defective Battery charge indicator 13 does not light up F016 L70 510 | (15.11.07) Mains plug of battery charger not plugged in (properly) Socket outlet, mains cable or battery charger defective Contact Service Agent Cut in stages Replace the battery Replace the blade Recharge battery; also see "Battery Charging" Remove grass Properly insert battery into battery charger Clean the battery contacts (e.g. by inserting and removing the battery several times) or replace the battery Replace the battery Insert mains plug (fully) into the socket outlet Check the mains voltage; have the battery charger checked by an authorised after-sales service agent for Bosch power tools Bosch Power Tools English | 25 Maintenance and Service Maintenance and Cleaning Before any work on the machine itself, remove the battery from the machine. Note: To ensure long and reliable service, carry out the following maintenance regularly. Regularly check for obvious defects such as loose fixings, and worn or damaged components. Check that covers and guards are undamaged and correctly fitted. Carry out necessary maintenance or repairs before using. If the machine should happen to fail despite the care taken in manufacture and testing, repair should be carried out by an authorised customer service agent for Bosch garden products. In all correspondence and spare parts order, please always include the 10-digit article number given on the type plate of the machine. After Trimming/Storage Switch the machine off and remove the battery. Ensure battery is removed before storage. Clean the exterior of the machine thoroughly using a soft brush and cloth. Do not use water, solvents or polishes. Remove all grass and debris, especially from the ventilation slots 8. Turn the machine on its side and clean the cutting guard 11 inside. If grass cuttings are compacted, remove with a wooden or plastic implement. Check if guards and protective devices are undamaged and properly mounted. Before using, carry out possibly necessary maintenance and repairs. The battery should be stored between 0 °C and 45 °C. Bosch Power Tools After-sales service and customer assistance Our after-sales service responds to your questions concerning maintenance and repair of your product as well as spare parts. Exploded views and information on spare parts can also be found under: www.bosch-pt.com Our customer consultants answer your questions concerning best buy, application and adjustment of products and accessories. Great Britain Robert Bosch Ltd. (B.S.C.) P.O. Box 98 Broadwater Park North Orbital Road Denham Uxbridge UB 9 5HJ Tel. Service: +44 (0844) 736 0109 Fax: +44 (0844) 736 0146 E-Mail: SPT-Technical.de@de.bosch.com Ireland Origo Ltd. Unit 23 Magna Drive Magna Business Park City West Dublin 24 Tel. Service: +353 (01) 4 66 67 00 Fax: +353 (01) 4 66 68 88 Australia, New Zealand and Pacific Islands Robert Bosch Australia Pty. Ltd. Power Tools Locked Bag 66 Clayton South VIC 3169 Customer Contact Center Inside Australia: Phone: +61 (01300) 307 044 Fax: + 61 (01300) 307 045 Inside New Zealand: Phone: +64 (0800) 543 353 Fax: +64 (0800) 428 570 Outside AU and NZ: Phone: +61 (03) 9541 5555 www.bosch.com.au F016 L70 510 | (15.11.07) 26 | English Transport The battery is tested according to UN document ST/SG/AC.10/11/Rev.3 Part III, subsection 38.3. It has effective protection against internal overpressure and short circuiting as well as devices for the prevention of violent rupture and dangerous reverse current flow. The lithium-equivalent content in the battery is below applicable limit values. Therefore, the battery is not subject to national or international regulations pertaining to dangerous mediums, neither as an individual component nor when inserted into a machine. However, the regulations governing dangerous goods may be relevant when transporting several batteries. In this case, it can be necessary to comply with special conditions (e.g., concerning the packaging). For more information, please refer to the instruction sheet (in English) under the following Internet address: http://purchasing.bosch.com/en/start/ Allgemeines/Download/index.htm. Only for EC countries: Defective or dead out battery packs/batteries must be recycled according the guideline 91/157/EEC. Batteries no longer suitable for use can be directly returned at: Great Britain Robert Bosch Ltd. (B.S.C.) P.O. Box 98 Broadwater Park North Orbital Road Denham Uxbridge UB 9 5HJ Tel. Service: +44 (0844) 736 0109 Fax: +44 (0844) 736 0146 E-Mail: SPT-Technical.de@de.bosch.com Subject to change without notice. Disposal The machine, accessories and packaging should be sorted for environmental-friendly recycling. Only for EC countries: Do not dispose of power tools into household waste! According the European Guideline 2002/96/EC for Waste Electrical and Electronic Equipment and its implementation into national right, power tools that are no longer usable must be collected separately and disposed of in an environmentally correct manner. Battery packs/batteries: Li-ion: Please observe the instructions in section “Transport”, page 26. Do not dispose of battery packs/batteries into household waste, fire or water. Battery packs/batteries should be collected, recycled or disposed of in an environmental-friendly manner. F016 L70 510 | (15.11.07) Bosch Power Tools Français | 27 Bosch Power Tools a.c. Bosch Power Tools Bosch Power Tools F016 L70 510 | (15.11.07) 30 | Français Dr. Eckerhard Strötgen Head of Product Certification Bosch Power Tools Bosch Power Tools F016 L70 510 | (15.11.07) 32 | Français Bosch Power Tools Bosch Power Tools F016 L70 510 | (15.11.07) 34 | Français Bosch Power Tools Français | 35 Problème Cause possible Remède Bosch Power Tools Bosch Power Tools Bosch Power Tools Español | 40 Dr. Eckerhard Strötgen Head of Product Certification Bosch Power Tools Bosch Power Tools F016 L70 510 | (15.11.07) Bosch Power Tools Español | 44 Síntomas Posible causa Solución Bosch Power Tools Bosch Power Tools Español | 46 Bosch Power Tools F016 L70 510 | (15.11.07) Português | 47 Bosch Power Tools F016 L70 510 | (15.11.07) Bosch Power Tools Bosch Power Tools F016 L70 510 | (15.11.07) 50 | Português Dr. Eckerhard Strötgen Head of Product Certification Bosch Power Tools Bosch Power Tools Bosch Power Tools Bosch Power Tools F016 L70 510 | (15.11.07) 54 | Português Remover a relva Bosch Power Tools Português | 55 Sintomas Possível causa Solução Bosch Power Tools Italiano | 57 Bosch Power Tools Bosch Power Tools Italiano | 59 Bosch Power Tools F016 L70 510 | (15.11.07) 60 | Italiano Bosch Power Tools Italiano | 61 Dr. Eckerhard Strötgen Head of Product Certification Bosch Power Tools F016 L70 510 | (15.11.07) Bosch Power Tools Italiano | 63 Bosch Power Tools Bosch Power Tools Italiano | 65 Bosch Power Tools F016 L70 510 | (15.11.07) 66 | Italiano Problema Possibili cause Rimedi Bosch Power Tools Italiano | 67 Bosch Power Tools F016 L70 510 | (15.11.07) Bosch Power Tools Nederlands | 69 Bosch Power Tools Bosch Power Tools Nederlands | 71 Bosch Power Tools F016 L70 510 | (15.11.07) 72 | Nederlands Dr. Egbert Schneider Senior Vice President Engineering Opladen Dr. Eckerhard Strötgen Head of Product Certification Bosch Power Tools Bosch Power Tools Bosch Power Tools Bosch Power Tools Snijmes vervangen
Bosch Power Tools Nederlands | 77 Symptomen Mogelijke oorzaak Oplossing Bosch Power Tools Bosch Power Tools Dansk | 79 Bosch Power Tools Bosch Power Tools Dansk | 81 Bosch Power Tools F016 L70 510 | (15.11.07) 82 | Dansk Støj-/vibrationsinformation Montering Dr. Eckerhard Strötgen Head of Product Certification Bosch Power Tools Bosch Power Tools Dansk | 85 Bosch Power Tools Bosch Power Tools Dansk | 87 Bosch Power Tools F016 L70 510 | (15.11.07) 88 | Svenska Bosch Power Tools Bosch Power Tools F016 L70 510 | (15.11.07) 90 | Svenska Bosch Power Tools Svenska | 91 Buller-/vibrationsdata Montage Dr. Egbert Schneider Senior Vice President Engineering Laddning Dr. Eckerhard Strötgen Head of Product Certification Bosch Power Tools Bosch Power Tools Svenska | 93 Bosch Power Tools F016 L70 510 | (15.11.07) 94 | Svenska Bosch Power Tools Svenska | 95 Symptom Möjlig orsak Åtgärd Bosch Power Tools F016 L70 510 | (15.11.07) 96 | Svenska Transport Avfallshantering Bosch Power Tools Norsk | 97 Bosch Power Tools Bosch Power Tools Norsk | 99 Bosch Power Tools F016 L70 510 | (15.11.07) 100 | Norsk Støy-/vibrasjonsinformasjon Montering Dr. Egbert Schneider Senior Vice President Engineering Opplading Dr. Eckerhard Strötgen Head of Product Certification Bosch Power Tools Bosch Power Tools Norsk | 103 Bosch Power Tools F016 L70 510 | (15.11.07) 104 | Norsk Symptomer Mulig årsak Utbedring Bosch Power Tools Norsk | 105 Transport Deponering Bosch Power Tools F016 L70 510 | (15.11.07) 106 | Suomi Bosch Power Tools Bosch Power Tools F016 L70 510 | (15.11.07) 108 | Suomi Bosch Power Tools Suomi | 109 Asennus Dr. Egbert Schneider Senior Vice President Engineering Dr. Eckerhard Strötgen Head of Product Certification Bosch Power Tools Bosch Power Tools Bosch Power Tools F016 L70 510 | (15.11.07) 112 | Suomi Bosch Power Tools Suomi | 113 Vian oire Mahdolliset vikalähteet Korjaus Bosch Power Tools F016 L70 510 | (15.11.07) 114 | Suomi Kuljetus Hävitys Bosch Power Tools Eλληνικά | 115 Bosch Power Tools F016 L70 510 | (15.11.07) Bosch Power Tools Eλληνικά | 117 Bosch Power Tools F016 L70 510 | (15.11.07) 118 | Eλληνικά Bosch Power Tools Eλληνικά | 119 Dr. Eckerhard Strötgen Head of Product Certification Bosch Power Tools F016 L70 510 | (15.11.07) Bosch Power Tools Bosch Power Tools F016 L70 510 | (15.11.07) Bosch Power Tools Eλληνικά | 123
Ισχυροί κραδασμοί/θόρυβοι Bosch Power Tools F016 L70 510 | (15.11.07) 124 | Eλληνικά Bosch Power Tools Eλληνικά | 125
Bosch Power Tools F016 L70 510 | (15.11.07) Türkçe | 126 Bosch Power Tools F016 L70 510 | (15.11.07) Bosch Power Tools Bosch Power Tools F016 L70 510 | (15.11.07) 129 | Türkçe Dr. Egbert Schneider Senior Vice President Engineering Dr. Eckerhard Strötgen Head of Product Certification Bosch Power Tools Bosch Power Tools Bosch Power Tools Türkçe | 132 Bosch Power Tools F016 L70 510 | (15.11.07) 133 | Türkçe Hata göstergesi Olas neden Giderilme yolu Bosch Power Tools Türkçe | 134 Bosch Power Tools Bosch Power Tools Bosch Power Tools Polski | 137 Zakres dostawy Bosch Power Tools F016 L70 510 | (15.11.07) 138 | Polski Bosch Power Tools Polski | 139 Dr Eckerhard Strötgen Head of Product Certification Bosch Power Tools Polski | 141 Bosch Power Tools Polski | 143 Bosch Power Tools Bosch Power Tools Polski | 145 Bosch Power Tools Bosch Power Tools Bosch Power Tools Bosch Power Tools Česky | 149 Dr. Eckerhard Strötgen Head of Product Certification Bosch Power Tools Bosch Power Tools Česky | 151 Bosch Power Tools Česky | 153 Příznaky Možná příčina Náprava Bosch Power Tools F016 L70 510 | (15.11.07) 154 | Česky Bosch Power Tools Slovensky | 155 Bosch Power Tools Bosch Power Tools Slovensky | 157 Bosch Power Tools F016 L70 510 | (15.11.07) 158 | Slovensky Bosch Power Tools Dr. Egbert Schneider Senior Vice President Engineering Dr. Eckerhard Strötgen Head of Product Certification Bosch Power Tools Bosch Power Tools Bosch Power Tools Bosch Power Tools Slovensky | 163 Symptómy Možná príčina Odstránenie príčiny Bosch Power Tools Magyar | 165 Bosch Power Tools Bosch Power Tools Magyar | 167 Szállítmány tartalma Bosch Power Tools F016 L70 510 | (15.11.07) 168 | Magyar Bosch Power Tools Dr. Egbert Schneider Senior Vice President Engineering Dr. Eckerhard Strötgen Head of Product Certification Bosch Power Tools F016 L70 510 | (15.11.07) Bosch Power Tools Bosch Power Tools Magyar | 173 Tünetek Lehetséges ok Elhárítás módja Bosch Power Tools Bosch Power Tools F016 L70 510 | (15.11.07) 176 | Русский Bosch Power Tools Bosch Power Tools Bosch Power Tools Русский | 179 Bosch Power Tools F016 L70 510 | (15.11.07) Dr. Eckerhard Strötgen Head of Product Certification Bosch Power Tools Bosch Power Tools F016 L70 510 | (15.11.07) Bosch Power Tools Bosch Power Tools Bosch Power Tools Русский | 185
Bosch Power Tools Bosch Power Tools Русский | 187 Bosch Power Tools F016 L70 510 | (15.11.07) 188 | Українська Bosch Power Tools Bosch Power Tools Bosch Power Tools Українська | 191 Bosch Power Tools F016 L70 510 | (15.11.07) Dr. Eckerhard Strötgen Head of Product Certification Bosch Power Tools Bosch Power Tools F016 L70 510 | (15.11.07) 194 | Українська (ART 23 Li) (ART 26 Li) (ART 23 Li) (ART 26 Li) Bosch Power Tools Українська | 195 Заміна ножа
Bosch Power Tools F016 L70 510 | (15.11.07) 196 | Українська
Прилад не ріже Ніж зламався Замініть ніж Bosch Power Tools Українська | 197 Bosch Power Tools Bosch Power Tools Românã | 199 Bosch Power Tools Bosch Power Tools Greutate conform EPTA-Procedure 01/2003
0,7 0,7 Bosch Power Tools F016 L70 510 | (15.11.07) 202 | Românã Dr. Eckerhard Strötgen Head of Product Certification Bosch Power Tools Bosch Power Tools Bosch Power Tools Bosch Power Tools Bosch Power Tools Românã | 207 Simptome Cauză posibilă Remediere Bosch Power Tools Bosch Power Tools Български | 209 Bosch Power Tools Bosch Power Tools Български | 211 Bosch Power Tools F016 L70 510 | (15.11.07) 212 | Български Bosch Power Tools Dr. Eckerhard Strötgen Head of Product Certification Bosch Power Tools Bosch Power Tools Bosch Power Tools Bosch Power Tools Български | 217 Bosch Power Tools Bosch Power Tools Български | 219 Bosch Power Tools Bosch Power Tools Srpski | 221 Bosch Power Tools F016 L70 510 | (15.11.07) Bosch Power Tools Bosch Power Tools F016 L70 510 | (15.11.07) 224 | Srpski Dr. Egbert Schneider Senior Vice President Engineering Postupak punjenja Dr. Eckerhard Strötgen Head of Product Certification Bosch Power Tools Bosch Power Tools F016 L70 510 | (15.11.07) Bosch Power Tools Bosch Power Tools (ART 23 Li) (ART 26 Li) (ART 23 Li) (ART 26 Li) Bosch Power Tools Srpski | 229 Simptomi Mogući uzroci Pomoć Bosch Power Tools F016 L70 510 | (15.11.07) Srpski | 230 Bosch Power Tools Bosch Power Tools F016 L70 510 | (15.11.07) Bosch Power Tools Slovensko | 233 Teža po EPTA-Procedure 01/2003
0,7 0,7 Bosch Power Tools F016 L70 510 | (15.11.07) 234 | Slovensko Dr. Eckerhard Strötgen Head of Product Certification (ART 23 Li) (ART 26 Li) Bosch Power Tools Slovensko | 237 Zamenjava noža
Bosch Power Tools F016 L70 510 | (15.11.07) 238 | Slovensko Simptomi Možen vzrok Pomoč Bosch Power Tools Slovensko | 239 Bosch Power Tools Bosch Power Tools Bosch Power Tools F016 L70 510 | (15.11.07) 242 | Hrvatski Bosch Power Tools Hrvatski | 243 Dr. Eckerhard Strötgen Head of Product Certification Bosch Power Tools Bosch Power Tools Bosch Power Tools F016 L70 510 | (15.11.07) (ART 23 Li) (ART 26 Li) (ART 23 Li) (ART 26 Li) Bosch Power Tools F016 L70 510 | (15.11.07) 248 | Hrvatski Bosch Power Tools Eesti | 249 Bosch Power Tools Bosch Power Tools Eesti | 251 Bosch Power Tools F016 L70 510 | (15.11.07) 252 | Eesti Dr. Egbert Schneider Senior Vice President Engineering Dr. Eckerhard Strötgen Head of Product Certification Bosch Power Tools Bosch Power Tools Eesti | 255 Seade on defektne Pöörduge remonditöökotta Seade on defektne Pöörduge remonditöökotta Aku on defektne Bosch Power Tools F016 L70 510 | (15.11.07) 256 | Eesti Tunnused Võimalik põhjus Kõrvaldamine Bosch Power Tools Eesti | 257 Bosch Power Tools F016 L70 510 | (15.11.07) 258 | Latviešu Bosch Power Tools Bosch Power Tools F016 L70 510 | (15.11.07) 260 | Latviešu Piegādes komplekts Attēlotās sastāvdaļas Bosch Power Tools Latviešu | 261 Bosch Power Tools F016 L70 510 | (15.11.07) 262 | Latviešu Dr. Eckerhard Strötgen Head of Product Certification Bosch Power Tools Bosch Power Tools F016 L70 510 | (15.11.07) 264 | Latviešu Lietošana Bosch Power Tools Bosch Power Tools F016 L70 510 | (15.11.07) 266 | Latviešu Bosch Power Tools Latviešu | 267 Simptomi Iespējamais cēlonis Novēršana Bosch Power Tools F016 L70 510 | (15.11.07) Bosch Power Tools Lietuviðkai | 269 Bosch Power Tools Lietuviðkai | 271 Bosch Power Tools F016 L70 510 | (15.11.07) 272 | Lietuviðkai Dr. Eckerhard Strötgen Head of Product Certification Bosch Power Tools Bosch Power Tools Bosch Power Tools Bosch Power Tools Bosch Power Tools Lietuviðkai | 277 Požymiai Galima priežastis Pašalinimas Bosch Power Tools F016 L70 510 | (15.11.07) 278 | Lietuviðkai Transportavimas Sunaikinimas Bosch Power Tools