
FIM 53 KA IX - Built-in oven INDESIT - Free user manual and instructions
Find the device manual for free FIM 53 KA IX INDESIT in PDF.
| Product type | Built-in oven |
| Brand | INDESIT |
| Model | FIM 53 KA IX |
| Dimensions (W x H x D) - Stamped rail version | 43.5 x 32.4 x 40.6 cm |
| Dimensions (W x H x D) - Wire rail version | 45.5 x 32.4 x 40.6 cm |
| Volume - Stamped rail version | 58 L |
| Volume - Wire rail version | 60 L |
| Power supply | 220-240 V ~ 50/60 Hz |
| Maximum power consumption | 2250 W |
| Programmer type | Electronic with digital display |
| Cooking functions | Traditional, Multi-cooking, Top heat, Grill, Gratin |
| Temperature range | 60 °C to MAX (grill recommended MAX, gratin max 200 °C) |
| Timer | Independent, audible, programmable |
| Cooking programming | Duration and end of cooking |
| Interior light | 25 W bulb, E14 base |
| Shelf levels | 5 levels |
| Included accessories | Grid, drip tray, rails |
| Cleaning | Removable door, manual cleaning without abrasives |
| Safety | Grid stop system, cooling ventilation, child safety |
| Installation | Built-in, electrical connection by professional |
| Country of manufacture | Not specified |
| Repairability | Spare parts available, intervention by approved technician |
Frequently Asked Questions - FIM 53 KA IX INDESIT
User questions about FIM 53 KA IX INDESIT
0 question about this device. Answer the ones you know or ask your own.
Ask a new question about this device
Download the instructions for your Built-in oven in PDF format for free! Find your manual FIM 53 KA IX - INDESIT and take your electronic device back in hand. On this page are published all the documents necessary for the use of your device. FIM 53 KA IX by INDESIT.
USER MANUAL FIM 53 KA IX INDESIT
Operating Instructions
OVEN
Contents
Operating Instructions,1
Warnings,3
Assistance,8
Description of the appliance,10
Description of the appliance,12
Installation,21
Start-up and use,23
Cooking modes,23
The electronic programmer*,25
Precautions and tips,26
Maintenance and care,26
FR
Français
Mode d'emploi
FOUR
Sommaire
Mode d'emploi,1
Avertissements,4
Assistance,8
WARNING: The appliance and its accessible parts become hot during use. Care should be taken to avoid touching heating elements. Children less than 8 years of age shall be kept away unless continuously supervised. This appliance can be used by children aged from 8 years and above and persons with reduced physical, sensory or mental capabilities or lack of experience and knowledge if they have been given supervision or instruction concerning use of the appliance in a safe way and understand the hazards involved. Children shall not play with the appliance. Cleaning and user maintenance shall not be made by children without supervision.
Do not use harsh abrasive cleaners or sharp metal scrapers to clean the oven door glass since they can scratch the surface, which may result in shattering of the glass.
Never use steam cleaners or pressure cleaners on the appliance.
WARNING: Ensure that the appliance is switched off before replacing the lamp to avoid the possibility of electric shock.
! When you place the rack inside, make sure that the stop is directed upwards and in the back of the cavity.
FR
Avertissements
! Never use the services of an unauthorised technician.
Please have the following information to hand:
The type of problem encountered.
The appliance model (Mod.).
The serial number (S/N).
The latter two pieces of information can be found on the data plate located on the appliance.
FR
Assistance
! He 3BepTaIeCra no donomory do He ynoBHOBaKeHOro nepcoHaNo.
Повдомити:
Tin HecnpaBHOCTi;
- MoD'enb npuanay (Mod.)
CepiHnH Homep (S/N)
Li dahi 3haoqTbcra Ha Tabnuci 3 daHIMn Ha camomy npinapdi.
IT
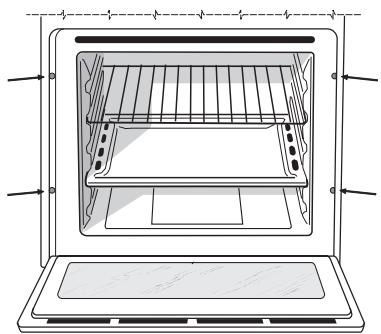
Description of the appliance
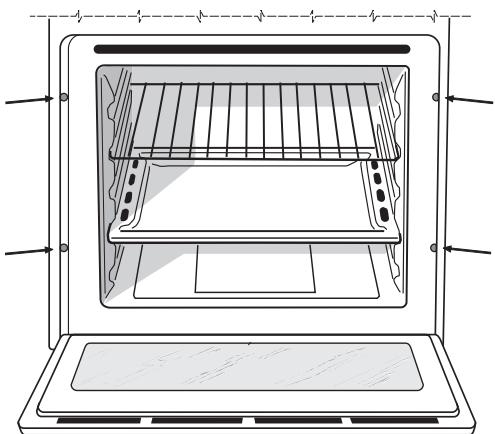
Overall view
1 POSITION 1
2 POSITION 2
3 POSITION 3
4 POSITION 4
5 POSITION 5
6 GUIDES for the sliding racks
7 DRIPPING PAN
8 GRILL
9 Control panel
FR
Description of the appliance
Control panel
1 SELECTOR knob
2 TIMER knob
3 THERMOSTAT knob
4 THERMOSTAT indicator light
5 ELECTRONIC programmer
- Only available in certain models.
FR
! Please keep this instruction booklet in a safe place for future reference. If the appliance is sold, given away or moved, please make sure the booklet is also passed on to the new owners so that they may benefit from the advice contained within it.
! Please read this instruction manual carefully: it contains important information concerning the safe operation, installation and maintenance of the appliance.
Positioning
! Do not let children play with the packaging material; it should be disposed of in accordance with local separated waste collection standards (see Precautions and tips).
!The appliance must be installed by a qualified professional in accordance with the instructions provided. Incorrect installation may damage property or cause harm to people or animals.
Built-in appliances
Use an appropriate cabinet to ensure that the appliance operates properly:
- The panels adjacent to the oven must be made of heat-resistant material.
- Cabinets with a veneer exterior must be assembled with glues which can withstand temperatures of up to 100^ .
- To install the oven under the counter (see diagram) or in a kitchen unit, the cabinet must have the following dimensions:
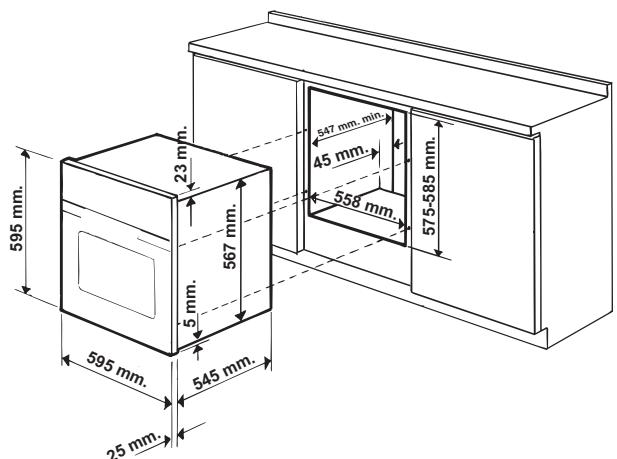
* Stainless steel models only
The appliance must not come into contact with electrical parts once it has been installed.
The indications for consumption given on the data plate have been calculated for this type of installation.
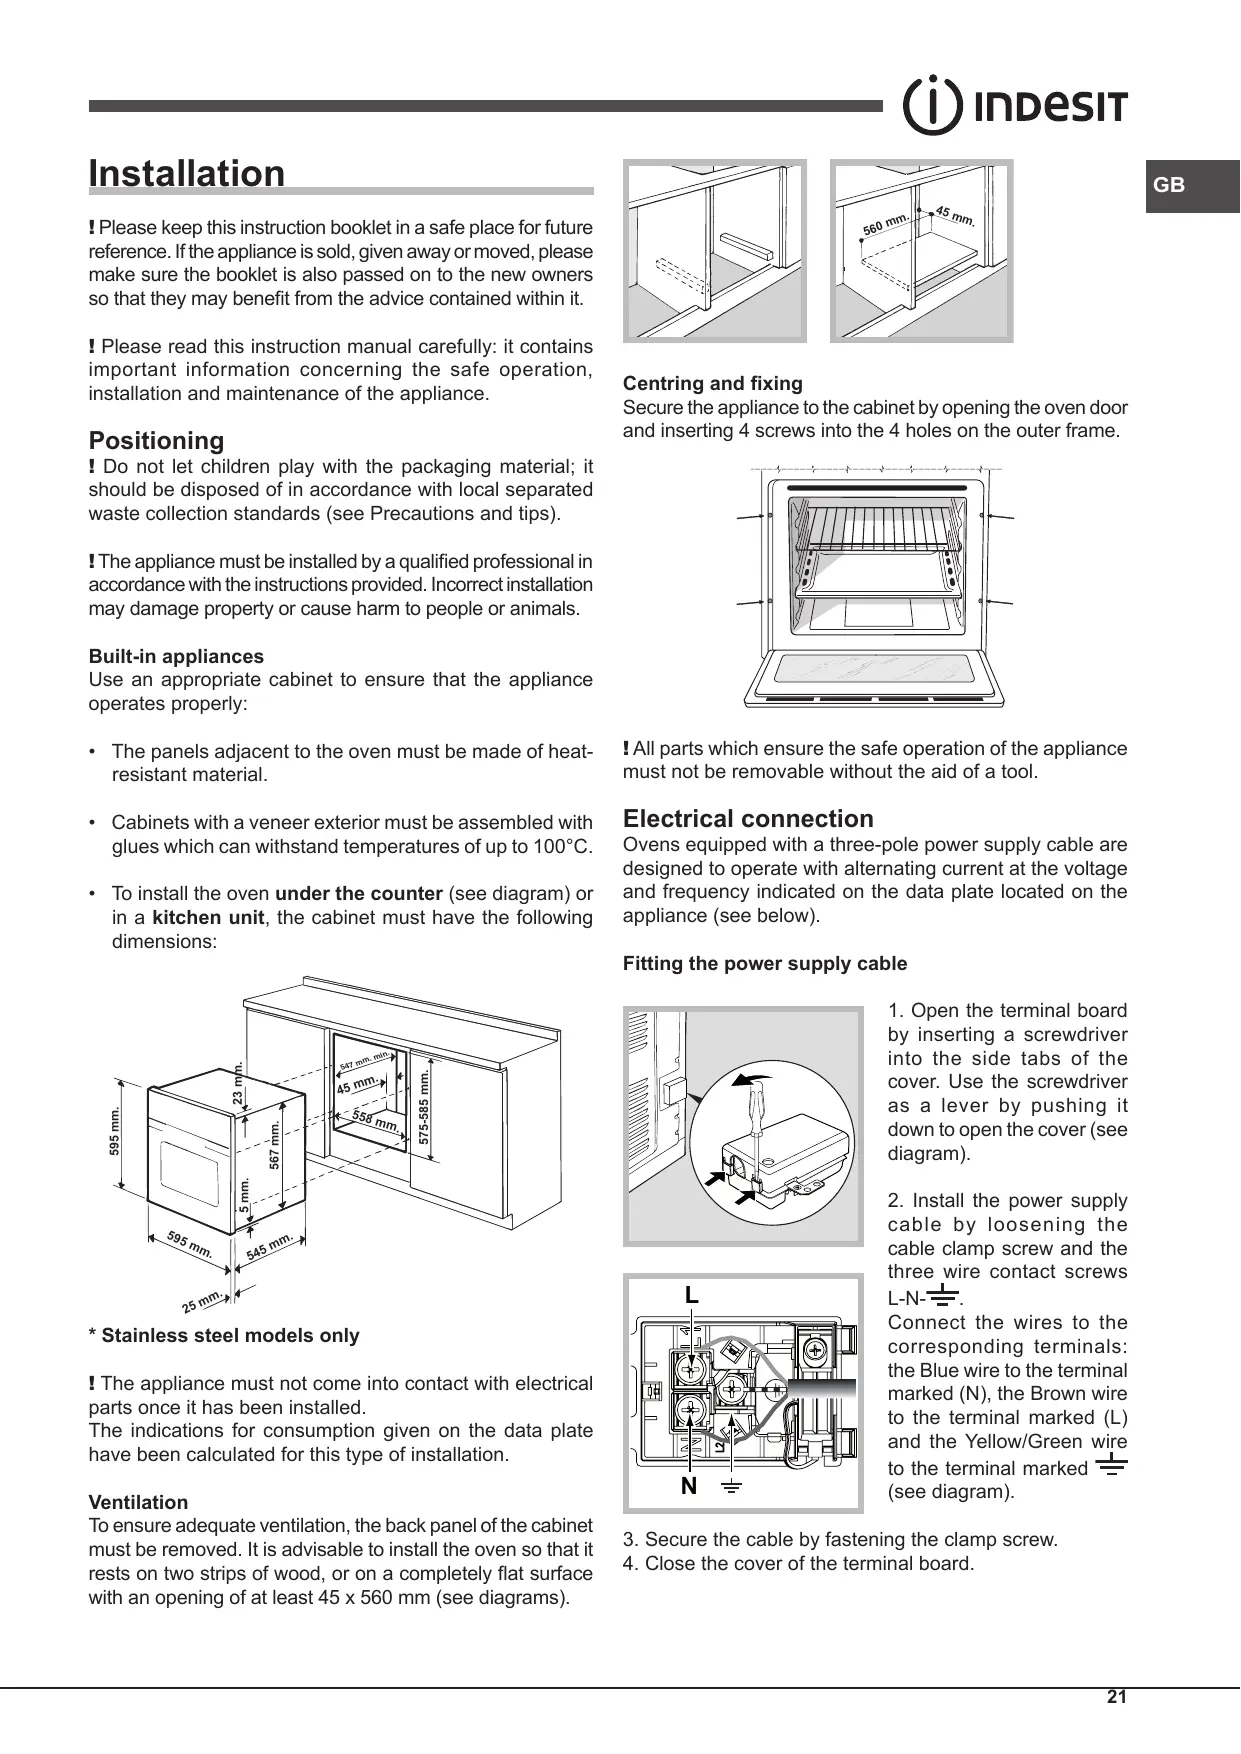
Ventilation
To ensure adequate ventilation, the back panel of the cabinet must be removed. It is advisable to install the oven so that it rests on two strips of wood, or on a completely flat surface with an opening of at least 45 × 560 ~mm (see diagrams).
Centring and fixing
Secure the appliance to the cabinet by opening the oven door and inserting 4 screws into the 4 holes on the outer frame.
!All parts which ensure the safe operation of the appliance must not be removable without the aid of a tool.
Electrical connection
Ovens equipped with a three-pole power supply cable are designed to operate with alternating current at the voltage and frequency indicated on the data plate located on the appliance (see below).
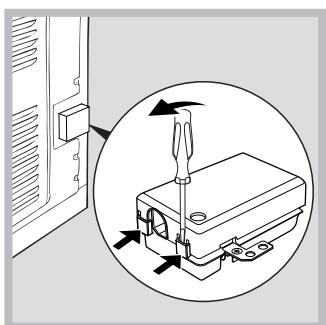
Fitting the power supply cable
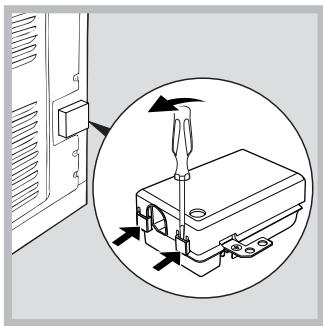
- Open the terminal board by inserting a screwdriver into the side tabs of the cover. Use the screwdriver as a lever by pushing it down to open the cover (see diagram).
- Install the power supply cable by loosening the cable clamp screw and the three wire contact screws L-N-
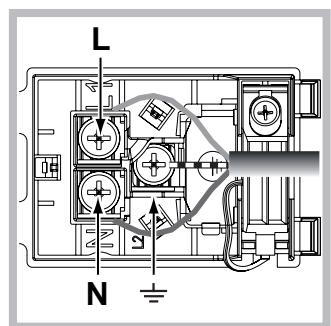
Connect the wires to the corresponding terminals: the Blue wire to the terminal marked (N), the Brown wire to the terminal marked (L) and the Yellow/Green wire to the terminal marked 1一 (see diagram).
- Secure the cable by fastening the clamp screw.
- Close the cover of the terminal board.
Connecting the supply cable to the mains
Install a standardised plug corresponding to the load indicated on the data plate (see table).
The appliance must be directly connected to the mains using an omnipolar switch with a minimum contact opening of 3 mm installed between the appliance and the mains. The switch must be suitable for the charge indicated and must comply with current electrical regulations (the earthing wire must not be interrupted by the switch). The supply cable must be positioned so that it does not come into contact with temperatures higher than 50^ at any point (the back panel of the oven, for example).
! The installer must ensure that the correct electrical connection has been performed and that it is fully compliant with safety regulations.
Before connecting the appliance to the power supply, make sure that
- The appliance is earthed and the plug is compliant with the law.
- The socket can withstand the maximum power of the appliance, which is indicated on the data plate.
- The voltage is in the range between the values indicated on the data plate.
- The socket is compatible with the plug of the appliance. If the socket is incompatible with the plug, ask an authorised technician to replace it. Do not use extension cords or multiple sockets.
! Once the appliance has been installed, the power supply cable and the electrical socket must be easily accessible.
! The cable must not be bent or compressed.
! The cable must be checked regularly and replaced by authorised technicians only (see Assistance).
! The manufacturer declines any liability should these safety measures not be observed.
| APPLIANCE SPECIFICATIONS | |
| Dimensions* | width 43.5 cm height 32,4 cm depth 40.6 cm |
| Volume* | 58 l |
| Dimensions** | width 45.5 cm height 32,4 cm depth 40.6 cm |
| Volume** | 60 l |
| Electrical connections | Voltage: 220 - 240 V~ 50/60 Hz (see data plate) maximum power absorbed 2250 W |
| ENERGY LABEL | Directive 2002/40/EC on the label of electric ovens. Standard EN 50304 Models with cooling ventilation: Energy consumption for Natural convection heating mode: Convection Declared energy consumption for Forced convection Class heating mode: Multi-cooking Models without cooling ventilation Energy consumption for Forced convection heating mode: Multi-cooking Declared energy consumption for Natural convection Class heating mode: Convection |
| CE | This appliance conforms to the following European Economic Community directives: - 2006/95/EEC dated 12/12/06 (Low Voltage) and subsequent amendments. - 2004/108/EEC dated 03/05/89 (Electromagnetic Compatibility) and subsequent amendments. - 93/68/EEC dated 22/07/93 and subsequent amendments. - 2012/19/EC and subsequent amendments. |
- Only for models with drawn rails.
** Only for models with wire rails.
Start-up and use
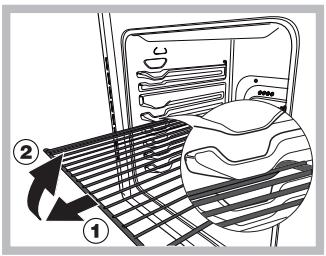
WARNING! The oven is provided with a stop system to extract the racks and prevent them from coming out of the oven (1).
As shown in the drawing, to extract them completely, simply lift the racks, holding them on the front part, and
pull (2).
! The first time you use your appliance, heat the empty oven with its door closed at its maximum temperature for at least half an hour. Ensure that the room is well ventilated before switching the oven off and opening the oven door. The appliance may emit a slightly unpleasant odour caused by protective substances used during the manufacturing process burning away.
Setting the clock
- Select the desired cooking mode by turning the SELECTOR knob.
- Select the desired temperature using the THERMOSTAT knob. A list detailing cooking modes and suggested cooking temperatures can be found in the Cooking advice table (see Cooking modes).
- The THERMOSTAT indicator light indicates that the oven is heating up to the temperature set.
-
During cooking it is always possible to:
-
change the cooking mode by turning the SELECTOR knob;
- adjust the temperature by turning the THERMOSTAT knob;
- stop cooking by turning the SELECTOR knob to the "0" position.
! Never put objects directly on the bottom of the oven; this will prevent the enamel coating from being damaged.
! Always place cookware on the rack(s) provided.
Cooling ventilation
In order to cool down the external temperature of the oven, a cooling fan blows a stream of air between the control panel and the oven door, as well as towards the bottom of the oven door.
! Once cooking has been completed, the cooling fan continues to operate until the oven has cooled down sufficiently.
Oven light
When selecting with the SELECTOR knob the oven light goes on. It remains lit when a cooking mode is selected.
How to use the timer*
- To set the buzzer, turn the TIMER knob clockwise almost one complete revolution.
-
Turn the knob anticlockwise to set the desired time: align the minutes shown on the TIMER knob with the indicator on the control panel.
-
The timer operates in minutes: when the selected time has elapsed, a buzzer will sound.
! The timer does not turn the oven on or off.
Cooking modes
Cooking modes
! A temperature value between 60^ and MAX can be set for all cooking modes except the following:
- GRILL (recommended: set only to MAX power level)
- GRATIN (recommended: do not exceed 200^ ).

TRADITIONAL OVEN mode
Both the top and bottom heating elements will come on. When using this traditional cooking mode, it is best to use one cooking rack only. If more than one rack is used, the heat will be distributed unevenly.

MULTILEVEL mode
All the heating elements (top, bottom and circular) switch on and the fan begins to operate. Since the heat remains constant throughout the oven, the air cooks and browns food in a uniform manner. A maximum of two racks may be used at the same time.

TOP OVEN mode
The top heating element comes on. This mode can be used to brown food at the end of cooking.

GRILL mode
The top heating element comes on. The extremely high and direct temperature of the grill makes it possible to brown the surface of meats and roasts while locking in the juices to keep them tender. The grill is also highly recommended for dishes that require a high temperature on the surface: such as beef steaks, veal, rib steak, filets, hamburgers etc... Some grilling examples are included in the "Practical Cooking Advice" paragraph. Always cook in this mode with the oven door closed.

GRATIN mode
The top heating element, as well as the fan, will come on. This combination of features increases the effectiveness of the unidirectional thermal radiation provided by the heating elements through forced circulation of the air throughout the oven. This helps prevent food from burning on the surface and allows the heat to penetrate right into the food. Always cook in this mode with the oven door closed.
- Only available in certain models.
Practical cooking advice
! Do not place racks in position 1 and 5 during fan-assisted cooking. This is because excessive direct heat can burn temperature sensitive foods.
! In the GRILL and GRATIN cooking modes, particularly when using the rotisserie spit, place the dripping pan in position 1 to collect cooking residues (fat and/or grease).
MULTI-COOKING
- Use positions 2 and 4, placing the food which requires more heat on 2.
- Place the dripping pan on the bottom and the rack on top.
GRILL
- Place the rack in position 3 or 4. Position the food in the centre of the rack.
- We recommend that the power level is set to maximum. The top heating element is regulated by a thermostat and may not always operate constantly.
PIZZA
- For best results when cooking pizza, use the MULTI-COOKING mode.
- Use a light aluminium pizza pan. Place it on the rack provided.
For a crispy crust, do not use the dripping pan (prevents crust from forming by extending cooking time).
- If the pizza has a lot of toppings, we recommend adding the mozzarella cheese on top of the pizza halfway through the cooking process.
Cooking advice table
| Cooking modes | Foods | Weight (in kg) | Rack position | Pre-heating time (min) | Recommended temperature | Cooking time (minutes) |
| Convection Oven | Duck | 1 | 3 | 15 | 200 | 65-75 |
| Roast veal or beef | 1 | 3 | 15 | 200 | 70-75 | |
| Pork roast | 1 | 3 | 15 | 200 | 70-80 | |
| Biscuits (short pastry) | - | 3 | 15 | 180 | 15-20 | |
| Tarts | 1 | 3 | 15 | 180 | 30-35 | |
| Multi-cooking | Pizza (on 2 racks) | 1 | 2 and 4 | 15 | 230 | 15-20 |
| Lasagne | 1 | 3 | 10 | 180 | 30-35 | |
| Lamb | 1 | 2 | 10 | 180 | 40-45 | |
| Roast chicken + potatoes | 1+1 | 2 and 4 | 15 | 200 | 60-70 | |
| Mackerel | 1 | 2 | 10 | 180 | 30-35 | |
| Plum cake | 1 | 2 | 10 | 170 | 40-50 | |
| Cream puffs (on 2 racks) | 0.5 | 2 and 4 | 10 | 190 | 20-25 | |
| Biscuits (on 2 racks) | 0.5 | 2 and 4 | 10 | 180 | 10-15 | |
| Sponge cake (on 1 rack) | 0.5 | 2 | 10 | 170 | 15-20 | |
| Sponge cake (on 2 racks) | 1 | 2 and 4 | 10 | 170 | 20-25 | |
| Savoury pies | 1.5 | 3 | 15 | 200 | 25-30 | |
| Top oven | Browning food to perfect cooking | - | 3/4 | 15 | 220 | - |
| Grill | Soles and cuttlefish | 1 | 4 | 5 | Max | 8-10 |
| Squid and prawn kebabs | 1 | 4 | 5 | Max | 6-8 | |
| Cod filet | 1 | 4 | 5 | Max | 10 | |
| Grilled vegetables | 1 | 3 or 4 | 5 | Max | 10-15 | |
| Veal steak | 1 | 4 | 5 | Max | 15-20 | |
| Cutlets | 1 | 4 | 5 | Max | 15-20 | |
| Hamburgers | 1 | 4 | 5 | Max | 7-10 | |
| Mackerels | 1 | 4 | 5 | Max | 15-20 | |
| Toasts | 4 | 4 | 5 | Max | 2-3 | |
| Gratin | Grilled chicken | 1.5 | 2 | 5 | 200 | 55-60 |
| Cuttlefish | 1.5 | 2 | 5 | 200 | 30-35 |
The electronic programmer*
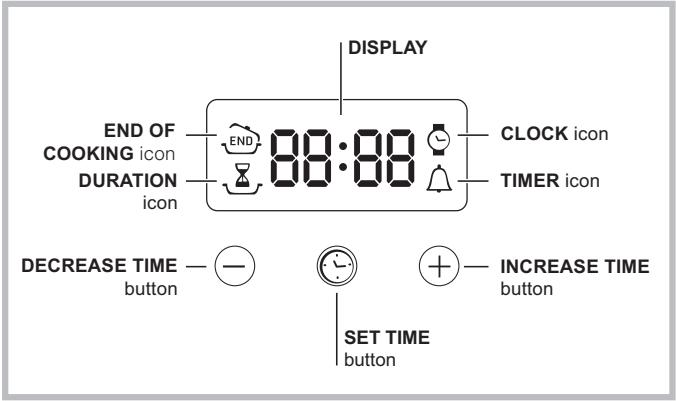
Setting the clock
! The clock may be set when the oven is switched off or when it is switched on, provided that a the end time of a cooking cycle has not been programmed previously.
After the appliance has been connected to the mains, or after a blackout, the icon and the four numerical digits on the DISPLAY will begin to flash.
- Press the button several times until the icon and the four digits on the display begin to flash.
- Use the "+" and "-" buttons to adjust the time; if you press and hold either button, the display will scroll through the values more quickly, making it quicker and easier to set the desired value.
- Wait for 10 seconds or press the button again to finalise the setting.
Setting the timer
! This function does not interrupt cooking and does not affect the oven; it is simply used to activate the buzzer when the set amount of time has elapsed.
- Press the button several times until the icon and the three digits on the display begin to flash.
- Use the "+" and "-" buttons to set the desired time; if you press and hold either button, the display will scroll through the values more quickly, making it quicker and easier to set the value.
- Wait for 10 seconds or press the button again to finalise the setting.
The display will then show the time as it counts down. When this period of time has elapsed the buzzer will be activated.
Programming cooking
! A cooking mode must be selected before programming can take place.
Programming the cooking duration
-
Press the button several times until the icon and the three digits on the DISPLAY begin to flash.
-
Use the "+" and "-" buttons to set the desired duration; if you press and hold either button, the display will scroll through the values more quickly, making it quicker and easier to set the value.
- Wait for 10 seconds or press the button again to finalise the setting.
-
When the set time has elapsed, the text END appears on the DISPLAY, the oven will stop cooking and a buzzer sounds. Press any button to stop it.
-
For example: it is 9:00 a.m. and a time of 1 hour and 15 minutes is programmed. The programme will stop automatically at 10:15 a.m.
Setting the end time for a cooking mode
! A cooking duration must be set before the cooking end time can be scheduled.
- Follow steps 1 to 3 to set the duration as detailed above.
- Next, press the button until the icon and the four digits on the DISPLAY begin to flash.
- Use the "+" and "-" buttons to adjust the cooking end time; if you press and hold either button, the display will scroll through the values more quickly, making it quicker and easier to set the desired value.
- Wait for 10 seconds or press the button again to finalise the setting.
- When the set time has elapsed, the text END appears on the DISPLAY, the oven will stop cooking and a buzzer sounds. Press any button to stop it.
Programming has been set when the and buttons are illuminated. The DISPLAY shows the cooking end time and the cooking duration alternately. - For example: It is 9:00 a.m. and a duration of 1 hour has been programmed. 12:30 is scheduled as the end time. The programme will start automatically at 11:30 a.m.
Cancelling a programme
To cancel a programme:
- Press the button until the icon corresponding to the setting you wish to cancel and the digits on the display are no longer flashing. Press the "—" button until the digits 00:00 appear on the display.
-
Press and hold the "+" and "-" buttons; this will cancel all the settings selected previously, including timer settings.
-
Only available in certain models.
Precautions and tips
! This appliance has been designed and manufactured in compliance with international safety standards. The following warnings are provided for safety reasons and must be read carefully.
General safety
- The appliance was designed for domestic use inside the home and is not intended for commercial or industrial use.
- The appliance must not be installed outdoors, even in covered areas. It is extremely dangerous to leave the appliance exposed to rain and storms.
- When moving or positioning the appliance, always use the handles provided on the sides of the oven.
- Do not touch the appliance while barefoot or with wet or damp hands and feet.
- The appliance must be used by adults only for the preparation of food, in accordance with the instructions provided in this booklet. Any other use of the appliance (e.g. for heating the room) constitutes improper use and is dangerous. The manufacturer may not be held responsible for any damage caused as a result of improper, incorrect and unreasonable use of the appliance.
- Do not touch the heating elements or certain parts of the oven door when the appliance is in use; these parts become extremely hot. Keep children well away from the appliance.
- Make sure that the power supply cables of other electrical appliances do not come into contact with the hot parts of the oven.
- The ventilation and heat dispersal openings must never be obstructed.
- Always grip the oven door handle in the centre: the ends may be hot.
- Always use oven gloves when placing cookware in the oven or when removing it.
- Do not use aluminium foil to line the bottom of the oven.
- Do not place flammable materials in the oven: if the appliance is switched on accidentally, the materials could catch fire.
- Always make sure the knobs are in the “●”/“○” position when the appliance is not in use.
- When unplugging the appliance, always pull the plug from the mains socket; do not pull on the cable.
- Do not perform any cleaning or maintenance work without having disconnected the appliance from the electricity mains.
- If the event of malfunctions, under no circumstances should you attempt to perform the repairs yourself. Contact an authorised Service Centre (see Assistance).
- Do not rest objects on the open oven door.
- Do not let children play with the appliance.
- The appliance should not be operated by people (including children) with reduced physical, sensory or mental capacities, by inexperienced individuals or by anyone who is not familiar with the product. These individuals should, at the very least, be supervised by someone who assumes responsibility for their safety or receive preliminary instructions relating to the operation of the appliance.
- The appliance is not intended to be operated by means of an external timer or separate remote-control system.
Disposal
- When disposing of packaging material: observe local legislation so that the packaging may be reused.
- The European Directive 2012/19/EC on Waste Electrical and Electronic Equipment (WEEE), requires that old household electrical appliances must not be disposed of in the normal unsorted municipal waste stream. Old appliances must be collected separately in order to optimise the recovery and recycling of the materials they contain and reduce the impact on human health and the environment. The crossed out "wheeled bin" symbol on the product reminds you of your obligation, that when you dispose of the appliance it must be separately collected.
Consumers should contact their local authority or retailer for information concerning the correct disposal of their old appliance.
Respecting and conserving the environment
- You can help to reduce the peak load of the electricity supply network companies by using the oven in the hours between late afternoon and the early hours of the morning. The cooking mode programming options, the "delayed cooking" mode (see Cooking modes) and "delayed automatic cleaning" mode (see Care and Maintenance) in particular, enable the user to organise their time efficiently.
- Always keep the oven door closed when using the GRILL and GRATIN modes: This will achieve improved results while saving energy (approximately 10% ).
- Regularly check the door seals and wipe clean to ensure they are free of debris so that they stick properly to the door and do not allow heat to disperse.
Maintenance and care
Switching the appliance off
Disconnect your appliance from the electricity supply before carrying out any work on it.
Cleaning the appliance
- The stainless steel or enamel-coated external parts and the rubber seals may be cleaned using a sponge that has been soaked in lukewarm water and neutral soap. Use specialised products for the removal of stubborn stains. After cleaning, rinse and dry thoroughly. Do not use abrasive powders or corrosive substances.
- The inside of the oven should ideally be cleaned after each use, while it is still lukewarm. Use hot water and detergent, then rinse well and dry with a soft cloth. Do not use abrasive products.
- All accessories - with the exception of the sliding racks - can be washed like everyday crockery, and are even dishwasher safe.
- We recommend that detergents are not sprayed directly onto the control panel, but that a sponge is used instead.
! Never use steam cleaners or pressure cleaners on the appliance.
Cleaning the oven door
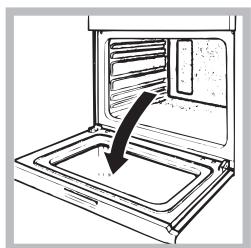
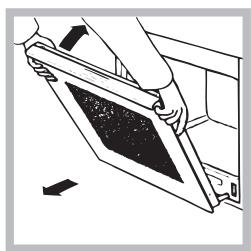
Clean the glass part of the oven door using a sponge and a non-abrasive cleaning product, then dry thoroughly with a soft cloth. Do not use rough abrasive material or sharp metal scrapers as these could scratch the surface and cause the glass to crack. For more thorough cleaning purposes, the oven door may be removed:
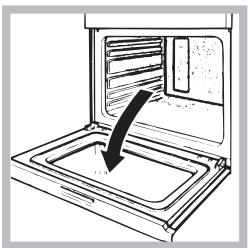
- Open the oven door fully (see diagram);
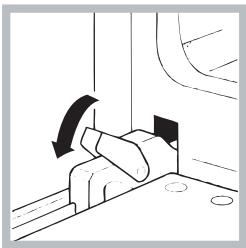
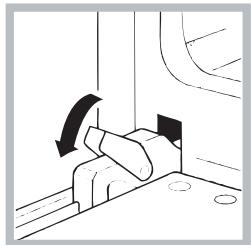
- Lift up and turn the small levers located on the two hinges (see diagram);
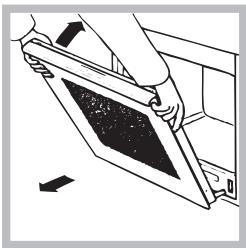
- Grip the door on the two external sides and close it approximately half way. Pull the door towards you, lifting it out of its slot (see diagram).
To replace the door, reverse this sequence.
Inspecting the seals
Check the door seals around the oven regularly. If the seals are damaged, please contact your nearest Service Centre (see Assistance). We recommend that the oven is not used until the seals have been replaced.
To replace the door, reverse this sequence.
Contrôle des joints
ZeHTpyBaHHi 3aKpInJIeHHn
Uo6 3aKpInTu npnlaD o Me6nI: BiKpnTu DBepuTa duXOBKn i 3aBnHTTu 4 DepeB'Ani rBnTu y 4 OTbOp, kki 3haxOJaTbcra Ha nepmEtpaJIbHi paMuI.
! Bci quactnHn, kI 3a6e3neuyOToB 6e3neky, MaIOb 3akpinIOBaTncsraTak, uOb yHEmoKJIbNTn IX BNTraHHa 6e3 cneiaIbHnx IHcTpymentIB.
EneKtpnHi nikJIOueHHe
!DyXOBKn OCHaSeHITpINoJIIOCHNIM UHNypOM XINBnEHNa Ta npaIIOJB BiD 3MiHHoro CTPymy,po6OHa HAppyra i YacTota BkAsyIObCRA Na TAbNIuCi 3DaHmMn,3aKpiJIpeHOi Ha npuJaDi (DNVB.HNXue).
BctaHOBJIeHHIshypyXnBJIeHHI
- BiДкриTe KJIeMHy KOpO6Ky, CkOpNCTaBwHcB BnKpyTKoI OY K BaXeJIeM, HATnCKyUOn HeO Ha 6iHiЯ3nKN KpUShKn:NotTgHtTa BiДкриTe KpUShKy (INB. MaIHOHOK).
2.ПдгOTуTe Ta BCTaHOBITb шнужИВЛeHHЯ: 3HIMITb ГВИNTи 3ЗатСКУВач a I Трn ГВИNTи 3 КOLTAKТIB L-N- ,notim 3akpinitь кИПи пд ГЛБКами ГИNTIB, ДOTРМУЮЧиь КЛБоріВ СиНи (N)Корч neuropи (L) ЖOBТи-3eLEhen () - ДИВ.MaHOnHOK. - 3aφíkcyuǐte shyprBiIDNoBIDHm 3aTnCKaUem.
- 3aKpnIte KpnUkoJ KJIeMHy KOp6Ky.
ПдклоченншурхиВлесндоeКТPNHoiМерекi 3a6e3neue Te UHyp BnIkoIO, npuaTHOДЯ Bka3aHOHa Ta6nUci 3 daHIMn HabaHTaKeHHN (DNB.nOpyu).Y pa3 6e3nocepEnbOTo PdKlouhenNdo MepeXi Heo6XiHDo NpeedbaHTnMI KpnaIaOM i MepeXe BCenONHCHN BmNKauch 3MiHimaJIbHO BIdCTAHIO MIX KOHTaKTAMu y 3 MM. JkN BvTPmYc HabaHTaKeHHI bIDNoBIAe YHHHM HopMaM (dpit 3a3emLeHHr He MaE nepePbATncra BmNKaueM).
Ppno p03taubybAHni shhpy kNWBleHnCnIDkyIe, 1o6 Tempepatya y npmiueHHi He npeBnuSyBaNa 50^ B HiaKi ToUci.
!MOntaxkHnK e BiIIOBiaIaNbHnM 3a npabunbHe eNeKtpnHe niiKluOeHHa Ta dOTpMaHnHa HOpm 6e3neKn.
Iepu HIX BnKohyBaTu NiikNIOUeHNe, nepeKoHaTeCBy TOMy, 0:
- po3etka Ma€ 3a3emJIeHЯ y BiДnoBIДHOCTI Do BCTAHOBJIeHIX HOpM;
po3eTka po3paxObaHa Ha MaKcImaJIbHe HaBaHTaKeHHy y Mexkax NToTyXHNoCTI npJnaY, 3a3NaYe H Ta6nCi 3 xapaKtePncTnKaMn (INB. HnKye);
Ha npyra KINBJIeHn 3HaXoIITbcr B MexKax 3HaueHb, Bka3aHnx Ha Ta6IuNci 3 XapaKtePncTnKaMn (INB.HNXe); - po3eTka cymicha 3 BvnkoI npnIaIy. B iHou My BvnapIky 3amHITb po3eKyu a6o BvnKy; He BnKOpncToByIte NODOBKByaI I TpiHNI.
! Y BCTaHOBNeHOMy npnlaMiMa6 6ytN 3a6e3neueHn IeKn IOCTyn Do eNEkTpUHOro Uhypy i po3eKn.
!Hyp He noBHeH MaTn 3rHiB a6o yTuCKiB.
!Ishyp maé nepioDnUHO nepeBiprTnci 3amHOBaTncra TilbKn BNOBHOBaXeHmMΦaxIBaMn (INB. IOnomora).
! Komnaiia 3Hima 3 ce6e BiinobiJaIbHiCtby pa3i HeDToPImaHH BkA3aHnx HOpM.
!HapnkiHci npiroTyBaHHi Xi BeHTnIaTOp npoIOBKyE npaIOBaTn Do NOBHOrO OXoJOnKeHHa DyXOBKn.
OcbItIeHHaDyXOBKn
!L4yHKiIe nepeepnBaac roTyBaHH,BOHa 3aJExKNTb BID BIKOPNCtAHN DYXOBKn; 3aBdAKN I npOrpamYeTbcr 3BykOBn CnHaNIO 3aKiHHeHHI 3aHaHO r acy.
- HATNCHTb DekiIbKa pa3iB Ha KhoNky ,doKn He noHc6bnMaTH iKoHka 1pa3OM 3 TpbOM uΦpamn Ha DCNCJIPE;2.KHOKNaMn “+” i “-” 3aJaTe baxaHn Yac; npuYTPmUyBaHHi KHONoK MoXHa 3HaUHO WbNiDhe NpeerIHyTu cnOprn i JnerWe 3aDaTn Yac.
- 3auekaIte 10 cek. a6o nobTOpHO HATNCHITb Ha KhoNky, iO6 niTBePdUnT 3aDaHnY qac.
BvBoDntbcra 3BOpOTnH BIDNIK, npo NOrO 3aKInueHHa CNoBicTNTb 3ByKOuN CNrHaI.
Jk 3anporpaMyBaTu rOtYaBaHHj iXi
!PpOpyBaHnIe MoKInBe TiJIbKn NiicN BnBOpy npOpynni npiroTsyBaHH.
- HāyBNi JIiSe y DejKnx MoJeJx.
Jk 3anporpamyBaTn TpnbAJIcIb npriotyBaHHa
- Hatncihitb dekiibka pa3iB ha KhoNky 念 ,doKn He noUHe 6bnMaTn iKoHka _v pa30m 3 Tpboma unppamn Ha DCNCJIPEi;
- Khonkamn “+” i “-” 3aadaite 6baxaHy trpmbaIicTB; npu TpymbaHHi KhONOK MOXHa 3NaHNO 5BnuDwe nepereHHTN cnppn i Ierwe 3aDATn napaMeTp.
- 3auekaIte 10 cek. a6o noBtOpHo HaTnCHiTb Ha KhoNkY C, 106 niD TBepdntn 3aDaHn napaMeTp.
- nicra BnuepnaHry acy Ha NICPJIeI 3'YBnEeTcR HannC "END", npo 3aBepseHHra roTyBaHnR cNoBicITb 3ByKOBn CnHaJ.
- Hanpikna: notochn yac: 9:00, 3daeTbcra TpuBaicTb 1 roDHa 15 xBilH. PporpaMa aBTomatuHNo 3yInHre po60Ty y 10:15.
Jk 3anporpamyBaTn KiHeu npnroTybaHHa
!3anporpamyBaTn 3aKiHueHH npiroToyBaHH moXHa JIiSe nicJ3aDaHH TpBbAIOCTI roTyBaHH.
- Binkoha Te npoceDpy 1 - 3ДЯЗаднг TrpBaNocti roTyBaHH;
- Hatncitb dekiIbka pa3ib Ha KhoNky ,doKn He noUHe 6JIMATi IKOHka pa3OM 3 YoTnpMa zufpaAMn Ha INCJIPEi;
- Khonkamn “+” i “—” Hana TuYte Yac 3aKiHcHHeNpnproTyBaHH; pni yTpmyBaHHi KHOK MoXHa 3HaHOb WbUdJe neperIyHuTn cHpNi I JnerWe 3aDaTu Yac.
- 3auekaTe 10 cek. a6o nobTOpHO hATnCHiTb Ha KhoNky, iO6 niTBePdntu 3aDaHn npaMeTp.
5.ПияВИчepнаньacyHaДИСПЛЕI'3'ЯВЯТьсЯнИС "END",поЗавершени roTyBaHня cNoBicTITb 3ByKOBи CnRhan.
YBIMKHeH iIKOHKn cNOBIaHTbnpo 3diIChHe nporpamyBaHHaHa DCPIEIO cep3i 3'ABnEbCyaac 3akHcEHn npiroTyBaHH i TpNBanictb.
JCKacyBaTH nporpamyBaHHN
Uo6ckacybatiniporpamyBaHHa:
- HatnckaTe Ha KhoNky, DoKn He NoUHe 6nImaTn iKoHka npametpy, kIn CJIiD cKacyBAtn, pa3OM 3 uΦpamn Ha DnCnIe!. HatnckaTe Ha KhoNky "—", DoKn Ha DnCnIe! He 3'ABNTbcra 00:00.
- YtpmmyTe OJHouaCHO KHOJIKN “+” i “—”; cKaCOByOTbcB CbI BnKOHaHI pIPOrpaMyBaHHra, BKJIHOHaOu TaIMep.
3anobixhi 3axoyn Ta nopadi
!DyXOBka po3po6JIeHa i cKoHCTpyuOBAHa BiIIOBiINO do mIXhAPoDHnx CTaHdaptIB 6e3neKn. LjIOnpeJKeHNHaJaHObTc8 3aIJI Bauoi 6e3neKn: yBaJxHO O3HaJOMTeC8 3 HIMN.
3aaraIbHa 6e3neka
-Духовka пизнаецда НерофессIHORO ВИКОпСТань Всередик.JИТЛOBИХ приміцеHb.
3a6bopohraetbcra BCTaHOBNIIOBaTn n03a npmimiueHHaM, HabiTB 3axuieHnx Micx, TOMy Ioo dujke He6e3neHNO iDabATn NOrO BpNBy Doouy i rpo3n.
- Дяпегсявань пиладу обов'язково скоростаитессецiambHMpykamn,як3нхODЯТьс3БOKIBdYXOBKN.
He TopkaItecMaJINHrOImnHoramn a6o MOKpIMN cn BOJOrIMn pykAmn HOramn.
- PpIJaMaE BnKOpNCToBvBaTncIgI npriOtYBaHnI iXi, TIIbKn DopocImM OO6aMn I 3rIdNo IHCTpyKciM, BkazAHm y ciI 6poUpsi. Bydb-ajaKe Ihwe BnKOpNCTaHHa (HaPnPKlaad: dIy o6irpiBy npmiueHb) BBaxaTmMetbcA He 3a npn3NaeHnAm I, To6To, HeKopekTHM. Bnpo6Hk BiDxInJc 6yB-ky BiDnOBiDaJIbHicTb 3a MoJNBI 36NTKN BHaCNIIDOK BnKOpNCTaHHa He 3a npn3HaueHHM, NOMNIKOBOrO a6o Hepo3ymHOrO 3actOCyBaHHa.
-Пд уас роботи прадау harpiBaIbHi eIeMeHTa Ta DBepZra Td yXOBKn B DeKnx Miczx Dzyke HarpiBaIbzc.Бydte obepexHi: He TopkaItecЯix i TrpmaTe DiTe Ha 6e3neuHi BiDCTaHi.
CπiДуI Te, Μιδ ΜιHypι κυνβληνΗ Bι ἀι έινιχν Νόβγτονιχν πριπαίβιν Εν TopΚΑΙΝΥ εραγχν Καγθήν Κύχονικη.
- He 3aKpNBaIe BeHTnJIaI Hi OTBOpN IOTBOpN IJIa BiDBeDEHNa TENJa.
-ДяВдКрпTTЯДверцгБерпсьЗа ручky уцentpi:3 6OKiB BOHa може诫и rapryою.
3aBxNn BnKOpNCtOByTe pyKaBnCi IJn 3aBaHTaXeHHa6o BnTgRaHHMaICTKOCTe 3i CtpaBAMn.
He nokpmbaTe dNo dyxOBKn oJoiieIO.
He knai itb ropoumi MaTepiAin BdyXOBky: npu BnpaKOBomy yBimKHeHHi npuaMy MOKe cTaTcN 3aMHaHn.
KoNn Bn He KopncTyEcTepnlaDom o6OB'3KOBo npebipraIte, uO6 peryIpyTopn nepe6yBaJIv B no3uCi " /"o".
- Пи Вииманни Вилики 3еNEКтучно розтк Тримапесу T小编ки за сamy Вилики i Hi в якову пazi 3a унур.
Bci onepaui 3 uienen a6o texhuiHoro o6cIyroByBaHHa MaIOTB BIKOHyBaTNC, PONepeHbO BITrHyBUN BINKU 3 eNEKTPnHoi p03ETKN.
- Y Jozhomy Bnnaqky He po6iTb cnpo6 camoctiHOBuKohatn peMOHT BHyTpuihix MexaHi3MiB. 3BepHiTbcy cepBiCnH ueHtp (DnB. Donomora).
He cTaBte BaxkI npEmdEt Na BiDkpnti Dbepzra Ta DyXOBKn.
He nepebdacbBnKOpntaHn npnaOocbAmn (BkIouaOnuDiTei)3OBMeKeHNmΦi3NuHMn,ceHCOPHMM a6o po3ymOBnMn 3di6HoCTaMn, HeoCbiDuYeHNm OCbAmn abo TaKIMN, 10 He o3Haonomnuc3 Bnpobom, 3a BnKlUeHNm BnApKnB HarJy 3 bokyOC6b, BiNoBdaJIbHOi 3a IXHIO 6e3neKy; He nepebdacbCBA KOpntaHn npnaDy OC6bAMn, kki He OTPmaJIIN nonepedhIX Bka3IBOK 10do Ioro BVKnOpntaHH.
CTeXTe, 106 2iTn He rpaIaIc3 npIaIom.
Ytulizauia
- Ytɪnɪzaцɪya nakyBaɪnbHOrO mæterpɪaŋy: Ṣɔdɪepʌkjʊntecb MɪcɪeBɪx HɒpM, Tɑk ḋk nakyBaɪnɪŋ Mɔjoe 6yɪt N BɪKOpɪctaHe NOBtopHo.
€Bponecbska DnpeKtNa 2012/19/CE 3 BiDxOIB BID eNektpnHoi i neEeKtpoHoi anapatypn (RAEE), neped6aue, 10 noobyToBI eNekTpponpnilaIi He moKyTB nepepo6JIaTncs y 3BnuaiHOMy npAky IJr TBePdIX McbkX BIXxOJDIB. 3NRTi 3 ekCnpyatauii nobyToBI npnilaIIMaOTb 6ytN 3i6paHI OKPEMO IJN ONTmImiaui CTynHeIO BIDHOJIeHHN I NOBTOPHORO 3actocyBaHH MaTePIaIIB, 10 BXODaTb Do IXhBOrO CKnaIy, Ta 3 MeTOU ycHyENH NOTeHUIHOI WKOOn IJN 3doOpOB'ra Ta IOBkiINr. CmBON 3akpcJeHOro CMITTEBO r KOHTeHepa, 3O6paKeHNI Ha BCix BnPo6ax, HaraNyE npo Heo6XiHicThb OkpeMoI yTuJI3auii.
Длnoядьшоi inhopmaцii уdo npabnblhoi ytni3aцii нобутбоиТexнicken,ixH bIaChNkn MOxKyb 3BepHyTncddo BiINOBiDnHex MicbKnx Cnyk6 a6o Do noCTaaybHnka.
Oxopoha i 6aJnBe BiDHOseHnDo DOBkInJa
- YbimkHeHHny dYxOBKn B npomjKy 3 ni3HbOro nicIyobiDhBOrO yacy Do paHHbOro paHKy D03BOJNTb 3MeHnITn HabaHTaXeHHraHa NiIpNcEMCTBa-BuPObHNKn eNeKTpoEhepri. HaDaHI MoKlNbOCti 0oDo INaHyBaHHra npOrpam, 3OKpema "BiDCtPOueHe roTyBaHH" (INB. PporpAm) i "BiDCTPOueHe ABTomAtUne OOnIeHH" (INB. TexHiye ObcIyROByBaHH Ta DOrIa) DOonomarAOTb oprAh3yBaTnc 3aJIeKHO BiD yacy.
- PnpirotybaHnry y pexmMax BAPBEKIO i KOHBEKLIIHNI I PRNJIb noTpe6yHO TB 3akpntnx DBePcT dYxOBKn: ce Do3BOJNTb OTpImaTn KpaCi pe3yJbTaTn i 3aoaJNTn eEeKTPoeHeprio (npnbIu3Ho 10%
-Пдтpresу Te Bpo6Omy CTahi i MInTe yuIbHOBaTi TaK, 6ВТРATn TepJa.
Texhichne obcnyroByBaHHaTaoDOrJa
Yak BiDkJIouHTn eJekTpnuHn cTpyM
Ipeed npoBeHnHm 6ydb-koI onepaui BntTgHiTB BnIKy 3 eEeKtpuHoi p03eTKN.
K OuNCTHTn npNJaI
3OBHIuHi emaIbOBoHi a6o HeipKabHoiyeTeIy rymoBi yuIbHIOBaui MoXHa MNTn 3BOLOXeHOU y TeNIIy BODi rykoIO i HeITpaJIbHm MmOM. IJRA BvBeDeHHa CTiKnx PJIaM BVKOpNCTOByte CpeuaJIbHi 3acObu. Do6pe oBnoLoCHtB BOIOU i BVscUti b nicra MTTT. He BVKOpNCTOByte abpazNBH i nopouKn a6o iDki peOboHN.
- PekomHeNyEbCmNTn DuyxOBky BcepeHnHi KoxHoro pa3y nicra BNKOpNCtAHn, KOJI NBOHa E ue TeIIOHO. MInTe rapyaOIO BOHO I MNIOHM 3acO6OM, Notim ObnIoNCHiB i BucSyuITb M'koTO raHupKOHO. YHnKaIte a6pa3nBHNX 3acO6IB.
- Akcecyapn MOkyTb MHTncyak 3BnuaHnN NocyD, TAKOX B NOCyDOMHHi MaunHi, 3a BNHrTKOM KOB3Hnx HnprMnX.
UA
!3a6bopohraTcBc BnKOpncTaHH anapatIB dIy ouHneHH npo1o a6o BnCOKIM TnCKOM.
Якочистдеверцета
MnTe cKJIO DBePcT dYxOBKn r6KOIO Ta Hea6pa3NBHMn 3ac06amN BNTnpaIte M'koTO TkaHNOHO; He BVKOpNCtOByTe wepwaI abpa3NBHi MaTepiAn a6o 3arocTeHl MeTaJIeBI cKe6Kn, kI MOKyb NoprNaTI NOBepXHi a6o BnKNkATn TpickaHnckna.
ДябьшpeTeIbHOrO OUnIeHnRA MoKHa 3HЯТиДВeRЯТа DyXOBKN:
1.NOBHICTU BiKpnIe Te DBepuTa (INB.MaHIOHOK);
2.niBveiItb i o6epHitb MaIeHbKi BaxKeni, kki 3HaXoJrTbcra Ha dBox 3aBicax (dVB.MaIIOHOK);
- BO3bMNTecb 3a DBepCy pykamn C dByX CTOpOH, PIIaBHO 3aKpoIte ee, HO He IONHOCTbIO. 3aTeM IOTAHNITe DBepCy Ha Ce6ra, CHImaer ee CO CBOEro THe3da (CM.Cxemy).