HA 6AMK2 - Audio Amplifier Cayin - Free user manual and instructions
Find the device manual for free HA 6AMK2 Cayin in PDF.
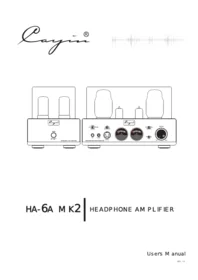


| Brand | Cayin |
| Model | HA-6A MK2 |
| Product type | Tube headphone amplifier |
| Configuration | Two chassis: separate power supply and amplifier |
| Power supply dimensions | 160 × 297 × 185 mm |
| Amplifier dimensions | 285 × 297 × 185 mm |
| Power supply weight | 8.2 kg |
| Amplifier weight | 11.2 kg |
| Power consumption | 130 W |
| Tubes used | 2 × JJ 12AU7/ECC82, 2 × Genalex KT88, 2 × JJ GZ34/5AR4 |
| Maximum headphone output power | Up to 4500 mW + 4500 mW (4-pin XLR, ultralinear) |
| Headphone load impedance | 8 to 600 Ω, selectable (L / M / H) |
| Audio inputs | XLR balanced, RCA unbalanced |
| Headphone outputs | 6.35 mm, 4.4 mm balanced, 4-pin XLR |
| Preamplifier output | RCA (PRE-OUT) |
| Operating modes | Triode / Ultralinear, switchable |
| Soft start | Yes, approximately 60 seconds |
| Remote control | Yes |
| Frequency response | 10 Hz – 26 kHz ±3 dB |
| Signal-to-noise ratio | 104 dB (A-weighted) |
| Distortion (THD+N) | ≤ 0.3% (1 kHz, 200 mW) |
| Maintenance | Clean with a dry cloth only |
| Safety | Do not open the device; risk of electric shock |
| Spare parts / repairability | Spare tubes and fuses included, replaceable by a qualified technician |
Frequently Asked Questions - HA 6AMK2 Cayin
User questions about HA 6AMK2 Cayin
0 question about this device. Answer the ones you know or ask your own.
Ask a new question about this device
Download the instructions for your Audio Amplifier in PDF format for free! Find your manual HA 6AMK2 - Cayin and take your electronic device back in hand. On this page are published all the documents necessary for the use of your device. HA 6AMK2 by Cayin.
USER MANUAL HA 6AMK2 Cayin


HA-6A MK2
HEADPHONE AMPLIFIER
Thank you for choosing Cayin HA-6A MK2 Headphone Amplifier.
We have inserted protective foam inside the Vacuum Tube Cage in order to protect the vacuum tubes during transportation. Please remove these foams before you connect the amplifier into your sound system. Fail to do so might cause serious damage to the amplifier or disaster such as fire accident.
We have prepared this user manual to help you understand the features and get familiar with the operation of the amplifier. We suggest all customers read through this manual before they start to use the device.
Table of Contents
Table of Contents.... 1
Package Contents.... 2
Safety Precautions.... 2
Product Features.... 3
Specifications.... 4
Precautions.... 5
Front Panel Functional Description.... 6
Rear Panel Functional Description....7
Top Panel Functional Description.... 8
Vacuum Tube Substitution.... 8
System connection.... 10
Connect to Headphones.... 11
Turning on.... 12
Small Tips.... 12
Warranty Service.... 12
Basic Operation.... 13
Troubleshooting.... 14
How to Install Vacuum Tubes.... 15
Follow us.... 16
Package Contents
Please place the box in upright position according to the marking of the package. Please examine the product package before you open it, the package should be free from any physical damage or water stain. You should find the following items when you open the package:
- Cayin HA-6A MK2 x1
- User's Manual x1
- AC Power Cord x1
- Umbilical Power Cable x1
- Remote Control x1
- Spare Fuses:
①.External Main Fuse x2 (\~220V-240V: T1AL250V; \~100V-120V: T2AL250V)
②. External Fuse for High Voltage x2 (T160mA E250V)
Safety Precautions
- Unplug the power cord if you are not going to use the product for an extended period of time.
- The machine will become hot after working for a long time. Please keep the unit's ventilation open and install the amplifier at a well-ventilated place to avoid troubles and fire hazard.
- Forbidden to operate when the output is open or shorted.
- Do not attempt to service this product yourself. Opening the cover may expose you to dangerous voltage or other hazards.
- We are not responsible for any problems caused by checking and opening without permission of our company. For service, Please contact a qualified service technician.
- Do not place any objects filled with liquids such as vases or some others on the top or around.
- Clean only with dry cloth.
- Please move the amplifier carefully not to drop the unit or be subject to other strong shocks.
Product Features
◆ Point to point wielding with premium wire. The entire circuitry is handwired by skillful craftsman.
◆ Matched-pair custom build EI output transformers.
◆ In-house Designed Premium Toroid Power Transformer with high inductance and high efficiency.
Split Design for Cleaner Sound: The power supply and audio circuit are placed in separate units to reduce interference and provide cleaner power to the audio section.
◆ Stable and Quiet Power Supply: Different parts of the circuit use their own power supplies. The voltage amplifier gets a low-noise regulated power source for better performance and sound quality.
◆ Pure Single-Ended Amplifier: The amplifier uses a single-ended design to keep the music natural and highlight its warm, rich character.
◆ Two pieces JJ GZ34/5AR4 are applied for power rectification.
◆ JJ 12AU7/ECC82 are used for voltage amplification.
◆ Genalex KT88 are used for power amplification.
◆ High quality Neutrik 6.35mm single-ended headphone, NIPPON DICS 4.4mm balanced headphone, and Neutrik 4-pin balanced headphone are included.
In -house designed output transformers provide three set of impedance matched outputs (High, Mid, Low) from 8Ω to 600Ω at your direction.
◆ Two sets of line input XLR balanced RCA single-ended. One set RCA PRE-OUT connector.
Dual operation mode Triode & Ultralinear. Triode mode is tendering, rich in harmonic, smooth, iush and holography. Ideal for vocal and string music. Ultra-linear mode can improve power and extension. Clean, energetic, and authoritative. Ideal for music requires a lot of punch, dynamic and control.
◆ Strong output power to match with wide range of headphone in the market.
◆ Lock on and quick-release aviation grade copper connectors with silver plated Teflon umbilical cable provides low internal resistance, low dissipation, and more stable transmission for outboard power supply connection.
◆ Soft start function (about 60 seconds).
◆ Equipped with remote control.
◆ Design with an innovative circuit layout and highly effective shielding consideration, the components will function at premium environment to ensure high quality audio performance form the amplifier.
◆ Equipped with easily-installed tube cover for protection.
Specifications
◆ To reduce the risk of electric shock, do not remove the cover.
◆ No user serviceable parts inside. Refer servicing to qualified service personnel.
◆ To reduce the risk of fire or electronic shock, do not expose the unit to rain or moisture.

The lightning flash with arrowhead symbol is intended to alert user to the presence of uninsulated “dangerous voltage” within the product's enclosure that may be of a risk shock to persons.

The exclamation point is intended to alert user to the presence of important operation and maintenance (servicing) instructions accompanying the appliance.
Recommendation: Cayin HA-6A MK2 Headphone Amplifier is designed and manufactured with our original parts and reaching the best results. We are not responsible for problems and damages caused by non-original parts replacement in the amplifier. Please keep all packaging materials for future use as you may need to repackage the amplifier in the future. Please fill in the product warranty card immediately and mail it to authorized dealer to safeguard your after-sales service.
Note: Please make sure local voltage level is matched with the input level of the amplifier, which indicates on the rear panel. Too low or too high voltage may cause problem. Please contact our company or our local agent if you've found improper voltage.
Precautions

- Connecting the power supply unit and AC socket.
After connecting with the audio source, connect the quick-release power supply cable between the main unit and the outboard power supply unit, then connect with power supply unit to an AC power supply socket with the power cable.
- Connecting and disconnecting of the quick-release power supply cable.
Connecting: Align the slots (marked with the red dot) of the connector with the slot (marked with the red dot) of the socket of the power input/output on the machine (Figure 1), and plug the power cable to connect.
Disconnecting: Firmly hold the lock ring of the connector and pull it out (Figure 2), the power supply cable would be disconnected.
There should be sufficient space around the power outlet to facilitate plugging and unplugging the power cord.
Front Panel Functional Description


Diagram 1: HA-6A MK2 Front Panel
①. Power On/Off: Turn on and off the amplifier. Press "down" the button to turn on the amplifier, Press again the button will resume to original position and the amplifier will power off.
②. Power Indicator: Indicate the working status: The indicator will remain always on when the amplifier is in regular operation
③. Headphone Output Selector: With the switch you can select the suitable type of headphone output. HA-6A MK2 offers three types output.
④. STANDARD: Output for headphones terminated in 6.35mm TRS connector
⑤. 4. 4 Balance Output: 4. 4 balance output for headphone terminated in 4. 4mm connector.
⑥. 4PIN BALANCE: Output for headphones terminated in 4pins XLR connector
⑦. IMPEDANCE: Select the most desirable: impedance-matched output from the amplifier, three options were offered: (L:8\~64Ω; M:65\~250Ω; H: 251\~600Ω)
⑧. VU meter: monitor output level of the amplifier
⑨. TR/UL: Used to select the operation mode between Triode and Ultralinear.
⑩. SOURCES: select balanced or single-ended input
⑪. Working State Indicator/Mute Indicator
Used to indicate the working state. The indicator will be on when it is working normally. The indicator will flicker for 60 seconds when it delays to work. The indicator will keep flickering when it is at mute state.
⑫. Volume Knob
Used to control volume
⑬. IR Remote Sensor
Used to receive the code of remote control.


Attention:
◆ If you want to connect a 3.5mm terminated headphone to the amplifier, you need a 3.5mm to 6.3mm adapter (not included in the package).
◆ Listening through headphones at a high volume for extended periods of time can result in hearing impairments.
◆ Please do not use mono (TS) phone plug with this amplifier as this might cause serious damage such as short circuit in the amplifier.
◆ Please unplug the power plug from AC power circuit if the amplifier is not used for a long time.
Rear Panel Functional Description

Diagram 2: HA-6A MK2 Rear Panel
①.Balanced input (XLR)
Connect a balanced audio input to the amplifier. Please make sure the left and right channel is connected correctly
②.Single-ended input (RCA)
Connect a single-ended audio input to the amplifier. Please make sure the left and right channel is connected correctly
③.PRE-OUT:
Connect to Amplifiers with Pre-In Input.
④.Output Selection Switch:
Select PRE-OUT or headphone out.
⑤.HV FUSE: (T160mA E250V)
⑥.Power Input for Amplifier Unit.
⑦.Power Output from Power Supply Unit.
⑧. AC Power Input with Fuse Holder:
Please replace fuse with the same specification
Attention:
Please make sure the AC voltage of your local power supply match the voltage of the amplifier. Cayin will not be responsible for the damage or accidents such as fire caused by incorrect input voltage
Top Panel Functional Description


Diagram 3: HA-6A MK2 Top Panel
①. V3、V4: JJ GZ34/5AR4 Vacuum Tube
②. A1、A2: Genalex KT88 Vacuum Tube
③. V1、V2: JJ 12AU7/ECC82 Vacuum Tube
Attention:
◆The vacuum tube will become very hot during operation, please be careful and don't get burned.
◆ Please turn off the amplifier for 20 minutes before replacing the vacuum tube. Hold the base of vacuum tube firmly and to avoid damaging the fragile part of the vacuum tube.
When install vacuum tube to the amplifier, position the vacuum tube correctly according to the alignment pin before push the vacuum tube base into the socket.
◆Only used matched pair KT88 and 12AU7 in the HA-6A MK2 amplifier.
Vacuum Tube Substitution
| Vacuum Tube | Acceptable Substitution |
| Genalex KT88 | EL34、KT66、6CA7、6L6、KT77、KT88、6550、KT90、KT120、KT150 |
| JJ GZ34/5AR4 | GZ34、GZ37、5AR4、5V4G、5R4G、5U4G、5Y3GT、5DJ4 |
| JJ 12AU7/ECC82 | 12AU7、ECC82、ECC802S |
Remote Control

①. MUTE Button
②. Volume UP and DOWN Button


Effective Distance: about 6 meters.

Installation:
- Remove the screws from the back cover of the remote.
- Clean the battery holder thoroughly, ensuring there is no dust or grease.
- Hold the battery by its edges, align it with the battery compartment, and gently press it in until it is flat and secure.
- Screw the battery cover back into place.
NOTE:
◆ Please handle the remote control with care and keep it in a dry environment.
◆ The battery has a lifespan of approximately three years. Replace the battery promptly when its capacity is insufficient.
◆ Please use the CR2032 lithium coin cell battery.
When replacing the battery, do not touch both the positive and negative terminals simultaneously. Remove and install the battery by holding it from the edges.

System connection
This section will illustrate how to connect audio equipment to the HA-6A MK2 amplifier.

BALANCE Socket:
- The BALANCE socket is with XLR input. The functions are following:
◆ Music signal is transferred as balance signal without the outside disturbance.
◆ Professional XLR connectors are used to raise reliability of connection.
- In the following two systems, professional XLR connectors are used for inside connection.
a. USA System:
①PIN1 : GND;
②PIN2 : HOT;
③PIN3 : COLD

b. European System:
①PIN1 : GND;
②PIN2 : COLD;
③PIN3 : HOT

- This amplifier uses the USA System.
If the XLR balance connector is used by European system, the restored signal of pre-amplifier or main amplifier will be inverse. Therefore, please setup the correct phase in advance.
Attention to Audio Connection:
- Please refer to the manual of associated equipment whenever necessary.
- Do not connect the power cord until all equipment are properly connected
- "R" indicates the right channel; "L" indicates left channel.
- Please make sure all connectors are securely installed. Bad connection might cause noise and degrade in audio performance, or even damaging your equipment.
- Please do not tie the power cord, audio interconnects, and speaker cable together or run them in parallel because this will produce adverse effect on audio performance.
Note: Please make sure + and -, left and right are connected properly.

Connect to Headphones
Selecting Headphone Connection provided three types of headphone output: 4-pins XLR for balanced, 4.4mm Balanced, 6.35mm for singled-end, we have optimized the headphone amplifier to perform satisfactory for all outputs, user are free to use any headphone output according to their need without worrying one is better than the other.
Single-ended Headphone Connection
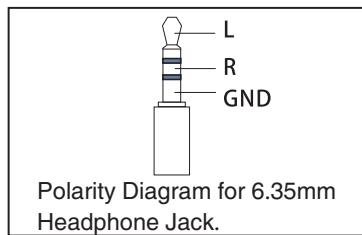
- HA-6A MK2 provides one set of 6.35mm headphone input, the pin definition of the headphone connector is as illustra
- Headphones terminated with 3.5mm connector will require a 3.5mm to 6.35mm adapter in order to use it with this headphone amplifier.
4.4mm Balanced Headphone Connection
- HA-6A MK2 provides one set of 4.4mm headphone input, the pin definition of the headphone connector is as illustrated.
- Headphones terminated with 2.5mm connector will require a 2.5mm to 4.4mm adapter in order to use it with this headphone amplifier.
XLR Balance Headphone Connections
- HA-6A MK2 provide one set of 4-pin XLR headphone input, the pin definition of the XLR connector is as illustrated.
- Headphones terminated with dual XLR (3-pins), 4.4mm or 2.5mm balanced headphone connectors will require corresponding XLR4 adapter in order to use it with this headphone amplifier.


IMPEDANCE matched output
- Headphones are currently available from 8 to 600, in view of this wide range of impedance rating, HA-6A MK2 provides three sets of impedance matched outputs (L:8\~64; M:65\~250; H: 251\~600) to ensure the headphone amplifier can handle vast variety of headphones satisfactory.
- We recommend users to start with the output setting that match the impedance rating of your headphone.
- It is technically safe to select any impedance setting for your headphone. You can try other impedance setting without worrying causing any damage to your headphone.
Attention:
◆Balanced headphones can convert into single-ended headphone with appropriate converter and use the 6.35mm headphone output.
◆ Single-ended headphone cannot use an adapter to plug into the XLR4 balanced headphone output of the HA-6A MK2, it can cause damage to your headphone and/or headphone amplifier.
◆Turning the volume to the minimum when you exchange the Headphone.
Turning On
Before turning on the amplifier please make sure all connections are right and power supply is stable.
◆ Turn on the amplifier, the power indicator will be on and the working indicator will keep flickering.
◆ The working indicator will be on after 60 seconds. It means that the amplifier is working normally. If the working indicator is off, please turn off the power and contact with our local agent or our company.
◆ Select the right audio source channel, adjust the volume to a certain position and then you can enjoy the music you prefer.
NOTE: 1. When the audio system is under working state, don't unplug the signal cable or speaker cables, or it will cause damage to the amplifier and other equipments.
- It should at least takes 2 minutes before you turn on the power again, or it will cause damage to the vacuum tubes.
Small Tips
Read the Manual —— Please read the user's manual carefully before installation and operation.
Keep the Manual —— Please keep the manual for future reference.
Warning Signs —— Don't tear off or rub off the serial number.
Operation —— Do the operations as you are instructed in the Manual.
Parts —— If you are going to use parts not supplied by our company like power cord, fuses etc please make sure that parts you used are compatible with the safety requirements. Or it will cause fire or electric shock.
Placement —— Put the amplifier on a level place. Make sure that it doesn't bring damage to the children, adults and the amplifier itself.
Power —— Please make sure the local voltage is the same level as indicated on the rear panel.
Overload —— If the power socket is overloaded with other equipment, it will cause fire or electric shock.
Warranty Service — Do not open the product and change the components inside yourself. Opening the cover may expose you to dangerous voltage or other hazards. The warranty doesn't extend to any product that has been opened by you without permission of our company.
Troubleshooting ——If you encounter any abnormal behavior during setup or playback, please refer to the advice in next pages of this manual to recover your amplifier back to normal operation. If you fail to rectify the problems after that, please contact your authorized dealer for technical support.
Warranty Service
- The Product is warranted for a period of twelve (12) months from the date of original purchase (the “Warranty Period”). Replacement Products are warranted for the remainder of the original twelve (12) month warranty period. Six-month warranty on stock vacuum tubes.
- The defective product must be returned to your dealer or our company for repairing when your dealer or our company accepts your requirement.
- The warranty doesn't extend to any product that has been opened by you without permission of our company.
NOTE: The information in this manual is subject to change without further notice.
Basic Operation
Please make sure all connections are correct and power supply voltage is stable before turn on the amplifier.
- Turn on the amplifier, the power indicator will light up.
- When the power indicator remains lighted up steadily, the amplifier is ready for operation. If the power indicator will become steady (always ON). It means that the amplifier is ready for operation. If the power indicator did not light up, the amplifier is malfunction, please turn off the power and contact your local dealer for service support.
- The tubes regulated power supply might require around 30-60 seconds to ramp up the voltage gradually, it is normal if you heard ting-ting noise from your headphone or speaker during this time.
- The vacuum tube might require 10 minutes of warm up before they reach optimum performance.
- Select your input source: XLR for balanced input, RCA for single-ended input.
- If you are using single-ended headphone, insert the 6.35mm connector of your headphone into the STANDARD headphone output on the front panel. Switch the headphone output selector (PHONES) to STA.
- If you are using a 4.4mm balanced headphone, insert the 4.4 connector of your headphone into the 4.4 BALANCE headphone output on the front panel. Switch the headphone output selector (PHONES) to 4.4 BAL.
- If you are using a 4pin XLR balanced headphone, insert the XLR4 connector of your headphone into the 4 PIN BALANCE headphone output on the front panel. Switch the headphone output selector (PHONES) to 4 PIN BAL.
- Select the appropriate output (L, M, or H) on the IMPEDANCE switch according to the specification of your headphone for optimized performance.
- Adjust Volume to appropriate level and enjoy your music.
Attention:
◆Please do not disconnect your interconnect when the amplifier is operating, this might cause damage to the amplifier or associated equipment
◆You can swap headphones during playback, but to avoid damaging your sensitive headphone and protect your hearing, please turn the volume down to 0 when you unplug or plug in another pair of headphone.
◆If you have turn off the amplifier, please wait 2 minutes before you turn in on again, ot it might cause damage to the vacuum tubes.
Troubleshooting
Please follow the instruction in the manual in order to keep the amplifier work in its best state. If wrongly operated and you thought that would be troubles please check according to following tips to look for the exact reasons.
| Problem | Cause | Solution | |
| No Sound after power on | Power Indicator is OFF. | Power is not connected | Connect power cord securely Check main power supply |
| Main fuse is out. | Replace fuse with same specification | ||
| Power Indicator is ON. | NO input signal . | Check source equipment is working Select input source correctly | |
| Volume at minimum position | Turn up volume | ||
| Interconnect not properly connected | Connect all cables securely | ||
| Headphone cable not properly connected | Connect headphone cable properly | ||
| Headphone output not specified correctly | Select headphone output correctly | ||
| Selected the wrong output | Select headphone or speaker output correctly | ||
| Umbilical Power cable not properly connected | Reconnect the umbilical power cable, position the alignment groove correctly before tighten up the screw-threaded connector | ||
| Working State Indicator is OFF. | Control circuit power failure | Contact authorized dealer for technical support | |
| Working State Indicator is ON. | External Fuse for high voltage is out. | Replace fuse with same specification | |
| Excessive noise | Input source badly connected | Install interconnect properly | |
| Equipment malfunction | Contact authorized dealer for technical support | ||
| Soundstage and imaging not focused | Left and right channel of source equipment reversed | Reinstall related cabled correctly | |
| Headphone cable polarity reversed | |||
| Malfunction of Remote Control. | Be disturbed.Low Battery.Obstacles between the amplifier and remote. | Keep away from the source of disturbance. Turn off and restore.Replace with new batteries.Remove the obstacles. | |
NOTE: Rayin® is the registered trademark of Zhuhai Spark Electronic Equipment Co., Ltd.
How to Install Vacuum Tubes
How to Install 9-Pin Vacuum Tubes

Applicable vacuum tube:
Instructions to Change and Install the vacuum tubes:
To install a nine-pin vacuum tube, align the pins of the vacuum tube with the holes of the tube socket and insert the tube vertically up and down (as shown in the figure above).
▲ Please note that when installing the nine-pin vacuum tube, pay attention to the alignment of the vacuum tube pins with the holes of the tube socket. Otherwise wrong insertion will cause damage to the vacuum tube and prevent the amplifier from working properly, which may lead to failure of the amplifier.
How to Install 8-Pin Vacuum Tubes

Applicable vacuum tube:
Instructions to Change and Install the vacuum tubes:
To install an eight-pin vacuum tube, align the positioning pin of the tube with the grooves in the positioning holes of the tube socket, and install the tube by pulling up and down vertically (as shown in the figure above).
▲Please note that when installing the eight-pin vacuum tube, pay attention to the alignment of the vacuum tube positioning pin with the positioning hole of the tube socket. Otherwise wrong insertion will cause damage to the vacuum tube and prevent the amplifier from working properly, which may lead to failure of the amplifier.
How to Install 4-Pin Vacuum Tubes

Applicable vacuum tube:
300B、2A3 etc. 4-pin vacuum tubes.
Instructions to Change and Install the vacuum tubes:
To install a four-pin vacuum tube, please pay attention to the thickness of different pins of the vacuum tube and the size of the tube socket hole. Thick pin should be aligned with the big hole, and the thin pin should be aligned with the small hole. Install the tube vertically up and down (as shown in the figure above).
▲ Please note that when installing the four-pin vacuum tube, pay attention to the thickness of differnet pins of the vacuum tube and the size of the tube socket holes. Otherwise wrong insertion will cause damage to the vacuum tube and prevent the amplifier from working properly, which may lead to failure of the amplifier.
How to Install Big 4-Pin Vacuum Tubes
Applicable vacuum tube:
845、805、211 etc. 4-pin vacuum tubes.
Instructions to Change and Install the vacuum tubes:
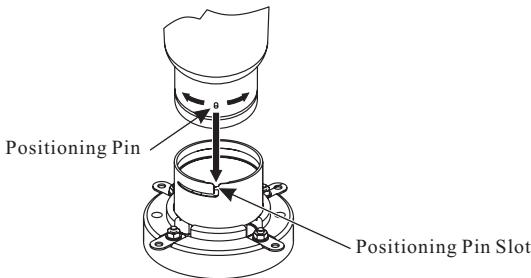
To install the big four-pin vacuum tube, align the vacuum tube positioning pin with positioning pin slot of the tube socket and then rotate 45° clockwise to tighten. (As shown in the picture above). To take out the big four-pin vacuum tube, turn the tube 45° counterclockwise and take it out upward after loosening.
▲ Please note that when installing the big four-pin vacuum tube, pay attention to the alignment of the vacuum tube positioning pin with positioning pin slot of the tube socket and then rotate 45° clockwise to tighten. It is strictly forbidden to install the vacuum tube when the positioning pin is off or missing. Otherwise wrong insertion will cause damage to the vacuum tube and prevent the amplifier from working properly, which may lead to failure of the amplifier.
Please follow us :

Cayin Facebook

Cayin SINA Weibo

Cayin Website
Zhuhai Spark Electronic Equipment Co., LTD
www.cayin.cn
Tel: : 0756-3828711
Fax: 0756-3828722
Email: market@cayin.cn
Address: 9 Lianfa Road, Liangang Industrial Park, Shuanglin Zone, Zhuhai, Guangdong, China
Post Code : 519045


- TABLE OF CONTENTS
- PACKAGE CONTENTS
- SAFETY PRECAUTIONS
- PRODUCT FEATURES
- PRECAUTIONS
- FRONT PANEL FUNCTIONAL DESCRIPTION
- ATTENTION
- REAR PANEL FUNCTIONAL DESCRIPTION
- TOP PANEL FUNCTIONAL DESCRIPTION
- VACUUM TUBE SUBSTITUTION
- REMOTE CONTROL
- INSTALLATION
- NOTE
- SYSTEM CONNECTION
- BALANCE SOCKET
- ATTENTION TO AUDIO CONNECTION
- CONNECT TO HEADPHONES
- SINGLE-ENDED HEADPHONE CONNECTION
- MM BALANCED HEADPHONE CONNECTION
- XLR BALANCE HEADPHONE CONNECTIONS
- IMPEDANCE MATCHED OUTPUT
- TURNING ON
- SMALL TIPS
- WARRANTY SERVICE
- BASIC OPERATION
- TROUBLESHOOTING
- HOW TO INSTALL VACUUM TUBES
- APPLICABLE VACUUM TUBE
- INSTRUCTIONS TO CHANGE AND INSTALL THE VACUUM TUBES
Brand : Cayin
Model : HA 6AMK2
Category : Audio Amplifier