Infinity - Pigtronix - Free user manual and instructions
Find the device manual for free Infinity Pigtronix in PDF.


| Product Type | Guitar Looper Pedal |
| Brand | Pigtronix |
| Model | Infinity |
| Included microSD Card | 8 GB preinstalled |
| Maximum Supported microSD Card | 32 GB |
| Required microSD Card Class | Class 6 or Class 10 |
| Maximum Recording Time | 2 hours with included 8 GB card |
| Number of Presets | Up to 50 |
| Recording Time Customization | Adjustable via software by changing preset structure |
| Multiplier Values | Affect maximum loop length per preset |
| Computer Connection | USB |
| Software | Pigtronix Infinity Application |
| Firmware Update | Via SD card image (LooperImage.img) and disk writer |
| OS Compatibility | Windows and macOS |
| Warranty | Back cover removal for SD access does not void warranty unless damage occurs |
| Safety | Do not use tools inside the Infinity; avoid liquids |
| Maintenance | Clean exterior with a dry, soft cloth; keep SD card contacts clean |
| Repairability | User-replaceable microSD card; unauthorized repairs void warranty |
| Required Tool for Back Cover | #2 Phillips screwdriver |
| Data Backup | Reformatting erases all audio and preset settings; backup recommended |
Frequently Asked Questions - Infinity Pigtronix
User questions about Infinity Pigtronix
0 question about this device. Answer the ones you know or ask your own.
Ask a new question about this device
Download the instructions for your in PDF format for free! Find your manual Infinity - Pigtronix and take your electronic device back in hand. On this page are published all the documents necessary for the use of your device. Infinity by Pigtronix.
USER MANUAL Infinity Pigtronix
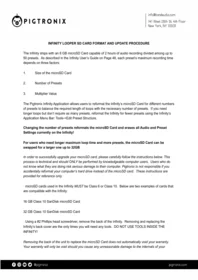
INFINITY LOOPER SD CARD FORMAT AND UPDATE PROCEDURE
The Infinity ships with an 8 GB microSD Card capable of 2 hours of audio recording divided among up to 50 presets. As described in the Infinity User's Guide on Page 48, each preset's maximum recording time depends on three factors:
- Size of the microSD Card
- Number of Presets
- Multiplier Value
The Pigtronix Infinity Application allows users to reformat the Infinity's microSD Card for different numbers of presets to balance the required length of loops with the necessary number of presets. If you need longer loops but don't require as many presets, reformat the Infinity for fewer presets using the Infinity's Application Menu Bar: Tools->Edit Preset Structure.
Changing the number of presets reformats the microSD Card and erases all Audio and Preset Settings currently on the Infinity!
For users who need longer maximum loop time and more presets, the microSD Card can be swapped for a larger one up to 32GB.
In order to successfully upgrade your microSD card, please carefully follow the instructions below. This process is technical and should ONLY be performed by knowledgeable computer users. Users who do not know what they are doing risk serious damage to their computer. Pigtronix is not responsible if you accidentally reformat your computer's hard drive instead of the microSD card. These instructions are provided for reference only.
- microSD cards used in the Infinity MUST be Class 6 or Class 10. Below are two examples of cards that are compatible with the Infinity:
16 GB Class 10 SanDisk microSD Card
32 GB Class 10 SanDisk microSD Card
- Using a #2 Phillips head screwdriver, remove the back of the Infinity. Removing and replacing the Infinity's back cover are the only times you will need any tools. DO NOT USE TOOLS INSIDE THE INFINITY!
Removing the back of the unit to replace the microSD Card does not automatically void your warranty. Your warranty will only be void should you cause any unreasonable damage to the internals of your
Infinity: Spilling liquids inside your Infinity, physically damaging the internals with tools (no tools should be used inside the Infinity), unauthorized repairs, etc
· Depending on when your Infinity was manufactured you will have one of the microSD Card holders pictured below.
. For early Infinity's the microSD Card holder will look like the image below. To remove the microSD Card, push on the microSD Card itself from right to left until you hear a click. Release the microSD Card and it will partially eject itself from the holder. Carefully grab the microSD Card and pull right until it is free. To insert the new microSD Card, hold it as pictured (with the notch pointed up), insert it into the holder from the right, and press until you hear a click.

. For later Infinity's the microSD Card will look like the image below. To remove the microSD Card, press your finger on the metal cover and slide it left. You will feel a slight click once it is unlocked. Once it is unlocked, carefully flip the cover to the left; doing so roughly can disconnect the cover from the rest of the holder and if you are unable to re-attach it the unit will have to be sent to us as an out of warranty repair. Once the cover is freed the microSD Card can be lifted out of the holder. To insert the new microSD Card, hold it as pictured (with the notch pointed up), and place it into the holder from above. There is a complementary notch in the holder that will hold it in place. Then carefully flip the cover to the right, press it closed, and slide the cover to the right.

- Replace the Infinity's back plate and use the #2 Phillips head screwdriver to tighten the screws. Be careful not to over-tighten.
FOR WINDOWS:
- Download and install the Win32 Disk Imager from here.
- Download and save the LooperImage.img file from here to your computer.
- Run the previously installed Win32 Disk Imager and you will see the following screen.

- Click on the File icon highlighted in the above picture, this will open a File Dialog so that you can select the LooperImage.img file downloaded in the previous step. Navigate to the folder where you downloaded the LooperImage.img file (likely in your Downloads folder).
- Select LooperImage.img and click Open.
- Now find the Drive letter for the Infinity drive on your computer. Below is an image that shows the drive letter to be “G” It may be different on your computer and may change depending on how many USB drives you have connected to your computer.

Videos

Local Disk (C:)

- Win32 Disk Imager will now have the path to the LooperImage.img filled into the “Image File” text box:

- Select the Drive letter for the Infinity from the “Device” drop-down box. Here that letter is “G” and it is the only one in the list. This may be different on your computer.
- At this point, double and triple check the drive letter you found. If you choose the incorrect drive letter you will erase and possibly damage any attached USB Hard Drives or Disks.
- Once you are sure that you've selected the correct img file and the correct Drive Letter, click "Write." A warning box will appear asking you to make sure that you wish to write to the selected Drive. If you have selected the correct drive, select "Yes."

· After clicking "Yes" Win32 Disk Imager will display its progress.
Disconnect the Infinity from the computer and power cycle the unit to leave USB mode. The Infinity will automatically set up the default 50 presets.
FOR MAC:
- Download and unzip InfinitySFormat.zip.
- Download and save the LooperImage.img file into the folder with InfinitySDFormat.sh, the file created by unzipping InfinitySDFormat.zip
- Go to Applications → Utilities and run Terminal.

- In the terminal window type “cd” and a space, and then drag the folder icon of the window containing InfinitySDFormat.sh into the Terminal. After the path to the folder has appeared in Terminal press “Enter”

- Type “./InfinitySDFormatter.sh” into the Terminal and press Enter and follow the on screen instructions. Select the Drive you wish to format by typing the number to the right of it and then type “y” if you are sure it is the correct drive and wish to format it.


Brand : Pigtronix
Model : Infinity