MODAL 008R - Musical synthesizer Modal Electronics - Free user manual and instructions
Find the device manual for free MODAL 008R Modal Electronics in PDF.


| Product Type | 8-voice polyphonic analogue synthesiser |
| Sound Engine | Two 100% analogue VCOs per voice plus two sub-oscillators |
| Filter | Unique 15-mode multimode analogue filter (LP, HP, BP, Notch, Phase Shift) |
| Envelopes | Filter DADSR envelope and amplifier ADSR envelope with exponential curves |
| Modulation | 11 modulation sources including 2 audio-rate LFOs, velocity, aftertouch, keytracking and joystick axes |
| Sequencer | 12-row, 32-step sequencer with parameter/CC automation |
| Animator | Note-triggered parameter sequencer with 12 simultaneous rows |
| Arpeggiator | Comprehensive arpeggiator with multiple direction modes, hold and octave options |
| Effects (with optional Digital I/O Board) | Chorus/Flanger, Stereo Echo/Delay and Reverb with 1000 FX presets |
| Audio Outputs | Stereo combo sockets (balanced XLR or unbalanced TS), individual analogue voice outs via D-Sub, headphone jack |
| Audio Inputs | Two mono TS inputs for processing external audio through the analogue VCF and VCA |
| MIDI | 5-pin DIN In/Out/Thru, USB-MIDI (class compliant) and optional USB Audio/MIDI |
| Connectivity | Ethernet port for OS updates, Web User Interface and cloud features |
| Power Supply | AC 90-260V, 50-60Hz via standard grounded IEC power cord |
| Display | High quality 4.3" LCD screen |
| Controls | Aluminium-turned encoders, backlit keypad, datawheel and 6 menu buttons |
| Construction | Black metal case with aluminium controls |
| Operating System | OS Version 1.03, updateable via internet |
| Safety | No user serviceable parts inside; service only by qualified personnel |
| Maintenance | Keep away from water, ensure free air movement, clean with dry cloth when unplugged |
| Repair and Support | Contact support@modalelectronics.com for remote support and diagnostics |
Frequently Asked Questions - MODAL 008R Modal Electronics
User questions about MODAL 008R Modal Electronics
0 question about this device. Answer the ones you know or ask your own.
Ask a new question about this device
Download the instructions for your Musical synthesizer in PDF format for free! Find your manual MODAL 008R - Modal Electronics and take your electronic device back in hand. On this page are published all the documents necessary for the use of your device. MODAL 008R by Modal Electronics.
USER MANUAL MODAL 008R Modal Electronics


Machines for
Musicians
Modal Electronics 008R
8 voice polyphonic analogue synthesiser
User Manual
OS Version - 1.03

WARNING – AS WITH ALL ELECTRICAL PRODUCTS, care and general precautions must be observed in order to operate this equipment safely. If you are unsure how to operate this apparatus in a safe manner, please seek appropriate advice on its safe use.
Please ensure you read this Modal 008R 'Quick Start Guide' before attempting to operate this apparatus.
THIS APPARATUS IS HEAVY – observe lifting and handling precautions when moving it. Also ensure that the apparatus is placed on a suitable stand so as to enable safe operation and prevent toppling.
This apparatus MUST NOT BE OPERATED NEAR WATER or where there is risk of the apparatus coming into contact with sources of water such as sinks, taps, showers or outdoor water units, or wet environments such as in the rain. Take care to ensure that no liquids are spilt onto or come into contact with the apparatus. In the event this should happen remove power from the unit immediately and seek expert assistance.
Be careful to allow free air movement around the apparatus and do not block any air vents or exits during operation - this apparatus produces heat.
This apparatus produces sound that could cause permanent damage to hearing. Always operate the apparatus at safe listening volumes and ensure you take regular breaks from being exposed to sound levels
THERE ARE NO USER SERVICEABLE PARTS INSIDE THIS APPARATUS. It should only be serviced by qualified service personnel, specifically when:
- The apparatus has been dropped or damaged in any way or anything has fallen on the apparatus
• The apparatus has been exposed to liquid whether this has entered the apparatus or not - The power supply cables to the apparatus have been damaged in anyway whatsoever
- The apparatus functions in an abnormal manner or appears to operate differently in any way whatsoever.
00. Introduction 6
01. I just want to play this thing... 8
Power on 9
Screen Controls 10
Patch Screen 12
Load Patch 13
Patch storage 14
02. Connections 16
03. Synthesis Engine 18
Oscillators 20
Mixer 22
Filter 24
Filter Envelope 26
Amplitude Envelope 28
LFO's 30
Modulation 32
04. Keyboard and Quick Recall 36
Key Modes 37
Keyboard 38
Quick Recall 40
05. Sequencer, Animator and Arpeggiator 42
Sequencer 44
Animator 48
Arpeggiator 50
Modes 51
06. Dual and Split 52
Performance Mode 53
Performance Edit 54
Performance Storage 56
07. Snapshot 58
08. Digital Input/Output Board 60
09. Settings 70
- Web User Interface 84
00 Introduction
Modal 008R is an 8-voice analogue synthesizer.
It features two 100% analogue VCO's per voice with two sub oscillators, an innovative and extremely flexible 15 multi-mode filter, VCA, 11 modulation sources, including two audio rate LFOs, with unlimited destinations and a very powerful Sequencer and Arpeggiator.
The hardware has been manufactured with high-quality components: black metal case, aluminum turned encoders and high quality 4.3" LCD screen.
Among the many connections, Modal 008R features an ethernet port to connect your synth to your network and enable updates via the internet (no need for MIDI sysex dumps) and also access to the Modal cloud features and HTML Web User Interface.
Please update your unit immediately
Internet connectivity is a key-point for Modal products: we release updates on a regular basis, constantly providing new features and bug fixes.
Please read 'Settings' (chap.8) for a more detailed description of the update procedure.
01
I just want to play this thing...
Power on
Connect the power lead to your 008R then connect the output of the 008R to your mixer, or if you prefer connect your headphones.
Also connect an ethernet cable from your router to the 008R.
In order to maintain a high Signal to Noise Ratio the voices are alternatively split left and right (eg. 8 voices are split 4 voices on the left and 4 on the right), so we recommend panning the two channels slightly off centre on your mixer or audio interface.
Before powering up ensure the volume control is at minimum, analogue electronics during first power on create a ‘pop’ and this may cause damage to your speakers and the sound guy’s ear drums.
Then power on.
You will see a progress bar on the screen. When the synth has loaded it will change to show the main patch page.
Press down a key and slowly turn up the volume to a comfortable level.

If your 008R is out of tune then you would need to run the 'Auto Tune' feature. We recommend waiting for your 008R to warm up (approx. 10 mins) before navigating to Settings using the sixth 'menu button' (F), then selecting Global (5th option) and then Auto Tune (1st option). A confirm page will appear where pressing the first 'menu button' (A) will start the procedure. The next section 'Screen Controls' explains in more depth how to navigate the synth if these steps seem hard to follow.
The Modal 008R interface is designed to be extremely intuitive and easy to use, so that all the most important parameters are easily accessible and tweakable.
P1, P2 and P3 Controls
By default the three encoders to the right of the main 'screen controls' can be used to quickly navigate around the interface. P1 controls what page is shown, P2 can be used to select a parameter on that page and P3 can be used to change the value of that parameter.
They can be also used to load patches, sequences etc. P3 will scroll through the patch database and turning P2 once will load the currently selected patch.
Keypad
Hover mode
You can use the keypad to select a specific parameter box on the screen - you can see the subscript numbers shown in the bottom left of every box in every screen page (except for the patch loading page).
Edit mode
You can use the keypad to type the value of that parameter.
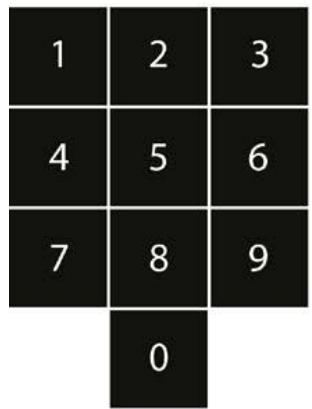
Key 0
In hover mode on every page key 0 is assigned to the 'X' exit button. In edit mode typing 0 before entering other values allows for minus numbers to be entered. For example typing 0, 2, 4 would make -24.

Hover mode
Dark grey cursor and white text. Turning datawheel and +/- navigates around the screen to different parameters. Keypad can be used to shortcut to specific parameters and enter edit mode. Push datawheel or press select to switch to edit mode.
Edit mode
Light grey cursor and black text.
Turning datawheel and +/- changes values of currently selected parameter.
Keypad can be used to type parameter values. 0 followed by a number is a minus.
Push datawheel or press select to switch to hover mode.


Select button
Alternative to pushing datawheel, up to user's preference. Select is mainly used for switching between hover / edit mode. So you navigate to a parameter in hover mode then press select to edit the value. It is also used to load patches.
+ / - buttons
Alternative to turning datawheel. Pushing once increments one step. Pressing and holding repeats increments.
Datawheel
Large rotary encoder for data selection and entry. Turning clockwise increments, anti-clockwise decrements and pushing selects. Same functionality as the Select and + / - buttons.

Menu buttons
6 buttons below the screen to navigate quickly to different sections.
Some are dual function, where pressing twice will bring up other pages.
Links up to bottom menu of the screen
After power on you will be shown the Patch screen. This screen shows you the currently selected patch, as well as some useful details about the current patch.

- Patch Number - is always shown as 4 digits (0000), the first two digits represent the bank number (00xx - 99xx) and the last two the patch number (xx00 - xx99) within the bank. There are 100 banks of 100 patches in total (0000 - 9999). If the patch number is highlighted in white then it is the currently loaded patch number.
- Patch Name - Patch names can be up to 32 characters long.
- Keyboard Transpose - the keyboard section shows the current octave and transpose settings for the current patch. The numbers on the keys show the midi note value for each octave, so in the example above C2 to C7. We use C4 as middle C (MIDI note 60) but the white value on the right shows the current note on middle C with octave and transpose applied.
- Midi Channel - the current midi channel 008R recieves and sends on. This can be changed in the Settings > MIDI menu.
- Key Mode - Polyphonic, Monophonic, Unison or Stack. Within the graph each line represents a voice, each different height the number of notes that can be played at once and the gap between the lines the detune amount (only used on Unison and Stack).
- Arpeggiator Status - whether arpeggiator is currently on or off
- Animator Status - whether animator is currently on or off
If you want to load another patch:
- Scroll through the patches either using the Datawheel, or the '-/+’ buttons above, or directly type the slot patch number with the keypad
- Now you see a different patch name, but no new patch has been loaded yet (the patch number on the left of the screen is grey). If you want to actually load it, press the Select button to confirm your selection: the patch is now loaded (the number is white)
- If you don't want to load a new patch, but just scroll through the patch names, you can keep turning the Datawheel (or pressing the '-/+' buttons) without any harm (the patch number will remain grey)
- You can use the first 'menu button' (A) as an 'Escape' button. If you have scrolled past the current patch, pressing that button returns you to the current patch name (without re-loading it, so you will not loose your edits). The patch number is now white.
Another way to load patches is to use the 'Quick Patch Load' method. While holding down the first 'menu button' (A) you can press the '-/+' buttons to load the next or previous patch.
This method can also be used on any page, not just the patch page and will not switch page when the new patch is loaded. This can be useful if for example you would like to see the filter settings of the previous patch you can stay on the VCF page when switching between patches.
Now feel free to have some fun with your 008R: find a patch that you like and tweak some knobs to modify the sound characteristics.
Then if you would like to save that sound:
- Press the 4th 'menu button' (D) - the LCD will display the storage page. You can save many different types of data (including Performances, Sequences, etc.), but since you are working on a mono-timbral patch, the screen will automatically select Patch Storage.

- If you want to save the edited sound in the same slot (overwriting the previously saved patch) just press Select.
- Alternatively, if you want to save the sound in a different slot, you can select one by either using the datawheel or the '-/+' buttons. Once you found the right slot, press Select to confirm.
- Now the LCD shows the QWERTY keyboard, where you can type a new name for the preset. Using the datawheel (which can also be tapped to confirm selection) is probably the easiest way to type the name. Once you are done, just scroll down to the 'Done' box and confirm.

- You will need to confirm what you have just typed, so press number '2' on the keypad (or Select again), which corresponds to the 'Yes' box. If you are not sure about the name, type '1', which corresponds to the 'No' box.

Please note, Patches are saved with a link to the current Animator number and (if the Link option is on) the current Sequence number. However, if an Animator or Sequence has been edited those changes will not be saved, they would be need to be saved separately with the Animator / Sequence in that slot number.
02
Connections
Headphones
(On the front) A 1/4" stereo jack socket. We recommend using headphones with a minimum impedance of 70 ohms.
Audio In
Two mono TS audio inputs, to process your audio source with 008R's analogue VCF and VCA.
USB-B (Audio, MIDI)
This USB-B port is part of the optional digital input/output board only, and allows the synth to appear as a USB Audio/MIDI device on a computer, providing both audio/MIDI inputs and outputs
MIDI (In, Out, Thru)
To receive/send/pass through MIDI data from/to other devices.

Audio Out
008R's main audio output, featuring a stereo 'combo-socket' outputs with balanced XLR or unbalanced TS plugs. With the standard version of the Modal 008R, four voices are hard-wired to the left, four voices to the right. The optional digital output board instead centres all voices to both outputs, however it also provides custom panning and mixing options.
Analogue Out
D-Sub connector providing individual pure analogue output for each of the 12 voices.
Connect
Internet connection. Connect an Ethernet cable directly to your router to allow updates to the OS, access to the Web Editor and other internet features.
The USB-A port is used for connecting class-compliant USB-MIDI devices and allows MIDI in/out connections. Devices should be connected directly rather than through a USB hub.
Power
AC power inlet, accepting standard grounded IEC power cord. It operates over a range of 90 to 260 volts and 50 to 60 Hz. Connect the cord included with your 008R, then press the power switch on the front panel to turn the synth on.
03
Synthesis engine
In this section we are going to have an in-depth look at every section related to the sound engine of the 008R.
MODAL
ELECTRONICS

回回8R
| 1 | 2 | 3 |
| 4 | 5 | 6 |
| 7 | 8 | 9 |
| 0 |


008R features two 100% analogue oscillators per voice (Voltage Controlled Oscillators - VCO) identified by VCO-1 and VCO-2 labels, each one with its own Squarewave Sub-Oscillator.
008R's VCOs are a traditional sawtooth integrator circuit using carefully selected components for stability and accurate temperature compensation. Analogue wave shaping provides triangle and variable pulse waveforms simultaneously. The VCO outputs have a high amplitude and the drive option in cooperation with the vco level controls can be used to further shape and distort the waveforms, morphing the character of the sourced from smooth and precise to hard and overdriven.
- Waveforms: 008R VCOs can produce 4 different classic analogue waveforms; Triangle, Sawtooth, Pulse and Noise (available on VCO2 only – see below): just press the related button to activate the waveform and you will see the LED lighting up. Our particular design allows the oscillators to output multiple waveforms simultaneously: the different waveforms are mixed internally and their overall volume is regulated by the Mix parameter (see below).
- Note: These two encoders control the tuning of each oscillator in semitones, covering a range from -24 to +24 semitones.
- Fine: For VCO1 this parameter controls the fine tuning of the oscillator, with a range from -1 to +1 semitones. For VCO2 this parameter controls the Linear Detune value of the oscillator, with a larger detune range for lower notes/pitches."
- Sync: VCO2 has a hard synchronisation input driven by VCO1. When this option is On, the two oscillators are hard-synced. VCO1 is the 'slave' oscillator: you can detune it or modulate its pitch, but it will always follow VCO2 'master' pitch.
- Pulse Width (PW): If the Pulse waveform is enabled, this parameter acts as a Pulse Width control, with a maximum value of 255 corresponding to a squarewave.
- Noise: A noise generator is available on VCO2 only and, if enabled, the Sub2 encoder works as a volume knob for it. The Mix encoder still works as an overall oscillator volume after the noise volume. This means that if you want to hear the noise wave only, you need to disable the Triangle, Saw and Pulse waves and turn up the Mix VCO2 level and use Sub2 level to control the noise level.
- VCO-2 Mod: This option controls the amount of modulation the VCO2 signal will apply on either or both the VCO1 frequency and the VCF Cutoff frequency. Please note that you can tap the encoder to select the modulation destinations: you have 4 options (both Off, VCO1 only, VCF only, both VCO1 and VCF) and the two LEDs on the front panel will mirror the selected choice. VCO2 modulating VCO1 is generally referred to as 'Frequency Modulation (FM)', while VCO2 modulating Filter Cutoff is commonly called 'Filter FM'.

You can easily mix the signals coming from the oscillators in the Oscillator section on the front panel or the Mix section on the LCD:
- Mix VCO1: This parameter controls the volume coming from Oscillator 1.
- Mix VCO2: This parameter controls the volume coming from Oscillator 2.
- Sub1: This parameter controls the volume coming from the Sub-Oscillator linked to Oscillator 1. This sub-oscillator produces a squarewave one octave below the played note.
- Sub2: This parameter controls the volume coming from the Sub-Oscillator linked to Oscillator 2. This sub-oscillator either produces a squarewave one octave below the played note or regulate the noise volume if the Noise waveform is enabled.
Not accessible from the front panel - only editable via screen controls:
- Ext In Left/Right: These two parameters control the volume of the incoming external audio signals, if there are external sources connected to the 008's Audio Input.
You can process any instrument producing a 'line' signal (e.g. a drum machine, another synth or DAW output) with our VCF and VCA, through a pure analogue signal path.
You have two separate controls for L and R Inputs, so you can effectively process two separate mono sources: please bear in mind that Left input is wired to voices 5 and 7, while the Right input is wired to 6 and 8, so if the Ext In Left or Right control is above 0 the polyphony of the instrument is reduced to 4 voices. Therefore if you do not wish to use an external input please keep these controls at 0 for maximum polyphony.
Please note that external inputs are available on VCO2 only, with the Mix VCO2 encoder working as an overall oscillator volume. This means that if you want to hear the external inputs only, you need to disable Triangle, Saw, Pulse and Sub2 and turn up the Mix VCO2 level.
Please note that mixer levels over 200 begin to drive the oscillator into the filter and will cause distortion. If two or more VCOs are set to the maximum value of 255 it can cause clipping, so if you want a clean sound please stay below 200.


Modal 008R uses a unique and novel 15 multi-mode analogue filter design providing extreme flexibility in terms of filter types and responses. The VCF processes the signal coming from the oscillators (or from an external source).
The resonance network is carefully designed to allow smooth and predictable sine wave tones on demand. The filter is subject to autotune allowing the self oscillating filter to track the keyboard across the full 10 octaves and be played as a polyphonic 3rd oscillator. Like every true polyphonic synthesiser, Modal 008R has an individual VCF per voice.
- Cutoff: This parameter controls the low-pass filter cutoff frequency. The minimum value (i.e. 0) corresponds to about 40 Hz.
- Reso: This parameter controls the amount of resonance of the filter.
- Constant: Increasing the Reso value, especially with some filter modes, can cause an overall volume drop: the Constant option activates a volume compensation algorithm to counteract this effect.
-
Mode: 008R peculiar filter design features 15 different modes:
-
Low-Pass (1LP, 2LP, 3LP, 4LP): classic low-pass filter design, from a 1-pole (-6dB/oct) to a 4-pole (-24dB/oct) configuration
- Notch (2N): notch filter design in a 2-pole (-12dB/oct) configuration. High Reso values narrow down the selected frequency range to be removed
- Notch + LowPass (2N+LP): combination of the previous notch filter design with a 1-pole low pass filter
- Phase Shift (3PS): this filter mode shifts the phase of the incoming signal. It is a 3-pole phaser and by adjusting the cutoff parameter its phase response is changed
- Phase Shift + LowPass (3PS+LP): combination of the previous phase shift filter design with a 1-pole low pass filter
- Band-Pass (2BP, 4BP): band-pass filter design, both in 1-pole and 2-pole configurations
- Hi-Pass (3HP, 2HP, 1HP): classic high-pass filter design, from a 1-pole to a 3-pole (-18dB/oct) configuration
- High-Pass + Low-Pass (3HP+LP, 2HP+LP): a combination of hi-pass and low-pass filter designs with linked cutoff frequencies: hi-pass filter comes with a 2-pole or 3-pole design, while the low-pass is either case 1-pole

Modal 008R envelopes have true exponential slopes on all curves. All envelope parameters are ‘voltage controlled’ allowing dynamic modulation of the curves and levels by any of the internal modulation sources.
The deep modulation capabilities of the envelopes allow multiple sources to modulate the curves by unique and independent amounts and even recursive modulation.
These factors combine to allow a depth of programming and modulation only before experienced in modular synthesisers.
Modal 008R provides a dedicated 5-stage DADSR contour generator for the filter, whose parameters can be controlled in the VCF-EG front panel section. This envelope modulates the filter cutoff frequency, if a value different from zero is set for the filter Amount parameter. This envelope can also be used as a modulation source.
- Delay: This parameter controls the time passing from the moment you press a key (i.e. 'MIDI Note On' message) until the envelope actually starts its initial phase (i.e. the Attack). During this Delay time the envelope stays totally closed.
- Attack: This parameter controls the time passing from when the Delay phase is over until the envelope reaches its maximum value. If Delay is 0, then Attack is equal to the time passing from the moment you press a key until the envelope reaches its maximum value.
- Decay: This parameter controls the time passing for the envelope to drop from its maximum value to a sustain level (see below).
- Sustain: This parameter controls the level of the sustain phase of the envelope while keeping the key pressed: this value is reached immediately after the Decay phase, until the note is released. For a quick filter sweep, put Sustain to 0 and a short Decay time.
- Release: This parameter controls the time passing from the moment you leave a key (i.e. 'MIDI Note Off' message) until the envelope reaches 0 value.
- Amount: This parameter controls the amount of envelope modulation applied to the VCF Cutoff frequency. Note that this parameter can also have negative sign.
TIP: use a high negative EG value combined with a long Release on the Envelopes, in order to get some nice ‘filter-opening’ effects when releasing the keys. - Assign: The VCF envelope can be effectively used as a modulation source: by holding down Assign button you can assign this envelope to any modulation destination by simply turning the related knob on the front panel. Please note that every single destination can have a unique modulation amount. Please refer to the Modulation section for a more detailed description.

Modal 008R provides a classic 4-stage ADSR contour generator for the amplifier, whose parameters can be controlled in the VCA-EG front panel section. This envelope modulates the amplitude level of the voice, if a value different from zero is set for the filter Amount parameter.
- Attack: This parameter controls the time passing from the moment you press a key (i.e. 'MIDI Note On' message) until the sound reaches its maximum value
- Decay: This parameter controls the time passing for the sound to drop from its maximum value to a sustain level (see below)
- Sustain: This parameter controls the level of the sustain phase of the sound while keeping the key pressed: this value is reached immediately after the Decay phase, until the note is released. For a percussive sound, put Sustain to 0 and a short Decay time.
- Release: This parameter controls the time passing from the moment you leave a key (i.e. 'MIDI Note Off' message) until the sound reaches silence
- Drive: This button activates the VCA's 'drive mode': when this mode is on, the gain of the VCOs are boosted while simultaneously reducing the final output to maintain the same audio level.
- Amount: This parameter controls the amount of envelope applied to the VCA. If this parameter is set to 0 you hear silence, while turning it up causes the volume to increase.

The two LFOs provided on the Modal 008R are extremely flexible providing both envelope and LFO functions, both with identical parameters and are both global.
The LFOs have individually adjustable delay and release controls allowing the fade in and fade out of modulation to be musically controlled. In single shot mode, this allows the LFOs to be a true exponential Attack-Release envelope generator with the wave set to square, and an Attack-Decay envelope generator with the wave set to saw.
The LFOs can reach audio rates and can be mapped to any analogue destination:
- Depth: This parameter controls the global depth for all LFO modulation for either LFO1 or LFO2.
- Waveform: This switch allows you to choose one among the four available LFO waveforms (i.e. sine, sawtooth, square and sample & hold).
- Rate: This parameter controls the speed of the LFO.
- Delay: This parameter controls the initial delay of the LFO. The LFO is initially silent, then it's amplitude increases until it reaches its full amplitude and keeps constant: 'Delay' regulates the time needed to complete this initial phase.
- Release: This parameter regulates the time needed for the LFO to decrease its amplitude until it becomes silent once it has entered the 'Release' phase. Note that when an LFO is in 'single' mode the value is reversed - a release value of 0 = no release, 1 = very slow release, 255 = instant release.
- Sngl: This button activates the LFO's 'single' mode. When this mode is on, for the sine/saw/random waveforms just a single cycle of the waveform is read every time you press a key, then the LFO stops; however using the square waveform instead sets the LFO to behave as an Attack-Release envelope generator.
TIP: if using a sawtooth waveform, the LFO turns into a simple ‘decay envelope’, that can be extremely useful to modulate many different parameters, like oscillators’ pitch (see ‘Modulation’ section - later in this same chapter).
-
Reset: This button activates the LFO's 'reset mode': when this mode is on, the LFO retriggers on each new note received.
-
MIDI Sync: This button activates the LFO's 'MIDI sync mode': when this mode is on, the LFO is synced to the MIDI clock tempo.

The Modal 008R has extremely comprehensive and flexible modulation capabilities. A total of 11 modulation sources are available to modulate every variable parameter on the synth by its own unique depth at a super smooth sample rate of 10 kHz.
Sources: The available sources are LFO1, LFO2, Velocity, Aftertouch, Note (Keytracking), the four joystick axes (X+ right, X- left, Y+ up and Y- down), External Input (Expression pedal socket on the rear) and FEG (Filter Envelope).
Assign Modulation
Assigning modulation is very simple and there are three easy ways to do it:
Front Panel: Press the Assign button for the source you want to assign the modulation to and the modulation matrix page for that source is shown. This page allows you to scroll through all possible destinations and visualise or edit what depths have been assigned for that source.. The assign buttons are all located on the right. The only exception is the Recall button, that switches the first 8 buttons to Quick Recall mode.
Matrix: On the LCD parameters screen, 3rd 'menu button' (C), there is a Modulation Matrix page (option 10). This displays a page showing all sources of modulation, as well as their destinations and depths. More information on this page can be found in the next section, 'Modulation Matrix'.
Per Page: On the LCD if any parameters on a page are available to be modulated the page icon (top left) is highlighted in white. Selecting this icon will allow you to select a source of modulation then allow you to assign a parameter to this source of modulation. This is also the page that is shown when using the front panel to assign modulation.
TIP: A quick and easy way to see if a parameter has any modulation active is to navigate to the page where the parameter is located. Then by selecting the page icon, top left, you can scroll through the available sources and the values of that page will update to show the modulation depths for the selected source.


In order to quickly see what modulation is routed where, we have made a Modulation Matrix page that allows you to quickly navigate, visualise and edit all the modulation for 008R.
The Modulation Matrix page is split into two main sections. One that allows you to select a modulation source and one that lets you select a modulation destination.
Select Source
Upon first navigating to the Modulation Matrix page you will be scrolling around the sources across the top bar. Pressing select or pressing the data wheel will allow you to scroll down the list of destinations for that source.
You can also select sources by pressing the modulation source assign buttons on the front panel, without turning any destination knob. This will send you to the same page as selecting a source across the top bar. However, this method has the benefit of not resetting the users postion in the destinations list. This means that if you have navigated down the destination list by pressing different modulation source assign buttons you can quickly see if there is any modulation on the destination you have navigated to.
To return to the Select Source section when you are on the Select Destination section you can either navigate to the top of the list until the source is highlighted in white or press 0 on the keypad.

Select Destination
Once you have selected a source you can scroll down a list desitinations. The available destinations and their order are displayed in the table below. The final destination, PitchBend Amount, is only available for the joystick axes:
| Destination | Destination | Destination | Destination | ||||
| 1 | VCF - CutOff | 10 | VCO2 - Mod | 19 | FEG - Release | 28 | MIX - Sub2 |
| 2 | VCF - Reso | 11 | VCO1 - PW | 20 | FEG - Delay | 29 | MIX - ExtIn L |
| 3 | VCO1 - Note | 12 | VCO2 - PW | 21 | AEG - Attack | 30 | MIX - ExtIn R |
| 4 | VCO2 - Note | 13 | VCO1 - Fine | 22 | AEG - Decay | 31 | LFO1 - Delay |
| 5 | VCA - Amount | 14 | VCO2 - Fine | 23 | AEG - Sustain | 32 | LFO1 - Release |
| 6 | LFO1 - Depth | 15 | FEG - Amount | 24 | AEG - Release | 33 | LFO2 - Delay |
| 7 | LFO1 - Rate | 16 | FEG - Attack | 25 | MIX - VCO1 | 34 | LFO2 - Release |
| 8 | LFO2 - Depth | 17 | FEG - Decay | 26 | MIX - VCO2 | 35 | KEYB - Glide |
| 9 | LFO2 - Rate | 18 | FEG - Sustain | 27 | MIX - Sub1 | 36 | PBEND - Amount |
There is a scroll bar on the left hand side and each destination is numbered so that you know how far down the list you have scrolled.
To change the depth of a destination navigate to and highlight the one required using the +/- or data wheel then press select or press the data wheel. You can also type the destination number displayed in the table using the keypad. Pressing select or pushing the data wheel again will allow you to scroll the destination list again.
Reset Modulation
On the Modulation Matrix page you can reset the modulation for either a source or a destination by holding down select or the data wheel.
If you are currently on the Select Source page holding down select will show a confirm page to reset all modulation for the highlighted source.
If you are currently on the Select Destination page holding down select will show a confirm page to reset all modulation for the highlighted destination.
04
Keyboard and
Quick Recall
In this section we are going to discuss the bottom-left area of the front panel interface, which includes various settings for keyboard and quick recall options.
Key Modes
The KeyMode option sets the keyboard polyphony and the allocation method for the voices. 008R has 4 different KeyModes:
- Poly: standard polyphonic mode, where you can play up to 8 notes simultaneously, each one using one single voice and uses most recent note priority
- Mono: standard monophonic mode, where you can play just one note at time, using just one voice
- Unison: standard unison mode, where you can play just one note at time (mono keyboard), but you can use up to 8 voices simultaneously for that note
- Stack: special ‘poly/unison’ mode, where you can decide how many notes you can play together (polyphonic keyboard) and also how many voices the Modal 008R uses for each note. E.g. with a Size of 4 voices, you can play up to 2 notes simultaneously, with each note using 4 voices, because you have 8 voices available. This mode uses most recent note priority
Modal 008R has several options for the keyboard in order to transpose, control glide and manipulate different voices.
- Octave: this parameter controls the octave shift of the keyboard, allowing you to transpose the whole keyboard by up to 2 octaves up or down
-
Glide: this parameter controls the speed with which the oscillators change their pitch, 'sliding' from one note to the next one pressed:
-
a large value will mean the 'glide' takes longer to reach the new note
- a shorter value will result in a quicker 'slide'
The 008R glide unit has a rich feature set allowing both linear and exponential glide curves in both 'normal' and 'auto' modes. The glide circuit can be modulated by any of the internal sources allowing velocity, note, LFO or other sources to dynamically adjust the glide rate for natural sounding variations in the portamento time.
- Auto Glide: this parameter controls the mode of the glide unit. In 'auto' mode the glide circuit is enabled only when overlapping notes are played, also known as legato. In 'normal' mode the glide circuit is always enabled.
- Glide Curve: this parameter controls the shape of the glide curve between notes, either linear or exponential.
- Transpose: This allows you to transpose the Keyboard, Sequencer and Arpeggiator. To use the function simply hold down the transpose button whilst pressing a key on the keyboard. A 'Zero' transpose is obtained by pressing the third C from the bottom of the keyboard.
- Chord: This allows you to transpose a stored chord when pressing a single key. The key held down is the root note of the chord. To turn on chord mode hold down a chord via MIDI-in to set that chord to be transposed when playing notes (via the keyboard, MIDI-in, arpeggiator, and sequencer) then select the Chord button on the LCD. Chord mode only works in poly and stack modes.
- Size: (available for both Unison and Stack modes): this parameter controls how many voices the synth is using for a single note
- Key Mode: Select between Polyphonic, Monophonic, Unison and Stack
- Spread: this parameter controls the amount of frequency detuning between the currently used voices (note that this is different from oscillators Fine parameter, which is the amount of frequency detuning for the 2 VCOs in the same voice)

Eight Quick Recall buttons can be enabled to build lists of patches, sequences and animations etc. that can be quickly accessed or stored.
To enable Quick Recall's on the front panel of 008R push the button labelled Recall in the bottom right. This enables the first 8 modulation source buttons to act as Quick Recall buttons instead. To disable simply push the Recall button again.
To load a Quick Recall press and release the button. A list of what is currently on the Quick Recall buttons can be seen on the main Quick Recall page that can be accessed by pressing the third 'menu button' (C) twice.
On this page you can also load a new bank of Quick Recalls, banks can be saved in the same way as patches or sequences and up to 100 banks are available. The bank contains the 8 Quick Recall slots that are present at the time of saving.
To access a slot to edit or load via the screen navigate to the corresponding slot number and press 'Select'.

The Quick Recall Slot page shows what is currently on the slot as well as providing options to load or edit the slot.
There are 6 different types of Quick Recall Slot:
- Patch: this will load a Patch
- Performance: this will load a Bi-timbral (two patch) setup, sequences and animations
- Sequence: this will load a Sequence
- Sequence Set: coming soon
- Animator: this will load an Animation
- Recall: this will load a new Quick Recall Bank
To quickly save a Quick Recall Slot press and hold the Quick Recall button corresponding to the slot number you want to save into.

05
Sequencer, Animator and Arpeggiator
In this section we are going to explain three very important features of the Modal 008R: first of all, our very powerful 12 row, 32 step Sequencer; secondly, a unique tool called Animator, a note-triggered sequencer for parameters that allow you to create complex modulations; finally, the 008R's Arpeggiator.
To access the screen page related to the Sequencer or Animator, use the second 'menu button' (B). The Arpeggiator screen is located on the main parameters page, third 'menu button' (C).
On each page there are some key parameters to edit and control each feature:
- the Tempo parameter, (expressed in BPM) controls the speed of the Sequencer, Animator and Arpeggiator. This parameter is located in the top right of the screen, but can only be accessed on certain screens. If the parameter is accessible then the tempo has a darker font colour.
• the Clock start/stop, starts the internal clock, which starts the Sequencer running. - Backward/Forward buttons, for changing the step position on the LCD (both for the Sequencer and the Animator)
- a Mode parameter, for changing the direction mode of the sequence/or animation/arpeggiator
- Up/Down buttons, for changing the two currently displayed rows on the LCD (both for the Sequencer and the Animator)
The Modal 008R Sequencer allows you to create up to 12 simultaneous sequences of up to 32 Steps, each of which allows you to create up to 12 rows of notes or parameter/CC automations.

The previous screenshot shows the main Sequencer page on the LCD. On the top row you can find:
- Sequence Number/Name: these two boxes show the current sequence slot number and name which can be used to load sequences in almost the same way that patches are loaded (see chapter 1). You just need to select the Sequence name, scroll through presets and then press 'Select' to confirm.
- Status: this switch controls the status of the currently selected sequence: if On, the sequence is active and it will play as soon as you tap the Tempo knob; if Off, it will not play, even if you start the Sequencer with the Tempo knob.
You will notice that this parameter automatically turns On as soon as you load a new sequence from the Name box (if it previously was Off).
Please also note that this parameter is mostly useful in 'Performance Mode' (see 'Multi-Timbrality' - next chapter), as it controls the status of the currently selected part only.
The only reason why you would turn this parameter Off in 'Patch Mode' is if you are synced to an External MIDI Clock (see 'MIDI Settings' section in chapter 8) and you do not want it to start/stop the Sequencer.
- Setup: this button gives you access to a sub-menu with further controls for sequence editing (see below).
In the top menu after the page title 'SEQUENCER' the current step position of the screen and front panel is shown. Although the step sequencer can have 32 steps only 8 steps can be shown and edited at a time.
Underneath the first row, you can find:
- A set of 4 direction buttons on the left-hand side, for changing the rows (Up/Down arrows) and the 8 steps (Backward/Forward arrows) being displayed on the LCD.
• Note/Parameter Selection: these two boxes allow you to select the row function.
On the Sequencer, a row can either play a note sequence or modulate a parameter/CC. The screen can only show two rows a time. You can use the Up/Down arrows to scroll between rows.
On these 'selection boxes', a value of 0 means an empty row, a value of 1 is a note row, while values greater than 2 are parameters/CCs.
To add a row, just scroll down, select the empty box and use the screen controls to choose the type of row.
Please refer to the Midi Implementation Chart at the end of the document for the full list of internal parameters which can be modulated by the Sequencer: you will notice that it can control almost any parameter available in the 008R, considerably expanding the synth modulation possibilities.
Besides notes and parameters/CCs, there are 3 special (fixed) rows, to allow further control on each step:
• Gate Length, expressed in percentage of related Step Length;
• Velocity, between 0-127 (active just on note rows);
- Step Length, expressed in beat divisions.
By default, the Sequencer page shows the Step Length row in the first position for quick pattern editing. Velocity and Gate Length rows are located just above it, while notes and parameters can be added below.
- Destination: on the right of 'selection boxes', you can find 'destination boxes'. Notes and parameters can either be routed to the internal sound engine (Int), or sent as MIDI Note/CC messages externally (Ext), or Both, making the 008R a very flexible 'master instrument' in your studio setup.

Values: Each row contains a set of 8 steps and each step has its largest part showing its current value (e.g. note number, CC value, step length, velocity and gate length). These values can be edited by turning the front panel push-dials and/or by using screen controls.
By default, the Sequencer page shows the first 8 steps (i.e. 1-8): if you want to reach and control the following steps, you can just press the Backward/Forward arrows.
Steps: each step has an inner little box on its bottom-left corner with a letter 'S' on note/CC rows or 'J' on the step length row. This option allows you to edit secondary values:
• on the note/CC rows, it controls the step Status (which creates a rest if turned OFF)
- on the step length row, it controls the Jump value (which causes the step to be ignored if turned ON, directly jumping to the next step)
Legato: on note/parameter rows, each step has an inner little box on its bottom-right corner with a letter 'L', which stands for 'legato'.
On a note row if Legato is on, the Note Off message of the selected step will be triggered after the Note On of the following step.
On a CC row if Legato is on, the parameter will slew to the next step value allowing you to create a smooth transition between steps. (Not available for Digital IO board parameters)
The Setup sub-menu page contains the following options:
- Mode: allows you to set the direction mode of the sequence. You can use either the dedicated button or the screen controls to change the value of this parameter.
The available Mode options are similar to those of the arpeggiator (see end of this chapter) - Start: the start step of the sequence
- End: the end step of the sequence
- Swing: allows you apply swing to the sequence. A positive value delays the even step, however a negative value brings the even step forward in time
To exit the Setup page, select the Setup button again, or just type '5' (or also '0') with the keypad, provided that nothing is selected.
To Save a sequence, just press the 4th 'menu button' (D). If you were already in the Sequencer page, it automatically recognises that you are going to save a sequence (instead of a patch) - from now on, the procedure is identical to Patch Storage (see chapter 1).
Please note that patches and sequences are totally independent of each other. This means that when you save/load a new patch, 008R will not save/load a sequence together with it: to do that, you need to save both in a Performance (see 'Performance Storage' section, chapter 6).
The Animator is basically another Sequencer for parameters, but it's triggered by notes: if enabled, each note retriggers the animation when pressed.
Also, exactly as in the normal Sequencer, you can have 12 rows running simultaneously and they can control almost any parameter available in the 008R.
This makes the Animator a very powerful and flexible modulation source.
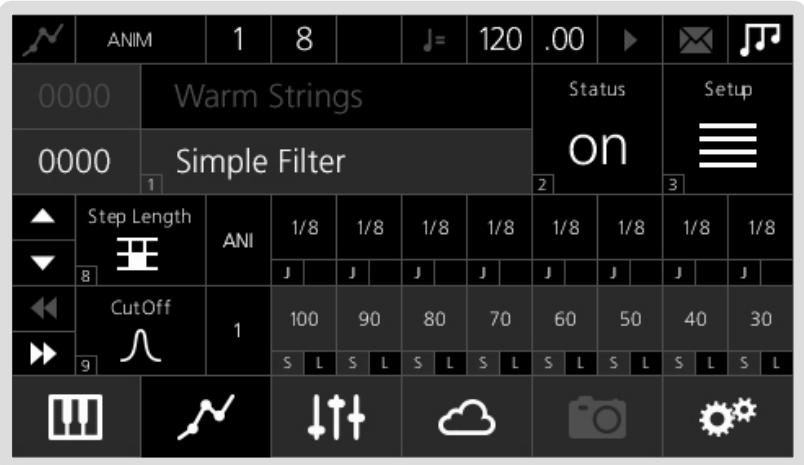
The main Animator page is very similar to the related Sequencer page, with the only differences being:
• there are no Gate Length and Velocity rows (as you would expect);
- being a modulation source for parameters only, you can't add a note row.
Legato: on parameter rows, each step has an inner little box on its bottom-right corner with a letter 'L', which stands for 'legato'. If Legato is on, the parameter will slew to the next step value allowing you to create a smooth transition between steps. (Not available for Digital IO board parameters)
Please, refer to the Sequencer section (see above) for a detailed description of all the parameters.
Also the Setup sub-menu page looks similar to Sequencer's one with the addition of a Relative/ Absolute mode and Animator Cycle Mode
If ‘relative’ mode is enabled, the Animator will take ‘relative’ control of the assigned parameters by default. This means that the current parameters value is offset by the current step value. In ‘absolute’ mode the current step value will override the current parameters value.
Animator Cycle Mode controls if the animation loops or only plays once when triggered. There are three options:
- Loop - when the animation ends it will loop back to the beginning.
- Single+Reset - when the animation ends the animated parameters are set to the patch values.
- Single+Hold - when the animation ends the animated parameters are set to the animations last step values
Once enabled, the Animator will take 'relative' control of the assigned parameters by default. This means that the current parameters value is offset by the current step value. In 'absolute' mode the current step value will override the current parameters value.
It is important to understand that (unlike sequences) animations are linked to patches. The Animator is intended as a real modulation source ‘built into’ the patch, so its settings (including Status) are automatically recalled every time you load a new patch (exactly as e.g. LFOs or Velocity modulations).
Please note that when you save a patch you save only the link to the animation's slot, not the animation itself (this because you may want to save the edited animation to a different slot, as the same animation can be used by different patches).
As in the Sequencer, as soon as you load a new Animation, the Status automatically turns on.
Please note that both the Sequencer and the Arpeggiator ‘trigger’ the Animator: this means that each repeated step will be ‘animated’ (provided that you have long enough Step Length and Gate Length values).
This can lead to very complex modulations, good to design nice evolving pads and highly textured ambient sounds.
The Modal 008R also comes with a comprehensive arpeggiator.

- Status: this parameter activates the arpeggiator. It can also be turned on using the front panel by pushing the left and right buttons below the tempo knob down together.
- Mode: allows you to set the direction mode of the sequence. The available options are similar to those of the Sequencer (see Arpeggiator modes).
- Octave: if this option is on, the arpeggiator will always repeat each note twice with the second note one octave higher, e.g. if playing C3-E3-G3-B3 in 'Forward' mode (see later), you will have C3-C4-E3-E4-G3-G4-B3-B4-C3-C4-E3...
- Hold: if this option is off, you need to hold the keys down to include notes into the arpeggiated sequence (i.e. if you are playing a chord and you leave just one key, the arpeggiator removes that from the sequence, but will keep playing the remaining notes).
Alternatively, if this option is on, you can insert new notes in the sequence without holding the keys down and then remove them by pressing the same keys again. This is a unique feature of the 008R, and allows you to easily access other parameters of the synth while the arpeggiator is running, as well as have more control over the pattern of notes, similar to a full sequencer. - Length: this parameter controls the step length of the arpeggiator, expressed in beat-divisions. This means that the length of each repeated note will be calculated accordingly to the current 'Tempo' value (expressed in BPM).
At the moment, the 'Gate' of the arpeggiator is set at a default value of 50%.
In this section we are going to explain the different modes available for the Sequencer, the Animator and the Arpeggiator.
From now on, 'pressed-order' means the order in which you played the notes; on the other hand, 'note-order' means the keyboard ascending/descending order, no matter which notes you pressed first (i.e. this is the standard meaning of 'order' for classic arpeggiators).
Modes 'fwd1', 'bck1', 'pen1', 'pen2', 'shuf' and 'rand' are available for both the Sequencer, the Animator and the Arpeggiator. Modes 'fwd2', 'bck2', 'pen3' and 'pen4' are available for the Arpeggiator only.
As an example, let's take a sequence of notes in this order G-C-B-E:
- Forward1 ('fwd1'): the arpeggiator repeats the notes in the same pressed-order i.e G-C-B-E-G-C-B-E-G...
- Backward1 ('bck1'): the arpeggiator repeats the notes in inverse pressed-order i.e. E-B-C-G-E-B-C-G-E...
- Pendulum1 ('pen1'): the arpeggiator repeats the sequence forward then backward, playing the first and last notes twice i.e. G-C-B-E-E-B-C-G-G-C-B...
- Pendulum2 ('pen2'): like Pen1, but without repeating the first and last note of the sequence i.e. G-C-B-E-B-C-G-C-B-E-B...
- Shuffle ('shuf'): the arpeggiator generates a random pattern (i.e. a new note order) as long as the number of pressed notes, then it repeats that pattern
i.e. B-E-G-C-B-E-G-C-B-E...
• Random ('rand'): completely random pattern - Forward2 ('fwd2'): like Forw1, but in note-order i.e. C-E-G-B-C-E-G-B...
- Backward2 ('bck2'): like Back1, but in note-order i.e. B-G-E-C-B-G-E-C-B...
- Pendulum3 ('pen2'): like Pen1, but in note-order i.e. C-E-G-B-B-G-E-C-C-E...
- Pendulum4 ('pen4'): like Pen2, but in note-order i.e. C-E-G-B-G-E-C-E-G...
06 Dual and Split
Modal 008R features a 'Performance Mode': in 'Patch Mode', (i.e. the mode we have discussed so far) you can load 1 single sound preset and use all the 8 voices available for it. In 'Performance Mode' you can load 2 sound presets (called 'parts' from now on) and either have them both spread across the whole keyboard in Dual mode or select a key to separate them in Split Mode.
If you are in the standard patch loading page, press the first 'menu button' (A) and the screen will show a confirmation page: if you press 'Yes' (first 'menu button' again), the synth will switch to Dual/Split Mode after a momentary wait message; if you press 'No' (second 'menu button') you will stay in Sngl Mode.

When in 'Performance Mode', the top bar of the screen displays either Low or Up, highlighted inside a grey box, which shows the currently active part. You can switch between Lower and Upper parts by using the Lower and Upper buttons on the front panel or selecting the box on the LCD.
Switch between Dual and Split Mode by selecting the box on the LCD.
To load new presets into the Lower and Upper parts select the either of the two patch boxes (First box is Lower, Second box is Higher) and scroll to the patch you want to load then press Select.
Along the bottom of this main Performance page, you will find:
- Performance Number/Name: these two boxes show the current performance slot number and name (see end of the chapter for a detailed explanation), which can be used to load performances in the same way that patches are loaded.
- Setup: this button gives you access to a page that lets you set different setup options for each of the two parts.

- Channels: this page defines some MIDI settings for Performance Mode only. At the moment, you can set separate MIDI Channels for the 008R's joystick and keyboard. This also allows you to decide on which parts the joystick and the keyboard will be active (i.e. they need to share the same channel - see later in this chapter).
- Key Split: this control allows you to select the MIDI Note (C4 is MIDI Note 60) that is used for the start of the Higher Part split. It has no effect in Dual Mode.
To exit Performance Mode and go back to Patch Mode, just press the first 'menu button' (A) again.
Once you select the Part Setup page from the main Performance page you are shown the page below:

- Destination: this sets where notes and parameter/CC messages are being sent, i.e. the internal sound engine only (Int), external MIDI Out only (Ext), or Both.
- MIDI Channel: this parameter sets what channel MIDI messages from each part are sent out on, as well as the channel of messages that each part will process from the MIDI input. This parameter also defines the interaction between the selected part and the 008R's joystick and keyboard, according to the settings in the Performance Mode's Global menu.
IMPORTANT: please note that joystick and keyboard will be active in the selected part if and only if they share the same MIDI Channel. - Transpose: this parameter sets the keyboard note transpose value for each part.
- Gain: this parameter sets the gain of each part.
- Seq Status: this parameter can be used to control the status of the sequencer for each part.
When you save a patch in Patch Mode, you store all the synth engine parameters, together with Arpeggiator settings and a link to an Animation (if any used) and Sequencer (if link is on). See Patch Storage section in chapter 1 for further details on how to save a patch.
Same thing applies if you store a patch while you are editing a part (not a performance) in Performance Mode.
However, if you are in the main Performance page and you press the 4th 'menu button' (D), it will automatically detect that you are working on an entire Performance and proceed with saving it (as shown in the picture below).

With the word Performance we mean several things together:
• a link to a patch for each part, so up to 12 different patches together
• all the settings for each part (channel, gain, etc.)
• a link to the sequence used on each part and its status
- Channel settings.
07 Snapshot
Snapshot is a feature that allows you to compare your edited sound with the sound that is saved in the currently loaded patch.
When a sound has been edited an asterisk (*) will appear at the beginning of the name to let you know that there are unsaved changes. At this point you can press the snapshot button (menu button 'E') to hear the original sound and the asterisk will dissapear. Pressing this button again will take you back to your edited sound.

When Snapshot is enabled or disabled the user is kept on the current page. A useful example of this functionality is when a user has changed some filter settings on the VCF page but wants to know what the original filter settings were. Pressing the snapshot button will show the saved settings, then pressing again will show the current settings.
Please note any changes made when Snapshot is enabled are discarded when Snapshot is disabled, so re-enabling will go back to the original sound that was loaded, not the sound before disabling Snapshot mode.
Pressing and holding menu button 'E' will reload the original sound and discard any changes you may have made.
08
Digital Input/Output Board
The Modal 008R Digital I/O Card provides the Modal 008R synthesiser with digital audio and MIDI input and output capability over Class Compliant* USB, plus the ability to apply a range of audio effects to the sound presets.
More specifically, the Digital Card allows up to eight channels (one per voice) of audio to be sent to a DAW over a single USB connection at either 48 or 96KHz / 24 bits, as well as 'master' stereo pairs (either with or without effects) over USB at up to 192KHz / 24 bits.
Additionally, it provides a stereo input from a DAW, pre-filter stage on the 008R, allowing external audio to be processed by the 008R analogue VCF and VCA (again at either 48, 96 or 192KHz / 24 bits)
The I/O Card also features three discrete effects buses, with Chorus, Delay and Reverb channels, which can be configured and controlled to create custom effects presets and easily be applied to single timbre patches or multi-timbral performance setups.
USB MIDI works in the same way as the existing MIDI IO of the synth: it works with notes, CCs, pitchbend, program change messages, aftertouch, clock timing/start/stop, and all the existing controls/settings (e.g. MIDI filters) work with USB MIDI as well.
*(class compliant on Apple Macintosh™ computers, may require a driver for some Windows™ PCs)


Modal Digital I/IO Card is USB class compliant* on Apple Macintosh™ computers and as such it doesn't require any installation process: please plug a USB cable from the 008R's 'USB Audio/MIDI' port to an available USB port on your computer and the Digital Card will be ready to use.
In your DAW preferences please select the default CoreAudio driver option, then select the Input/Output Device related to the Digital Card: this should be in the form of 'MODAL 008 x', where 'x' stands for either '48', '96' or '192', according to the value of the 'USB Audio Out Mode' setting on your 008R synthesiser (more details in the next section).
On Mac OSX you can also create an aggregate device in the Audio MIDI Setup page: this allows you to merge the available audio channels on your 008R Digital Card with the ones on your main studio audio interface into a unique audio device. In this case, please make sure that the aggregate device (not the 'MODAL DOB') is selected as Input/Output Device in your DAW preferences.


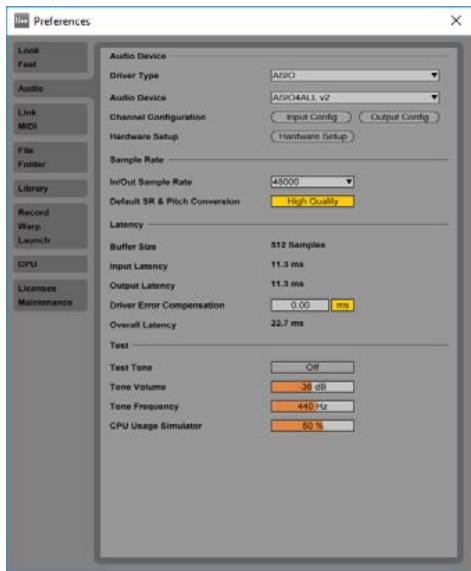
If using the Digital I/O Card for USB audio on a Windows system, Modal recommends using the ASIO4ALL universal ASIO driver. Please download and install ASIO4ALL from http://www.asio4all.com, then plug the USB cable coming from your 008R's 'USB Audio/MIDI' port.
In your DAW preferences please select the Driver Type (where applicable) to 'ASIO' and the Audio Device to 'ASIO4ALL' (to the left is a screenshot of the Ableton Live audio preferences).
Now please open the ASIO4ALL setup window either via the up-arrow icon on the right side of Windows bottom bar, or with a dedicated button which can usually be found on most DAWs (in Ableton Live this is called 'Hardware Setup' - see above screenshot).
Please configure the ASIO4ALL settings to setup the input/output devices you want to use within your DAW. For example, to use your 008R Digital Card as an audio input device (while still using your main audio interface as output device), please enable the MODAL 008R 'In' channels (but not the 'Out' channels) in the ASIO4ALL settings.

*IMPORTANT NOTE FOR WINDOWS USER: if using a Windows operating system the 'USB Sample Rate' on your 008R Settings must be set to '48Legacy'. Other sample rates will not work with Windows OS, resulting in no audio device appearing.
The Modal Digital I/O Card features a digital effects section, which contains three fully controllable FX: Chorus/Flanger, Stereo Echo/Delay, Reverb.
There are 1000 FX presets, and each preset is a combination of the three effects.
The FX main page is accessible either as last option in the Parameters Menu (third button below the LCD) or, more simply, by clicking the 'Assign' button on the right hand side of the front panel.
In addition to this, the three encoders of the 'Assign' section can be used to control the three Digital Card FX Return values (see below).
You can press and hold the 'Assign' button to switch between 'Alternative Page Controls Mode' ('A' LED lit up) and 'FX Controls Mode' ('B' LED lit up).

- Preset Name / Number: in Patch mode, each Patch has a linked FX preset, which is automatically recalled every time you load that Patch. You can change the linked FX preset by loading a different one then saving the Patch. An FX preset contains all the individual FX settings as well as three Return controls, but not Sends and Dry/Wet (see below)
- Dry/Wet: each Patch has standard FX Dry/Wet parameter (0 = fully dry, 64 = equal mix, 127 = fully wet) which controls the global effects mix for the Patch. Please note that this is a Patch parameter (as opposed to FX parameter)
- Sends: each Patch has three Send parameters which control how much of the Patch sound is sent to the three effects. Please note that these are Patch parameters (as opposed to FX parameters)
- Returns: each FX preset has three Return parameters which control the output level of each effect line.
Within a certain degree of approximation, the Return controls can be considered as the amount / level of each effect applied to the original sound: for this reason, they are particularly important and they can be easily controlled from the front panel thanks to the three encoders of the 'Assign' section - provided that the 'Assign' button LED is in 'B' mode (press and hold the button to switch mode).
Please note that these are FX parameters (as opposed to Patch parameters), so their values are stored within the FX preset.
There are some differences in the routing of the FX section between Patch and Performance mode.
In Performance mode, the linked FX preset number, as well as the Dry/Wet amount, are 'global' Performance parameters, so they are stored together with the overall Performance (not the single Part).
On the other hand, the three Send controls are Part parameters: they are particular useful for applying different levels of the overall FX to each Part in the Performance.
The three Return controls are again part of the linked FX Preset, not Part / Performance parameters.
Additionally, the Digital I/O Card allows to panpot each voice (thus each Part) individually: you can find a 'Pan' parameter in the Part Mixer section along with a Mute parameter, accessible via the main Performance mode page.

CHORUS
• Delay: delay time of the Chorus effect
• Feedback: amount of feedback
• Mod Time: rate of the LFO which modulates the Chorus Delay Time
• Mod Depth: amount of modulation of the LFO applied to the Chorus Delay Time
• Width: Chorus stereo width
ECHO (DELAY)
• Cross Level: amount of left input sent to the right delay line and vice versa
- Left Time: delay time on the left channel. Values 0-127 are free-running time values, whereas values in the negative range are beat division values for syncing the time to the currently selected MIDI clock
- Left Feedback: amount of feedback on the left channel, which determines the total length of the echo on the left
• Right Time: delay time on the right channel. Values same as Left Time.
- Right Feedback: amount of feedback on the right channel, which determines the total length of the echo on the right
- Chorus/Echo: amount of signal processed by the Chorus which is fed into the Echo
REVERB
• Pre-Delay: initial delay time before the signal is sent to the reverb
• Time: time required for the reverb tail to drop to -60dB (also known as T60)
- Delay: relative length of the internal reverb delay buffers: low to middle values change the resonance frequencies of the room, while high values give an unnatural sucking effect to the buildup. The effect is most noticeable when using shorter Time.
- Late Refl: early reflections vs. late reflections balance, i.e. low values emphasise the early reflection stage, while high values emphasise the ‘diffusion network’ (i.e. main reverb body and tail)
- Feedback: internal feedback coefficients levels: very low or very high values cause self-oscillation of the reverb
• FX/Reverb: amount of signal processed by the Echo, which is fed into the Reverb
09 Settings
In this section we are going to have a look at the settings page of the Modal 008R. You can access this page by pressing the sixth 'menu button' (F).
You can access the nine available sub-menus by pressing the corresponding number on the keypad (or using the '-/+/Select' buttons).

The update procedure of the Modal 008R operating system is very easy. To enter the Update section from the settings page, just press number '1' on the keypad: the main area in the centre of the screen will show the current OS version.
Update: If you want to update your system, just press number '1' again: the Modal 008R will now check for available updates.
If there is no new software available, the screen will go back to the patch loading page. If there is a new version of the software, it will ask if you want to download it from our servers and update the system.
Please note that the update procedure may take from 3 to 10 minutes (depending on the size of the update): during this time, the screen will display a progress bar and the current step of the update.
- DO NOT TURN THE SYNTH OFF NOW! - You may cause serious damage to the internal structure of the OS and lose your data.
- When updating the voices 008R produces a loud noise so we recommend turning the volume to minimum during an update.
After a successful update, the synth will automatically reboot and get back to the previously selected preset.
Redo: if for any reason (see Troubleshooting section) you need to re-install the latest software OS, press number '2' on the keypad. The 008R will now run the update procedure again and install the same software version.
Quick Redo: A quicker version of the above 'Redo' option, where it only reinstalls the elements of the OS that have changed.
Before turning the Modal 008R on, be sure to connect it to your local router via ethernet cable: as soon as you turn the synth on, the OS will automatically establish an internet connection. If everything goes fine, you should be able to go to the settings page, press number '2' on the keypad to access the Network screen, and see this:

The IP Mode area displays 'DHCP' and your 008R should have an automatically assigned IP Address: a valid local IP address has the 192.168.1.xx format.
- Out Channel: this parameter controls the number of the global MIDI Out channel (1-16) in Patch Mode.
- Local: this option allows you to turn on/off the communication between the keyboard and the internal sound engine. When this option is on, the keyboard will send messages to both the 008R and an external MIDI receiver. When this option is off, the keyboard will not control the internal sound engine anymore, but it will still be able to send MIDI messages to an external instrument, including the Sequencer and Arpeggiator outputs: you can use the 008R just as a MIDI controller/sequencer.
- Clock: Internal, external or auto MIDI clock. If using internal MIDI clock, the Sequencer, Arpeggiator and MIDI-synced LFOs will be synced to the Tempo parameter (expressed in BPM - always displayed in the top-right corner of the screen). When using external, the 008's clock will be synced to the MIDI clock coming from an external source. Selecting the third 'auto' option will set the 008R to sync to an external clock if MIDI clock messages are detected, else it will sync to the internal clock."
- In Channel: this parameter controls the number of the global MIDI In channel (1-16) in Patch Mode. This parameter is currently ignored in Performance Mode, where the MIDI settings are defined by the Channels sub-menu and each part's internal settings (see 'Performance Mode' section in chapter 6).
The 008R can contain up to three different interfaces/ports all for providing MIDI input/output to the synth. These are as follows:
- MIDI-DIN sockets (In, Out, Thru) – For connecting traditional MIDI devices to the 008R via 5 pin DIN connectors.
- USB-A port - For connecting class compliant USB-MIDI devices to the 008R, such as USB-MIDI keyboards. Devices should be connected directly rather than through a USB hub.
- USB-B port (digital IO board only) – For connecting the 008R to a USB host, such as a computer, allowing the synth to appear as a USB-MIDI device.

In this page you can individually enable or disable different categories of external MIDI messages received from the MIDI In port on the back of 008R.
- Notes: this parameter enables / disables processing MIDI Note messages (Note On, Note Off and Velocity)
- Control: this option enables / disables processing MIDI Control Change messages
- Patch: this option enables / disables processing MIDI Bank and Program Change messages
- AfterTouch: this option enables / disables processing MIDI Aftertouch messages
- PitchBend: this option enables / disables processing MIDI Pitchbend messages
- Transport: this option enables / disables processing MIDI clock start/continue/stop messages
- Pbend Range: this option scales the range the internal voices interpret incoming MIDI Pitchbend messages in semitones
- CCs as Modulation: When enabled this prevents MIDI-in CC messages from updating patch values on the LCD or Web Interface and instead just treats the CC messages as modulation control values. This improves the performance of the synth when sending many simultaneous streams of CC automation from a DAW or when using external MIDI controllers that send many streams of CC messages for modulation.
MIDI-in Activity Indicator
The crochet symbol on the top bar of the LCD will flash when receiving any MIDI-In data (except for clock messages). Please note that messages not on the global MIDI channel will also be shown here.
In this page you can individually enable or disable different categories of internal MIDI messages sent from the MIDI Out port on the back of 008R.

- Notes: this parameter enables / disables processing MIDI Note messages (Note On, Note Off and Velocity)
- Control: this option enables / disables processing MIDI Control Change messages
- Patch: this option enables / disables processing MIDI Bank and Program Change messages
- AfterTouch: this option enables / disables processing MIDI Aftertouch messages
- PitchBend: this option enables / disables processing MIDI Pitchbend messages
- Transport: this option enables / disables processing MIDI clock start/continue/stop messages
- Clock: this option enables / disables processing MIDI Clock messages
To access the Global Settings page, you can press number '5' on the keypad: the screen will show you the 3 available parameters.
- Auto Tune: Modal 008R's voice architecture is made from discrete electronic components so the synthesiser's oscillator and filter will need to occasionally be retuned, generally after it has been moved or when there have been changes in temperature or humidity where it is being used or after extended periods of not being used.
We recommend waiting for your 008R to reach a normal operating temperature, which will take approx. 10 mins.
PLEASE ENSURE YOU TURN THE VOLUME OF YOUR 008R DOWN TO ZERO BEFORE BEGINNING AUTOTUNE as loud noises will be made from the synthesiser during the whole tuning process. - Tune: This parameter allows you to tune your 008R in fractions of a semi tone, where the max value (+63) equals a one semi tone offset above the standard tune and min value (-63) equals a one semi tone offset below the standard tune.
- PageSwitch: the Modal 008R display is context sensitive: this means that the parameter associated to any encoder touched by the user is immediately displayed. You can disable this option by turning the value of this PageSwitch option off.
- Brightness: This parameter controls the LCD screen brightness.
- Seq Link: This parameter sets the behaviour of linked-sequence loading whilst the sequencer is active. When 'Seq Link' is set to off it disables linked sequence loading whilst the sequencer is playing - this allows you to preview the same sequence with different patches. Else the linked sequence is loaded on every patch load, regardless of the playing state of the sequencer.
- AutoLoad: This parameter enables Patches / Sequences / Animations after a short pause to be loaded without needing to press Select to confirm.
- Poly Note Priority Mode: Sets the note/voice priority when stealing notes in poly/stack mode. The options are: 1. Last note - the oldest note is stolen giving priority to the last/newest note. 2. Lowest note - the highest note is stolen giving priority to the lowest note. 3. Highest note - the lowest note is stolen giving priority to the highest note. 4. Off - note stealing is turned off.
- VCO1 sub oscillator calibration: Use to manually calibrate voices that appear to produce a small amount of Sub1 bleed under the main VCO1 signal, where a certain offset value of above 0 will reduce the bleed. 'Sub Offset 1' is for the first 4 voices and 'Sub Offset 2' for the last 4 voices.
This feature allows you to get remote technical support from the Modal Electronics team: this means that a Modal operator can connect to your unit in order to diagnose and fix potential problems.
If you have any issues with your 008R then you can contact us at:
support@modalelectronics.com
We will get back in touch and supply you with a 10 digit access code that will allow us to access your synthesiser remotely. The code can be entered with either the keypad or using the on screen controls. When the code has been entered then navigate to and press DONE.

If a Modal Digital I/O Card is installed, the USB Digital Input and Output audio settings are available in the main Settings page (sixth button below the LCD screen).
These are all global preferences, so they are saved between sessions.
- Bypass: if this parameter is On, the Digital Card is completely bypassed
- USB Audio In: this is a Gain parameter for the USB digital stereo input channel.
This works exactly in the same way as the analogue Audio-In in the 'Mixer' page, where you have to set the 'Ext In' control to above 0 to allow the audio input to be triggered.
Please note that USB Audio-In will only work if no jacks are connected to the analogue Audio In connectors. - USB Sample Rate: it sets the audio sample rate of the digital audio stream over USB, between 4 different options from 48 to 192kHz (more details in the next section)
- USB Audio Out Mode: this specifies how the host computer will see the Digital I/O Card, as either stereo pairs channels 1-2 and 3-4 ('stereo' mode) or 8 separate mono channels ('8 channel' mode) (more details in the next section)
- DSP Gain: if the Auto Gain algorithm is disabled, you can manually adjust the DSP Gain. To find the optimal setting, please start from very low values, then play some notes / chords and increase the value until you can hear clipping.
- Auto Gain: this enables an algorithm to prevent digital clipping. Please bear in mind that the sum of the 8 008R's analogue voices outputs can be very hot and this can cause problems in the input stage of the Digital Card's DSP: this is particularly true when using Unison patches with a large Size value, or even just Poly patches with very long releases. In order to prevent digital clipping, the Auto Gain algorithm applies a gain factor before the signal enters the DSP, based on the current patch Drive and Osc Mix settings.
- Legacy Output Mode: This sets half the voices to be hard-panned to the left audio output, and the other half to be hard-panned to the right, just like on the original 008R output board

USB audio-out is available using 4 different sample rates, which each appear on the host computer as separate USB devices/drivers. These are:
- '48Legacy' (USB Audio Class 1, needed for Windows computers, at 48kHz), available as either wet stereo pair output or dry stereo pair output
- '48kHz' (USB Audio Class 2 at 48kHz), available as stereo pair output or 8 channel outputs
- '96kHz' (USB Audio Class 2 at 96kHz), available as stereo pair output or 8 channel outputs
• '192kHz' (USB Audio Class 2 at 192kHz), available as stereo pair output.
In 48/96kHz the host computer will always see 12 input channels, no matter whether the USB Audio Out Mode is set to 'stereo' or '8 channel' mode, however only the first 8 are used on 008R. In 192Khz mode only 4 channels are shown.
If in 'stereo' mode the wet audio will come out of channels 1-2 and the dry audio will come out of channels 3-4; if in '8 channel' mode each voice will come out of its own channel and will have no FX applied.
*IMPORTANT NOTE FOR WINDOWS USER: if using a Windows operating system the 'USB Sample Rate' on your 008R Settings must be set to '48Legacy'. Other sample rates will not work with Windows OS, resulting in no audio device appearing.
If you experience any odd behavior on your 008R (see Troubleshooting section), you can reboot the machine with this command: if the rest of the front panel stops responding, you should still be able to trigger the reboot by using screen controls.
If the software reboot fails, the LCD screen will say so and suggest a hardware reboot: in this case please make sure to leave the unit off for at least 60 seconds before powering it back up.

If you experience any odd behavior on your 008R (see Troubleshooting section), you can reset parts of the operating system with the 3 options in this page.

- Network: this option resets all Network settings and it is very useful anytime you connect the 008R to a different router or in a different network configuration
- Preferences: this option resets all the Setting preferences to the original factory values
- Factory: this option triggers a complete factory reset: in detail, it resets all 008R settings, including the above Network and Preferences, as well as restoring the original factory sound banks. Please be careful when applying this, as you will lose all your saved patches that are in the factory banks.
10 Web User Interface

Connection
The Web User Interface is a web based editor for remotely controlling any parameter on your Modal synthesiser. Once connected to the synth you will be able to edit patches, set up sequences and perform additional actions that are not available on the front panel.
The procedure to add your synthesiser to you network and connect to the Web UI is outlined below:
- Connect the power lead to your Modal synthesiser. On the back of the instrument you will find an Ethernet socket that can be used to connect the synth to your local network router via a standard Ethernet cable. Once the connection has been established you can power up the unit.
If you can't easily reach your router, you can use a laptop / desktop computer to share the internet connection. Please bear in mind that each operating system (MacOSX, Windows, Linux) has a different method to do this. - Please ensure your synthesiser is connected to your local network and powered up, then press the sixth button below the LCD to enter the Settings page.
- Press '2' on the keypad to enter the 'Network' page and show the 'IP address' of your Modal device. It's usually of the form - 192.168.xxx.xxx but this can vary depending on network settings.
- Now open a web browser (we recommend Google Chrome) on your computer or tablet and in the address bar at the top type in - http://192.168.xxx.xxx
We do not recommend using Internet Explorer. Also phone size devices are not supported.
You should now see the Web UI Patch editor screen.
On the left hand side of the page you can find a scrollable list of all the 100 patches contained in the currently selected bank. To load a patch, just click on its name and you will see the parameters in the main section updating.
The selected patch is now highlighted in red.
To the right of each patch slot you can find a small button with a gear icon. If you click on it, 3 options will appear: to quickly rename a patch, just click on its name with the mouse and delete/input new letters with the keyboard, then press 'Rename' to commit the changes ('Swap' and 'Init' are currently not implemented).
On the top of the list you can choose the bank number, either by incrementing/decrementing the selection with the '+/-' buttons or directly typing the bank number in the box.
Just below the navigation bar, centre page, there is a section featuring 3 main functions.

- Save: by pressing this button, you can open the Patch saving section: you can change both Patch slot number and name, just by clicking on the related boxes with the mouse and using the keyboard. To commit the edits, then please press 'Save' ('Swap' and 'Init' are currently not implemented)
- Random: if you press this button, all the parameters in the Patch Edit area below will randomly change value – this is a good alternative to load an initialised patch, as it can give you some nice unexpected sound design inputs
- Current Patch: this slot just displays the currently loaded Patch name and number, whose parameters are shown in the Patch Edit area below
The process is similar on all other pages such as the Sequencer, Animator and FX sections.
The 'Cloud' page of the Web UI features some very useful tools, including the download of new Patch Banks, Local Patch Memory Backup and Backup Re-Upload
Click on the 'Cloud' icon on the menu at the top right to access the page: if you scroll down, you can see the four different sections.
- Patch Bank Download: to download a new bank, simply click the Download button below the related box and type in a bank number you would like the bank to go to (for example type '01').
A bank is a collection of 100 patches, e.g. bank 2 means patches from 200 to 299 - Patch Backup: enter the bank number, press 'Backup' and choose the folder on your filesystem where you want to save the sound Bank.
- Patch Backup Upload: click 'Choose File' to select the backup file from your filesystem, type in the correct bank number (make sure that number corresponds to an empty bank or a bank you want to overwrite) then confirm by pressing 'Upload'. No MIDI / SysEx dump needed.
- Manuals: download the latest full versions of the User Manual for all our products

| Function | CC | Values |
| Mod Wheel | 1 | 0 - 127 |
| VCO1 - PW | 2 | 0 - 127 |
| VCO1 - Square | 3 | OFF = 0 - ON = 127 |
| VCO1 - Note | 4 | 0 - 48 (-24 OFFSET) |
| KEYB - Glide | 5 | 0 - 127 |
| NRPN MSB | 6 | - |
| VCA - Amount | 7 | 0 - 127 |
| VCO2 - Fine | 8 | 0 - 127 (-63 OFFSET) |
| VCO2 - Square | 9 | OFF = 0 - ON = 127 |
| VCO - Sync | 10 | OFF = 0 - ON = 127 |
| - | 11 | - |
| - | 12 | - |
| VCA - Drive | 13 | OFF = 0 - ON = 127 |
| MIX - VCO1 | 14 | 0 - 127 |
| MIX - Sub1 | 15 | 0 - 127 |
| MIX - VCO2 | 16 | 0 - 127 |
| MIX - Sub2 | 17 | 0 - 127 |
| MIX - Ext In L / R | 18 | 0 - 127 |
| VCF - Resonance | 19 | 0 - 127 |
| - | 20 | - |
| VCF-EG - Amount | 21 | 0 - 127 (-63 OFFSET) |
| VCF-EG - Attack | 22 | 0 - 127 |
| VCF-EG - Decay | 23 | 0 - 127 |
| VCF-EG - Sustain | 24 | 0 - 127 |
| VCF-EG - Release | 25 | 0 - 127 |
| VCA-EG - Attack | 26 | 0 - 127 |
| VCA-EG - Decay | 27 | 0 - 127 |
| VCA-EG - Sustain | 28 | 0 - 127 |
| VCA-EG - Release | 29 | 0 - 127 |
| VCO2 - Note | 30 | 0 - 48 (-24 OFFSET) |
| VCO1 - Fine | 31 | 0 - 127 (-63 OFFSET) |
| - | 32 | - |
| - | 33 | - |
| - | 34 | - |
| - | 35 | - |
| LFO1 - Rate | 36 | 0 - 127 |
| LFO1 - Depth | 37 | 0 - 127 (-63 OFFSET) |
| NRPN LSB | 38 | - |
| - | 39 | - |
| - | 40 | - |
| - | 41 | - |
| - | 42 | - |
| - | 43 | - |
| - | 44 | - |
| - | 45 | - |
| - | 46 | - |
| LFO2 - Rate | 47 | 0 - 127 |
| LFO2 - Depth | 48 | 0 - 127 (-63 OFFSET) |
| - | 49 | - |
| LFO2 - Wave | 50 | 0 - 3 |
| VCO2 - Mod Depth | 51 | 0 - 127 |
| VCF-EG - Delay | 52 | 0 - 127 |
| LFO1 - Delay | 53 | 0 - 127 |
| LFO1 - Release | 54 | 0 - 127 |
| Function | CC | Values |
| LFO2 - Release | 55 | 0 - 127 |
| - | 56 | - |
| - | 57 | - |
| - | 58 | - |
| LFO2 - Sngl | 59 | OFF = 0 - ON = 127 |
| - | 60 | - |
| - | 61 | - |
| - | 62 | - |
| - | 63 | - |
| Sustain | 64 | OFF = 0 - ON = 127 |
| - | 65 | - |
| - | 66 | - |
| - | 67 | - |
| - | 68 | - |
| - | 69 | - |
| - | 70 | - |
| - | 71 | - |
| - | 72 | - |
| - | 73 | - |
| VCF - CutOff | 74 | 0 - 127 |
| - | 75 | - |
| - | 76 | - |
| - | 77 | - |
| VCO1 - Saw | 78 | OFF = 0 - ON = 127 |
| VCO1 - Triangle | 79 | OFF = 0 - ON = 127 |
| VCO2 - Saw | 80 | OFF = 0 - ON = 127 |
| VCO2 - Triangle | 81 | OFF = 0 - ON = 127 |
| VCO2 - Noise | 82 | OFF = 0 - ON = 127 |
| VCO2->VCO1 Mod | 83 | OFF = 0 - ON = 127 |
| VCO2->VCF Mod | 84 | OFF = 0 - ON = 127 |
| VCF - Constant | 85 | OFF = 0 - ON = 127 |
| LFO1 - Sngl | 86 | OFF = 0 - ON = 127 |
| LFO1 - Reset | 87 | OFF = 0 - ON = 127 |
| LFO2 - Reset | 88 | OFF = 0 - ON = 127 |
| - | 89 | - |
| - | 90 | - |
| - | 91 | - |
| - | 92 | - |
| - | 93 | - |
| VCF - Mode | 94 | 0 - 15 |
| ARP - Mode | 95 | 0 - 11 |
| ARP - Note Length | 96 | 0 - 96 |
| - | 97 | - |
| NRPN - Parameter | 98 | - |
| NRPN - Bank | 99 | - |
| KEYB - Mode | 100 | 0 - 3 |
| KEYB - Size | 101 | 0 - 12 |
| ANIM - Status | 102 | 0 - 1 |
| VCO2 - PW | 103 | 0 - 127 |
| LFO1 - Wave | 104 | 0 - 3 |
| - | 105 | - |
| KEYB - Transpose | 106 | 24 - 84 (-48 OFFSET) |
| LFO2 - Delay | 107 | 0 - 127 |
| - | 108 | - |
| Function | CC | Values |
| - | 109 | - |
| - | 110 | - |
| - | 111 | - |
| - | 112 | - |
| KEYB - Spread | 113 | 0 - 63 |
| KEYB - Octave | 114 | 0 - 4 (-2 OFFSET) |
| - | 115 | - |
| - | 116 | - |
| - | 117 | - |
| - | 118 | - |
| - | 119 | - |
| - | 120 | - |
| - | 121 | - |
| - | 122 | - |
| - | 123 | - |
| - | 124 | - |
| - | 125 | - |
| - | 126 | - |
| - | 127 | - |
B Appendix
Troubleshooting FAQ's
My synth doesn't boot
Please do not power cycle your unit: always allow 60 seconds before switching the unit back on. If you don't wait long enough, you might experience some erratic behaviors, including unusual voice detuning or synth not booting.
If your synth doesn't boot, please leave it off for few minutes, then try again: if the issue persists after 3-4 attempts, please contact support@modalelectronics.com.
I can't hear any sound
First of all, please check the volume knob is fully open, then try to load a new patch. If this doesn't help, you may want to check MIDI Settings and especially MIDI Local option, which should always be ON.
If this doesn't help either, a soft Reboot from the Settings should solve the problem.
The front panel has stopped responding
If you turn an encoder, neither the LCD screen updates nor can you hear the sound changing.
However, all the screen controls (i.e. keypad, 6 menu buttons, +/-Select and DataWheel) should still be functioning.
If that is the case, then try to simply switch to the Settings page by pushing the sixth 'menu button' (F), then try to move another encoder: this should 'wake up' the synth.
If this doesn't help, try to load a new patch and do the same.
If this doesn't help either, a soft Reboot from the Settings should solve the problem.
The LCD screen has stopped responding
If you turn an encoder, you can hear the sound changing but the screen doesn't update.
Also, none of the screen controls (i.e. keypad, 6 menu buttons, +/-Select and DataWheel) are working.
In this case, you have to physically reboot the unit (please always allow 60 seconds before switching the unit back on).
If the issue persists, please contact support@modalelectronics.com.
Hung notes
If a voice has a hung note: to get rid of it, just push the KeyMode button on the Key/QR front panel section (you may want to do it 4 times, so that you can go back to the original keyboard mode).
I can't get any internet connection
If in the Network Settings you can't get any IP address, please press '5' to re-'Apply': you might need more than a couple of attempts before getting a result.
If this doesn't help, try to disconnect and re-connect the Ethernet cable to the 008R socket, then go to Settings and trigger a soft Reboot.
Other issues
If you experience any kind of odd behavior on your 008R, please contact support@modalelectronics.com: we can use the Remote Support feature to log into your unit to diagnose and fix potential problems.
C
Appendix
DB15 Pin Outs
- Ground
- Voice
- Voice
- Voice
- Voice
- Ground
- Voice
- Voice
- Voice
- Voice
- Ground
- N/A
- N/A
- N/A
- N/A



- MODAL ELECTRONICS 008R
- USER MANUAL
- INTRODUCTION
- I JUST WANT TO PLAY THIS THING
- CONNECTIONS
- SYNTHESIS ENGINE
- KEYBOARD AND QUICK RECALL
- SEQUENCER, ANIMATOR AND ARPEGGIATOR
- DUAL AND SPLIT
- SNAPSHOT
- DIGITAL INPUT/OUTPUT BOARD
- SETTINGS
- PLEASE UPDATE YOUR UNIT IMMEDIATELY
- POWER ON
- P1, P2 AND P3 CONTROLS
- KEYPAD
- HOVER MODE
- EDIT MODE
- KEY
- SELECT BUTTON
- BUTTONS
- DATAWHEEL
- MENU BUTTONS
- HEADPHONES
- AUDIO IN
- USB-B (AUDIO, MIDI)
- MIDI (IN, OUT, THRU)
- AUDIO OUT
- ANALOGUE OUT
- CONNECT
- POWER
- MODAL
- ASSIGN MODULATION
- SELECT SOURCE
- SELECT DESTINATION
- RESET MODULATION
- KEYBOARD AND
- QUICK RECALL
- KEY MODES
- CHORUS
- ECHO (DELAY)
- REVERB
- MIDI-IN ACTIVITY INDICATOR
- WEB USER INTERFACE
- CONNECTION
- B APPENDIX
- TROUBLESHOOTING FAQ'S
- MY SYNTH DOESN'T BOOT
- I CAN'T HEAR ANY SOUND
- THE FRONT PANEL HAS STOPPED RESPONDING
- THE LCD SCREEN HAS STOPPED RESPONDING
- HUNG NOTES
- I CAN'T GET ANY INTERNET CONNECTION
- OTHER ISSUES
- C
- APPENDIX
- DB15 PIN OUTS
Brand : Modal Electronics
Model : MODAL 008R
Category : Musical synthesizer