CLOU9 - Smoke machine Chauvet Professional - Free user manual and instructions
Find the device manual for free CLOU9 Chauvet Professional in PDF.


User questions about CLOU9 Chauvet Professional
0 question about this device. Answer the ones you know or ask your own.
Ask a new question about this device
Download the instructions for your Smoke machine in PDF format for free! Find your manual CLOU9 - Chauvet Professional and take your electronic device back in hand. On this page are published all the documents necessary for the use of your device. CLOU9 by Chauvet Professional.
USER MANUAL CLOU9 Chauvet Professional
cloud9
User Manual

Model ID: CLOU9
220VCLOUD9
Edition Notes
The Cloud 9 User Manual includes a description, safety precautions, installation, programming, operation, and maintenance instructions for the Cloud 9 as of the release date of this edition.
Trademarks
Chauvet, Chauvet Professional, the Chauvet logo, and Cloud 9 are registered trademarks or trademarks of Chauvet & Sons, LLC (d/b/a Chauvet and Chauvet Lighting) in the United States and other countries. Other company and product names and logos referred to herein may be trademarks of their respective companies.
Copyright Notice
The works of authorship contained in this manual, including, but not limited to, all design, text, and images are owned by Chauvet.
© Copyright 2025 Chauvet & Sons, LLC. All rights reserved.
Electronically published by Chauvet in the United States of America.
Manual Use
Chauvet authorizes its customers to download and print this manual for professional information purposes only. Chauvet expressly prohibits the usage, copy, storage, distribution, modification, or printing of this manual, or its content for any other purpose without written consent from Chauvet.
Document Printing
For best results, print this document in color, on letter size paper (8.5 x 11 in), double-sided. If using A4 paper (210 x 297 mm), configure the printer to scale the content accordingly.
Intended Audience
Any person installing, operating, and/or maintaining this product should completely read through the guide that shipped with the product, as well as this manual, before installing, operating, or maintaining this product.
Disclaimer
Chauvet believes that the information contained in this manual is accurate in all respects. However, Chauvet assumes no responsibility and specifically disclaims any and all liability to any party for any loss, damage or disruption caused by any errors or omissions in this document, whether such errors or omissions result from negligence, accident, or any other cause. Chauvet reserves the right to revise the content of this document without any obligation to notify any person or company of such revision, however, Chauvet has no obligation to make, and does not commit to make, any such revisions.
Document Revision
Go to www.chauvetprofessional.com for the latest version.
| Revision | Date | Description |
| 8 | 05/2025 | Updated framemaker format. Added atmospheric notation to Maintenance. |
TABLE OF CONTENTS
1. Before You Begin .... 1
What Is Included 1
Claims 1
Manual Conventions 1
Symbols 1
Safety Notes 2
2. Introduction ...... 3
Features.... 3
Product Overview 4
Overview 1 4
Overview 2 .... 5
Product Dimensions 6
3. Setup 7
AC Power 7
AC Plug 7
Resetting the Breaker 7
DMX Linking.... 7
DMX Personalities.... 7
Mounting 8
Orientation....8
Rigging 8
Procedure....8
Hose Attachment.... 9
4. Operation 10
Preparation for Operation.... 10
Operation 10
Control Panel Operation.... 11
Control Options 11
Programming.... 11
Menu Map 11
DMX Configuration.... 11
DMX Control.... 11
DMX Channel Assignments and Values 12
Standalone Configuration.... 12
Interval 12
Duration.... 12
Timer Out 12
Volume Out 12
Fluid Sensor 12
Direct Timer.... 12
Error Codes.... 12
5. Maintenance.... 13
Fog Machine Maintenance.... 13
Storage.... 13
6. Technical Specifications .... 14
Contact Us 15
Warranty & Returns.... 15
1. Before You Begin
What Is Included
Cloud 9
• Seetronic Powerkon power cord (2 for 120 V, 1 for 230 V)
• Directional hose and clamp
• Overflow polyurethane tubing, 8.5mm, 3ft
• Quick Reference Guide
Claims
Carefully unpack the product immediately and check the container to make sure all the parts are in the package and are in good condition.
If the box or the contents (the product and included accessories) appear damaged from shipping, or show signs of mishandling, notify the carrier immediately, not Chauvet. Failure to report damage to the carrier immediately may invalidate any claim. In addition, keep the box and contents for inspection.
For other issues, such as missing components or parts, damage not related to shipping, or concealed damage, file a claim with Chauvet within 7 days of delivery.
Manual Conventions
| Convention | Meaning |
| 1-512 | A range of values |
| 50/60 | A set of values of which only one can be chosen |
| A button on the product's control panel | |
| Settings | A product function or a menu option |
Symbols
| Symbol | Meaning |
 | Critical installation, configuration, or operation information. Not following these instructions may make the product not work, cause damage to the product, or cause harm to the operator. |
 | Important installation or configuration information. The product may not function correctly if this information is not used. |
 | Useful information. |


Any reference to power connections in this manual assumes the use of Seetronic IP-rated cables.
The term “DMX” used throughout this manual refers to the USITT DMX512-A digital data transmission protocol.
Connection of the control signal: DMX line
• The product has XLR sockets for DMX input and output.
- Notice: This control circuit is isolated and belongs to the Class 2 data port.
The control circuit has a cumulative leakage current of less than 3.5 mA.
Safety Notes
Read all the following safety notes before working with this product. These notes contain important information about the installation, usage, and maintenance of this product.

This product contains no user-serviceable parts. Any reference to servicing in this User Manual will only apply to properly trained, certified technicians. Do not open the housing or attempt any repairs.

All applicable local codes and regulations apply to proper installation of this product.
-
If the external flexible cable or cord of this product is damaged, it shall be replaced by a special cord or cord exclusively available from the manufacturer or its service agent.
CAUTION: -
This product's housing may be hot when operating. Mount this product in a location with adequate ventilation, at least 20 in (50 cm) from adjacent surfaces.
- When transferring the product from extreme temperature environments, (e.g., cold truck to warm humid ballroom) condensation may form on the internal electronics of the product. To avoid causing a failure, allow the product to fully acclimate to the surrounding environment before connecting it to power.
- Condensation from the emitted fog may form on the floor around the output nozzle. Use caution when walking in this area.
• ALWAYS:
- Connect this product to a grounded and protected circuit.
- Drain the tank before transporting the product.
• DO NOT:
- Open this product. It contains no user-serviceable parts.
- Leave any flammable material within 30 cm of this product while operating or connected to power.
- Connect this product to a dimmer or rheostat.
- Operate this product if the housing, hoses, fluid tank, or cables appear damaged.
- Operate this product outdoors or in any location where dust, excessive heat, water, or humidity may affect it (adhere to standards for the published IP rating).
• Use for space-heating purposes. - Touch the output nozzle on this product. It is very hot during operation, and it may remain hot for several hours after turning the product off.
- Add anything to the fluid.
- Drink the fluid.
- Allow the fluid to contact skin or eyes.
• ONLY use Chauvet fluids.
- Depending on the amount of fog/haze generated, all fog/haze machines may set off smoke detectors.
- The maximum ambient temperature is 113 °F (45 °C). Do not operate this product at higher temperatures.
- The minimum startup temperature is -4°F (-20°C). Do not start the product at lower temperatures.
- The minimum ambient temperature is -22°F (-30°C). Do not operate the product at lower temperatures.
- To eliminate unnecessary wear and improve its lifespan, during periods of non-use completely disconnect the product from power via breaker or by unplugging it.
• In the event of a serious operating problem, stop using immediately.

If this Chauvet product requires service, contact Chauvet Technical Support.
2. Introduction
Features
• Professional fogger gives high-impact low-lying fog effect on stage or in ballrooms
• Continuous operation produces fog to cover 3,230 ft 4 (300 m 2 ) area
• Ultrasonic agitator combines distilled water with fog to produce low-lying fog effect
- Ships in rugged flight case with locking casters with hinged top cover to allow for operation even when closed
• Control via on board digital display or DMX
• Integrated water drain system makes cleanup fast and easy
- Use low-lying fog fluid (LLG) to produce the CO 2 effect that lasts for several minutes before dissipating
• Use without dry ice or CO 2 —no special licensing or training required
- Quick connector allows easy attachment of the directional hose to the unit with just a 1/4 turn
Product Overview
Overview 1
Cloud 9 120V

| # | Name | # | Name |
| 1 | 3-pin DMX in/out | 4 | Power switch |
| 2 | 5-pin DMX in/out | 5 | Power in (x2) |
| 3 | Breaker | 6 | Drainage/overflow valves |
Cloud 9
230V

| # | Name | # | Name |
| 1 | 5-pin DMX in/out | 4 | Power in |
| 2 | Drainage/overflow valves | 5 | Power switch |
| 3 | 3-pin DMX in/out | 6 | Breaker |
Overview 2

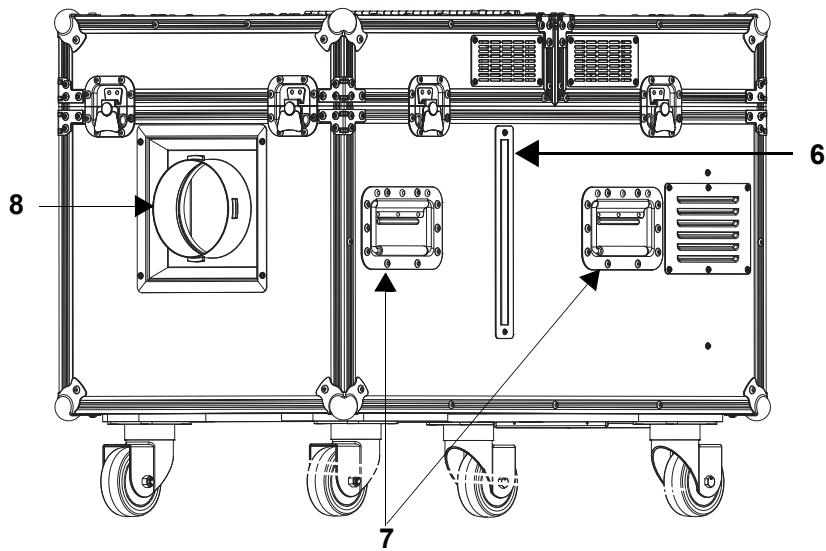
| # | Name | # | Name |
| 1 | Fluid tank | 5 | Open/close water tank |
| 2 | LCD display | 6 | Fluid level indicator |
| 3 | Menu buttons | 7 | Handles (x4) |
| 4 | Distilled water tank | 8 | Nozzle |
Product Dimensions
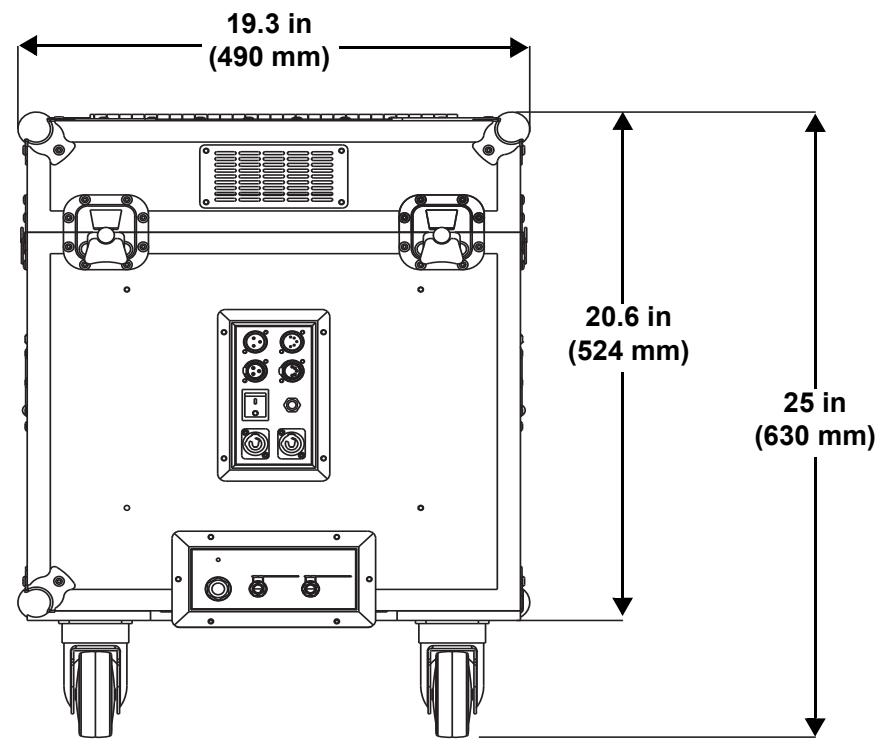

3. Setup
AC Power
Each Cloud 9 has a fixed power supply that works with an input voltage of either 120 VAC (60 Hz) or 230 VAC (50 Hz), depending on the specific model. To determine the power requirements for each Cloud 9, refer to the label affixed to the product. You can also refer to the Technical Specifications chart in this manual.
The listed current rating indicates the maximum current draw during normal operation. For more information, download Sizing Circuit Breakers from the Chauvet website: www.chauvetprofessional.com.

- Always connect the product to a protected circuit (e.g., circuit breaker or fuse). Make sure the product has an appropriate electrical ground to avoid the risk of electrocution or fire.
- To eliminate unnecessary wear and improve its lifespan, during periods of non-use completely disconnect the product from power via breaker or by unplugging it.

Never connect the product to a rheostat (variable resistor) or dimmer circuit, even if the rheostat or dimmer channel serves only as a 0 to 100% switch.

The 120 V version of the Cloud 9 consumes more than 20 A of power, and thus requires 2 power cords with its own circuit.
AC Plug
The Cloud 9 comes with a power input cord terminated with a Seetronic Powerkon connector on one end and an Edison plug on the other end (U.S. market). If the power input cord that came with the product has no plug, or if it is necessary to change the plug, use the table below to wire the new plug.
| Connection | Wire (U.S.) | Wire (Europe) | Screw Color |
| AC Live | Black | Brown | Yellow or Brass |
| AC Neutral | White | Blue | Silver |
| AC Ground | Green/Yellow | Green/Yellow | Green |
Resetting the Breaker
This product is equipped with a resettable circuit breaker. If the breaker trips, all sections of this product will lose power.
- Remove the power cord from main power.
- Allow unit to cool for 15 minutes.
- After 15 minutes, user may attempt to reset the breaker by pressing the button with their finger.
- Plug the product's power cord into the power outlet and continue using as recommended.
DMX Linking
The Cloud 9 can link to a DMX controller using a 3- or 5-pin DMX connection. If using other DMX-compatible products with this product, each can be controlled individually with a single DMX controller.
DMX Personalities
The Cloud 9 uses a 3- or 5-pin DMX data connection for the 2-channel DMX personality.
• Refer to the Introduction for a brief description of each DMX personality.
• Refer to the Operation chapter to learn how to configure the Cloud 9 to work in these personalities.
• The DMX Values section provides detailed information regarding the DMX personalities.

For information about DMX standards, Master/Slave connectivity, or the DMX cables needed to link this product to a DMX controller, download the DMX Primer from the Chauvet website: www.chauvetprofessional.com.
Mounting
Before mounting the product, read and follow the safety recommendations indicated in the Safety Notes.
Orientation
Always mount this product in a safe position, making sure there is adequate room for ventilation, configuration, and maintenance.
Rigging
Chauvet recommends using the following general guidelines when mounting this product.
- Before deciding on a location for the product, make sure there is easy access to the product for maintenance and programming purposes.
- Make sure that the structure and attachment points can support the weight before hanging the product (see the Technical Specifications for weight information).
Procedure
The Cloud 9 includes 4 rubber wheels that are attached for floor mounting.
Floor Mounting Diagram

Hose Attachment
The Cloud 9 comes with a quick connector, a directional hose, and a clamp that attaches to the nozzle for a low-lying fog effect. To attach or remove the hose, use the quick connector to secure the directional hose to the nozzle.

* The quick connector with the directional hose can be attached to the unit with a 1/4 turn.

This product may NOT be tilted. This product should be level while operating. Drain all distilled water before transporting or storing.
4. Operation
Preparation for Operation
To prepare the Cloud 9 for operation:
- Open the flight case.
- Pull out the fluid tank and remove the cap.
- Verify that the two plastic hoses attached to the inside of the cap are in place and in good condition.
- Pour Chauvet fog fluid inside the tank, and re-cap.
- Reinsert the tank.
- Make sure that the plastic hose that goes from the cap to the fogger is not bent.
- Plug in power and wait approximately 4 minutes for warm-up to complete.

- Due to water evaporation, the Cloud 9 may need to be refilled with distilled water to continue triggering the machine.
- The Cloud 9 is fitted with a safety shutoff feature, which prevents the unit's heaters from turning on when the water level is too low. If this safety shutoff feature has been engaged, simply add more water to continue using the Cloud 9.

While operating the Cloud 9, make sure there is adequate fog or haze fluid and distilled water in the machine to prevent pump and heater damage. When the fog fluid/distilled water level becomes low, simply add more fog or haze fluid to continue using the Cloud 9.
Operation
To prepare the Cloud 9 for operation:
- Place the machine on a level surface. Plug the Seetronic Powerkon power cord(s) (2 for the 120 V unit, 1 for the 230 V unit) in to the Cloud 9.
- Remove the top lid.
- Fill the water tank with distilled water to the maximum fill line located on the inside of the tank. The container can hold up to 5.3 gal (20 l).
- Fill the fluid tank with Chauvet haze or fog fluid to the maximum fill line located on the outside of the tank. The container can hold up to 1 gal (3.5 l).
- Low-lying Fog Fluid – Best overall performance for a medium to large coverage area. Fog dissipates after lifting into the air.
-
Turn the product on using the power switch on the back panel. Make sure the fans are operating properly.
-
Using the control panel, set the product to the desired operating mode.

Allow the Cloud 9 about 4 minutes to heat up before continuing.

- When storing the product, ALWAYS be sure to store the fluid tank with the cap up (see Floor Mounting Diagram) before installing the front cover to avoid tube damage that may cause leakage.
- Condensation may form on the bottom of the product, creating damp or wet conditions under and around the Cloud 9. Use caution! Surfaces around the product may become slippery.
- Filling the distilled water tank above the maximum fill line will reduce the performance of the product. To ensure optimal performance, drain any excess water via the overfill drain prior to use.
- Only use Chauvet approved haze or fog fluid. The use of any other fluid will void the product's warranty.
- Low-lying Fog Fluid will provide the best overall performance for a medium to large coverage area. Fog dissipates after lifting into the air.
- When storing the product, ALWAYS be sure to store the fluid tank with the cap up (see Floor Mounting Diagram) before installing the front cover to avoid tube damage that may cause leakage. - Condensation may form on the bottom of the product, creating damp or wet conditions under and around the Cloud 9. Use caution! Surfaces around the product may become slippery. - Filling the distilled water tank above the maximum fill line will reduce the performance of the product. To ensure optimal performance, drain any excess water via the overfill drain prior to use. - Only use Chauvet approved haze or fog fluid. The use of any other fluid will void the product's warranty. - Low-lying Fog Fluid will provide the best overall performance for a medium to large coverage area. Fog dissipates after lifting into the air.

Control Panel Operation
| Button | Function |
| Exits from the current menu or function | |
| UP navigates upwards through the menu list and increases the numeric value when in a function.TIMER starts the timer controlled operation | |
| DOWN navigates downwards through the menu list and decreases the numeric value when in a function.VOLUME triggers the pump to modify the output volume | |
| ENTER enables the currently displayed menu or sets the currently selected value into the selected function.STOP turns the fog output off. |

If the product is turned off while in timer mode, the product will still be in timer mode when the product is turned back on.

The Cloud 9 can operate with the top lid on or off.
Control Options
Set the Cloud 9 starting address in the 001-512 DMX range. This enables control of up to 256 products in the 2-channel personality.
Programming
Refer to the Menu Map to understand the menu options. The menu map shows the main level and a variable number of programming levels for each option.
• To go to the desired main level, press



- CLOUD
- EDITION NOTES
- TRADEMARKS
- COPYRIGHT NOTICE
- MANUAL USE
- DOCUMENT PRINTING
- INTENDED AUDIENCE
- DISCLAIMER
- DOCUMENT REVISION
- TABLE OF CONTENTS
- BEFORE YOU BEGIN
- INTRODUCTION
- SETUP
- OPERATION
- MAINTENANCE
- TECHNICAL SPECIFICATIONS
- CONTACT US
- WHAT IS INCLUDED
- CLAIMS
- MANUAL CONVENTIONS
- SYMBOLS
- SAFETY NOTES
- FEATURES
- PRODUCT OVERVIEW
- OVERVIEW
- PRODUCT DIMENSIONS
- AC POWER
- AC PLUG
- RESETTING THE BREAKER
- DMX LINKING
- DMX PERSONALITIES
- MOUNTING
- ORIENTATION
- RIGGING
- PROCEDURE
- FLOOR MOUNTING DIAGRAM
- HOSE ATTACHMENT
- PREPARATION FOR OPERATION
- CONTROL OPTIONS
- PROGRAMMING
- DMX CONFIGURATION
- DMX CONTROL
- DMX CHANNEL ASSIGNMENTS AND VALUES
- STANDALONE CONFIGURATION
- INTERVAL
- DURATION
- TIMER OUT
- VOLUME OUT
- FLUID SENSOR
- DIRECT TIMER
- ERROR CODES
- FOG MACHINE MAINTENANCE
- DO NOT ALLOW THE PRODUCT TO RUN DRY
- STORAGE
- WARRANTY & RETURNS
Brand : Chauvet Professional
Model : CLOU9
Category : Smoke machine