Surround Hub X - Surround sound system System Audio - Free user manual and instructions
Find the device manual for free Surround Hub X System Audio in PDF.



| Brand | System Audio |
| Model | Surround Hub X |
| Product Type | Wireless surround sound hub |
| Audio Decoding | Dolby Atmos, DTS:X |
| Wireless Streaming | Apple AirPlay, Chromecast built-in, DLNA, Spotify Connect |
| Bluetooth | Yes, with visibility control |
| HDMI Connectivity | HDMI inputs and output with ARC/eARC |
| WiSA Certified | Pair with WiSA certified speakers |
| Remote Control | Included, pair using rear button |
| Power Adapter | Included with EU/US/UK plugs |
| Antenna | Included external Wi-Fi antenna |
| Batteries | 2x AAA for remote |
| On-Screen Display | Built-in OSD menu for settings |
| Bass Management | Configurable crossover, distances, levels |
| Automatic Standby | After 20 minutes without audio signal |
| Audio Inputs | HDMI, LINE (analog), 2x Optical, Bluetooth, Wi-Fi |
| Output | HDMI to TV (ARC/eARC) |
| Setup Requirement | Google Home app for Wi-Fi configuration |
| Cleaning | Clean only with dry cloth |
| Safety | Do not expose to water or moisture |
| Repairability | Service by qualified personnel |
Frequently Asked Questions - Surround Hub X System Audio
User questions about Surround Hub X System Audio
0 question about this device. Answer the ones you know or ask your own.
Ask a new question about this device
Download the instructions for your Surround sound system in PDF format for free! Find your manual Surround Hub X - System Audio and take your electronic device back in hand. On this page are published all the documents necessary for the use of your device. Surround Hub X by System Audio.
USER MANUAL Surround Hub X System Audio
Surround Hub X Manual
TABLE OF CONTENT
1. Introduction . . . . . . . . . . . . . . . . 03
2. Surround Hub X Overview. 04
2.1 Included in the box 04
2.2 Surround Hub X Layout 05
2.3 Remote Layout 06
2.4 Wi-Fi LED indications 07
3. How to set up 08
3.1 Setting up the Surround Hub X 08
3.2 Pairing the remote 08
3.3 Connecting the Hub to home network 09
3.4 Connecting Surround Hub X to TV 10
3.5 Pairing speakers using WiSA 11
3.6 Access the on-screen display menu 12
3.7 Select speaker layout 12
4. How to use 14
4.1 Using the remote 14
4.2 Audio Playback 15
4.3 Automatic Standby 18
4.4 Manual Crossover 18
5. Troubleshooting . . . . . . . . . . . . . . . 19
5.1 Drop-outs in only one speaker 19
5.2 Power cycling 20
5.3 Factory reset 20
6. Safety & Warnings . . . . . . . . . . . . . . . 21
6.1 Important Safety Instructions 21
6.2 Warning 22
6.3 Legal information 22
1. Introduction

Thank you for buying the Surround Hub X. We hope you will enjoy it!
Features:
• Audio streaming:
Stream wireless audio from a wide variety of services.
• HDMI switching with eARC:
Easy switching between multiple HDMI sources and forward to TV-screen with ARC or eARC (audio return channel).
• Audio decoding:
Advanced multichannel immersive audio decoding for Dolby Atmos and DTS:X.
• Bass management system:
Configurable bass management system to freely setup crossovers, distances and levels.
2. Surround Hub X Overview
2.1 Included in the box

1x Surround Hub X


1x Antenna
1x Power adapter (with EU/US/UK plug)

1x Remote
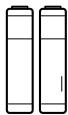
2x AAA Batteries

1x Allen key
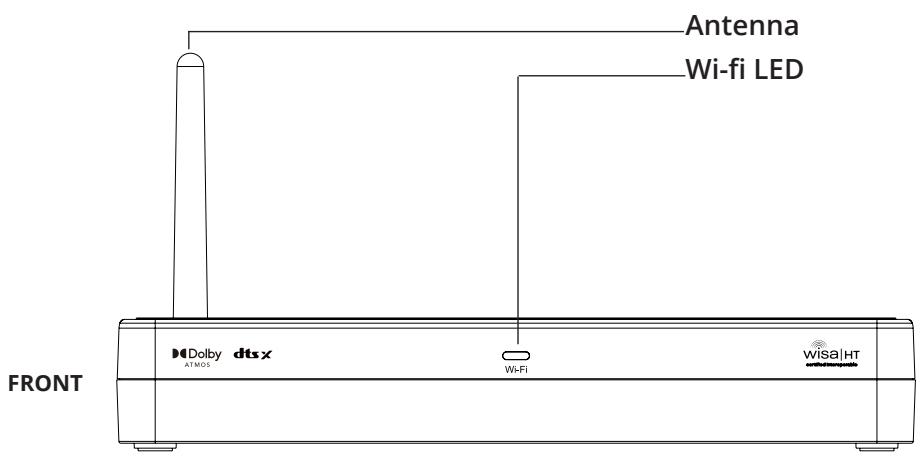
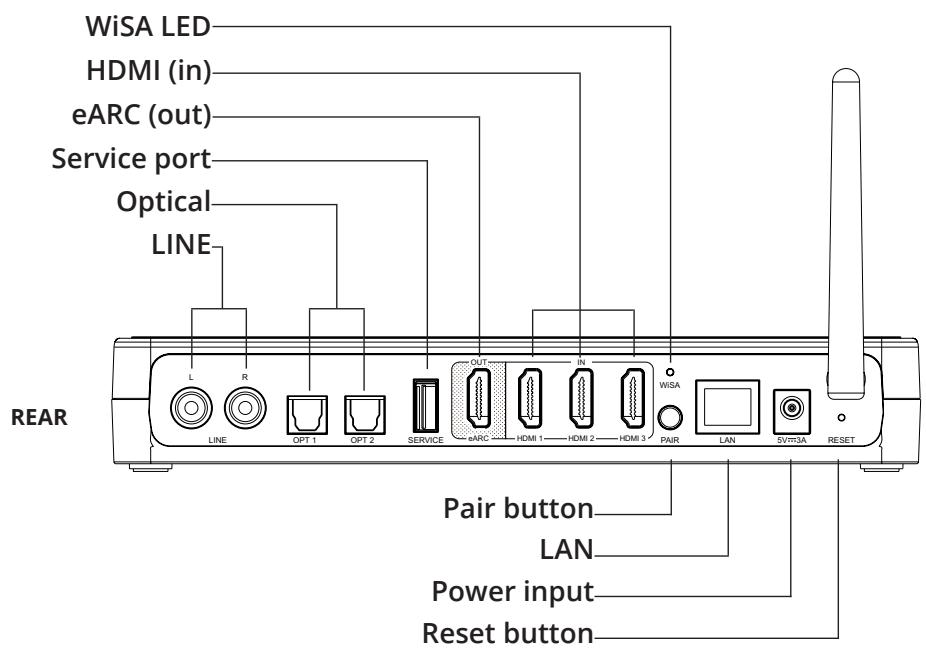
2.2 Surround Hub X Layout
2.3 Remote Layout

2.4 Wi-Fi LED indications

Solid white: Connected to network

White (slow blinking): Booting

White (rapid blinking): Wi-Fi configuration mode

White (Irregular blinking): Updating software

Solid green: Spotify streaming
3. How to set up
3.1 Setting up the Surround Hub X


1. Connect antenna to the back
- Screw the included Wi-Fi antenna on to the back plate of the Surround Hub X.
2. Connect power supply
- Plug the included power adapter into the Surround Hub X.
3.2 Pairing the remote
Pair the remote before proceeding to the next step. Make sure your Hub is on before starting.

1. Insert batteries
- Unscrew the bottom plate of the remote using the included Allen key.
- Insert batteries into your remote.
• Make sure batteries has the correct direction, as indicated on the inside of the remote.

2. Press and hold pair
- Press and hold the 'Pair' button on the Surround Hub X for 3 seconds until the WiSA LED on the REAR of the Surround Hub X starts blinking rapidly.

3. Press any button on remote
- Press any button on the remote, if pairing is successful, the 'WiSA LED' on the rear of the hub will stop blinking.
- When pressing any button on the remote, the 'WiSA LED' should blink once.
3.3 Connecting the Hub to home network
1. Download the "Google Home" App
Scan the QR code below to get direct access to the app from the Apple Store or the Google Play store.

IOS

Android
2. Power on the Surround Hub X
The Surround Hub X is ready for the next step when the 'Wi-Fi LED' starts flashing rapidly, meaning it has entered 'Wi-Fi Configuration' mode.
3. Open the Google Home app and follow the instructions
You will be guided through each step in the app.
4. Wait for LED to turn solid white
After finishing the setup in the Google Home app, the 'Wi-Fi LED' should turn solid white, signifying that the Hub is connected to the Wi-Fi and ready to stream.
3.4 Connecting Surround Hub X to TV

1. Connect to TV
- Connect Surround Hub X's HDMI output to your TV's HDMI ARC/eARC input, using a compliant HDMI cable.
NB:
-IF TV HAS eARC: HDMI cable must support 4k video and HDR with ethernet.
- IF TV HAS ARC ONLY: HDMI version 1.4 or newer is enough.

2. Check your TV's audio output settings
• Make sure the Surround Hub X is powered ON.
- Set output to HDMI ARC/eARC in the TV's menu.

- Set TV's digital output to bit-stream or automatic.
- Activate CEC controls if available.
3. Switch to eARC input
- Set input on Surround Hub X to eARC using the remote to hear the TV's audio.
3.5 Pairing speakers using WiSA
The Surround Hub X can easily be paired with any WiSA certified speakers.

1. Prepare speakers
• Make sure all speakers are correctly positioned, powered ON and their pairing or associate mode is activated.
2. Press pair
- To pair the speakers with the Surround Hub X, press the pairing button on REAR once and await slow blinking in WiSA LED while connecting. This function can also be accessed via the products on-screen-display menu.
3.6 Access the on-screen display menu
The Surround Hub X bas a built in on-screen display. It can be seen by choosing the HDMI port on the TV corresponding to the port the Surround Hub X HDMI output is connected to. When TV has that port selected, press the 'OK' button on the remote and the OSD menu will open. From here the systems settings can be managed.
3.7 Select speaker layout


1. Setup speaker channels
- To setup your speakers channels, browse to the OSD menu: "speaker setup" → "speaker layout".
2. Select layout type
- Select "Layout" and scroll left or right until you reach your desired layout type.
- Press 'OK/Confirm' to confirm.
3. Check speaker assignment
• Assuming all your speakers are already paired with the system, you can now assign the channels for each speaker.
- Jump down through the list of all the channels required by the chosen speaker layout. You should hear a 'ping' noise from the speakers assigned for each channel.
- Should a channel not be correctly assigned, you can open it by pressing "OK/Confirm" and choose 'assign new'.
- Now you can 'ping' all the paired speakers and assign the correct speaker to this channel.
- Do this operation for all channels until all speakers are correctly assigned.
4. How to use
4.1 Using the remote

Power Surround Hub X ON/OFF
The Surround Hub X can be turned ON or OFF using the 'ON/OFF' button.

Changing volume
Volume can be adjusted on the remote using the up and down 'Navigation' buttons when the OSD menu is not open.

Mute
The audio can be muted using the 'Mute' button. Press once to mute, and press again to unmute.

SKIP/Play/Pause
The audio stream can be started, paused, and tracks skipped, using the bottom three buttons. This is only available for Bluetooth and Wi-Fi inputs.
HDMI3
eARC
LINE
OPT1
OPT2
BT ◦
Wi-Fi

Input selection
Input can be changed using the remote by pressing left/right, when not in the OSD menu. You can see the current input on screen or on the 'Input Indicator' LED on the remote.
Hide Bluetooth visibility
- Hold PREV button for 3 seconds. When input LED blinks, Bluetooth is hidden and no new units can be paired.
- Hold NEXT button for 3 seconds. When input LED blinks, Bluetooth is visible for pairing new units.

Lock volume for specific input
A volume can be locked for specific inputs.
- Select the input and volume you want to lock.
- Press and hold mute for 5 seconds until the input indicator blinks once.
NB: To unlock, choose the input you want to unlock and press and hold mute again for 5 seconds
4.2 Audio Playback
HDMI
HDMI
- Connect your Surround Hub X to an HDMI source using HDMI cable from the 'HDMI (in)' ports on the REAR of the Surround Hub X to the correct port on the HDMI source using a HDMI cable 1.4 or newer.
- Set input to "HDMI" using the remote.

LINE
- Any analogue source with LINE out can be connected to the Surround Hub X through the LINE port on the REAR of the Hub.
- Switch audio input to "LINE" using the remote to playback audio.
NB: LINE can only support up to 2,5V rms

Optical
- Any source with optical SPDIF output can be connected to your Surround Hub X through the two optical ports on the REAR of the Hub.
- Switch audio input to the chosen Optical port using the remote.

Bluetooth
Bluetooth
- The Surround Hub X is by default visible and ready for Bluetooth pairing. Find and select the Surround Hub X in the Bluetooth Settings on the device you want to connect, the name should be something like "Surround Hub_XXXXXX".
- When the connection is established, the input will change automatically to "BT", making it ready to start playback.
- If a new device needs to be connected, disconnect the current device before starting the new connection process.
Spotify Connect
- Open the Spotify Connect app and make sure your device and the Surround Hub X is on the same network.
• Find your Surround Hub X in the app and select it as playback device. - The input will automatically switch to "Wi-Fi". This can be seen on the 'Input indicator' on the remote.
- If a new input is selected, playback will be paused. Resuming playback will change the input back to "Wi-Fi".
Apple AirPlay
• Make sure the device you want to play from and the Surround Hub X is on the same network.
- Find the "AirPlay" icon on the device you want to play from. Tap it and select your Surround Hub X from the list.
- The input will automatically switch to "Wi-Fi". This can be seen on the 'Input indicator' on the remote.

Spotify


Works with
Apple AirPlay
- If a new input is selected, AirPlay will disconnect and will need to be reconnected as described above.
Google Chromecast
• Make sure the device you want to play from and the Surround Hub X is on the same network.
- Find the "Chromecast" icon on the device you want to play from. Tap it and select your Surround Hub X from the list.
- The input will automatically switch to "Wi-Fi". This can be seen on the 'Input indicator' on the remote.
- If a new input is selected, Chromecast will be paused. Resuming the casting will change the input back to "Wi-Fi".

Chromecast built-in
DLNA
- Open your designated DLNA app and make sure your device and the Surround Hub X is on the same network.
• Find the your Surround Hub X in the app and select it as playback device. - The input will automatically switch to "Wi-Fi". This can be seen on the 'Input indicator' on the remote.
- If a new input is selected, playback will be paused. Resuming playback will change the input back to "Wi-Fi".

dlna® CERTIFIED
4.3 Automatic Standby
The Surround Hub X will enter Automatic Standby mode after 20 minutes without audio signal. The Hub will become active again automatically when it recieves a signal.
NB: When Surround Hub X goes to standby from the LINE or Optical inputs, it is only able to wake up again from the input it was using before it went into standby
4.4 Manual Crossover
Manual crossover can be adjusted from the OSD menu.
- Select "Speaker setup" → "Crossover setup"
- The speaker setup can be accessed from the main OSD menu.
- Select the speaker(s) you want to adjust
- Press 'OK' on the remote to select and navigation arrows to go through the options.
- When a crossover frequency has been selected, press "OK" again to confirm.
5. Troubleshooting
If you are experiencing problems that are not described in this guide, please visit our FAQ at: https://platinaudio.com/.
5.1 Drop-outs in only one speaker
If only one speaker looses input (as opposed to all speakers in your setup loosing their input at the same time), it indicates that there may be signals interfering with the WiSA connection. Please follow these guidelines carefully, to trouble shoot this:
1. Check if the location of your Surround Hub X is optimal
• Make sure there are at least 3 meters between the router (Or other wireless equipment) and the Surround Hub X.
- Avoid having walls between the Surround Hub X and the speakers.
- Avoid having the router placed in between the Surround Hub X and the speakers.
2. Check Wi-Fi settings
• Try to avoid MESH networks.
• Instead try to connect to a 2.4GHz Wi-Fi network.
- Try to avoid having a too high bandwidth, aim for 20MHz or 40MHz if possible.
5.2 Power cycling
Some times after a software update, it can be a good idea to power cycle the unit:
- Turn of the unit.
- Wait for 30 seconds before returning power to the unit.
5.3 Factory reset
If you for some reason need to factory reset the Surround Hub X, it can be done in two ways:
- Select 'System reset' from the OSD menu.
- Press the pinhole button on the REAR of the Surround Hub X.
6. Safety & Warnings
6.1 Important Safety Instructions
- Read these instructions.
- Keep these instructions.
- Heed all warnings.
- Follow all instructions.
- Do no use this apparatus near water.
- Clean only with dry cloth.
- Do not block any ventilation openings. Install in accordance with manufacturer's instructions.
- Do not install near any heat sources such as radiators, heat registers, stoves or other apparatus (Including amplifiers) that produces heat.
- Do no defeat the purpose of the safety purpose of the polarized or grounding-type plug. A polarized plug has two blades with one wider than the other. A grounding type plug has two blades and a grounding plug. The wide blade or the third plug is provided for your safety. If the provided plug does not fit into our outlet, consult an electrician for replacement of the obsolete outlet.
- Protect the power cord from being walked on or pinched, particularly plugs, convenience receptacles, and the point where they exit from the apparatus.
- Only use attachments/accessories specified by the manufacturer.
- Use only with the cart, stand, tripod, bracked, or table specified by the manufacturer, or sold with the apparatus. When a cart is used, use caution when moving the cart/apparatus combination to avoid injury from tip-over.

-
Unplug this apparatus during lightning storms or when unused for a long period of time.
-
Refer all servicing to qualified service personnel. Servicing is required when the apparatus has been damaged in any way, such as power supply cold or plug is damaged, liquid has been spilled or object have fallen into the apparatus, the apparatus has been exposed to rain or moisture, does not operate normally, or has been dropped.
6.2 Warning
To reduce the risk of fire or electric shock, do not expose this apparatus to rain or moisture
The apparatus shall not be exposed to dripping or splashing and that no objects filled with liquids, such as vases, shall be placed on the apparatus.

This symbol is intended to alert the user to the presence of important operating and maintenance instructions in the literature accompanying this product.
6.3 Legal information
Chromecast built-in is a trademark of Google LLC.
The Spotify software is subject to third party licenses found here: http://developer.spotify.com/esdk-third-party-licenses/
The Bluetooth word mark and logos are registered trademarks owned by Bluetooth SIG, Inc. and any use of such marks by Platin is under license. Other trademarks and trade names are those of their respective owners.
Company Information:
Platin Gate ApS
Anelystparken 31C
8381 Tilst
Denmark
For documentation and other information see:
https://platinaudio.com/pages/platin-product-documentation


- SURROUND HUB X MANUAL
- TABLE OF CONTENT
- INTRODUCTION
- SURROUND HUB X OVERVIEW
- HOW TO SET UP
- HOW TO USE
- TROUBLESHOOTING
- SAFETY & WARNINGS
- FEATURES
- INCLUDED IN THE BOX
- SURROUND HUB X LAYOUT
- REMOTE LAYOUT
- WI-FI LED INDICATIONS
- SETTING UP THE SURROUND HUB X
- CONNECT ANTENNA TO THE BACK
- CONNECT POWER SUPPLY
- PAIRING THE REMOTE
- INSERT BATTERIES
- PRESS AND HOLD PAIR
- PRESS ANY BUTTON ON REMOTE
- CONNECTING THE HUB TO HOME NETWORK
- DOWNLOAD THE "GOOGLE HOME" APP
- POWER ON THE SURROUND HUB X
- OPEN THE GOOGLE HOME APP AND FOLLOW THE INSTRUCTIONS
- WAIT FOR LED TO TURN SOLID WHITE
- CONNECTING SURROUND HUB X TO TV
- CONNECT TO TV
- NB
- CHECK YOUR TV'S AUDIO OUTPUT SETTINGS
- SWITCH TO EARC INPUT
- PAIRING SPEAKERS USING WISA
- PREPARE SPEAKERS
- PRESS PAIR
- ACCESS THE ON-SCREEN DISPLAY MENU
- SELECT SPEAKER LAYOUT
- SETUP SPEAKER CHANNELS
- SELECT LAYOUT TYPE
- CHECK SPEAKER ASSIGNMENT
- USING THE REMOTE
- POWER SURROUND HUB X ON/OFF
- CHANGING VOLUME
- MUTE
- SKIP/PLAY/PAUSE
- INPUT SELECTION
- HIDE BLUETOOTH VISIBILITY
- LOCK VOLUME FOR SPECIFIC INPUT
- NB: TO UNLOCK, CHOOSE THE INPUT YOU WANT TO UNLOCK AND PRESS AND HOLD MUTE AGAIN FOR 5 SECONDS
- AUDIO PLAYBACK
- HDMI
- LINE
- NB: LINE CAN ONLY SUPPORT UP TO 2,5V RMS
- OPTICAL
- BLUETOOTH
- SPOTIFY CONNECT
- APPLE AIRPLAY
- SPOTIFY
- WORKS WITH
- GOOGLE CHROMECAST
- DLNA
- AUTOMATIC STANDBY
- MANUAL CROSSOVER
- DROP-OUTS IN ONLY ONE SPEAKER
- CHECK IF THE LOCATION OF YOUR SURROUND HUB X IS OPTIMAL
- CHECK WI-FI SETTINGS
- POWER CYCLING
- FACTORY RESET
- IMPORTANT SAFETY INSTRUCTIONS
- WARNING
- LEGAL INFORMATION
- COMPANY INFORMATION
- FOR DOCUMENTATION AND OTHER INFORMATION SEE
Brand : System Audio
Model : Surround Hub X
Category : Surround sound system