dAD3 - CD Player Cyrus Audio - Free user manual and instructions
Find the device manual for free dAD3 Cyrus Audio in PDF.


| Product Type | CD Player |
| Brand / Model | Cyrus Audio dAD3 |
| Dimensions (W × H × D) | 215 x 75 x 365 mm |
| Weight | 3.1 kg |
| Power Supply | 230V AC or 115V AC depending on model |
| Power Consumption | 12 W playing, 6 W standby |
| Digital Output | TOSLINK optical for external D/A converter |
| Analogue Outputs | Stereo RCA pair, 2 V RMS |
| MC-BUS Connection | Yes, for Cyrus system integration |
| PSX-R Upgrade Input | Yes, for connection to Cyrus PSX-R power supply |
| Frequency Response | 20 Hz - 20 kHz |
| Signal-to-Noise Ratio | >98 dBA (silent track) |
| Total Harmonic Distortion | 0.008% at -10 dB |
| Channel Separation | >95 dB at 1 kHz, >95 dB at 20 kHz |
| Program Memory | Up to 20 tracks / 100 minutes |
| Remote Control | Full-feature handset with numeric keypad, phase, display off |
| Cleaning & Care | Unplug before cleaning; use damp cloth only |
| Safety | No user-serviceable parts; laser safety label |
| Spare Parts & Service | Genuine parts via authorized Cyrus service centres |
| Included Accessories | AC cable, remote control, 2 x MC-BUS phono leads |
Frequently Asked Questions - dAD3 Cyrus Audio
User questions about dAD3 Cyrus Audio
0 question about this device. Answer the ones you know or ask your own.
Ask a new question about this device
Download the instructions for your CD Player in PDF format for free! Find your manual dAD3 - Cyrus Audio and take your electronic device back in hand. On this page are published all the documents necessary for the use of your device. dAD3 by Cyrus Audio.
USER MANUAL dAD3 Cyrus Audio
User Instructions Cyrus dAD3
Cyrus dAD3


IMPORTANT! Read before operating this equipment!
CAUTION: The exclamation mark is to draw your attention to important instructions and safety procedures in this manual.

ATTENTION: The lightning flash warns you of the risk of electrical shock presented by components inside this product. Unauthorised personnel must not open this unit.

WARNING: To reduce the risk of electrical shock do not remove any unit covers or panels. There are no user serviceable parts in this product.
WARNING: To reduce the risk of electric shock, do not expose this equipment to rain or moisture.
HEED WARNINGS: All warnings on the product and in the operating instructions should be adhered to.
READ ALL THE INSTRUCTIONS: All the safety and operating instructions should be read before the product is operated.
RETAIN INSTRUCTIONS: The safety and operating instructions should be retained for future reference.
FOLLOW INSTRUCTIONS: All operating and use instructions should be followed.
CLEANING: Unplug this product from the mains before cleaning. Do not use liquid or aerosol cleaners. Use a damp cloth for cleaning.
WATER AND MOISTURE: Do not use this product near water - for example, near a bath tub, wash bowl, kitchen sink, or laundry tub, in a wet basement; or near a swimming pool and the like.
HEAT: The product should be situated away from heat sources such as radiators, stoves, or any other products (including amplifiers) that produce heat.
VENTILATION: Slots and openings in the cabinet are provided for ventilation, to ensure reliable operation of the product and to protect it from overheating and these openings must not be blocked or covered. The openings should never be blocked by placing the product on a bed, sofa, rug or similar surface. This product should not be placed in a built-in installation such as a bookcase or rack unless proper ventilation is provided or the manufacturer's instructions have been adhered to.
OBJECT OR LIQUID ENTRY: Never push objects of any kind into this product through openings as they may touch dangerous voltage points or short-out parts that could result in a fire or electric shock.
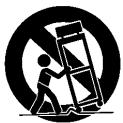
ACCESSORIES: Do not place this product on an unstable cart, stand, tripod, bracket, or table. The product may fall, causing serious injury to a child or adult, and serious damage to the product. Use only with a cart, stand, tripod, bracket or table recommended by the manufacturer, or sold with the product. Any mounting of the product should follow the manufacturer's instructions, and should use a mounting accessory recommended by the manufacturer.
ATTACHMENTS: Do not use attachments not recommended by the product manufacturer as they may cause hazards.
MOVING THE PRODUCT: A product and cart combination should be moved with care. Sudden stops, excessive force, and uneven surfaces may cause the product and cart to overturn.
POWER SOURCES: This product should be operated only from the type of power source indicated on the marking label. If you are not sure of the type of power supply to your home, consult your product dealer or local power company. For products intended to operate from battery power, or other sources, refer to the operating instructions.
OVERLOADING: Never overload wall outlets, extension cords, or integral convenience receptacles. This can result in an increased risk of fire or electric shock.
POWER CORD PROTECTION: Power supply cords should be routed so that they are not likely to be walked on or pinched by items placed upon or against them, paying particular attention to cords at plugs, convenience receptacles, and the point where they exit from the product.
LIGHTNING: For added protection for this product during a lightning storm, or when it is left unattended or unused for long periods of time, unplug it from the wall outlet and disconnect the antenna or cable system. This will prevent damage to the product due to lightning and power-line surges.
CAUTION! POLARISED CONNECTOR (CANADA and USA):
To prevent electrical shock, match wide blade of plug to wide slot, fully insert. Do not alter or remove this plug if it does not fit your mains power socket. Have a suitable socket installed by a competent electrician.
POWER SUPPLY:
Connect the moulded IEC connector of the AC cord supplied plugs into the power inlet ⑤ on the rear of the unit. The mains fuse ⑥ is on the rear panel next to the power switch. It must only be replaced as follows:
U.K. / Europe 230V T100mA 20mm
N. America / Far East - 115V T200mA 20mm
The mains supply requirement for your Cyrus dAD3 is marked on a label on the rear panel. Before connecting, check that this voltage is the same as your mains supply.
230V Products: Voltage Range 220V-240V
115V Products: Voltage Range 110V-120V
If you move to an area with a different mains voltage, contact your local Cyrus distributor to have your product converted.
NOTE FOR UK CUSTOMERS:
The Cyrus dAD3 is supplied with a power cable terminated by a fused 13A mains plug. This plug should not be removed but if it is removed, dispose of it safely and do not re-use it. To connect a new 13A plug, proceed as follows: Connect the brown wire to the terminal marked L or coloured red. Connect the blue wire to the terminal marked N or coloured black. The internal plug fuse should be 3A.
SERVICING:
Do not attempt to service this product yourself as opening or removing covers may expose you to dangerous voltage or other hazards. Refer all servicing to qualified service personnel.
CONDITIONS REQUIRING SERVICE: Unplug this product from the wall outlet and refer servicing to qualified service personnel when:
- When the power supply cord or plug is damaged.
• If liquid has been spilled, or objects have fallen into the product.
• If the product has been exposed to rain or water.
• If the product has been dropped or damaged in any way. - If the product does not operate normally by following the operating instructions. (Adjust only those controls that are covered by the operating instructions. Improper adjustment of other controls may result in damage requiring extensive work by a qualified technician to restore the product to its normal operation).
- When the product exhibits a distinct change in performance.
REPLACEMENT PARTS: When replacement parts are required, be sure the service technician has used replacements specified by the manufacturer or have the same characteristics as the original part. Unauthorised substitutions may result in fire, electric shock, or other hazards.
SAFETY CHECK: Upon completion of any service or repairs to this product, ask the service technician to perform safety checks to determine that the product is in proper operating condition.
PRODUCT SERVICE CENTRES:
For product service or technical advice, contact only authorised Cyrus service centres. The Cyrus distributors are listed at the end of this instruction manual.
Welcome to the world of Cyrus!
Congratulations on your choice of Cyrus Hi-fi products. Our state-of-the-art design technology and outstanding quality of manufacture has won countless awards around the world. We are confident that you will derive great pleasure from owning a product from one of the most recognised and respected manufacturers of hi-fi equipment.
Please read these instructions carefully before commencing installation. They provide full guidance to help you install your Cyrus dAD3 safely and correctly.
Preparations for Installation
Before installing the Cyrus dAD3 check that the following items are included in the accessory box.
• Warranty Card (with instruction manual)
- AC Mains Cable
- Remote Control Handset
• 2 x Phono leads for MC-BUS connection
After removing these items, please retain the packaging.
Install the Cyrus dAD3 in a well ventilated location away from sources of high temperature, dust or humidity. Never stand the Cyrus dAD3 under another unit or on any surface likely to hamper its cooling or ventilation.
INSTALLATION (Refer to Fig.1)
Key to the rear panel drawing:
| 1. | TOSLINK Digital Output | 4. | PSX-R Connection |
| 2. | Audio Outputs | 5. | Power Inlet |
| 3. | MC-Bus System | 6. | Mains Fuse |
| Connection | 7. | Power Switch |
Connecting to the System Amplifier
Connect a suitable stereo RCA phono interconnect to the audio output sockets ② of the Cyrus dAD3 and the corresponding input of the amplifier or receiver. Amplifier inputs suitable for this purpose are CD or AUX inputs.
DO NOT connect the Cyrus dAD3 to the PHONO input of the amplifier, as this could damage your amplifier or speakers.
Connecting an External D/A Converter
The Cyrus dAD3 provides a digital output to drive an external D/A converter. Using a 'TOSlink' optical fibre interconnect, connect the socket marked DIGITAL OUT ① to the optical input of a suitable D/A converter and connect the converter's audio outputs to a suitable input of the amplifier.
Refer to the D/A converter handbook for guidance.
Connecting a Cyrus PSX-R
The Cyrus PSX-R is a high quality regulated power supply, the use of which will elevate your Cyrus dAD3 into a true world-class state-of-the-art product.
The connector fitted to the umbilical cable from the PSX-R must be securely connected to the PSX-R socket ④ on the rear of the Cyrus dAD3. When correctly fitted, the connector will latch into the socket.
Note: The PSX-R power supply and the Cyrus dAD3 will both require connection to the mains supply.
Mc-Bus System Connection (Optional)
By using the MC-BUS connection on your Cyrus dAD3, a highly functional integrated system with full remote control may be set up. This feature is usable if you own a Cyrus III/III amplifier, MR3 multi-room unit or Cyrus Pre-amplifier. Refer to the relevant product handbook for MC-BUS wiring instructions.
OPERATION (Refer to Fig.2)
Key to the front panel drawing:
| 1. | CD Loading Door | 8. | Repeat |
| 2. | Standby Key | 9. | Search Forward |
| 3. | Standby Light | 10. | Search Reverse |
| 4. | Remote Eye | 11. | Next Track |
| 5. | Display Window | 12. | Previous Track |
| 6. | Stop/Open | 13. | Play/Pause |
| 7. | Memory Store |
Switching On
The mains power switch ⑦ on the rear panel of the Cyrus dAD3 should be left on for normal operation, except when left unattended for a long period when it should be switched off or disconnected from the AC supply.
When power is applied, the STANDBY key ② is used for power control. The Standby light ③ shows red when the Cyrus dAD3 is in Standby and green when operational.
Loading a Disc
Press the STOP/OPEN key ⑥ to open the CD tray. Place a CD in the tray with the label side upward. Press the STOP/OPEN key again. The CD tray will load into the player.
Playing a Disc
Press the PLAY/PAUSE key ⑬ on the front panel. Playback will commence from track 1 unless otherwise selected.
Pausing
Press the PLAY/PAUSE key ⑬ to pause the current track. The disc will be held at the precise point of interruption and the PAUSE symbol will show on the display. Press the PLAY key ⑬ again to resume playing the disc.
Fast Forward/Reverse
The SEARCH FORWARD ⑨ and SEARCH REVERSE ⑩ keys may be used to locate a specific point within a track. The search will commence initially at a slow speed increasing after a few seconds if the key is held down.
The Search keys will also search through next or previous tracks if held down long enough.
Previous/Next Track Selection
Pressing the NEXT ⑪ or PREVIOUS ⑫ keys allow you to change forward or backward through the tracks on the CD. Track indications appear on the display.
Repeat
The REPEAT key ⑧ can be used to replay the entire disc or programmed tracks.
When REPEAT is selected, its symbol shows on the display. Press the key a second time to clear Repeat.
If a program selection has been stored, the REPEAT key ⑧ will allow continuous play of this program sequence.
Stop/Open Key
When a disc is playing, press the STOP/OPEN Key ⑥ to stop the disc immediately.
If the disc is already stationary, one touch of the STOP/OPEN key ⑥ will open the tray.
Program Memory Storage
To store a customised program sequence:
Load a disc. Select a track number using the NEXT key ⑪ or PREVIOUS key ⑫. Press the MEMORY key ⑦.
The display will confirm memory storage.
As each selection is stored, the letter 'P' will be displayed followed by the position of the track in the memory (e.g.P:07 indicates this track is in position 7). Repeat for up to 20 tracks.
NOTE:
- Memory full indication will show on the display when the program stored exceeds 20 tracks or a stored program time of 100 minutes or greater.
-
When engaging STOP while a program is stored, an extra press is needed to clear the memory. Thus:
-
Press STOP once to stop the disc.
- Press STOP a second time to clear the memory.
- Press STOP a third time to open the tray.
• One continuous press will accomplish all operations.
Program Memory Review
After storing a selection of tracks you can check the contents of the memory with a long press of the MEMORY key ⑦. The program display will show each memory position in turn and the track display will show the corresponding track numbers.
Program Memory Review is not available from the Remote Control handset.
FRONT PANEL DISPLAY (Refer to Fig.4)
Key to the Front Panel Display drawing:
a. Repeat Indicator
This symbol indicates that repeat is set.
b. Track Display (Two Digit)
Track number, disc reading and error display..
c. Memory Display
Indicates when a program is stored in the memory.
d. Time Mode Indicator
Three time modes are available:
i) Total time (disc stopped)
ii) Elapsed time for the current track
iii) Time remaining to the end of the disc
e. Pause Indicator
This symbol indicates that pause is set.
f. Phase
This symbol lights to show phase inversion
g. Time Display
Shows the time elapsed, remaining or program times.
h. 'Q' Symbol
Indicates that the 'Q' D/A converter upgrade is fitted.
Remote Control (Refer to Fig.3)
Key to the Remote Handset drawing:
| 1. | Standby | 8. | Next Track |
| 2. | Number keypad | 9. | Previous Track |
| 3. | Stop/Open | 10. | Play |
| 4. | Search Forward | 11. | Pause |
| 5. | Search Reverse | 12. | Repeat |
| 6. | Time Display | 13. | Memory Store |
| 7. | Phase | 14. | Display On/Off |
All front panel controls of the Cyrus dAD3 except program memory review feature on the remote handset. The remote control handset also provides access to some additional features of the Cyrus dAD3.
Direct Access Numeric Keypad
Press any numeric key ② on the handset. The track number will appear on the display and the Cyrus dAD3 will scan and play the selected track. If the disc has more than ten tracks the Cyrus dAD3 will briefly wait for entry of a second digit when appropriate.
When a program is stored, the keypad will enable access only to tracks included in the program memory.
Display Control
Press the DISPLAY key 14 on the handset to switch the display of the Cyrus dAD3 off. Pressing this key again restores the display to its normal mode. Switching the display off stops the digital traffic required to update it and reduces the load on the power supply. This improves the overall quality of the sound without adversely affecting the normal functions of your Cyrus dAD3.
Phase Control
Absolute phase is determined by the audio system and the recording process. Changes in absolute phase are subtle and are best established from the listening position. The absolute phase of the audio signal can be changed from the remote control using the PHASE key ⑦. The phase symbol shows on the display when absolute phase is inverted. When a program is stored phase settings are memorised. They can be changed for each program entry.
The performance of the Cyrus dAD3 is unaffected whether the signal is in normal or phase inverted mode.
Note: When an external D/A converter is used, absolute phase correction is not applied to the digital output. Phase correction must then be selected at the D/A converter.
Time Display Selection
The TIME key ⑥ features selection of two time display modes.
Mode 1 Elapsed time display with arrow pointing left. The time display will read the time elapsed from the beginning of the current track.
Mode 2 Remaining time display with arrow pointing right. The time display reads time remaining to the end of the disc or program if stored.
The Cyrus Module
The 'Q' module is a high performance D/A converter which can be fitted inside the Cyrus dAD3 player by your authorised Cyrus dealer.
The ‘Q’ module provides the sonic benefits of a superb external D/A converter unit without the degradation involved when an external DAC is connected to the player via a cable.
When the module is fitted the 'Q' symbol will show in the display window (see display view, on fold out page).
TROUBLESHOOTING GUIDE
If your Cyrus dAD3 is not operating properly, disconnect the power and check all connections using the notes in this handbook. If problems persist, the checklist below may help.
If you are in any doubt, consult your dealer.
Disc Spinning with no sound
Switch off the power to the audio system and check that connections have been correctly made from the Cyrus dAD3 to the amplifier.
If used with another D/A converter, check the connection from the 'DIGITAL OUT' socket of the Cyrus dAD3 to the D/A converter. Check also that power is applied to the D/A converter and amplifier and that the input selection and volume control of these units is correctly set.
Pause may have been set. Check for the pause symbol on the display. Press the PLAY/PAUSE key again on the front panel or handset to cancel pause.
Skipping tracks or distorted sound
The disc may be dirty or badly scratched. Try playing another disc. If the other disc plays ok, try cleaning the 1st disc.
Indication 'EO' on the display (Error: Operating)
A function has been selected which is not available.
Indication 'EP' on the display (Error: Programming)
An incorrect key sequence has been used during programming.
Indication 'Ed' on the display (Error: Disc)
The disc will not read. It may be dirty or defective.
No display
The display may have been switched off at the handset. Press the display key again to restore the display and backlight.
No Remote Operation
The handset batteries may need to be replaced:
Remove the battery compartment cover located underneath the unit. Remove the batteries and replace with new ones carefully noting the orientation marked in the bottom of the battery case.
The batteries in the unit should only be replaced with new batteries type AAA (I.E.C.L R03).
Laser Product
This label on the rear panel tells you that the unit contains a Laser component. Opening this unit will expose the user to radiation from the laser beam.

WARRANTY
The warranty card enclosed should be completed by the Dealer and the purchaser and returned to CYRUS or its Distributor within 8 days of purchase. No Dealer or Distributor may vary the terms of this warranty which is personal to the original Purchaser and is not transferable.
Please retain the sales receipt as proof of purchase.
Warranty claims must wherever possible be made through the Dealer from whom the equipment was purchased.
This warranty excludes:
- Damage caused through neglect, accident, misuse, wear and tear, or through incorrect installation, adjustment or repair by unauthorised personnel. Any unauthorised servicing will result in loss of guarantee.
- Liability for damage or loss occurring in transit to or from the purchaser.
- Consequential damage, loss or injury, arising from or in conjunction with this equipment.
Equipment for attention under warranty should be consigned return carriage paid. If returned equipment is found to comply with the published specification, MISSION reserves the right to raise a charge.
The above conditions do not affect your statutory rights as a consumer.
SPECIFICATIONS
Power Supply
Voltage: As plate on rear of unit
Power Consumption
Playing 12W
Standby....6W
Safety Requirements ...... EN60065
Enclosure
Dimensions (WxHxD).... 215 x 75 x 365mm
Weight....3.1Kg
Material ....Die cast chassis
Audio Performance
Output Level.....2V rms
Input Impedance 50Ω
Frequency Response 20-20,000Hz
Channel Separation ....>95dB @ 1kHz
95dB@20kHz
SNR (using silent track) ....>98dBA
THD @ -10dB 0.008%
Cyrus reserves the right to change all specifications without notice. E &OE


- USER INSTRUCTIONS CYRUS DAD
- IMPORTANT! READ BEFORE OPERATING THIS EQUIPMENT
- CAUTION! POLARISED CONNECTOR (CANADA AND USA)
- POWER SUPPLY
- NOTE FOR UK CUSTOMERS
- SERVICING
- PRODUCT SERVICE CENTRES
- WELCOME TO THE WORLD OF CYRUS
- PREPARATIONS FOR INSTALLATION
- CONNECTING TO THE SYSTEM AMPLIFIER
- CONNECTING AN EXTERNAL D/A CONVERTER
- CONNECTING A CYRUS PSX-R
- MC-BUS SYSTEM CONNECTION (OPTIONAL)
- SWITCHING ON
- LOADING A DISC
- PLAYING A DISC
- PAUSING
- FAST FORWARD/REVERSE
- PREVIOUS/NEXT TRACK SELECTION
- REPEAT
- STOP/OPEN KEY
- PROGRAM MEMORY STORAGE
- NOTE
- PROGRAM MEMORY REVIEW
- FRONT PANEL DISPLAY (REFER TO FIG.4)
- REMOTE CONTROL (REFER TO FIG.3)
- DIRECT ACCESS NUMERIC KEYPAD
- DISPLAY CONTROL
- PHASE CONTROL
- TIME DISPLAY SELECTION
- THE CYRUS MODULE
- TROUBLESHOOTING GUIDE
- DISC SPINNING WITH NO SOUND
- SKIPPING TRACKS OR DISTORTED SOUND
- INDICATION 'EO' ON THE DISPLAY (ERROR: OPERATING)
- INDICATION 'EP' ON THE DISPLAY (ERROR: PROGRAMMING)
- INDICATION 'ED' ON THE DISPLAY (ERROR: DISC)
- NO DISPLAY
- NO REMOTE OPERATION
- LASER PRODUCT
- WARRANTY
- SPECIFICATIONS
- POWER CONSUMPTION
- ENCLOSURE
- AUDIO PERFORMANCE
Brand : Cyrus Audio
Model : dAD3
Category : CD Player