NX 60i / 80i / 100i - Washing machine Yard Force - Free user manual and instructions
Find the device manual for free NX 60i / 80i / 100i Yard Force in PDF.


| Product Type | Robotic lawn mower |
| Model Compatibility | Yard Force NX 60i / NX 80i / NX 100i |
| Max Cutting Area | 600 m² (NX60i) / 800 m² (NX80i) / 1000 m² (NX100i) |
| Cutting Width | 18 cm |
| Cutting Height Range | Approx. 20–60 mm (adjustable dial) |
| Max Slope Capability | Up to 40% incline/decline |
| Battery Type | Maintenance-free 28 V Li-ion battery |
| Battery Capacity | 2000 mAh (NX60i) / 2850 mAh (NX80i & NX100i) |
| Mowing Time per Charge | 60 min (NX60i) / 80 min (NX80i & NX100i) |
| Charging Time | 60 min (NX60i) / 90 min (NX80i & NX100i) |
| Power Supply | Input 100–240 V~, 50/60 Hz; Output 32 V DC, 1.5 A |
| Weight | 8.5 kg |
| Sound Pressure Level (LpA) | 53 dB (K = 3 dB) |
| Sound Power Level (LwA) | 64 dB (K = 3 dB) |
| Degree of Protection | Mower IP24, power supply IP67, plug IP44 |
| Obstacle Detection | Ultrasonic sensors + collision sensors |
| Rain Sensor | Automatically returns to charging station when rain is detected |
| Boundary Wire Signal | 148.5 kHz, selectable S1/S2 to avoid interference |
| WiFi Frequency Band | 2400–2483.5 MHz (for app control) |
| Included Accessories | Docking station, power supply unit, boundary wire (120/150/200 m depending on model), wire pegs, spare blades, connectors, measurement ruler |
| Recommended Pre-Mow Grass Height | Mow lawn to 60 mm before installation for best performance |
| Operating Temperature Range | Between 5 °C and 45 °C |
Frequently Asked Questions - NX 60i / 80i / 100i Yard Force
User questions about NX 60i / 80i / 100i Yard Force
0 question about this device. Answer the ones you know or ask your own.
Ask a new question about this device
Download the instructions for your Washing machine in PDF format for free! Find your manual NX 60i / 80i / 100i - Yard Force and take your electronic device back in hand. On this page are published all the documents necessary for the use of your device. NX 60i / 80i / 100i by Yard Force.
USER MANUAL NX 60i / 80i / 100i Yard Force

NX 60i / 80i/ 100i

ROBOTIC MOWER
Original Installation Guide

MÄHROBOTER
Description of the product ....1
Installation 2
Operation 10
Technical data 14
Maintenance and storage 15
Troubleshooting ....17
Description of product
- STOP button
- Ultrasonic sensor
- Charging inlet
- Rear wheel
- Height adjustment dial
- Control panel
- Blade plate
- Carry handle
- Power switch button


Scope of delivery

Robotic Mower

Docking station
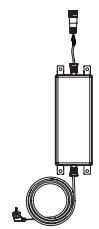
Switching Power Supply

Extension cord

Wire pegs

Spare blades

Connectors

Measurement ruler

Boundary wire

Manuals


Installation
Installation Guide
This chapter explains how to install the Robotic Mower. Please read this completely before you start the installation.
Introduction
We recommend creating a drawing of your lawn, including all obstacles and how these should be protected. This makes it easier to find a good position for the docking station and how to correctly place the boundary wire around your garden perimeter protecting bushes, flower beds etc. You will also need some tools, like a hammer and wire cutters, pliers or scissors.
Pre Cut your lawn
Your lawn needs to be prepared correctly, prior to installing the robot lawnmower. Pre cut your lawn to a height of 60 mm.

Cutting limitations
The Robotic Mower is equipped with collision sensors. These detect all rigid and solid obstacles that are higher than 100 mm, such as walls, fences and garden furniture.
When the sensors report an obstacle, the Robotic Mower stops, backs up and then mows in a different direction. As a long-term solution, it is recommended to lay the boundary wire accordingly using the ruler to protect obstacles and the device. Lay the boundary wire so that the Robotic Mower is not more than 20 m away from the boundary wire at any point in the mowing area.

Trees
The Robotic Mower treats trees as common obstacles, but if the roots of the tree are exposed and lower than 100mm, this area should be excluded using boundary wire in order to protect the tree root, cutting blades or rear wheels from damage.

Stones
We recommend clearing the lawn of small (less than 100 mm high) rocks and stones and any stones with a round or sloped edge. The Robotic Mower might try and climb such rocks instead of recognising them as a barrier. The Robotic Mower getting stuck on such a stone requires user intervention to restart mowing. Contact with stones can result in damage to the blades.

Slopes
The Robotic Mower can navigate slopes up to a maximum of 40% incline or decline.
The boundary wire should never be perpendicular to an incline of more than 10%. Also, leave strip of at least 2 m between a slope of 10% or steeper and the boundary wire. Otherwise, the higher speed going down the slope may cause the Robotic Mower to go over the boundary wire, especially on wet and slippery ground.

Paths, Driveways and Roads
If an elevated driveway crosses your lawn, better keep it outside the boundary wire.
Please allow a safety distance of 30 cm between driveway and boundary wire.

If the driveway and lawn are at the same level, feel free to use the boundary wire to create a corridor. This allows your Robotic Mower to cross the driveway and reach the opposite lawn.

Uneven lawn surfaces
Uneven lawn areas may cause the blades to touch the ground. We recommend leveling the lawn before using your Robotic Mower or excluding uneven areas with the boundary wire.
Placing the docking station
Locate the best position for your docking station. Be aware that it needs a permanent connection to the mains, so take into account the location of the nearest power outlet.
To ensure the Robotic Mower can return to the docking station smoothly, leave 1.5 m of straight wire to the front of the docking station and 30 cm to the side facing the cutting area. Use a shaded location for the docking station, as a lower temperature while charging is beneficial to the battery. Important: Place the docking station on an even, flat surface away from ponds, pools or stairs. We recommend suitable protection from the elements, for example a robot port or garage.
Do not place the docking station too close to a slope, such as at the top of a hill or the bottom of a furrow. Avoid left and right inclination in excess of 5 degrees.


If your lawn has a soft or uneven surface, we recommend fortifying the area around the docking station with a grass protection mesh. Otherwise, the repeated stress of the rear wheels can damage the turf.
Once the position of the docking station is confirmed and mains electrical connection is laid out, please do not connect to main power yet. Finish all boundary layout work before connecting the docking station to the power supply.
Pegging your boundary wire
We strongly recommend mowing the lawn to 60 mm or less before laying out the boundary wire. Burying the boundary wire is entirely optional. Still, the closer to the ground you lay out the boundary wire, the lower the chance of tripping over it or damaging it when mowing the lawn.
Use the included ruler to ensure the required 30 cm distance between wire and obstacles.

The recommended distance between two pegs is about 80 cm in straight lines, and less in tight curves. Note that the pegs' hook and wire slit always faces the outside of the boundary. Within a short time the cable will be covered with grass. Since the voltage is only 32 V, there is no risk of electric shock. Make sure that the hook of the peg and the opening for the cable always face the demarcated.

When first planting the pegs, do not drive them fully into the ground. Use a light hammer to drive them in a little bit. Also locate the fixing pegs and lay each one on the lawn at approximately the
correct distance from lawn edges (30 cm) and obstacles.
Flowerbeds
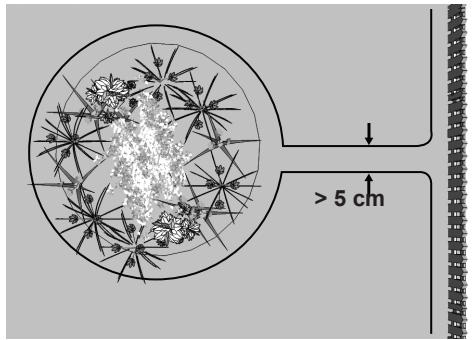
Use the boundary wire to exclude any flowerbeds from the cutting area. There are two options for the two lengths of boundary wire running between the flowerbed and the outer boundary:
1) Keep the distance between the parallel wires above 5 cm. This way, the Robotic Mower will recognise the boundary wire as an ordinary obstacle. When cutting, it will "bounce" off it as usual. When following the boundary wire back to the docking station, it will take the detour around the flower bed.

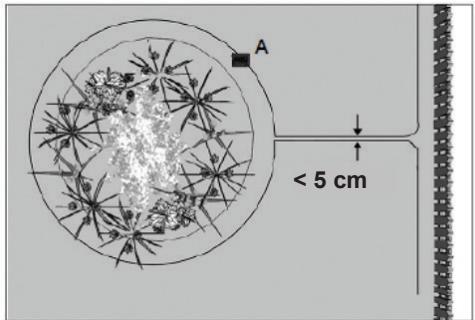
2) Alternatively, keep the distance between the two parallel wires below 5 cm. Do not cross the wires - see below. This way, the Robotic Mower will not recognise the wires and travel across them unhindered. This option requires placing an obstacle on the boundary wire around the flowerbed. Place the obstacle, e. g. a large rock or pole, near position A indicated on the below illustration. The obstacle must be surrounded by a flat area of about 1 m x 1 m, without any slopes. This obstacle will allow the machine to exit the circle.

Ponds and Pools
While the Robotic Mower is protected against rain and spray water, being submerged is likely to cause severe damage to the electronic parts.
Therefore, it is imperative to exclude any pools from the cutting area. For added safety, we recommend placing a fence around the pool.
Inventory and garage
If you have created a boundary corridor inside your working area, the corridor should be at least 2 m wide and a max length of 8 m.
If a corridor is too narrow or too long, the Robotic Mower might not be able to navigate it from one end to the other.

Connect the docking station to the boundary wire
Run the boundary wire underneath the front of the docking station and connect the end of the wire to the left (black) connector marked 'F' (front). After you have placed the wire around the garden then place the other end into right (red) connector marked "B" (back).

Insert the mains plug into a properly installed socket. Once the blue LED confirms all is OK, test the Robotic Mower's function. Check the LED regularly to ensure fixing the boundary wire has not affected the connection and signal shows S1 on the charging satation. Then place the Robotic Mower in the working area, a few metres beside the docking station. Set the main power switch to "ON". and then check the S1 signal on the panel is light on, press 4 times to unlock the panel.


Press the buttons 📋 and then close the lid, a few seconds later, the Robotic Mower should automatically return to the docking station by locating and following the boundary wire in anticlockwise direction. If Robotic Mower fails to dock correctly, move the docking station to a more suitable position.


Once the device has docked, "Charging" will show on the display, and the S1&S2 indicators on the docking station will flash alternately. This indicates that the battery is charging correctly.


After initial installation, the Robotic Mower will remain in the docking station until the battery is fully charged.
Successful docking and charging indicates that you have found a suitable position for the docking station. You should now drive fixing pegs into ground fully.
Take care not to damage or kink the surplus wire stored under the docking station.

Signal selection
Note: the default signal is S1, no need to change the signal when there isn't a influence signal form the neighbors.


If your neighbour is using the same mower, you will need to keep a distance of 0.5m between you and your neighbour's boundary wires to prevent the two devices interfering with each other. Ensure to position your docking station at least 10m away from your neighbour's boundary wires and that both products are using different signals. Please refer to section "Signal setting" in order to select signal S1 or S2 for your installation.
- Press the "signal" button on the charging station, the indicator will be switched to S2.
- Press the "S2" button on the control panel. the indicator will be switched to S2

Operation
Control panel

Initial interface
when power on your robotic mower, after entering the default PIN 0000, you will see the initial interface on the display.


*NOTE: Inverted color means date was selected.
Mon


Before starting your robotic mower
Please follow below steps to adjust the time setting before starting your robotic mower.
- Press the MENU button to enter the menu setting.

- Press the 1 button to enter time setting

- Press the 1 button to set the system date


- Press the ② button to set the system time


- Press the ③ button to enter next page

- Press the 1 button to set the working date
- Press the relative numbers to select the working date your required.


- Press the ② button to set the working time
- Press the relative numbers to select the working time your required.


NOTE: If the working day is activated, then the blinking cursor will move to specified time setting.
Sensor setting
- Press the MENU button to enter the menu setting.

- Press the ② button to enter the sensor setting.
| Sensor Settings | |
| UltraSonic | Rain |
| 1 | 2 |


- UltraSonic sensor
This machine equipped 2 ultrasonic sensors which may detect the obstacle on the lawn. When the sensor is active, the robot will stop and then turn around when detect an obstacle.
Press ② to switch off the sensor.
Press ③ to elect the detect distance you require.
- Rain sensor
NOTE: Mowing in the rain is not recommended.
This machine has a rain sensor which may stop the robot from mowing in the rain. When the rain sensor is triggered, the robot will go back to the charging station first, where it will be fully charged. Once charged the mower will remain in the charging station until the rain has stopped before starting to mow again.
Note: Be careful not to short circuit the sensors on the machine with any metal objects. This will cause the mower to work abnormally.
Press ② to switch off the sensor.
Press ③ to set the extra time.
PIN code
- Press the MENU button to enter the menu setting.

- Press the ③ button to enter the PIN setting.
- This option sets the passcode of the mower to prevent theft or unauthorised change of the menu settings. The existing (old) passcode is required to change to a new passcode. If you have forgotten the passcode, contact your local dealer or after sales service.
The default passcode of the mower is "0000".
![graph LR A["Enter Old PIN Code"] --> B["1 2 3"] A --> C["4 5 6"] A --> D["7 8 9"] A --> E["Q OK"] B --> F["Enter New PIN Code"] C --> F D --> F E --> F F --> G["1 2 3"] F --> H["4 5 6"] F --> I["7 8 9"] F --> J["Q OK"] G --> K["Re-Enter New PIN Code"] H --> K I --> K J --> K K --> L["Hand icon point…](/content/2026/08/1634144/images/3a802e5bb2056a7943c24bce6ba623fed1ec46b039fc9903919df70039577956.jpg)
- After re-enter the new PIN, press OK button OK complete this setting.
Language
- Press the MENU button to enter the menu setting.
- Select related number to set the language you require.
| Current Language Setting | |||
| English | Svenska | Deutsh | |
| 1 | 2 | 3 | 5 |
WiFi settings
Press the 📞 button to enter the menu setting.
| WiFi | ||
| Config | Status | Mode |
| 1 | 2 | 3 |
There are 3 further options in "WiFi".
Config
Select this option when you need to connect you mower to APP, see APP manual
Status
Show currently WiFi status
Mode
Client Mode-Default mode
Direct Mode-select this mode when you choose direct mode connection you on your phone.
Signal setting
- Set you require signal by pressing S1 or S2 button.

Cutting height adjustment
The cutting height can be adjusted by rotating the height adjustment dial located on the top of the machine. Cutting height range from 20 mm - 60 mm.
NOTE!
We recommend using an ordinary lawn mower or trimmer to cut the lawn below 60 mm before using the Robotic Mower. This will ensure you get the optimum performance.


Start mowing
After finishing the time settings, now you can start your Robotic Mower
- Press the Ⓞ button for 4 times to unlock the panel.
- Press the button ▶ and then close the lid, the Robotic Mower will start to work.
![graph TD A["Car Icon"] --> B{Direction} B --> C["Arrow Right"] B --> D["Arrow Left"] B --> E["Arrow Down"] B --> F["Arrow Up"] style A fill:#f9f,stroke:#333 style B fill:#ccf,stroke:#333](/content/2026/08/1634144/images/1b1bf92dfcffc210960cb405dc4138dc360daa1bbacc4f826df345ec0fdefdd9.jpg)
Return to the docking station
- Press the Ⓞ button for 4 times to unlock the panel.
- Press the button [ ] and then close the lid, the Robotic Mower will back to the docking
station.
![graph TD A["Car Icon"] --> B["Arrow Left"] B --> C["Car Icon"] C --> D["Arrow Right"] D --> E["Car Icon"] E --> F["Arrow Down"] F --> G["Car Icon"] G --> H["Arrow Up"] H --> I["Car Icon"]](/content/2026/08/1634144/images/ad006f47f9e798799179240fcca439e428bb728d468b6a09d4279af5e1a330e8.jpg)
Emergency Stop
Press STOP button to halt the mower at any time.

Technical Data
| Model | NX 60i | NX 80i | NX 100i |
| Max cutting area | 600 m2 | 800 m2 | 1000 m2 |
| Battery pack | 28 V/ 2000 mAh | 28 V/ 2850 mAh | 28 V/ 2850 mAh |
| Switch power supply | Input: 100-240 V~,50/60 Hz, 56 WOutput: 32V ===, CC1.5 A | Input: 100-240 V~,50/60 Hz, 56 WOutput: 32V ===, CC1.5 A | Input: 100-240 V~,50/60 Hz, 56 WOutput: 32V ===, CC1.5 A |
| Power supply model* | FY3201500S1/FY3201500S2/FY3201500S3 | FY3201500S1/FY3201500S2/FY3201500S3 | FY3201500S1/FY3201500S2/FY3201500S3 |
| Mowing time on one charge | 60 min | 80 min | 80 min |
| Rated voltage | 28 V | 28 V | 28 V |
| Rated power | 50 W | 50 W | 50 W |
| No load speed | 3500 min-1 | 3500 min-1 | 3500 min-1 |
| Cutting width | 18 cm | 18 cm | 18 cm |
| Cutting height | Approx 20-60 mm | Approx 20-60 mm | Approx 20-60 mm |
| Charging time | 60 min | 90 min | 90 min |
| Blade model | 846210 | 846210 | 846210 |
| Weight | 8.5 kg | 8.5 kg | 8.5 kg |
| Frequency Band | 0-148.5 kHz | 0-148.5 kHz | 0-148.5 kHz |
| Magnetic Field Strength | 70 dBμA/m | 70 dBμA/m | 70 dBμA/m |
| Wifi Frequency Band | 2400~2483.5MHz | 2400~2483.5MHz | 2400~2483.5MHz |
| Wifi Magnetic Field strength | 20dBm | 20dBm | 20dBm |
| Max sound pressure level | LpA=53 dB, K=3 dB | LpA=53 dB, K=3 dB | LpA=53 dB, K=3 dB |
| Max sound power level | LwA=64 dB, K=3 dB | LwA=64 dB, K=3 dB | LwA=64 dB, K=3 dB |
| Degree of protection: | |||
| Robotic Mower | IP24 | IP24 | IP24 |
| Switching power supply | IP67, Plug IP44 | IP67, Plug IP44 | IP67, Plug IP44 |
| Spare parts | |||
| Spare Blades | 6 Pcs | 6 Pcs | 6 Pcs |
| Boundary pegs | 150 Pcs | 200 Pcs | 220 Pcs |
| Boundary wire | 120 m | 150 m | 200 m |
| Connectors | 3 Pcs | 3 Pcs | 3 Pcs |
* WARNING: For the purposes of recharging the battery, only use the detachable supply unit provided with this appliance.
Maintenance and storage
Maintenance work that has not been described in these instructions must be carried out by a servicing agency authorised by the manufacturer. Only use original parts.
Maintenance
Check and clean your Robotic Mower regularly and replace worn parts if necessary. Preferably use a dry brush, a damp cloth or a sharpened wooden piece.
Never use flushing water.
Following these maintenance instructions can extend your Robotic Mower's service life.
Battery Life
The Robotic Mower has a maintenance free Li-ion battery, with an estimated life of more than 2 years (depending on treatment and usage).
Winter Storage
During winter, keep your mower, docking station and power supply in a dry place.
We recommend a shed, garage or preferably store it indoors.
Prepare your device for winter storage as follows:
- Fully recharge the battery.
- Set the mains power switch to "OFF".
- Thoroughly clean your Robotic Mower.
- Unplug the power supply from the mains outlet.
- Disconnect the power supply from the docking station.
- Disconnect the boundary wire from the docking station. Lift up the docking station and clean. The boundary wire can remain outside. However, it is imperative to protect the wire against corrosion. We recommend a water-free grease or suitable sealing tape.
If available, repack the product in the original packaging.
Alternatively, our service centre offers a winter service for your device. This will include a check-up of all parts and - if available - a software upgrade.
Preparing for spring
After winter storage, please clean the charging contacts on both the Robotic Mower and the docking station.
Use a fine abrasion paper or a brass brush; this will help to achieve the best charging efficiency and avoid any charging interference.
Cleaning the mower body
As your Robotic Mower is battery powered you need take care when cleaning. Remove rough dirt with a soft brush. Use a manual water spray with mild household detergent for intensive cleaning. Wipe off any residue after cleaning with a moist rag.
Disposal
To help the environment, please dispose of the product properly when it has reached the end of its useful life and not in the household waste. Information on collection points and their opening hours can be obtained from your local authority.
Li-Ion environmental damage through incorrect disposal of the batteries / rechargeable batteries. Remove the battery pack from the product before disposal. Batteries / rechargeable batteries may not be disposed of with the usual domestic waste. They may contain toxic heavy metals and are subject to hazardous waste treatment rules and regulations. Please dispose of batteries according to the relevant local requirements.
Replacing the battery
While the actual battery life will depend on usage and environmental factors, the typical service life is several years. Spare batteries are available from customer support. To replace the battery, please follow the instructions below.
- Ensure the main power switch is turned OFF. Clean the underside as instructed.
- Set the Autonomous Mower to the lowest cutting height.
- Turn the mower upside-down. Remove the 5 screws fixing the battery compartment's lid. Note one screw is partially covered by the blade protector and is only accessible through a service hole.
- Pull out the battery and disconnect it from the Autonomous Mower.
- Carefully clean the lid and the edge of the battery compartment. Debris may allow excessive water to enter the battery compartment, causing major damage to the appliance.
- Connect and insert the replacement battery, close the compartment and fix the lid with 5 screws. Do not turn on the Autonomous Mower before placing it back on its wheels. Beware of sharp blades!

Cleaning the underside
Ensure the main power switch is in OFF position. Wearing protective gloves, turn the Robotic Mower onto its side to expose its underside. Clean the blade disc and frame using a soft brush or damp cloth. Rotate the blade disc to make sure that it can move freely, check that the blades can turn on their pivots and that there is no grass is obstructing them.


Clean the contact pins and the charging strips
Using wire wool, metal cleaner or very fine grade emery paper, clean the contact pins and the charging strips on your mower and docking station. Remove any debris, leaves, or grass clippings around the contact pins and charging strips to ensure efficient charging.
Reversing or replacing the blades

WARNING!
Ensure the Robotic Mower is completely shut off before cleaning, adjusting or replacing the blades. Always wear protective gloves.

WARNING!
To ensure maximum cutting efficiency and safety, always use recommended replacement blades and blade mounting parts when replacing.
Your Robotic Mower has three blades, fixed to the blades disk.
Unless damaged by hard obstacles, these blades can last for up to five months of everyday use.
Weekly inspection of the blades and the fixing screws is advised. Note that the blades are double-edged. When the first side becomes blunt, loosen the fixing screw and the blade upside down and
re-fix. Check that the blade can move freely.

A set of spare blades is included with the Robotic Mower. More blades can be purchased via customer support.
To ensure you get the best performance from your machine, always replace all three blades at the same time. Only use spare parts recommended by manufacturer.
NOTE: if blades have been removed/ changed, please ensure that the screw is firmly secured in place and that the blade is free to move
Spare parts list
In case you need spare parts or any support with your device, please call our after sales centre.


Troubleshooting
Robotic Mower cannot dock with docking station
- Check that the boundary wire in front and underneath the charger is in a straight line.
- Check that the docking station's position is suitable as explained in this manual.
Robotic Mower runs in circles while mowing or while following boundary wire back to docking station
- Verify that no power cable runs parallel and in close proximity the boundary wire. If necessary, reposition the boundary wire.
- Check if a front wheel is stuck.
- If a neighbor has a similar Robotic Mower, the signals may interfere. Try setting your docking station and Robotic Mower are set to the alternative boundary signal S1 to S2.
- Driving motor may be damaged, please contact customer support.
The Robotic Mower is noisy
- Inspect the blade fixing screws; tighten if necessary.
- Inspect the blades for damage; replace if necessary.
- Grass may be too high. Try increasing the cutting height, or mow the lawn with an ordinary lawnmower first.
• Cutting motor failure, please call after sales service.
Mower remains at or returns to docking station when pressing START button
- Check if the mower has already completed the programmed working time for that day.
- Battery is low, the Robotic Mower needs to be charged.
LED signal indicator on docking station
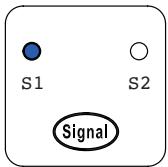

S1/S2 indicator lights on.
Boundary wire signal in good condition.


S1/S2 indicator flashes.
Boundary wire broken, no signal.


S1/S2 indicator flashing alternately.
Mower is charging in the docking station.
Charging trouble shooting
| Problem | Possible cause | Corrective action |
| No light on charge base | Incorrect wire connection | Check wire connections "F and B" |
| AC Power has not been switched ON | Switch on AC power | |
| S1 or S2 indicator flashes separately | Boundary wire broken, no signal | Repair broken cable with provided connectors |
| Robot not charging | Machine not correctly docked in charge base | Check machine is fully docked in charge base |
| Check charge base is on flat surface | ||
| Charger pins corroded | Clean the charger pins |
Mowing trouble shooting
| Problem | Possible cause | Corrective action |
| No Power to machine | ON/OFF key has not been activated | Switch ON the machine and try again |
| Robotic Mower has low charge | Place machine in the docking station | |
| Machine fails to START | Time setting not activated | Select time schedule and then try again |
| Grass build up under deck | Clean under deck with brush | |
| Battery power low | Place machine in docking station | |
| Grass too long | Mow the lawn to 60mm | |
| Cutting height is too low | Mow the lawn to 60mm and raise cutting height | |
| Battery temperature too cold /hot | Working condition is between 5 and 45 °C | |
| Boundary wire broken | Repair broken boundary wire | |
| Mower outside the boundary wire | Boundary wire is on a slope | Modify boundary wire and leave bigger distance on slope |
| Parts of the lawn are uncut | Mower needs more cutting time | Increase scheduled cutting time |
| Grass too long | Mow the lawn to 60 mm | |
| Mower gets stuck in Lawn area | Obstacles on lawn | Remove obstacles from the lawn |
| Boundary wire not correct laid | Modify boundary wire to zone out obstacles | |
| Wire in front of docking station incorrect installed | 1.5 m of straight cable to front of docking station needed | |
| Excessive vibration/noisy | Blade loose | Tighten screw bolt |
| Blades damaged jammed | Replace damaged blades | |
| Grass maybe to high | Increase cutting height, reduce later step by step or mow the lawn with ordinary lawnmower first | |
| Cutting motor failure | Please call the after sales service |
| Problem | Possible cause | Corrective action |
| Mower runs in circles | Power cable runs parallel/close to wire | Reposition of boundary wire |
| Front wheel is stuck | Clean front wheel area | |
| Signal interfere with robot in neighborhood | Change to alternative boundary signal (S1/S2) | |
| Driving motor failure | Please call after sales service | |
| Connection issue or broken/cut boundary wire | Repair/check connections on charge base and boundary wire being broken/cut |


- DESCRIPTION OF PRODUCT
- SCOPE OF DELIVERY
- INSTALLATION
- INSTALLATION GUIDE
- INTRODUCTION
- PRE CUT YOUR LAWN
- CUTTING LIMITATIONS
- TREES
- STONES
- SLOPES
- PATHS, DRIVEWAYS AND ROADS
- UNEVEN LAWN SURFACES
- PLACING THE DOCKING STATION
- PEGGING YOUR BOUNDARY WIRE
- FLOWERBEDS
- PONDS AND POOLS
- INVENTORY AND GARAGE
- CONNECT THE DOCKING STATION TO THE BOUNDARY WIRE
- SIGNAL SELECTION
- OPERATION
- CONTROL PANEL
- INITIAL INTERFACE
- BEFORE STARTING YOUR ROBOTIC MOWER
- SENSOR SETTING
- PIN CODE
- LANGUAGE
- WIFI SETTINGS
- CONFIG
- STATUS
- MODE
- SIGNAL SETTING
- CUTTING HEIGHT ADJUSTMENT
- NOTE
- START MOWING
- RETURN TO THE DOCKING STATION
- EMERGENCY STOP
- TECHNICAL DATA
- MAINTENANCE AND STORAGE
- MAINTENANCE
- BATTERY LIFE
- WINTER STORAGE
- PREPARING FOR SPRING
- CLEANING THE MOWER BODY
- DISPOSAL
- REPLACING THE BATTERY
- CLEANING THE UNDERSIDE
- CLEAN THE CONTACT PINS AND THE CHARGING STRIPS
- REVERSING OR REPLACING THE BLADES
- WARNING
- NOTE: IF BLADES HAVE BEEN REMOVED/ CHANGED, PLEASE ENSURE THAT THE SCREW IS FIRMLY SECURED IN PLACE AND THAT THE BLADE IS FREE TO MOVE
- SPARE PARTS LIST
- TROUBLESHOOTING
- ROBOTIC MOWER CANNOT DOCK WITH DOCKING STATION
- ROBOTIC MOWER RUNS IN CIRCLES WHILE MOWING OR WHILE FOLLOWING BOUNDARY WIRE BACK TO DOCKING STATION
- THE ROBOTIC MOWER IS NOISY
- MOWER REMAINS AT OR RETURNS TO DOCKING STATION WHEN PRESSING START BUTTON
- LED SIGNAL INDICATOR ON DOCKING STATION
Brand : Yard Force
Model : NX 60i / 80i / 100i
Category : Washing machine