
OR90L7DBGFX2 - Cooker Fisher & Paykel - Free user manual and instructions
Find the device manual for free OR90L7DBGFX2 Fisher & Paykel in PDF.


| Product type | 90 cm dual fuel freestanding cooker |
| Brand | Fisher & Paykel |
| Model | OR90L7DBGFX2 |
| Dimensions (H x W x D) | 898 x 900 x 600 mm |
| Weight | 113 kg |
| Power supply | Electric oven and gas cooktop (dual fuel) |
| Gas connection | Natural gas or LPG (convertible) |
| Number of gas burners | 5 burners, including triple-ring wok burner |
| Oven capacity | 140 L (total) |
| Oven functions | 7 functions: bake, fan bake, fan grill, grill, defrost, convection, and roast |
| Cleaning system | Pyrolytic self-cleaning |
| Cooktop features | Flame wok burner, heat diffuser, and pan supports |
| Control interface | Dial and touch controls |
| Display | LED display with clock and timer |
| Safety features | Flame failure protection, child lock, and cool touch oven door |
| Smart connectivity | Wi-Fi enabled with SmartHQ app |
| Accessories | Includes baking tray, broiler pan, and wire racks |
| Spare parts availability | Genuine parts available from Fisher & Paykel service centers |
| Repair index | High repairability with replaceable burners, oven elements, and thermostats |
| Energy efficiency | A+ rating for oven |
| Certification | CE, UKCA, and Gas Safe compliant |
Frequently Asked Questions - OR90L7DBGFX2 Fisher & Paykel
User questions about OR90L7DBGFX2 Fisher & Paykel
0 question about this device. Answer the ones you know or ask your own.
Ask a new question about this device
Download the instructions for your Cooker in PDF format for free! Find your manual OR90L7DBGFX2 - Fisher & Paykel and take your electronic device back in hand. On this page are published all the documents necessary for the use of your device. OR90L7DBGFX2 by Fisher & Paykel.
USER MANUAL OR90L7DBGFX2 Fisher & Paykel
OR90L7DBGFX2 FP BI double oven models
INSTALLATION GUIDE / USER GUIDE
UK IE
Safety and warnings 4
Installation instructions 10
Introducing your cooker 21
Using your gas cooktop 22
Troubleshooting
26
First use | Main multifunction oven 27
Electronic clock/programmer touch-control 28
Using your main oven 31
Cooking functions 32
Auto Cook 34
First use | Compact multifunction oven 35
Using your compact oven 36
Care and cleaning 39
Warranty and service 49
Customer care 50
Installation
WARNING!

Electric Shock Hazard
Failure to follow this advice may result in electric shock or death.
- Always disconnect the cooker from the mains electricity supply before carrying out any maintenance operations or repairs.
WARNING!

Cut Hazard
Failure to follow this advise could result in injury and cuts.
• Take care - panel edges are sharp.
IMPORTANT SAFETY PRECAUTIONS
General
- To avoid hazard, follow these instructions carefully before installing or using this product.
- Please make this information available to the person installing the product as it could reduce your installation costs.
• Installation must comply with your local building and electricity regulations. - Failure to install the cooker correctly could invalidate any warranty or liability claims.
• Some appliances have a protective film. Remove this film before using the cooker. - After unpacking the appliance, check to to ensure it is not damaged and the door closes correctly. If in doubt, do not use it and consult your Fisher & Paykel dealer or a professionally qualified technician.
Electrical
- This cooker is to be installed and connected to the electricity supply only by an authorised person.
- If the installation requires alterations to the domestic electrical system call a qualified electrician. He should also check that the electrical system is suitable for the electricity drawn by the cooker.
-
The appliance must be connected to the mains, checking that the voltage corresponds to the value given in the rating plate and that the electrical cable sections can withstand the load specified on the plate.
-
A suitable disconnection switch must be incorporated in the permanent wiring, mounted and positioned to comply with the local wiring rules and regulations. The switch must be of an approved type installed in the fixed wiring and provide a 3 mm air gap contact separation in all poles in accordance with the local wiring rules.
• The switch must always be accessible. - The power supply cable must not touch any hot parts and must be positioned so that it does not exceed 50 °C at any point and cannot become entrapped in the oven door.
- To connect the cooker to the mains, do not use adapters, reducers or branching devices as they can cause overheating and burning.
- This cooker must be connected to a suitable double pole control unit adjacent to the cooker. No diversity can be applied to this control unit.
• The cooker must be earthed.
Gas
- This cooker is supplied for use with natural gas only, and cannot be used on any other gas
- without modification. See ‘Gas installation’ for modification to other gas types.
- This cooker can only be installed in a room with adequate ventilation. See the 'Ventilation requirements' in the installation instructions.
General
- Do not leave packing elements (plastic bags, polystyrene foam, nails, packing straps etc) around within easy access of children, as these may cause serious injuries.
- Read the instructions carefully before installing and using the appliance.
- The manufacturer declines all liability for injury to persons or damage to property caused by the incorrect use or improper use of the appliance.
- If you should decide to dispose of this cooker, we recommended that it be made inoperative in an appropriate manner in accordance to health and environmental protection regulations. In particular, ensure that all potentially hazardous parts are made harmless, especially in regard to children who could play with unused appliances.
- Various components of the appliance are recyclable. Dispose of them in accordance with the regulations in force in your country. If the appliance is to be scrapped, remove the power cord.
Operation
Your freestanding cooker has been carefully designed to operate safely during normal cooking procedures. Please keep the following guidelines in mind when you are using it:
WARNING!

Electric Shock Hazard
Failure to follow this advice may result in electric shock or death.
- Switch the cooker off at the wall before replacing fuses or the oven lamp.
WARNING!
 | Hot Surface HazardFailure to follow this advice could result in burns and scalds.Accessible parts will become hot when this cooker is in use.To avoid burns and scalds keep children away.Do not touch hot surfaces inside the ovens.Use oven mitts or other protection when handling hot surfaces such as oven shelves or dishes.Take care when opening the oven doors.Let hot air or steam escape before removing or replacing food.Do not touch the cooktop components, burners, trivets/pan supports or the base when hot.Before cleaning, turn the cooker off and make sure it is cool. |
WARNING!
| ⚠ WARNING! | |
 | ExplosionFailure to follow this advice may result in death or serious injury.Do not store flammable materials such as gasoline near the cooktop.Do not store flammable material in the ovens or in the storage compartment.Do not spray aerosols near the cooktop during use. |
IMPORTANT SAFETY PRECAUTIONS
- Never leave the appliance unattended when in use. Boilover causes smoking and greasy spillovers that may ignite. NEVER try to extinguish a fire with water. Switch the appliance off at the wall and then cover the flame with a lid or fire blanket.
- Isolating switch: make sure this cooker is connected to a circuit which incorporates an isolating switch providing full disconnection from the power supply.
- Household appliances are not intended to be played with by children. Children of less than 8 years old must be kept away from the appliance unless continuously supervised. This appliance can be used by children aged from 8 years and above, and persons with reduced physical, sensory or mental capabilities or lack of experience and knowledge, if they have been given supervision or instruction concerning the use of the appliance in a safe way and they understand the hazards involved.
• Cleaning and user maintenance shall not be done by children without supervision. - Safe food handling: leave food in the oven for as short a time as possible before and after cooking. This is to avoid contamination by organisms which may cause food poisoning.
• Take particular care during warmer weather. - Do not place aluminium foil, dishes, trays, water or ice on the oven floor during cooking as this will irreversibly damage the enamel.
- Do not line the walls with aluminium foil.
- Do not stand on the doors, or place heavy objects on them.
- Do not use harsh abrasive cleaners or sharp metal scrapers to clean the oven door glass since they scratch the surface, which may result in shattering of the glass.
- Do not use a steam cleaner to clean any part of the cooker.
- Do not use an asbestos mat or decorative covers between the flame and the saucepan as this may cause serious damage to your cooktop. Do not place aluminium foil or plastic dishes on the cooktop burners.
- Do not let large saucepans or frying pans overlap the bench as this can deflect heat onto your benchtop and damage the surface.
- Do not let large saucepans, frying pans or woks push any other pans aside. This could make them unstable or deflect heat onto your benchtop and damage the surface.
- Saucepan handles may be hot to touch. Ensure saucepan handles do not overhang other gas burners that are on. Keep handles out of reach of children.
- Do not hang towels, dishcloths or other items on the cooker or oven door handle as this is a potential a fire hazard.
- If the electrical supply cord is damaged, it must only be replaced by an authorised person.
- Do not touch the cooker with wet hands or feet. Do not operate whilst in bare feet.
• This cooker is not to be used as a space heater. - The use of a gas cooking appliance results in the production of heat and moisture in the room in which it is installed. Ensure the kitchen is well ventilated. Keep natural ventilation holes open or install a mechanical ventilation device (mechanical extractor hood). Prolonged intensive use of the appliance may call for additional ventilation, for example opening of a window, or more effective ventilation, for example increasing the level of mechanical ventilation where present.
- Do not operate the cooker by means of an external timer or separate remote-control system.
-
Do not modify this appliance as it may become dangerous to use. The manufacturer declines all responsibility for any inconvenience or damage to persons or property arising from the non-observance of this condition.
-
The manufacturer declines all liability for damage to property cause by the incorrect or improper use of the appliance.
- Important! This appliance is designed and manufactured solely for the cooking of domestic (household) food and it not suitable for any non domestic application and therefore should not be used in a commercial environment.
- The appliance guarantee will be void if the appliance is used with in a non domestic environment ie a semi-commercial, commercial or communal environment.
Light source information
- This product contains a light source of energy efficiency class G. The light source used in this appliance is not suitable for room illumination.


WARNING - VERY IMPORTANT!
FIRE/OVERHEATING HAZARD:
- Do not place towels/cloths etc. onto the hob rail or oven door handle/s whilst the product is in use or hot.
TO AVOID DAMAGE TO THE APPLIANCE:
- Do not lift/move the cooker by the hob rail or oven door handle/s. - Do not lean on the hob rail or oven door handle/s.


| MM | |
| A | 900 |
| B | 877-937 |
| C | 600 |
| D | 60 |
Usable capacity = 42 L
Usable capacity = 76 L
Total capacity = 118 L
The cooker must be installed by a qualified technician and in compliance with local safety standards. This cookers has class "2/1" overheating protection so that it can be installed next to a cabinet.
The cooker may be located in a kitchen, a kitchen/diner or bed-sitting room but not in a room containing a bath or shower.
The furniture walls adjacent to the cooker must be made of material resistant to heat. The veneered synthetical material and the glue used must be resistant to a temperature of 150\ °C in order to avoid ungluing or deformations.
If the cooker is located on a pedestal it is necessary to provide safety measures to prevent falling out.

| MM | |
| A | 200 |
| B | 500 |
| C | 650 |
| D | 450 |
If the cooker is installed adjacent to furniture which is higher than the gas hob cooktop, a gap of at least 200 mm must be left between the side of the cooker and the furniture.
Curtains must not be fitted immediately behind appliance or within 500 mm of the sides.
It is essential that the cooker is positioned as stated.
Fitting the adjustable feet
IMPORTANT!
Using the supplied adjustable feet is MANDATORY. For safety reasons and to ensure adequate ventilation, the cooker chassis MUST NOT sit directly on the floor, a plinth, or other support surface.
The adjustable feet must be fitted to the base of the cooker before use. Fit the four legs by screwing them tight into the support base as shown.

Rest the rear of the cooker on a piece of the polystyrene packaging exposing the base for the fitting of the feet.
Fit the four legs by screwing them tight into the support base as shown.
If your cooker is installed on a platform, ensure it is securely fixed to prevent tipping or movement.
Levelling the cooker

Level the cooker by screwing the bottom of the feet in or out, as shown.
Moving the cooker
IMPORTANT!
Two people must always raise the cooker, as shown, to prevent damaging the adjustable feet.
• Do not lift the cooker by the door handles.
• DO NOT DRAG the cooker. Lift the feet clear of the floor.

Backguard
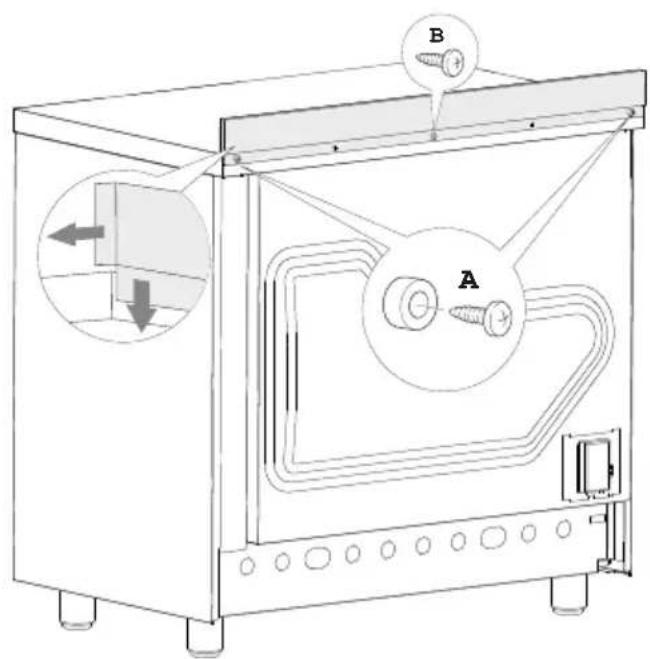
① Remove the screws and spacers on the rear of the cooktop.
② Assemble the backguard as shown and fix onto the back of the range using the same screws and spacers.
③ Fix the backguard onto the range using the screws provided.
Anti-Tip Bracket
IMPORTANT!
To restrain the range and prevent it tipping accidentally secure the range to the wall using the supplied anti-tip bracket.
If installing the range above a plinth (without fitting the adjustable feet) revise the installation dimensions for the anti-tip bracket accordingly, considering that the feet have the following measurements: min 85mm - max 135mm.
Before drilling any holes or inserting any screws into the floor or wall check that you will not damage any wiring or pipes.
To fit the anti-tip bracket
① Loosely fix the anti-tip bracket to the wall using the supplied screws
- Drill two 8mm diameter holes in the wall and insert the supplied plastic sleeve anchors before inserting the screws.
② Slide the range into place and adjust the height of the bracket so that it will align with the slot on the back of the range.
③ Tighten the screws to fix the anti-tilt bracket in place.
④ Push the range back into place so that the bracket is fully inserted into the slot on the back of the range.

Ventilation requirements
The appliance should be installed into a room or space with an air supply in accordance with BS 5440-2:2000.
For rooms with a volume of less than 5 m3 , permanent ventilation of 100 mm2 free area will be required.
For rooms with a volume of between 5 m3 and 10 m3 , permanent ventilation of 50 cm2 free area will be required unless the room has a door which opens directly to the outside air in which case no permanent ventilation is required.
For rooms with a volume greater than 10 m3 , no permanent ventilation is required.
IMPORTANT!
Regardless of room size, all rooms containing the appliance must have direct access to the outside air via an openable window or equivalent.
Where there are other fuel burning appliances in the same room, BS 5440-2:2000 should be consulted to determine the correct amount of free area ventilation requirements.
Gas installation
IMPORTANT!
This appliance must be installed and serviced only by a suitably qualified and registered person, and in accordance with the current editions of the following standards and regulations or other locally applicable regulations:
• Gas Safety (Installation and Use) Regulations
• Building Regulations
• British Standards
• Regulations for Electrical Installation
Failure to install the appliance correctly could invalidate any manufacturer's warranty and lead to prosecution under the above-quoted regulation.
Gas connection
The installation of the cooker to Natural Gas or LP Gas must be carried out by a qualified gas engineer. Installers shall take due account of the provisions of the relevant British Standards Code of Practice, the Gas Safety Regulations and the Building Standards (Scotland) (Consolidation) Regulations issued by the Scottish Development Department.
Note: It is recommended that the gas connection to the cooker is installed with a flexible connecting tube made to BS 5386.
Installation to Natural gas
Installation to Natural Gas must conform to the Code of Practice, etc. The supply pressure for Natural Gas is 20 mbar.
Installation to Liquid Petroleum gas
This appliance must only be connected to LPG after an LPG conversion kit has been fitted. The installation must conform to the relevant British Standards.
IMPORTANT!
Regardless of room size, all rooms containing the appliance must have direct access to the outside air via an openable window or equivalent.
Where there are other fuel burning appliances in the same room, BS 5440-2:2000 should be consulted to determine the correct amount of free area ventilation requirements.
The above requirements allow also for use of a gas oven and grill but if there are other gas burning appliances in the same room, consult a qualified engineer.
Gas installation
IMPORTANT!
Only a suitably qualified and registered person may convert the appliance to a different gas type.
- When using Butane gas a supply pressure of 28–30 mbar is required.
- When using Propane gas a supply pressure of 37 mbar is required. Notes:
- Flexible hoses can be used where the sited ambient temperature of the hose does not exceed 70 °C. These hoses must be manufactured in accordance with BS669 part 1 and be of the correct construction for the type of gas being used.
- Gas hoses designed for natural gas MUST NOT be used for supplying LPG gas (LPG gas hoses can be identified by a either a red band or stripe on the rubber outer coating of the hose).
- The hose should not be crushed or trapped or be in contact with sharp or abrasive edges. It should also not be subjected to corrosion by acidic cleansing agents.
Gas mains connection area
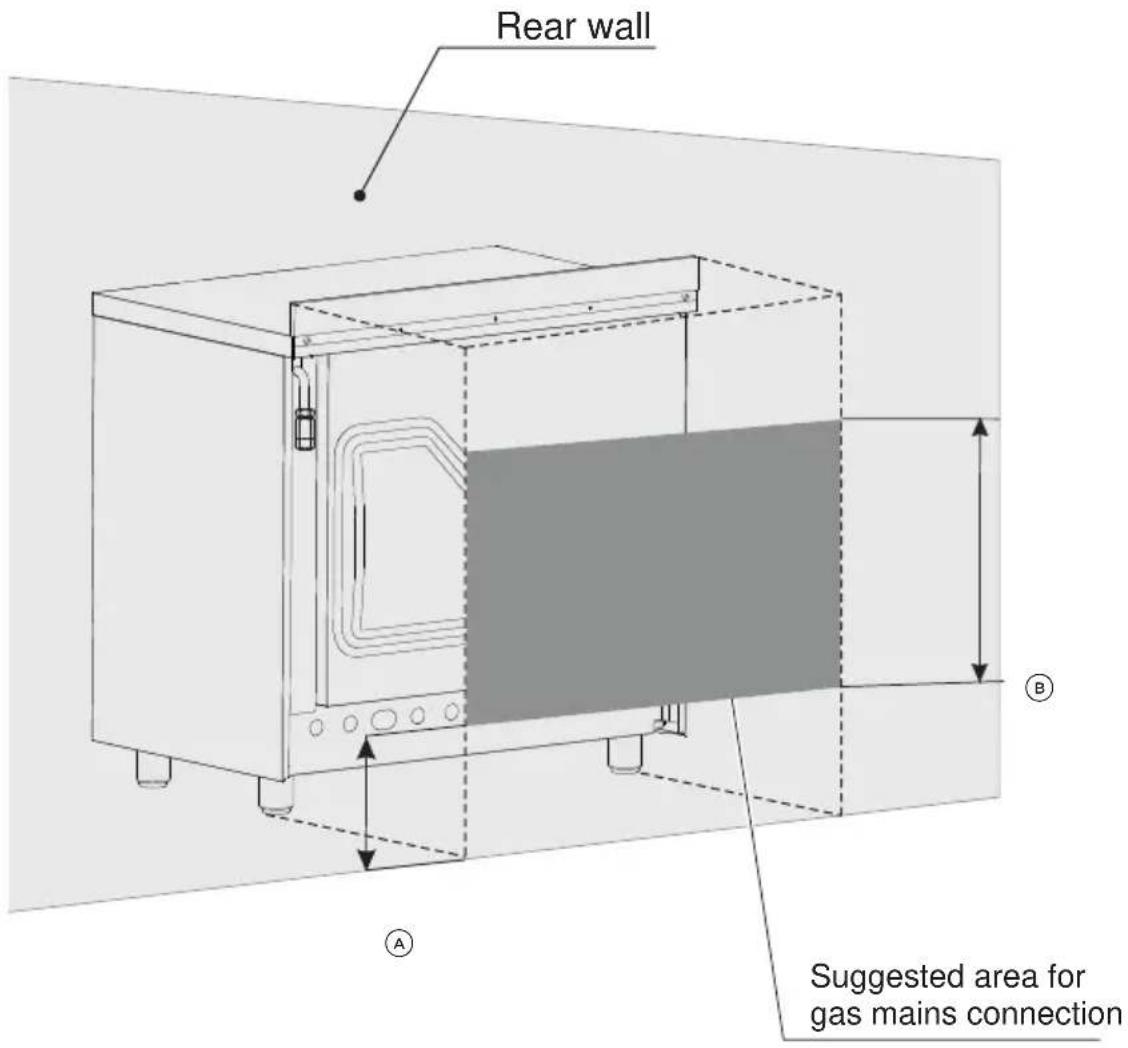
MM
(A) Distance from floor of gas supply area 200
⑧ Height of gas supply area 700
To connect the gas supply
Fit the 1/2" BSP (female) connector (supplied with the cooker in a separate kit) to the gas inlet at the rear of the cooker interposing the gasket.

Connect the gas supply to the gas inlet at the rear of the cooker. The connection must be made at the rear of appliance:
• The pipe is not to cross the cooker.
- If the connection pipe does cross the cooker, it must be positioned under the cooker's back panel.
- The hose should not be crushed or trapped or be in contact with sharp or abrasive edges. It should also not be subjected to corrosion by acidic cleansing agents.
- The hose should also be connected in such a way that it does not touch the floor and must hang in a natural loop between the appliance and the fitting.

Check the correct positioning of the connector as shown.
To avoid damage to the appliance gas rail inlet pipe tighten the fittings using two suitable spanners.
If there is a leak, tighten the fitting and then recheck for leaks. Using a suitable leak detection fluid solution (e.g. Rocol) check each gas connection one at a time by brushing the solution over the connection. The presence of bubbles will indicate a leak.
IMPORTANT! Do not use a naked flame to test for leaks.
Replacement of burner injectors
If the injectors are not supplied, contact the Fisher & Paykel Authorised Service Centre. Select the injectors to be replaced from table below.
| BURNER | NOMINAL POWER (KW) | REDUCED POWER (KW) | G 30 | 28-30 MBARG 31 | 37 MBAR | G 20 | 20 MBAR |
| ∅ INJECTOR(1/100 MM) | ∅ INJECTOR(1/100 MM) | |||
| Auxiliary 1.00 0.40 50 72 (X) | ||||
| Semirapid 1.75 0.45 65 97 (Z) | ||||
| Rapid 3.00 0.75 85 128 (H3) | ||||
| Double-ring compact | 4.00 | 1.50 | 100 | 150 (H3) |


Cat: II 2H3+
To replace the injectors
If the injectors are not supplied, contact the Fisher & Paykel Authorised Service Centre. Select the injectors to be replaced according to the table above.

Auxiliary, semi-rapid and rapid burner
Double-ring
compact burner
Remove pan supports and burners from the cooktop.
Using a wrench substitute the nozzle injectors with those most suitable for the kind of gas for which it is to be used. The burners are designed so that adjustment of primary air is not required.
Lubrication of the gas taps
A qualified technician must lubricate the gas taps.
IMPORTANT!
All intervention regarding installation maintenance and conversion of the appliance must be fulfilled with original factory parts. The manufacturer declines any liability if these correct parts are not used.
Adjusting the minimum burner setting
Check whether the flame spreads to all burner ports when the burner is lit with the gas tap set to the minimum position. If some ports do not light, increase the minimum gas rate setting.
Check whether the burner remains lit even when the gas tap is turned quickly from the maximum to the minimum position. If the burner does not remain lit, increase the minimum gas rate setting.
To adjust the minimum gas rate setting

① Turn on the burner
② Turn the tap to the MINIMUM position
③ Take off the dial
④ With a small flat screwdriver turn the screw to the correct regulation.
G30/G31 gas:
Completely tighten the screw.
Connecting the feeder cable to the cooker
IMPORTANT!
The power supply cable must be connected by an authorised service person. DO NOT unscrew the screws fixing the cover plate behind the terminal block.

① Remove the screws securing the cover on the rear of the cooker.
② Unscrew the screw D and open completely the cable clamp E.
③ Connect the phase, neutral and earth wires to terminal board G. Note: The earth conductor must be left about 3 cm longer than the others.
④ Strain the feeder cable and block it with cable clamp E (by screwing screw D).
⑤ Close the terminal block cover (check the two hooks are correctly hooked).
Power Supply
220 - 240 V - 50/60 Hz 5000W
Feeder cable section
"TYPE H05RR-F"
220 - 240 V\~ 3 x 2.5 mm 2*
* Connection with wall box connection.
©

Gas burners
① Auxiliary burner
② Semi-rapid burner
③ Rapid burner
④ Double-ring compact burner
Burner control dial
The dial controls the flow of gas through the safety tap.

0 = closed valve (see image on the left)
Maximum aperture or flow

You can choose to cook at any heat between maximum and minimum, but never between ● and OFF.
Before first use
- Read this user guide, taking special note of the safety and warnings section.
- Turn the cooker on.
• Make sure all controls are turned off.
Lighting the cooktop
① Choose the control dial for the burner you want to use.
② Press the dial down gently and turn it anticlockwise to the ● position. The ignitors on all the burners will spark.
③ Hold down the dial for approximately ten seconds after the burner has lit. Releasing the dial too soon will extinguish the flame.
④ Adjust the flame anywhere between the• and ● positions. Do not adjust the flame between ● and OFF.
Note: If the burner does not light within 15 seconds, turn the control dial off and wait at least one minute before trying again.
To switch the burner off, turn the dial clockwise until you hear the safety click.
After use, always turn the dials to the off position.
Flame failure safety feature
The flame failure probe cuts off the gas supply to the burner if the flame is blown out.
When lighting the burner on flame failure models, hold down the dial for approximately ten seconds after the burner has lit. Releasing the dial too soon will extinguish the flame.
If the flames are accidentally extinguished, turn off the burner and do not try to light it again for at least one minute (to allow the gas to disperse).
If the cooktop does not light
If the cooktop does not light, check that:
• The cooker is switched on.
• The gas is turned on.
• You have held down the dial for at least ten seconds.
- The ignitors are sparking. If the ignitors are not sparking, they may be dirty or wet. Clean them with a toothbrush and methylated spirits, as shown.

If the flame is irregular
If the flame is yellow or irregular, check that the burner parts, including the burner cap, are:
- Clean and dry.
- Positioned correctly. See 'Care and cleaning'.
• See also 'Troubleshooting'.
Choosing a burner
Use flat-bottomed pans, and make sure that they match your burner, as shown in the following table. A small pot on a large burner is not efficient.
Diameters of pans which may be used on the cooktop
| BURNER MINIMUM MAXIMUM | |
| Auxiliary 12 cm 14 cm | |
| Semi-rapid 16 cm 24 cm | |
| Rapid 24 cm 26 cm | |
| Double-ring compact 26 cm 28 cm | |
| Woks: 26 cm 36 cm | |
Correct and incorrect size matching Efficient and inefficient saucepan bottoms

Wok stand
See below for correct placement of wok stand:

IMPORTANT!
• Using a wok without the stand may cause the burner to operate incorrectly.
• Do not use the stand for ordinary, flat-bottomed saucepans.
- The wok stand MUST BE PLACED ONLY over the pan support for the double-ring compact burner.
• The cooktop becomes very hot during operation. Keep children well out of reach.
Cooktop
PROBLEM POSSIBLE CAUSES AND WHAT TO DO
| My cooktop burners do not light | Check the cooker is switched on.Check the gas supply valve is turned on and the supply to the house is working. You should hear the gas when you turn a burner on.The ignitors may be dirty. Clean them with a toothbrush and methylated spirits.The burner parts may not be located properly. Check the assembly and make sure the burner cap is sitting flat. |
| My burner flames are yellow or hard to start | The burner parts may not be located properly. Check the assembly and make sure the burner cap is sitting flat.If you use bottled gas this may indicate you are getting near the end of the bottle.Check the burner parts are clean and dry.The gas pressure may not be at the correct level. Check with your service person or installer.Your cooker may not be set up for the gas you are using. Check this with your service person or installer. |
| One of my burners has an uneven flame | Check the burner parts are clean and dry.Check the assembly and make sure the burner cap is sitting flat. |
| The flame goes out at low settings | The gas supply pressure may be low. Check this with your service person or installer.The low setting may have been adjusted incorrectly. Check this with your service person or installer. |
| My burners do not turn down much (when running on bottled gas or LPG) | Your cooktop may not have been adjusted correctly. Check this with your service person or installer. |
| The flame tips are very yellow | Call your service person to service the cooker. |
| There are objectionable odours | |
| The flame appears to lift off the burner | |
| There is an electricity failure If there is an electricity failure, you can still use your cooktop. Light the burners by holding a match close to the side of the burner and turning the control dial to the High position. Wait until the flame is burning evenly before adjusting. | |
Control panel

Before using your new oven, please:
① Read this user guide, taking special note of the 'Safety and warnings' section.
② Remove all accessories and packaging.
③ Set the clock. The oven will not work until the clock has been set.
④ Condition the oven:
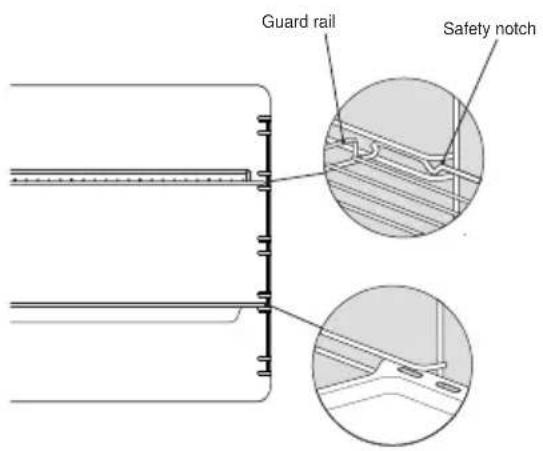
- Put in the shelves and trays. Fit them between the metal runners, with the safety notch (which stops the tray sliding all the way out) facing down and the guard rail at the back. If the shelf supports are not already fitted, see 'Care and cleaning' for how to do this.
• Heat the oven on maximum for:
60 minutes in the ☐ position
30 minutes in the position
15 minutes in the position
⑤ When the oven has cooled, switch it off at the wall. Wipe out the oven with a damp cloth and mild detergent, and dry thoroughly.
Correct position of shelves and pan

Display symbols
1 Power
2 Cooking time
3 Timer
4 Oven temperature
5 AM/PM time format
6 Screen brightness
7 Acoustic signal volume
8 Time of day setting
9 Prorgammer "touch control" panel key lock
Description of the 'touch control' panel symbols
10 Program selection
11 Digit backward setting for all functions
12 Digit forward setting for all functions
13 Menu selection
IMPORTANT NOTE: When using the timer and during a semi-automatic cooking, the countdown of the function with less time remaining prevails on the display.
Touch controls
Operate the touch controls by gently placing your finger on the key.
For best results, use the flat part of your finger rather than the tip.
The display will reset about 5 seconds after your last selection.
Setting the clock
When connecting for the first time, or after a power failure, the word OFF flashes on the display and the Ⓛ symbol is lit. Adjust the time touching the + or — key.
Important: The oven does not operate, in manual cooking, without first having set the clock.
To change the time with the appliance already installed, touch the key for more than 2 seconds, then touch it again until the symbol flashes. Then adjust the time, within 5 seconds, using the + or —.
Important: It is not possible to adjust the clock if a cooking program is in progress.
Using the timer
You can use the timer at any time, even when the oven is not in use.
ATTENTION: This is only an alarm that DOES NOT switch off the oven or grill.
Remember to turn off the oven/grill manually.
The timer can be set for a maximum time of 23 hours and 59 minutes.
① To set the timer, with the appliance already connected, touch the key (several times) until the symbol flashes on the display. Set the time (increase in minutes) within 5 seconds using the + or ☑ key. At the end of the adjustment the display shows the countdown.
② At the end of the count, the timer starts beeping and the 🔔 symbol flashes on the display. Touch any key to turn off the acoustic signal that would otherwise stop after 7 minutes.
③ Turn the oven off manually (switch and thermostat dials in the off position) if you do not wish to continue with manual cooking.
To reset the timer in operation at any time:
⑲ Only timer function active (no semi-automatic or automatic cooking in progress): touch the ⏰ key for 3 seconds.
⑯ With semi-automatic or automatic cooking in progress: touch several times the key 🏠 until the ⚙ symbol flashes on the display. Then touch the ⏻ key within 5 seconds until 00:00 appears on the display.
② The time of day is shown on the display.
User preference settings
Programmer touch controls panel key lock
Use key lock to prevent accidental touches and avoid changing settings while cooking.
You can turn the key lock on or off at any time, whether the oven is running or off.
To lock:
- Touch the key for more than 2 seconds until the indicator light starts flashing. Then touch the + key to activate the key lock, the word On, appears on the display, wait a few seconds until the operation is completed. When this function is active, the indicator light is on.
To unlock:
- Touch the key for more than 2 seconds until the indicator light starts flashing. Then touch the — key to deactivate the key lock, the word OFF appears on the display, wait a few seconds until the operation is completed. When this function is not active, the indicator light is off.
Sound setting
It is possible to select three sound tones.
- Touch the key for more than 2 seconds, then touch the same key several times until the symbol flashes.
- Touch the + or —; key; the display shows the tone set (b-01, b-02 or b-03).
- The last tone displayed remains active.
Screen brightness setting
It is possible to select three brightness levels.
- Touch the key for more than 2 seconds, then touch the same key several times until the symbol flashes.
- Touch the + or —; key; the display shows the brightness set (d-01, d-02 or d-03).
- The last brightness displayed remains active.
Time format
It is possible to choose the 24 hour or 12 hour clock format.
• To activate the 12 hour format, touch the +, key for more than 5 seconds until the AM or PM symbol is activated.
- To activate the 24 hour format, touch the +, key for more than 5 seconds until the AM or PM symbol is deactivated.

Function dial Temperature dial
① Select the function using the function dial. The oven light will come on.
② Select the temperature using the temperature control dial. The oven temperature indicator light, on the display, will glow until the oven has reached the set temperature, and then it will go out.
③ When you have finished cooking, turn the function and temperature control dials to the off O position.
| Oven functions | ||
| DEFROST |  | Only the oven fan comes on. Use with the temperature dial set to O. The fan circulates air around the oven, speeding up the defrosting process by approximately 30%.Note: this function is not for cooking food. |
| PIZZA BAKE -EASY STEAM |  | The lower element and the fan motor come on.The temperature must be regulated between the minimum and max. 250 °C.EASY STEAMBy evaporating water inside the oven, the Easy Steam function helps make food soft on the inside and crisp on the outside.1 With the oven cold, pour 250 ml of drinking water into the circular well on the floor of the oven.2 Place the food in the oven and activate the Easy Steam functionCaution: never open the door or top up the water when cooking is in progress. Burns hazard!3 At the end of the cooking process, open the door slowly and let the steam out.Caution: to prevent the formation of lime-scale, you are advised to clean the bottom of the oven after each cooking cycle with Easy Steam, once the oven has cooled down completely.You are also advised to wipe the condensation off the door glass with a soft cloth (see CARE AND CLEANING).Alternate Easy Steam cycles with conventional cooking cycles. |
| BAKE |  | The upper and lower heating elements come on. BAKE is the traditional method of cooking. It is best to cook on only one shelf at a time in this function. |
| FAN BAKE |  | The upper and lower heating elements and the fan come on.The temperature must be regulated between the minimum and the maximum position. |
| FAN FORCED (energy saving) |  | The circular heating element and the fan come on. The oven set on FAN FORCED can cook several different foods together. Use FAN FORCED for multi-shelf cooking.This function reduces the appliance's energy consumption. Ideal for gentle cooking over a longer period of time.For best results, cook small portions on a single shelf and always use with the oven door closed. It is not necessary to preheat the oven.Cooking times may be longer than standard functions. Do not use this function to preheat the oven for other functions. |
| FAN GRILL |  | Both the grill and the fan come on. Use with the oven door closed and the temperature dial between 50 °C and max. 200 °C. Do not grill for longer than 60 minutes at any one time. |
| TOP HEAT |  | Only the upper element comes on.The temperature must be regulated between the minimum and the maximum position. |
| CLASSIC BAKE |  | Only the lower element comes on.The temperature must be regulated between the minimum and max. 250 °C. |
| GRILL |  | The grill at the top of the oven comes on. Preheat for two minutes. Use with the oven door closed and the temperature dial between 50 °C and max. 225 °C. Do not grill for longer than 60 minutes at any one time. |
| WARM |  | The lower element, the circular element and the fan come on.The temperature must be regulated between the minimum and the maximum position |
| AIR FRY |  | The upper element, the circular element and the fan come on.The temperature must be regulated between the minimum and the maximum position.This function can also be used for quick preheating. |
IMPORTANT!
Safe food handling: leave food in the oven for as short a time as possible before and after cooking or defrosting. This is to avoid contamination by organisms which may cause food poisoning. Take particular care during warmer weather.
Notes on baking and roasting:
• Preheat the oven before baking.
- Do not place anything, including water or ice, on the oven floor.
Use Auto Cook to automatically turn off the oven automatically after a set period of time.
Before you start
Make sure that your oven is displaying the correct time of day and food is in the oven.
IMPORTANT!
Safe food handling: leave food in the oven for as short a time as possible before and after cooking or defrosting. This is to avoid contamination by organisms which may cause food poisoning. Take particular care during warmer weather.
① Select the function and temperature. The oven will come on.
② Touch the × key until the symbol flashes on the display. Set the cooking time (increase in minutes - consider the preheating time, if necessary) within 5 seconds using + or —. At the end of the adjustment the display shows the countdown.
③ At the end of the count the oven turns off, the timer starts beeping, the symbol flashes and the word End appears on the display.
④ Turn the temperature and function dials to the off position.
⑤ Touch the ▼key to deactivate the acoustic signal (which otherwise will stop after 7 minutes) and to return the programmer to manual mode (the time is shown on the display). If instead the acoustic signal is deactivated with one of the other keys, after deactivation also touch the ▼key to return the programmer to manual mode (the time is shown on the display).
To cancel the Auto Cook program at any time:
Only Auto-Cook program active (no timer in use): touch the ⏻ key for 3 seconds, the ⏰ symbol and the word End are shown on the display.
With active timer: touch the ⏻ key several times until the ⏱ symbol flashes. Then touch the — key within 5 seconds until 00:00 appears on the display, replaced after a few seconds by the ⏱ symbol and the word End.
② Touch the ▼key again to return the programmer to manual mode (the time of day is shown on the display). If cooking is finished turn the temperature and function dials to the off position, otherwise continue cooking and then remember to turn the oven off manually.
ATTENTION (AUTO COOK):
If a very short power interruption occurs, the oven keeps the programming.
If the interruption is instead longer than a few tens of seconds, the Auto Cook program is cancelled. In this case, turn the temperature and function dials to the off position and restart programming if necessary.
Before using your new oven, please:
① Read this user guide, taking special note of the 'Safety and warnings' section.
② Remove all accessories and packaging.
③ Condition the oven:
- Put in the shelves and trays. Fit them between the metal runners, with the safety notch (which stops the tray sliding all the way out) facing down and the guard rail at the back. If the shelf supports are not already fitted, see 'Care and cleaning' for how to do this.
• Heat the oven on maximum for:
60 minutes in the ☐ position
60 minutes in the Ⓞ position
15 minutes in the position
④ When the oven has cooled, switch it off at the wall. Wipe out the oven with a damp cloth and mild detergent, and dry thoroughly.
Correct position of shelf and pan


Function dial Temperature dial
① Select the function using the function dial. The oven light will come on.
② Select the temperature using the temperature control dial. The oven temperature indicator light, above the temperature dial on the control panel, will glow until the oven has reached the set temperature, and then it will go out.
③ When you have finished cooking, turn the function and temperature control dials to the off O position.
| Oven functions | ||
| DEFROST |  | Only the oven fan comes on. Use with the temperature dial set to O. The fan circulates air around the oven, speeding up the defrosting process by approximately 30%.Note: this function is not for cooking food. |
| PIZZA BAKE |  | The lower element and the fan motor come on.The temperature must be regulated between the minimum and max. 250 °C. |
| BAKE |  | The upper and lower heating elements come on. BAKE is the traditional method of cooking. It is best to cook on only one shelf at a time in this function. |
| FAN BAKE |  | The upper and lower heating elements and the fan come on.The temperature must be regulated between the minimum and the maximum position. |
| FAN FORCED (energy saving) |  | The circular heating element and the fan come on. The oven set on FAN FORCED can cook several different foods together. Use FAN FORCED for multi-shelf cooking.This function reduces the appliance's energy consumption. Ideal for gentle cooking over a longer period of time.For best results, cook small portions on a single shelf and always use with the oven door closed. It is not necessary to preheat the oven.Cooking times may be longer than standard functions. Do not use this function to preheat the oven for other functions. |
| FAN GRILL |  | Both the grill and the fan come on. Use with the oven door closed and the temperature dial between 50 °C and max. 200 °C. Do not grill for longer than 60 minutes at any one time. |
| TOP HEAT |  | Only the upper element comes on.The temperature must be regulated between the minimum and the maximum position. |
| CLASSIC BAKE |  | Only the lower element comes on.The temperature must be regulated between the minimum and max. 250 °C. |
| GRILL |  | The grill at the top of the oven comes on. Preheat for two minutes. Use with the oven door closed and the temperature dial between 50 °C and max. 225 °C. Do not grill for longer than 60 minutes at any one time. |
| WARM |  | The lower element, the circular element and the fan come on.The temperature must be regulated between the minimum and the maximum position |
| AIR FRY |  | The upper element, the circular element and the fan come on. The temperature must be regulated between the minimum and the maximum position.This function can also be used for quick preheating. |
IMPORTANT!
Safe food handling: leave food in the oven for as short a time as possible before and after cooking or defrosting. This is to avoid contamination by organisms which may cause food poisoning. Take particular care during warmer weather.
Notes on baking and roasting:
• Preheat the oven before baking.
- Do not place anything, including water or ice, on the oven floor.
IMPORTANT!
Before you start cleaning your cooker, please:
- Read these cleaning instructions and the 'Safety and warnings' section at the start of this user guide.
• Turn the cooker off at the wall.
• Make sure the cooker is a safe temperature to touch. - Do not use a steam cleaner.
- Do not keep flammable substances in the ovens or storage compartment.
General advice
- Wipe out the ovens after every use.
- Wipe up spills. Avoid leaving alkaline or acidic substances (such as lemon juice or vinegar) on the oven surfaces.
- Do not use cleaning products with a chlorine or acidic base.
Cleaning the outside of the cooker
IMPORTANT!
- Do not use abrasive cleaners, cloths or pads on the outside surfaces.
- Immediately wipe off any caustic cleaners if they are spilled onto the oven door handles.
Wipe the outside surfaces often, using warm water and a mild household detergent. The stainless steel may also be cleaned with a suitable cleaner and polish.
Note: if you choose to use a commercial stainless steel cleaner, please read the label to make sure it does not contain chlorine compounds as these are corrosive and may damage the appearance of your cooker.
Cleaning the gas cooktop
MAINTENANCE PERIOD DESCRIPTION
| Daily Clean gas cooktop as per following instructions. | |
| Monthly | Remove all burner parts, and clean using a non-abrasive detergent. Rinse in cold water, dry thoroughly, and replace.Clean the ignitor and probe carefully, using a toothbrush and methylated spirits. |
| Every 3-4 years Contact your local authorized gas Service Agent to perform a thorough check on all gas components on the gas cooker. | |
Auxiliary, rapid and semi-rapid burner parts and pan supports

- You can remove and clean these parts with hot soapy water or non-abrasive detergents. Clean spills regularly before they become burnt on. Do not wash these parts in a dishwasher.
- After cleaning, check that the burners and their flame spreaders are dry before replacing correctly.
- It is very important to check that the burner flame spreader and the cap have been correctly positioned. Failure to do so can cause serious problems.
- Note: To avoid damage to the electric ignition do not try to light the cooktop when the burners are not in place.


Replacing the burners
Check that:
• The ignitor is always clean to ensure trouble-free sparking.
- The probe is always clean to ensure correct operation of the safety valves.
Note: both the ignitor and probe must be very carefully cleaned using a toothbrush and methylated spirits.
Double-ring compact burner parts

Replacing the double-ring compact burner
To replace the double-ring compact burner, fit the burner ring to the housing as shown by the arrows below. Make sure the burner is not able to rotate.


Gas taps
If you have problems with the gas taps, call your Authorised Service Centre.
Cleaning the oven door glass
- Do not use oven cleaners or any other harsh/abrasive cleaners, cloths, scouring pads, steel wool or sharp metal scrapers to clean the oven door glass. These scratch the glass, which in turn could result in the glass cracking and shattering.
- Use a soft cloth and a mixture of warm water and dishwashing liquid to remove soiling after every use.
- For stubborn stains, try a mixture of baking soda and warm water with a non-abrasive scrubbing pad, then wipe dry with a soft, lint-free cloth.
Cleaning the inside of your ovens
- Clean the oven regularly and do not allow fats or oils to build up in the oven base or tray. Remove spillages as soon as they occur.
• Do not use abrasive cleaners, cloths or pads to clean the enamel. - Do not use any oven cleaners, abrasive cleaners, ammonia-based cleaners, products containing acids or alkalis, or detergents on the catalytic panels (not supplied with all models).
Removing the side racks

To make cleaning easier, you can remove the side racks and the oven door.
The grill element is self-cleaning.
Cleaning the enamel cavity
Clean the enamel on the inside of the oven when it has cooled down, using household detergents or an ammonia-based cleaner. You may use ‘off the shelf’ oven cleaners, if you carefully follow the manufacturers’ instructions.
Storage compartment
The storage compartment is accessible through the pivoting panel.

IMPORTANT!
Do not store flammable material in the ovens or in the storage compartment.
Removing and refitting the oven door(s)
IMPORTANT! Take care, the oven door is heavy!
To remove the door

① Open the door fully.

② Open the levers and hook into the spot shown in the image.

③ Hold the door.

④ Close the door until the levers hook to it.

⑤ Disengage the hinges and remove the door.
To refit the door
Repeat these steps in reverse order.
IMPORTANT!
Always keep a safe distance from the door hinges, paying special attention to position of your hands. If the door hinges are not correctly hooked, they could unhook and close suddenly and unexpectedly with risk of injury.

To remove the inner pane

① Push the glass retainer tabs in on both sides of the door and remove the retainer.
② Gently lift and pull out the inner pane of glass by releasing it from the bottom retainers. Do not angle the pane too much as you may damage the glass.
To replace the door glass pane after cleaning
When replacing the glass pane make sure that:
- you replace the inner pane correctly as shown. The pane must be in the position described below in order to fit into the door and to ensure that the oven operates safely and correctly;
• you take extra care not to bump the edges of the glass against any object or surface - you do not force any of the panes into place. If you are experiencing difficulties replacing the panes, remove them and start the process again from the beginning. If this still does not help, call Customer Care.
To replace the door glass pane after cleaning

• Make sure you fit the glass the right way up, with the bevelled top corner in the correct position.
- Slot the bottom of the pane into the lower notch at the bottom of the door.
- Position the pane by gently lowering it.
- Slide the glass retainer back into place and ensure it is fully clipped securely in place.
IMPORTANT!
Make sure the glass retainer is correctly and firmly in place and the glass pane is secure.
Replacing the oven lamps
IMPORTANT!
Disconnect the cooker from the power supply before continuing.
Let the oven cavity and the heating elements cool down.
- Remove the protective cover (A).
- Replace the halogen lamp with a new one suitable for high temperatures having the following specifications: 220 - 240 V ac, 50 - 60 Hz and same power (check watt power as stamped in the bulb itself) of the replaced lamp.

IMPORTANT!
Never replace the halogen bulb with bare hands. Contamination from your fingers can cause premature failure. Always use a clean cloth or gloves.
• Refit the protective cover.
- Turn the power to the cooker back on and set the clock.
Note: Oven bulb replacement is not covered by your warranty.
The intended purpose of the lamp, fitted on this appliance, is to illuminate the oven cavity and thus help the user to better monitor the food while cooking. This lamp is not suitable for other usage (e.g. environments lighting).
This product contains a light source of energy efficiency class G.

Before you call for service or assistance
Check the things you can do yourself. Refer to the installation instructions and your user guide and check that:
① Your product is correctly installed.
② You are familiar with its normal operation.
If after checking these points you still need assistance, please refer to the Service & Warranty book for warranty details and your nearest Authorised Service Centre, or contact us through our website www.fisherpaykel.com
This cooker has been designed and constructed in accordance with the following codes and specifications:
In Europe:
Safety requirements of EEC "Gas" Regulation (EU) 2016/426:
• EN 30-1-1
EN 30-2-1
• EN 437

Safety requirements of EEC Directive "Low voltage" 2014/35/EU:
• EN 60335-1 General Requirements for Domestic electrical appliances
• EN 60335-2-6 Particular Requirements for Domestic electrical cooking appliances
Safety requirements of EEC Directive "EMCD" 2014/30/EU:
- EN 55014-1, EN 55014-2, EN 61000-3-2, EN 61000-3-3 Electromagnetic Compatibility Requirements
Requirements of EEC Directive 93/68/EEC and 2011/65/EU.
European directive 2012/19/EU on Waste Electrical and Electronic Equipment (WEEE) (for European Union countries only)
GB:
This appliance is marked according to the European directive 2012/19/EU on Waste Electrical and Electronic Equipment (WEEE). By ensuring this product is disposed of correctly, you will help prevent potential negative consequences for the environment and human health, which could otherwise be caused by inappropriate waste handling of this product.
The symbol 📋 on the product, or on the documents accompanying the product, indicates that this appliance may not be treated as household waste. Instead it shall be handed over to the applicable collection point for the recycling of electrical and electronic equipment. Disposal must be carried out in accordance with local environmental regulations for waste disposal. For more detailed information about treatment, recovery and recycling of this product, please contact your local city office, your household waste disposal service or the shop where you purchased the product.
Complete and keep for safe reference:
Model
Serial No.
Purchase Date ____
Purchaser
Dealer ____
Suburb
Town
Country ____
FISHERPAYKEL.COM
© Fisher & Paykel Appliances 2025. All rights reserved.
The models shown in this guide may not be available in all markets and are subject to change at any time.
The product specifications in this guide apply to the specific products and models described at the date of issue. Under our policy of continuous product improvement, these specifications may change at any time.
For current details about model and specification availability in your country, please go to our website or contact your local Fisher & Paykel dealer.

- INSTALLATION
- WARNING
- ELECTRIC SHOCK HAZARD
- CUT HAZARD
- IMPORTANT SAFETY PRECAUTIONS
- GENERAL
- ELECTRICAL
- GAS
- OPERATION
- FAILURE TO FOLLOW THIS ADVICE MAY RESULT IN ELECTRIC SHOCK OR DEATH
- LIGHT SOURCE INFORMATION
- WARNING - VERY IMPORTANT
- FIRE/OVERHEATING HAZARD
- TO AVOID DAMAGE TO THE APPLIANCE
- IMPORTANT
- ANTI-TIP BRACKET
- TO FIT THE ANTI-TIP BRACKET
- VENTILATION REQUIREMENTS
- GAS INSTALLATION
- GAS CONNECTION
- INSTALLATION TO NATURAL GAS
- INSTALLATION TO LIQUID PETROLEUM GAS
- TO CONNECT THE GAS SUPPLY
- REPLACEMENT OF BURNER INJECTORS
- TO REPLACE THE INJECTORS
- LUBRICATION OF THE GAS TAPS
- ADJUSTING THE MINIMUM BURNER SETTING
- TO ADJUST THE MINIMUM GAS RATE SETTING
- G30/G31 GAS
- POWER SUPPLY
- FEEDER CABLE SECTION
- GAS BURNERS
- BURNER CONTROL DIAL
- BEFORE FIRST USE
- LIGHTING THE COOKTOP
- FLAME FAILURE SAFETY FEATURE
- IF THE COOKTOP DOES NOT LIGHT
- IF THE FLAME IS IRREGULAR
- CHOOSING A BURNER
- WOK STAND
- COOKTOP
- CONTROL PANEL
- DISPLAY SYMBOLS
- DESCRIPTION OF THE 'TOUCH CONTROL' PANEL SYMBOLS
- TOUCH CONTROLS
- SETTING THE CLOCK
- USING THE TIMER
- USER PREFERENCE SETTINGS
- PROGRAMMER TOUCH CONTROLS PANEL KEY LOCK
- SOUND SETTING
- SCREEN BRIGHTNESS SETTING
- TIME FORMAT
- NOTES ON BAKING AND ROASTING
- BEFORE YOU START
- ATTENTION (AUTO COOK)
- GENERAL ADVICE
- CLEANING THE OUTSIDE OF THE COOKER
- CLEANING THE GAS COOKTOP
- AUXILIARY, RAPID AND SEMI-RAPID BURNER PARTS AND PAN SUPPORTS
- REPLACING THE BURNERS
- DOUBLE-RING COMPACT BURNER PARTS
- REPLACING THE DOUBLE-RING COMPACT BURNER
- GAS TAPS
- CLEANING THE OVEN DOOR GLASS
- CLEANING THE INSIDE OF YOUR OVENS
- REMOVING THE SIDE RACKS
- CLEANING THE ENAMEL CAVITY
- STORAGE COMPARTMENT
- TO REMOVE THE INNER PANE
- TO REPLACE THE DOOR GLASS PANE AFTER CLEANING
- WHEN REPLACING THE GLASS PANE MAKE SURE THAT
- REPLACING THE OVEN LAMPS
- DISCONNECT THE COOKER FROM THE POWER SUPPLY BEFORE CONTINUING
- BEFORE YOU CALL FOR SERVICE OR ASSISTANCE
- IN EUROPE
- GB
- FISHERPAYKEL.COM
Brand : Fisher & Paykel
Model : OR90L7DBGFX2
Category : Cooker