
Swift 14 AI - Laptop ACER - Free user manual and instructions
Find the device manual for free Swift 14 AI ACER in PDF.


| Product Type | Laptop |
| Brand | Acer |
| Model | Swift 14 AI |
| Display Size | 14 inches IPS |
| Resolution | 2560 x 1600 pixels |
| Processor | Intel Core Ultra 7 (up to 4.8 GHz) with AI acceleration |
| RAM | 16 GB LPDDR5X (soldered) |
| Storage | 512 GB NVMe PCIe SSD |
| Graphics | Intel Arc integrated graphics |
| Operating System | Windows 11 Home |
| Battery Capacity | 65 Wh 4-cell lithium-ion |
| Battery Life | Up to 12 hours (mixed usage) |
| Fast Charging | Supports 65 W USB-C AC adapter |
| Connectivity | Wi-Fi 6E, Bluetooth 5.3, 2x USB-C, 1x USB-A, HDMI 2.1, 3.5mm audio |
| Weight | 1.38 kg (3.04 lbs) |
| Dimensions | 312.9 x 220.1 x 14.9 mm (12.32 x 8.67 x 0.59 in) |
| Backlit Keyboard | Yes, with adjustable brightness |
| Security | Fingerprint reader plus TPM 2.0 |
| Power | Input: 100-240V AC, 50-60Hz; Output: 65W via USB-C |
| Maintenance | Wipe with a soft dry microfiber cloth; ensure vents are not blocked |
| Spare Parts and Repairability | Battery and SSD replaceable by certified technicians; RAM is not upgradeable |
Frequently Asked Questions - Swift 14 AI ACER
User questions about Swift 14 AI ACER
0 question about this device. Answer the ones you know or ask your own.
Ask a new question about this device
Download the instructions for your Laptop in PDF format for free! Find your manual Swift 14 AI - ACER and take your electronic device back in hand. On this page are published all the documents necessary for the use of your device. Swift 14 AI by ACER.
USER MANUAL Swift 14 AI ACER
Swift 14 AI
USER'S MANUAL
© 2024. All Rights Reserved.
Swift 14 AI
Covers: SF14-51 / SF14-51T
This revision: August 2024

Important
This manual contains proprietary information that is protected by copyright laws. The information contained in this manual is subject to change without notice. Some features described in this manual may not be supported depending on the Operating System version. Images provided herein are for reference only and may contain information or features that do not apply to your computer. Acer Group shall not be liable for technical or editorial errors or omissions contained in this manual.
Model number: ____
Serial number: ____
Date of purchase: ____
Place of purchase: ____

Advance™
Covered by patents at patentlist.accessadvance.com
HDMI TM
HIGH-DEFINITION MULTIMEDIA INTERFACE
The terms HDMI and HDMI High-Definition Multimedia Interface, and the HDMI Logo are trademarks or registered trademarks of HDMI Licensing Administrator, Inc. in the United States and other countries.
TABLE OF CONTENTS
First things first 5
Your guides 5
Basic care and tips for using your
computer.... 5
Turning your computer off.... 5
Taking care of your computer 6
Taking care of your AC adapter 7
Cleaning and servicing.... 7
Guidelines for safe battery usage 8
Internal battery.... 10
Taking care of your vision.... 10
Your Acer notebook tour 12
Screen view 12
Keyboard view 14
Left view 15
USB Type-A information 15
USB Type-C information 15
Right view 16
USB Type-A information 16
Rear view.... 17
Base view 17
Using the keyboard 18
Lock keys.... 18
Special keys 18
Hotkeys.... 19
The Windows OS Desktop 20
Tips and hints for using Windows...... 21
Where are my apps?...... 21
Can I turn off notifications? 21
How do I check for Windows updates?..... 22
Where can I get more information?...... 22
Using the Precision Touchpad 23
Touchpad gestures.... 23
Changing touchpad settings 25
Recovery 26
Creating a file history backup 26
Restoring your computer 28
Reset this PC and keep my files 28
Reset this PC and remove everything ..... 31
Using a Bluetooth connection 34
Enabling and disabling Bluetooth 34
Enable Bluetooth and add a device 34
Connecting to the Internet 36
Connecting to a wireless network.... 36
Connecting to a wireless LAN.... 36
AcerSense 40
The AcerSense main screen 40
Widget card 41
AcerSense settings.... 41
Account and Support 42
Checkup.... 43
Personal Settings.... 45
App Center 48
Experience Zone.... 49
Securing your computer 51
Using a computer security lock.... 51
Using passwords 51
Entering passwords 52
Fingerprint Reader 53
How to use the fingerprint reader 53
BIOS utility 57
Boot sequence.... 57
Setting passwords 57
Power management 58
Saving power 58
Battery pack 60
Battery characteristics 60
Charging the battery 60
Optimizing battery life 61
Checking the battery level.... 62
Battery-low warning 62
Traveling with your computer 63
Disconnecting from the desktop 63
Moving around 63
What to bring.... 64
Universal Serial Bus (USB) 66
Thunderbolt 4 port 67
Displays 67
HDMI 68
Video and audio connectors 69
Connecting a monitor.... 69
Headphones and microphone.... 69
Frequently asked questions 71
Requesting service 73
Troubleshooting 74
Troubleshooting tips.... 74
Error messages.... 74
Internet and online security 76
First steps on the net 76
Protecting your computer.... 76
Choose an Internet Service Provider...... 76
Network connections.... 78
Surf the Net! 79
Internet security software.... 79
Getting started...
In this section you will find:
- Useful information on caring for your computer and your health
- Where to find the power button, ports and connectors
- Windows 11 interface overview
- Tips and tricks for using the touchpad and keyboard
• How to create recovery backups
• Guidelines for connecting to a network and using Bluetooth - Information on using Acer's bundled software
FIRST THINGS FIRST
We would like to thank you for making this Acer notebook your choice for meeting your mobile computing needs.
Your guides
To help you use your Acer notebook, we have designed a set of guides:
First off, the Setup Guide helps you get started with setting up your computer.
For more on how your computer can help you to be more productive, please refer to the User's Manual. This guide contains detailed information on such subjects as system utilities, data recovery, expansion options and troubleshooting.
Once you have connected to the internet, you can download updates for your computer from:
http://go.acer.com/support
- The link will open the Acer Support webpage.
- Scroll down to Drivers and Manuals and search for your model by pasting in or manually entering the serial number, SNID, or product model.
- From this page you can also download and install the Acer identification utility that will automatically detect your computer's serial number and SNID and allow you to copy it to the clipboard.
- Once you have found your product model, any updates, or documents will be listed.
Basic care and tips for using your computer
Turning your computer off
To turn the power off, do any of the following:
- Use the Windows shutdown command: Press the Windows key or select the Windows Start button, select Power > Shut down.
- Right-click the Windows Start button > Shut down or sign out > Shut down.
If you need to power down the computer for a short while, but don't want to completely shut it down, you can put it to Sleep by doing any of the following:
- Press the power button.
- Press the sleep hotkey.
- Press the Windows key or select the Windows Start button, select Power > Sleep.
- Right-click the Windows Start button > Shut down or sign out > Sleep.

Note
If you cannot power off the computer normally, press and hold the power button for up to ten seconds to shut down the computer. If you turn off the computer and want to turn it on again, wait at least two seconds before powering up.
Taking care of your computer
Your computer will serve you well if you take care of it.
- Only use the adapter provided with your device, or an Acer-approved adapter to power your device.
- Do not expose the computer to direct sunlight. Do not place it near sources of heat, such as a radiator.
- Do not expose the computer to temperatures below 0° C ( 32° F) or above 50° C ( 122° F).
- Do not subject the computer to magnetic fields.
- Do not expose the computer to rain or moisture.
- Do not spill water or any liquid on the computer.
- Do not subject the computer to heavy shock or vibration.
- Do not expose the computer to dust or dirt.
- Never place objects on top of the computer.
- Do not slam the computer display when you close it.
- Never place the computer on uneven surfaces.
Taking care of your AC adapter
Here are some ways to take care of your AC adapter:
- Do not connect the adapter to any other device.
- Do not step on the power cord or place heavy objects on top of it. Route the power cord and any cables away from where people walk.
- When unplugging the power cord, do not pull on the cord itself but pull on the plug.
- The total ampere ratings of the equipment plugged in should not exceed the ampere rating of the cord if you are using an extension cord. Also, the total current rating of all equipment plugged into a single wall outlet should not exceed the fuse rating.
Cleaning and servicing
When cleaning the computer, follow these steps:
- Turn off the computer.
- Disconnect the AC adapter.
- Use a soft, moist cloth. Do not use liquid or aerosol cleaners.
If your computer is dropped or visibly damaged, or does not work normally, please contact your nearest authorized Acer service center.
Guidelines for safe battery usage

Warning
When using a charging cart or a small space to simultaneously charge or operate multiple devices, the area must be well-ventilated and the temperature kept between 0 °C (32 °F) to 35 °C (95 °F) and battery charging must be stopped when 100% capacity is reached.
Continuous charging can cause deformation or damage to the battery/device.
Precautions when charging batteries
The useful lifespan of a battery is adversely affected by the following behavior:
- Constantly charging the battery/device when already at full capacity.
- Charging the battery/device at temperatures above 35 °C (95 °F) or below 0 °C (32 °F).
To prevent damage, follow these precautions:
- Stop charging the battery once it reaches 100% capacity; regularly or frequently charging a fully charged battery for an extended period of time may cause battery deformation or damage. We recommend that you recharge the device when the battery level drops below 70% capacity.
- Do not charge battery in temperatures above 35 °C (95 °F) or below 0 °C (32 °F). Charging in abnormally high or abnormally low temperatures can cause battery deformation or damage.
- The charging port must be clean and free from debris and should only be used with Acer charging equipment. Use of a non-Acer battery or charging equipment can cause damage to the product and will void the warranty.
- If you plan to store the device for a long period of time, turn-off the device, remove AC power and store the product at room temperature (0 °C - 35 °C) in a dry (humidity: 45% - 80%), well-ventilated area. Avoid direct sunlight, high temperatures and high humidity. Do not leave your device's battery completely discharged for a long period of time; this may cause battery deformation or damage. We recommend that the battery is checked and charged to approximately 50% capacity every 6 months.
- ONLY CHARGE THE BATTERY IN A CLEAN, WELL VENTILATED AREA.

Warning
Batteries may explode if not handled properly.
Do not disassemble or dispose of batteries in fire.
Do not short external contacts, crush, puncture or otherwise tamper with batteries. Keep batteries away from children.
Follow local regulations when disposing of used batteries.
Precautions when replacing the battery
Improper replacement or mishandling could damage the battery, cause overheating, result in injury, and risk fire or explosion.
- Device with built-in battery: A built-in battery must be replaced by an authorized service center. Do not attempt to replace or remove the battery by yourself.
- Device with removable battery: The battery should only be replaced with parts approved by Acer. Do not replace the battery with any parts other than approved ones.
This notebook uses a Lithium-based battery. Do not use it in a humid, wet or corrosive environment. Do not put, store or leave your product in or near a heat source, in a high temperature location, in strong direct sunlight, in a microwave oven or in a pressurized container, and do not expose it to temperatures over 50 °C (122 °F).
Failure to follow these guidelines may cause the battery to leak acid, become hot, explode or ignite and cause injury and/or damage. Do not pierce, open or disassemble the battery. If the battery leaks and you come into contact with the leaked fluids, rinse thoroughly with water and seek medical attention immediately. For safety reasons, and to prolong the lifetime of the battery, charging will must not occur at temperatures below 0 °C (32 °F) or above 35 °C (95 °F).
The full performance of a new battery is achieved only after two or three complete charge and discharge cycles. The battery can be charged and discharged hundreds of times, but it will eventually wear out. When the operation time becomes noticeably shorter than normal, check an authorized reseller to purchase a new battery.
Use the battery only for its intended purpose. Never use any charger or battery that is damaged. Do not short-circuit the battery. Accidental short-circuiting can occur when a metallic object such as a coin, clip or pen causes direct connection of the positive (+) and negative (-) terminals of the battery. (These look like metal strips on the battery.) This might happen, for example, when you carry a spare battery in your pocket or purse. Short-circuiting the terminals may damage the battery or the connecting object.
The capacity and lifetime of the battery will be reduced if the battery is left in hot or cold places, such as in a closed car in summer or winter. Always try to keep the battery between 15° C and 25° C ( 59° F and 77° F). A device with a hot or cold battery may not work temporarily, even when the battery is fully charged. Battery performance is especially limited in temperatures well below freezing.
Do not dispose of batteries in a fire as they may explode. Batteries may also explode if damaged. Dispose of batteries according to local regulations. Please recycle when possible. Do not dispose as household waste.
Wireless devices may be susceptible to interference from the battery, which could affect performance.

Note
Please refer to www.acer.com for battery shipping documents.
Internal battery
- Do not attempt to replace a built-in rechargeable battery, battery replacement must be done by an Acer-authorized repair facility.
- Recharge the battery by following the instruction included in the product documentation.
Taking care of your vision
Long viewing hours, wearing incorrect glasses or contact lenses, glare, excessive room lighting, poorly focused screens, very small typefaces and low-contrast displays could stress your eyes. The following sections provide suggestions on how to reduce eyestrain.
- Eyes
- Rest your eyes for 5 - 10 minutes every hour.
- Give your eyes regular breaks by looking away from the monitor and focusing on a distant point.
- Blink frequently to keep your eyes from drying out.
- Display
- Keep your display clean.
- Keep your head at a higher level than the top edge of the display so your eyes point downward when looking at the middle of the display.
- Adjust the display brightness and/or contrast to a comfortable level for enhanced text readability and graphics clarity.
- Eliminate glare and reflections by:
- placing your display in such a way that the side faces the window or any light source,
- minimizing room light by using drapes, shades or blinds,
- using a task light,
- changing the display's viewing angle,
• using a glare-reduction filter, - using a display visor, such as a piece of cardboard extended from the display's top front edge.
- Avoid adjusting your display to an awkward viewing angle.
- Avoid looking at bright light sources for extended periods of time.
YOUR ACER NOTEBOOK TOUR
After setting up your computer as illustrated in the Setup Guide, let us show you around your new Acer computer.
Screen view

| # Icon Item Description | |
| 1 Microphones | Internal digital microphone for sound recording. |
| 2 Camera shutter | Slide the shutter to the right to cover the camera. Slide left to open it. |
| 3 Camera | Camera for video communication or taking photos.A light next to the camera indicates that the camera is active. |
| 4 Screen Displays computer output. | |
| # Icon Item Description | ||
| 5 Microphone | Internal digital microphone for sound recording with AI noise reduction function. | |
| 6 | IR Camera / IR indicator | The built-in infrared camera utilizes infrared imaging for facial recognition and supports Windows Hello. |
| 7 | Acer User Sensing | Allows your laptop to detect when you're near or far, allowing you to log in quickly as you approach or lock as you leave. |

Note
This monitor uses low blue light panel. When the monitor is default setting (Preset mode: Standard), it works in compliance with TÜV Rheinland. The Low Blue Light feature on the display is designed to minimize blue light emitted from the display for better eye comfort.
Keyboard view


Note
Copilot key Feature availability varies by market, see aka.ms/WindowsAIFeatures
| # Icon Item Description | ||
| 1 Keyboard | For entering data into your computer. See "Using the keyboard" on page 18. | |
| 2 Touchpad | Touch-sensitive pointing device.The touchpad and selection buttons form a single surface.Press down firmly on the touchpad surface to perform a left click.Press down firmly on the lower right corner to perform a right click. | |
| 3 Activity Indicator | The lighting is on when turning on your device and when Copilot has been activated. | |
| 4 | Power button with fingerprint reader | Turns the computer on and off.Touch lightly to use fingerprint reader for Windows Hello and security. |
| 5 | AcerSense key Launches AcerSense application. | |
Left view

| # Icon Item Description | |||
| 1 | HDMI | HDMI port | Supports high-definition digital video connections. |
| 2 |  | USB port with power-off charging | Connects to USB devices. |
| 3 | [0A4A] | USB Type-C port with DC-in | Connects to the provided USB Type-C power adapter and to USB devices with a USB Type-C connector.Supports ThunderboltTM 4 and displays. |
USB Type-A information
- USB 3.2 Gen 1 compatible port(s): blue.
- Compatible with USB 3.2 Gen 1 and earlier devices.
- For optimal performance, use USB 3.2 Gen 1-certified devices.
- Defined by the USB 3.2 Gen 1 specification (SuperSpeed USB).
USB Type-C information
- Supports DisplayPort™ audio/video output.
- Compatible with Thunderbolt™ 4.
- Compatible with USB4 ® port.
- Delivers up to 3 A at 5 V DC for USB charging.
- DC-in: requires power adapter or power source providing 65 W at 20 V.
For optimal performance, please use a certified Acer power adapter or USB Power Delivery device.
Right view

| # Icon Item Description | |||
| 1 |  | Headset/speaker jack | Connects to audio devices (e.g.,speakers, headphones) or a headset with microphone. |
| 2 |  | USB port Connects to USB devices. | |
| 3 |  | Battery indicator | Indicates the computer's battery status.Charging: The light shows amber when the battery is charging.Fully charged: The light shows blue when in AC mode. |
 | Power indicator | Indicates the computer's power status. | |
USB Type-A information
- USB 3.2 Gen 1 compatible port(s): blue.
- Compatible with USB 3.2 Gen 1 and earlier devices.
- For optimal performance, use USB 3.2 Gen 1-certified devices.
- Defined by the USB 3.2 Gen 1 specification (SuperSpeed USB).
Rear view

| # Icon Item Description | ||
| 1 | Ventilation and cooling fan | Allows the computer to stay cool.Do not cover or obstruct the openings. |
Base view
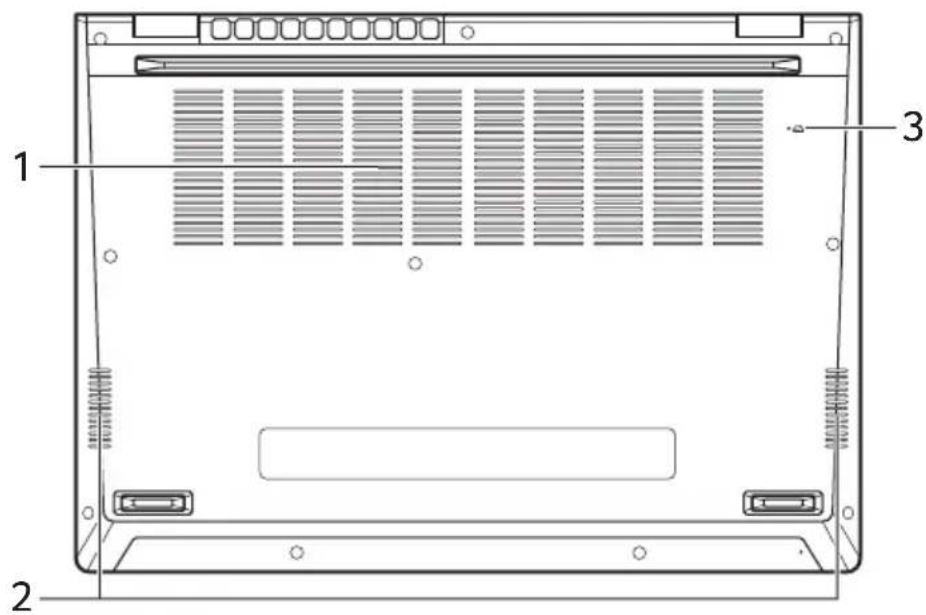
| # Icon Item Description | ||
| 1 | Ventilation and cooling fan | Allows the computer to stay cool.Do not cover or obstruct the openings. |
| 2 Speakers Deliver stereo audio output. | ||
3  | Battery reset pinhole | Simulates removing and reinstalling the battery.Insert a paperclip into the hole and press for four seconds. |
USING THE KEYBOARD
The keyboard has full-sized keys, a numeric keypad, separate cursor, lock, Windows, special keys and hotkeys.
Lock keys
The keyboard has lock keys which you can use to turn keyboard functions on and off.
| Lock key Description | |
| Caps Lock | When Caps Lock is on, all alphabetic characters typed are in uppercase. |
Special keys
Your computer's keyboard includes keys that activate special functions. The function of each key is clearly marked with an icon.
| Icon Function Description | ||
 | Speaker toggle Turns the speakers on and off. | |
 | Volume down Decreases the sound volume. | |
 | Volume up Increases the sound volume. | |
 | Microphone toggle | Turns the microphones on and off. |
 | Brightness down Decreases the screen brightness. | |
 | Brightness up Increases the screen brightness. | |
 | Display toggle | Switches display output between the display screen, external monitor (if connected) and both. |
 | Lock your computer | Locks your computer to secure your information. You can enter password to continue your work. |
 | Flight mode | Turns on / off the computer's network devices. |
 | Touchpad toggle | Turns the built-in touchpad on and off. |
 | Keyboard backlight control | Adjusts keyboard backlight brightness |
 | Snipping tool | Snips a rectangle, freeform, window or full screen to your clipboard. |
Hotkeys
To activate hotkeys, press and hold the Fn key before pressing the other key in the hotkey combination.
| Hotkey Icon Description | ||
| Fn + F1-F12 | Activates the F1 to F12 keys. | |
| Fn + delete | ins | Turns Insert on or off. |
| Fn + ◀ | home Scrolls to the beginning of a document. | |
| Fn + ▷ | end Scrolls to the end of a document. | |
| Fn + △ | pg up Scrolls up a page in a document. | |
| Fn + ▽ | pg dn Scrolls down a page in a document. | |

Note
To swap the hotkey and special function of the F1 to F12 keys, change the function key setting in the BIOS (to open the BIOS press F2 when starting your computer, then select the Main menu and change Function key behavior to Function keys).
(Specifications vary depending on model.)
THE WINDOWS OS DESKTOP


Note
Screen simulated, subject to change. Feature availability and rollout timing varies by market and device.
Item Description
| 1 Settings Changes the apps settings for your computer. | |
| 2 Widgets | Provides the weather, news, stocks, and sports information. |
| 3 S t a r | Launches apps, through Pinned, Recommended, or All apps. |
| 4 S e a r | Types in the texts to search on your computer and the Internet. |
| 5 Task View | Allows to switch between running applications and add the virtual desktop. |
| 6 Power Shut down, sleep or restart your computer. | |
| # Item Description | |
| 7 Quick settings | Displays the situation of network connection, battery level and sound setting. You can toggle quick actions to instantly adjust or open settings. |
| 8 Notification Displays the notifications and calendar. | |
Tips and hints for using Windows
We know this is a new operating system that will take some getting used to, so we've created a few pointers to help you get started.
Where are my apps?
Move your cursor to the lower center of the screen and click search icon, start typing the name of the app you would like to open.
How do I make an app appear on Start?
If you're in all apps list and you want to make an app appear on Start, right-click an app and select Pin to Start.
How do I remove an app from Start?
Right-click an app to select it and select Unpin from Start to remove the app from Start.
How do I make an app appear on my taskbar?
If you're in all apps list and you want to make an app appear on the taskbar, right-click an app and select More > Pin to taskbar.
Can I turn off notifications?
Press the Windows key or select the Windows Start button and select Settings > System > Notifications. From here you can enable/disable notifications for all of your apps or choose which apps to enable/disable.
How do I check for Windows updates?
Press the Windows key or select the Windows Start button > Settings > Windows Update. Select Advanced options to configure the settings.
Where can I get more information?
For more information please visit the following pages:
- Windows 11 information: support.microsoft.com/Windows
• Support FAQs: support.acer.com
USING THE PRECISION TOUCHPAD
The touchpad controls the arrow (or 'cursor') on the screen. As you slide your finger across the touchpad, the cursor will follow this movement. The Precision Touchpad (PTP) is designed to provide a more uniform, smooth, and accurate touchpad experience. Many applications support precision touchpad gestures that use one or more fingers, however, some gestures may not be supported by the specific application or program you are using.
Touchpad gestures

Single-finger slide
Slide a finger across the touchpad to move the cursor.

Single-finger press or tap
Press the touchpad down, or lightly tap the touchpad with your finger, to perform a 'click', which will select or start an item. Quickly repeat the tap to perform a double tap or 'double click'.

Two-finger press
Lightly tap the touchpad with two fingers to perform a 'right click'. In the Start screen, this will toggle the app commands. In most apps this will open a context menu related to the selected item.

Two-finger slide
Swiftly scroll through web pages, documents and playlists by placing two fingers on the touchpad and moving both in any direction.

Two-finger pinch
Zoom in and out of photos, maps and documents with a simple finger-and-thumb gesture.

Three-finger press
Lightly tap the touchpad with three fingers to open the Search Windows.

Three-finger swipe
Swipe across the touchpad with three fingers.
- Swipe up to open Task View. Move the cursor over a window and tap the touchpad to select that window, or swipe downwards to exit Task View.
- Swipe down to minimize all open windows and show Desktop; swipe upwards to restore the minimized windows.
- Swipe left or right to switch between open windows.

Four-finger press
Lightly tap the touchpad with four fingers to open the Action Center.

Four-finger swipe
Swipe across the touchpad with four fingers.
- Swipe up to open Task View. Move the cursor over a window and tap the touchpad to select that window, or swipe downwards to exit Task View.
- Swipe down to minimize all open windows and show Desktop; swipe upwards to restore the minimized windows.
The precision touchpad includes added technology features that help recognize and prevent unintentional gestures such as accidental taps, gestures, and pointer movement.

Note
The touchpad is sensitive to finger movement; the lighter the touch, the better the response. Please keep the touchpad and your fingers dry and clean.
Changing touchpad settings
To change the touchpad settings to suit your personal requirements, please do the following.
- In the icon tray in the lower right-hand corner of the screen, select the Network, Sound and Battery icon to open the Quick settings pane.

- Select All settings.

- Select Bluetooth & devices > Touchpad

- Now you can adjust the settings to suit your personal needs. You can switch off the touchpad if you prefer to use a mouse. Or you can adjust the touchpad sensitivity to suit your needs. Scroll down to see more settings.

RECOVERY
If you are having trouble with your computer, and the frequently asked questions (see Got a question? on page 70) do not help, you can recover your computer.
This section describes the recovery tools available on your computer. Using recovery tools can help you reset or refresh your PC, back up files/data, or create a factory default backup.
Creating a file history backup
Windows backup allows you to quickly and easily back up your files and restore them if the originals are lost, damaged or deleted.
- Click on Settings 📋 in the Start menu, select Accounts, and then select Windows backup.
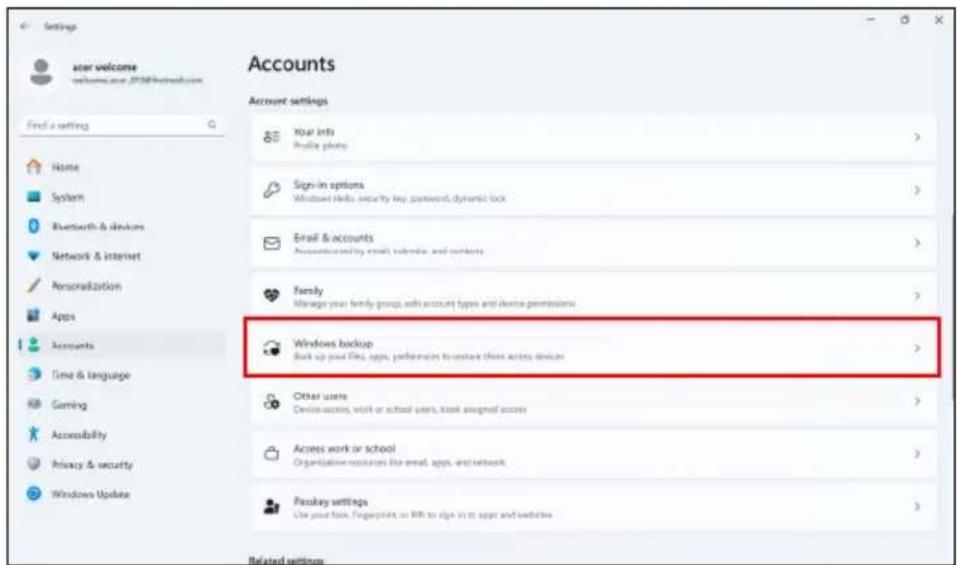
- Click Manage sync settings for OneDrive folder syncing to continue.

- Make sure the folders that you want to back up are selected and click Save changes to continue.

- You can select View progress to watch files sync until it completes.

- To open the OneDrive folder, double-click OneDrive icon in the notification area.
Restoring your computer
Recovery allows you to quickly and easily restore your computer back to its default status. You can choose to keep your files or remove them before reinstalling Windows.
Reset this PC and keep my files
-
Click on Settings in the Start menu, select System, and then select Recovery.
-
Click Reset PC to Choose an option.

- Select Keep my files to refresh your PC and reinstall your operating system without removing your personal files.

- Choose from the two options - Cloud download or Local reinstall to reinstall Windows. (Ensure you are connected to the internet when using Cloud download.)

- Click Change settings to open the Choose settings options.

- Choose your settings options and follow the instructions on screen. Click Confirm then Next to continue.


Important
If you have apps installed on your PC, they will be removed.
- Resetting the PC will reinstall Windows, change settings back to their factory defaults and remove all preinstalled apps and programs without removing your personal files. Click Reset to continue. This will take a while and your PC will restart.

-
You will be shown the reset progress on the screen. The screen will turn off during the reset process.
-
The screen will turn back on when it is installing Windows. Your PC will restart several times during the reset process.
-
Follow the process until it completes.
-
When your PC has completed the reset process, Windows will have been reset back to its factory default settings without removing your personal files.
Reset this PC and remove everything
- Click on Settings 📋 in the Start menu, select System, and then select Recovery.
- Click Reset PC to Choose an option.

- Select Remove everything to reset your PC back to its factory default.

- Choose from the two options - Cloud download or Local reinstall to reinstall Windows. (Ensure you are connected to the internet when using Cloud download.)

- Click Change settings to open the Choose settings options.

- Choose your settings options and follow the instructions on screen. Click Confirm then Next to continue.

7. Click Reset to continue.

- You will be shown the reset progress on the screen. The screen will turn off during the reset process.
- The screen will turn back on when it is installing Windows. Your PC will restart several times during the reset process.
- Follow the process until it completes.
- When your PC has completed the reset process, Windows will use factory default settings.
USING A BLUETOOTH CONNECTION
Bluetooth is a technology enabling you to transfer data wirelessly over short distances between many different types of devices. Bluetooth-enabled devices include computers, cell phones, tablets, wireless headsets, and keyboards.
To use Bluetooth, you must ensure the following:
- Bluetooth is enabled on both devices.
- Your devices are "paired" (or connected).
Enabling and disabling Bluetooth
The Bluetooth adapter must be enabled on both devices. For your computer, this may be an external switch, a software setting, or a separate Bluetooth dongle plugged into the computer's USB port (if no internal Bluetooth adapter is available).

Note
Please check your devices owner's manual to determine how to turn on its Bluetooth adapter.
Enable Bluetooth and add a device
Every new device must first be "paired" with your computer's Bluetooth adapter. This means it must first be authenticated for security purposes. You only need to pair once. After that, simply turning on the Bluetooth adapter of both devices will connect them.
Bluetooth on your computer is disabled by default. To enable your computer's Bluetooth adapter, do the following:
- Press the Windows key or select the Windows Start button > Settings > Bluetooth & devices, and click the toggle under Bluetooth to enable/disable it.
- Click on Add device then select the device that you want to add.
-
Your computer will automatically start searching for devices, as well as make itself visible to other devices.
-
Select the device you wish to pair from the list of discovered devices.

- After pairing, if there is a code displaying on the screen, enter that code on the device to proceed the connection.


Note
Some devices using older versions of the Bluetooth technology require both devices to enter a PIN. In the case of one of the devices not having any inputs (as in a headset), the passcode is hardcoded into the device (usually "0000" or "1234"). Consult your device's user manual for more information.
You can also enter the Bluetooth settings by selecting the Network, Sound and Battery icon in the lower right-hand corner of the screen to open the Quick settings pane. From here, you can enable or disable Bluetooth or right-click on Bluetooth > Go to Settings to enter the Bluetooth settings.
CONNECTING TO THE INTERNET
This chapter includes general information on types of connections, and getting connected to the internet. For detailed information, please refer to Network connections on page 78.
Your computer's built-in network features make it easy for you to connect your computer to the internet.
First though, in order to connect to the internet from home, you'll need to sign up for internet services from an ISP (Internet Service Provider) -- usually a phone or cable company -- that will have to go to your home or office to set up internet service. The ISP will install a small box, a router or modem, that will allow you to connect to the internet.
Connecting to a wireless network
Connecting to a wireless LAN
A wireless LAN (or WLAN) is a wireless local area network, which can link two or more computers without using wires. Once connected to WLAN, you can access the internet. You can also share files, other devices, and even your internet connection itself.
Your computer's wireless connection is turned on by default and Windows will detect and display a list of available networks during setup. Select your network and enter the password if required.

Warning
Using wireless devices while flying in aircraft may be prohibited. All wireless devices must be switched off before boarding an aircraft and during take-off, as they may be dangerous to the operation of the aircraft, disrupt communications, and even be illegal. You may turn on your computer's wireless devices only when informed that it is safe to do so by the cabin crew.
Acer computers feature a Flight mode hotkey that turns the network connection on or off. You can use the network management options to turn your wireless network on/off or control what is shared over the network.
To connect to a wireless network, please follow the steps below.
- Ensure you have a wireless router/access point and current internet connection through the ISP of your choice. Make a note of the wireless network's name and password (if necessary). If you are trying to connect to a public network (such as at a coffeeshop), make sure you have the wireless network's name.

Note
Please refer to your ISP or router documentation for details on connecting to the internet.
- Click Network icon in the notification area.

- Select Manage WiFi connections.


Note
If Wi-Fi is turned off, please click Wi-Fi icon to turn it on.
- You will see a list of available wireless networks. Select the one you wish to use.

- Once you select a wireless network, select Connect.

- If required, enter the network's password.

ACERSENSE
AcerSense is a device configuration center that provides you with the comprehensive capabilities to monitor system performance, check the health and charging status of your battery, adjust fan speed and power plan settings, as well as receive live update notifications.
It also allows you to switch scenarios and access apps quickly using the widget card.

Note
Function varies depending on configuration.
The AcerSense main screen
The Home page provides a comprehensive overview of system performance, including temperatures and battery status. Users can directly access the widget card and system settings from this interface. Furthermore, it dynamically displays the current usage mode with live animations that accurately reflect the operational status.


Note
The performance parameters and temperatures listed may vary depending on your computer's configuration and the power output of the CPU and GPU.
Widget card
Widget card is always visible on all AcerSense screens by default.
- Under the Live Update tab, you have the option to manually check for available updates any time by clicking on the Check Now button. For a more detailed view of available updates, simply select Details to access the Update List.

- Under the App Shortcut tab, click on an app will promptly open it. For an expanded array of available apps, select Details to access the App Center.

AcerSense settings
Select the Settings icon Ⓞ to manually update the firmware and configure the system to automatically check for available updates upon startup. Furthermore, on this screen, you have the option to adjust temperature units as needed.

Account and Support
Select the Support icon Ⓞ to either sign in or sign up for an Acer ID and register your Acer product. As a valued Acer user or Acer member, you can access a comprehensive range of benefits and services. Within this section, Find an Answer provides you full support in resolving common issues through knowledge base searches or discussions with other Acer product owners and enthusiasts. If you can't find an answer to your question, please refer to the Contact Us to locate your local service center for further assistance.

Checkup
Select the Checkup tab to swiftly evaluate the health of your system components including battery, storages and RAM with just one single click - Checkup All.

- System Info: Click on to view the comprehensive overview of the laptop's system information.
- Support Service: Click on and go to Account & Support page.
Battery
You can check the battery's health status by clicking Check button. For a comprehensive view of battery usages details, click on icon. In addition, the Battery Power shows an estimate of the remaining battery time, along with a percentage display.
To ensure optimal battery performance, it is recommended to perform Battery Calibration on a regular basis.
Storage
To assess the health status of your storage, initiate the evaluation by clicking the Check button. Besides, you can see the current utilization of storage by both apps and files, along with a check on available storage space.
For improved laptop performance, utilize either Quick Cleanup or Advanced Cleanup to efficiently remove temporary and unnecessary files, helping you clean up storage space and speed up your laptop.


RAM
To assess the health status of your RAM, click the Check button and view the current RAM usage.

Note
Specifications vary depending on model or Operating System.
Personal Settings
In the Personal Settings tab, you can select the systems usage mode, battery charging mode, screen and touchpad related settings according to your preferences.

System Usage Mode
There are three available modes to choose from: Silent, Normal and Performance. Choose the one that best suits for your specific use case. You can easily switch between modes at any time by pressing the Fn+F keys.
Battery & USB Charging
- Battery Charge Mode
There are two battery charging options available for your selection: Optimized Battery Charging and Full Battery Charging. It is highly recommended to opt for the Optimized Battery Charging mode. When this mode is selected, the system charges the battery up to 80% capacity, effectively enhancing the overall battery life.
• Power-off USB Charger
Make use of the designated USB port to charge mobile devices, even when the laptop is powered off or in Hibernation mode. In addition, you can set a battery level; when the battery power drops below this set level, the charging will be automatically halted. This feature serves to optimize laptop energy, particularly in situation where a power adapter is not available.

Screen
- BluelightShield
The BluelightShield can be enabled to reduce blue-light emissions from the screen to protect your eyes. You have the flexibility to toggle BluelightShield on or off, and choose from four different modes to fit your needs.

- Low Reduction: Reduces blue light emission from the LED backlit screen by 10% to 25% for basic protection.
- Medium Reduction: Reduces blue light emission from the LED backlit screen by 26% to 45% to protect your eyes.
- High Reduction: Reduces blue light emission from the LED backlit screen by 46% to 65% for maximum protection.
- Long Hour Mode: Professionally tuned to reduce eye strain over an extended period of time.
- Acer OLED Care Settings
OLED screen is known for its ability to display near-perfect blacks and brilliant colors, offering an exceptional visual experience without the need for a backlight, compared to the LED panel. However, it's crucial to be mindful of OLED burn-in potential. This can occur if the maximum settings for backlight, brightness, and contrast are used to display static images, possibly resulting in permanent burn-in damage to your OLED display.
Touchpad
You can enable or disable AI Lighting Effect (Activity Indicator). Select View more introduction to see AI Lighting Effect descriptions.


Note
Specifications vary depending on model or Operating System.
App Center
Select the App Center tab to swiftly launch the installed app on your computer. In case you cannot locate the app within the comprehensive list of All Apps, utilize the search function. In addition, you can refine the display by showing only preloaded apps or games, and organize them based on Popularity, Alphabet, or Installation Date. If the app is newly installed, then click the Refresh icon 📷 to reload the view.


Note
For ease of access, you can pin the app shortcut to the widget card. To do so, hover the cursor over the app and click the Pin icon. To unpin the app from the widget card, repeat the step.
App Center Widget card
![graph LR A["Snipping Tool"] --> B["Run"] B --> C["App Shortcut"]](/content/2026/08/1629444/images/d590fbb8bc16c333e7de63b6a6e7850f57ccd34a2fc877a1af47cc0321039ee4.jpg)
Experience Zone
It provides users with a suite of AI-enhanced features for collaboration.
In particular, Experience Zone offers a quick and easy way to fine-tune your AI-assisted Acer PurifiedView camera, Acer PurifiedVoice microphone settings and Activity Indicator (depending on your model), all in one place. Designed to be intuitive, it automatically appears when your device detects that your webcam or microphone has been turned on, and smartly hides itself after a brief period of inactivity.

Keeping your computer and data safe...
In this section you will find:
• How to secure your computer
- Setting passwords
- What you need to prepare when you're traveling
• How to get the most out of your battery
SECURING YOUR COMPUTER
Your computer is a valuable investment that you need to take care of. Learn how to protect and take care of your computer.
Security features include hardware and software locks — a security notch and passwords.
Using a computer security lock
The computer comes with a computer security slot for a security lock.
Wrap a computer security lock cable around an immovable object such as a table or handle of a locked drawer. Insert the lock into the notch and turn the key to secure the lock. Some keyless models are also available.
Using passwords
Passwords protect your computer from unauthorized access. Setting these passwords creates several different levels of protection for your computer and data:
- Supervisor Password prevents unauthorized entry into the BIOS utility. Once set, you must enter this password to gain access to the BIOS utility. See Setting passwords on page 57.
- User Password secures your computer against unauthorized use. Combine the use of this password with password checkpoints on boot-up and resume from Hibernation (if available) for maximum security.
- Password on Boot secures your computer against unauthorized use. Combine the use of this password with password checkpoints on boot-up and resume from Hibernation (if available) for maximum security.

Important
Do not forget your Supervisor Password! If you forget your password, please get in touch with your dealer or an authorized service center.
Entering passwords
When a password is set, a password prompt appears in the center of the display screen.
- When the Supervisor Password is set, a prompt appears when you enter the BIOS utility.
- Type the Supervisor Password and press Enter to access the BIOS utility. If you enter the password incorrectly, a warning message appears. Try again and press Enter.
- When the User Password is set and the password on boot parameter is enabled, a prompt appears at boot-up.
- Type the User Password and press Enter to use the computer. If you enter the password incorrectly, a warning message appears. Try again and press Enter.

Important
You have three chances to enter a password. If you fail to enter the password correctly after three tries, the system halts. Press and hold the power button for four seconds to shut down the computer. Then turn on the computer again, and try again.
FINGERPRINT READER
In addition to using an account password or PIN to sign in to Windows apps and services, you can also use the fingerprint reader to sign-in and unlock your Acer notebook.
In order to use the fingerprint reader, you must first configure the fingerprint reader to recognize your fingerprint to confirm your identity.
How to use the fingerprint reader
Select the Start button, then select Settings > Accounts > Sign-in options to set up Windows Hello.
- In Fingerprint recognition (Windows Hello), select Set up to configure the fingerprint reader.

- In the Windows Hello setup window, select Get started to begin the fingerprint configuration.

- Enter your PIN to confirm your identity.

- When the Windows Hello setup window appears, follow the onscreen directions. Press and hold your finger on the fingerprint sensor and then lift. Repeat this step until the fingerprint configuration is complete.

- Once the fingerprint configuration is complete, you will be able to sign in or unlock your computer by placing your fingerprint on the fingerprint reader. You may select Add another finger to add another fingerprint to unlock the computer.


Note
If the notebook has multiple accounts, you can set up access separately and automatically switch between accounts.
BIOS UTILITY
The BIOS utility is a hardware configuration program built into your computer's BIOS.
Your computer is already properly configured and optimized, and you do not normally need to run this utility. However, if you encounter configuration problems, you may need to run it.
To activate the BIOS utility, press F2 while the computer logo is being displayed.
Boot sequence
To set the boot sequence in the BIOS utility, activate the BIOS utility, then select Boot from the categories listed on the top of the screen.
Setting passwords
To set a password on boot, activate the BIOS utility, then select Security from the categories listed on the top of the screen.
Find Set Supervisor Password and enter a password to enable this feature. Once you have entered a password for this feature, you may then enable/disable Password on Boot.
Remember to select F10 to properly save and exit the BIOS utility when you are done making changes.
POWER MANAGEMENT
This computer has a built-in power management unit that monitors system activity. System activity refers to any activity involving one or more of the following devices: keyboard, mouse, hard disk, peripherals connected to the computer, and video memory. If no activity is detected for a period of time, the computer stops some or all of these devices in order to conserve energy.
Saving power
Disable Fast startup
Your computer uses Fast startup to start quickly, but also uses a small amount of power to check for signals to start. These checks will slowly drain your computer's battery.
If you prefer to reduce your computer's power requirements and environmental impact, turn off Fast startup:

Note
If Fast startup is off, your computer will take longer to start from Sleep. Your computer will also not start if it receives an instruction to start over a network (Wake on LAN).
- Press the Windows key or select the Windows Start button then search for "Choose a power plan".
- Select Choose what the power buttons do.
3. Select Change settings that are currently unavailable.

4. Scroll down and disable Turn on fast start-up.

5. Select Save changes.
BATTERY PACK
The computer uses an embedded Lithium battery that gives you long use between charges.
Battery characteristics
The battery is recharged whenever you connect the computer to the AC adapter. Your computer supports charge-in-use, enabling you to recharge the battery while you continue to operate the computer. However, recharging with the computer turned off significantly reduces charge time.
The battery will come in handy when you travel or during a power failure.
Charging the battery
Plug the AC adapter into the computer, and connect to a mains power outlet.

Note
You are advised to charge the battery before retiring for the day. Charging the battery overnight before traveling enables you to start the next day with a fully charged battery.
Conditioning a new battery pack
Before you use a battery pack for the first time, there is a conditioning process that you should follow:
- Connect the AC adapter and fully charge the battery.
- Turn on the computer and complete setting up the operating system.
- Disconnect the AC adapter.
- Operate the computer using battery power.
- Fully deplete the battery until the battery-low warning appears.
- Reconnect the AC adapter and fully charge the battery again.
Follow these steps again until the battery has been charged and discharged three times.
Use this conditioning process for all new batteries, or if a battery hasn't been used for a long time.

Warning
Do not expose battery packs to temperatures below 0° C ( 32° F) or above 45° C ( 113° F). Extreme temperatures may adversely affect the battery pack.
The battery conditioning process ensures your battery accepts the maximum possible charge. Failure to follow this procedure will prevent you from obtaining the maximum battery charge, and will also shorten the effective lifespan of the battery.
In addition, the useful lifespan of the battery is adversely affected by the following usage patterns:
- Using the computer on constant AC power.
- Not discharging and recharging the battery to its extremes, as described above.
- Frequent use; the more you use the battery, the faster it will reach the end of its effective life. An embedded battery has a life span of more than 1,000 charge/discharge cycles.
Optimizing battery life
Optimizing battery life helps you get the most out of battery operation, prolonging the charge/recharge cycle and improving recharging efficiency. You are advised to follow the suggestions set out below:
- Use AC power whenever possible, reserving battery for mobile use.
- Remove accessories that are not being used (e.g. a USB disk drive), as they can continue to draw power.
- Store your PC in a cool, dry place. The recommended temperature is 10°C (50°F) to 30°C (86°F). Higher temperatures cause the battery to self-discharge faster.
- Excessive recharging decreases the battery life.
- Look after your AC adapter and battery.
Checking the battery level
The power meter indicates the current battery level. Rest the cursor over the battery/power icon on the taskbar to see the battery's present charge level.
Battery-low warning
When using battery power pay attention to the power meter.

Important
Connect the AC adapter as soon as possible after the battery-low warning appears. Data may be lost if the battery is allowed to become fully depleted and the computer shuts down.
When the battery-low warning appears, the recommended course of action depends on your situation:
Situation Recommended Action
| The AC adapter and a power outlet are available. | 1. Plug the AC adapter into the computer, and then connect to the main power supply.2. Save all necessary files.3. Resume work.Turn off the computer if you want to recharge the battery rapidly. |
| The AC adapter or a power outlet is unavailable. | 1. Save all necessary files.2. Close all applications.3. Turn off the computer. |
TRAVELING WITH YOUR COMPUTER
This section gives you tips and hints to consider when moving around or traveling with your computer.
Disconnecting from the desktop
Follow these steps to disconnect your computer from external accessories:
- Save any open files.
- Remove discs from optical drive.
- Shut down the computer or put it into Sleep or Hibernate mode.
- Close the display cover.
- Disconnect the cord from the AC adapter.
- Disconnect the keyboard, pointing device, printer, external monitor and other external devices.
- Disconnect the Kensington / Noble lock if you are using one to secure the computer.

Note
Specifications vary depending on model.
Moving around
When you are just moving within short distances, for example, from your office desk to a meeting room.
Before moving the computer, close and latch the display cover to place it in Sleep mode. You can now safely take the computer anywhere you go within the building.
If you are moving within a larger distance, you may choose to shut down the computer.

Note
The computer may enter Hibernation or Deep Sleep mode after being in Sleep mode for a period of time.
What to bring
When you are just moving within short distances, you probably do not need to bring anything with you other than your computer. If your battery is not fully charged, you may want to bring the AC adapter with you to plug in your computer. If you cannot find an electrical outlet, reduce the drain on the battery by putting the computer in Sleep mode. Press the Sleep hotkey or close the display cover whenever you are not actively using the computer.
When you are moving within a larger distance, for instance, traveling locally or internationally, after shutting down the computer and disconnecting any external devices, pack the computer in a protective case that can prevent the computer from sliding around and cushion it if it should fall.
Ports and connectors...
In this section you will find:
• Information on the ports and connectors fitted to your computer
UNIVERSAL SERIAL BUS (USB)
The USB port is a high-speed port which allows you to connect USB peripherals, such as a mouse, an external keyboard, additional storage (external hard disks), or any other compatible device.


Note
Two USB standards are currently available on Acer computers: USB 2.0 (High-speed USB) and USB 3.2 Gen 1 (SuperSpeed USB). USB 2.0 ports on Acer computers have a black tongue in the port, while USB 3.2 Gen 1 ports have a blue tongue. For best performance, USB 3.2 Gen 1 devices should always be plugged into USB 3.2 Gen 1 ports. Consult your device's documentation to see which standard it supports.
You can also charge devices such as tablets, smartphones, or other devices through a USB port. Some USB 3.2 Gen 1 ports support charging devices when the computer is in Hibernate or turned off. Additionally, you can use a USB hub to connect multiple devices to a single USB port.

Important
When removing a USB storage device, you should right-click on the USB icon in the Windows task bar and select "Eject
THUNDERBOLT 4 PORT
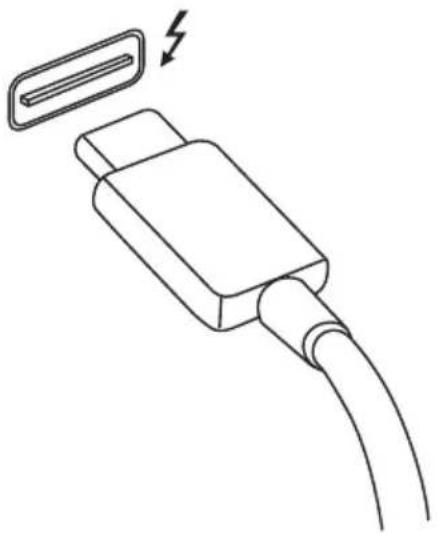
A Thunderbolt 4 port allows you to easily connect devices with a Type-C connector to your computer, such as additional storage (e.g. an external drive), displays, or any other compatible device. Up to six devices, including displays, can be connected in series to a single Thunderbolt port.
The Thunderbolt connection uses a USB Type-C port and is compatible with Thunderbolt, USB, DisplayPort and power on USB-C devices. The Type-C port is reversible; connectors may be inserted with either side up.
Displays
Up to two 4K displays with can be connected to a single Thunderbolt 4 port. If an adapter is used, DisplayPort or compatible devices, including HDMI, DVI or VGA, can be used.

Note
Thunderbolt 4 ports support transfer speeds up to 40 Gbps, and USB devices with a Type-C connector at lower speeds (typically up to 10 Gbps).
Other USB or older Thunderbolt devices with a USB Type-C connector (or adapter) are supported, but transfer speeds may be reduced and certain functions may be disabled (such as Thunderbolt display support).

Important
When removing a USB storage device, you should right-click on the USB icon in the Windows task bar and select "Eject
HDMI
HDMI (High-Definition Multimedia Interface) is a high-quality, digital audio/video interface. HDMI allows you to connect any compatible digital audio/video source, such as your computer, a set-top box, DVD player, and audio/video receiver to any compatible digital audio and/or video monitor, such as a digital television (DTV) with a single cable.
The single cable keeps everything neat and tidy while ensuring easy connection and the best audio and visual quality.

VIDEO AND AUDIO CONNECTORS
Add an external monitor to your computer via a video port. The type of port available depends on your computer's configuration.
Connecting a monitor
- Check that the computer is powered off and the monitor power switch is turned off.
- Attach the video cable to the monitor port on the computer.
- Connect the monitor power cable and plug it into a properly grounded wall outlet.
- Follow any setup instructions in the monitor's user's guide.
- Turn on power to the monitor, then the computer.
- The correct resolution and refresh rate should be detected automatically. If necessary, change the display settings used by the computer.

Note
To access the display controls, right-click anywhere on the desktop and select Display settings.
Headphones and microphone
One or more 3.5 mm jacks on your computer allow you to connect audio devices.
Use the headphone port to plug in stereo headphones or powered speakers; connecting an audio device to the headphone port disables the built-in speakers.
Use the microphone port to connect an external microphone; connecting a microphone disables the built-in microphone.

Note
Some computers have a single "combo" port that allows you to use single-pin headsets with a built-in microphone. These headsets are most commonly used with smartphones.
Got a question?
In this section you will find:
• Frequently asked questions
- Troubleshooting information
• How to protect yourself while online
- Where to find Acer service center contact information
FREQUENTLY ASKED QUESTIONS
The following is a list of possible situations that may arise during the use of your computer. Easy solutions are provided for each one.
I turned on the power, but the computer does not start or boot up.
Check if power is being supplied to the computer (if your computer has a power indicator, it will be off); if there is no power, check the following:
- If you are using on the battery, it may be low and unable to power the computer. Connect the AC adapter to recharge the battery pack. You may need to wait a few minutes before trying to turn your computer on again.
- Make sure that the AC adapter is properly plugged into the computer and to the power outlet.
If power is being supplied to the computer, check the following:
- Do you have a USB storage device (USB drive, CD drive or smartphone) plugged into your computer? Unplug it and press Ctrl + Alt + Del to restart the system.
Nothing appears on the screen.
The computer's power management system automatically blanks the screen to save power. Press any key to turn the display back on.
If pressing a key does not turn the display back on, three things might be the cause:
- The brightness level might be too low. Use the Brightness up hotkey to adjust the brightness level.
- The display device might be set to an external monitor. Press the display toggle hotkey to toggle the display back to the computer.
- The computer may be in Sleep or Hibernate mode (if there is a power LED, it will flash). Press and release the power button to resume.
No audio is heard from the computer.
Check the following:
- The volume may be muted. Look at the volume control (speaker)
icon in the taskbar. If it is crossed-out, click the icon and drag the slider to the right to increase the volume.
- The volume level may be too low. Check the volume from the volume control (speaker) icon in the taskbar. You can also use the volume control hotkeys to adjust the volume.
- If headphones, earphones or external speakers are connected to the headphone jack on the computer, the internal speakers automatically turn off.
The keyboard does not respond.
Try attaching an external keyboard to a USB port on the computer. If it works, contact your dealer or an authorized service center as the internal keyboard cable may be loose.
The printer does not work.
- Make sure that the printer is connected to a power outlet and that it is turned on.
- Make sure that the printer cable is connected securely to a USB port and the corresponding port on the printer.
I want to restore my computer to its original settings.

Note
If your system is the multilingual version, the operating system and language you choose when you first turn on the system will be the only option for future recovery operations.
This recovery process helps you restore the C: drive with the original software content that is installed when you purchased your computer.

Warning
Your C: drive will be reformatted and all data will be erased. It is important to back up all data files before using this option.
Before performing a restore operation, please check the BIOS settings.
- If there is a D2D Recovery setting in Main, make sure it is Enabled.
- Exit the BIOS utility and save changes. The system will reboot.

Note
To access the BIOS utility, press F2 when you see the Acer logo during boot up.
For more information, see Restoring your computer on page 28.
Requesting service
International Travelers Warranty (ITW)
Your computer is backed by an International Travelers Warranty (ITW) that gives you security and peace of mind when traveling. An ITW passport came with your computer and contains all you need to know about the ITW program. A list of available, authorized service centers is in this handy booklet. Read this passport thoroughly.
Always have your ITW passport on hand, especially when you travel, to receive the benefits from our support centers. Attach your proof-of-purchase to the ITW passport.
If the country you are traveling in does not have an Acer-authorized ITW service site, you can still get in contact with our offices worldwide. Please visit www.acer.com.
Before you call
Please have the following information available when you call Acer for online service, and please be at your computer when you call. With your support, we can reduce the amount of time a call takes and help solve your problems efficiently. If there are error messages or beeps reported by your computer, write them down as they appear on the screen (or the number and sequence in the case of beeps).
You are required to provide the following information:
Name:
Address:
Telephone number:
Machine and model type:
Serial number:
Date of purchase:
Troubleshooting
This chapter shows you how to deal with common system problems. Read it before calling a technician if a problem occurs. Solutions to more serious problems require opening up the computer. Do not attempt to open the computer yourself; contact your dealer or authorized service center for assistance.
Troubleshooting tips
This computer incorporates an advanced design that delivers onscreen error message reports to help you solve problems.
If the system reports an error message or an error symptom occurs, see "Error messages" below. If the problem cannot be resolved, contact your dealer.
Error messages
If you receive an error message, note the message and take the corrective action. The following table lists the error messages in alphabetical order together with the recommended course of action.
| Error messages Corrective action | |
| CMOS battery bad | Contact your dealer or an authorized service center. |
| CMOS checksum error | Contact your dealer or an authorized service center. |
| Disk boot failure | Insert a system (bootable) disk, then press Enter to reboot. |
| Equipment configuration error | Press F2 (during POST) to enter the BIOS utility, then press Exit in the BIOS utility to reboot. |
| Hard disk 0 error | Contact your dealer or an authorized service center. |
| Hard disk 0 extended type error | Contact your dealer or an authorized service center. |
| I/O parity error | Contact your dealer or an authorized service center. |
| Keyboard error or no keyboard connected | Contact your dealer or an authorized service center. |
| Keyboard interface error | Contact your dealer or an authorized service center. |
| Memory size mismatch | Press F2 (during POST) to enter the BIOS utility, then press Exit in the BIOS utility to reboot. |
If you still encounter problems after going through the corrective measures, please contact your dealer or an authorized service center for assistance.
INTERNET AND ONLINE SECURITY
First steps on the net
Protecting your computer
It is vital to protect your computer from viruses and attacks over the internet (see Internet security software on page 79).
A comprehensive internet security program is offered when you first start your computer. You should activate this protection as soon as possible, certainly before you connect to the internet.
Choose an Internet Service Provider

Using the internet has become a natural part of daily computing. Just a few simple steps can connect you to a vast collection of knowledge and communication tools. To accomplish these steps you should first select an Internet Service Provider (ISP), which supplies the connection between your computer and the internet. You should research the ISPs available in your region, not forgetting to talk to friends and family about their experiences or to check reviews and consumer reports. The ISP you select will provide instructions on how to connect to the internet (you may need additional software or a special ‘box’ that connects to your phone line).
Connection types
Depending on your computer model, your location and your communication needs, you have several ways to connect to the internet.
Dial-up
Some computers include a telephone dial-up ('modem') connector. This allows you to connect to the internet using your telephone line. With a dial-up connection, you cannot use the modem and the telephone simultaneously on a single phone line. This type of connection is recommended only if you have limited use of the
internet as the connection speed is low and connection time is typically charged per hour.
DSL (e.g. ADSL)
DSL (Digital Subscriber Line) is an ‘always-on’ connection that runs over the phone line. As DSL and phone do not use the same frequencies, you can use your telephone at the same time you are connected to the internet (this requires a ‘micro-filter’ on each telephone socket to avoid interference). To be eligible for DSL, you must be located near an DSL-equipped phone exchange (service is sometimes unavailable in rural areas). Connection speeds vary depending on your location, but DSL generally provides very fast and reliable internet connection. As the connection is always-on, it is generally charged at fixed monthly rates.

Note
A DSL connection requires an appropriate modem. A modem is usually provided by the ISP when you register. Many of these modems include an 'router' that provides network and Wi-Fi access.
Cable
A cable connection provides fast and always-on internet service via a cable television line. This service is generally available in large cities. You can use your telephone and watch cable TV at the same time you are connected to the internet.
Cellular
A cellular connection allows you to use cellular networks (such as those used by a mobile phone) to connect to the internet while away from home. The socket for a SIM card may be built in to your computer, or may require an external device, such as a USB modem or even an appropriately equipped mobile phone.

Note
If your computer includes a SIM card slot, you require a compatible SIM card and a contract with a cellular provider.
Before using the cellular features, check with your service provider to see if any additional charges will be incurred, especially roaming charges.
Network connections
A LAN (Local Area Network) is a group of computers (for example, within an office building or home) that share a common communications line and resources. When you set up a network, you can share files, peripheral devices (such as a printer) and an internet connection. You can set up a LAN using wired technologies (such as Ethernet) or wireless technologies (such as Wi-Fi or Bluetooth).
Wireless networks
A wireless LAN or WLAN is a wireless local area network, which may link two or more computers without using wires. Setting up a wireless network is easy and allows you to share files, peripheral devices and an internet connection.
What are benefits of a wireless network?
Mobility
Wireless LAN systems allow you and other users of your home network to share access to files and devices connected to the network, for example a printer or scanner.
Also you can share an internet connection with other computers in your home.
Installation speed and simplicity
Installing a wireless LAN system can be fast and easy and eliminates the need to pull cables through walls and ceilings.
Components of a wireless LAN
To set up your Wireless network at home you need to have the following:
Access point (router)
Access points (routers) are two-way transceivers that broadcast data into the surrounding environment. Access points act as a mediator between wired and wireless network. Most routers have a built-in DSL modem that will allow you access to a high speed DSL internet connection. The ISP (Internet Service Provider) you have chosen normally supplies a modem/router with the subscription to their
services. Read carefully the documentation supplied with your Access point/router for detailed setup instructions.
Wireless adapter
Most computers feature a wireless module and Wi-Fi button that turns the network connection on or off. You may also turn your wireless network on or off, or control what is shared over the network with the network management options.

Warning
Using wireless devices while flying in aircraft may be prohibited. Switch off all devices before boarding an aircraft; they may be dangerous to the operation of the aircraft, disrupt communications, and even be illegal. After take off, ask the cabin crew if you may enable Wi-Fi.
Surf the Net!
To surf the internet, you need a program called an internet browser. Microsoft Edge provides an easy and secure web browsing experience. As soon as you have your internet access installed and you are connected, from the Start Menu, click the Microsoft Edge app or the icon located in the taskbar and take your internet experience to a new level!

Acer website
To get you started why not visit our website, www.acer.com.
Acer is dedicated to provide you with on-going personalized support. Check out our Support section to get help tailored to your needs.
www.acer.com is your portal to a world of online activities and services: visit us regularly for the latest information and downloads!
Internet security software
To help you stay ahead of cybercriminals, Acer has partnered with McAfee to offer you security for all your devices.
Select Acer computers include protection by McAfee
McAfee is pre-installed on select Acer computers, protecting your identity and financial data from viruses, spyware, malware and other online threats. Learn more about how to stay safe online and how to stay protected after your introductory subscription ends.

Note
Specifications vary depending on model or Operating System.
Staying ahead of cybercriminals
Stay ahead of hackers and cybercriminals by understanding the tactics they use to access your private data.
Ensure your software is up to date
Cybercriminals rely heavily upon software or platform vulnerabilities, as they are the easiest way to sneak malware into a user's device unnoticed, sometimes with little action on the user's part. Immediately after a software manufacturer announces an update, hackers are ready with malware that can breach holes in the software that would have been patched if the update was installed.
How to stay safe: Perform any and all software updates as soon as they are available.
Keep a lookout for fake or phishing emails
Beware of emails that appear to be from a friend or business colleague that you know but seem a little odd. Maybe they didn't capitalize your name or there are misspellings. The email might be from cybercriminals who are trying to fool you into sending them your credit card number, social security number, or logging into a fake bank website that looks like yours but really isn't.
How to stay safe: Use a strong antispam filter. If an email looks strange, don't click on anything and delete it immediately. Instead manually launch a browser and type in your bank's website address and log-in yourself.
Don't be fooled if someone calls your phone
A tech support scam is a form of online fraud where people call you on the phone saying they're Technical Support from a trusted
company like McAfee or Microsoft and that you have a virus. The main motive behind these scams is to extort money from the victim. Cybercriminals can also install malware such as keylogging software or backdoor Trojans in order to gain access to personal information.
How to stay safe: Don't fall for phone calls that tell you your software or computer isn't working. Never give your personal information like social security or credit card numbers to someone that you don't know over the phone.
Common threats cybercriminals use
Now you know a few very common ways cybercriminals try to sneak onto your device or trick you into providing private information to them directly. Here are a few of the types of malware they like to deploy once they've got into a device and what to do if you're ever infected.
Ransomware
A form of malware that will encrypt personal data files on your computer and attached devices. Encryption converts files into another format, that can only be opened with a specific decryption key. Once the ransomware installs itself, it will display a warning message that the computer is now locked. The user is given a specific amount of money to pay as a "fine" and a timeframe in which to pay. Even if paid, the criminal might choose to not unencrypt the files anyway!
What to do if you're infected: Avoid getting infected in the first place by staying protected with internet security software like McAfee Security. Also, perform regular backups of all your data either online or to a separate external hard drive that is only attached to your computer while performing the backup. Ransomware has been known to lock access to external hard drives attached to the computer.
If you are infected with ransomware, think twice before you pay the ransom. There is no guarantee the cybercriminal will unlock your files and you'll be funding them to prey upon another innocent victim.
Botnets
A botnet is a string of infected, connected computers coordinated together to perform a task. Botnets gain access to your machine through some piece of malicious coding. Once the software is downloaded, the botnet will now contact its master computer and let it know that everything is ready to go. Now your computer, phone,
tablet, or IoT device is entirely under the control of the person who created the botnet. Most people who are infected with botnets aren't even aware that their computer's security has become compromised!
What to do if you're infected: If you're infected you probably don't realize it as bots are notoriously quiet. Your Internet Service Provider might send you a notification alerting you that they found a threat on your network and that you need to remove the bot. If you have a bot, use internet security software like McAfee to scan all of your devices.
Viruses/Malware
"Virus" is the commonplace word for all malicious software programs for years now; however, a virus is just one type of malicious threat. A virus is classified as a self-replicating piece of malicious code that travels by inserting itself into files or programs.
What to do if you're infected: Take steps to avoid infection by staying protected with internet security software like McAfee.
Take special precautions when using public Wi-Fi
Public Wi-Fi is available just about everywhere, from the local coffee shop to the hotels and airports you visit while traveling. While public Wi-Fi has made our lives a little easier, it also poses security risks to the personal information available on our laptops and smartphones. A virtual private network (VPN) gives you online privacy and anonymity by creating a private network from a public internet connection. VPNs mask your internet protocol (IP) address so your online actions are virtually untraceable as well as secure. One of the biggest security risks on public Wi-Fi are man-in-the-middle attacks (MITM). These attacks are akin to eavesdropping. Data is sent from point A (computer) to point B (server/website), and an attacker can get in-between these transmissions. They then set up tools programmed to "listen in" on transmissions, intercept data that is specifically targeted as valuable, and capture the data, such as your login credentials and passwords.
Use a virtual private network (VPN) to ensure your privacy and anonymity are protected when you use public Wi-Fi. VPN services can encrypt all the data that you send and receive while using a public Wi-Fi hotspot, securing your information from hackers and other users of the same connection.
For more tips on how to stay safe
Good security habits can reduce your exposure to online crime. By adopting a few basic behaviors, you can make big strides in reducing cybercrime risk:
- Protect your accounts with strong, unique passwords that use a combination of at least 10 uppercase and lowercase letters, symbols and numbers.
- Don't click on random links or open unsolicited messages and attachments-particularly from people you don't know.
- Don't access any personal information or social media accounts over unprotected Wi-Fi networks.
- Use security software on your devices to help protect yourself from the latest threats.
Protect your computer with Windows security tools
Windows provides a variety of protection applications.
Windows Updates
If you have an active internet connection, Windows can check for important updates for your computer and install them automatically. These updates include security patches and program updates that can improve your computing experience and help protect your computer against new viruses and attacks.
- USER'S MANUAL
- IMPORTANT
- TABLE OF CONTENTS
- FIRST THINGS FIRST
- YOUR ACER NOTEBOOK TOUR
- USING THE KEYBOARD
- THE WINDOWS OS DESKTOP
- USING THE PRECISION TOUCHPAD
- RECOVERY
- USING A BLUETOOTH CONNECTION
- CONNECTING TO THE INTERNET
- ACERSENSE
- SECURING YOUR COMPUTER
- FINGERPRINT READER
- BIOS UTILITY
- POWER MANAGEMENT
- BATTERY PACK
- TRAVELING WITH YOUR COMPUTER
- UNIVERSAL SERIAL BUS (USB)
- THUNDERBOLT 4 PORT
- HDMI
- VIDEO AND AUDIO CONNECTORS
- FREQUENTLY ASKED QUESTIONS
- INTERNET AND ONLINE SECURITY
- GETTING STARTED
- IN THIS SECTION YOU WILL FIND
- YOUR GUIDES
- HTTP://GO.ACER.COM/SUPPORT
- BASIC CARE AND TIPS FOR USING YOUR COMPUTER
- TURNING YOUR COMPUTER OFF
- NOTE
- TAKING CARE OF YOUR COMPUTER
- TAKING CARE OF YOUR AC ADAPTER
- CLEANING AND SERVICING
- GUIDELINES FOR SAFE BATTERY USAGE
- WARNING
- PRECAUTIONS WHEN CHARGING BATTERIES
- PRECAUTIONS WHEN REPLACING THE BATTERY
- INTERNAL BATTERY
- TAKING CARE OF YOUR VISION
- EYES
- DISPLAY
- ELIMINATE GLARE AND REFLECTIONS BY
- SCREEN VIEW
- KEYBOARD VIEW
- LEFT VIEW
- USB TYPE-A INFORMATION
- USB TYPE-C INFORMATION
- RIGHT VIEW
- REAR VIEW
- BASE VIEW
- LOCK KEYS
- SPECIAL KEYS
- HOTKEYS
- ITEM DESCRIPTION
- TIPS AND HINTS FOR USING WINDOWS
- WHERE ARE MY APPS
- CAN I TURN OFF NOTIFICATIONS
- HOW DO I CHECK FOR WINDOWS UPDATES
- WHERE CAN I GET MORE INFORMATION
- TOUCHPAD GESTURES
- SINGLE-FINGER SLIDE
- SINGLE-FINGER PRESS OR TAP
- TWO-FINGER PRESS
- TWO-FINGER SLIDE
- TWO-FINGER PINCH
- THREE-FINGER PRESS
- THREE-FINGER SWIPE
- FOUR-FINGER PRESS
- FOUR-FINGER SWIPE
- CHANGING TOUCHPAD SETTINGS
- CREATING A FILE HISTORY BACKUP
- RESTORING YOUR COMPUTER
- RESET THIS PC AND KEEP MY FILES
- RESET THIS PC AND REMOVE EVERYTHING
- CLICK RESET TO CONTINUE
- ENABLING AND DISABLING BLUETOOTH
- ENABLE BLUETOOTH AND ADD A DEVICE
- CONNECTING TO A WIRELESS NETWORK
- CONNECTING TO A WIRELESS LAN
- THE ACERSENSE MAIN SCREEN
- WIDGET CARD
- ACERSENSE SETTINGS
- ACCOUNT AND SUPPORT
- CHECKUP
- BATTERY
- STORAGE
- RAM
- PERSONAL SETTINGS
- SYSTEM USAGE MODE
- BATTERY & USB CHARGING
- POWER-OFF USB CHARGER
- SCREEN
- BLUELIGHTSHIELD
- ACER OLED CARE SETTINGS
- TOUCHPAD
- APP CENTER
- EXPERIENCE ZONE
- KEEPING YOUR COMPUTER AND DATA SAFE
- USING A COMPUTER SECURITY LOCK
- USING PASSWORDS
- ENTERING PASSWORDS
- HOW TO USE THE FINGERPRINT READER
- BOOT SEQUENCE
- SETTING PASSWORDS
- SAVING POWER
- DISABLE FAST STARTUP
- SELECT CHANGE SETTINGS THAT ARE CURRENTLY UNAVAILABLE
- SCROLL DOWN AND DISABLE TURN ON FAST START-UP
- SELECT SAVE CHANGES
- BATTERY CHARACTERISTICS
- CHARGING THE BATTERY
- CONDITIONING A NEW BATTERY PACK
- OPTIMIZING BATTERY LIFE
- CHECKING THE BATTERY LEVEL
- BATTERY-LOW WARNING
- DISCONNECTING FROM THE DESKTOP
- MOVING AROUND
- WHAT TO BRING
- PORTS AND CONNECTORS
- DISPLAYS
- CONNECTING A MONITOR
- HEADPHONES AND MICROPHONE
- GOT A QUESTION
- THE KEYBOARD DOES NOT RESPOND
- THE PRINTER DOES NOT WORK
- REQUESTING SERVICE
- INTERNATIONAL TRAVELERS WARRANTY (ITW)
- BEFORE YOU CALL
- TROUBLESHOOTING
- TROUBLESHOOTING TIPS
- ERROR MESSAGES
- FIRST STEPS ON THE NET
- PROTECTING YOUR COMPUTER
- CHOOSE AN INTERNET SERVICE PROVIDER
- CONNECTION TYPES
- DIAL-UP
- DSL (E.G. ADSL)
- CABLE
- CELLULAR
- NETWORK CONNECTIONS
- WIRELESS NETWORKS
- WIRELESS ADAPTER
- SURF THE NET
- ACER WEBSITE
- INTERNET SECURITY SOFTWARE
- COMMON THREATS CYBERCRIMINALS USE
- RANSOMWARE
- BOTNETS
- VIRUSES/MALWARE
- TAKE SPECIAL PRECAUTIONS WHEN USING PUBLIC WI-FI
- FOR MORE TIPS ON HOW TO STAY SAFE
- PROTECT YOUR COMPUTER WITH WINDOWS SECURITY TOOLS
- WINDOWS UPDATES
Brand : ACER
Model : Swift 14 AI
Category : Laptop