
S27D604UAE - Monitor SAMSUNG - Free user manual and instructions
Find the device manual for free S27D604UAE SAMSUNG in PDF.


| Product Type | LED Monitor |
| Brand | Samsung |
| Model | S27D604UAE |
| Screen Size | 27 inches |
| Panel Type | IPS |
| Resolution | 1920 x 1080 (Full HD) |
| Aspect Ratio | 16:9 |
| Brightness (Typical) | 250 cd/m² |
| Contrast Ratio (Typical) | 1000:1 |
| Response Time | 5 ms (GTG) |
| Viewing Angles (H/V) | 178°/178° |
| Connectivity | 1 x HDMI, 1 x D-Sub (VGA) |
| Power Consumption (Typical) | 25 W |
| Standby Power Consumption | < 0.3 W |
| Dimensions (With Stand, WxHxD) | 619.9 x 466.4 x 250.5 mm |
| Weight (With Stand) | 4.5 kg |
| Additional Features | Eye Saver Mode, Flicker Free, Game Mode |
| Cleaning | Use a soft, dry cloth; avoid abrasive cleaners |
| Safety | Place on a stable surface; ensure proper ventilation |
| Repairability | Contact Samsung authorized service; spare parts available |
| General Information | User manual available for free in PDF |
Frequently Asked Questions - S27D604UAE SAMSUNG
User questions about S27D604UAE SAMSUNG
0 question about this device. Answer the ones you know or ask your own.
Ask a new question about this device
Download the instructions for your Monitor in PDF format for free! Find your manual S27D604UAE - SAMSUNG and take your electronic device back in hand. On this page are published all the documents necessary for the use of your device. S27D604UAE by SAMSUNG.
USER MANUAL S27D604UAE SAMSUNG
S24D60* S27D60* S32D60* S24D60*U S27D60*U S32D60*U
S27D70* S32D70* S37D70* S27D80* S32D80* S37D80*
S27D80*U S32D80*U S37D80*U
(Singapore only: S24D600EAE / S27D600EAE / S32D600EAE / S24D604UAE / S27D604UAE / S32D604UAE / S27D700EAE / S32D700EAE / S32D701EAE / S32D700EBE / S37D702EAE / S27D800EAE / S32D800EAE / S37D802EAE / S27D804UAE / S32D804UAE / S32D800UBE / S37D802UAE)
(Saudi Arabia only: S24D606EAM / S27D606EAM / S32D606EAM / S24D600UAU / S27D600UAU / S32D604UAM / S27D706EAM / S32D706EAM / S32D707EAM / S32D702EBM / S37D700EAM / S32D806EAM / S37D800EAM / S32D806UAM / S32D800UBM / S37D800UAM)
The colour and the appearance may differ depending on the product, and the content in the manual is subject to change without prior notice to improve the performance.
The contents of this manual are subject to change without notice to improve quality.
© Samsung
Samsung owns the copyright for this manual.
Use or reproduction of this manual in parts or entirety without the authorization of Samsung is prohibited.
Trademarks other than that of Samsung are owned by their respective owners.
Table of contents
Before Using the Product
| Safety Precautions 4 | |
| Electricity and Safety 4 | |
| Installation | 5 |
| Operation | 6 |
| Cleaning | 7 |
Correct posture to use the product 8
Preparations
| Installation | 9 |
| Attaching the Stand 9 | |
| Separating the stand neck from the stand base 10 | |
| Precautions for moving the product 10 | |
| Checking the space around the product 11 | |
| Adjusting the Product Tilt and Height 11 | |
| Rotating the Product 13 | |
| Anti-theft Lock 14 | |
| Wall Mount Kit Specifications (VESA) 15 | |
| Control Panel 16 | |
Direct Key Guide 17
Connecting and Using a Source Device
| Read below before connecting the product. | 18 |
| Ports | 19 |
| Connecting and Using a PC | 20 |
| Connection Using the HDMI Cable | 20 |
| Connection Using an DP Cable | 20 |
| Connecting to headphones or earphones | 20 |
| Connecting the Power | 20 |
| Connecting the Product to a PC as a USB HUB | 21 |
| Connection Using the USB Type-C Cable | 22 |
| Connecting an External Monitor | 22 |
| Connection Using an DP Cable | 22 |
| DP Out | 23 |
| DP Out (MST/SST) Function Implementation | 23 |
| Tidying Up the Cables | 26 |
| Setting Optimum Resolution | 26 |
| List of graphic cards supporting HDR10 | 26 |
Menu
| Picture | 27 |
| Eye Care | 31 |
| PIP/PBP | 31 |
| OnScreen Display | 33 |
| System | 33 |
| Support | 36 |
Installing the Software
| Easy Setting Box 38 | |
| Restrictions and Problems with the Installation | 38 |
| System Requirements | 38 |
| Driver Installation | 38 |
Table of contents
Troubleshooting Guide
| Requirements Before Contacting Samsung Customer Service Centre 39 |
| Product diagnosis (Screen issue) 39 |
| Checking the Resolution and Frequency 39 |
| Check the following. 39 |
Q&A 42
Specifications
| General | 43 |
Standard Signal Mode Table 45
Appendix
| Responsibility for the Pay Service (Cost to Customers) | 48 |
| Not a product defect 48 | |
| A Product damage caused by customer's fault | 48 |
| Others | 48 |
TCO CERTIFIED 49
| Say hello to a more sustainable product 49 |
| Product warranty information 49 |
| Software updates 49 |
Before Using the Product
Safety Precautions
Warning
A serious or fatal injury may result if instructions are not followed.
Caution
Personal Injury or damage to properties may result if Instructions are not followed.
| CAUTION | |||
| RISK OF ELECTRIC SHOCK. DO NOT OPEN. | |||
| CAUTION: TO REDUCE THE RISK OF ELECTRIC SHOCK, DO NOT REMOVE COVER (OR BACK). THERE ARE NO USER SERVICEABLE PARTS INSIDE. REFER ALL SERVICING TO QUALIFIED PERSONNEL. | |||
 | This symbol indicates that high voltage is present inside. It is dangerous to make any kind of contact with any internal part of this product. |  | AC voltage: Rated voltage marked with this symbol is AC voltage. |
 | This symbol indicates that this product has Included important literature concerning operation and maintenance. |  | DC voltage: Rated voltage marked with this symbol is DC voltage. |
 | Class II product: This symbol indicates that a safety connection to electrical earth (ground) is not required. If this symbol is not present on a product with a mains lead, the product MUST have a reliable connection to protective earth (ground). |  | Caution. Consult instructions for use: This symbol instructs the user to consult the user manual for further safety related information. |
Electricity and Safety
Warning
- Do not use a damaged power cord or plug, or a loose power socket.
- Do not use multiple products with a single power socket.
- Do not touch the power plug with wet hands.
- Insert the power plug all the way in so it is not loose.
- Connect the power plug to a grounded power socket (type 1 insulated devices only).
- Do not bend or pull the power cord with force. Be careful not to leave the power cord under a heavy object.
- Do not place the power cord or product near heat sources.
- Clean any dust around the pins of the power plug or the power socket with a dry cloth.
Caution
- Do not disconnect the power cord while the product is being used.
- Only use the power cord provided with your product by Samsung. Do not use the power cord with other products.
- Keep the power socket where the power cord is connected unobstructed.
- The power cord must be disconnected to cut off power to the product when an issue occurs.
- Hold the plug when disconnecting the power cord from the power socket.
Installation
Warning
- DO NOT PLACE CANDLES, INSECT REPELLANTS OR CIGARETTES ON TOP OF THE PRODUCT. DO NOT INSTALL THE PRODUCT NEAR HEAT SOURCES.
- Keep the plastic packaging out of the reach of children.
Children may suffocate. - Do not install the product on an unstable or vibrating surface (insecure shelf, sloped surface, etc.)
– The product may fall and become damaged or cause an injury. - Using the product in an area with excess vibration may damage the product or cause a fire.
- Do not install the product in a vehicle or a place exposed to dust, moisture (water drips, etc.), oil, or smoke.
- Do not expose the product to direct sunlight, heat, or a hot object such as a stove.
- The product lifespan may be reduced or a fire may result.
- Do not install the product within the reach of young children.
– The product may fall and injure children. - Edible oil (such as soybean oil) may damage or distort the product. Keep the product away from oil pollution. And do not install or use the product in the kitchen or near the kitchen stove.
Caution
- Do not drop the product while moving.
- Do not set down the product on its front.
- When installing the product on a cabinet or shelf, make sure that the bottom edge of the front of the product is not protruding.
- The product may fall and become damaged or cause an injury.
- Install the product only on cabinets or shelves of the right size.
- Set down the product gently.
– Product failure or personal injury may result.
- Installing the product in an unusual place (a place exposed to a lot of fine dust, chemical substances, extreme temperatures or a significant presence of moisture, or a place where the product will operate continuously for an extended period of time) may seriously affect its performance. - Be sure to consult Samsung Customer Service Centre if you want to install the product at such a place.
- Before assembling the product, place the product down on a flat and stable surface so that the screen is facing downwards.
• In the same series, the colour can vary depending on the size.
Operation
Warning
- There is a high voltage inside the product. Never disassemble, repair or modify the product yourself.
Contact Samsung Customer Service Centre for repairs.
• To move the product, first disconnect all the cables from it, including the power cord. - If the product generates abnormal sounds, a burning smell or smoke, disconnect the power cord immediately and contact Samsung Customer Service Centre.
- Do not let children hang from the product or climb on top of it.
– Children may become injured or seriously harmed. - If the product is dropped or the outer case is damaged, turn off the power and disconnect the power cord. Then contact Samsung Customer Service Centre.
- Continued use can result in a fire or electric shock.
- Do not leave heavy objects or items that children like (toys, sweets, etc.) on top of the product.
- The product or heavy objects may fall as children try to reach for the toys or sweets resulting in a serious injury.
- During a lightning or thunderstorm, power off the product and remove the power cord.
- Do not drop objects on the product or apply impact.
- Do not move the product by pulling the power cord or any cable.
- If a gas leakage is found, do not touch the product or power plug. Also, ventilate the area immediately.
- Do not lift or move the product by pulling the power cord or any cable.
- Do not use or keep combustible spray or an inflammable substance near the product.
- Ensure the vents are not blocked by tablecloths or curtains.
-
An increased internal temperature may cause a fire.
-
Do not insert metallic objects (chopsticks, coins, hairpins, etc) or objects that burn easily (paper, matches, etc) into the product (through the vent or input/output ports, etc).
- Be sure to power off the product and disconnect the power cord when water or other foreign substances have entered the product. Then contact Samsung Customer Service Centre.
- Do not place objects containing liquid (vases, pots, bottles, etc) or metallic objects on top of the product.
- Be sure to power off the product and disconnect the power cord when water or other foreign substances have entered the product. Then contact Samsung Customer Service Centre.
- Do not use liquid fumigators containing chemicals, such as mosquito repellent or air freshener, around the product.
- If steam comes in contact with the product surface or enters the product, it may cause stains or malfunction.
Caution
- Leaving the screen fixed on a stationary image for an extended period of time may cause afterimage burn-in or defective pixels.
- Set the screen to power-saving mode or moving-picture screen saver when not using the product for an extended period of time.
- Disconnect the power cord from the power socket if you do not plan on using the product for an extended period of time (vacation, etc).
- Dust accumulation combined with heat can cause a fire, electric shock or electric leakage.
- Use the product at the recommended resolution and frequency.
- Your eyesight may deteriorate.
- Do not hold the product upside-down or move it by holding the stand.
– The product may fall and become damaged or cause an injury. - Looking at the screen too close for an extended period of time can deteriorate your eyesight.
- Do not use humidifiers or stoves around the product.
- Rest your eyes for more than 5 minutes or look at distance objects for every 1 hour of product use.
- Do not touch the screen when the product has been turned on for an extended period of time as it will become hot.
• Store small accessories out of the reach of children.
• Exercise caution when adjusting the product angle or stand height. - Your hand or finger may get stuck and injured.
- Tilting the product at an excessive angle may cause the product to fall and an injury may result.
- Do not place heavy objects on the product.
– Product failure or personal injury may result. - When using headphones or earphones, do not turn the volume too high.
- Having the sound too loud may damage your hearing.
Cleaning
High-glossy models can develop white stains on the surface if an ultrasonic wave humidifier is used nearby.
Contact your nearest Samsung Customer Service Centre if you want to clean the inside of the product (Service fee will be charged.)
Do not press the product screen with hands or other objects. There is a risk of damaging the screen.
Exercise care when cleaning as the panel and exterior of advanced LCDs are easily scratched.
Take the following steps when cleaning.
1 Power off the product and PC.
2 Disconnect the power cord from the product.
Hold the power cord by the plug and do not touch the cable with wet hands. Otherwise, an electric shock may result.
3 Wipe the product with a clean, soft and dry cloth.
Wet a soft cloth in water, wing it out well, and then use the cloth to wipe the exterior of the product clean.
- Do not apply a cleaning agent that contains alcohol, solvent, or surfactant to the product.
- Do not spray water or detergent directly on the product.
4 Connect the power cord to the product when cleaning is finished.
5 Power on the product and PC.
Correct posture to use the product

Use the product in the correct posture as follows:
- Straighten your back.
- Allow a distance of 45 to 50cm between your eye and the screen, and look slightly downward at the screen.
- Keep your eyes directly in front of the screen.
- Adjust the angle so light does not reflect on the screen.
- Keep your forearms perpendicular to your upper arms and level with the back of your hands.
- Keep your elbows at about a right angle.
- Adjust the height of the product so you can keep your knees bent at 90 degrees or more, your heels attached to the floor, and your arms lower than your heart.
- Do the Eye exercises or blink frequently, then eye fatigue will be relieved.
Preparations
Installation
Attaching the Stand
Before assembling the product, place the product down on a flat and stable surface so that the screen is facing downwards.
Disassembly is the reverse order of assembly.


Check the direction of the arrow on the stand base. Align the direction of the arrow on the stand base with the front direction of the stand neck, and then insert the stand neck from top to bottom.
Turn the stand neck clockwise to fasten it to the base. Lift the stand slightly and check that the PUSH button on the bottom of the base protrudes.
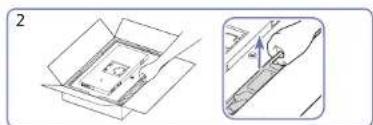
As shown in the figure, remove the product and foam cushion, and then place the product on the table with its front side facing the floor.

Push the assembled stand into the main body in the direction of the arrow as shown in the figure. Confirm that the stand is tightly fastened. If Chas not been fully lowered, lower it while holding it with your hand.

Stand assembly is complete. Caution

Do not arbitrarily remove the panel film. If not observed, the warranty service may be restricted.
Separating the stand neck from the stand base

Lift the assembled stand slightly and press the PUSH button on the bottom of the base. While holding down the PUSH button, turn the stand neck anticlockwise to remove it.
Precautions for moving the product

- Hold the lower corners or edges of the product when moving it.

- Do not directly apply pressure on the screen.
- Do not hold the screen when moving the product.

- Do not hold the product upside down only by the stand.

- Do not press down on the product. There is a risk of damaging the product.
Checking the space around the product
Make sure to have enough space for ventilation when placing the product. An internal temperature rise may cause fire and damage the product. Maintain enough space around the product as shown in the diagram when installing the product.
The exterior may differ depending on the product.
S24D60* / S27D60* / S32D60* / S24D60*U / S27D60*U / S32D60*U / S27D80* / S32D80* / S37D80* / S27D80*U / S32D80*U / S37D80*U

S27D70* / S32D70* / S37D70*

Adjusting the Product Tilt and Height
The colour and shape of parts may differ from what is shown. Specifications are subject to change without notice to improve quality.
S24D60* / S27D60* / S32D60* /
S24D60*U / S27D60*U / S32D60*U /
S27D80*/S32D80*/
S27D80*U / S32D80*U

S37D80*/S37D80*U

S27D70* / S32D70* S37D70*

• The product tilt can be adjusted.
- Hold the lower part of the product and adjust the tilt carefully.
S24D60* / S27D60* / S32D60* / S24D60*U / S27D60*U / S32D60*U / S27D80* / S32D80* / S37D80* / S27D80*U / S32D80*U / S37D80*U

• The product tilt and height can be adjusted.
- Hold the top centre of the product and adjust the height carefully.
- When adjusting the stand height, you may hear a noise. This noise is generated because of the ball inside the stand slides when the stand height is adjusted. It is a normal noise and not a malfunction of the product.
Caution


- Grasp the left and right sides of the monitor and adjust the swivel.
• Grasp the centre of the monitor and adjust the height. - Do NOT hold the stand moving part with your hand when leveling the screen. Your hand may get hurt.
- Do not put an object around the lower part of the product. The product or object may get damaged when adjusting the product height.
After adjusting the product tilt and height, if the screen is not level, take the following actions.

- Hold the bezel at both side edges and adjust the monitor angle until the screen becomes level. (Be careful not to directly hold the LCD display.)
- The monitor angle can be adjusted from -3° to +3° . (SZ7D70* / S32D70* / S37D70* / S37D80* / S37D80*U models only.)
Rotating the Product
The colour and shape of parts may differ from what is shown. Specifications are subject to change without notice to improve quality.
S24D60* / S27D60* / S32D60* / S24D60*U / S27D60*U / S32D60*U / S27D80* / S32D80* / S27D80*U / S32D80*U
-92.0° (±2.0°) - 92.0° (±2.0°)

S24D60* / S27D60* / S32D60* / S24D60*U / S27D60*U / S32D60*U / S27D80* / S32D80* / S37D80* / S27D80*U / S32D80*U / S37D80*U
-30.0° (±3.0°) \~ 30.0° (±3.0°)

S27D70* / S32D70* / S37D70* / S37D80* / S37D80*U
-3.0° (±2.0°) - 3.0° (±2.0°)

You can rotate your product as shown below.


- Be sure to fully extend the stand before rotating the product.
- If you rotate the product without fully extending the stand, the corner of the product may hit the floor and get damaged.
- When rotating the product, be careful not to damage the product by hitting the object or stand.
Anti-theft Lock
An anti-theft lock allows you to use the product securely even in public places.
The locking device shape and locking method depend on the manufacturer. Refer to the manuals provided with your anti-theft locking device for details.
To lock an anti-theft locking device:

1 Fix the cable of your anti-theft locking device to a heavy object such as a desk.
2 Put one end of the cable through the loop on the other end.
3 Insert the locking device into the anti-theft lock slot at the back of the product.
4 Lock the locking device.
- An anti-theft locking device can be purchased separately.
- Refer to the manuals provided with your anti-theft locking device for details.
- Anti-theft locking devices can be purchased at electronics retailers or online.
Wall Mount Kit Specifications (VESA)
Install your wall mount on a solid wall perpendicular to the floor. Before attaching the wall mount to surfaces other than plaster boards, please contact your nearest dealer for additional information. If you install the product on a slanted wall, it may fall and result in severe personal injury. Samsung wall mount kits contain a detailed installation manual and all parts necessary for assembly are provided.
- Do not use screws that are longer than the standard length or do not comply with the VESA standard screw specifications. Screws that are too long may cause damage to the inside of the product.
- For wall mounts that do not comply with the VESA standard screw specifications, the length of the screws may differ depending on the wall mount specifications.
- Do not fasten the screws too firmly. This may damage the product or cause the product to fall, leading to personal injury. Samsung is not liable for these kinds of accidents.
- Samsung is not liable for product damage or personal injury when a non-VESA or non-specified wall mount is used or the consumer fails to follow the product installation instructions.
- Do not mount the product at more than a 15 degree tilt.
- Standard dimensions for wall mount kits are shown in the table follow.
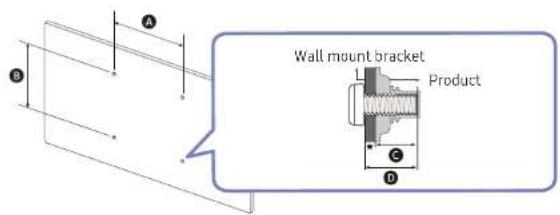
| Model name | VESA screw hole specs(A * 3 in millimetres | C | D | Standard Screw | Quantity |
| S24D60* / S24D60*US27D60* / S27D60*US32D60* / S32D60*US27D70* / S32D70*S37D70*S27D80* / S27D80*US32D80* / S32D80*US37D80* / S37D80*U | 100.0 x 100.0 | 6.8 ~ 8.8 mm | C + ★ | M4 | 4 |
Do not install your Wall Mount Kit while your product is turned on. It may result in personal injury due to electric shock.
Control Panel
The colour and shape of parts may differ from what is shown. Specifications are subject to change without notice to improve quality.
You can turn on the product with the Ⓤ button, and then use the Function Key Guide. Function Key Guide appears when the Ⓤ button is pressed while the product is On.
![graph TD A["Power LED"] --> B["Function Key Guide"] B --> C["Return"] D["(Rear)"] --> E["UP"] E --> F["LEFT"] F --> G["PRESS(ENTER)"] G --> H["DOWN"] H --> I["RIGHT"] I --> J["Custom Key"]](/content/2026/08/1625276/images/a6fead94419090ce4ee9a4b716f8b3d1db0bd2e17f0b0c1a85fa335f2d032108.jpg)
| Parts Description | |
| Use this multi-directional button to turn on the power or navigate menus. | |
| Power LED | This LED is power status indicator.You can select the power LED operation to be enabled or disabled on the menu screen. [IMAGE] → System → Power LED On) |
| Function Key Guide | To use the Function Key Guide, press the @button when the screen is turned on. |
| Custom Key | Custom Key is used to directly access the function set in Setup Custom Key.Setup Custom KeyGo to [IMAGE] → System → Setup Custom Key and change the custom key. |
| Source | Changes the input source. A message will appear on the top left corner of the screen if the input source has been changed. |
| Menu | Displays the main on-screen menu.To enable or disable the menu lock, move to the next step (move the @button to the right) with the "Menu" displayed, and then push the @button to the left for 10 seconds until the menu screen disappears.If the menu lock is enabled, Brightness, Contrast, Eye Saver Mode, Volume and Information are available. |
| Power Off | Turns off the product. |
| Return | Exits from the menu page. |
Direct Key Guide
On the Direct Key Guide screen, the following menu options appear when the product screen is switched on or the Input source is changed.
S24D60* / S27D60* / S32D60* / S27D70* / S32D70* / S37D70* / S27D80* / S32D80* / S37D80*

The Direct Key Guide screen shows if Eye Saver Mode is enabled. (Off, Low, High)
When the product not displays the OSD menu, the ⏻ button could be used as below.
• UP: Adjust Brightness, Contrast, Eye Saver Mode.
• DOWN: Adjust Volume, Mute.
• LEFT/RIGHT: Adjust Source.
- PRESS(ENTER): Display Function Key Guide.
S24D60*U / S27D60*U / S32D60*U / S27D80*U / S32D80*U / S37D80*U

The Direct Key Guide screen shows if Eye Saver Mode is enabled. (Off, Low, High)
When the product not displays the OSD menu, the button could be used as below.
- UP: Adjust Brightness, Contrast, Eye Saver Mode.
• DOWN: Adjust Volume, Mute.
• RIGHT: Switch the USB source.
LEFT: Adjust Source. - PRESS(ENTER): Display Function Key Guide.
Connecting and Using a Source Device
Read below before connecting the product.
1 Before connecting the product, check the shapes of both ports of the supplied signal cables and the shapes and locations of the ports on the product and external device.
2 Before connecting the product, make sure you remove the power cords from both the product and the external device to prevent damage to the product due to a short circuit or over current.
3 After all signal cables have been properly connected, connect the power cords back to the product and the external device.
4 After connecting is completed, make sure you read the manuals to acquaint yourself with the product functions, precautions and other information required to use the product properly.
Connecting parts may differ in different products.
Provided ports may vary depending on the product.
Ports
The functions available may vary depending on the product model. The colour and shape of parts may differ from what is shown. Specifications are subject to change without notice to improve quality. Refer to the actual product.

524D60^ / 527D60^ / 532D60^


S24D60*U/S27D60*U/S32D60*U


S27D70* / S32D70* / S37D70*

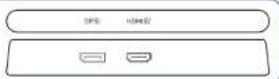
S77D80*/S37D80*/S37D80*
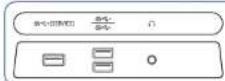

S27D90*II / S32D90*II / S37D80*U


| Port Description | |
| SS←(SERVICE) | Connect to a USB device.Used to update the software. |
| SS↔ SS↔ /SS↔ | Connect to a USB device. These ports are enabled when a PC is connected to the PC ↔ port using a USB Type-B cable. 24D60 * /S27D60 * /S32D60 * /S24D60 * U/S27D60 * U/S32D60 * U/S27D80 * /S32D80 * /S37D80 * /S27D80 * U/S32D80 * U/S37D80 * U models only.These ports are enabled when a PC is connected to the \( ↔ port using a USB Type-C cable. 24D60 * U/S27D60 * U/S32D60 * U/S27D80 * U/S32D80 * U/S37D80 * U models only. |
| ∩ | Connect to an audio output device such as headphones. |
| LAN | If a PC is connected to the monitor using a USB Type-C cable, connect a LAN cable to this port to connect the PC to the network.\( Use Cat7 * ( STP) * cable for the connection. (10/100 Mbps)*Shielded Twisted Pair 24D60 * U/S27D60 * U/S32D60 * U/S27D80 * U/S32D80 * U/S37D80 * U models only. |
| HDMI\( | Connects to a source device using an HDMI cable. |
| DP | Connects to a PC using a DP cable. |
| DP | Connects to another product using a DP cable. 24D60 * U/S27D60 * U/S32D60 * U models only. |
| PC\( ↔ | Connects to a PC using a USB cable.This port can only connect to a PC. 24D60 * /S27D60 * /S32D60 * /S24D60 * U/S27D60 * U/S32D60 * U/S27D80 * /S32D80 * /S37D60 * U/S32D80 * U/S37D80 * U models only. |
| \( ↔ | Connects to a source device using a USB Type-C cable. Compatible with a USB cable version 3.0.The USB Type-C port can be connected to a notebook or mobile device for charging.Charging some mobile devices through the USB Type-C port may not be supported depending on the mobile device specifications. 24D60 * U/S27D60 * U/S32D60 * U/S27D80 * U/S32D80 * U/S37D80 * U models only. |
| \( | Connect the power cord for product. |
Connecting and Using a PC
Select a connection method suitable for your PC.
If you connect a source device using a gender changer, the product may not work properly, depending on the characteristics of the gender changer.
The functions available may vary depending on the product model. Refer to the Ports page for port specifications for each product.
Connection Using the HDMI Cable

It is recommended to use the HDMI cable provided as components. If not provided, be sure to use authorised cable for HDMI cable connections. If you use a unauthorised HDMI cable, the image quality may be degrade.
Connection Using an DP Cable

If is recommended to use the DP cable provided as an accessory. If not provided, be sure to use a DP cable of 1.5 m or below.
Use a VESA certified DP 1.2 cable or higher and its gender.
Connecting to headphones or earphones

Use headphones or earphones when activating sound with an HDMI-HDMI or DP cable.
The headphones or earphones jack supports only the 3 conductor tip-ring-sleeve (TRS) type.
Connecting the Power

To use the product, connect the power cord to a power outlet and the port on the product.
The input voltage is switched automatically.
Connecting the Product to a PC as a USB HUB
Using the product as a hub, connect and use various source devices with the product at a time.
Port names and the number of ports may differ, depending on the model.
S24D60* / S27D60* / S32D60* / S27D80* / S32D80* / S37D80*
![graph TD A["Computer"] --> B["USB"] B --> C["PC 2"] C --> D["Storage Unit"] D --> E["Storage Unit"] E --> F["Server"] style A fill:#f9f,stroke:#333 style F fill:#ccf,stroke:#333](/content/2026/08/1625276/images/a6a8afdd863697fab15bdd4ebbc01134964a8071f66f9bd0b5162362f8feb192.jpg)
S24D60*U / S27D60*U / S32D60*U / S27D80*U / S32D80*U / S37D80*U

Use the product as a hub to connect the PC to a variety of devices or networks.
Network connection through LAN is supported. (S24D60*U / S27D60*U / S32D60*U / S27D80*U / S32D80*U / S37D80*U models only)
With some PCs, network connection through LAN may not be supported.
Using the product as a hub, connect and use various source devices with the product at a time.
To detect and start a USB device faster, connect the USB device to the (SERVICE), port on the product. The read/write rate will be affected by the USB device and your PC.
For USB-related problems caused by OS, drive programmes or software, please contact relevant suppliers.
With the launch of various USB devices on the market, we cannot guarantee that our products are matched with all USB devices.
For an external mass-storage HDD requiring external power supply, be sure to connect it to a power source.
The company is not liable for problems or damages to an external device caused by using an unauthorised cable for the connection.
Some products do not follow the USB standard, and it may cause a malfunction of the device.
Charging some mobile devices through the USB Type-C port may not be supported depending on the mobile device specifications.
Connection Using the USB Type-C Cable
S24D60*U / S27D60*U / S32D60*U / S27D80*U / S32D80*U / S37D80*U

Check the bandwidth of your USB Type-C cable whether it is available. The output may not be adequate depending on the cable specification and condition.
Do not quickly connect or disconnect the connector and power cord, because it requires some time.
Due to the compatibility issue, the function may not be available when any Thunderbolt device is connected using a cable.
When charging with a USB Type-C cable, malfunction may occur depending on the device type. In this case, use the provided charger or consult the manufacturer of the device.
Charging some mobile devices through the USB Type-C port may not be supported depending on the mobile device specifications.
Connecting an External Monitor
Connection Using an DP Cable
S24D60*U / S27D60*U / S32D60*U

DP Out
SZ4D60*U / S27D60*U / S32D60*U models only.
Select the input signal to output to the next monitor and the output mode to simplify the connection and control of displaying devices.
Before selecting the MST mode for DP Out, make sure that the device supports MST (Dalsy Chain)/HBR3 (High Bit Rate). Incorrect settings may lead to black screen or inconsistency between the actual output mode and the selected output mode. If a black screen occurs, change the DP Out output mode.
MST connection guarantees normal operation of up to two monitors, whereas SST connection guarantees normal operation of up to four monitors.
DP Out (MST/SST) connection supports the following models only: S24D60*/S27D60*/S32D60*/S24D60*U/S27D60*U/S32D60*U. If other monitor models are connected using DP Out (MST/SST), those monitors may not operate normally.
- MST/SST: A technology used for connection and driving of multi-stream display signals.
- MST: Stands for Multi-Stream Transport. Can transport multiple video and audio streams, but needs the support of both the drive capacity of the graphics card and the resolution of the monitor.
- SST: Stands for Single Stream Transport. Can transport only a combination of a single video stream and a single audio stream.
- DP Out mode: 4 modes
USB Type-C:MST
USB Type-C:SST
DisplayPort:MST
DisplayPort:SST
DP Out (MST/SST) Function Implementation
Connecting a PC via DisplayPort
![graph LR A["PC Monitor 1 Monitor 2"] --> B["MST"] B --> C["DisplayPort: MST"] C --> D["Screen A Screen B"] D --> E["OSD → DisplayPort: MST"] E --> F["OSD → DisplayPort: MST"] style A fill:#f9f,stroke:#333 style B fill:#ccf,stroke:#333 style C fill:#cfc,stroke:#333 style D fill:#fcc,stroke:#333 style…](/content/2026/08/1625276/images/2fb927a21e65b92d6af201d6be9aecd1125ef58f510d52cf44b1136755a7b614.jpg)
![graph LR SST --> PCMonitor1["PC Monitor 1 Monitor 2"] PCMonitor1 -->|DIP Cable DP Cable| DisplayPort["SST"] DisplayPort -->|OSD → DisplayPort:SST| ScreenA["Screen A Screen A"] ScreenA -->|DIP| DisplayPort["SST"] DisplayPort -->|OSD → DisplayPort:SST| DisplayPort["SST"]](/content/2026/08/1625276/images/d4dbefc7e257f68058cdd484c191f95cd84d2df8c6edc279299e2aea22209efc.jpg)
- Make sure that the graphics card supports the MST (Daisy Chain) function. To check this, visit the website of the graphics card manufacturer.
- The output mode of DP Out varies with the settings of DisplayPort Ver. When DisplayPort Ver. is set to 1.1, DP Out only supports SST.
- When connecting a PC using DP cable, you must set DP Out mode to "DisplayPort: MST(SST)" on the OSD menu. (OSD - System - DP Out - DisplayPort:MST/DisplayPort:SST)
-
Because of the bandwidth limit of DisplayPort Ver.1.4, up to two 2560 x 1440 @ 100 Hz monitors can be connected and used. But this specification may vary depending on the cable used and the performance of the graphics card.
-
When this function is available, the following may occur: flashing screen or black screen, which depends on the type of the previous device used and the quality of the cable used. Try to use a Samsung branded cable, and visit the website of the graphics card manufacturer to check and update its driver with the latest version.
• A Samsung branded cable is recommended. - To use the DP Out feature, set all monitors to the same mode (e.g., monitor 1: SST – monitor 2: SST / monitor 1: MST – monitor 2: MST).
• The HDR feature is not supported in MST mode.
Turn off the HDR feature before entering MST mode.
Connecting a PC via USB Type-C port
![graph LR subgraph PC_Monitor1_Monitor2 MST["Computer"] -->|USB Type-C Cable| ScreenA["Screen A Screen B"] MST -->|OSD → USB Type-C:MST| Display["Display"] Display -->|DP Cable| Display1["Display"] Display1 -->|OSD → USB Type-C:MST| Monitor1["Monitor 1"] end subgraph SST SST["Computer"] -->|USB Type-…](/content/2026/08/1625276/images/af201188f9401459aac0eda4f1899899b11be6b1265648e7b7db20f3375d4ba9.jpg)
- Make sure that the graphics card supports the MST (Daisy Chain) function. To check this, visit the website of the graphics card manufacturer.
- When connecting a PC using USB Type-C cable, you must set DP Out mode to "USB Type-C: MST (SST)" on the OSD menu. (OSD - System - DP Out - USB Type-C:MST/USB Type-C:SST) The quantity of available monitors may vary depending on the cable used and the performance of the graphics card.
-
When this function is available, the following may occur: flashing screen or black screen, which depends on the type of the previous device used and the quality of the cable used. Try to use a Samsung branded cable, and visit the website of the graphics card manufacturer to check and update its driver with the latest version.
• A Samsung branded cable is recommended. -
To use the DP Out feature, set all monitors to the same mode (e.g., monitor 1: SST – monitor 2: SST / monitor 1: MST – monitor 2: MST).
• The HDR feature is not supported in MST mode.
Turn off the HDR feature before entering MST mode.
When the MST function is not supported
1 Make sure that the cable is connected correctly and DP Out mode is set correctly on the OSD menu. Refer to DP Out (MST/SST) Function Implementation.
2 Make sure that the graphics card can support the MST (Daisy Chain) function. To check this, visit the website of the graphics card manufacturer.
3 When DisplayPort Ver. is set to 1.1, DP Out only supports SST for the DP source.
4 Check and ensure the following setting: Right-click the Windows desktop → Click Screen resolution (or click Display settings for Windows 10). Make sure that MST is enabled: Check if the Multiple displays list is set to "Extend these displays". If a different value is set, change to "Extend these displays".
Windows 7

Windows 10

Tidying Up the Cables

Connect the corresponding cables. Pull the right side of the HOLDER-STAND

CABLE to remove from the stand. The left side of the HOLDER-STAND CABLE can be damaged when pulled forcibly.

Put both cables in the cable holder on the stand (HOLDER-STAND CABLE) to organise the cables, as shown in the figure.
Assembly is complete.
Setting Optimum Resolution
An information message about setting optimum resolution will appear if you power on the product for the first time after purchase.
Select a language on information message and change the resolution on your PC to the optimum setting.
If the optimum resolution is not selected, the message will appear up to three times for a specified time even when the product is turned off and on again.
If you want to set the optimum resolution for your computer. Please refer to (Q&A) → "How can I change the resolution?"
List of graphic cards supporting HDR10
HDR10 is accessible only on Windows 10 systems equipped with graphic cards that support Play Ready 3.0 Digital Rights Management (for protected HDR content). Use graphic cards listed below for HDR10.
• NVIDIA GeForce 1000 series or higher
• AMD Radeon™ RX 400 series or higher
• Intel UHD Graphics 600 series or higher
Graphic cards that support hardware-accelerated 10-bit video decoding for HDR video codecs are recommended.
Menu
Function Key Guide →
The functions available may vary depending on the product model. The colour and shape of parts may differ from what is shown. Specifications are subject to change without notice to improve quality.
Picture
2nd Description
| Picture Mode This menu provides an optimum picture quality suitable for the environment where the product will be used. |
| This menu is not available when Eye Saver Mode is enabled. |
| This menu is not available when PIP/PBP Mode is enabled. |
| In PC mode |
| • Entertain: Obtain the clear and vivid picture quality with colour enhancement. |
| • Graphic: Obtain the quality of image contents without colour enhancement. |
| • Eco: This screen is provided to save energy. |
| • Game Standard: Obtain a picture quality suitable for playing games. |
2nd Description
| Picture Mode | RPG: This mode is optimised for 3D graphics and instant messaging on the RPG (Role Playing Game) game screen.RTS: Increase the colour temperature and contrast ratio to improve visibility of the RTS (Real-Time Strategy) screen and minimap.FPS: Increase the brightness of darker areas of the FPS (First-Person Shooter) game screen. This mode increases visibility of your enemies during a FPS (First-Person Shooter) game.Sports: Obtain the brightness and sharpness of monitors suitable for enjoying sports contents.Original: Obtain the pure picture quality of contents without colour enhancement.Custom: Customise the contrast and brightness as required. |
2nd Description
Picture Mode In AV mode
When the external input is connected through HDMI, DP, USB Type-C and PC/AV Mode is set to AV, Picture Mode has eleven automatic picture settings (Dynamic, Standard, Eco, Movie, Game Standard, FPS, RTS, RPG, Sports, Original and Custom) that are preset at the factory. You can activate either Dynamic, Standard, Eco, Movie, Game Standard, FPS, RTS, RPG, Sports, Original or Custom. You can select Custom which automatically recalls your personalised picture settings.
Supported ports may differ, depending on the product.
- Dynamic: Select this mode to view a sharper image than in Standard mode.
• Standard: Select this mode when the surroundings are bright.
• Eco: This screen is provided to save energy. - Movie: Select this mode when the surroundings are dark. This will save power and reduce eye fatigue.
- Game Standard: Obtain a picture quality suitable for playing games.
- RPG: This mode is optimised for 3D graphics and instant messaging on the RPG (Role Playing Game) game screen.
2nd Description
| Picture Mode | RTS: Increase the colour temperature and contrast ratio to improve visibility of the RTS (Real-Time Strategy) screen and minimap.FPS: Increase the brightness of darker areas of the FPS (First-Person Shooter) game screen. This mode increases visibility of your enemies during a FPS (First-Person Shooter) game.Sports: Obtain the brightness and sharpness of monitors suitable for enjoying sports contents.Original: Obtain the pure picture quality of contents without colour enhancement.Custom: Select this mode when you want to adjust the image according to your preferences.The input source is 480p, 576p, 720p or 1080p and product can display normally (Not every model can support all of these signals.). |
Brightness You can adjust the general brightness of the picture. (Range: 0\~50)
| A higher value will make the picture appear brighter.This menu is not available when Eye Saver Mode is enabled. | |
| Contrast Adjust the contrast between the objects and background. (Range: 0~50)A higher value will increase the contrast to make the object appear clearer.This menu is not available when PIP/PBP Mode is enabled. | |
2nd Description
| Sharpness Make the outline of objects more clear or blurry. (Range: 0–20)A higher value will make the outline of objects clearer.This menu is not available when PIP/PBP Mode is enabled. |
| Color Adjust the colour saturation levels. Colour saturation intensifies asthe value nears 50.This menu is not available when Eye Saver Mode is enabled.This menu is not available when PIP/PBP Mode is enabled. |
| Tint (G/R) Adjust the ratio of green to red tint levels. Increasing valuesIntensifies the saturation of red and green colours.This menu is not available when Eye Saver Mode is enabled.This menu is not available when PIP/PBP Mode is enabled. |
| Contrast Enhancer Automatically balance the contrast to prevent excessive differencesbetween bright and dark areas.Off / Low / HighThis menu is not available when Eye Saver Mode is enabled.This menu is not available when PIP/PBP Mode is enabled. |
| HDR Tone Mapping Automatically adjusts the brightness with tone mapping processingaccording to HDR content information.This menu is not available when Eye Saver Mode is enabled.This menu is not available when PIP/PBP Mode is enabled. |
2nd Description
| Color Tone Select a colour tone that best suits your viewing needs.This menu is not available when Eye Saver Mode is enabled.This menu is not available when PIP/PBP Mode is enabled. |
| White Balance Adjust the colour temperature of the picture so that white objects appear brighter.This menu is not available when Eye Saver Mode is enabled.This menu is not available when PIP/PBP Mode is enabled. |
| RedAdjust the red saturation level. Values closer to 50 mean greater intensity for the colour. |
| GreenAdjust the green saturation level. Values closer to 50 mean greater intensity for the colour. |
| BlueAdjust the blue saturation level. Values closer to 50 mean greater intensity for the colour. |
| ResetRestore the white balance settings to the default values. |
| Gamma Adjust the middle level of luminance.This menu is not available when Eye Saver Mode is enabled.This menu is not available when PIP/PBP Mode is enabled. |
2nd Description
| Shadow Detail Adjust the brightness of dark images. Black detail increases as the value nears 5.This menu is not available when Eye Saver Mode is enabled.This menu is not available when PIP/PBP Mode is enabled. | |
| Color Space | This menu is not available when Eye Saver Mode is enabled.This menu is not available when PIP/PBP Mode is enabled. |
| Color SpaceConfigure colour space settings to refine the spectrum of colours on your screen. | |
| Black Level Optimise HDMI picture brightness and contrast by adjusting the black level of the video signal.In such case, Black Level can be used to adjust the image quality.• Auto / Normal / LowThis function is only available in HDMI mode.This menu is not available when PIP/PBP Mode is enabled.Black Level may not be compatible with some source devices.The Black Level feature is only activated at a certain AV resolution, such as 480p @ 60 Hz, 576p @ 50 Hz, 720p @ 60 Hz and 1080p @ 60 Hz. | |
2nd Description
| Response Time Accelerate the panel response rate to make video appear more vivid and natural.UseStandardmode when not playing a video or game.This menu is not available whenP/PBP Modeis enabled. |
| Screen Ratio Choose the size and aspect ratio of the picture displayed on screen.In PC mode•Auto / WideIn AV mode•4:3 / 16:9 / Screen FitThe function may not be supported depending on the ports provided with the product.Changing theScreen Ratiois available when the following conditions are satisfied.The input source is 480p, 576p, 720p or 1080p and product can display normally (Not every model can support all of these signals.).This can only be set when the external input is connected through HDMI, DP, USB Type-C andPC/AV Modeis set toAV.Supported ports may differ, depending on the product. |
2nd Description
Screen Adjustment Adjust the position of the screen or increase the picture quality.
• H-Position: Move the screen to the left or right.
• V-Position: Move the screen up or down.
Connection Using the HDMI, DP, USB Type-C Cable.
Supported ports may differ, depending on the product.
This menu is only available when Screen Ratio is set to Screen Fit in AV Mode.
When a 480p, 576p, 720p or 1080p signal is input in AV mode and the product can display normally, select Screen Fit to adjust horizontal position and vertical position in 0-6 levels.
This menu is not available when PIP/PBP Mode is enabled.
Picture Reset Restore all picture settings to the factory default.
Eye Care
2nd Description
| Adaptive Picture Optimises brightness and provides the best picture quality in real time, based on the lighting condition and the content you're viewing. |
| Minimum Brightness Set the minimum brightness for the monitor screen. This function only works if its value is lower than the value set in the Picture menu's Backlight setting.This option is only available when Adaptive Picture is set to On. |
| Eye Saver Mode Set to an optimum picture quality suitable for eye relaxation.When Eye Saver Mode is 'On', the blue light that wavelength is around 400nm will decrease, and it will provide an optimum picture quality suitable for eye relaxation. |
PIP/PBP
If the product is set to an Incompatible resolution, the product may display an abnormal or blank screen. Change to a supported resolution by referring to the Standard Signal Mode Table.
2nd Description
| PIP/PBP Mode | Turn PIP/PBP Mode on or off. |
| Mode Type | Select the size and aspect ratio of the sub-screen.8:9 | 8:9 / PIP |
| 2nd Description | |
| Screen Size | Select sub-screen size.●S24D60*/S27D60*/S32D60*/S24D60*U/S27D60*U/S32D60*U models only.●S27D70*/S32D70*/S37D70*/S27D80*/S32D80*/S37D80*/S27D80*U/S32D80*U/S37D80*U models only.This option is available when Mode Type is set to PIP. |
| Screen Position | Select the position of the sub-screen from the available options.●This option is available when Mode Type is set to PIP. |
| Source | Select the source for each screen. |
| Sound Source | Set which screen you want to hear the sound for.In PIP mode●In PBP mode● |
| 2nd Description | |
| Switch USB | Switch the USB source while in the PIP/PBP mode.S24D60*U / S27D60*U / S32D60*U / S27D80*U / S32D80*U /S37D80*U models only. |
| Screen Ratio | Choose the size and aspect ratio of the picture displayed on screen.In PC modeAuto / WideIn AV mode4:3 / 16:9 / Screen FitThe function may not be supported depending on the ports providedwith the product.Changing theScreen Ratiois available when the following conditionsare satisfied.The input source is 490p, 576p, 720p or 1080p and product candisplay normally (Not every model can support all of thesesignals).This can only be set when the external input is connected throughHDMI, DP, USB Type-C andPC/AV Modeis set to AV.Supported ports may differ, depending on the product. |
| Contrast | Adjust the contrast level. Values closer to 50 mean a bigger light/dark contrast. |
OnScreen Display
2nd Description
| Transparency Set the transparency for the menu windows. | |
| Position | H-Position: Move the menu position to the left or right.V-Position: Move the menu position up or down. |
| Language Set the menu language. | A change to the language setting will only be applied to the onscreen menu display.If will not be applied to other functions on your PC. |
| Display Time Set how long the menu window will remain on screen for when it is not in use. | |
| Display Time Info Show the time left until the menu window disappears. Menu display time can be set in the Menu settings. | |
| Enlarge Enlarge the size of the Menu area. | |
System
2nd Description
| Save Energy Reduce power consumption by adjusting brightness settings. | |
| DP Out Select which input source to output to the screen. MST may not be supported depending on the video card.USB Type-C(MST): Displays the USB Type C input screen as an expansion screen on the DisplayPort output port.USB Type-C(SST): Displays the USB Type C input screen as a duplicate screen on the DisplayPort output port.DisplayPort(MST): Displays the DisplayPort Input screen as an expansion screen on the DisplayPort output port.DisplayPort(SST): Displays the DisplayPort input screen as a duplicate screen on the DisplayPort output port.S24D60*U / S27D60*U / S32D60*U models only. | |
| Ω Volume | Change the Volume setting. |
| USB Source Setup Set up a USB port assigned to the video source.S24D60*U / S27D60*U / S32D60*U / S27D80*U / S32D80*U / S37D80*U models only. | |
2nd Description
| Off Timer Plus Off Timer | Off Timer: Turn on Off Timer mode.Turn Off After: The off timer can be set within a range of 1 to 23 hours. The product will automatically power off after the specified number of hours.- This option is only available when Off Timer is set to On.För products for the market in some regions, the Off Timer is set to automatically activate 4 hours after the product powers on. This is done in accordance with power supply regulations. If you do not want the timer to activate, go toSystem → Off Timer Plus and set Off Timer to Off. |
| Eco TimerEco Timer: Turn on Eco Timer mode.Eco Off After: The Eco Timer can be set between 10 and 180 minutes. The product will automatically power off after the specified time has elapsed.- This option is only available when Eco Timer is set to On. | |
| PC/AV Mode | Set PC/AV Mode to AV. The picture size will be enlarged.This option is useful when you view a movie.PProducts with a display area of 16:9 or 16:10 are only supported. |
2nd Description
| DisplayPort Ver. Select the DisplayPort version to use. |
| Incorrect settings may cause the screen to go blank. If this occurs, check the device specifications. |
| Input Port Ver. Select an HDMI version. |
| The supportable device and resolution may differ depending on its version.When the version is changed, the screen may blink.If you set the HDMI mode to 1.4, some high resolutions may not be supported because of bandwidth limitation of the HDMI 1.4 protocol.When the setting is not appropriate, a blank screen may appear. In this case, check the specifications of the device.Set HDMI mode to 1.4 if the monitor is connected to an HDMI device and the monitor does not display the screen properly, displays a blank screen, or does not play sound at all. |
2nd Description
| Auto Source Switch+ By activating, a new connected source is displayed automatically.This function may not be supported depending on the model or geographical area.Auto Source Switch+By activating, a new connected source is displayed automatically. |
| USB-C SwitchWhen there is no signal, the display automatically switches to the new device connected to the USB-C port.S24D60*U / S27D60*U / S32D60*U / S27D80*U / S32D80*U / S37D80*U models only. |
| Key Repeat Time Control the response rate of a button when the button is pressed.Acceleration, 1 sec or 2 sec can be selected. If No Repeat is selected, a command responds only once when a button is pressed. |
| Power LED On Configure the settings to enable or disable the power LED located at the lower part of the product.Working: The power LED is on when the product is turned on.Stand-by: The power LED is on when the product is turned off. |
2nd Description
| Accessibility Configures the accessibility options. |
| SeeColors Mode: Allows users with colour blindness to experience rich colours. Enable this feature to customise colours to suit your viewing conditions, to experience richer colours on the screen.Some menus are not available when SeeColors Mode is in use.This function may not be supported depending on the model. |
| High Contrast: Increase the contrast between the text and background for the Settings menu. |
| Grayscale: Change the colour sense of the screen to black-and white tone. |
| Color Inversion: Invert the colours of the Settings menu. White becomes black, black becomes white, and other colours are inverted according to RGB colour values. |
2nd Description
| USB-C Preference Choose between high resolution and data transfer speed. If youchange the settings during data transfer, the transfer may be canceled or data corruption may occur.High Resolution: If High Resolution is selected, 3440 x 1440 @ 100 Hz is available for input of USB-C. The performance for LAN and ports may be limited. The operates as USB 2.0.High-Speed Data: If High-Speed Data is selected, 3440 x 1440 @ 100 Hz is not available for input of USB-C. The port operates as USB 3.0.S27D80*U / S32D80*U / S37D80*U models only. |
| Setup Custom Key Set the custom key so that your chosen function can be set up directly. |
| Best Brightness Optimises brightness in real time, based on your lighting environment.This option is not available when Adaptive Picture is set to On. |
| Minimum Brightness Set the minimum brightness for the monitor screen. This function only works if its value is lower than the value set in the Picture menu's Backlight setting.This option is only available when Best Brightness is set to On. |
| Max. Power Saving Set to on, Ethernet is turned off to save power. Set to off, the USB-C connected PC or laptop can be woken by LAN.S24D60*U / S27D60*U / S32D60*U / S27D80*U / S32D80*U / S37D80*U models only. |
Support
2nd Description
| Self Diagnosis Perform this test when you experience a problem with your monitor's picture. Never turn off the power nor change the input source during self diagnosis. If possible, try not to interrupt testing. | |
| Software Update Update software using an update file on a USB device. | |
| 1 Save the update file (in .img format) that you downloaded from the Samsung website (http://www.samsung.com) to a USB device. | |
| 2 Connect the USB device to the SPGH(SERVICE) monitor.Select[10]→Support→Software Update. | |
| 3 Follow the instructions on the screen to proceed with update. | |
| 4 Your product will turn itself off and on again automatically after completing update, and then turn off your product. | |
| 5 Remove the power cord from the power outlet and then reconnect the cord after turning off.To perform software update by using a USB device, first format the USB device to FAT$2.When updating by a USB device, be sure to use the device whose version of USB 3.0 or lower.When performing update, make sure that only one IMG file (.img) is saved in the root directory.If the No USB devices detected. Please check and try again. message is displayed, this is probably due to the following reasons. | |
2nd Description
| Software Update | A USB device is not connected to the SP-4-(SERVICE) port.The files in the connected USB device are not compatible formats.There are no valid update files found in the connected USB device.(There are no update files saved in the memory or the file names are Incorrect.)The update will not start if the downloaded software does not match the software installed on the monitor. To check the software for consistency, select 📄 → Support → Information.Do not turn off the product until the update is complete. And prevent the updating from any interruption as far as possible. In general, the product returns to the previous version if an update is interrupted.If may change the screen colour or blink during USB update, but it is not a monitor problem. Since 5/W update is performed normally, please wait until the update is finished. |
Register Product Discover how to register your product.
| This function may not be supported depending on the model. |
| Information View the current software information. Refer to the actual monitor screen. |
| Reset All Return all the settings for the product to the default factory settings. |
Installing the Software
Easy Setting Box

Easy Setting Box
Easy Setting Box enables users to use the product by partitioning multiple sections.
To install the latest version of Easy Setting Box, download it from the Samsung website.
(http://www.samsung.com)
The software may not work properly if you do not restart the PC after the installation.
The Easy Setting Box icon may not appear depending on the PC system and the product specifications.
If the shortcut icon does not appear, press the F5 key.
Restrictions and Problems with the Installation
The Easy Setting Box installation may be affected by the Graphics Card, Motherboard and the Networking Environment.
System Requirements
OS Hardware
| Windows 7 32Bit/64Bit | At least 32MB of memory |
| Windows 8 32Bit/64Bit | At least 60MB of free space on the hard disk drive |
| Windows 8.1 32Bit/64Bit | |
| Windows 10 32Bit/64Bit | |
| Windows 11 32Bit/64Bit |
Driver Installation
To install the latest version of the product driver, download it from the Samsung website.
(http://www.samsung.com)
You can set the optimum resolution and frequency for this product by installing the corresponding drivers.
Troubleshooting Guide
Requirements Before Contacting Samsung Customer Service Centre
Before calling Samsung Customer Service Centre, test your product as follows. If the problem persists, contact Samsung Customer Service Centre.
Product diagnosis (Screen issue)
If a problem occurs with the product screen, run Self Diagnosis to check that the product is working properly.
Checking the Resolution and Frequency
If a resolution that is not supported (see the Standard Signal Mode Table) is selected, the Not Optimum Mode message may appear for a short time or the screen may not be displayed properly.
The displayed resolution may vary, depending on the PC system settings and cables.
Check the following.
Caution
When the product makes popping (cracking) sound.
The sound may be caused by contraction or expansion from temperature change of external components or internal circuit of the product.
This is NOT a product failure and does not affect the life of the product.
Installation issue
Blank spaces are found on all four sides of the screen when an HDMI cable is connected to the product and PC.
The blank spaces found on the screen have nothing to do with the product.
Blank spaces on the screen are caused by the PC or graphics card. To resolve the problem, adjust the screen size in the HDMI settings for the graphics card.
If the graphics card settings menu does not have an option to adjust the screen size, update the graphics card driver to the latest version.
(Please contact the graphics card or PC manufacturer for further details about how to adjust the screen settings.)
Screen issue
The power LED is off. The screen will not turn on.
Check that the power cord is connected properly.
If a problem occurs with the product screen, run Self Diagnosis to check that the product is working properly.
The message Check the cable connection and the settings of the source device. appears.
Check that the cable is properly connected to the product.
Check that the device connected to the product is powered on.
Check the PC/AV Mode status. 📄 → System → PC/AV Mode → DisplayPort, HDMI, USB Type-C → PC or AV.)
Set the connected HDMI or DisplayPort version. (HDMI: 📄 → System → Input Port Ver. → 1.4 or 2.0,
DisplayPort: 10 → System → DisplayPort Ver. → 1.1 or 1.4 (S24D60* / S27D60* / S32D60* / S24D60*U / S27D60*U / S32D60*U) / 1.1 or 1.2↑ (S27D70* / S32D70* / S37D70* / S27D80* / S32D80* / S37D80* / S27D80*U / S32D80*U / S37D80*U))
Not Optimum Mode is displayed.
This message appears when the signal from the graphics card exceeds the maximum resolution or frequency for the product.
Change the maximum resolution and frequency to suit the product performance, referring to Standard Signal Mode Table (P45).
The images on the screen look distorted.
Check the cable connection to the product.
The screen is not clear. The screen is blurry.
Remove any accessories (video extension cable, etc.) and try again.
Set the resolution and frequency to the recommended level.
The screen appears unstable and shaky. There are shadows or ghost images left on the screen.
Check that the resolution and frequency for the PC are within the range of resolution and frequency compatible with the product. Next, if required, change the settings, referring to Standard Signal Mode Table (P4S) in this manual and the Information menu on the product.
Change the Response Time in the Display OSD to Faster or Standard depending on your application and usage.
Available functions may differ depending on the model.
The screen is too bright. The screen is too dark.
Adjust Brightness and Contrast.
Screen colour is inconsistent.
Change the Color settings.
The colours on the screen have a shadow and are distorted.
Change the Color settings.
White does not really look white.
Change the Color settings.
There is no image on the screen and the power LED blinks every 0.5 to 1 second.
Check the cable connection between the product and PC, and ensure the connectors are locked.
Press any key on the keyboard or move the mouse to return to normal operating mode.
The product is operating in power-saving mode.
Text is blurry.
If using a Windows OS (e.g. Windows 7, Windows 8, Windows 8.1 or Windows 10): Go to Control Panel → Fonts → Adjust ClearType text and change Turn on ClearType.
Video playback is choppy.
Playback of high-definition large video files can be choppy. This may be because the video player is not optimised for the PC resource.
Try playing the file on another video player.
When setting the PIP Screen Size, the screen does not fit the PIP size.
Depending on the graphic card or graphic card driver, it may not be automatically set to the Optimum resolution. If you set it properly for the first time, there will be no problems thereafter.
Sound issue
There is no sound.
Re-check the condition of the connected headphone or earphone or adjust the volume.
Check the volume.
Check whether the volume of the product or the source device is set to mute.
The volume is too low.
Adjust the volume.
If the volume is still low after turning it up to the maximum level, adjust the volume on your PC sound card or software.
Video is available but there is no sound.
Sound cannot be heard if an HDMI-DVI cable or DVI cable is used to connect the input device.
Connect the device using an HDMI cable or a DP cable.
Source device issue
A beeping sound is heard when my PC is booting.
If a beeping sound is heard when your PC is booting, have your PC serviced.
Q & A
Refer to the user manual for your PC or graphics card for further instructions on adjustment.
How can I change the frequency?
Set the frequency on your graphics card.
- Windows 7: Go to Control Panel → Appearance and Personalization → Display → Screen Resolution → Advanced settings → Monitor, and adjust Screen Refresh Rate under Monitor settings.
- Windows 8(Windows 8.1): Go to Settings → Control Panel → Appearance and Personalization → Display → Screen Resolution → Advanced settings → Monitor, and adjust Refresh rate under Monitor settings.
- Windows 10: Go to Settings → System → Display → Advanced display settings → Display adapter properties → Monitor, and adjust Screen refresh rate under Monitor settings.
How can I change the resolution?
- Windows 7: Go to Control Panel → Appearance and Personalization → Display → Screen Resolution → Adjust Resolution.
- Windows 8(Windows 8.1): Go to Settings → Control Panel → Appearance and Personalization → Display → Adjust Resolution, and adjust the resolution.
- Windows 10: Go to Settings → System → Display → Advanced display settings, and adjust the resolution.
How do I set power-saving mode?
- Windows 7: Go to Control Panel → Appearance and Personalization → Personalization → Screen Saver Settings → Power options or BIOS SETUP on the PC.
- Windows 8(Windows 8.1): Go to Settings → Control Panel → Appearance and Personalization → Personalize → Screen Saver Settings → Power options or BIOS SETUP on the PC.
- Windows 10: Go to Settings → Personalization → Lock screen → Screen timeout settings → Power & sleep or BIOS SETUP on the PC.
Specifications
General
| Model Name | S24D60* / S24D60*U S27D60* / S27D60*U S32D60* / S32D60*U | ||
| Size | 60.4 cm 68.4 cm 80.1 cm | ||
| Display area | 526.848 mm (H) x 296.352 mm (V) | 596.736 mm (H) x 335.664 mm (V) | 698.112 mm (H) x 392.688 mm (V) |
| Pixel Pitch | 0.2058 mm (H) x 0.2058 mm (V) 0.2331 mm (H) x 0.2331 mm (V) 0.2727 mm (H) x 0.2727 mm (V) | ||
| Maximum Pixel Clock | 410.5 MHz 410.5 MHz 410.5 MHz | ||
| Model Name S27D70* S32D70* S37D70* | |||
| Size | 68.4 cm 80.0 cm 92.7 cm | ||
| Display area | 596.736 mm (H) x 335.664 mm (V) | 697.306 mm (H) x 392.234 mm (V) | 808.0128 mm (H) x 454.5072 mm (V) |
| Pixel Pitch | 0.1554 mm (H) x 0.1554 mm (V) | 0.18159 mm (H) x 0.18159 mm (V) | 0.07014 mm (H) x 0.21042 mm (V) |
| Maximum Pixel Clock | 597.08 MHz | 597.08 MHz | 597.08 MHz |
| Model Name | S27D80* / S27D80*U | S32D80* / S32D80*U | S37D80* / S37D80*U |
| Size | 68.4 cm 80.0 cm 92.7 cm | ||
| Display area | 596.736 mm (H) x 335.664 mm (V) | 697.306 mm (H) x 392.234 mm (V) | 808.0128 mm (H) x 454.5O72 mm (V) |
| Pixel Pitch | 0.1554 mm (H) x 0.1554 mm (V) | 0.18159 mm (H) x 0.18159 mm (V) | 0.07014 mm (H) x 0.21042 mm (V) |
| Maximum Pixel Clock | 597.08 MHz | S97.08 MHz | 597.08 MHz |
| Power Supply | AC100-240V~ 50/60HzRefer to the label at the back of the product as the standard voltage can vary in different countries. |
| Signal connectors | HDMI, DisplayPort, USB Type-C (S24D60*U / S27D60*U / S32D60*U / S27D80*U / S32D80*U / S37D80*U models only.) |
| Environmental conditions Operating | Temperature: 10 °C to 40 °C (50 °F to 104 °F)Humidity: 10 % to 80 %, non-condensing |
| StorageTemperature: -20 °C to 45 °C (-4 °F to 113 °F)Humidity: 5 % to 95 %, non-condensing |
- Plug-and-Play
This product can be installed and used with any Plug-and-Play compatible systems. Two-way data exchange between the product and PC system optimises the product settings. Product installation takes place automatically. However, you can customise the installation settings if desired.
- Panel Dots (Pixels)
Due to the nature of the manufacturing of this product, approximately 1 pixel per million (1ppm) may be brighter or darker on the LCD panel. This does not affect product performance.
• The specifications are subject to change without notice to improve quality.
• For detailed device specifications, visit the Samsung website.
• Open Source Licence Notice
Open Source used in this product can be found on the following webpage (https://opensource.samsung.com).

The terms HDMI, HDMI High-Definition Multimedia Interface, HDMI trade dress and the HDMI Logos are trademarks or registered trademarks of HDMI Licensing Administrator, Inc.
Standard Signal Mode Table
| Model Name S24D60* / S27D60* / S32D60* / | S27D70* / S32D70* / S37D70* S27D80* / S32D80* / S37D80* / | ||
| S24D60*U / S27D60*U / S32D60*U | S27D80*U / S32D80*U / S37D80*U | ||
| Synchronization Horizontal Frequency | 30 ~ 151 kHz | 30 ~ 135 kHz | 30 ~ 135 kHz |
| Vertical Frequency | 48 ~ 100 Hz 60 Hz 60 Hz | ||
| Resolution Optimum Resolution | 2560 x 1440 @ 60 Hz | 3840 x 2160 @ 60 Hz | 3840 x 2160 @ 60 Hz |
| Maximum Resolution | 2560 x 1440 @ 100 Hz | ||
If a signal that belongs to the following standard signal modes is transmitted from your PC, the screen will automatically be adjusted. If the signal transmitted from the PC does not belong to the standard signal modes, the screen may be blank even though the power LED turns on. In such a case, change the settings according to the following table by referring to the graphics card user manual.
S24D60* / S27D60* / S32D60* / S24D60*U / S27D60*U / S32D60*U
| Resolution Horizontal Frequency | (kHz) | Vertical Frequency (Hz) | Pixel Clock (MHz) | Sync Polarity (H/V) |
| VESA, 640 x 480 | 31.469 | 59.940 | 25.175 | -/- |
| VESA, 640 x 480 | 37.500 | 75.000 | 31.500 | -/- |
| VESA, 800 x 600 | 37.879 | 60.317 | 40.000 | +/+ |
| VESA, 800 x 600 | 46.875 | 75.000 | 49.500 | +/+ |
| VESA, 1024 x 768 | 48.363 | 60.004 | 65.000 -/- | |
| VESA, 1024 x 768 | 60.023 | 75.029 | 78.750 | +/+ |
| VESA, 1152 x 864 | 67.500 75.000 108.000 +/+ | |||
| VESA, 1280 x 720 | 45.000 60.000 74.250 +/+ | |||
| VESA, 1280 x 800 | 49.702 | 59.810 | 83.500 | -/+ |
| VESA, 1280 x 1024 | 63.981 60.020 108.000 +/+ | |||
| VESA, 1280 x 1024 | 79.976 75.025 135.000 +/+ | |||
| VESA, 1440 x 900 | 55.935 | 59.887 | 106.500 | -/+ |
| VESA, 1600 x 900 | 60.000 60.000 | 108.000 +/+ | ||
| VESA, 1680 x 1050 | 65.290 | 59.954 | 146.250 | -/+ |
| VESA, 2560 x 1440RB | 88.787 | 59.951 | 241.500 | +/- |
| VESA, 2560 x 1440RB | 150.919 | 99.946 | 410.500 | +/- |
| CEA, 720 x 576 | 31.250 50.000 | 27.000 | -/- | |
| CEA, 720 x 480 | 31.469 | 59.940 | 27.000 | -/- |
| CEA, 1280 x 720 | 37.500 50.000 | 74.250 +/+ | ||
| CEA, 1280 x 720 | 45.000 60.000 74.250 +/+ | |||
| CEA, 1920 x 1080 | 56.250 | 50.000 | 148.500 +/+ | |
| CEA, 1920 x 1080 | 67.500 60.000 148.500 +/+ | |||
| CEA, 1920 x 1080 | 135.000 | 120.003 | 297.000 | +/+ |
S27D70* / S32D70* / S37D70* / S27D80* / S32D80* / S37D80* / S27D80*U / S32D80*U / S37D80*U
| Resolution Horizontal Frequency | Vertical Frequency | Pixel Clock (MHz) | Sync Polarity (H/V) | Port | ||
| (kHz) | (Hz) | HDMI IN DP IN / USB Type-C IN | ||||
| VESA, 640 x 480 | 31.469 | 59.940 | 25.175 | -/- | O | O |
| VESA, 800 x 600 | 37.879 60.317 40.000 +/+ O O | |||||
| VESA, 1024 x 768 | 48.363 60.004 65.000 -/- O O | |||||
| VESA, 1280 x 720 | 45.000 | 60.000 | 74.250 | +/+ | O | O |
| VESA, 1280 x 800 | 49.702 | 59.810 | 83.500 | -/+ | O | O |
| VESA, 1280 x 1024 | 63.981 | 60.020 | 108.000 | +/+ O O | ||
| VESA, 1440 x 900 | 55.935 | 59.887 | 106.500 | -/+ | O | O |
| VESA, 1600 x 900 | 60.000 | 60.000 | 108.000 | +/+ O O | ||
| VESA, 1680 x 1050 | 65.290 | 59.954 | 146.250 | -/+ | O | O |
| VESA, 1920 x 1080 | 56.250 50.000 | 148.500 | +/+ O | - | ||
| VESA, 1920 x 1080 | 67.500 | 60.000 | 148.500 | +/+ O O | ||
| VESA, 2560 x 1440 | 88.787 | 59.951 | 241.500 | +/- | O | O |
| VESA, 3840 x 2160 | 67.500 | 30.000 | 297.000 | +/+ | O | O |
| VESA, 3840 x 2160 | 133.313 | 59.997 | 533.250 | +/- | O | O |
USB Type-C is supported on the S27D80*U and S32D80*U and S37D80*U models only.
— Horizontal Frequency
The time required to scan a single line from the left to the right side of the screen is called a horizontal cycle. The reciprocal number of a horizontal cycle is called horizontal frequency. Horizontal frequency is measured in kHz.
— Vertical Frequency
Repeating the same picture dozens of times per second allows you to view natural pictures. The repeat frequency is called "vertical frequency" or "refresh rate" and is indicated in Hz.
This product can be set to only one resolution for each screen size to obtain the optimum picture quality due to the nature of the panel. Using a resolution other than the specified resolution may degrade the picture quality. To avoid this, it is recommended that you select the optimum resolution specified for your product.
Some resolutions listed in the table above may not be available depending on graphics card specifications.
Appendix
Responsibility for the Pay Service (Cost to Customers)
When the service is requested, in spite of in warranty, we may charge you for a visit from a service technician in the following cases.
Not a product defect
Cleaning of the product, Adjustment, Explanation, Re-installation and etc.
- If a service technician is requested to give instructions on how to use product or simply adjusts options without disassembling product.
• If a defect is caused by external environmental factors (Internet, Antenna, Wired Signal, etc.) - If a product is reinstalled or devices are connected additionally after installing the purchased product for the first time.
- If a product is reinstalled to move to a different spot or to move to a different house.
• If the customer requests instructions on how to use another company's product. - If customer requests instructions on how to use the network or another company's Programme.
• If customer requests software installation and setup for the product.
• If a service technician removes/cleans dusts or foreign materials inside of the product. - If customer requests an installation additionally after purchasing a product through home-shopping or online.
A Product damage caused by customer's fault
Product damage caused by customer's mishandling or wrong repair
If a product damage is caused by;
• External impact or drop.
• Use of supplies or separately sold product unspecified by Samsung.
- Repair from a person besides an engineer of outsourcing service company or partner of Samsung Electronics Co., Ltd.
- Remodeling or repairing the product by customer.
• Using it with incorrect voltage or non-authorised electrical connections.
• Not following the "cautions" in User Manual.
Others
• If product fails by natural disaster. (lightning, fire, earthquake, flood damage, etc)
- If consumable components are all used up. (Battery, Taner, Fluorescent lights, Head, Vibrator, Lamp, Filter, Ribbon, etc.)
If customer requests a service in case the product has no defect, service fee may be charged. So please read User Manual first.
TCO CERTIFIED
A third-party certification according to ISO 14024 Applies to TCO-certified models only.


Toward sustainable IT products
Say hello to a more sustainable product
IT products are associated with a wide range of sustainability risks throughout their life cycle. Human rights violations are common in the factories. Harmful substances are used both in products and their manufacture. Products can often have a short lifespan because of poor ergonomics, low quality and when they are not able to be repaired or upgraded.
This product is a better choice. It meets all the criteria in TCO Certified, the world's most comprehensive sustainability certification for IT products. Thank you for making a responsible product choice, that help drive progress towards a more sustainable future!
Criteria in TCO Certified have a life-cycle perspective and balance environmental and social responsibility. Conformity is verified by independent and approved verifiers that specialize in IT products, social responsibility or other sustainability issues. Verification is done both before and after the certificate is issued, covering the entire validity period. The process also includes ensuring that corrective actions are implemented in all cases of factory non-conformities. And last but not least, to make sure that the certification and independent verification is accurate, both TCO Certified and the verifiers are reviewed regularly.
Want to know more?
Read information about TCO Certified, full criteria documents, news and updates at tcocertified.com. On the website you'll also find our Product Finder, which presents a complete, searchable listing of certified products.
Product warranty information
• Minimum Included product warranty : 1-3 years
• Minimum purchasable extended warranty : 2\~4 years
• Total available warranty (free + extended) : 5 years
• The maximum cost per year for the extended warranty: under 15% of product cost
The warranty period may vary by region and model.
Software updates
Samsung guarantees the availability of free-of-charge security updates, corrective updates and functionality updates to the operating system for at least 5 years after the end of placement on the market. You can download the latest version of software from the Samsung.com support page.

- TABLE OF CONTENTS
- BEFORE USING THE PRODUCT
- SAFETY PRECAUTIONS
- WARNING
- CAUTION
- ELECTRICITY AND SAFETY
- INSTALLATION
- OPERATION
- CLEANING
- CORRECT POSTURE TO USE THE PRODUCT
- PREPARATIONS
- ATTACHING THE STAND
- SEPARATING THE STAND NECK FROM THE STAND BASE
- PRECAUTIONS FOR MOVING THE PRODUCT
- CHECKING THE SPACE AROUND THE PRODUCT
- ADJUSTING THE PRODUCT TILT AND HEIGHT
- ROTATING THE PRODUCT
- ANTI-THEFT LOCK
- TO LOCK AN ANTI-THEFT LOCKING DEVICE
- WALL MOUNT KIT SPECIFICATIONS (VESA)
- CONTROL PANEL
- DIRECT KEY GUIDE
- CONNECTING AND USING A SOURCE DEVICE
- READ BELOW BEFORE CONNECTING THE PRODUCT
- PORTS
- CONNECTING AND USING A PC
- CONNECTION USING THE HDMI CABLE
- CONNECTION USING AN DP CABLE
- CONNECTING TO HEADPHONES OR EARPHONES
- CONNECTING THE POWER
- CONNECTING THE PRODUCT TO A PC AS A USB HUB
- CONNECTION USING THE USB TYPE-C CABLE
- CONNECTING AN EXTERNAL MONITOR
- DP OUT
- DP OUT (MST/SST) FUNCTION IMPLEMENTATION
- CONNECTING A PC VIA USB TYPE-C PORT
- WHEN THE MST FUNCTION IS NOT SUPPORTED
- TIDYING UP THE CABLES
- SETTING OPTIMUM RESOLUTION
- LIST OF GRAPHIC CARDS SUPPORTING HDR10
- MENU
- 2ND DESCRIPTION
- EYE CARE
- PIP/PBP
- ONSCREEN DISPLAY
- SYSTEM
- SUPPORT
- INSTALLING THE SOFTWARE
- EASY SETTING BOX
- RESTRICTIONS AND PROBLEMS WITH THE INSTALLATION
- SYSTEM REQUIREMENTS
- DRIVER INSTALLATION
- TROUBLESHOOTING GUIDE
- REQUIREMENTS BEFORE CONTACTING SAMSUNG CUSTOMER SERVICE CENTRE
- PRODUCT DIAGNOSIS (SCREEN ISSUE)
- CHECKING THE RESOLUTION AND FREQUENCY
- CHECK THE FOLLOWING
- INSTALLATION ISSUE
- SCREEN ISSUE
- VIDEO PLAYBACK IS CHOPPY
- WHEN SETTING THE PIP SCREEN SIZE, THE SCREEN DOES NOT FIT THE PIP SIZE
- SOUND ISSUE
- THERE IS NO SOUND
- THE VOLUME IS TOO LOW
- VIDEO IS AVAILABLE BUT THERE IS NO SOUND
- SOURCE DEVICE ISSUE
- A BEEPING SOUND IS HEARD WHEN MY PC IS BOOTING
- Q & A
- HOW CAN I CHANGE THE FREQUENCY
- HOW CAN I CHANGE THE RESOLUTION
- HOW DO I SET POWER-SAVING MODE
- SPECIFICATIONS
- APPENDIX
- RESPONSIBILITY FOR THE PAY SERVICE (COST TO CUSTOMERS)
- NOT A PRODUCT DEFECT
- A PRODUCT DAMAGE CAUSED BY CUSTOMER'S FAULT
- OTHERS
- TCO CERTIFIED
- SAY HELLO TO A MORE SUSTAINABLE PRODUCT
- PRODUCT WARRANTY INFORMATION
- SOFTWARE UPDATES
Brand : SAMSUNG
Model : S27D604UAE
Category : Monitor