
CRB-2 - Whiteboard Elmo - Free user manual and instructions
Find the device manual for free CRB-2 Elmo in PDF.


| Product Type | Portable Interactive Whiteboard (IWB) Wireless Set |
| Brand | Elmo |
| Model | CRB-2 |
| Main Function | Converts a whiteboard or LCD TV into an interactive whiteboard |
| Components Included | Sensor (CRB-2S), pen, wireless unit (CRB-1W), wireless adapter (CRA-1R), USB cables, AC adapter, attachment plate, double-sided tape |
| Sensor Model | CRB-2S |
| Sensor Operating Temperature | 10°C to 40°C (50°F to 104°F) |
| Sensor Power Source | DC 5V |
| Sensor Dimensions (L × W × H) | 227 × 43 × 11 mm |
| Sensor Weight | 80 g |
| Pen Battery | 1 × AA alkaline battery |
| Pen Dimensions (L × Φ) | 152 × 25 mm |
| Pen Weight | 37 g without battery |
| Wireless Unit Model | CRB-1W |
| Wireless Communication Band | 2.4 GHz |
| Wireless Communication Range | Approx. 15 m depending on usage |
| Wireless Unit Power Consumption | Max. 5.0 V, 60 mA |
| Wireless Adapter Model | CRA-1R |
| Wireless Adapter Interface | USB Type A plug (USB 2.0 HI-SPEED) |
| Wireless Adapter Power Source | USB bus power |
| Compatible Software and Cameras | ELMO Interactive Toolbox (EIT); L-12, L-12i, L-12iD document cameras |
| Supported Operating Systems | Windows 7/8/8.1/10 32/64-bit, macOS on Intel CPU |
| Minimum PC Requirements | Intel Core i5 2 GHz or higher, 2 GB RAM, 1 GB HDD, 1024×768 true color |
| Cleaning and Maintenance | Use a soft, dry cloth; unplug AC adapter before cleaning; do not use solvents |
| Safety, Replacement Parts and Servicing | Do not open the case; use only manufacturer-approved parts; have safety checks performed after service |
Frequently Asked Questions - CRB-2 Elmo
User questions about CRB-2 Elmo
0 question about this device. Answer the ones you know or ask your own.
Ask a new question about this device
Download the instructions for your Whiteboard in PDF format for free! Find your manual CRB-2 - Elmo and take your electronic device back in hand. On this page are published all the documents necessary for the use of your device. CRB-2 by Elmo.
USER MANUAL CRB-2 Elmo
Portable IWB Wireless set CRB-2
IWB = Interactive whiteboard
Please read this manual before use.
In preparation for the occasion of an emergency, please save with care this manual.
Important safeguards
Read Instructions
All the safety and operating instructions should be read before the appliance is operated.
■Retain Instructions
The safety and operating instructions should be retained for future reference.
■Heed Warnings
All warnings on the product and in the operating instructions should be adhered to.
■ Follow Instructions
All operating and use instructions should be followed.
■Cleaning
Unplug this product from the wall outlet before cleaning. Do not use liquid cleaners or aerosol cleaners. Use a damp cloth for cleaning.
■ Attachments
Do not use attachments not recommended by the product manufacturer as they may cause hazards.
■Water and Moisture
Do not use this product near water - for example, near a bath tub, wash bowl, kitchen sink, or laundry tub, in a wet basement, or near a swimming pool, and the like.
The connector of this unit and the USB cable into the water or foreign matter, or not wet. This could cause a fire or electric shock.
Placement
Do not place this product on an unstable cart, stand, tripod, bracket, or table. The product may fall, causing serious injury to a child or adult, and serious damage to the product. Use only with a cart, stand, tripod, bracket, or table recommended by the manufacturer, or sold with the product. Any mounting of the product should follow the manufacturer's instructions, and should use a mounting accessory recommended by the manufacturer.
Ventilation
Slots and openings in the cabinet are provided for ventilation and to ensure reliable operation of the product and to protect it from overheating, and these openings must not be blocked or covered. The openings should never be blocked by placing the product on a bed, sofa, rug, or other similar surface. This product should not be placed in a built-in installation such as a bookcase or rack unless proper ventilation is provided or the manufacturer's instructions have been adhered to.
■ Power Sources
This product should be operated only from the type of power source indicated on the marking label. If you are not sure of the type of power supply to your home consult your appliance dealer or local power company. For products intended to operate from battery power, or other sources, refer to the operating instructions.
■Grounding or Polarization
This product may be equipped with either a polarized 2-wire AC line plug (a plug having one blade wider than the other) or a 3-wire grounding type plug, a plug having a third (grounding) pin. The 2-wire polarized plug will outlet, try reversing the plug. If the plug still fails to fit, contact your electrician to replace your obsolete outlet. Do not defeat the safety purpose of the polarized plug. The 3-wire grounding type plug will fit into a grounding type power outlet. This is a safety feature. If you are unable to insert the plug into the outlet, contact your electrician to replace your obsolete outlet. Do not defeat the safety purpose of the grounding type plug.
■ Power-Cord Protection
Power-supply cords should be routed so that they are not likely to be walked on or pinched by items placed upon or against them, paying particular attention to cords at plugs, convenience receptacles, and the point where they exit from the product.
Lightning
For added protection for this product during a lightning storm, or when it is left unattended and unused for long periods of time, unplug it from the wall outlet and disconnect the antenna or cable system. This will prevent damage to the product due to lightning and power-line surges.
■Overloading
Do not overload wall outlets, extension cords, or integral convenience receptacles as this can result in a risk of fire or electric shock.
■A product and cart combination should be moved with care.
Quick stops, excessive force, and uneven surfaces may cause the product and cart combination to overturn.

■Object and Liquid Entry
Never push objects of any kind into this product through openings as they may touch dangerous voltage points or short-out parts that could result in a fire or electric shock. Never spill liquid of any kind on the product.
Servicing
Do not attempt to service this product yourself as opening or removing covers may expose you to dangerous voltage or other hazards. Refer all servicing to qualified service personnel.
■Damage Requiring Service
Unplug this product from the wall outlet and refer servicing to qualified service personnel under the following conditions:
- When the power-supply cord or plug is damaged.
- If liquid has been spilled, or objects have fallen into the product.
- If the product has been exposed to rain or water.
- If the product does not operate normally by following the operating instructions. Adjust only those controls that are covered by the operating instructions as an improper adjustment of other controls may result in damage and will often require extensive work by a qualified technician to restore the product to its normal operation.
- If the product has been dropped or damaged in any way.
- When the product exhibits a distinct change in performance - this indicates a need for service.
■ Replacement Parts
When replacement parts are required, be sure the service technician has used replacement parts specified by the manufacturer or have the same characteristics as the original part. Unauthorized substitutions may result in fire, electric shock or other hazards.
■Safety Check
Upon completion of any service or repairs to this product, ask the service technician to perform safety checks to determine that the product is in proper operating condition.
Heat
The product should be situated away from heat sources such as radiators, heat registers, stoves, or other products (including amplifiers) that produce heat.


SA 1965
The lightning flash with arrowhead symbol, within an equilateral triangle, is intended to alert the user to the presence of uninsulated “dangerous voltage” within the product’s enclosure that may be of sufficient magnitude to constitute a risk of electric shock to persons.

SA 1966
The exclamation point within an equilateral triangle is intended to alert the user to the presence of important operating and maintenance (servicing) instructions in the literature.

This symbol [crossed-out wheeled bin WEEE Annex IV] indicates separate collection of waste electrical and electronic equipment in the EU countries.
Please do not throw the equipment into the domestic refuse.
Please use the return and collection systems available in your country for the disposal of this product.

This symbol [crossed-out wheeled bin Directive 2006/66/EC Annex II] indicates separate collection of waste batteries in the EU countries.
Please do not throw the batteries into the domestic refuse.
Please use the return and collection systems available in your country for the disposal of the waste batteries.
WARNING
TO REDUCE THE RISK OF FIRE OR ELECTRIC SHOCK, DO NOT EXPOSE THIS PRODUCT TO RAIN OR MOISTURE.
The connection of a non-shielded equipment interface cable to this equipment will invalidate the FCC Certification or Declaration of this device and may cause interference levels which exceed the limits established by the FCC for this equipment. It is the responsibility of the user to obtain and use a shielded equipment interface cable with this device. If this equipment has more than one interface connector, do not leave cables connected to unused interfaces. Changes or modifications not expressly approved by the manufacturer could void the user's authority to operate the equipment.
FOR UNITED STATES USERS:
INFORMATION
This equipment has been tested and found to comply with the limits for a Class A digital device, pursuant to Part 15 of the FCC Rules. These limits are designed to provide reasonable protection against harmful interference when the equipment is operated in a commercial environment.
This equipment generates, uses, and can radiate radio frequency energy and, if not installed and used in accordance with the instruction manual, may cause harmful interference to radio communications. Operation of this equipment in a residential area is likely to cause harmful interference in which case the user will be required to correct the interference at his own expense.
This device complies with part 15 of the FCC Rules. Operation is subject to the following two conditions: (1) This device may not cause harmful interference, and (2) this device must accept any interference received, including interference that may cause undesired operation.
FCC CAUTION
Changes or modifications not expressly approved by the party responsible for compliance could void the user's authority to operate the equipment.
This Class A digital apparatus complies with Canadian ICES-003.
THIS IS A CLASS A PRODUCT. IN A DOMESTIC ENVIRONMENT THIS PRODUCT MAY CAUSE RADIO INTERFERENCE IN WHICH CASE THE USER MAY BE REQUIRED TO TAKE ADEQUATE MEASURES.
WARNING:
Handling the cord on this product or cords associated with accessories sold with this product, will expose you to lead, a chemical known to the State of California to cause birth defects or other reproductive harm.
Wash hands after handling.
Caution
■About electric waves used by wireless unit and wireless adapter
The wireless unit uses electric waves in the 2.4 GHz band. When using the wireless unit, a radio station license is not necessary. However, please note the following precautions.
●Do not use near the following:
- Microwave ovens/industrial, scientific or medical equipment, such as pacemakers
- In-factory radio stations for mobile unit identification systems (radio stations that require a license) used in production lines of factories
- Specified low power radio stations (radio stations that do not require a license)
- IEEE802.11g/b wireless LAN units
When the wireless unit is used near any of the equipment mentioned above, electric wave interference may occur, making the wireless unit difficult to use.
● Wireless communication may be affected depending on the usage environment (for example: obstructions between the wireless unit and the wireless adapter).
■ About wireless equipment using 2.4GHz bandwidth
This frequency bandwidth is the same as for industrial, scientific, and medical equipment such as microwave ovens, mobile unit identification systems (radio stations that require a license) used in factory production lines, and specified low-power radio stations (radio stations that do not require a license).
- Please do not use abroad this equipment.
- Before using this product, check that there are no radio stations for mobile unit identification systems or specified low-power radio stations nearby.
- If this product emits electric waves which interfere with in-factory radio stations for mobile unit identification systems, cease use immediately and stop generating the electric waves. For information on countermeasures, etc. (for example, erecting partitions), contact your dealer from whom you purchased this product.
- If this product emits electric waves which interfere with specified low-power radio stations used for mobile unit identification systems, or causes similar problems, contact your dealer from whom you purchased this product.
■About usage environment and storage
- Portable IWB is indoor-only model, cannot be used outdoors.
- When using this device, be sure to use the supplied AC adapter.
- The supplied AC adapter and power plug are for use with this product only. Do not use them with other equipment.
- Be sure to use the power plug applicable to your local power specifications.
- When storing the product, do not leave it under direct sunlight or by heaters.
It may become discolored, deformed, or damaged.
■ Do not place this product in any humid, dusty, salt bearing wind, or vibrating locations.
Only use it under the following environmental conditions:
Temperature: 10° C - 40° C ( 50° F - 104° F)
Humidity: 10% - 80% (No condensation)
■ Use a soft, dry cloth for cleaning.
Do not use any volatile solvent such as thinner or benzene.
■ Follow the guidelines below to prevent the unit from dropping or overturning.
- Please use on stable place. Do not put it on an unstable location.
- Place or wire the unit to prevent the AC adapter cord or video cable from pulling.
If this product is used for longer than the warranty period, its performance and quality may deteriorate due to the lifetime of its parts. To purchase replacement parts, consult the dealer from whom you purchased this product or our branch/office near your location.
■Battery precautions:
- If this product is not going to be used for a long time, take the batteries out of the pen.
- Do not use rechargeable batteries.
- Do not try to recharge or short-circuit the batteries.
- When disposing of used batteries, follow the instructions of your local government.
- Insert from one side and pay particular attention to the polarity (+/- directions).
- Be sure to use AA alkaline batteries.
- If any liquid from a battery leaks onto your skin or clothes, flush the area with clean water immediately.
If it gets into your eye, flush immediately with clean water and then contact a doctor.
Nib there is a possibility that the swallow. Therefore, the tip of the pen and the bundled products (extra lead five) please do not place out of reach of infants. By any chance, if swallowed, it will be the cause of the failure to suffocation or stomach, please immediately consult a doctor.
Table of contents
Important safeguards....2
Caution 6
Table of contents......8
Before use....9
Main function....10
Bundled items....11
Part Names ....12
■Sensor....12
■ Pen....13
■Wireless unit 14
■Wireless adapter....14
Preparations 15
Assembly and disassembly of the AC adapter 15
Preparing the pen....16
Connection of wireless unit and sensor 17
How to use....18
- Connect the document camera, computer and projector ....18
- Connect the wireless adapter to the device....19
- Attach the sensor to the projection surface ....19
- Confirm the pairing of wireless unit and wireless adapter ....22
- Perform the pen calibration .....23
- Using pen to operate the IWB screen....25
Other features....26
About LED 26
Sensor 26
Wireless unit 26
Wireless adapter....27
Troubleshooting 28
Product Specifications ....30
Product Specifications ....30
Operating environment....31
Disclaimer....32
About trademarks....32
Before use
Thank you very much for purchasing this product.
Please read this manual carefully to make suitable use of the portable IWB. Also, please be sure to refer to any supplemental information included with this product.
NOTE
You can use this product (portable IWB) with ELMO's document camera L-12/L-12i/L-12iD, or with PC that installed ELMO's application software "ELMO Interactive Toolbox (EIT)".
Caution
- To use with the pen tablet CRA-1, wireless communication settings of the pen tablet and the wireless adapter of the portable IWB need to be configured. Please refer to the instruction manual of the pen tablet for the settings of wireless communication.
- Please use the wireless adapter supplied with the portable IWB. You cannot use the wireless adapter supplied with the pen tablet.
- The pen tablet may require the update. Contact your dealer from whom you purchased this product for any questions.
Caution
Please note that screens and figures used in this manual may differ from the actual views.
Main function
■Converting your whiteboard or LCD TV to an Interactive Whiteboard
By attaching this product to an LCD TV or whiteboard and connecting to a computer that installed the application software "ELMO Interactive Toolbox (EIT)", you can turn your LCD TV or whiteboard into an interactive whiteboard and make your lesson effective.
■Wireless connection with the wireless unit
The supplied wireless unit enables the wireless connection between the sensor and the computer, eliminating the cable between them. It provides you more space around the IWB's operating area.
■ Using with the pen tablet and the document camera
By using the Elmo document camera model L-12/L-12i/L-12iD (sold separately), you can operate the portable IWB without a computer.
The portable IWB can also be used with the pen tablet (sold separately).
※The pen tablet (CRA-1) and the portable IWB cannot be used at the same time.

Bundled items
Package contents of this product are as follows. If the following are not included in the package of purchase, please contact your dealer.

Part Names
■Sensor
Front

Bottom

Back

Top


Battery box cover
Turn the cover to put in the battery.
Button 1
Act like the mouse right button.
Button 2
This is used to cancel the calibration. (Refer to "5. Perform the pen calibration")
Part A
When holding the pen, do not cover here by hand.
Sensor may not be able to detect pen location.
Pen tip
Act like the mouse left button and a drawing pen.
![graph TD A["ELMD"] --> B["UN"] A --> C["Power"] D["table"] --> E["Line 1"] D --> F["Line 2"]](/content/2026/08/1625242/images/5c37839036289cda9179d329e504ecbb1b5405141bf29c22b83e7e8be3be66ec.jpg)

USB connector
Use USB cable (white) to connect the sensor (CRB-2S).
Link LED
Display the state of the wireless communication.
Power LED
Lights when DC5V is input from the AC adapter.
DC plug
Use USB cable (black) to connect the AC adapter for power supply.
Wireless setting button
Use when set up communication with the wireless adapter.
■ Wireless adapter

Wireless setting button (LED)
Use when set up communication with the wireless unit.
Preparations
Assembly and disassembly of the AC adapter

■ Assembly
Push the power plug to the groove of the AC adapter. Then slide the power plug until it clicks.
■Disassembly
When removing the power from the AC adapter, slide it to the opposite direction while pressing the lock button and pull it out.
Insert the dry cell battery in the pen before use.
First, unscrew and remove the battery box cover.
Next, put the battery in the direction of the figure. After installing the battery, turn the battery box cover tight, so that it does not come off.

AA alkaline battery


- Make sure that the polarity (+/-) of the battery is correct.
- If this product is not going to be used for a long time, take the battery out of the pen.
- Do not try to recharge or short-circuit the battery.
- Be sure to use AA alkaline battery. Do not use rechargeable batteries.
- Please attach the cover of the battery box once the battery is set.
- The supplied dry cell battery is for an initial operation check. Its operating life is not guaranteed.
- When disposing of used batteries, follow the instructions of your local government.
When the dry cell battery level is low, the operability may deteriorate.

- Replace the dry cell battery at least once a year.
Connect the wireless unit and the sensor with the USB cable as shown in the below figure.
![graph TD A["USB cable (white)"] --> B["ELMO"] C["Sensor"] --> B B --> D["Wireless unit"] D --> E["USB cable (black)"] E --> F["AC adapter"]](/content/2026/08/1625242/images/147fe577ba246a8c475e208e76128384d058595e1aa1c58b4516c0ba3333c5a0.jpg)
How to use
1. Connect the document camera, computer and projector
For detailed operation of each device, please refer to the respective instruction manual.
Using L-12 / L-12i / L-12iD
By using the drawing function of the document camera, you can operate the portable IWB without a computer.

Using PC / Document Camera
By using the ELMO application software, you can operate the portable IWB.
Install the ELMO application software to your computer beforehand.
Refer to the included Quick Start Guide for the installation procedure of the software.

2. Connect the wireless adapter to the device
Connect the wireless adapter to the USB connector on each device you want to use, and then turn them on.
A wireless adapter button flashes in blue.


3. Attach the sensor to the projection surface
■Projector
Set the sensor next to the projected screen.

NOTE
- No matter whether the sensor is installed vertically or horizontally, attach it in parallel with the projected screen, aligning the center of the sensor with the center of the screen.
- Secure 9 cm gap from the sensor to the edge of projected screen.
- Because sensor sensitivity is reduced while air-conditioning equipment is operating, the drawing area may be narrower.
If the magnet does not stick to the surface of the board, use the attachment plate and the double-sided tape to attach the sensor as shown in the figure.

LCD TV
Set the sensor next to the LCD TV screen.
If you cannot secure 9 cm gap from the sensor to the edge of the TV screen, prepare a plate as shown in the figure, attach the sensor using the plate to the frame of LCD TV.

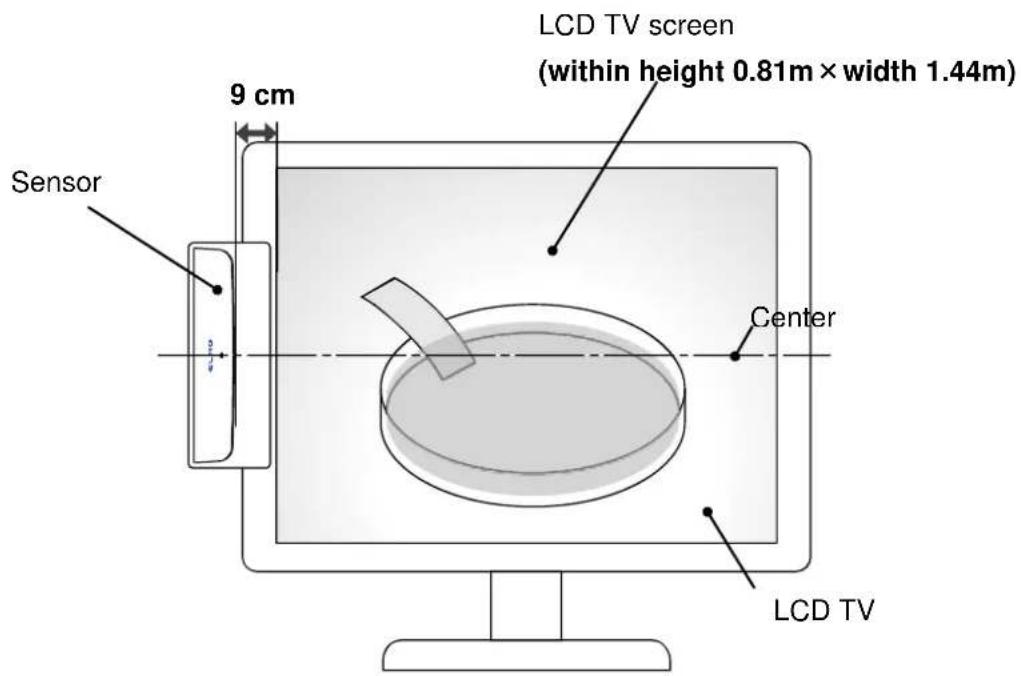
NOTE
- No matter whether the sensor is installed vertically or horizontally, attach it in parallel with the LCD TV screen, aligning the center of the sensor with the center of the screen.
- Secure 9 cm gap from the sensor to the edge of the LCD TV screen.
- Because sensor sensitivity is reduced while air-conditioning equipment is operating, the drawing area may be narrower.
■Limit of mounting height
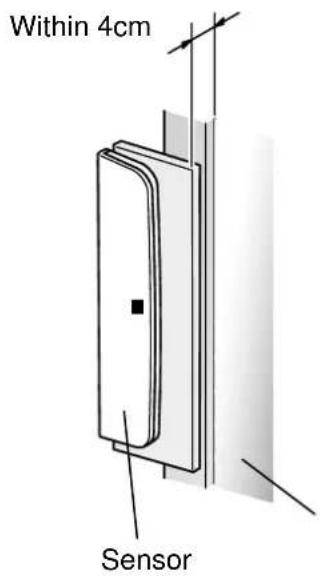
Attach the sensor within 4cm from the writing plane (projected screen / LCD screen), like the figure on the left. ※Attaching the sensor outside of the proper height may cause the detection become unstable and unable to write.
Writing plane (projected screen / LCD screen)
NOTE
- Because sensor sensitivity is reduced at low temperatures, you may not be able to draw accurately.
4. Confirm the pairing of wireless unit and wireless adapter
If the LED of the wireless adapter button and the wireless unit LINK are off, the pairing is successfully completed (factory default).

NOTE
※If the LED flashes in blue, the pairing is not completed.
※1 The LED begins to flash quickly after the wireless unit button is pressed for 5 seconds.
※2 When the wireless adapter button is pressed in this condition, the LED turns off and the pairing is completed.
Perform the wireless setting within 30 seconds of pressing the "Wireless setting button" on the underside of the wireless unit.
Press the "Wireless setting button" while supporting the body of the wireless adapter.
5. Perform the pen calibration
When you use the portable IWB for the first time or change the size of screen, you need to calibrate the position of the sensor and the screen.
Method of calibration
- Point the pen to the center of the sensor (within 2cm radius) and press the button 1 for over 3 seconds.
An icon appears on the left top of the projected screen [①] with a beep sound. - Each time the icon is touched with the pen, the icon moves to the next position with a short beep in the order described in the figure.
- When you hear 3 short beeps after touching all 4 positions, the pen calibration is successfully completed.

NOTE
The pen calibration cannot be performed for L-12 with a serial number between 1850001 and 1850662 or 1880001 and 1880327.
Contact your dealer for further information.
NOTE
- When doing the calibration, pay attention to the following. Keep the pen at a right (90°) angle to the projected screen. Touch the center of the icon.
- If you failed to touch the icon correctly, press the button 2 for over 2 seconds and try again.
- If no operation is performed for over 30 seconds, the calibration mode is released automatically with 2 short beeps.
- When using with the "L-12i/L-12iD" and "ELMO Interactive Toolbox (EIT)", calibration guide screen will appear. Click on the target mark.
- When using with L-12, the pencil icon appears. Click on the tip of the pencil icon.

- When using "ELMO Interactive Toolbox (EIT)" (immediately after start-up), it is recommended to do the calibration when "pencil icon" or "marker icon" appears. Do not do the calibration when "palm cursor" appears.
- Do the calibration when "arrow icon" appears in Finder (OS Basics) state on the Mac.
- Cursor (icon) position during the calibration will be different for "Windows, L-12i/L-12iD" and "Mac".
- How to deal with the hang up during calibration with EIT Windows version.
(A)Remove the wireless adapter (CRA-1R) from the USB port.
(B)Press "F1" key.
(C)Operate the menu of IMAccDriver that resides in the task tray.
※Before performing (C), you will need to show the Windows toolbar in front of the screen of EIT Windows version by means such as "Alt-Tab".
Using the L-12/L-12i/L-12iD
The drawing operation and the operation of icons displayed on the screen are now possible.
Using PC / Document Camera
The mouse operation of the computer is now possible.
The drawing operation is possible by starting ELMO Interactive Toolbox (EIT).
◆PC operation with a pen

Pen tip: Left button of the mouse Button 1: Right button of the mouse
NOTE
- When there is misalignment of the projected image and the pen's position, please perform the above item 5: pen calibration again.
- Do not change the position of the sensor or the screen size. Doing so may cause failure of proper detection of the pen position and you may not be able to draw correctly.
Do not change the resolution of monitor, projector of Document Camera. - The LED of the sensor turns red when the pen position is out of the drawing area or the battery of the pen is run out.
- A multiple number of pens cannot be used.
- Do not cover [A] with your hand when you hold the pen.
The pen position data may not be recognized correctly. - Keep the pen at a right angle (90°) to the projected plane. If the angle is too large, you may not be able to draw correctly.
- The power of the pen turns off automatically after one of either "Pen tip", "Button 1", or "Button 2" is pressed for 2 minutes and 30 seconds.
The maximum time that you can draw in one stroke is 2 minutes and 30 seconds. - Do not use a rechargeable battery.
©
■ Wireless setting button (LED) (blue)
| LED status | Operation |
| Off | Power of computer or document camera is not turned ON.Or when the power is ON, communication with the wireless unit is performed correctly. |
| Flashing | Cannot communicate with the wireless unit or the pairing is not done.※Interval of flashing may vary depending on operating conditions. |
| Fast flashing | The wireless setting button for the wireless adapter is pressed. |
Troubleshooting
If you have questions or when trouble occurs, look at this first.
Contact your dealer if the problem still persists.
| Cannot use the sensor / No icon is displayed | |
| Is operating temperature appropriate? | The sensor may not function properly in other than ambient temperature of 10°C~40°C.At low temperatures environment (10 °C), you may not be able to draw accurately if there are some difference in height (4 cm) to the sensor mounting surface and the drawing surface. At low temperatures, mount and use the sensor on the same plane with the drawing surface (difference in height is 0 cm). |
| Is vent of air conditioning or other equipment near the writing area? | The sensor may not operate normally if the temperature variation occurs in the writing area. |
| Is any equipment that emits infrared near the sensor? | The sensor may not work properly in the room where a motion sensor is installed.The sensor cannot be used simultaneously with an infrared remote controller.Install the sensor to a place where the sensor does not receive strong light. |
| Is fluorescent lighting near the sensor? | The sensor may not operate normally immediately after the fluorescent lamp is lit.The sensor may not work properly under high frequency fluorescent lamp. |
| Is using with plasma TV? | The sensor may not operate due to the characteristic of plasma TV. Use television of the other types. |
| Is the proper wireless adapter used? | Use the wireless adapter bundled with the wireless unit.Do not use the wireless adapter bundled with the pen tablet. |
| Is wireless communication configuration of the wireless adapter and wireless unit done? | Before using the wireless unit you need to configure the wireless communication settings between the wireless unit and the wireless adapter. Perform the wireless communication configuration. (pen calibration) |
| Is the wireless adapter connected to the computer? | Check that the wireless adapter is connected to the computer being used. Caution Connect the wireless adapter directly to the USB port on the computer. It may not operate correctly if a USB hub is used. Caution Connect the wireless adapter directly to the USB port on the computer. It may not operate correctly if a USB hub is used. |
| Is the Link LED on the wireless unit or the LED on the wireless adapter flashing? | There is no communication between the wireless unit and wireless adapter. See "Confirm the pairing of wireless unit and wireless adapter". |
| Communication is not possible | If a wireless device or electronic equipment is used near the product, communication between the wireless unit and wireless adapter may be unstable due to interference from electric waves.Do not use equipment that causes interference near the wireless unit. |
| Is the pen's battery running low? | Replace with a new dry cell battery.See "Preparing the pen". |
| Communication between the wireless unit and wireless adapter is unstable | |
| Is third-party Tablet software or a wireless device installed? | If third-party Tablet software or a wireless device is running, it may conflict with the operations of this product.Do not operate third-party Tablet software or a wireless device while using this product. |
| Are the wireless unit and wireless adapter in the proper condition? | Communication may become unstable because of an obstruction between the wireless unit and wireless adapter, due to the inherent characteristics of wireless communication, or because of the installation angles of each part.Remove the obstruction or change the installation location. |
| Is a wireless device or electronic equipment being used nearby? | A wireless device or electronic equipment may interfere with the communication between the wireless unit and wireless adapter.Refer to “Confirm the pairing of wireless unit and wireless adapter” and then perform the wireless settings.If the condition persists, stop using the wireless device or electronic equipment, or move to a location with no interference. |
Product Specifications
Product Specifications
■Sensor
| Type | CRB-2S |
| Operating temperature | 10°C~40°C |
| Power Source | DC5V |
| Power Consumption | Maximum 0.5W |
| Dimensions | L227×W43×H11 (mm) |
| Weight | 80g |
| Interface | USB 2.0 micro B receptacle×1 |
Pen
| Battery | AA alkaline battery×1 |
| Dimensions | L152×Φ25 (mm) |
| Weight | 37g (without dry cell battery) |
■Wireless unit
| Type | CRB-1W |
| Operating temperature | 0°C~40°C |
| Radio bandwidth | 2.4GHz |
| Communication distance | About 15m (depending on usage) |
| Power Source | DC5V |
| Power Consumption | Maximum 5.0V 60mA |
| Dimensions | L53×W44×H25.2 (mm) |
| Weight | 90g |
■ Wireless adapter
| Type | CRA- 1R |
| Operating temperature | 0°C~40°C |
| Radio bandwidth | 2.4GHz |
| PC interface | USB type A plug (USB 2.0 HI-SPEED) |
| Power Source | USB bus power |
| Power Consumption | Maximum 5.0V 50mA |
| Dimensions | L64×W22×H10 (mm) |
| Weight | 11g |
Operating environment
CRB-2 can be used in the following environments.
When used with the document camera
| Compatible DocumentCameras | L-12/L-12i/L-12iD |
When used with the computer
| Computer model | Windows: IBM PC/AT compatibleMac: Intel CPU Mac |
| Operating system (OS) | · Windows 7 32/64bit· Windows 8、8.1 32/64bit· Windows 10 32/64bit |
| CPU | Intel Core i5 2GHz equivalent or higher |
| Memory | 2GB or higher |
| Hard disk | 1GB or higher |
| Screen resolution / Display Color | 1024 × 768 pixels or higher / true color |
| USB | USB 2.0 HI-SPEED(Connect to document camera) |

Caution
- If a sound device cannot be used, some of the functions may not operate.
- Operation is not guaranteed for all computer environments.
Disclaimer
The information on this manual and CRB-2 are subjects to change without prior notice.
The software already installed in your computer or other devices connected to your computer may affect the performance of ELMO Interactive Toolbox (EIT).
ELMO is not liable for any direct or indirect damages resulting from the use of ELMO Interactive Toolbox (EIT).
About trademarks
Trademarks and registered trademarks of the following are used in this manual.
ELMO is a registered trademark of ELMO Co., Ltd.
Intel are registered trademarks of Intel Corporation.
The full title for Windows® 7 is the Microsoft® Windows® 7 operating system.
The shortened form of the OS name is used in the text.
The full title for Windows® 8 is the Microsoft® Windows® 8 operating system.
The shortened form of the OS name is used in the text.
The full title for Windows® 8.1 is the Microsoft® Windows® 8.1 operating system.
The shortened form of the OS name is used in the text.
The full title for Windows® 10 is the Microsoft® Windows® 10 operating system.
The shortened form of the OS name is used in the text.
Microsoft and Windows are registered trademarks of the Microsoft Corporation in the U.S. and other countries.
Apple, the Apple logo, Mac, Mac OS and Macintosh are trademarks of Apple Inc., registered in the United States and other countries.
Mac is a service mark of Apple Inc.
All other company/product names described in this manual are trademarks or registered trademarks of their respective companies.
ELMO CO., LTD.
6-14, Meizen-cho, Mizuho-ku
Nagoya, 467–8567, Japan
OVERSEAS SUBSIDIARY COMPANIES
ELMO USA CORP.
Headquarters
1478 Old Country Road
Plainview, NY 11803, U.S.A.
Tel. (516) 501-1400 Fax.(516) 501-0429
E-mail: mailto:elmo@elmousa.com
Web: http://www.elmousa.com/
West Coast Branch
5555 Garden Grove Boulevard.
Suite 375
Westminster, CA 92683
Tel. (714) 828-8457 Fax. (714) 828-8429
ELMO Europe SAS
Headquarters
40549 Düsseldorf Germany
Tel. 49 (0) 211 544756 40
Fax. 49 (0) 211 544756 60
Middle East (Branch)
5WA-129, Dubai Airport Free Zone
P.O. Box 371556, Dubai
United Arab Emirates
TEL. +971-(0)4-260-2390
FAX. +971-(0)4-260-2392

- PORTABLE IWB WIRELESS SET CRB
- IMPORTANT SAFEGUARDS
- READ INSTRUCTIONS
- RETAIN INSTRUCTIONS
- HEED WARNINGS
- FOLLOW INSTRUCTIONS
- CLEANING
- ATTACHMENTS
- WATER AND MOISTURE
- PLACEMENT
- VENTILATION
- POWER SOURCES
- GROUNDING OR POLARIZATION
- POWER-CORD PROTECTION
- LIGHTNING
- OVERLOADING
- A PRODUCT AND CART COMBINATION SHOULD BE MOVED WITH CARE
- OBJECT AND LIQUID ENTRY
- SERVICING
- DAMAGE REQUIRING SERVICE
- REPLACEMENT PARTS
- SAFETY CHECK
- HEAT
- WARNING
- TO REDUCE THE RISK OF FIRE OR ELECTRIC SHOCK, DO NOT EXPOSE THIS PRODUCT TO RAIN OR MOISTURE
- FOR UNITED STATES USERS
- INFORMATION
- FCC CAUTION
- THIS IS A CLASS A PRODUCT. IN A DOMESTIC ENVIRONMENT THIS PRODUCT MAY CAUSE RADIO INTERFERENCE IN WHICH CASE THE USER MAY BE REQUIRED TO TAKE ADEQUATE MEASURES
- CAUTION
- ABOUT ELECTRIC WAVES USED BY WIRELESS UNIT AND WIRELESS ADAPTER
- ABOUT WIRELESS EQUIPMENT USING 2.4GHZ BANDWIDTH
- ABOUT USAGE ENVIRONMENT AND STORAGE
- TABLE OF CONTENTS
- BEFORE USE
- HOW TO USE
- OTHER FEATURES
- TROUBLESHOOTING
- PRODUCT SPECIFICATIONS
- NOTE
- MAIN FUNCTION
- CONVERTING YOUR WHITEBOARD OR LCD TV TO AN INTERACTIVE WHITEBOARD
- WIRELESS CONNECTION WITH THE WIRELESS UNIT
- USING WITH THE PEN TABLET AND THE DOCUMENT CAMERA
- BUNDLED ITEMS
- PART NAMES
- SENSOR
- FRONT
- BOTTOM
- BACK
- TOP
- BATTERY BOX COVER
- BUTTON
- PART A
- PEN TIP
- USB CONNECTOR
- LINK LED
- POWER LED
- DC PLUG
- WIRELESS SETTING BUTTON
- WIRELESS ADAPTER
- WIRELESS SETTING BUTTON (LED)
- PREPARATIONS
- ASSEMBLY AND DISASSEMBLY OF THE AC ADAPTER
- ASSEMBLY
- DISASSEMBLY
- CONNECT THE DOCUMENT CAMERA, COMPUTER AND PROJECTOR
- USING L-12 / L-12I / L-12ID
- USING PC / DOCUMENT CAMERA
- CONNECT THE WIRELESS ADAPTER TO THE DEVICE
- ATTACH THE SENSOR TO THE PROJECTION SURFACE
- PROJECTOR
- LCD TV
- LIMIT OF MOUNTING HEIGHT
- CONFIRM THE PAIRING OF WIRELESS UNIT AND WIRELESS ADAPTER
- ※IF THE LED FLASHES IN BLUE, THE PAIRING IS NOT COMPLETED
- PERFORM THE PEN CALIBRATION
- METHOD OF CALIBRATION
- USING THE L-12/L-12I/L-12ID
- ◆PC OPERATION WITH A PEN
- OPERATING ENVIRONMENT
- DISCLAIMER
- ABOUT TRADEMARKS
- OVERSEAS SUBSIDIARY COMPANIES
- ELMO USA CORP
- ELMO EUROPE SAS
Brand : Elmo
Model : CRB-2
Category : Whiteboard