
EW 500 P G4 - Microphone SENNHEISER - Free user manual and instructions
Find the device manual for free EW 500 P G4 SENNHEISER in PDF.



| Product Type | Wireless Microphone System |
| Brand | Sennheiser |
| Model | EW 500 P G4 |
| Category | Microphone |
| Receiver Type | True Diversity, Rack-mountable |
| Microphone Type | Handheld Dynamic Microphone |
| Frequency Range | UHF (varies by region) |
| Tunable Frequencies | Up to 1680 |
| RF Output Power | Up to 30 mW |
| Range | Up to 100 m (328 ft) |
| Audio Output | XLR and 1/4" Jack |
| Display | OLED Display |
| Receiver Power Supply | 12 V DC External |
| Transmitter Power Supply | 2 AA Batteries |
| Battery Life | Up to 8 hours |
| Dimensions (Receiver) | Approx. 190 x 43 x 210 mm |
| Weight (Receiver) | Approx. 950 g |
| Cleaning | Wipe with a soft dry cloth |
| Safety | Keep away from liquids and extreme temperatures |
| Repairability | Professional service recommended |
| Spare Parts | Available from Sennheiser customer service |
Frequently Asked Questions - EW 500 P G4 SENNHEISER
User questions about EW 500 P G4 SENNHEISER
0 question about this device. Answer the ones you know or ask your own.
Ask a new question about this device
Download the instructions for your Microphone in PDF format for free! Find your manual EW 500 P G4 - SENNHEISER and take your electronic device back in hand. On this page are published all the documents necessary for the use of your device. EW 500 P G4 by SENNHEISER.
USER MANUAL EW 500 P G4 SENNHEISER
evolution wireless G4 500 P series
Instruction Manual
Overview 6
ew 500 P G4 series products 7
EK 500 G4 diversity receiver 8
SKM 500 G4 handheld transmitter 9
SK 500 G4 bodypack transmitter 10
SKP 500 G4 plug-on transmitter 11
Accessories 12
Microphones and cables 12
Microphone modules 12
Headset and Lavalier microphones 13
Line connecting cable 14
Rechargeable battery and charger 15
BA 2015 rechargeable battery 15
L 2015 charger 15
Accessories for camera mounting 16
CA 2 camera adapter 16
Additional accessories 17
Color labeling set 17
Microphone clamp 17
The frequency bank system 18
Installing ew 500 P G4 series devices 19
Installing the EK 500 G4 20
Inserting and removing the batteries/rechargeable batteries 20
Battery status 21
Connecting headphones to the EK 500 G4 22
Attaching the diversity receiver to a camera 23
Connecting the diversity receiver to a camera 26
Installing the SKM 500 G4 28
Inserting and removing the batteries/rechargeable batteries 29
Battery status 30
Replacing the microphone module 31
Changing the colored ring 32
Installing the SK 500 G4 33
Inserting and removing the batteries/rechargeable batteries 34
Battery status 35
Connecting a microphone to the SK 500 G4 36
Connecting an instrument or line source to the SK 500 G4 37
Attaching the bodypack transmitter to clothing 38
Installing the SKP 500 G4 39
Inserting and removing the batteries/rechargeable batteries 39
Battery status 40
Attaching the plug-on transmitter to the microphone 41
Using ew 500 P G4 series devices 42
Using the EK 500 G4 44
Operating elements of the EK 500 G4 diversity receiver
45
Switching the EK 500 G4 on and off 46
Volume control of the PHONES socket 47
Lock-off function 48
Displays on the EK 500 G4 display panel 49
Buttons for navigating through the menu 50
Home screen 52
Frequency/Name standard display 52
Frequency Bank/Channel/Name standard display 53
Setting options in the menu 54
Menu structure 56
Sync menu item 57
Phones Volume menu item 57
Squelch menu item 58
Easy Setup menu item 60
Frequency Preset menu item 61
Name menu item 62
AF Out menu item 63
Auto Lock menu item 64
Advanced menu item 65
Advanced -> Tune menu item 66
Only adjusting the frequency 66
Setting the channel and frequency 66
Advanced -> Sync Settings menu item 67
Advanced -> Pilot Tone menu item 68
Advanced -> LCD Contrast menu item 68
Advanced -> Reset menu item 69
Advanced -> Software Revision menu item 69
Using the SKM 500 G4 70
Operating elements of the SKM 500 G4 handheld transmitter 71
Switching the SKM 500 G4 handheld transmitter on and off 72
Muting the handheld transmitter (AF mute) 73
Deactivating the RF signal (RF mute) 73
Lock-off function 74
Displays on the SKM 500 G4 handheld transmitter display panel 75
Select a standard display 76
Buttons for navigating the SKM 500 G4 menu 77
Navigating through the menu 77
Making changes in a menu item 77
Setting options in the menu 78
Sensitivity menu item 79
Frequency Preset menu item 79
Name menu item 80
Auto Lock menu item 80
Advanced menu item 81
Advanced > Tune menu item 82
Only adjusting the frequency 82
Setting the channel and frequency 82
Advanced > RF Power menu item 83
Advanced > Pilot Tone menu item 83
Advanced > LCD Contrast menu item 84
Advanced > Reset menu item 84
Advanced > Software Revision menu item 84
Using the SK 500 G4 85
Operating elements of the SK 500 G4 bodypack transmitter 86
Switching the SK 500 G4 bodypack transmitter on and off 87
Muting the bodypack transmitter (AF mute) 88
Deactivating the RF signal (RF mute) 89
Deactivating the RF signal with the MUTE switch 89
Deactivating the RF signal with the ON/OFF button 90
Lock-off function 92
Displays on the SK 500 G4 bodypack transmitter display panel 93
Select a standard display 94
Buttons for navigating the SK 500 G4 menu 95
Navigating through the menu 95
Making changes in a menu item 95
Setting options in the menu 96
Sensitivity menu item 97
Frequency Preset menu item 97
Name menu item 98
Auto Lock menu item 98
Advanced menu item 99
Advanced > Tune menu item 100
Only adjusting the frequency 100
Setting the channel and frequency 100
Advanced > Mute Mode menu item 101
Advanced > RF Power menu item 101
Advanced > Pilot Tone menu item 102
Advanced > LCD Contrast menu item 102
Advanced > Reset menu item 102
Advanced > Software Revision menu item 102
Using the SKP 500 G4 103
Operating elements of the SKP 500 G4 plug-on transmitter 104
Switching the SKP 500 G4 plug-on transmitter on and off 105
Muting the plug-on transmitter (AF mute) 106
Deactivating the RF signal (RF mute) 107
Deactivating the RF signal with the MUTE switch 107
Deactivating the RF signal with the ON/OFF button 108
Lock-off function 109
Displays on the SKP 500 G4 plug-on transmitter display panel 110
Select a standard display 111
Buttons for navigating the SKP 500 G4 menu 112
Navigating through the menu 112
Making changes in a menu item 112
Setting options in the menu 113
Sensitivity menu item 114
Frequency Preset menu item 114
Name menu item 115
Auto Lock menu item 115
Advanced menu item 116
Advanced > Tune menu item 117
Only adjusting the frequency 117
Setting the channel and frequency 117
Advanced > Mute Mode menu item 118
Advanced > RF Power menu item 118
Advanced > Phantom Power 48V menu item 119
Advanced > Pilot Tone menu item 119
Advanced > LCD Contrast menu item 119
Advanced > Reset menu item 119
Advanced > Software Revision menu item 120
Establishing a radio link 121
Setting notes 121
Synchronizing devices 122
Overview 123
Product variants 124
EK 500 G4 product variants 124
Made in Germany 124
Assembled in the USA 124
SKM 500 G4 product variants 125
Made in Germany 125
Assembled in the USA 125
SK 500 G4 product variants 126
Made in Germany 126
Assembled in the USA 126
SKP 500 G4 product variants 127
Made in Germany 127
Assembled in the USA 127
Frequency tables 128
Specifications 129
EK 500 G4 130
RF characteristics 130
AF characteristics 131
Overall device 131
SKM 500 G4 132
RF characteristics 132
AF characteristics 133
Overall device 133
SK 500 G4 134
RF characteristics 134
AF characteristics 135
Overall device 135
SKP 500 G4 136
RF characteristics 136
AF characteristics 137
Overall device 137
Pin assignment 138
3.5 mm stereo jack plug 138
3.5 mm mic jack plug 138
3.5 mm line jack plug 138
6.3 mm stereo jack plug, balanced (audio in/loop out) 138
6.3 mm mono jack plug, unbalanced 139
6.3 mm stereo jack plug for headphone jack 139
XLR-3 plug, balanced 139
Hollow jack plug for power supply 139
Cleaning and maintenance 140
Cleaning the sound inlet basket of the microphone module 140
PRODUCT INFORMATION
Overview
You can find information about the individual products in the ew 500 P G4 series under “ew 500 P G4 series products”.
For information about the available accessories, see "Accessories".
You can find information about the ew 500 P G4 series frequency bank system under “The frequency bank system”.

ew 500 P G4 series products
You can also find more information here:
- A variety of frequency variants are available from the individual products. You can find more information under “Product variants”.
- You can find technical specifications about the individual products under "Specifications".
- You can find information about installing the products under “Installing ew 500 P G4 series devices”.
- You can find information about operating the products under "Using ew 500 P G4 series devices".
EK 500 G4 diversity receiver

You can find more detailed information about the EK 500 G4 in the following sections:
• Installation and Startup: "Installing the EK 500 G4"
• Operation: "Using the EK 500 G4"
• Technical Data: "EK 500 G4"
SKM 500 G4 handheld transmitter

You can find more detailed information about the SKM 500 G4 in the following sections:
• Installation and Startup: "Installing the SKM 500 G4"
• Operation: "Using the SKM 500 G4"
• Technical Data: "SKM 500 G4"
SK 500 G4 bodypack transmitter

You can find more detailed information about the SK 500 G4 in the following sections:
• Installation and Startup: "Installing the SK 500 G4"
• Operation: "Using the SK 500 G4"
• Technical Data: "SK 500 G4"
SKP 500 G4 plug-on transmitter

You can find more detailed information about the SKP 500 G4 in the following sections:
• Installation and Startup: "Installing the SKP 500 G4"
• Operation: "Using the SKP 500 G4"
• Technical Data: "SKP 500 G4"
Accessories
A variety of accessories are available for the ew 500 P G4 series.
Microphones and cables
Microphone modules
We recommend using the following microphone modules with the SKM 500 G4 handheld transmitter.
Module Features Article
no.
| MMD 835-1 BK Dynamic, cardioid, black 502575 | ||
| MMD 845-1 BK Dynamic, super-cardioid, black 502576 | ||
| MME 865-1 BK Capacitor, super-cardioid, black 502581 | ||
| MMD 935-1 BK Dynamic, cardioid, black 502577 | ||
| MMD 945-1 BK Dynamic, super-cardioid, black 502579 | ||
| MMK 965-1 BK Capacitor, switchable Cardioid/super-cardioid, black | 502582 | |
| MMK 965-1 NI Capacitor, switchable Cardioid/super-cardioid, nickel | 502584 | |
| MMD 42-1 Dynamic, omni-directional, black 506772 | ||
| MD 9235 BK Dynamic, cardioid, black 502585 | ||
| MD 9235 NI Dynamic, cardioid, black 502586 | ||
| MD 9235 NI/BK | Dynamic, cardioid, nickel/black | 502591 |
| Neumann KK 204 | Capacitor, cardioid, nickel | 008651 |
| Neumann KK 204 BK | Capacitor, cardioid, black | 008652 |
| Neumann KK 205 | Capacitor, super-cardioid, nickel | 008653 |
| Neumann KK 205 BK | Capacitor, super-cardioid, black 008654 | |
You can find more information about the individual microphone modules on their respective product pages at www.sennheiser.com.
Headset and Lavalier microphones
We recommend using the following Lavalier microphones and headset microphones with the SK 500 G4 bodypack transmitter.
Microphone Features Article
| no. | |
| ME 2-II Lavalier microphone, omni-directional, black | 507437 |
| ME 3-II Headset microphone, cardioid, black | 506295 |
| ME 4-N Lavalier microphone, cardioid, black | 005020 |
| MKE 1-ew Lavalier microphone, omni-directional, black | 502876 |
| MKE 1-ew-3 Lavalier microphone, omni-directional, beige | 502879 |
| MKE 2-ew Gold Lavalier microphone, omni-directional, black | 009831 |
| MKE 40-ew Lavalier microphone, cardioid, black | 500527 |
| SL Headmic 1 BE Headband microphone, omni-directional, beige | 506272 |
| SL Headmic 1 BK Headband microphone, omni-directional, black | 506271 |
| SL Headmic 1 SB Headband microphone, omni-directional, silver | 506904 |
You can find more information about the individual microphones on their respective product pages at www.sennheiser.com.
Line connecting cable
The following cables can be used to connect cameras to the EK 500 G4 diversity receiver:
• CL 1
3.5 mm jack plug on lockable 3.5 mm jack plugs Article no. 005022

• CL 500
XLR-3 on a 3.5 mm jack plug Article no.
Rechargeable battery and charger
BA 2015 rechargeable battery
The BA 2015 rechargeable battery is designed for use with evolution wireless G4 series handheld transmitters, bodypack transmitters and bodypack receivers.
Article no. 009950

L2015 charger
The BA 2015 rechargeable battery can be charged in the L 2015 charger on its own or inside of the bodypack transmitter/bodypack receiver.
Article no. 009828

Accessories for camera mounting
CA 2 camera adapter
Camera adapter with hot shoe for portable receivers from the ew 100 P G4 and ew 500 PG4 series.
Article no. 009986

Additional accessories
Color labeling set
- KEN 2, color labeling set for SKM handheld transmitters Article no. 530195

Microphone clamp
• MZQ 1, microphone clamp for SKM handheld transmitters Article no. 076670

The frequency bank system
There are different frequency ranges in the UHF band available for transmission.
The following frequency ranges are available for the ew 500 P G4 series:
• Aw+ range: 470 - 558 MHz
• AS range: 520 - 558 MHz
• Gw1 range: 558 - 608 MHz
• Gw range: 558 - 626 MHz
• GBw range: 606 - 678 MHz
• Bw range: 626 - 698 MHz
• Cw range: 718 - 790 MHz
• Dw range: 790 - 865 MHz
• JB range: 806 - 810 MHz
• K+ range: 925 - 937.5 MHz
Every frequency range has 26 frequency banks with up to 32 channels:
![graph TD A["Frequency banks 1... 20"] --> B["Channel 1 – Frequency preset"] A --> C["Channel 2 – Frequency preset"] A --> D["..."] A --> E["Channel 32 – Frequency preset"] F["Frequency bank U1... U6"] --> G["Channel 1 – freely selectable frequency"] F --> H["Channel 2 – freely selectable frequency"]…](/content/2026/08/1624843/images/4680a5bb938f4a65d9af4674f643e5059a53fee3fcccab020740bd8607cb7faa.jpg)
You can find information about the frequency presets in the frequency tables of the respective frequency ranges under "Frequency tables".
INSTALLATION
Installing ew 500 P G4 series devices
You can find information about installing and connecting ew 500 P G4 series devices in the following sections.

EK 500 G4
- EK 500 G4 diversity receiver >> "Installing the EK 500 G4"

SKM 500 G4
- SKM 500 G4 handheld transmitter >> "Installing the SKM 500 G4"

SK 500 G4
- SK 500 G4 bodypack transmitter >> "Installing the SK 500 G4"

SKP 500 G4
- SKP 500 G4 plug-on transmitter >> "Installing the SKP 500 G4"
You can find information about operating the products under "Installing ew 500 P G4 series devices".
Installing the EK 500 G4
These sections contain detailed information about installing the EK 500 G4.
You can find information about operating the EK 500 G4 under "Using the EK 500 G4".
Inserting and removing the batteries/rechargeable batteries
You can operate the diversity receiver either with batteries (AA, 1.5 V) or with the rechargeable Sennheiser BA 2015 battery.
▶ Press the two catches and open the battery compartment cover.
▶Insert the batteries or the rechargeable battery as shown below. Please observe correct polarity when inserting the batteries.


▷Close the battery compartment.
The cover locks into place with an audible click.
Battery status
Charge status of the batteries:

Charge status is critical (LOW BATT):

Connecting headphones to the EK 500 G4
ATTENTION

Danger due to high volume levels
Volume levels that are too high may damage your hearing.
Turn down the volume of the headphone output before you put on the headphone.
To connect the headphones to the receiver:
Insert the cable's 3.5 mm jack plug into the PHONES socket on the receiver as shown in the diagram.
▶Screw the plug's coupling ring onto the audio socket thread of the receiver if needed.

Attaching the diversity receiver to a camera
You can attach the diversity receiver on the hot shoe of the camera with the included CA 2 camera kit.
To attach the EK 500 G4 diversity receiver to a camera:
Determine where on the perforated plate you need to attach the hot shoe adapter so that the diversity receiver can be optimally attached to the camera.
Place a square nut under the perforated plate at this position.
▶Affix the hot shoe adapter to the perforated plate with the square nut.


▶Lift the belt clip.
▶ Press one side of the clip downward on the fixing hole and pull it out of the housing.
Do the same thing on the other side.

- Place the perforated plate on the rear side of the diversity receiver. - Reattach the clip.


▶Slide the receiver onto a camera.


Connecting the diversity receiver to a camera
To connect the diversity receiver to a camera:
▶Attach the line input of the camera to the jack socket of the receiver using one of the enclosed line connecting cables.


OR


Adjust the level of the AF Out audio output in the operating menu of the diversity receiver based on the input level of the camera (see "AF Out menu item").
The shielding of the line cable acts as an antenna for the second diversity branch. For details on the pin assignment, see "Pin assignment".
Installing the SKM 500 G4
These sections contain detailed information about installing and starting up the SKM 500 G4.
You can find information about operating the SKM 500 G4 under “Using the SKM 500 G4”.
Inserting and removing the batteries/rechargeable batteries
You can operate the wireless microphone either with batteries (AA, 1.5 V) or with the rechargeable Sennheiser BA 2015 battery.
Screw the rear part of the wireless microphone in the direction of the arrow (counter-clockwise) off of the handle of the wireless microphone.
When you remove the wireless microphone during operation, mute is automatically activated. MUTE appears in the display panel. When you screw the microphone back together, mute is deactivated.
▶Pull the rear part of the wireless microphone all the way out.
▶Open the cover of the battery compartment.
Place the batteries or the BA 2015 rechargeable battery in the battery compartment as shown on the cover. Please observe correct polarity when inserting the batteries/accupack.

▷Close the cover.
▶Push the battery compartment into the handle of the wireless microphone.
▶Screw the rear part of the wireless microphone back onto the handle.
Battery status
Charge status of the batteries:

Charge status is critical (LOW BATT):

Replacing the microphone module
You can find a list of the recommended microphone modules for the handheld transmitter under "Microphones and cables".
To change the microphone module:
▶Unscrew the microphone module.
▶Screw the desired microphone module on.

Do not touch the wireless microphone contacts or the microphone module contacts. If you touch the contacts, they may become dirty or bent.
When you unscrew the microphone module during operation, mute is automatically activated. MUTE appears in the display panel. When you screw the microphone module back on, mute is deactivated.
Changing the colored ring
To change the colored ring:
▶Pull the colored ring off as shown in the diagram.

▶Attached a colored ring in the color you want as shown in the diagram.

Installing the SK 500 G4
These sections contain detailed information about installing and starting up the SK 500 G4.
You can find information about operating the SK 500 G4 under “Using the SK 500 G4”.

Inserting and removing the batteries/rechargeable batteries
You can operate the bodypack transmitter either with batteries (AA, 1.5 V) or with the rechargeable Sennheiser BA 2015 battery.
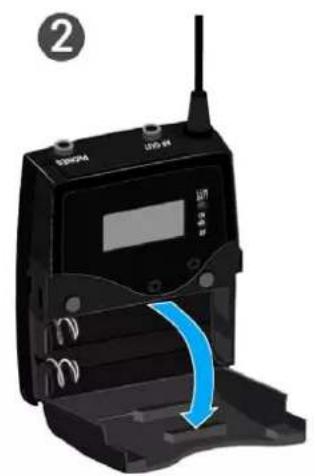
▶ Press the two catches and open the battery compartment cover.
▶Insert the batteries or the rechargeable battery as shown below. Please observe correct polarity when inserting the batteries.


▷Close the battery compartment.
The cover locks into place with an audible click.
Battery status
Charge status of the batteries:

Charge status is critical (LOW BATT):

Connecting a microphone to the SK 500 G4
You can find a list of recommended Lavalier and headset microphones for the bodypack transmitter under "Microphones and cables".
To connect a microphone to the bodypack transmitter:
Insert the cable's 3.5 mm jack plug into the MIC/LINE socket on the bodypack transmitter as shown in the diagram.
▶Screw the plug's coupling ring onto the audio socket thread of the bodypack transmitter.

Connecting an instrument or line source to the SK 500 G4
You can connect instruments or audio sources with a line level to the bodypack transmitter.
To do this, you will need the Ci 1-N (6.3 mm jack plug on a lockable 3.5 mm jack plug) or CL 2 (XLR-3F plug on lockable 3.5 mm jack plug) Sennheiser cables.
To connect an instrument or line source to bodypack transmitter:
Insert the cable's 3.5 mm jack plug into the MIC/LINE socket on the bodypack transmitter as shown in the diagram.
▶Screw the plug's coupling ring onto the audio socket thread of the bodypack transmitter.

Attaching the bodypack transmitter to clothing
You can use the belt clip to attach the bodypack transmitter to your waist-band or on a guitar strap.
The belt clip is detachable so that you can also attach the bodypack transmitter with the antenna pointing downwards. To do so, withdraw the belt clip from its fixing points and attach it the other way round.
The belt clip is secured so that it cannot slide out of its fixing points accidentally.

To detach the belt clip:
▷Lift the belt clip as shown in the diagram.
▶ Press one side of the clip downward on the fixing hole and pull it out of the transmitter housing.
Do the same thing on the other side.

Installing the SKP 500 G4
These sections contain detailed information about installing and starting up the SKP 500 G4.
You can find information about operating the SKP 500 G4 under "Using the SKP 500 G4".
Inserting and removing the batteries/rechargeable batteries
You can operate the plug-on transmitter either with batteries (AA, 1.5 V) or with the rechargeable Sennheiser BA 2015 battery.
▶ Slide the battery compartment cover in the direction of the embossed arrow and open the cover.
Insert the batteries or the accupack as shown below. Please observe correct polarity when inserting the batteries/accupack.

▷Close the battery compartment.
The cover locks into place with an audible click.
Battery status
Charge status of the batteries:

Charge status is critical (LOW BATT):

Attaching the plug-on transmitter to the microphone
i Microphones with a metal casing should be used for optimal signal transmission.
- Loosen the locking ring (2) by rotating it in the clockwise direction past the center point.
This unlocks the XLR-3 plug (1) of the plug-on transmitter.
Connect the plug-on transmitter's XLR-3 plug (1) to the XLR-3 socket of the microphone.
▶ Tighten the locking ring (2) by rotating it counter-clockwise in the direction of the arrow.

OPERATION
Using ew 500 P G4 series devices
You can find information about using ew 500 P G4 series devices in the following sections.

EK 500 G4
- EK 500 G4 diversity receiver >> "Using the EK 500 G4"

SKM 500 G4
- SKM 500 G4 handheld transmitter >> "Using the SKM 500 G4"

SK 500 G4
- SK 500 G4 bodypack transmitter >> "Using the SK 500 G4"

SKP 500 G4
- SKP 500 G4 plug-on transmitter >> "Using the SKP 500 G4"
You can find information about installing the products under "Installing ew 500 P G4 series devices".
In the sections below, you can find important information about specific use cases.

- Establishing a radio link between the transmitter and receiver >> "Establishing a radio link"

- Synchronizing the receiver settings to the transmitter >> "Synchronizing devices"

- Using the menu of the diversity receiver >> "Displays on the EK 500 G4 display panel"

- Using the menu of the handheld transmitter >> "Displays on the SKM 500 G4 handheld transmitter display panel"

- Using the menu of the bodypack transmitter >> "Displays on the SK 500 G4 bodypack transmitter display panel"

- Using the menu of the plug-on transmitter >> "Displays on the SKP 500 G4 plug-on transmitter display panel"
Using the EK 500 G4
These sections contain detailed information about using the EK 500 G4.
You can find information about installing the EK 500 under "Using the EK 500 G4".
Operating elements of the EK 500 G4 diversity receiver

1Display panel
• See "Displays on the EK 500 G4 display panel"
2Operation and battery indicator, red LED
- illuminated = ON
See "Switching the EK 500 G4 on and off"
- flashing = LOW BATTERY
See "Inserting and removing the batteries/rechargeable batteries"
3 Wireless reception indicator, green LED
- illuminated = RF
4UP button
- See "Buttons for navigating through the menu"
5SET button
- See "Buttons for navigating through the menu"
6DOWN button
- See "Buttons for navigating through the menu"
7 ON/OFF button with ESC function in the operating menu
- Switch the transmitter on or off See "Switching the EK 500 G4 on and off"
- Escape function in the menu See "Buttons for navigating through the menu"
8Infra-red interface
• See "Synchronizing devices"
93.5 mm jack socket PHONES
- See "Connecting headphones to the EK 500 G4"
• See "Volume control of the PHONES socket"
103.5 mm jack socket AF OUT
- lockable See "Connecting the diversity receiver to a camera"
Switching the EK 500 G4 on and off
▶ Press the two catches and open the battery compartment cover.
To switch the receiver on:
Hold down the ON/OFF button until the Sennheiser logo appears on the display.


To switch the receiver off:
Hold down the ON/OFF button until the display goes off.
Volume control of the PHONES socket
To adjust the volume of the connected headphone:
▶ Press the UP or DOWN buttons.

Lock-off function
You can set the automatic lock-off function in the Auto lock menu (see "Auto Lock menu item").
When you have switched on the lock-off function, you will have to turn the transmitter off and on again in order to operate it.
To temporarily deactivate the lock-off function:
▷Press the SET button.
Locked appears in the display panel.
▶ Press the UP or DOWN button.
Unlock? appears in the display panel.
▷Press the SET button.
Lock-off function is now temporarily deactivated.

When you are in the operating menu
Lock-off function is deactivated long enough for you to work in the operating menu.
When one of the standard displays is shown
Lock-off function is automatically activated after 10 seconds.
The lock-off function icon flashes while lock-off function is being activated again.
Displays on the EK 500 G4 display panel
Status information such as reception quality, battery status, audio level, etc. is displayed on the home screen of the display panel. See “Home screen”.
The display panel also displays the operating menu which you can use to configure all of the settings. See “Setting options in the menu”.
Buttons for navigating through the menu
To navigate through the EK 500 G4 operating menu, you need the following buttons.

ON/OFF

Press the ON/OFF button
- ESC function: Cancels the entry and returns to the current standard display
- Selects a standard display (see "Home screen")
SET

Press the SET button
- Changes from the current standard display to the operating menu
- Calls up a menu item
- Changes to a submenu
- Stores the settings and returns to the operating menu

Press the UP or DOWN button
- Changes to the previous or next menu item
- Changes the setting of a menu item
Home screen
After you switch on the receiver, the display panel initially displays the Sennheiser logo. After a short time, the home screen is then displayed.
The home screen has two different standard displays.
▶ Short-press the ON/OFF button to switch between the standard displays.
Frequency/Name standard display

1RF level (radio frequency)
- RF signal level display
- including the display of the squelch threshold (see "Squelch menu item")
2AF audio level (audio frequency)
- Displays the audio level of the received transmitter
When the display shows full deflection, the audio input level is excessively high.
• See "AF Out menu item"
3Frequency
• Current receiving frequency
• See "Frequency Preset menu item"
4Name
• Freely selectable name of the receiver
• See "Name menu item"
5Lock-off function
- Lock-off function is activated on the receiver
- See "Lock-off function"
6Battery status of the receiver
- See "Inserting and removing the batteries/rechargeable batteries"
7MUTE muting function
- No RF signal received
8P pilot tone
- P = Activated pilot tone evaluation
- No symbol = Evaluation is deactivated
- P is black = Pilot tone is being received on the current frequency
- See "Advanced -> Pilot Tone menu item"
Frequency Bank/Channel/Name standard display
The Frequency Bank/Channel/Name standard display shows the level of the line output AF Out instead of the MUTE muting function.

Setting options in the menu
In the EK 500 G4 menu, you can configure the following settings.
Synchronizing the transmitter with the diversity receiver
▶See "Sync menu item"
Adjusting the volume of the headphone socket
▶See "Phones Volume menu item"
Adjusting the squelch threshold
▶See "Squelch menu item"
Scanning for unused frequency presets, releases and selects frequency presets
▷See "Easy Setup menu item"
Setting the frequency bank and the channel
▶See "Frequency Preset menu item"
Entering a freely selectable name
▶See "Name menu item"
Adjusting the audio output level
▶See "AF Out menu item"
Activate/deactivate the automatic lock-off function
▷See "Auto Lock menu item"
Configuring enhanced settings in the Advanced Menu:
- Adjusting the receiving frequencies for the U frequency bank
- Activating/deactivating the parameters to be transferred to the transmitters
- Activating/deactivating the pilot tone evaluation
- Adjusting the contrast of the display panel
- Resetting the receiver
- Displaying the current software revision ▶ See “Advanced menu item”
Menu structure
The figure shows the complete EK 500 G4 menu structure in an overview.
![graph TD A["Menu"] --> B["Sync\nPhones Volume\nSquelch\nEasy Setup\nFrequency Preset Name\nAF Out"] A --> C["Auto Lock\nAdvanced\nExit"] B --> D["Easy Setup"] C --> E["Advanced Menu"] D --> F["Reset List\nCurrent List\nScan New List\nExit"] E --> G["Tune\nSync Settings\nPilot Tone\nLCD Contrast\nRes…](/content/2026/08/1624843/images/fde572de210f9590e77a7f9f51b8f2e88ed735b85bfc4b797ab19ac4177029b9.jpg)
Sync menu item
In the Sync menu item you can synchronize ew 500 P G4 series transmitters and receivers.
For more information, see "Synchronizing devices".
Phones Volume menu item
In the Phones Volume menu item you can adjust the volume for the headphone output.
Setting range: 1 to 5
You can also adjust the headphone volume in the standard display with the UP and DOWN buttons. See "Volume control of the PHONES socket".
Squelch menu item
You can adjust the squelch threshold in the Squelch menu item.
Setting range:
- Low >> 5 dBμV
- Middle >> 15 dBμV
- High >> 25 dBμV
The squelch threshold is displayed on the home screen in the RF signal level area.
![graph LR A["Input Signal"] --> B["High"] A --> C["Middle"] A --> D["Low"] B --> E["RF"] C --> E D --> E E --> F["Output Radio"] style A fill:#f9f,stroke:#333 style B fill:#ccc,stroke:#333 style C fill:#ccc,stroke:#333 style D fill:#ccc,stroke:#333 style E fill:#666,stroke:#333 style F fill:#999,stro…](/content/2026/08/1624843/images/a464c10c4a6e444e274f26d8079b56473038039044b59cf8a2590ac735310b39.jpg)
To open the Squelch menu item:
On the home screen, press the SET button to open the operating menu.
▶ Press the UP or DOWN button until the Squelch menu item appears in the selection frame.
▶ Press the SET button to open the menu item.
▶Adjust the settings as desired.
![graph LR A["Menu\nSquelch\nLow"] --> B["Squelch\nLow"] B --> C["Squelch\nHigh"] C --> D["Stored"] D --> A style A fill:#f9f,stroke:#333 style B fill:#ccf,stroke:#333 style C fill:#cfc,stroke:#333 style D fill:#fcc,stroke:#333](/content/2026/08/1624843/images/b9fb0dbf7f61cda8ee8905a0963d8fe53f6a7fea46d4d5d2f044e222c32d7e8c.jpg)
▶ Press the SET button to save the changes you made to the settings. or
▶ Press the ON/OFF button to cancel the entry without saving the settings.
CAUTION
Risk of hearing and material damage
If you set the squelch threshold to a very low value, a very loud hissing noise can occur in the receiver. This hissing noise can be loud enough to cause hearing damage or overload your system's loudspeakers.
Before adjusting the squelch threshold, set the volume of the audio output to the minimum.
▶Never change the squelch threshold during a live transmission.
Easy Setup menu item
You can scan for unused frequencies using the Easy Setup menu item.

Switch off all transmitters before you perform the scan. If transmitters are still switched on, they are detected as unavailable frequencies and the frequencies that are actually available cannot then be
used.
To open the Easy Setup menu item:
On the home screen, press the SET button to open the operating menu.
▶ Press the UP or DOWN button until the Easy Setup menu item appears in the selection frame.
▷ Press the SET button to open the menu item.
▶Adjust the settings as desired.
- Scan New List: Automatically searches for unused receiving frequencies (frequency preset scan):
![graph LR A["Easy Setup\nScan New List"] --> B["Scan New List\n734 ... 776 MHz\n|\n......|"] B --> C["Easy Setup\nBank 12\nFree: 12"] C --> D["Easy Setup\nB.Ch: 12.1\nSync 746.450 MHz"] D --> E["..."] E --> F["Stored"] F --> A](/content/2026/08/1624843/images/a583622d64b69fbb2ccde7a1a388a48c92d5ce60d1e672991c54e3a5aefffe69.jpg)
- Current List: Selects an unused frequency preset:
![graph LR A["Easy Setup\nCurrent List"] -->|SET| B["Easy Setup\nBank 12\nFree: 12"] B -->|SET| C["Easy Setup\nB.Ch: 12.1\nSync 746.450 MHz"] C -->|SET| D["..."] D --> E["„Stored”"]](/content/2026/08/1624843/images/9a57d2bbb1ce8a0514cb988bcb68b274501e5024e9902e5263ef9622624ed08e.jpg)
- Reset List: Releases all occupied frequency presets and selects an unused frequency preset:
![graph TD A["Menu\nEasy Setup"] --> B["SET"] B --> C["Easy Setup\nReset List"] C --> D["Stored"] D --> A](/content/2026/08/1624843/images/85368dd611f06e039ecbe52c2215e3773c0eb739afa6a84c423c2d524fa2aee9.jpg)
▶ Press the SET button to save the changes you made to the settings. or
▶ Press the ON/OFF button to cancel the entry without saving the settings.
Frequency Preset menu item
In the Frequency Preset menu item, you can adjust the receiving frequency of the receiver by adjusting the frequency bank and the channel.
To open the Frequency Preset menu item:
On the home screen, press the SET button to open the operating menu.
▶ Press the UP or DOWN button until the Frequency Preset menu item appears in the selection frame.
▶ Press the SET button to open the menu item.
▶Adjust the settings as desired.
![graph TD A["Menu\nFrequency Preset\nInactive"] --> B["Frequency Preset\nB.Ch: 8.1\n734.375 MHz"] B --> C["Frequency Preset\nB.Ch: 1.2\n734.875 MHz"] C --> D["Stored"] D --> A style A fill:#f9f,stroke:#333 style B fill:#ccf,stroke:#333 style C fill:#cfc,stroke:#333 style D fill:#fcc,stroke:#333](/content/2026/08/1624843/images/4821b63e0d80f59bb3b451ddef3d995b3d3be136283417b9897e19af80ab0681.jpg)
▶ Press the SET button to save the changes you made to the settings. or
▶ Press the ON/OFF button to cancel the entry without saving the settings.
Name menu item
In the Name menu item you can enter a name for the radio link.
To open the Name menu item:
On the home screen, press the SET button to open the operating menu.
▶ Press the UP or DOWN button until the Name menu item appears in the selection frame.
▷ Press the SET button to open the menu item.
▶Adjust the settings as desired.
![graph TD A["Menu\nName\nLichael"] --> B["SET"] B --> C["Name\nLichael"] C --> D["SET"] D --> E["Name\nMichael"] E --> F["SET"] F --> G["Stored"] G --> H["←"] H --> I["→"]](/content/2026/08/1624843/images/93a59afeea5aabe5e40ccf95df45a1fb13bbe373f7bb39482e62020480dad13c.jpg)
▶ Press the SET button to save the changes you made to the settings. or
▶ Press the ON/OFF button to cancel the entry without saving the settings.
AF Out menu item
In the AF Out menu item you can adjust the level of the line audio output based on the level of the connected camera.
Setting range:
- -24 dB to +18 dB in 6 dB steps
To open the AF Out menu item:
On the home screen, press the SET button to open the operating menu.
▶ Press the UP or DOWN button until the AF Out menu item appears in the selection frame.
▷ Press the SET button to open the menu item.
▶Adjust the settings as desired.
![graph LR A["Menu\nAF Out\n+18 dB"] --> B["SET"] B --> C["AF Out\n+18 dB"] C --> D["▼▲"] D --> E["AF Out\n+15 dB"] E --> F["SET"] G["Stored"] --> A](/content/2026/08/1624843/images/843d3b0e2b87e1e7f25a432fba2e127544f0a6dce04497f27a31ddcfa6545a8f.jpg)
▶ Press the SET button to save the changes you made to the settings. or
▶ Press the ON/OFF button to cancel the entry without saving the settings.
Auto Lock menu item
In the Auto Lock menu item you can activate or deactivate the auto lock-off function.
You can find information about temporarily deactivating the lock-off function during operation under "Lock-off function".
To open the Auto Lock menu item:
On the home screen, press the SET button to open the operating menu.
▶ Press the UP or DOWN button until the Auto Lock menu item appears in the selection frame.
▶ Press the SET button to open the menu item.
▶Adjust the settings as desired.
![graph LR A["Menu\nAuto Lock\nInactive"] --> B["SET"] B --> C["Auto Lock\nInactive"] C --> D["▼▲"] D --> E["Auto Lock\nActive"] E --> F["SET"] F --> G["Stored"] G --> A](/content/2026/08/1624843/images/a9f8cf2a76067ff28b3b866ae6d57f92ffb0ca1e99d67a021a5660d81f6a41f0.jpg)
▶ Press the SET button to save the changes you made to the settings. or
▶ Press the ON/OFF button to cancel the entry without saving the settings.
Advanced menu item
In the Advanced submenu you can configure enhanced settings.
To open the Advanced submenu:
On the home screen, press the SET button to open the operating menu.
▶ Press the UP or DOWN button until the Advanced menu item appears in the selection frame.
▷ Press the SET button to open the menu item.
The following sub-items are available:
Adjusting the receiving frequency for the frequency bank U
▶See "Advanced -> Tune menu item"
Activating/deactivating the parameters to be transferred to the transmitters
▷See "Advanced -> Sync Settings menu item"
Activating/deactivating the pilot tone evaluation
▷See "Advanced -> Pilot Tone menu item"
Adjusting the contrast of the display panel
▷See "Advanced -> LCD Contrast menu item"
Resetting the receiver
▶See "Advanced -> Reset menu item"
Displaying the current software revision
▶See "Advanced -> Software Revision menu item"
Advanced -> Tune menu item
In the Tune menu item of the Advanced submenu, you can configure the receiving frequencies for the U frequency bank.
Only adjusting the frequency
▶ Open the Tune menu item in the Advanced menu.
Adjust the settings.
![graph LR A["Advanced Menu\nTune\n746.450 MHz"] --> B["Tune\n746.450 MHz\nB.Ch: U.1"] B --> C["Tune\n746.450 MHz\nB.Ch: U.1"] C --> D["Stored"] style A fill:#f9f,stroke:#333 style B fill:#ccf,stroke:#333 style C fill:#cfc,stroke:#333 style D fill:#fcc,stroke:#333](/content/2026/08/1624843/images/ce8ab3aa447a63989a6a0c5db5ff622af5ec5f60799a8b37c1acef9d937a63cf.jpg)
Setting the channel and frequency
▶ Select the menu item and call it up by holding down the SET button until the channel selection appears.
![graph LR A["Advanced Menu\nTune\n746.450 MHz"] --> B["Tune\n746.450 MHz\nB.Ch: U.1"] B --> C["Tune\n746.450 MHz\nB.Ch: U.1"] C --> D["Tune\n746.450 MHz\nB.Ch: U.1"] D --> E["..."] style A fill:#f9f,stroke:#333 style B fill:#ccf,stroke:#333 style C fill:#ccf,stroke:#333 style D fill:#ccf,stroke:#333…](/content/2026/08/1624843/images/9cff919205a0580fe11dedf716a333a3e23aa17ac1d00a8ac7131eb18a7e54a4.jpg)
Advanced -> Sync Settings menu item
In the Sync Settings menu item of the Advanced submenu, you can configure the parameters to be sent to the transmitters and activate or deactivate transmission. The parameters are defined separately for the SK, SKM and SKP.
You can activate/deactivate the following parameters:
- Sensitivity
• Auto Lock - M u t e M o d e
• R F P o w e r
• Phantom Power 48 V (only SKP 500 G4)
To configure a parameter and activate or deactivate transmission:
- Go to the parameter in question in the Advanced -> Sync Settings menu.
▶ Press the SET button to open the sub-item.
▶ Press the UP and DOWN buttons to set the value.
▷ Press the SET button to save the setting.
▶ Press the UP and DOWN buttons to activate or deactivate the check box.
![graph LR A["Advanced Menu Sync Settings"] --> B["Sync Settings SKP Settings"] B --> C["SKP Settings Mute Mode RF On/Off"] C --> D["Mute Mode RF On/Off Sync □"] D --> E["Mute Mode RF On/Off Sync ✓"] E --> F["Stored"] F --> A style A fill:#f9f,stroke:#333 style B fill:#ccf,stroke:#333 style C fill:#cf…](/content/2026/08/1624843/images/45b9b37b06aa259681542564f9e3ef4bdac20f27efb47fb7032b41aed3c2c7b3.jpg)
When the check box is activated, the value will be transmitted during synchronization. If it is deactivated, the value will not be transmitted.
▶ Press the SET button to save the setting.
Advanced -> Pilot Tone menu item
In the Pilot Tone menu item of the Advanced submenu, you can activate and deactivate the pilot tone evaluation.
![graph LR A["Advanced Menu\nPilot Tone\nInactive"] --> B["Pilot Tone\nInactive"] B --> C["Pilot Tone\nActive"] C --> D["Stored"] D --> A style A fill:#f9f,stroke:#333 style B fill:#ccf,stroke:#333 style C fill:#cfc,stroke:#333 style D fill:#fcc,stroke:#333](/content/2026/08/1624843/images/5cb64deae9b31a879b6d273a0344eabd3e9b87d725928ac28593b411f0c634ba.jpg)
The pilot tone has an inaudible frequency that is sent from the transmitter and evaluated by the receiver. It supports the receiver's squelch function.
Advanced -> LCD Contrast menu item
In the LCD Contrast menu item of the Advanced submenu, you can adjust the display contrast of the display panel in 16 steps.
![graph TD A["Advanced Menu\nLCD Contrast\n7"] --> B["LCD Contrast\n7"] B --> C["LCD Contrast\n10"] C --> D["Stored"] D --> A style A fill:#f9f,stroke:#333 style B fill:#ccf,stroke:#333 style C fill:#cfc,stroke:#333 style D fill:#fcc,stroke:#333](/content/2026/08/1624843/images/22e1d3a971761d07b56bdc3d3dde2ae94f6a1b0f1f92d204ce1f420e50ad399a.jpg)
Advanced -> Reset menu item
In the Reset menu item of the Advanced submenu, you can reset the settings of the receiver.
When you reset the diversity receiver, only the selected settings of the pilot tone and the U frequency bank are retained.
![graph TD A["Advanced Menu Reset"] --> B{SET} B --> C["Reset"] C --> D{Yes} D --> E["Set"] C --> F["Stored"] F --> G["←"]](/content/2026/08/1624843/images/93d0b696d6d53e7ad15a19eeed760c9109f453c96526c9e48d69730ee8cde414.jpg)
Advanced -> Software Revision menu item
In the Software Revision menu item of the Advanced submenu, you can display the current software version of the receiver.
Using the SKM 500 G4
These sections contain detailed information about using the SKM 500 G4. You can find information on installation and startup of the SKM 500 G4 under “Installing the SKM 500 G4”.
Operating elements of the SKM 500 G4 handheld transmitter

1 Display panel
- See "Displays on the SKM 500 G4 handheld transmitter display panel"
2Infra-red interface
• See "Synchronizing devices"
3 DOWN, UP and SET multi-function switch
• See "Buttons for navigating the SKM 500 G4 menu"
4 ON/OFF button with ESC function in the operating menu
- Switch the transmitter on or off See "Switching the SKM 500 G4 handheld transmitter on and off"
- Escape function in the menu See "Buttons for navigating the SKM 500 G4 menu"
- Deactivating the RF signal See "Deactivating the RF signal (RF mute)"
5Colored ring
• Available in different colors (see “Additional accessories” and “Changing the colored ring”)
- Can be turned to protect the multi-function switch
6Operation and battery indicator, red LED
- illuminated = ON See "Switching the SKM 500 G4 handheld transmitter on and off"
- flashing = LOW BATTERY See "Inserting and removing the batteries/rechargeable batteries"
Switching the SKM 500 G4 handheld transmitter on and off
To switch on the SKM 500 G4:
Hold down the ON/OFF button until the Sennheiser logo appears on the display.

To switch off the SKM 500 G4:
Hold down the ON/OFF button until the display goes off.
Muting the handheld transmitter (AF mute)
The audio signal of the transmitter cannot be muted.
However, when you deactivate the RF signal no AF signal is output. See "Deactivating the RF signal (RF mute)".
Deactivating the RF signal (RF mute)
You can deactivate the RF signal with the ON/OFF button.
To deactivate the RF signal:
▷ Press the ON/OFF button.
RF Mute On? appears.
▷Press the SET button.
The transmission frequency is displayed, however the wireless microphone is not transmitting an RF signal. The transmission icon is not lit (see "Displays on the SKM 500 G4 handheld transmitter display panel").
To activate the RF signal:
▶ Press the ON/OFF button.
RF Mute Off? appears.
▷Press the SET button.
The transmission icon appears again (see "Displays on the SKM 500 G4 handheld transmitter display panel").
![graph TD A["short"] --> B["Device with fan icon"] B --> C{RF Mute On?} B --> D{RF Mute Off?} C --> E["SET"] D --> E style A fill:#f9f,stroke:#333 style B fill:#ccf,stroke:#333 style C fill:#dfd,stroke:#333 style D fill:#dfd,stroke:#333 style E fill:#dfd,stroke:#333](/content/2026/08/1624843/images/4a23c63b588f203328100f4d8f03a18d2169f6a17b4294cc15114154fe1d5f77.jpg)
Lock-off function
You can set the automatic lock-off function in the Auto lock menu (see "Auto Lock menu item").
When you have switched on the lock-off function, you will have to turn the transmitter off and on again in order to operate it.
To temporarily deactivate the lock-off function:
▷Press the SET button.
Locked appears in the display panel.
▶ Press the UP or DOWN button.
Unlock? appears in the display panel.
▷Press the SET button.
Lock-off function is now temporarily deactivated.
![graph TD A["SET"] --> B["Locked"] B --> C["Unlock?"] style A fill:#f9f,stroke:#333 style B fill:#ccf,stroke:#333 style C fill:#cfc,stroke:#333](/content/2026/08/1624843/images/10bd459d3626c0a89304bbaacaf1edd0a37942c58a78a87071eaed54fa133c96.jpg)
Displays on the SKM 500 G4 handheld transmitter display panel
You can view the following information on the transmitter display.

1AF audio level
- Displays the audio level with peak hold function
• See "Sensitivity menu item"
2Frequency
- Configured transmission frequency
• See "Frequency Preset menu item"
3Name
• Freely selectable name of the receiver
• See "Name menu item"
4Transmission icon
• RF signal is being transmitted
- See "Deactivating the RF signal (RF mute)"
5Lock-off function
- Lock-off function is activated
• See "Auto Lock menu item"
6Battery status
- See "Battery status"
7MUTE muting function
• The audio signal is muted
- See "Muting the handheld transmitter (AF mute)"
8P pilot tone
- Pilot tone transmission is activated
- See "Advanced > Pilot Tone menu item"
"Buttons for navigating the SKM 500 G4 menu"
"Setting options in the menu"
Select a standard display
▶ Move the multi-function switch to select a standard display:
Frequency/Name standard display

Channel/Frequency standard display

Name/Channel standard display

Buttons for navigating the SKM 500 G4 menu
Navigating through the menu
To open the menu:
▷Press the SET button.
The operating menu is shown on the transmitter display panel.
To open a menu item:
▶ Press the UP or DOWN buttons to navigate through the individual menu items.
▶ Press the SET button to open the selected menu item.
i "Operating elements of the SKM 500 G4 handheld transmitter"
Making changes in a menu item
After you open a menu item, you can make changes as follows:
▶ Press the UP or DOWN buttons to set the displayed value.
▶ Press the SET button to save the setting.
▶ Press the ESC (ON/OFF) button to leave the menu item without saving the setting.
i "Operating elements of the SKM 500 G4 handheld transmitter"
"Displays on the SKM 500 G4 handheld transmitter display panel"
"Setting options in the menu"
Setting options in the menu
In the SKM 500 G4 menu, you can configure the following settings.
Adjusting the input sensitivity
▷See "Sensitivity menu item"
Setting the frequency bank and the channel
▶See "Frequency Preset menu item"
Entering a freely selectable name
▶See "Name menu item"
Activating/deactivating the automatic lock-off function
▷See "Auto Lock menu item"
Configuring enhanced settings in the Advanced Menu:
- Adjusting the transmission frequencies for the U frequency bank
- Configuring the transmission power
- Activating/deactivating the pilot tone evaluation
- Adjusting the contrast of the display panel
- Resetting the transmitter
- Displaying the current software revision
▷See "Advanced menu item"
Sensitivity menu item
- Adjusting the input sensitivity – AF audio level
Setting range: 0 dB to -48 dB in 6 dB steps
The AF audio level is also displayed when the wireless microphone is muted, e.g. to check the sensitivity before a live broadcast.
![graph LR A["Menu Sensitivity -12 dB"] --> B["Sensitivity - 12 dB"] B --> C["Sensitivity -36 dB"] C --> D["„Stored”"] D --> A](/content/2026/08/1624843/images/2130bc1f9e4c24458b8f016b914ee5d1fa3ce565b2907fd44c5a9c04903d05be.jpg)
Recommended presets:
• Loud music/vocals: -48 to -18 dB
• Moderation: -18 to -12 dB
• Interviews: -12 to 0 dB
Frequency Preset menu item
- Manually selecting a frequency bank and channel
![graph LR A["Menu\nFrequency Preset\nB.Ch: 1.1"] --> B["Frequency Preset\nB.Ch: 1.1\n516.200 MHz"] B --> C["Frequency Preset\nB.Ch: 20.1\n533.875 MHz"] C --> D["Stored"] D --> A](/content/2026/08/1624843/images/91467310f63700f11ef83f44944ab0d1a71ee5304865695aef4812209c1e9e35.jpg)
i While you work in the Frequency Preset menu, the RF signal is deactivated.
Please note when creating multi-channel systems:
Only the factory-preset frequencies within one frequency bank are inter-modulation-free. The wireless microphone and receiver must be set to the same frequency. Be sure to note the information on frequency selection under "Establishing a radio link".
Name menu item
- Entering names
![graph TD A["Menu\nName\nLichael"] --> B["Name\nLichael"] B --> C["Name\nMichael"] C --> D["Stored"] D --> A](/content/2026/08/1624843/images/8efaebc229b079297a8d9b93da48cacd996fabca9a54f1da3a7a1e5e991040b9.jpg)
In the Name menu item you can enter any name you want for the wireless microphone (e.g. the names of the musicians).
The name can be shown in the Frequency/Name and Name/Channel standard displays.
The names are a maximum of 8 characters:
• All letters except umlauts.
- Numbers from 0 to 9
• Special characters and spaces
Enter the names as follows:
▶Move the multi-function switch to select a character.
▶Press the multi-function switch to jump to the next space or to save the name you have entered once it is complete.
Auto Lock menu item
- Switching the automatic lock-off function on and off
![graph LR A["Menu\nAuto Lock\nActive"] --> B["Auto Lock\nActive"] B --> C["Auto Lock\nInactive"] C --> D["Stored"] D --> A](/content/2026/08/1624843/images/c0e00d3f5e3c1f520b8b4d122217655f581e532868cf75f57e6d9315b4165c7c.jpg)
This lock prevents the wireless microphone from being unintentionally switched off and also prevents any unintentional changes to the transmitter's configuration. In the current standard display, the lock icon shows whether the lock-off function is currently switched on.
You can find information about using the lock-off function under "Lock-off function".
Advanced menu item
In the Advanced submenu you can configure enhanced settings.
The following sub-items are available:
Adjusting the transmission frequencies for the U frequency bank
▷See "Advanced > Tune menu item"
Configuring the transmission power
▷See "Advanced > RF Power menu item"
Activating/deactivating the pilot tone evaluation
▶See "Advanced > Pilot Tone menu item"
Adjusting the contrast of the display panel
▶See "Advanced > LCD Contrast menu item"
Resetting the transmitter
▷See "Advanced > Reset menu item"
Displaying the current software revision
▶See “Advanced > Software Revision menu item”
Advanced > Tune menu item
- Configuring the transmission frequency and frequency bank U
When you have configured the wireless microphone to a system bank and you call up the Tune menu item, channel 1 of the frequency bank U is automatically set. The message U.1 briefly appears in the display. In the factory settings, the channels of the frequency bank U are not assigned to any transmission frequency.
While you work in the Tune menu, the RF signal is deactivated.
You can configure a transmission frequency for the current channel or select a channel in the frequency bank U and configure a transmission frequency for this channel in the Tune menu. Be sure to note the information on frequency selection, see "Setting notes".
Only adjusting the frequency
To configure the transmission frequency for the current channel:
▶ Move the multi-function switch until the Tune menu item appears.
▷Press the multi-function switch.
The frequency selection appears.
![graph LR A["Advanced Menu\nTune\n553.875 MHz"] --> B["Tune\n553.875 MHz\nB.Ch: U.1"] B --> C["Tune\n534.875 MHz\nB.Ch: U.1"] C --> D["Stored"] D --> A](/content/2026/08/1624843/images/b8724bbbf57578476089f3ebbc2316360095e2bed9ed05697b2500e2fb5753fe.jpg)
▷Configure the desired frequency.
▷Press the multi-function switch.
Your settings will be saved. You are now back in the operating menu.
Setting the channel and frequency
To select a channel and assign it a frequency:
▶Move the multi-function switch until the Tune menu item appears.
Hold down the multi-function switch until the frequency bank selection appears.
![graph LR A["Advanced Menu\nTune\n543.200 MHz"] --> B["Tune\n543.200 MHz\nB.Ch: U.1"] B --> C["Tune\n543.200 MHz\nB.Ch: U.1"] D["Stored"] --> A](/content/2026/08/1624843/images/bf9519f0a90af3ba791e6ba327ba5380bd05c344a8086ae554320d0c00603436.jpg)
▷Set the desired channel.
▷Press the multi-function switch.
The frequency selection appears.
▶Configure the frequency.
Advanced > RF Power menu item
- Configuring the transmission power
![graph LR A["Advanced Menu\nRF Power\nY Low"] --> B["RF Power\nY Low"] B --> C["RF Power\nY Standard"] C --> D["Stored"] D --> A](/content/2026/08/1624843/images/ffc7823a1fab9c4c33fec491d3b199ecd1637c0b4c25ba4e0e3ee5df8c0bb244.jpg)
You can configure the transmission power in three steps in the RF Power menu item. Please note the information at the following address:
General conditions and restrictions for the use of frequencies
Setting range:
Low: 10 mW
Standard: 30 mW
High: 50 mW
Advanced > Pilot Tone menu item
- Activating/deactivating pilot tone transmission
![graph LR A["Advanced Menu\nPilot Tone\nActive"] --> B["Pilot Tone\nActive"] B --> C["Pilot Tone\nInactive"] C --> D["..."] style A fill:#000,stroke:#fff,color:#fff style B fill:#000,stroke:#fff,color:#fff style C fill:#000,stroke:#fff,color:#fff style D fill:#000,stroke:#fff,color:#fff note right of…](/content/2026/08/1624843/images/246b1f1e3681b7ab1ef496e48e0b9e9eeb8cebc20f3f1b7605d081c8a86bf49e.jpg)
The pilot tone has an inaudible frequency that is sent from the transmitter and evaluated by the receiver. It supports the receiver's squelch function.
Advanced > LCD Contrast menu item
- Adjusting the contrast of the display panel
You can configure the contrast of the display in 16 steps.
Advanced > Reset menu item
- Resetting the wireless microphone
![graph TD A["Advanced Menu\nReset\nActive"] --> B["Reset\nYes"] B --> C["Stored"] C --> A](/content/2026/08/1624843/images/554b45432791b2a856cc3705b26e22f4ce2bcb0a8fbbead1777fc461f39b0f28.jpg)
When you reset the wireless microphone, only the selected settings of the pilot tone and the U1 to U6 frequency banks are retained.
Advanced > Software Revision menu item
• Show software revision
You can display the current software revision.
Using the SK 500 G4
These sections contain detailed information about using the SK 500 G4.
You can find information on installation and startup of the SK 500 G4 under "Installing the SK 500 G4".
Operating elements of the SK 500 G4 bodypack transmitter
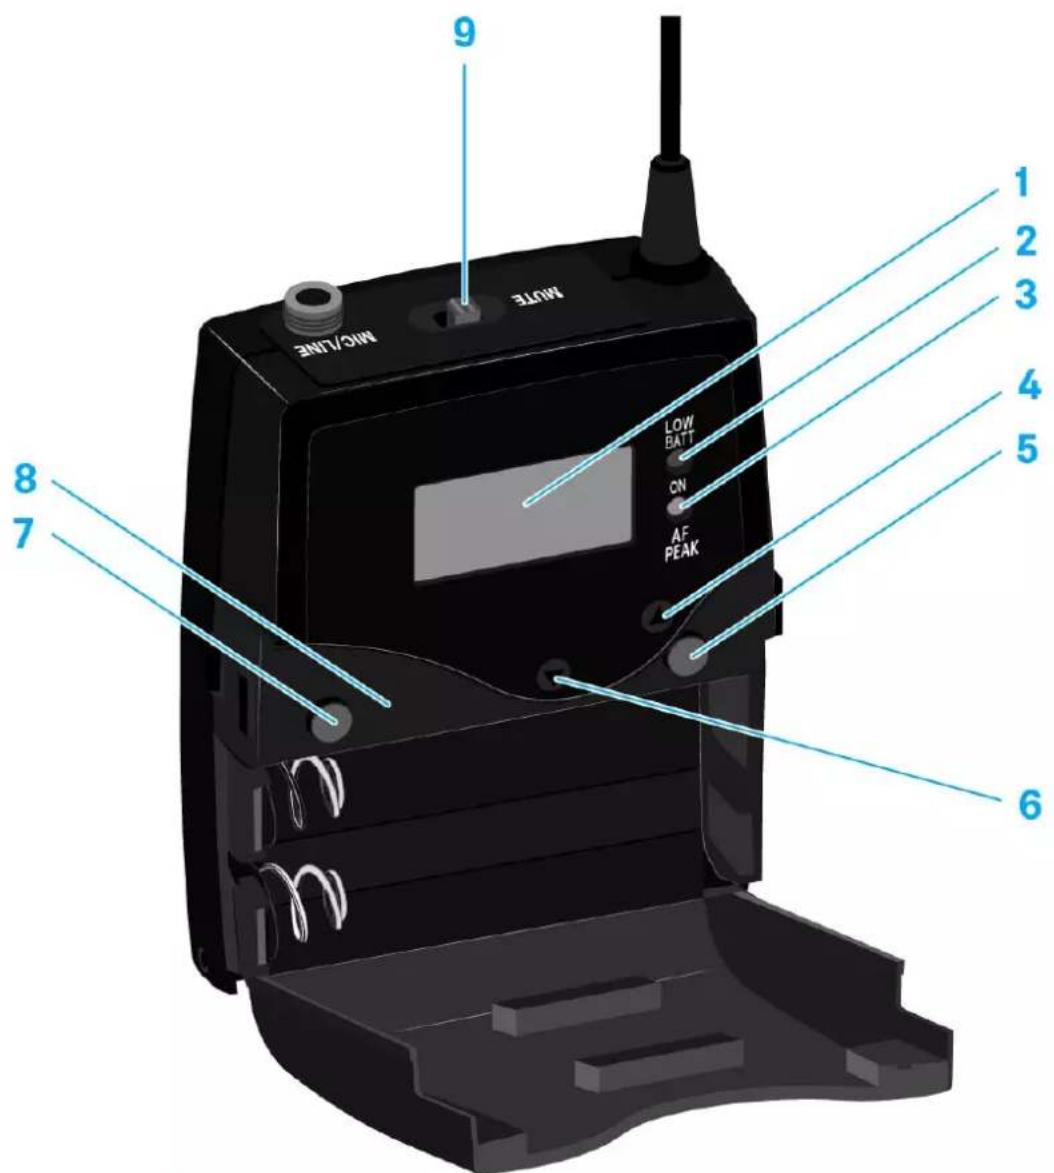
1 Display panel
- See "Displays on the SK 500 G4 bodypack transmitter display panel"
2Operation and battery indicator, red LED
- illuminated = ON See "Switching the SK 500 G4 bodypack transmitter on and off"
- flashing = LOW BATTERY See "Inserting and removing the batteries/rechargeable batteries"
3Audio overload indicator, yellow LED
- illuminated = AF PEAK (overload) See "Sensitivity menu item"
4UP button
• See "Buttons for navigating the SK 500 G4 menu"
5SET button
• See "Buttons for navigating the SK 500 G4 menu"
6DOWN button
- See "Buttons for navigating the SK 500 G4 menu"
7 ON/OFF button with ESC function in the operating menu
- Switch the transmitter on or off See "Switching the SK 500 G4 bodypack transmitter on and off"
- Escape function in the menu See "Buttons for navigating the SK 500 G4 menu"
8Infra-red interface
• See "Synchronizing devices"
9MUTE switch
- Deactivate and activate RF signal See "Deactivating the RF signal (RF mute)"
- Deactivate and activate audio signal See "Muting the bodypack transmitter (AF mute)"
Switching the SK 500 G4 bodypack transmitter on and off
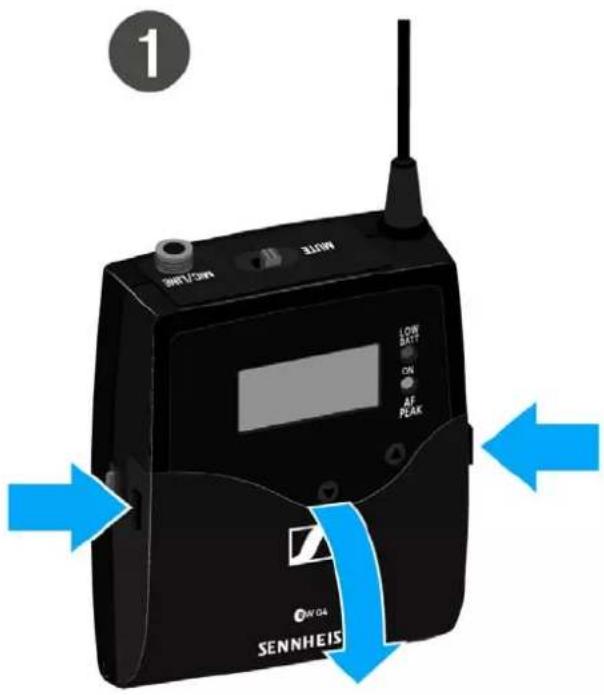
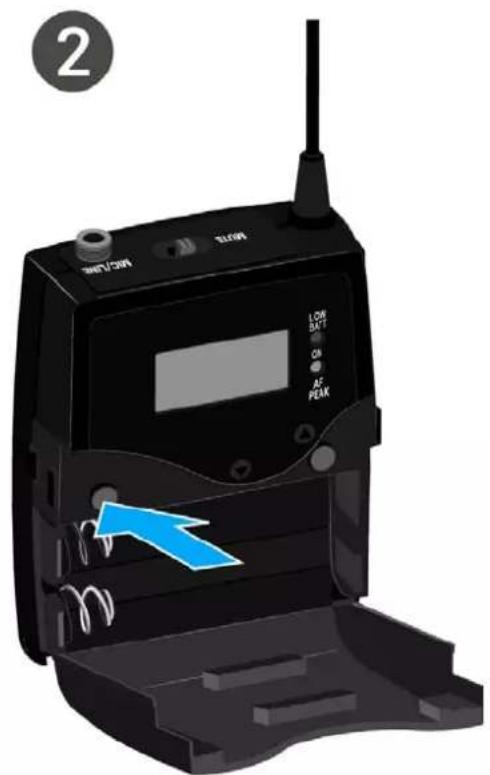
▶ Press the two catches and open the battery compartment cover.
To switch on the SK 500 G4:
Hold down the ON/OFF button until the Sennheiser logo appears on the display.
To switch off the SK 500 G4:
▶ Hold down the ON/OFF button until the display goes off.
Muting the bodypack transmitter (AF mute)
You can mute the audio signal with the MUTE switch.
To do this, the MUTE switch function must be configured to AF On/Off. You can find more information about this subject under “Advanced > Mute Mode menu item”.

▶ Slide the MUTE switch to the MUTE position. The audio signal is muted. The message MUTE is shown on the display.
Deactivating the RF signal (RF mute)
You can deactivate the RF signal in two ways:
Deactivating the RF signal with the MUTE switch
You can deactivate the RF signal with the MUTE switch.
To do this, the MUTE switch function must be configured to RF On/Off. You can find more information about this subject under "Advanced > Mute Mode menu item".

Slide the MUTE switch to the MUTE position.
The RF signal is deactivated. The message MUTE is shown in the display and the transmission icon no longer appears.

Deactivating the RF signal with the ON/OFF button
You can deactivate the RF signal with the ON/OFF button.
To deactivate the RF signal:
▶ Short-press the ON/OFF button.
RF Mute On? appears.
▷Press the SET button.
The RF signal is deactivated. The message MUTE is shown in the display and the transmission icon no longer appears.

To activate the RF signal:
▶ Short-press the ON/OFF button.
RF Mute Off? appears.
▶Press the SET button.
The transmission icon appears again.

Lock-off function
You can set the automatic lock-off function in the Auto lock menu (see "Auto Lock menu item").
When you have switched on the lock-off function, you will have to turn the transmitter off and on again in order to operate it.
To temporarily deactivate the lock-off function:
▷Press the SET button.
Locked appears in the display panel.
▶ Press the UP or DOWN button.
Unlock? appears in the display panel.
▷Press the SET button.
Lock-off function is now temporarily deactivated.

When you are in the operating menu
Lock-off function is deactivated long enough for you to work in the operating menu.
When one of the standard displays is shown
Lock-off function is automatically activated after 10 seconds.
The lock-off function icon flashes while the lock-off function is being activated again.
Displays on the SK 500 G4 bodypack transmitter display panel
You can view the following information on the transmitter display.
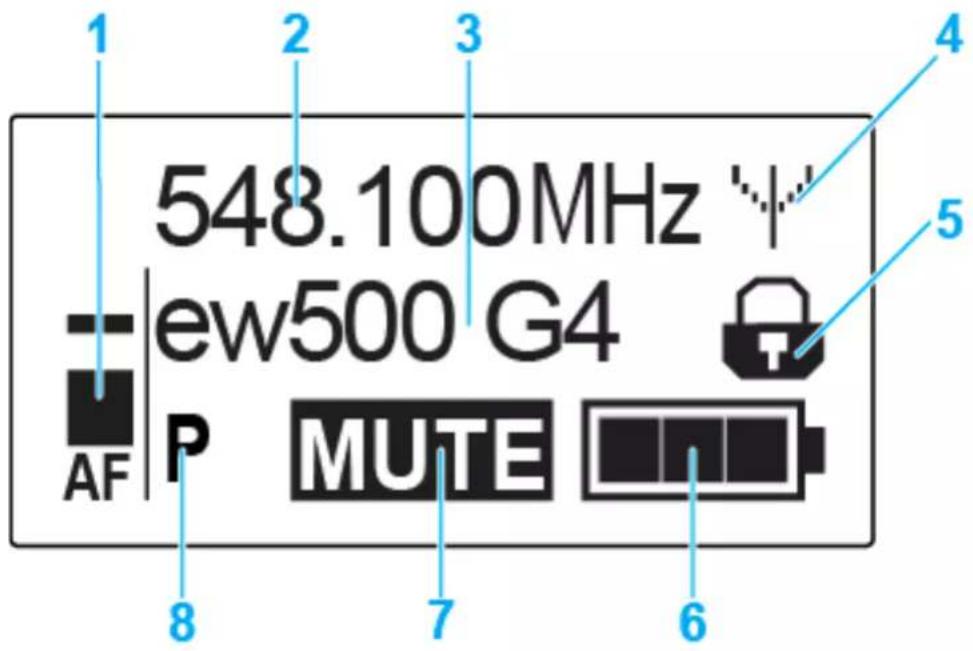
1AF audio level
- Displays the audio level with peak hold function
• See "Sensitivity menu item"
2Frequency
- Configured transmission frequency
• See "Frequency Preset menu item"
3Name
• Freely selectable name of the receiver
• See "Name menu item"
4Transmission icon
• RF signal is being transmitted
- See "Deactivating the RF signal (RF mute)"
5Lock-off function
- Lock-off function is activated
• See "Auto Lock menu item"
6Battery status
- See "Battery status"
7MUTE muting function
• The audio signal is muted
- See "Muting the bodypack transmitter (AF mute)"
8P pilot tone
- Pilot tone transmission is activated
- See "Advanced > Pilot Tone menu item"
"Buttons for navigating the SK 500 G4 menu"
"Setting options in the menu"
Select a standard display
▶ Press the UP or DOWN buttons to select a standard display.
Frequency/Name standard display

Channel/Frequency standard display

Name/Channel standard display

Buttons for navigating the SK 500 G4 menu
Navigating through the menu
To open the menu:
▷Press the SET button.
The operating menu is shown on the transmitter display panel.
To open a menu item:
▶ Press the UP or DOWN buttons to navigate through the individual menu items.
▶ Press the SET button to open the selected menu item.
i "Operating elements of the SK 500 G4 bodypack transmitter"
Making changes in a menu item
After you open a menu item, you can make changes as follows:
▶ Press the UP or DOWN buttons to set the displayed value.
▶ Press the SET button to save the setting.
▶ Press the ESC (ON/OFF) button to leave the menu item without saving the setting.
i "Operating elements of the SK 500 G4 bodypack transmitter"
"Displays on the SK 500 G4 bodypack transmitter display panel"
"Setting options in the menu"
Setting options in the menu
In the SK 500 G4 menu, you can configure the following settings.
Adjusting the input sensitivity
▷See "Sensitivity menu item"
Setting the frequency bank and the channel
▶See "Frequency Preset menu item"
Entering a freely selectable name
▶See "Name menu item"
Activating/deactivating the automatic lock-off function
▷See "Auto Lock menu item"
Configuring enhanced settings in the Advanced Menu:
- Adjusting the transmission frequencies for the U frequency bank
- Configuring the MUTE switch
- Configuring the transmission power
- Activating/deactivating the pilot tone evaluation
- Adjusting the contrast of the display panel
- Resetting the transmitter
- Displaying the current software revision
▶See "Advanced menu item"
Sensitivity menu item
- Adjusting the input sensitivity - AF audio level
![graph LR A["Menu Sensitivity -12 dB"] --> B["Sensitivity - 12 dB"] B --> C["Sensitivity -36 dB"] D["Stored"] --> A D --> C E["SET"] --> A](/content/2026/08/1624843/images/23f97feb4fb84a671b83d22773dfcd25cd85d8142fc956b1cb3716f2461ce348.jpg)
Setting range: 0 dB to -60 dB in 6 dB steps.
The AF audio level is also displayed when the bodypack transmitter is muted, e.g. to check the sensitivity before a live broadcast.
Recommended presets:
- Loud music/vocals: -30 to -21 dB
• Moderation: -21 to 0 dB
• Electric guitar with single-coil pickups: -30 to -24 dB
• Electric guitar with Humbucker pickups: -45 to -30 dB
• Electric guitars with active electronics: -45 to -30 dB
Frequency Preset menu item
- Manually selecting a frequency bank and channel
![graph LR A["Menu\nFrequency Preset\nB.Ch: 1.1"] --> B["Frequency Preset\nB.Ch: 1.1\n518.200 MHz"] B --> C["Frequency Preset\nB.Ch: 20.1\n526.200 MHz"] C --> D["Stored"] D --> A style A fill:#f9f,stroke:#333 style B fill:#ccf,stroke:#333 style C fill:#cfc,stroke:#333 style D fill:#fcc,stroke:#333](/content/2026/08/1624843/images/6799bed6e073cc2aebfec02c989d30127d8c99a7ba4de8736319d8aeabdc2539.jpg)
i While you work in the Frequency Preset menu, the RF signal is deactivated.
Please note when creating multi-channel systems:
Only the factory-preset frequencies within one frequency bank are inter-modulation-free. The bodypack transmitter and receiver must be set to the same frequency. Be sure to note the information on frequency selection under "Establishing a radio link".
Name menu item
- Entering names
![graph TD A["Menu\nName\nLichael"] --> B["Name\nLichael"] B --> C["Name\nMichael"] C --> D["Stored"] D --> A style A fill:#000,stroke:#fff,color:#fff style B fill:#000,stroke:#fff,color:#fff style C fill:#000,stroke:#fff,color:#fff style D fill:#000,stroke:#fff,color:#fff](/content/2026/08/1624843/images/9b656244d3f5a9ba2c65f2144ce0a2a64d6032c070386ea884abfb35484b4fcb.jpg)
In the Name menu item you can enter any name you want for the bodypack transmitters (e.g. the names of the musicians).
The name can be shown in the Frequency/Name and Name/Channel standard displays.
The names are a maximum of 8 characters:
- All letters except umlauts.
- Numbers from 0 to 9
• Special characters and spaces
Enter the names as follows:
▶ Press the UP or DOWN buttons to select a character.
▶ Press the SET button to switch to the next space or to save the name you have entered once it is complete.
Auto Lock menu item
- Switching the automatic lock-off function on and off
![graph LR A["Menu\nAuto Lock\nActive"] --> B["Auto Lock\nActive"] B --> C["Auto Lock\nInactive"] C --> D["Stored"] D --> A style A fill:#f9f,stroke:#333 style B fill:#ccf,stroke:#333 style C fill:#cfc,stroke:#333 style D fill:#fcc,stroke:#333](/content/2026/08/1624843/images/1fe5f740cf5f95e9234fc6210a5348fbf3f47b708b00913d3a50238a754d8b07.jpg)
This lock prevents the wireless microphone from being unintentionally switched off and also prevents any unintentional changes to the transmitter's configuration. In the current standard display, the lock icon shows whether the lock-off function is currently switched on.
You can find information about using the lock-off function under "Lock-off function".
Advanced menu item
In the Advanced submenu you can configure enhanced settings.
The following sub-items are available:
Adjusting the transmission frequencies for the U frequency bank
▷See "Advanced > Tune menu item"
Configuring the function of the MUTE switch and the RMS 1 remote mute switch
▷See "Advanced > Mute Mode menu item"
Configuring the transmission power
▶See "Advanced > RF Power menu item"
Activating/deactivating the pilot tone evaluation
▷See "Advanced > Pilot Tone menu item"
Adjusting the contrast of the display panel
▶See “Advanced > LCD Contrast menu item”
Resetting the transmitter
▷See "Advanced > Reset menu item"
Displaying the current software revision
▶See "Advanced > Software Revision menu item"
Advanced > Tune menu item
- Configuring the transmission frequency and frequency bank U
When you have configured the bodypack transmitter to a system bank and you call up the Tune menu item, channel 1 of the frequency bank U is automatically set. The message U.1 briefly appears in the display. In the factory settings, the channels of the frequency bank U are not assigned to any transmission frequency.
While you work in the Tune menu, the RF signal is deactivated.
You can configure a transmission frequency for the current channel or select a channel in the frequency bank U and configure a transmission frequency for this channel in the Tune menu. Be sure to note the information on frequency selection, see "Setting notes".
Only adjusting the frequency
To configure the transmission frequency for the current channel:
- Open the Tune menu item in the Advanced menu. The frequency selection appears.
![graph LR A["Advanced Menu\nTune\n553.875 MHz"] --> B["Tune\n553.875 MHz\nB.Ch: U.1"] B --> C["Tune\n534.875 MHz\nB.Ch: U.1"] C --> D["Stored"] D --> A style A fill:#f9f,stroke:#333 style B fill:#ccf,stroke:#333 style C fill:#cfc,stroke:#333 style D fill:#fcc,stroke:#333](/content/2026/08/1624843/images/968a2d7c2aa24cf8222ae65b36f25c91c8a84b274e2b7426250a9a599b3dd5b9.jpg)
▷Configure the desired frequency.
▶ Press the SET button.
Your settings will be saved. You are now back in the operating menu.
Setting the channel and frequency
To select a channel and assign it a frequency:
▶ Open the Tune menu item in the Advanced menu by pressing and holding the SET button until the frequency bank selection appears.
![graph LR A["Advanced Menu\nTune\n543.200 MHz"] --> B["Tune\n543.200 MHz\nB.Ch: U.1"] B --> C["Tune\n543.200 MHz\nB.Ch: U.1"] C --> D["Stored"] D --> A style A fill:#f9f,stroke:#333 style B fill:#ccf,stroke:#333 style C fill:#cfc,stroke:#333 style D fill:#fcc,stroke:#333](/content/2026/08/1624843/images/3e0656e119eb38f22172ed88aeaa993d2a670665687a899f730bb1d51c57d32b.jpg)
▷Set the desired channel.
▶ Press the SET button.
The frequency selection appears.
▶Configure the frequency.
Advanced > Mute Mode menu item
- Configuring the MUTE switch
![graph LR A["Advanced Menu\nMute Mode\nAF On/Off"] --> B["Mute Mode\nAF On/Off"] B --> C["Mute Mode\nRF On/Off"] C --> D["Stored"] D --> A style A fill:#f9f,stroke:#333 style B fill:#ccf,stroke:#333 style C fill:#cfc,stroke:#333 style D fill:#fcc,stroke:#333](/content/2026/08/1624843/images/22aa596e58135f8c46216afced7693666453f2abe9f460b55f892548385f7c43.jpg)
AF On/Off mode
- If set to position MUTE, the audio signal is muted
RF On/Off mode
- If set to the MUTE selector position, the RF signal is deactivated.
Disabled mode
- No function
You can find information about operating the mute switch under "Muting the bodypack transmitter (AF mute)" and "Deactivating the RF signal (RF mute)".
Advanced > RF Power menu item
- Configuring the transmission power
![graph LR A["Advanced Menu\nRF Power\nYLow"] --> B["RF Power\nY Low"] B --> C["RF Power\nYStandard"] C --> D["SET"] style A fill:#f9f,stroke:#333 style B fill:#ccf,stroke:#333 style C fill:#cfc,stroke:#333 style D fill:#fcc,stroke:#333](/content/2026/08/1624843/images/c7c553fd9ecb8d0134f5c83095341b7dd710ceda8a92647fc3ac61aaa3aa2c90.jpg)
You can configure the transmission power in three steps in the RF Power menu item. Please note the information at the following address:
General conditions and restrictions for the use of frequencies
Setting range:
Low: 10 mW
Standard: 30 mW
High: 50 mW
Advanced > Pilot Tone menu item
- Activating/deactivating pilot tone transmission
![graph LR A["Advanced Menu\nPilot Tone\nActive"] --> B["Pilot Tone\nActive"] B --> C["Pilot Tone\nInactive"] C --> D["Stored"] D --> A style A fill:#f9f,stroke:#333 style B fill:#ccf,stroke:#333 style C fill:#cfc,stroke:#333 style D fill:#fcc,stroke:#333](/content/2026/08/1624843/images/b99148e0aeb729e8e72052e44ff69608ab0a69413027e08d0eb4821034b97117.jpg)
The pilot tone has an inaudible frequency that is sent from the transmitter and evaluated by the receiver. It supports the receiver's squelch function.
Advanced > LCD Contrast menu item
- Adjusting the contrast of the display panel
You can configure the contrast of the display in 16 steps.
Advanced > Reset menu item
- Resetting the bodypack transmitter
![graph TD A["Advanced Menu Reset"] --> B["Reset Yes"] B --> C["Stored"] C --> A style A fill:#000,stroke:#fff,color:#fff style B fill:#000,stroke:#fff,color:#fff style C fill:#000,stroke:#fff,color:#fff style_D["SET"] --> A E["SET"] --> B](/content/2026/08/1624843/images/81d84d8aef559be750eb7c3ed1305f24fbf997b1720b44de4306fda20a1f4d51.jpg)
When you reset the bodypack transmitter, only the selected settings of the pilot tone and the U frequency bank are retained.
Advanced > Software Revision menu item
• Show software revision
You can display the current software revision.
Using the SKP 500 G4
These sections contain detailed information about using the SKP 500 G4. You can find information on installation and startup of the SKP 500 G4 under "Installing the SKP 500 G4".
Operating elements of the SKP 500 G4 plug-on transmitter

1Display panel
- See "Displays on the SKP 500 G4 plug-on transmitter display panel"
2UP button
- See "Buttons for navigating the SKP 500 G4 menu"
3Operation and battery indicator, red LED
- illuminated = ON See "Switching the SKP 500 G4 plug-on transmitter on and off"
- flashing = LOW BATTERY See "Inserting and removing the batteries/rechargeable batteries"
4 ON/OFF button with ESC function in the operating menu
- Switch the transmitter on or off See "Switching the SKP 500 G4 plug-on transmitter on and off"
- Escape function in the menu See "Buttons for navigating the SKP 500 G4 menu"
5DOWN button
- See "Buttons for navigating the SKP 500 G4 menu"
6MUTE switch
- See "Muting the plug-on transmitter (AF mute)"
7SET button
- See "Buttons for navigating the SKP 500 G4 menu"
8Infra-red interface
• See "Synchronizing devices"
Switching the SKP 500 G4 plug-on transmitter on and off
To switch on the SKP 500 G4:
Hold down the ON/OFF button until the Sennheiser logo appears on the display.

To switch off the SKP 500 G4:
Hold down the ON/OFF button until the display goes off.
Muting the plug-on transmitter (AF mute)
You can mute the audio signal with the MUTE switch.
To do this, the MUTE switch function must be configured to AF On/Off. You can find more information about this subject under “Advanced > Mute Mode menu item”.

▶ Slide the MUTE switch to the MUTE position.
The audio signal is muted. The message MUTE is shown on the display.
Deactivating the RF signal (RF mute)
You can deactivate the RF signal in two ways:
Deactivating the RF signal with the MUTE switch
You can deactivate the RF signal with the MUTE switch.
To do this, the MUTE switch function must be configured to RF On/Off. You can find more information about this subject under “Advanced > Mute Mode menu item”.

Slide the MUTE switch to the MUTE position.
The RF signal is deactivated. The message MUTE is shown in the display and the transmission icon no longer appears.

Deactivating the RF signal with the ON/OFF button
You can deactivate the RF signal with the ON/OFF button.
To deactivate the RF signal:
▶ Short-press the ON/OFF button.
RF Mute On? appears.
▶Press the SET button.
The RF signal is deactivated. The message MUTE is shown in the display and the transmission icon no longer appears.

To activate the RF signal:
▶ Short-press the ON/OFF button.
RF Mute Off? appears.
▷Press the SET button.
The transmission icon appears again.
Lock-off function
You can set the automatic lock-off function in the Auto lock menu (see "Auto Lock menu item").
When you have switched on the lock-off function, you will have to turn the transmitter off and on again in order to operate it.
To temporarily deactivate the lock-off function:
▷Press the SET button.
Locked appears in the display panel.
▶ Press the UP or DOWN button.
Unlock? appears in the display panel.
▷Press the SET button.
Lock-off function is now temporarily deactivated.

When you are in the operating menu
Lock-off function is deactivated long enough for you to work in the operating menu.
When one of the standard displays is shown
Lock-off function is automatically activated after 10 seconds.
The Lock-off function icon flashes while the lock-off function is being activated again.
Displays on the SKP 500 G4 plug-on transmitter display panel
You can view the following information on the transmitter display.

1AF audio level
- Displays the audio level with peak hold function
• See "Sensitivity menu item"
2Frequency
- Configured transmission frequency
• See "Frequency Preset menu item"
3Name
• Freely selectable name of the receiver
• See "Name menu item"
4Transmission icon
• RF signal is being transmitted
- See "Deactivating the RF signal (RF mute)"
5Lock-off function
- Lock-off function is activated
• See "Auto Lock menu item"
6Battery status
- See "Battery status"
7MUTE muting function
• The audio signal is muted
- See "Muting the plug-on transmitter (AF mute)"
8P pilot tone
- Pilot tone transmission is activated
- See "Advanced > Pilot Tone menu item"
"Buttons for navigating the SKP 500 G4 menu"
"Setting options in the menu"
Select a standard display
▶ Press the UP or DOWN buttons to select a standard display.
Frequency/Name standard display

Channel/Frequency standard display

Name/Channel standard display

Buttons for navigating the SKP 500 G4 menu
Navigating through the menu
To open the menu:
▷Press the SET button.
The operating menu is shown on the transmitter display panel.
To open a menu item:
▶ Press the UP or DOWN buttons to navigate through the individual menu items.
▶ Press the SET button to open the selected menu item.
i "Operating elements of the SKP 500 G4 plug-on transmitter"
Making changes in a menu item
After you open a menu item, you can make changes as follows:
▶ Press the UP or DOWN buttons to set the displayed value.
▶ Press the SET button to save the setting.
▶ Press the ESC (ON/OFF) button to leave the menu item without saving the setting.
i "Operating elements of the SKP 500 G4 plug-on transmitter"
"Displays on the SKP 500 G4 plug-on transmitter display panel"
"Setting options in the menu"
Setting options in the menu
In the SKP 500 G4 menu, you can configure the following settings.
Adjusting the input sensitivity
▷See "Sensitivity menu item"
Setting the frequency bank and the channel
▶See "Frequency Preset menu item"
Entering a freely selectable name
▶See "Name menu item"
Activating/deactivating the automatic lock-off function
▷See "Auto Lock menu item"
Configuring enhanced settings in the Advanced Menu:
- Adjusting the transmission frequencies for the U frequency bank
- Configuring the MUTE switch
- Configuring the transmission power
- Activating phantom powering
- Activating/deactivating the pilot tone evaluation
- Adjusting the contrast of the display panel
- Resetting the transmitter
- Displaying the current software revision
▶See "Advanced menu item"
Sensitivity menu item
- Adjusting the input sensitivity - AF audio level
![graph LR A["Menu Sensitivity -12 dB"] --> B["Sensitivity - 12 dB"] B --> C["Sensitivity -36 dB"] D["Stored"] --> A D --> C E["SET"] --> A](/content/2026/08/1624843/images/4d178e836205f57938b3e59fa78eac0224fc550c12d458d56a8cc5d6b9f17f43.jpg)
Setting range: 0 dB to -48 dB in 6 dB steps.
The AF audio level is also displayed when the plug-on transmitter is muted, e.g. to check the sensitivity before a live broadcast.
Frequency Preset menu item
- Manually selecting a frequency bank and channel
![graph LR A["Menu\nFrequency Preset\nB.Ch: 1.1"] --> B["Frequency Preset\nB.Ch: 1.1\n518.200 MHz"] B --> C["Frequency Preset\nB.Ch: 20.1\n526.200 MHz"] C --> D["Stored"] D --> A style A fill:#f9f,stroke:#333 style B fill:#ccf,stroke:#333 style C fill:#cfc,stroke:#333 style D fill:#fcc,stroke:#333](/content/2026/08/1624843/images/f9ae2100eefa0b48155644605847cebc57aff2ef9c7f48b0865196c641590401.jpg)
i While you work in the Frequency Preset menu, the RF signal is deactivated.
Please note when creating multi-channel systems:
Only the factory-preset frequencies within one frequency bank are inter-modulation-free. The bodypack transmitter and receiver must be set to the same frequency. Be sure to note the information on frequency selection under "Establishing a radio link".
Name menu item
- Entering names
![graph TD A["Menu\nName\nLichael"] --> B["Name\nLichael"] B --> C["Name\nMichael"] C --> D["Stored"] D --> A style A fill:#000,stroke:#fff,color:#fff style B fill:#000,stroke:#fff,color:#fff style C fill:#000,stroke:#fff,color:#fff style D fill:#000,stroke:#fff,color:#fff](/content/2026/08/1624843/images/f2920716af990269b0a66f36cddb314658d50a6143a307607b16778fc51417bf.jpg)
In the Name menu item you can enter any name you want for the bodypack transmitters (e.g. the names of the musicians).
The name can be shown in the Frequency/Name and Name/Channel standard displays.
The names are a maximum of 8 characters:
- All letters except umlauts.
- Numbers from 0 to 9
• Special characters and spaces
Enter the names as follows:
▶ Press the UP or DOWN buttons to select a character.
▶ Press the SET button to switch to the next space or to save the name you have entered once it is complete.
Auto Lock menu item
- Switching automatic the lock-off function on and off
![graph LR A["Menu\nAuto Lock\nActive"] --> B["Auto Lock\nActive"] B --> C["Auto Lock\nInactive"] C --> D["Stored"] D --> A style A fill:#f9f,stroke:#333 style B fill:#ccf,stroke:#333 style C fill:#cfc,stroke:#333 style D fill:#fcc,stroke:#333](/content/2026/08/1624843/images/14bb4dbcee019e6c010ed4aa8c93cf9edd3d80bd5b21ee8dbc7ff3fd5edd8514.jpg)
This lock prevents the wireless microphone from being unintentionally switched off and also prevents any unintentional changes to the transmitter's configuration. In the current standard display, the lock icon shows whether the lock-off function is currently switched on.
You can find information about using the lock-off function under "Lock-off function".
Advanced menu item
In the Advanced submenu you can configure enhanced settings.
The following sub-items are available:
Adjusting the transmission frequencies for the U frequency bank
▷See "Advanced > Tune menu item"
Configuring the function of the MUTE switch and the RMS 1 remote mute switch
▷See "Advanced > Mute Mode menu item"
Configuring the transmission power
▶See "Advanced > RF Power menu item"
Activating phantom powering
▶See “Advanced > Phantom Power 48V menu item”
Activating/deactivating the pilot tone evaluation
▶See “Advanced > Pilot Tone menu item”
Adjusting the contrast of the display panel
▶See “Advanced > LCD Contrast menu item”
Resetting the transmitter
▷See "Advanced > Reset menu item"
Displaying the current software revision
▶See “Advanced > Software Revision menu item”
Advanced > Tune menu item
- Configuring the transmission frequency and frequency bank U
When you have configured the bodypack transmitter to a system bank and you call up the Tune menu item, channel 1 of the frequency bank U is automatically set. The message U.1 briefly appears in the display. In the factory settings, the channels of the frequency bank U are not assigned to any transmission frequency.
While you work in the Tune menu, the RF signal is deactivated.
You can configure a transmission frequency for the current channel or select a channel in the frequency bank U and configure a transmission frequency for this channel in the Tune menu. Be sure to note the information on frequency selection, see "Setting notes".
Only adjusting the frequency
To configure the transmission frequency for the current channel:
- Open the Tune menu item in the Advanced menu. The frequency selection appears.
![graph LR A["Advanced Menu\nTune\n553.875 MHz"] --> B["Tune\n553.875 MHz\nB.Ch: U.1"] B --> C["Tune\n534.875 MHz\nB.Ch: U.1"] C --> D["Stored"] D --> A style A fill:#f9f,stroke:#333 style B fill:#ccf,stroke:#333 style C fill:#cfc,stroke:#333 style D fill:#fcc,stroke:#333](/content/2026/08/1624843/images/c4518a7c410fa8a1f03871f9962bbc1a23c5c917b48e3509b723f55475dea455.jpg)
▶Configure the desired frequency.
▶ Press the SET button.
Your settings will be saved. You are now back in the operating menu.
Setting the channel and frequency
To select a channel and assign it a frequency:
▶ Open the Tune menu item in the Advanced menu by pressing and holding the SET button until the frequency bank selection appears.
![graph LR A["Advanced Menu\nTune\n543.200 MHz"] --> B["Tune\n543.200 MHz\nB.Ch: U.1"] B --> C["Tune\n543.200 MHz\nB.Ch: U.1"] C --> D["Stored"] D --> A style A fill:#f9f,stroke:#333 style B fill:#ccf,stroke:#333 style C fill:#cfc,stroke:#333 style D fill:#fcc,stroke:#333](/content/2026/08/1624843/images/41965ed0d12b081c7ddef0d108b6e3346dca50fc2a235a999049916b85326ae1.jpg)
▷Set the desired channel.
▶ Press the SET button.
The frequency selection appears.
▶Configure the frequency.
Advanced > Mute Mode menu item
- Configuring the MUTE switch
![graph LR A["Advanced Menu\nMute Mode\nAF On/Off"] --> B["Mute Mode\nAF On/Off"] B --> C["Mute Mode\nRF On/Off"] C --> D["Stored"] D --> A style A fill:#f9f,stroke:#333 style B fill:#ccf,stroke:#333 style C fill:#cfc,stroke:#333 style D fill:#fcc,stroke:#333](/content/2026/08/1624843/images/8d8319ebaae76553a5e4c2fb63f2eb055672eb18682746d52445af927c3456a1.jpg)
AF On/Off mode
- If set to position MUTE, the audio signal is muted
RF On/Off mode
- If set to the MUTE selector position, the RF signal is deactivated.
Disabled mode
- No function
You can find information about operating the mute switch under "Muting the plug-on transmitter (AF mute)" and "Deactivating the RF signal (RF mute)".
Advanced > RF Power menu item
- Configuring the transmission power
![graph LR A["Advanced Menu\nRF Power\nYLow"] --> B["RF Power\nY Low"] B --> C["RF Power\nYStandard"] C --> D["SET"] style A fill:#f9f,stroke:#333 style B fill:#ccf,stroke:#333 style C fill:#cfc,stroke:#333 style D fill:#fcc,stroke:#333](/content/2026/08/1624843/images/c88f6a456b9d12faebc3b40f861d661fdcd5889844b2e4bd9737210bf8a3347d.jpg)
You can configure the transmission power in three steps in the RF Power menu item. Please note the information at the following address:
General conditions and restrictions for the use of frequencies
Setting range:
Low: 10 mW
Standard: 30 mW
High: 50 mW
Advanced > Phantom Power 48V menu item
- Activating phantom powering
![graph TD A["Advanced Menu PhantomPower48V Active"] --> B["PhantomPower48V Active"] B --> C["PhantomPower48V Inactive"] C --> D["SET"] style A fill:#f9f,stroke:#333 style B fill:#ccf,stroke:#333 style C fill:#cfc,stroke:#333 style D fill:#fcc,stroke:#333 note right of B: “PhantomPower48V Active” (▲▼)…](/content/2026/08/1624843/images/350ca0bac444e77b7872fd5c925c6f2742475d0e00402ae167419ea43fec80ff.jpg)
Advanced > Pilot Tone menu item
- Activating/deactivating pilot tone transmission
![graph LR A["Advanced Menu<br>Pilot Tone<br>Active"] --> B["Pilot Tone<br>Active"] B --> C["Pilot Tone<br>Inactive"] C --> D["Stored"] D --> A style A fill:#f9f,stroke:#333 style B fill:#ccf,stroke:#333 style C fill:#cfc,stroke:#333 style D fill:#fcc,stroke:#333](/content/2026/08/1624843/images/a55921a2cb128b1f828a92e0b21ab897102762ceec0518fc10c2ff86dec67f4c.jpg)
The pilot tone has an inaudible frequency that is sent from the transmitter and evaluated by the receiver. It supports the receiver's squelch function.
Advanced > LCD Contrast menu item
- Adjusting the contrast of the display panel
You can configure the contrast of the display in 16 steps.
Advanced > Reset menu item
- Resetting the plug-on transmitter
![graph TD A["Advanced Menu Reset"] --> B["Reset Yes"] B --> C["Stored"] C --> A style A fill:#000,stroke:#fff,color:#fff style B fill:#000,stroke:#fff,color:#fff style C fill:#000,stroke:#fff,color:#fff style_D["SET"] --> A style_E["SET"] --> B](/content/2026/08/1624843/images/205b15c643073f92d3d920e30eb87c7fdfefed7684975732918c50e4b130868d.jpg)
When you reset the plug-on transmitter, only the selected settings of the pilot tone and the U frequency bank are retained.
Advanced > Software Revision menu item
• Show software revision
You can display the current software revision.
Establishing a radio link
To establish a radio link between the transmitter and receiver, the same frequency must be set in both devices.
You can do this in a number of different ways:
- Use the Easy Setup function to perform an automatic frequency setup (see "Easy Setup menu item").
- Set a frequency in the receiver manually (see "Frequency Preset menu item") and synchronize it with the transmitter (see "Synchronizing devices").
- Set the frequency on the receiver and the transmitter manually (EK 500 G4: "Frequency Preset menu item", SKM 500 G4: "Frequency Preset menu item", SK 500 G4: "Frequency Preset menu item", SKP 500 G4: "Frequency Preset menu item")
Setting notes
Please note the following when synchronizing a transmitter with a receivers:
▶ Only use transmitters and receivers from the same frequency range (see the type plate on the transmitter and receiver).
▶Make sure that your chosen frequencies are listed in the frequency table for the particular frequency range (see “Frequency tables”).
▶Ensure that the desired frequencies are permitted in your country and apply for an operating license if necessary.

Please note the information at the following address:
General conditions and restrictions for the use of frequencies
Synchronizing devices
You can synchronize ew 500 P G4 series transmitters and receivers via the receiver's infrared interface.
You can adjust the Parameters to be transferred to the transmitter here: "Advanced -> Sync Settings menu item"
To synchronize the devices:
▷Switch the transmitter and the receiver on.
▶ Call up the Sync menu item on the receiver.
Sync appears in the receiver's display.
▶Hold the infra-red interface of the transmitter in front of the infra-red interface of the receiver.
The parameters are transferred to the transmitter. When the transfer is complete, a tick appears in the receiver's display as a confirmation. Then the receiver will return to the current standard display.


To cancel synchronization:
▷ Press the ON/OFF button on the receiver.
An X appears in the display.
This icon also appears when:
- no transmitter is found or the transmitter is not compatible.
- no transmitter is found and the synchronization process automatically ends after 30 seconds.
SPECIFICATIONS
Overview
In the sections below, you can find information about the different variants of the products in the ew 500 P G4 series as well as technical data for the individual products.
- Product variants and frequency variants >> "Product variants"
- Frequency tables with overviews of all banks and channels >> “Frequency tables”
- Product-specific technical data >> "Specifications"
- Information on pin assignment (jack and XLR) >> "Pin assignment"
You can also find information about safely cleaning and maintaining evolution wireless G4 series products.
- “Cleaning and maintenance”
Product variants
EK 500 G4 product variants
Made in Germany
| EK 500 G4-K+ 925 – 937.5 MHz Art. no. 507822 |
| EK 500 G4-GBw 606 – 678 MHz Art. no. 507823 |
| EK 500 G4-Gw 558 – 626 MHz Art. no. 507824 |
| EK 500 G4-Bw 626 – 698 MHz Art. no. 507825 |
| EK 500 G4-Cw 718 – 790 MHz Art. no. 507826 |
| EK 500 G4-Dw 790 – 865 MHz Art. no. 507827 |
| EK 500 G4-Aw+ 470 – 558 MHz Art. no. 508419 |
Assembled in the USA
| EK 500 G4-AS 520 – 558 MHz Art. no. 508161 |
| EK 500 G4-JB 806 – 810 MHz Art. no. 508162 |
| EK 500 G4-Gw 558 – 626 MHz Art. no. 508163 |
| EK 500 G4-Bw 626 – 698 MHz Art. no. 508164 |
| EK 500 G4-Cw 718 – 790 MHz Art. no. 508165 |
| EK 500 G4-Dw 790 – 865 MHz Art. no. 508166 |
| EK 500 G4-Aw+ 470 – 558 MHz Art. no. 508440 |
| EK 500 G4-Gw1 558 – 608 MHz Art. no. 508461 |
SKM 500 G4 product variants
Made in Germany
| SKM 500 G4-K+ 925 – 937.5 MHz Art. no. 507782 |
| SKM 500 G4-GBw 606 – 678 MHz Art. no. 507783 |
| SKM 500 G4-Gw 558 – 626 MHz Art. no. 507784 |
| SKM 500 G4-Bw 626 – 698 MHz Art. no. 507785 |
| SKM 500 G4-Cw 718 – 790 MHz Art. no. 507786 |
| SKM 500 G4-Dw 790 – 865 MHz Art. no. 507787 |
| SKM 500 G4-Aw+ 470 – 558 MHz Art. no. 508414 |
Assembled in the USA
| SKM 500 G4-AS | 520 – 558 MHz | Art. no. 508121 |
| SKM 500 G4-JB | 806 – 810 MHz | Art. no. 508122 |
| SKM 500 G4-Gw 558 – 626 MHz Art. no. 508123 | ||
| SKM 500 G4-Bw 626 – 698 MHz Art. no. 508124 | ||
| SKM 500 G4-Cw 718 – 790 MHz Art. no. 508125 | ||
| SKM 500 G4-Dw 790 – 865 MHz Art. no. 508126 | ||
| SKM 500 G4-Aw+ 470 – 558 MHz Art. no. 508435 | ||
| SKM 500 G4-Gw1 558 – 608 MHz Art. no. 508459 | ||
SK 500 G4 product variants
Made in Germany
| SK 500 G4-K+ 925 – 937.5 MHz Art. no. 507774 |
| SK 500 G4-GBw 606 – 678 MHz Art. no. 507775 |
| SK 500 G4-Gw 558 – 626 MHz Art. no. 507776 |
| SK 500 G4-Bw 626 – 698 MHz Art. no. 507777 |
| SK 500 G4-Cw 718 – 790 MHz Art. no. 507778 |
| SK 500 G4-Dw 790 – 865 MHz Art. no. 507779 |
| SK 500 G4-Aw+ 470 – 558 MHz Art. no. 508413 |
Assembled in the USA
| SK 500 G4-AS 520 – 558 MHz Art. no. 508113 |
| SK 500 G4-JB 806 – 810 MHz Art. no. 508114 |
| SK 500 G4-Gw 558 – 626 MHz Art. no. 508115 |
| SK 500 G4-Bw 626 – 698 MHz Art. no. 508116 |
| SK 500 G4-Cw 718 – 790 MHz Art. no. 508117 |
| SK 500 G4-Dw 790 – 865 MHz Art. no. 508118 |
| SK 500 G4-Aw+ 470 – 558 MHz Art. no. 508434 |
| SK 500 G4-Gw1 558 – 608 MHz Art. no. 508455 |
SKP 500 G4 product variants
Made in Germany
| SKP 500 G4-K+ 925 – 937.5 MHz Art. no. 507814 |
| SKP 500 G4-GBw 606 – 678 MHz Art. no. 507815 |
| SKP 500 G4-Gw 558 – 626 MHz Art. no. 507816 |
| SKP 500 G4-Bw 626 – 698 MHz Art. no. 507817 |
| SKP 500 G4-Cw 718 – 790 MHz Art. no. 507818 |
| SKP 500 G4-Dw 790 – 865 MHz Art. no. 507819 |
| SKP 500 G4-Aw+ 470 – 558 MHz Art. no. 508418 |
Assembled in the USA
| SKP 500 G4-AS 520 – 558 MHz Art. no. 508153 |
| SKP 500 G4-JB 806 – 810 MHz Art. no. 508154 |
| SKP 500 G4-Gw 558 – 626 MHz Art. no. 508155 |
| SKP 500 G4-Bw 626 – 698 MHz Art. no. 508156 |
| SKP 500 G4-Cw 718 – 790 MHz Art. no. 508157 |
| SKP 500 G4-Dw 790 – 865 MHz Art. no. 508158 |
| SKP 500 G4-Aw+ 470 – 558 MHz Art. no. 508439 |
| SKP 500 G4-Gw1 558 – 608 MHz Art. no. 508460 |
Frequency tables
You can find frequency tables for all available frequency ranges in the download section of the Sennheiser website uneer www.sennheiser.com/download.
Download area of the Sennheiser website
Enter ew G4 into the search bar to show the frequency tables.
Specifications
You can find the cross-system and product-specific technical data in the sections below.
EK 500 G4
RF characteristics
| Modulation Wideband FM | |
| Receiving frequency ranges Aw: 470 - 558 MHzAS: 520 - 558 MHzGw1: 558 - 608 MHzGw: 558 - 626 MHzGBw: 606 - 678 MHzBw: 526 - 698 MHzCw: 718 - 790 MHzDw: 790 - 865 MHzJB: 806 - 810 MHzK+: 925 - 937.5 MHz | |
| Receiving frequencies Max. 2880 receiving frequencies,adjustable in 25 kHz steps20 frequency banks, each with upto 32 factory-preset channels, nointermodulation6 frequency banks with up to 32programmable channels | |
| Switching bandwidth up to 88 MHz | |
| Nominal/peak deviation ±24 kHz / ±48 kHz | |
| Receiver principle Adaptive diversity | |
| Sensitivity (with HDX,peak deviation) | < 1.6 μV for 52 dBA eff S/N |
| Adjacent channel selection ≥ 65 dB | |
| Intermodulation attenuation ≥ 65 dB | |
| Blocking ≥ 70 dB | |
| Squelch Low: 5 dBμVMiddle: 15 dBμVHigh: 25 dBμV | |
| Pilot tone squelch Can be switched off | |
AF characteristics
Compander system Sennheiser HDX
| Signal-to-noise ratio(1 mV, peak deviation) | Line: ≥ 110 dBAPhones: approx. 90 dBA |
| Total harmonic distortion (THD) ≤ 0.9 % | |
| AF output voltage (at peak devia-tion, 1 kHz AF) | 3.5 mm jack socket +17 dBu (mo-no, unbalanced) |
| “AF Out” setting range 42 dB in 6 dB steps | |
Overall device
Temperature range -10 °C to +55 °C (14 °F to 131 °F)
| Power supply 2 AA batteries, 1,5 V orBA 2015 accupack |
| Nominal voltage 3 V battery /2.4 V rechargeable battery |
| Power consumption at nominal voltage:typically 180 mAwith transmitter switched off:≤ 25 μA |
| Operating time Typically 8 h |
| Dimensions Approx. 82 x 64 x 24 mm |
| Weight (with batteries) Approx. 130 g |
SKM 500 G4
RF characteristics
| Modulation Wideband FM | |
| Receiving frequency ranges Aw+: 470 - 558 MHzAS: 520 - 558 MHzGw1: 558 - 608 MHzGw: 558 - 626 MHzGBw: 606 - 678 MHzBw: 526 - 698 MHzCw: 718 - 790 MHzDw: 790 - 865 MHzJB: 806 - 810 MHzK+: 925 - 937.5 MHz | |
| Transmission frequencies Max 2880 receiving frequencies,adjustable in 25 kHz steps20 frequency banks, each with upto 32 factory-preset channels,no intermodulation6 frequency banks with up to 32programmable channels | |
| Switching bandwidth up to 88 MHz | |
| Nominal/peak deviation ±24 kHz / ±48 kHz | |
| Frequency stability ≤ ±15 ppm | |
| RF output power at 50 ? Switchable:Low: typically 10 mWStandard: typically 30 mWHigh: typically 50 mW | |
| Pilot tone squelch Can be switched off |
AF characteristics
| Compander system Sennheiser HDX | |
| AF frequency response 80 – 18,000 Hz | |
| Signal-to-noise ratio (1 mV, peak deviation) | ≥ 115 dBA |
| Total harmonic distortion (THD) ≤ 0.9 % | |
| Setting range for input sensitivity 48 dB in 6 dB steps | |
Overall device
| Temperature range -10 °C to +55 °C (14 °F to 131 °F) | |
| Power supply 2 AA batteries, 1,5 V or BA 2015 accupack | |
| Nominal voltage 3 V battery / 2.4 V rechargeable battery | |
| Power consumption | |
| at nominal voltage with transmitter switched off | typically 180 mA ≤ 25 μA |
| Operating time Typically 8 h | |
| Dimensions Approx. ∅ 50 x 265 mm | |
| Weight (with batteries) Approx. 450 g | |
SK 500 G4
RF characteristics
| Modulation Wideband FM | |
| Receiving frequency ranges Aw+: 470 - 558 MHzAS: 520 - 558 MHzGw1: 558 - 608 MHzGw: 558 - 626 MHzGBw: 606 - 678 MHzBw: 526 - 698 MHzCw: 718 - 790 MHzDw: 790 - 865 MHzJB: 806 - 810 MHzK+: 925 - 937.5 MHz | |
| Transmission frequencies Max 2880 receiving frequencies,adjustable in 25 kHz steps20 frequency banks, each with upto 32 factory-preset channels,no intermodulation6 frequency banks with up to 32programmable channels | |
| Switching bandwidth up to 88 MHz | |
| Nominal/peak deviation ±24 kHz / ±48 kHz | |
| Frequency stability ≤ ±15 ppm | |
| RF output power at 50 ? Switchable:Low: typically 10 mWStandard: typically 30 mWHigh: typically 50 mW | |
| Pilot tone squelch Can be switched off |
AF characteristics
| Compander system Sennheiser HDX | |
| AF frequency response Microphone: 80 – 18,000 HzLine: 25 – 18,000 Hz | |
| Signal-to-noise ratio (1 mV, peak deviation) | ≥ 115 dBA |
| Total harmonic distortion (THD) ≤ 0.9 % | |
| Max. input voltage Microphone/line | 3 Veff |
| Input impedance Microphone/line | 40 kΩ, unbalanced/1 MΩ |
| Input capacitance Switchable | |
| Setting range for input sensitivity 60 dB in 3 dB steps | |
Overall device
| Temperature range -10 °C to +55 °C (14 °F to 131 °F) | |
| Power supply 2 AA batteries, 1,5 V or BA 2015 accupack | |
| Nominal voltage 3 V battery | 2.4 V rechargeable battery |
| Power consumption | |
| at nominal voltage with transmitter switched off | typically 180 mA ≤ 25 μA |
| Operating time Typically 8 h | |
| Dimensions approx. 82 x 64 x 24 mm | |
| Weight (with batteries) Approx. 160 g | |
SKP 500 G4
RF characteristics
| Modulation Wideband FM | |
| Receiving frequency ranges Aw: 470 - 558 MHzAS: 520 - 558 MHzGw1: 558 - 608 MHzGw: 558 - 626 MHzGBw: 606 - 678 MHzBw: 526 - 698 MHzCw: 718 - 790 MHzDw: 790 - 865 MHzJB: 806 - 810 MHzK+: 925 - 937.5 MHz | |
| Transmission frequencies Max. 2880 receiving frequencies,adjustable in 25 kHz steps20 frequency banks, each with upto 32 factory-preset channels, nointermodulation6 frequency banks with up to 32programmable channels | |
| Switching bandwidth up to 88 MHz | |
| Nominal/peak deviation ±24 kHz / ±48 kHz | |
| Frequency stability ≤ ±15 ppm | |
| RF output power at 50 ? Switchable:Low: typically 10 mWStandard: typically 30 mWHigh: typically 50 mW | |
| Pilot tone squelch Can be switched off |
AF characteristics
| Compander system Sennheiser HDX | |
| AF frequency response 80 – 18,000 Hz | |
| Signal-to-noise ratio (1 mV, peak deviation) | ≥ 120 dBA |
| Total harmonic distortion (THD) ≤ 0.9 % | |
| Input voltage 6 V | eff |
| Input impedance | 68 kΩ, unbalanced |
| Input capacitance Switchable | |
| Setting range for input sensitivity 48 dB in 6 dB steps | |
Overall device
| Temperature range -10 °C to +55 °C (14 °F to 131 °F) | |
| Power supply 2 AA batteries, 1,5 V orBA 2015 accupack | |
| Nominal voltage 3 V battery /2.4 V rechargeable battery | |
| Power consumption at nominal voltage:typically 180 mAwith transmitter switched off:≤ 25 μA | |
| Operating time Typically 8 h | |
| Dimensions Approx. 105 x 43 x 43 mm | |
| Weight (with batteries) Approx. 195 g |
Pin assignment
3.5 mm stereo jack plug

- Plug for headphone and earphone cables, e.g. IE 4.
- Connect to:
• E K I E M G 4
• E K 5 0 0 G 4
3.5 mm mic jack plug

- Plug for lavalier and headset microphone, e.g. ME 2.
- Connect to:
• SK100G4
• SK 300 G4
• SK 500 G4
3.5 mm line jack plug

- Plug for line and instrument cables, e.g. Ci 1-N
- Connect to:
• SK100G4
• SK 300 G4
• SK 500 G4
6.3 mm stereo jack plug, balanced (audio in/loop out)

- Connect to:
• SR IEM G4 Audio In
- SR IEM G4 Loop Out
6.3 mm mono jack plug, unbalanced

- Connect to:
• EM 100 G4 Audio Out
• EM 300-500 G4 Audio Out
6.3 mm stereo jack plug for headphone jack

- Connect to:
• EM 100 G4 headphone input
• EM 300-500 G4 headphone input
• SR IEM G4 headphone input
XLR-3 plug, balanced

Hollow jack plug for power supply

Cleaning and maintenance
Note the following information when cleaning and maintaining evolution wireless G4 series products.
CAUTION
Liquids can damage the products' electronics.
Liquids entering the product housing can cause a short-circuit and damage the electronics.
▷Keep all liquids away from the products.
▶Do not use any solvents or cleansing agents.
▷Disconnect the products from the power supply system and remove rechargeable batteries and batteries before you begin cleaning.
▷Clean all products only with a soft, dry cloth.
▶Note the special cleaning instructions below for the following products.
Cleaning the sound inlet basket of the microphone module
▶Unscrew the top sound inlet basket from the microphone module by turning it counterclockwise.
Remove the foam insert.

You can clean the sound inlet basket in two ways:
▶Use a slightly damp cloth to clean the top sound inlet basket from the inside and outside.
▶Use a brush and rinse with clean water.
▶If necessary, clean the foam insert with a mild detergent or replace the foam insert.
▷Dry the top sound inlet basket and foam insert.
▶Reinsert the foam insert.
▶Screw the sound inlet basket back onto the microphone module.
From time to time, you should also clean the microphone module contacts:
▶Wipe the contacts of the microphone module with a soft, dry cloth.
- EVOLUTION WIRELESS G4 500 P SERIES
- OVERVIEW
- EW 500 P G4 SERIES PRODUCTS
- ACCESSORIES
- THE FREQUENCY BANK SYSTEM
- INSTALLING EW 500 P G4 SERIES DEVICES
- INSTALLING THE EK 500 G
- INSTALLING THE SKM 500 G
- INSTALLING THE SK 500 G
- INSTALLING THE SKP 500 G
- USING EW 500 P G4 SERIES DEVICES
- USING THE EK 500 G
- USING THE SKM 500 G
- USING THE SK 500 G
- USING THE SKP 500 G
- ESTABLISHING A RADIO LINK
- SYNCHRONIZING DEVICES
- PRODUCT VARIANTS
- FREQUENCY TABLES
- SPECIFICATIONS
- PIN ASSIGNMENT
- CLEANING AND MAINTENANCE
- PRODUCT INFORMATION
- YOU CAN ALSO FIND MORE INFORMATION HERE
- EK 500 G4 DIVERSITY RECEIVER
- SKM 500 G4 HANDHELD TRANSMITTER
- SK 500 G4 BODYPACK TRANSMITTER
- SKP 500 G4 PLUG-ON TRANSMITTER
- MICROPHONES AND CABLES
- MICROPHONE MODULES
- HEADSET AND LAVALIER MICROPHONES
- LINE CONNECTING CABLE
- CL
- RECHARGEABLE BATTERY AND CHARGER
- BA 2015 RECHARGEABLE BATTERY
- L2015 CHARGER
- ACCESSORIES FOR CAMERA MOUNTING
- CA 2 CAMERA ADAPTER
- ADDITIONAL ACCESSORIES
- COLOR LABELING SET
- MICROPHONE CLAMP
- INSTALLATION
- INSERTING AND REMOVING THE BATTERIES/RECHARGEABLE BATTERIES
- BATTERY STATUS
- CONNECTING HEADPHONES TO THE EK 500 G
- ATTENTION
- DANGER DUE TO HIGH VOLUME LEVELS
- ATTACHING THE DIVERSITY RECEIVER TO A CAMERA
- CONNECTING THE DIVERSITY RECEIVER TO A CAMERA
- REPLACING THE MICROPHONE MODULE
- CHANGING THE COLORED RING
- CONNECTING A MICROPHONE TO THE SK 500 G
- CONNECTING AN INSTRUMENT OR LINE SOURCE TO THE SK 500 G
- ATTACHING THE BODYPACK TRANSMITTER TO CLOTHING
- ATTACHING THE PLUG-ON TRANSMITTER TO THE MICROPHONE
- OPERATION
- OPERATING ELEMENTS OF THE EK 500 G4 DIVERSITY RECEIVER
- ON/OFF BUTTON WITH ESC FUNCTION IN THE OPERATING MENU
- INFRA-RED INTERFACE
- MM JACK SOCKET PHONES
- MM JACK SOCKET AF OUT
- SWITCHING THE EK 500 G4 ON AND OFF
- VOLUME CONTROL OF THE PHONES SOCKET
- LOCK-OFF FUNCTION
- WHEN YOU ARE IN THE OPERATING MENU
- WHEN ONE OF THE STANDARD DISPLAYS IS SHOWN
- DISPLAYS ON THE EK 500 G4 DISPLAY PANEL
- BUTTONS FOR NAVIGATING THROUGH THE MENU
- SET
- PRESS THE SET BUTTON
- PRESS THE UP OR DOWN BUTTON
- HOME SCREEN
- BATTERY STATUS OF THE RECEIVER
- MUTE MUTING FUNCTION
- P PILOT TONE
- FREQUENCY BANK/CHANNEL/NAME STANDARD DISPLAY
- SETTING OPTIONS IN THE MENU
- SYNCHRONIZING THE TRANSMITTER WITH THE DIVERSITY RECEIVER
- ADJUSTING THE VOLUME OF THE HEADPHONE SOCKET
- ADJUSTING THE SQUELCH THRESHOLD
- SCANNING FOR UNUSED FREQUENCY PRESETS, RELEASES AND SELECTS FREQUENCY PRESETS
- SETTING THE FREQUENCY BANK AND THE CHANNEL
- ENTERING A FREELY SELECTABLE NAME
- ADJUSTING THE AUDIO OUTPUT LEVEL
- ACTIVATE/DEACTIVATE THE AUTOMATIC LOCK-OFF FUNCTION
- CONFIGURING ENHANCED SETTINGS IN THE ADVANCED MENU
- MENU STRUCTURE
- SYNC MENU ITEM
- PHONES VOLUME MENU ITEM
- SQUELCH MENU ITEM
- SETTING RANGE
- TO OPEN THE SQUELCH MENU ITEM
- CAUTION
- RISK OF HEARING AND MATERIAL DAMAGE
- EASY SETUP MENU ITEM
- FREQUENCY PRESET MENU ITEM
- TO OPEN THE FREQUENCY PRESET MENU ITEM
- NAME MENU ITEM
- TO OPEN THE NAME MENU ITEM
- AF OUT MENU ITEM
- AUTO LOCK MENU ITEM
- ADVANCED MENU ITEM
- TO OPEN THE ADVANCED SUBMENU
- ADJUSTING THE RECEIVING FREQUENCY FOR THE FREQUENCY BANK U
- ACTIVATING/DEACTIVATING THE PARAMETERS TO BE TRANSFERRED TO THE TRANSMITTERS
- ACTIVATING/DEACTIVATING THE PILOT TONE EVALUATION
- ADJUSTING THE CONTRAST OF THE DISPLAY PANEL
- RESETTING THE RECEIVER
- DISPLAYING THE CURRENT SOFTWARE REVISION
- ADVANCED -> TUNE MENU ITEM
- ONLY ADJUSTING THE FREQUENCY
- SETTING THE CHANNEL AND FREQUENCY
- ADVANCED -> SYNC SETTINGS MENU ITEM
- ADVANCED -> PILOT TONE MENU ITEM
- ADVANCED -> LCD CONTRAST MENU ITEM
- ADVANCED -> RESET MENU ITEM
- ADVANCED -> SOFTWARE REVISION MENU ITEM
- OPERATING ELEMENTS OF THE SKM 500 G4 HANDHELD TRANSMITTER
- COLORED RING
- OPERATION AND BATTERY INDICATOR, RED LED
- SWITCHING THE SKM 500 G4 HANDHELD TRANSMITTER ON AND OFF
- MUTING THE HANDHELD TRANSMITTER (AF MUTE)
- DEACTIVATING THE RF SIGNAL (RF MUTE)
- DISPLAYS ON THE SKM 500 G4 HANDHELD TRANSMITTER DISPLAY PANEL
- AF AUDIO LEVEL
- FREQUENCY
- NAME
- TRANSMISSION ICON
- SELECT A STANDARD DISPLAY
- FREQUENCY/NAME STANDARD DISPLAY
- CHANNEL/FREQUENCY STANDARD DISPLAY
- NAME/CHANNEL STANDARD DISPLAY
- BUTTONS FOR NAVIGATING THE SKM 500 G4 MENU
- NAVIGATING THROUGH THE MENU
- MAKING CHANGES IN A MENU ITEM
- ADJUSTING THE INPUT SENSITIVITY
- ACTIVATING/DEACTIVATING THE AUTOMATIC LOCK-OFF FUNCTION
- SENSITIVITY MENU ITEM
- RECOMMENDED PRESETS
- PLEASE NOTE WHEN CREATING MULTI-CHANNEL SYSTEMS
- ADJUSTING THE TRANSMISSION FREQUENCIES FOR THE U FREQUENCY BANK
- CONFIGURING THE TRANSMISSION POWER
- RESETTING THE TRANSMITTER
- ADVANCED > TUNE MENU ITEM
- ADVANCED > RF POWER MENU ITEM
- ADVANCED > PILOT TONE MENU ITEM
- ADVANCED > LCD CONTRAST MENU ITEM
- ADVANCED > RESET MENU ITEM
- ADVANCED > SOFTWARE REVISION MENU ITEM
- OPERATING ELEMENTS OF THE SK 500 G4 BODYPACK TRANSMITTER
- DISPLAY PANEL
- AUDIO OVERLOAD INDICATOR, YELLOW LED
- UP BUTTON
- SET BUTTON
- DOWN BUTTON
- MUTE SWITCH
- SWITCHING THE SK 500 G4 BODYPACK TRANSMITTER ON AND OFF
- MUTING THE BODYPACK TRANSMITTER (AF MUTE)
- DEACTIVATING THE RF SIGNAL WITH THE MUTE SWITCH
- DEACTIVATING THE RF SIGNAL WITH THE ON/OFF BUTTON
- DISPLAYS ON THE SK 500 G4 BODYPACK TRANSMITTER DISPLAY PANEL
- BUTTONS FOR NAVIGATING THE SK 500 G4 MENU
- CONFIGURING THE FUNCTION OF THE MUTE SWITCH AND THE RMS 1 REMOTE MUTE SWITCH
- ADVANCED > MUTE MODE MENU ITEM
- AF ON/OFF MODE
- RF ON/OFF MODE
- DISABLED MODE
- OPERATING ELEMENTS OF THE SKP 500 G4 PLUG-ON TRANSMITTER
- SWITCHING THE SKP 500 G4 PLUG-ON TRANSMITTER ON AND OFF
- MUTING THE PLUG-ON TRANSMITTER (AF MUTE)
- DISPLAYS ON THE SKP 500 G4 PLUG-ON TRANSMITTER DISPLAY PANEL
- BUTTONS FOR NAVIGATING THE SKP 500 G4 MENU
- ACTIVATING PHANTOM POWERING
- ADVANCED > PHANTOM POWER 48V MENU ITEM
- SETTING NOTES
- PLEASE NOTE THE INFORMATION AT THE FOLLOWING ADDRESS
- EK 500 G4 PRODUCT VARIANTS
- SKM 500 G4 PRODUCT VARIANTS
- SK 500 G4 PRODUCT VARIANTS
- SKP 500 G4 PRODUCT VARIANTS
- EK 500 G
- RF CHARACTERISTICS
- AF CHARACTERISTICS
- OVERALL DEVICE
- SKM 500 G
- SK 500 G
- SKP 500 G
- MM STEREO JACK PLUG
- MM MIC JACK PLUG
- MM LINE JACK PLUG
- MM STEREO JACK PLUG, BALANCED (AUDIO IN/LOOP OUT)
- MM MONO JACK PLUG, UNBALANCED
- MM STEREO JACK PLUG FOR HEADPHONE JACK
- XLR-3 PLUG, BALANCED
- HOLLOW JACK PLUG FOR POWER SUPPLY
- LIQUIDS CAN DAMAGE THE PRODUCTS' ELECTRONICS
- CLEANING THE SOUND INLET BASKET OF THE MICROPHONE MODULE
Brand : SENNHEISER
Model : EW 500 P G4
Category : Microphone