
GS70 2PC Stealth - Laptop MSI - Free user manual and instructions
Find the device manual for free GS70 2PC Stealth MSI in PDF.


| Product Type | Gaming Laptop |
| Brand | MSI |
| Model | GS70 2PC Stealth |
| Display Size | 17.3 inches |
| Display Resolution | 1920 x 1080 pixels (Full HD) |
| Processor | Intel Core i7-4700HQ (2.4 GHz, up to 3.4 GHz) |
| Graphics Card | NVIDIA GeForce GTX 860M (2GB GDDR5) |
| Memory | 8GB DDR3L (expandable to 16GB) |
| Storage | 1TB HDD (7200RPM) + 128GB SSD |
| Operating System | Windows 8.1 |
| Weight | Approximately 2.6 kg (5.73 lbs) |
| Dimensions | 418.5 x 287 x 21.8 mm |
| Battery Capacity | 6-cell 4840 mAh |
| Power Supply | 120W AC adapter (19.5V) |
| Keyboard | Full-size SteelSeries backlit keyboard |
| Audio | Dynaudio speakers with Sound Blaster Cinema |
| Connectivity | Wi-Fi 802.11ac, Bluetooth 4.0 |
| Ports | USB 3.0, HDMI, mini DisplayPort, Gigabit Ethernet, SD card reader |
| Webcam | HD webcam (1280 x 720) |
| Cooling Technology | Cooler Boost dual-fan cooling system |
| Security Features | Kensington lock slot, password protection |
| Maintenance & Cleaning | Regular vent cleaning with compressed air |
| Spare Parts | Battery, AC adapter, keyboard, cooling fan available |
| General Information | User manual and drivers on MSI website |
Frequently Asked Questions - GS70 2PC Stealth MSI
User questions about GS70 2PC Stealth MSI
0 question about this device. Answer the ones you know or ask your own.
Ask a new question about this device
Download the instructions for your Laptop in PDF format for free! Find your manual GS70 2PC Stealth - MSI and take your electronic device back in hand. On this page are published all the documents necessary for the use of your device. GS70 2PC Stealth by MSI.
USER MANUAL GS70 2PC Stealth MSI
Regulations and Statements 1-4
FCC-B Radio Frequency Interference Statement ..... 1-4
FCC Conditions 1-4
CE Conformity 1-4
Battery Regulations 1-5
WEEE Statement 1-5
Safety Instructions 1-6
Trademarks 1-8
Reversion History...... 1-8
Chapter 2: Introductions
Manual Map....2-2
Unpacking 2-2
Product Overview 2-3
Top-Open View 2-3
Front Side View 2-6
Right Side View 2-8
Left Side View 2-10
Bottom Side View 2-12
Specification 2-13
Chapter 3: Getting Started
Begin to Use the Notebook 3-2
Power Management 3-3
AC Power 3-3
Battery Power 3-3
Power Management in Windows OS 3-5
Energy Saving Tips 3-7
Basic Operations....3-8
Safety and Comfort Tips 3-8
Knowing the Keyboard 3-10
Wireless Activation 3-14
Knowing the Touchpad 3-15
Knowing the Smart Pad.... 3-17
About Hard Disk Drive 3-18
Connecting the External Devices 3-19
Peripheral Devices 3-19
Communication Devices 3-20
◆ Regulations and Statements
FCC-B Radio Frequency Interference Statement
This equipment has been tested and found to comply with the limits for a Class B digital device, pursuant to part 15 of the FCC rules. These limits are designed to provide reasonable protection against harmful interference in a residential installation. This equipment generates, uses and radiates radio frequency energy, and, if not installed and used in accordance with the instructions, may cause harmful interference to radio communications. However, there is no guarantee that interference will not occur in a particular installation. If this equipment does cause harmful interference to radio or television reception, which can be determined by turning the equipment off and on, the user is encouraged to try to correct the interference by one or more of the following measures:
■ Reorient or relocate the receiving antenna.
■ Increase the separation between the equipment and receiver.
■ Connect the equipment into an outlet on a circuit different from that to which the receiver is connected.
■ Consult the dealer or an experienced radio TV technician for help.
NOTE
- The changes or modifications not expressly approved by the party responsible for compliance could void the user's authority to operate the equipment.
- Shield interface cables and AC power cord, if any, must be used in order to comply with the emission limits.
FCC Conditions
This device complies with part 15 of the FCC Rules. Operation is subject to the following two conditions:
■ This device may not cause harmful interference.
This device must accept any interference received, including interference that may cause undesired operation.
CE Conformity

This device is in compliance with the essential safety requirements and other relevant provisions set out in the European Directive.
Battery Regulations

European Union:
Batteries, battery packs, and accumulators should not be disposed of as unsorted household waste. Please use the public collection system to return, recycle, or treat them in compliance with the local regulations.

廢電池請回收
Taiwan:
For better environmental protection, waste batteries should be collected separately for recycling or special disposal.
California, USA: The button cell battery may contain perchlorate material and requires special handling when recycled or disposed of in California.
For further information please visit: http://www.dtsc.ca.gov/hazardouswaste/perchlorate/
Safety Guideline for Using Lithium Battery
Danger of explosion if battery is incorrectly replaced. Replace only with the same or equivalent type recommended by the equipment manufacturer. Discard used batteries according to manufacturer's instructions.
WEEE Statement
Under the European Union ("EU") Directive on Waste Electrical and Electronic Equipment, Directive 2002/96/EC, which takes effect on August 13, 2005, products of "electrical and electronic equipment" cannot be discarded as municipal waste anymore and manufacturers of covered electronic equipment will be obligated to take back such products at the end of their useful life.

◆ Safety Instructions

Read the safety instructions carefully and thoroughly. All cautions and warnings on the equipment or user's manual should be noted.

Keep this equipment away from humidity and high temperature.

Lay this equipment on a stable surface before setting it up.

The openings on the enclosure are used for air convection and to prevent the equipment from overheating. Do not cover the openings.

- Do not leave the equipment in an unconditioned environment with a storage temperature above 60°C (140°F) or below 0°C (32°F), which may damage the equipment.
- This unit should be operated under maximum ambient temperature of 35°C ( 95°F ).

- Make sure the power voltage is within safety range and has been adjusted properly to the value of 100\~240V before connecting the equipment to the power outlet.
- Always unplug the AC power cord before installing any add-on card or module to the equipment.
- Always disconnect the AC power cord or uninstall the battery pack or switch off the wall socket if the equipment would be left unused for a certain time to achieve zero energy consumption.

Never pour liquid into the opening that could damage the equipment or cause an electrical shock.

Place the power cord in a way that people are unlikely to step on it. Do not place anything on top of the power cord.
 | Always keep the strong magnetic or electrical objects away from the equipment. |
 | When installing the coaxial cable to the TV Tuner, it is necessary to ensure that the metal shield is reliable connected to protective earthing system of the building.Cable distribution system should be grounded (earthed) in accordance with ANSI/NFPA 70, the National Electrical Code (NEC), in particular Section 820.93, Grounding of Outer Conductive Shield of a Coaxial Cable. |
 | To prevent explosion caused by improper battery replacement, use the same or equivalent type of battery recommended by the manufacturer only.Always keep the battery in a safe place. |
 | If any of the following situations arises, get the equipment checked by a service personnel:The power cord or plug is damaged.Liquid has penetrated into the equipment.The equipment has been exposed to moisture.The equipment has not worked well or you can not get it work according to User's Manual.The equipment was dropped and damaged.The equipment has obvious signs of breakage. |
 | Green Product FeaturesReduced energy consumption during use and stand-byLimited use of substances harmful to the environment and healthEasily dismantled and recycledReduced use of natural resources by encouraging recyclingExtended product lifetime through easy upgradesReduced solid waste production through take-back policyEnvironmental PolicyThe product has been designed to enable proper reuse of parts and recycling and should not be thrown awayUsers should contact the local authorized point of collection for recycling and disposing of their end-of-life products. |
Trademarks
- All trademarks are the properties of their respective owners.
■ SRS Premium Sound, SRS and the symbol are trademarks of SRS Labs, Inc. - THX and THX TruStudio Pro are trademarks of THX Ltd. which may be registered in some jurisdictions. All rights reserved.
■ Sound Blasters registered trademark of Creative Technology Ltd.
Revision History
Version Revision History Date
1.0 First Released 02, 2014
2
Introductions
Congratulations on becoming an user of this notebook, the finely designed notebook. This brand-new exquisite notebook will give you a delightful and professional experience in using notebook. We are proud to tell our users that this notebook is thoroughly tested and certified by our reputation for unsurpassed dependability and customer satisfaction.
◆ Manual Map
This User's Manual provides instructions and illustrations on how to operate this notebook. It is recommended to read this manual carefully before using this notebook.
Chapter 1, Preface, gives users the basic safety information and caution that is interrelated to using this notebook. It is recommended to read these information or caution when using this notebook for the first time.
Chapter 2, Introductions, includes the descriptions of all the accessories of this notebook. It is recommended to check out that if you have all the accessories included when you open the packing box. If any of these accessories is damaged or missing, please contact the vendor where you purchased this notebook. Also, this chapter provides the specification of this notebook, and introduces the function buttons, quick launch buttons, connectors, LEDs and externals of this notebook.
Chapter 3, Getting Started, gives the basic operation instructions on using keyboard, touchpad, hard disk drive, and optical storage drive. Beside, the steps of installing and uninstalling the battery; and the procedures of connecting the various external devices, communication devices, and so on, are also provided to help users getting familiar with this notebook.
Unpacking
First, unpack the shipping carton and check all items carefully. If any item contained is damaged or missing, please contact your local dealer immediately. Also, keep the box and packing materials in case you need to ship the unit in the future. The package should contain the following items:
- Notebook
- Quick Start Guide
• AC/DC adapter and AC power cord
- Carry bag (optional)
- All-in-one application disk, containing the full version of user's manual, drivers, utilities, and optional recovery function, etc.
Product Overview
This section provides the description of basic aspects of the notebook. It will help you to know more about the appearance of this notebook before using it. Please be aware that the notebook shown in this section may vary from the actual one that users purchased.
Top-open View
The figure of top-open view and description shown below will lead you to browse the main operating area of your notebook.

The figures shown here are for reference only.
1. Webcam
- This built-in Webcam can be used for picture taking, video recording or conferencing, and any other interactive applications.
- Webcam LED indicator, next to the webcam, glows white when webcam function is activated; LED goes out when this function is turned off.
2. Internal Microphone
This is the built-in microphone and its function is the same with microphone.
3. Soundbar Speakers
Give high quality sound blaster with stereo system and Hi-Fi function supported.
4. Power Button / Power LED/ GPU Mode LED

Power Button
- Use the power button to turn the notebook power ON and OFF.
- Use the power button to awake the notebook from the sleep state.
Power LED/ GPU Mode LED
- Glowing white when the notebook power is turned on, and the UMA GPU mode is selected.
- Glowing amber when the optionally supported nVidia Optimus mode is selected.
- LED goes off when the notebook is turned off
5. Keyboard
The built-in keyboard provides all the functions of a full-sized keyboard.
Quick Launch [Fn] Keys
Use the [Fn] keys on the keyboard to activate the specific applications or tools.
With the help of these keys, users will be able to do work more efficiently.
The following keys will only be functional in the Operating System with the SCM application installed.
![MSI GS70 2PC Stealth - Quick Launch [Fn] Keys - 1](/content/2026/08/1624681/images/953f5951d7630e20986b75be9bd7c8889aa8960e95448cf36ca55cc7bcb1a77b.jpg)
Dragon Gaming Center or User Defined (optional)
- Press and hold the Fn key, and then press the F4 key to launch the default Dragon Gaming Center application.
Or, press and hold the Fn key, and then press the F4 key to launch the User Defined application after Dragon Gaming Center application is removed.
![MSI GS70 2PC Stealth - Quick Launch [Fn] Keys - 2](/content/2026/08/1624681/images/9e0fe48aa57f1e2e1ac6e5c1d9e539a017e07c22aa2b6715bd995515d44d4ac0.jpg)
ECO Engine (Power Saving)
- Press and hold the Fn key, and then press the F5 key repeatedly to switch among various power saving modes provided by ECO Engine, or to turn this function off recurrently.
![MSI GS70 2PC Stealth - Quick Launch [Fn] Keys - 3](/content/2026/08/1624681/images/ac0e0f23906f7d5f2378d003e7dbc61e4508a5de5eecc3cf5b57fe54891baec0.jpg)
Webcam
- Press and hold the Fn key, and then press the F6 key to turn the Webcam function on. Press again to turn it off.
![MSI GS70 2PC Stealth - Quick Launch [Fn] Keys - 4](/content/2026/08/1624681/images/dbc37364382bcf24dd6e98866a3bba8d07c265d48b499537112311b3017cd23f.jpg)
Airplane mode
- Press and hold the Fn key, and then press the F10 key repeatedly to turn Airplane mode on or off recurrently.
- For flight safety consideration, it is always recommended to turn Airplane Mode on when you are in flight.
Refer to the Airplane mode switch icon under [Start/Settings/Change PC Settings/Network/Airplane mode] on the desktop to check the device status. - To enable the WLAN or Bluetooth function, please refer to the instructions provided in “Wireless Activation” in chapter 3.
General [Fn] Keys
![MSI GS70 2PC Stealth - General [Fn] Keys - 1](/content/2026/08/1624681/images/c99ec260ccaae9536229d2d0cd8a5decbfc367dcd2a93505c7d961912f6f8d6b.jpg)
![MSI GS70 2PC Stealth - General [Fn] Keys - 2](/content/2026/08/1624681/images/e5d96a8cab8f36b72258b7efd297badfb23e77b2f05ca752a3d42ba2cad551e8.jpg)
- Increase keyboard LEDs' RGB saturation level.
- Decrease keyboard LEDs' RGB saturation level.
6. Touchpad
This is the pointing device of the notebook.
Front Side View

1. Status LED

Battery Status
♦ Glowing white when the battery is being charged.
- Continuously blinking amber if the battery fails and it is recommended to replace a new battery.
- Consult the local dealer for purchasing an equivalent type of battery recommended by the manufacturer.
- Battery LED goes out when it is fully charged or when the AC/DC adapter is disconnected.

WLAN(WiFi)
Wireless LAN (WiFi)
- This LED indicator glows white when Wireless LAN (WiFi) function is enabled.
- LED indicator goes out when this function is disabled.

Bluetooth
Bluetooth (optional)
Bluetooth LED indicator glows white when Bluetooth function is enabled.
- LED indicator goes out when this function is disabled.
Note: Functions listed above may be optionally supported depending on the model users purchased.
- Warning: For flight safety consideration, make sure the WLAN and Bluetooth LED indicators go out when you are in flight.
- To enable or disable the WLAN or Bluetooth function in Windows 8.x operating system, please refer to the instructions provided in Wireless Activation in chapter 3.
- Contact the local distributor for further information about wireless connection if necessary.

Caps Lock
Glowing white when the Caps Lock function is activated.

Num Lock
Glowing white when the Num Lock function is activated.

Hard Disk/ Optical Drive Device In-use
Blinking white when the system is accessing the hard disk drive or the optical drive device.

Sleep State
- Blinking white when the system is in Sleep state.
- LED goes out when the system is turned off.
Right Side View
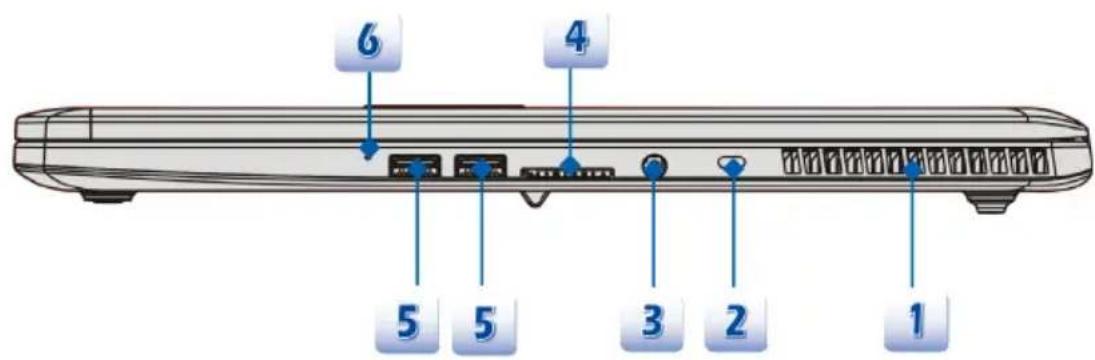
1. Ventilator
The ventilator is designed to cool the system. DO NOT block the ventilator for air circulation.
2. Kensington Lock
This notebook provides a Kensington Lock hole, which allows users to secure the notebook in place with a key or some mechanical PIN device and attached through a rubberized metal cable. The end of the cable has a small loop which allows the whole cable to be looped around a permanent object, such as a heavy table or other similar equipment, thus securing the notebook in place.
3. Power Connector
To connect the AC/DC adapter and supply power for the notebook.
4. Card Reader
The built-in card reader may support SD4.0 (Secure Digital) card. Contact the local dealer for further and correct information and be noted that the supported memory cards may vary without notice.
5. USB 3.0 Ports
USB 3.0, the SuperSpeed USB, delivers the higher interface speeds for connecting various devices, such as storage devices, hard drives, or video cameras, and offers more advantages over high-speed data transferring.
6. Battery Reset Hole
If your computer system hangs, you can use a straightened paperclip to insert this hole and reset the notebook.
Note: After resetting the computer system, please connect the AC power when first bootup the notebook.
Left Side View

1. Ventilator
The ventilator is designed to cool the system. DO NOT block the ventilator for air circulation.
2. RJ-45 Connector
The 10/100/1000 Ethernet connector is used to connect a LAN cable for network connection.
3. HDMI Connecto

HDMI (High Definition Multimedia Interface) is a new interface standard for PCs, displays and consumer electronics devices that supports standard, enhanced and high-definition video, plus multi-channel digital audio on a single cable.
4. Mini-DisplayPort
The Mini-DisplayPort is a miniaturized version of the DisplayPort, with a suitable adapter, the Mini-DisplayPort may be used to drive displays with a VGA, DVI or HDMI interface.
5. USB 3.0 Port/ Super Charger USB Port
Super Charger USB port provides faster power charging function for Apple devices when the notebook is in power off mode.
6. USB 3.0 Port
USB 3.0, the SuperSpeed USB, delivers the higher interface speeds for connecting various devices, such as storage devices, hard drives, or video cameras, and offers more advantages over high-speed data transferring.
7. Audio Port Connectors
Make high quality sound blaster with stereo system and Hi-Fi function supported.

Headphone out/ SPDIF-out
Used for speakers or headphones. The S/PDIF connector is also provided for digital audio transmission to external speakers through an optical fiber cable.
◆ Connect the Front speakers here.

Line In
- Used for an external audio device.
◆ Connect the Rear speakers here.

Microphone
- Used for an external microphone.
- Connect the Center and Subwoofer speakers here.
Bottom Side View

1. Ventilator
The ventilator is designed to cool the system. DO NOT block the ventilator for air circulation.
2. Subwoofer Speaker
The subwoofer speaker is to reproduce low-pitched audio frequencies known as bass.
Specification
The specification may change without notice. The actual products sold are different from areas. Please check the detailed specification with your local dealers.
Physical Characteristic
| Dimension 418.5 (W) x 287 (D) x 21.8 (H) mm |
| Weight 2.6 kg (with 6-cell battery) |
CPU
| Processor Type Intel | ® Haswell Quad Core |
| Supported Processor Intel | ® Quad Core processor |
Core Chip
| Core Chip Intel | ®Lynx Point HM8 series |
Memory
| Technology DDR3L 1333/ 1600 MHz |
| Memory DDR3L SO-DIMM X 2 slots |
| Maximum up to 16 GB |
Power
| AC/DC Adapter | 150W, 19.5V |
| Input: 100~240V, 50~60Hz | |
| Output: 19.5V =7.7A |
Battery Type 6-cell
RTC Battery Yes
Storage (items listed here may very without notice)
| HDD/ SDD form factor | 2.5" HDD / mSATA SSD |
I/O Port
| USB | x 4 (version 3.0) |
| Mic-in | x 1 |
| Line-in | x 1 |
Headphone-out x 1 (SPDIF-Out supported)
| RJ45 x 1 | |
| HDMI x 1 | |
| Mini-DisplayPort x 2 | |
| Card Reader x 1 (SD4.0)The supported memory cards may vary without notice. | |
| Communication Port | |
| LAN 10/ 100/ 1000Mb Ethernet | |
| Wireless LAN Supported | |
| Bluetooth Supported | |
| Display | |
| LCD Type 17.3" full HD display | |
| Brightness Controlled by K/B hot-keys | |
| Video | |
| Graphics NVIDIA GeForce discrete graphics card+Intel HD graphics card UMAWith NVIDIA Optimus supported | |
| VRAM GDDR5Depends on the model you purchased. | |
| HDMI output Supported | |
| DisplayPort output | Supported |
| Multi-Display Function | Supported |
| WebCam | |
| FHD CMOS Camera | Supported |
| Audio | |
| Internal Speaker Soundbar speakers + 1 subwoofer | |
| Sound Volume | Adjusted by keyboard hot-key & SW |
| Software & BIOS | |
| USB Flash Boot | USB floppy boot up DOS only |
| BIOS | Fast Boot Support |
Others
Compatibility WHQL
Kensington Lock Hole x 1
3
Getting Started
◆ Begin to Use the Notebook
For a new user of this notebook, we would like to suggest you follow the illustrations below to begin to use the notebook.


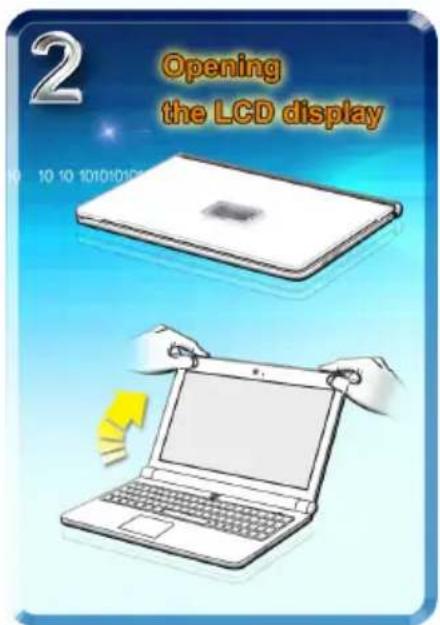
Power Management
AC Power
It is strongly recommended to connect the AC/DC adapter to the notebook and use the AC power while using this notebook for the first time. When the AC power is connected, recharging the battery will start immediately.
Note that the AC/DC adapter included in the package is approved for your notebook; using other adapter model may damage either the notebook or other devices attached to it.
Do not cover the AC/DC adapter since it may generate a certain heat while in use. Always be aware of heat coming from the AC/DC adapter in use.
Battery Power
This notebook is equipped with a built-in high-capacity Li-ion battery pack. The rechargeable Li-ion battery pack is an internal power source of the notebook. Be aware of that this battery pack may not be replaced by users.
Conserving Battery Power
Efficient battery power is critical to maintain a normal operation. If the battery power is not managed well, the saved data and customized settings may be lost.
To optimize battery life and avoid a sudden power loss, read the tips below:
- Suspend system operation if the system will be idle for a while or shorten the suspend timer's time period.
- Turn off the system if you won't be using it for a period of time.
- Disable unnecessary settings or remove idle peripherals.
- Connect an AC/DC adapter to the system whenever possible.
Charging the Battery Pack
The battery pack can be recharged while it is installed in the notebook. Please pay attention to the following tips before recharging the battery:
If a charged battery pack is not available, save your work and close all running programs and shut down the system or Save-to-Disk.
♦ Plug in an external AC/DC adapter.
- You can use the system, suspend system operation or shut down and turn off the system without interrupting the charging process.
- The battery pack uses Lithium-ion battery cells that have no “memory effect.” It is unnecessary to discharge the battery before recharging. However, to optimize the life of battery, we suggest that consuming the battery power completely once a month is necessary.
- The actual charging time will be determined by the applications in use.
Power Management in Windows OS
Power management of personal computers (PCs) and monitors has the potential to save significant amounts of electricity as well as deliver environmental benefits. To be energy efficient, turn off your display or set your PC to standby/hibernate mode after a period of user inactivity.
Follow the instructions below to adjust the power management settings in Windows OS:
"Power Options" in Windows OS allows you to control the power management features of your display, hard drive, and battery.

Drag the mouse cursor to the left corner of the screen and Start icon will show up. Right click on the icon to show selection menu. Select Control Panel in the menu.


Click on System and Security.


Click on Power Options.

Power Options
Require a password when the computer wakes | Change what the power buttons do
Change when the computer sleeps

Then select a power plan that meets your personal needs.
Choose or customize a power plan
A power plan is a collection of hardware and system settings (like display brightness, sleep, etc.) that manages how your computer uses power. Tell me more about power plans
Preferred plans
● Balanced (recommended)
Change plan settings
Automatically balances performance with energy consumption on capable hardware.
Power saver
Saves energy by reducing your computer's performance where possible.
Change plan settings
Show additional plans


The Power icon will present various and relative options as following:


You can wake up your computer from power saving mode by pressing the power button.
Energy Saving Tips
- Activate the ECO power saving function to manage the computer's energy consumption.
- Turn off the monitor after a period of user inactivity.
◆ Utilize the Fn and F12 sleep mode keys to turn into power saving mode. - Tune the settings in Power Options under Windows OS to optimize the computer's power management.
- Always disconnect the AC power cord or uninstall the battery pack or switch off the wall socket if the computer would be left unused for a certain time to achieve zero energy consumption.
The power management feature allows the computer to initiate a lower-power or “Sleep” mode after a period of user inactivity. When used with an external ENERGY STAR qualified monitor, this feature also supports similar power management features of the monitor. To take advantage of these potential energy savings, the power management feature has been preset to behave in the following ways when the system is operating on AC power:
♦ Turn off the display after 5 minutes
♦ Initiate Sleep after 10 minutes
The computer exits Sleep when the power/Sleep button is pressed. When the Wake On LAN (WOL) feature is enabled, the computer can also exit Sleep in response to a network signal.
◆ Basic Operations
If you are a beginner to the notebook, please read the following instructions to assure your own safety, and make yourself comfortable during the operations.
Safety and Comfort Tips
The notebook is a portable platform that allows you to work anywhere. However, choosing a good workspace is important if you have to work with your notebook for a long period of time.
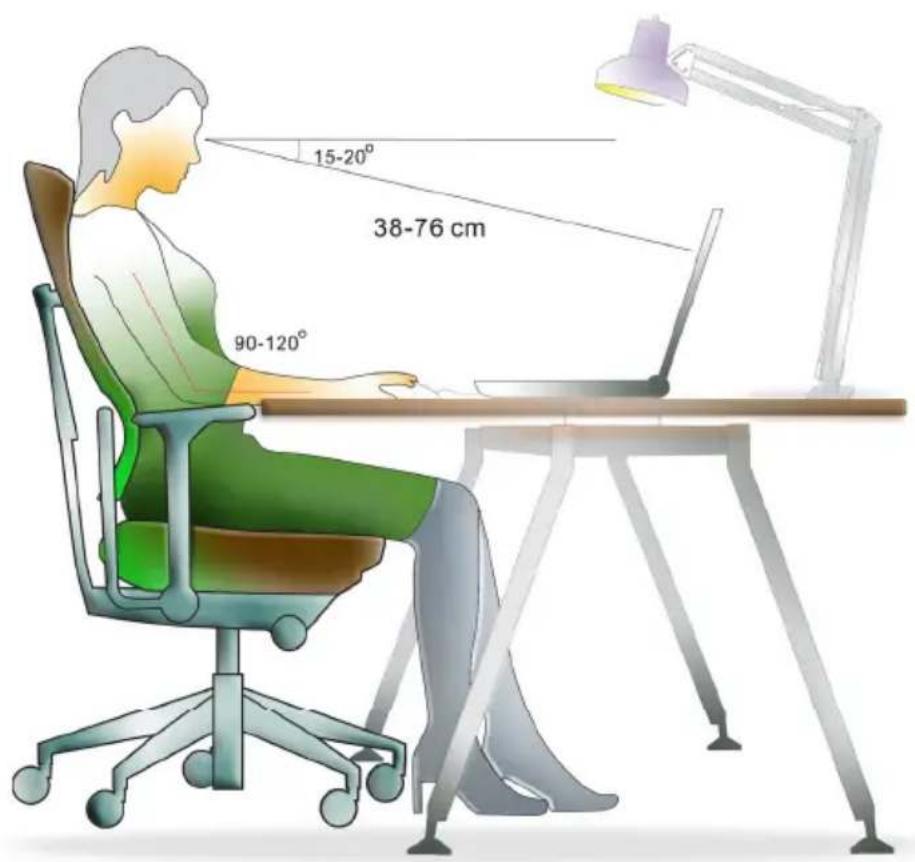
- Your work area should have enough illumination.
- Choose the proper desk and chair and adjust their height to fit your posture when operating.
- When sitting on the chair, adjust the chair's back (if available) to support your back comfortably.
- Place your feet flat and naturally on the floor, so that your knees and elbows have the proper position (about 90-degree) when operating.
- Put your hands on the desk naturally to support your wrists.
- Adjust the angle/position of the LCD panel to have an optimal view.
- Avoid using your notebook in the space where may cause you discomforted.
- Change your posture frequently.
- Stretch and exercise your body regularly.
- Remember to take a break after working for a period of time.
Knowing the Keyboard
This notebook provides a full-functioned keyboard. This keyboard can be divided into four categories: Typewriter keys, Cursor keys, Numeric keys and Function keys.

- Typewriter keys
- Numeric keys
- Cursor keys / Function keys
Typewriter Keys
In addition to providing the major function of the keyboard, these typewriter keys also provide several keys for special purposes, such as [Ctrl,] [Alt,] and [Esc] key.
When the lock keys are pressed, the corresponding LEDs will light up to indicate their status:
- Num Lock: Press this key to toggle the Num Lock on and off. When this function is activated, you can use the numeric keys that are embedded in the typewriter keys.
- Caps Lock: Press this key to toggle the Caps Lock on and off. When this function is activated, the letters you type are kept in uppercase.
- Scroll Lock: Press this key to toggle the Scroll Lock on and off. This function is defined by individual programs, and is usually used under DOS.
Numeric Keys
Find the numeric keys among the keyboard, and activate the Num Lock function to use these numeric keys to enter numbers and calculations.
Cursor Keys
The four cursor (arrow) keys and [Home], [PgUp], [PgDn], [End] keys are used to control the cursor movement.
The [Backspace] key, [Ins] and [Del] keys at upper right corner are used for editing purpose.
Function Keys
The following [Fn] keys will only be functional in the Operating System with the SCM application installed.
■ Windows Key
You can find the Windows Logo key (☐) on the keyboard which is used to perform Windows-specific functions, such as opening the Start menu and launching the shortcut menu.
■ General [Fn] Keys

Switch the display output mode between the LCD, external monitor and both.

Enable or disable the touchpad function.
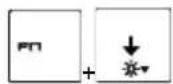
Decrease the LCD brightness.

Increase the LCD brightness.

Decrease the built-in speaker's volume.

Increase the built-in speaker's volume.
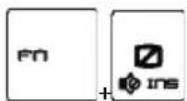
Disable the computer's audio function.

Force the computer into sleep state (depending on the system configuration).
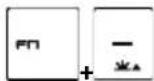
- Increase keyboard LEDs' RGB saturation level.

◆ Decrease keyboard LEDs' RGB saturation level.
■ Quick Launch [Fn] Keys
Use the [Fn] keys on the keyboard to activate the specific applications or tools. With the help of these keys, users will be able to do work more efficiently.
![MSI GS70 2PC Stealth - ■ Quick Launch [Fn] Keys - 1](/content/2026/08/1624681/images/14828f80e4bcd0980e96ffb1e5715e9a59cc76974ed8889510c513d2565539ff.jpg)
Dragon Gaming Center or User Defined
- Press and hold the Fn key, and then press the F4 key to launch the default Dragon Gaming Center application.
Or, press and hold the Fn key, and then press the F4 key to launch the User Defined application after Dragon Gaming Center application is removed.
![MSI GS70 2PC Stealth - ■ Quick Launch [Fn] Keys - 2](/content/2026/08/1624681/images/fcf72e939b0e91a245d2a308471e7cb0724e4c4c98ffd7c89933c622f33e0dfc.jpg)
ECO Engine
(Power Saving)
- Press and hold the Fn key, and then press the F5 key repeatedly to switch among various power saving modes provided by ECO Engine, or to turn this function off recurrently.
![MSI GS70 2PC Stealth - ■ Quick Launch [Fn] Keys - 3](/content/2026/08/1624681/images/aa4c1719367689b621ca8ccb82d6d90e6b0268ffd4b5fd9ea343c0c7a0a7549b.jpg)
Webcam
- Press and hold the Fn key, and then press the F6 key to turn the Webcam function on. Press again to turn it off.
![MSI GS70 2PC Stealth - ■ Quick Launch [Fn] Keys - 4](/content/2026/08/1624681/images/f0a343e184f0220eb0754df9c839e1c7f7c761f2e8ae31e11bd090090c8ecd00.jpg)
Airplane mode
- Press and hold the Fn key, and then press the F10 key repeatedly to turn Airplane mode on or off recurrently.
For flight safety consideration, it is always recommended to turn Airplane Mode on when you are in flight.
♦ Refer to the Airplane mode switch icon under [Start/Settings/Change PC settings/Network/Airplane mode] on the desktop to check the device status. - To enable the WLAN or Bluetooth function, please refer to the instructions provided in Wireless Activation.
Wireless Activation
- Find the Settings icon on the desktop and click on it.
- Enter the PC settings main page by clicking on Change PC settings.
- Unfold the Airplane mode selections under Network.
- Make sure Airplane mode is set to Off here.
- Turn the Wi-Fi or Bluetooth function on/off by sliding the function switch bar. Refer to the Status LED to check the device status.


- When Airplane mode is set to ON, the Wi-Fi and Bluetooth function will be disabled at once.
- The information provided here is for reference only, and may vary without notice.
Knowing the Touchpad
The touchpad integrated in your notebook is a pointing device that is compatible with standard mouse, allowing you to control the notebook by pointing the location of the cursor on the screen and making selection with its two buttons.
-
Cursor Movement Area This pressure-sensitive area of the touchpad, allows you to place your finger on and control the cursor on the screen by moving one of your finger.
-
Right / Left Buttons Acts as the mouse's right/ left button.

Using the Touchpad
Read the following description to learn how to use the touchpad:
■ Configuring the Touchpad
You can customize the pointing device to meet your personal needs. For example, if you are a left-handed user, you may want to swap the functions of the two buttons. In addition, you can change the size, shape, moving speed and other advanced features of the cursor on the screen.
To configure the touchpad, you can use the standard Microsoft or IBM PS/2 driver in your Windows operating system. The Mouse Properties in Control Panel allows you to change the configuration.
■ Positioning and Moving
Place your finger on the touchpad (usually using the forefinger), and the rectangular pad will act as a miniature duplicate of your display. When you move your fingertip across the pad, the cursor on the screen will move simultaneously to the same direction. When your finger reaches the edge of the pad, lift your finger and place it on a proper location of the touchpad to continue the movement.
■ Point and Click
When you have moved and placed the cursor over an icon, a menu item or a command that you want to execute, simply tap slightly on the touchpad or press the left button to select. This procedure, called as point and click is the basics of operating your notebook. Unlike the traditional pointing device such as the mouse, the whole touchpad can act as a left button, so that your each tap on the touchpad is equivalent to pressing the left button. Tapping twice more rapidly on the touchpad is to execute a double-click.
■ Drag and Drop
You can move files or objects in your notebook by using drag-and-drop. To do so, place the cursor on the desired item and slightly tap twice on the touchpad, and then keep your fingertip in contact with the touchpad on the second tap. Now, you can drag the selected item to the desired location by moving your finger on the touchpad, and then lift your finger from the touchpad to drop the item into place. Alternately, you can press and hold the left button when you select an item, and then move your finger to the desired location; finally, release the left button to finish the drag-and-drop operation.

-
Move the cursor by sliding your fingertip.
-
Put your wrist on the desk comfortably.
Knowing the Smart Pad
The Smart Pad integrated in your notebook allows users to perform various actions with multi-finger taps and gestures while operating the notebook, and is capable to detect the changes of the multi-finger movement performed by users precisely. This significant Smart Pad will surely bring users not only an efficient but also an enjoyable experience of using the notebook.
-
For the further information on how to use the Smart Pad function specifically, please refer to the instructions of Smart Pad by double clicking the "Smart Pad" icon (☐) from the taskbar list on the lower-right side of the screen.
-
The Elan Smart-Pad window will show up. Select information about the usage of the Smart Pad.

allows the users to get detailed


The information provided here is for reference only, and may be vary without notice.
About Hard Disk Drive
Your notebook is equipped with a 2.5-inch hard disk or mSATA SSD (optional). The hard disk drive is a storage device with much higher speed and larger capacity than other storage devices, such as the floppy disk drive and optical storage device. Therefore, it is usually used to install the operating system and software applications.
To avoid unexpected data loss in your system, please backup your crucial files regularly.
Do not turn off the notebook when the hard disk In-use LED is on.
Do not remove or install the hard disk drive when the notebook is turned on. The replacement of hard disk drive should be done by an authorized retailer or service representative.
◆ Connecting the External Devices
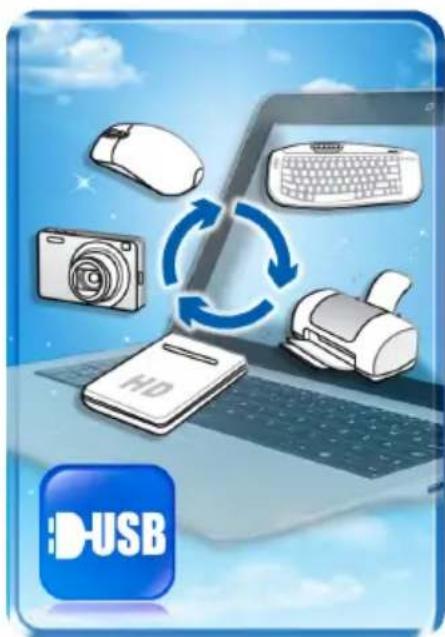
The I/O (input/output) ports on the notebook allow you to connect peripheral devices and communication devices. All functions and devices listed here are for reference only.
Peripheral Devices



Communication Devices
![graph TD A["Internet Cloud Computing"] --> B["WLAN"] A --> C["LAN"] A --> D["Bluetooth"]](/content/2026/08/1624681/images/9daa9682a8429869c9cc4a2547e0011ec9729a2d4bb65a477872e5bc690f0863.jpg)
The functions listed here are supported optionally, depending on the model users purchased.
Contact the local dealer for detailed information.
- CHAPTER 2: INTRODUCTIONS
- CHAPTER 3: GETTING STARTED
- CONNECTING THE EXTERNAL DEVICES
- ◆ REGULATIONS AND STATEMENTS
- FCC-B RADIO FREQUENCY INTERFERENCE STATEMENT
- NOTE
- FCC CONDITIONS
- CE CONFORMITY
- BATTERY REGULATIONS
- SAFETY GUIDELINE FOR USING LITHIUM BATTERY
- WEEE STATEMENT
- ◆ SAFETY INSTRUCTIONS
- TRADEMARKS
- REVISION HISTORY
- INTRODUCTIONS
- ◆ MANUAL MAP
- UNPACKING
- PRODUCT OVERVIEW
- TOP-OPEN VIEW
- WEBCAM
- INTERNAL MICROPHONE
- SOUNDBAR SPEAKERS
- POWER BUTTON / POWER LED/ GPU MODE LED
- POWER BUTTON
- POWER LED/ GPU MODE LED
- KEYBOARD
- QUICK LAUNCH [FN] KEYS
- GENERAL [FN] KEYS
- TOUCHPAD
- FRONT SIDE VIEW
- STATUS LED
- BATTERY STATUS
- WIRELESS LAN (WIFI)
- BLUETOOTH (OPTIONAL)
- CAPS LOCK
- NUM LOCK
- HARD DISK/ OPTICAL DRIVE DEVICE IN-USE
- SLEEP STATE
- RIGHT SIDE VIEW
- VENTILATOR
- KENSINGTON LOCK
- POWER CONNECTOR
- CARD READER
- USB 3.0 PORTS
- BATTERY RESET HOLE
- LEFT SIDE VIEW
- RJ-45 CONNECTOR
- HDMI CONNECTO
- MINI-DISPLAYPORT
- USB 3.0 PORT/ SUPER CHARGER USB PORT
- USB 3.0 PORT
- AUDIO PORT CONNECTORS
- HEADPHONE OUT/ SPDIF-OUT
- LINE IN
- MICROPHONE
- SUBWOOFER SPEAKER
- SPECIFICATION
- OTHERS
- GETTING STARTED
- ◆ BEGIN TO USE THE NOTEBOOK
- POWER MANAGEMENT
- AC POWER
- BATTERY POWER
- CONSERVING BATTERY POWER
- CHARGING THE BATTERY PACK
- POWER MANAGEMENT IN WINDOWS OS
- ENERGY SAVING TIPS
- ◆ BASIC OPERATIONS
- SAFETY AND COMFORT TIPS
- KNOWING THE KEYBOARD
- TYPEWRITER KEYS
- NUMERIC KEYS
- CURSOR KEYS
- FUNCTION KEYS
- WIRELESS ACTIVATION
- KNOWING THE TOUCHPAD
- USING THE TOUCHPAD
- POINT AND CLICK
- DRAG AND DROP
- KNOWING THE SMART PAD
- ABOUT HARD DISK DRIVE
- ◆ CONNECTING THE EXTERNAL DEVICES
- PERIPHERAL DEVICES
- COMMUNICATION DEVICES
Brand : MSI
Model : GS70 2PC Stealth
Category : Laptop