
THK 641 W/IX/N IT - Cooker IGNIS - Free user manual and instructions
Find the device manual for free THK 641 W/IX/N IT IGNIS in PDF.


| Product Type | Freestanding Cooker |
| Model | THK 641 W/IX/N IT |
| Brand | Ignis |
| Energy Source | Gas hob with electric oven |
| Oven Type | Multifunction electric oven |
| Oven Functions | Conventional, grill, fan-assisted, defrost, pizza, bottom heat |
| Oven Capacity | 58 liters (approx.) |
| Oven Temperature Range | 50°C to 250°C |
| Hob Type | Gas hob with 4 burners |
| Burner Configuration | Auxiliary, semi-rapid, rapid, triple-ring |
| Ignition | Automatic electric ignition |
| Safety Device | Thermocouple flame failure device on each burner |
| Oven Door | Drop-down door with removable inner glass panel |
| Interior Light | Yes |
| Controls | Front-mounted knobs with tactile indicators |
| Dimensions (W x D x H) | 60 cm x 60 cm x 85 cm (height adjustable) |
| Weight | 55 kg (approx.) |
| Finish | White enamel body with stainless steel oven door |
| Cleaning | Easy-clean enamel interior, removable burner caps and grates |
| Repair and Spare Parts | Heating elements, thermostats and gas valves available; spare parts kept for 10 years |
Frequently Asked Questions - THK 641 W/IX/N IT IGNIS
User questions about THK 641 W/IX/N IT IGNIS
0 question about this device. Answer the ones you know or ask your own.
Ask a new question about this device
Download the instructions for your Cooker in PDF format for free! Find your manual THK 641 W/IX/N IT - IGNIS and take your electronic device back in hand. On this page are published all the documents necessary for the use of your device. THK 641 W/IX/N IT by IGNIS.
USER MANUAL THK 641 W/IX/N IT IGNIS
s ownload the complete instruction manual httplaa docs whirlpool eukor call the phone number shown on the warranty booklet
qefore using the appliance read these safety instructions z eep them near by for future reference
these instructions and the appliance itself provide important safety warnings to be observed at all times
he manufacturer declines any liability for failure to observe these safety instructions for inappropriate use of the appliance or incorrect setting of controls
△ hese'instructionsarevalidifthecountrysymbol appears on the appliancexfthesymbolh doesn't appear onthe appliancehithisnecessarytorefer to the technical instructionswhichwillprovide the necessary instructions concerningmodiGcation of the appliancetotheconditionsofuseofthecountry
△r p x• -i hehuse of the gas cooking appliance results in the production of heat moisture and products of combustion in the room in which it is installed t nsure that the kitchen is well ventilated especially when the appliance is in use keep natural ventilation holes open or install at mechanical ventilation device Qmechanical extractor hood "rolonged intensive use of the appliance may call for additional ventilation for example opening of the window for more effective ventilation increasing the level of mechanical ventilation where present
p°-x-vi he appliance and its accessible parts become hot during use r are should be taken to avoid touching heating elements hildren less than g years of age must be kept away unless continuously supervised
Δ p° - x - v ilxfthethobhsurfacehiscrackeddon'thusethepplianceH-riskhofelectricalshock
⚠ p°-x-v ihs angerhofGreihs o!notstoreItemshon thecookingsurfaces
△r p x• -iH heH cooking process has to beH supervised pH short cooking process has to beH supervised continuously
⚠ p° - x - v ⚫ nattended cooking on a hob with fathor oil can be dangerous –risk of GreH - t t ° try to extinguish a Gre with water but switch oF the appliance and then cover Eame leg with a lid or a Gre blanket
⚠️s o not use the hob has a work surface or support z eep clothes or other Eammable materials away from the appliance until all the components have cooled down completely—risk of Gre
⚠ xfhthe information in this manual his not followed exactly a Gre or explosion may result causing property damage or injury
ery young children QYVb years should be kept away from the appliance ounghchildrenQbVg years should be kept away from the appliance unless continuously supervised hildren from g years hold
and above and persons with reduced physical sensory or mental capabilities or lack of experience and knowledge can use this appliance only if they are supervised or have been given instructions on safe use and understand the hazards involved r hildren must not play with the appliance leaning and user maintenance must not be carried out by children without supervision
△r p x• - iH xnH caseH ofH hotplateH glassH breakageiV shutH immediatelyH oF HallH burnersH andH anyH electricalH heatingH elementH andH isolateH theH applianceH fromH theH powerH supplyjH do not H touchH theH applianceH surfacejH V do not H useH theH applianceH
he h glass l lid can b break i in h if t is h eated u up H urn o F h all L the h burners h and h the h electric l plates h before h closing h the h lid h s o h not h shout d down h lid h when h burner h alight t )
w " w v K w
△r p x• – i the appliance is not intended to be operated by means of an external switching device such as a timer or separate remote controlled system
△ his appliance is intended to be used in household and similar applications such as that kitchen areas in shops or does and other working environments by farms houses by clients in hotels, motels, bed of breakfast and other residential environments
- oHotherHuseHisHpermittedHQeWgVHheatingHroomsRW
⚠ his appliance is not for professional use of no not use the appliance outdoors
⚠️ sehpotsandpanswithbottomsthesamewidthasthatoftheburnersorslightlylargerHQseespeciGchtableRWH" akesurepotsonthegratesdo not protrudebeyondtheedgeofthehob
⚠ xmpropertuse of the grids can result in damage to the hob do not position the grids upside down or slide them across the hob
s o!not!let!the!burner!Eame!extend!beyond!the!edge!of!the!pan! xf!the!hob!surface!is!in!glass!material!do!not!use!the!cast!iron!griddles! ollar!stones!terracotta!pots!and!pans!
s of not use heat dif users such as metal mesh or any other types j two burners simultaneously for one receptacle Qeig fuish kettle
hould particular local conditions of the delivered gas make the ignition of burner diD culld it is advisable to repeat the operation with the knob turned to small Eame setting
inc case of installation of a hood above the cooktop please refer to the hood instructions for the correct distance
helprotectiverubberfeetonthelgridsrepresentatchokinghazardforyoungchildren#pfterremovingthegridspleaseensurethatallthefeetarecorrectlyGtted
∅ s··s ∅
he appliance must be handled and installed by two or more persons and risk of injury. Se protective gloves to unpack and install risk of cuts
⚠️installation including water supply Qif any RH and electrical connections, and repairs must be carried out by qualiGed technician’s or not repair or replace any part of the appliance unless speciGcally stated in the user manual zeep children away from the installation site after unpacking the appliance make sure that it has not been damaged during transport
xn the event of problems contact the dealer or your nearest pfter sales ervice • nce installed packaging waste Qplastic styrofoam parts etc must be stored out of reach of children VH risk of su Focation he appliance must be disconnected from the power supply before any installation operation VH risk of electrical shock s uring installation make sure the appliance does not damage the power cable VH risk of Gre or electrical shock • nly activate the appliance when the installation has been completed
he|electrical|and|gas|connections|must|comply| with|local|regulation
p° - x - v i" odiGcation of the appliance and its method of installation are essential in order to use the appliance safely and correctly in all the additional countries
⚠️ set pressure regulators suitable for the gas pressure indicated in the instruction
⚠️ heroom must be equipped with an air extraction system that expels any combustion fumes
heEroom must also allow proper hair circulation ashair is needed for combustion to occur normally he Eow of hair must not be less than ha m bXhperk of installed power
he air circulation system may take air directly from the outside by means of a pipe with an inner cross section of at least ZYY cm the opening must not be vulnerable to any type of blockages
he system can also provide the hair needed for combustion indirectly from adjacent rooms Gtted with air circulation tubes as described above however these rooms must not be communal rooms or bedrooms or rooms that may present a Gre hazard
iquid petroleum gash sinks to the Eoor ash it is heavier than air herefore rooms containing "vH cylinders must also be equipped with events to allow gas to escape in the event of leak psh a result "vH cylinders whether partially or completely full must not be installed or stored in room for storage are as that are below ground level Qcellars and xth is advisable to keep only the cylinder being used in the room positioned so that it is not subject to heath produced by external sources Qovens Greplaces Stoves etc which could raise the temperature of the cylinder above dY°r
⚠️ r arryhouthallcabinetcuttingworksbeforeGtting the applianceinthe furnitureandremovehallwood chipsandsawdust
⚠️ xf the appliance is – ot installed above an oven a separator panel Q not included must be installed in the compartment under the appliance
would you experience diD culty in turning the burners knobs please contact after alest ervice for replacement of the burner tap found to be faulty
he openings used for the ventilation and dispersion of the heat must never be covered
ys Ku ∅∅wu ∅
p° - x - v i" rior to installation ensure that the local distribution conditions nature of gas and gas pressure and the adjustment of the appliance are compatible
⚠️ r heck that the pressure of the gas supply is consistent with the values indicated in “injectors’ able”
⚠ p°-x-v iH he adjustment conditions for this appliance are stated on the label Qor data plate RW
p°-x-vi his appliance is not connected to a combustion products evacuation device shall be installed and connected in accordance with current installation regulations articular attention shall be given to the relevant requirements regarding ventilation
xf the appliances is connected to liquid gas the regulation screw must be fasted as tightly as possible
⚠️ x” ” • ° p- iH hen gas cylinder isH adoptedH theH gas cylinder or H gas container must beH properlyH settledHQ vertical orientationRW
⚠ p° - x - v iH hisOperation must be performed by aqualiGed technician
seh only Eexible or rigid metal hose for gas connection
⚠️ r onnection with a rigid pipe Copper or steel r onnection to the gas system must be carried out in such halfway has not to place any strain of any kind on the appliance here is an adjustable shaped pipe. Gtting on the appliance supply ramp and this is Gtted with a seal in order to prevent leaks he seal must always be replaced after rotating the pipe. Gtting the seal is provided with the appliance which gas supply pipe. Gtting is a threaded ZXa gas cylindrical male attachment
△r onnecting a Eexible b jointless c stainless d steel e pipe f to g threaded h attachment i he j gas k supply l pipe m Gtting n is o a threaded p ZXal gas q cylindrical male r attachment s hese s pipes t must be installed so that they are never longer than aYYY mm when fully extended nce connection has been carried out make sure that the Eexible metal pipe does not touch any moving parts and his not compressed nly use pipes and seals that comply with current-ational regulations
△x” ” • ° p- iHxfA h stainlessH steelH hoseH isH usedUH itH mustHbeH installedHsoHASnotHtouchHanyHmobileHpartHofH theH furnitureHQeHGh drawerRMHxtHmustHpassHthroughH anH areaHwhereHthereAreHnoObstructionsHandHwhereHitHisH possibleHtoHinspectHtionHallHitsHlengthW
he appliance should be connected to the main gas supply or to gas cylinder in compliance with the current –ational regulations qefore carry out the connection makes sure that the appliance is compatible with the gas supply you wish to use this is not the case follow the instructions indicated in the paragraph “padapting to different types of gas”
⚠ pfter connection to the gas supply check for leaks with soapy water ight up the burners and turn the knobs from max position ZSH to minimum position ha Sto check Eame stability
s vs ∅yK Kv xxw w∅ K ffi w K xkys
xnHorder to adapt the appliance to Ha type of gash other than the type for which hith was manufactured. Qindicated on the rating label Ruh follow the dedicated steps provided after installation drawings
w•wu us • K) s ∅ ∅y
⚠️ x” ”• ° p- iH heI data relevant to the voltage anH power absorption are indicated on the rating plate
⚠ helpower cable must be long enough to connect the appliance once Gtted in its housing to the main power supply is oh not pull the power supply cable
⚠️ xthmust be possible to disconnect the appliance from the power supply by unplugging it if plug is accessible or by a multipole switch installed upstream of the socket in accordance with the wiring rules and the appliance must be earthed in conformity with national electrical safety standards
⚠️s oħnotħuseħextensionħleadsħmultipleħsocketsħorħ adaptersħ heħ electricalħ componentsħ mustħ notħ beħ accessibleħ toħ theħuserħafterħ installationħs oħnotħ useħ theħapplianceħwhenħyouħareħwetħorbarefootħs oħnotħ operateħ thisħ applianceħ ifħ ith hash aħ damagedħ powerħ cableħorħplugħifħiħisħnotħworkingħproperlyħorħifħithash ā beenħdamagedħorħdropped
xf the supply cord is damaged with must be replaced with an identical one by the manufacturer's service agent or similarly qualified persons in order to avoid a hazard risk of electrical shock
u·ws ∅ ∅yks ∅vK" s ∅ w∅s ∅uw
⚠ p° – x– v hnt nsure that the appliance is switched of hand disconnected from the power supply before performing any maintenance operation never use steam cleaning equipment risk of electric shock ⚠ s or not use abrasive or corrosive products chlorine based cleaners or paniscourers
v s • K xK su"sy ∅yK" s w s •
he|packaging|material|is|ZYYN|recyclable|and|is|marked|with|the|recycle|symbol|
het various parts of the packaging must therefore be disposed of responsibly and in full compliance with local authority regulations governing waste disposal
v s • K xK w • v Ks • s ∅uw
hist appliance is manufactured with recyclable or reusable materials is impose of it in accordance with local waste disposal regulations without further information on the treatment recovery and recycling of household electrical appliances. Contact your local authority the collection service for household waste or the store where your purchased appliance has appliance is marked in compliance with European irective YZaXZhXt and electronic equipment Q ttt and with the aster electrical and electronic equipment regulations YZbQask amended by ensuring this product is disposed of correctly you will help prevent negative consequences for the environment and human health
he'symbol: On the production on the accompanying documentation indicates that it should not be treated as domestic waste but must be taken to an appropriate collection center for the recycling of electrical and electronic equipment
w∅w y ffiK s - ∅y K
sepots and spans with bottom width equal to that of the cooking zone
- nly#use#Eat#bottomed#pots#and#pans#
henpossible.Keeppotlids on during cooking
sealpressure-cooker to save even more energy and time
" lace the pot in the middle of the cooking zone marked on the hob
v wu•s s ∅K xKu ∅x " ff
his appliance meets t codesign requirements of t uropean° regulation eeXaYZcH and hct codesign for tnergyV° elated" rproducts and tnergyXnformationQpmendmentRtKt xitR° egulationsaYZh in compliance with thet uropean standardlt - HbYVaVZ
∅ wu K s t • wK K K K K K K K K K K K K K K K K K K K K K K K K K K K K K K K K K K K K K K K K K K K K K K K K K K K K K K K K K K K K K K K K K K K K K K K K K K K K K K K K K K K
| ypeloftgasused | ypeloftburner( njectormarking | ated(thermalJ owratek) | atedconsumption | educed(heatcapacityk) | y aslpressurembar | |||
| min Krat | Kmax | |||||||
| -p °p hvpq" ethaneRHHHy db | emiVrapidpuxiliary" ini1 ok | hdiffif a1bZbgip | ZledZYYbbdY | Zdf hXhhdhlXhbbbhlXh | YlcYYlcYZled | ZfHaYad | ||
| x÷ tuxtst"t °· t " hvpqQutaneRHHHy eb | emiVrapidpuxiliary" ini1 ok | ebdYhZ | ZledZYYbbdY | ZaYgXhIf bkgXhadcHgXh | YlcYYlcYZled | aYragYbYbd | ||
| x÷ tuxtst"t °· t " hvpq" ropaneRHHHyec | emiVrapidpuxiliary" ini1 ok | ebdYhZ | ZledZYYbbdY | ZZglgXhIf ZlgXhacYgXh | YlcYYlcYZled | adIbfcd | ||
| ype#of#gastused" odelkconl | gurationf lt ∅w | ated(thermal)J owrate(5k) T | otalkratedconsumption | s irrequired#SmeTlfortburning#cmel#ofgas |
| y db##kaYhmbar | Z" H#a °H#Zp | f lg | f cb#LXh | h.da |
| y eb##kagVbYhmbar | Z" H#a °H#Zp | f lg | def hgXh | bYJhc |
| y ec##klbf hmbar | Z" H#a °H#Zp | f lg | ddf hgXh | ab.gY |
ELECTRIC SUPPLY: 220-240 V \~ 50-60 Hz - 0,6W
wu ∅ us · k ∅x " s ∅k x k w k ∅ s · · w
• selprotective gloves for handling, preparing and installing the product
- hisproduct can be embedded in a worktop a Y ÷ c Y mm thick
- x th there is in lo ven b beneath th the h ob k insert a separator p panel l that h has t surface a at least equal to the opening in the work surface h his l panel must be positioned at h at maximum distance of z dYimm below the upper surface of the work surface but in no case less than a Yimm from the bottom of the hob in the case that you intend to install an open beneath the hob make sure that it is equipped with a cooling system m
v " w∅ ∅ ls ∅v lv s ∅uw l lt wl" s ∅ s ∅wv


∅ wIf|distance|“s”|between|the|kitchen|cabinets|is|between|bb|mm|and|i|eb|mm|height|“t”|must|bef|least|geb|mm|fid|dancel|“s”|between|the|kitchen|cabinets|is|greater|than|the|width|of|the|hob|height|“t”|must|bef|least|f|bb|mm|flat|hood|is|installed|above|the|hob|refer|to|the|assembly|instructions|for|the|hood|to|seek|the|necessary|distance
s w" t • ffKKKKKKKK
s ften having cleaned the perimeter surface apply the supplied gasket to the hob ask shown kin the gure
"osition-the Hob-in-the-worktop opening made respecting the dimensions indicated in the instruction
∅ w/kthe/power/supply/cable/must/bellong/lenough/tok/permit/its/lupward/extraction
osecurethehobfusethebracketsopprovidedwithhituitthebracketsintotherelevantboreslshownbythearrow andfastenthembymeansoftheirscrewsfinllaccordancewiththethicknessoftheworktopQseethefollowingGguresR


20 mm 40 mm

30 mm


ys ku ∅∅wu ∅KXXH
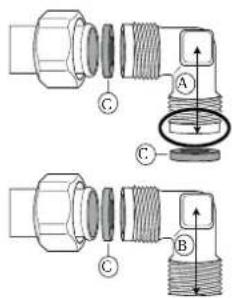
- r onnect the elbow O's RSH orl Qt RSH supplied with to the hobh inlet main pipe and interpose the washer QuR's supplied in compliance with it - Hdch
UK selelbowSs TlforXrancekandKelbowSt TlforAllotherkdestinations
- pfter|connection|to|the|gas|supply|check|for|leaks|with|soapy|water|ight|up|the|burners|and|turn|the|knobs|from|max|position|oft|minimum|position|check|Eame|stability/

yudRemovablespanstandgrids
dAuxiliaryburner
fludSemitrapiddburner
4:Mini/Wok/burner
- Semitrapid:burner
6dAuxiliaryburner:control:knob
-
Mini/Wok/burner/control:knob
-
Semitrapid/burnen/controliknob
-
Semitrapid/burner/controldknob
Symbols
Shaded-circle
Tap:closed
Largecame
Maximum:openingvdelivery andelectricdignition
Smallcame
- Minimumopening or reduced delivery
○○
○ ○ ○
● □ ○ ○
○ ○ ● □
vs •ffk w
) K K wK wK t
s not let the burner Eame extend beyond the edge of the pan s ∅ when the hob is in use the entire hob are may become hot
• 0 lignite one of the burners turn the relative knob antiVclockwise to the maximum Eame setting
• "ress the knob against the control panel to ignite the burner"
• after the burner has ignited keep the knob pressed for about dVZY seconds to allow proper device operation
- his burnet safety device shuts of the gas supply to the burnet if the Eame goes out accidentally because of sudden draught and interruption in the gas delivery boiling over of liquids etc.
- The knob must not be pressed for more than a sec. It after that time has elapsed the burner does not remain little wait at least one minute before trying to light hit again
•∅ will should particular local conditions of the delivered gas make the ignition of burners and cult with disadvisable to repeat the operation with the knob turned to small amel setting the burners might go out when the knob is released his means that the safety device has not warmed up enough this case. Repeat the operations described above
s u us - ls v - uw|x K ∅yK w|t ∅w
hist hobt has burners of different diameters uor better burner performance please stick to the following rulesi
•use+pots and pans with bottoms the same width as that of the burners or slightly larger? see table on the right
•onlyuseEat/bottomedpotsandpansj
• use the correct amount of water for cooking foods and keep the pot coveredj
•make sure pots on the grates do not protrude beyond the edge of the hobj
• on the case to spans with convex bottomsHQ • z RHuse the support grille (not provided) which should be positioned only on the multi-ring burner
•pvoidaccidentallyknockingthehobwithpansracksorotherkitchenutensil/
• Is not leave empty steak grills over the lit burner for longer than 10 minutes
" s ∅ Kimproperperfuseofthe grids can result link damage to the hob do not position the grids upside down or slide them across the hob
| t ∅w ∅u | “) s w/v s” w w |
| “ ini| ok|urom|ac|toka|cm | |
| emiVrapid|urom|Ze|to|aa|cm | |
| puxiliary|urom|g|to|Zc|cm | |
s of not-usei
• castirongriddles,ollarstones,terracottalpots and pansj
•heatdiF users such as metal mesh or any other typesj
- two burners simultaneously for one receptacle, gel/Gsh/kettle/ liquids spilled on hot-hob area can cause glass damage
svs ∅yⅠ lv xxw w∅ K ff w K xkys
A his operation must be performed by a qualified technician
xf the appliance is intended to operate with a different gas from the gas type stated on the rating plate and information label on the top of the hob change the injectors
°emove the information label and keep it with the instructions booklet self-pressure regulators suitable for the gas pressure indicated in the instruction
- thegasinjectormustbechangedbypfteraleservicetoralqualiGedtechnicianj
•injector not supplied with the appliance must be ordered from after sales servicej
-Adjust the minimum setting of the taps
∅ willwhenliquidpetroleumgaskiskusedSy ebay ec theminimumgaskettingscrewmustbeltightenedlaslfarlaskitwillgo
” s∅ It should you experience diH culty in turning the burners' knobs please contact the sfter ales ervice for the replacement of the burner'sapiff found to be faulty
s∅ whengas cylinder is adopted with gas cylinder for gas container must be properly settled vertical orientation
w ·su ∅y wK ∅ wu KGsee the injector table link theK afetyk instructionsFl
•H°emove+grids+Qs RW
•Ht xtract-burnersHQt R1
- sing a socket spanner of the appropriate size unscrew the injector QUR unscrew the injector to be replaced
•° eplace:it—with the injector suitable for the new type of gas
•H° eVassembletheinjectorhinHQv RN
• If you have a multiple crown burner uses side spanner to replace the injector QwR

before installing the hob remember to aD x the gas calibration plate supplied with the injectors in such a way that it covers the existing information relating to gas calibration
sv ∅y" ∅ " " kys k w ∅y x s
of ensure that the minimum setting is correctly adjusted remove the knob and proceed as followsi
•tighten|screw|to|reduce|the|Eame|height|HQVRj
- HloosenHscrewHtoIncreasetheHEmeHeightHQTRN
he:adjustment must be performed with the tap in minimum gasketting position: ♦ Qsmall-EameRi
he primary fair of the burners does not need to be adjusted
pt this stage light up the burners and turn the knobs from max position
to minimum position to check Eame stability
pon completion of adjustment using sealing wax or an equivalent material

" s ∅ w∅s ∅uwks ∅v ku•ws ∅ ∅y
⚠️ s isconnect the appliance from the power supply
u·ws ∅ ∅y k wK t K xs uw
• pll the enamelled and glass parts should be cleaned with warm water and neutral solution
- tainless steel surfaces may be stained by calcareous water or aggressive detergents if left in contact for took long, pny food spills, Qwater sauce, co Fe etc should be wiped away before they dry
•r lean with warm water and neutral detergent and then dry with soft cloth or chamois, emove baked from dirt with speci Gc cleaners for stainless steel surfaces)
∅ w|kclean|stainless|steel|only|with|kalsoft|cloth|on|sponge
• Its or not use abrasive or corrosive products. Chlorine based cleaners or pan-scourers
• Is of not use steam cleaning appliances
•His o/not-use\Eammableproducts
• Is not leave acid or alkaline substances such as vinegar mustard salt sugar or lemon juice on the hob
t·w ∅y
xf the hob will not operate correctly before calling the pfterales service refer to the roubleshooting guide to determine the problem
c he&burner fails to ignite or the J amelisk not even
r heckthati
• the gas on electrical supplies are not shut of hand especially that the gas supply tap is open
• the gas cylinder + liquid gas is not empty
• the burnen openings are not clogged
•theplugendhisnotdirtyj
• all the burner parts have been positioned correctly
•there are no draughts near the hob
d he&burner&does¬&stay&lit
r heckthati
- when lighting the burner the knob has been pressed for enough time to activate the protection device
• the burner openings are not clogged near the thermocouple
• the end of the safety device is not dirty
• the minimum gas setting his correct Q see relevant paragraph
u·ws ∅ ∅y K wK t K s
•r leanglass and enamelled parts only with soft cloth or sponge
•hv rids&burnercaps&hand&burners&can&be&removed&to&be&cleaned
- Ir lean them by hand with warm water and non abrasive detergent removing any food residues and checking that none off the burner openings is clogged
•H° inselanddry
- helcastYirongratesmaybecleanedlinkthedishwasher
removeany burntYonk foodk before placing thegratesinkthelowesttracklinkthedishwasher
• eGtburners and burner caps correctly in the respective housings
- hen replacing the grids make sure that the panstand area is aligned with the burner
• odesh equipped with electrical ignition plugs and safety device require thorough cleaning of the plug end in order to ensure correct operation. Heck these items frequently and if necessary clean them with a damp cloth pny baked food should be removed with a toothpick or needle
∅ wltotavoiddamagingthelectricignitiondeviceldolnotuselithwhentheburnerslarelnotfinktheirkhousing
e | helcontainers| are not stable
r heckthati
• the bottom of the container is perfectly Eatj
• the container is centred on the burner
- the grids have not been exchanged or positioned incorrectly
xf after the above checks the fault still occurs get in touch with the nearest pfterl alesl ervice
xn|order| to| receive| at| more| complete| assistance| please| register| your| production|www.whirlpool_euaregister
t wx wkus·· ∅yK wks x w Y s·w K w - uwI
c ee if you can solve the problem by yourself with the help of the suggestions given in the t·w ∅y
d witch the appliance of hand back on again to see if the fault persists
x! s x w k w! s t - w! u wu" k w! xs • l ••! uu y w k ∅k
u k) k w!∅ws w !s x w Y s • w ! w - uw
Receive assistance call the number shown on the warranty booklet follow the instructions on the website www whirlpool.eu
hencontactingkountr clientpftersalesservicealwaysspecifi • labriefdescriptionofthefaultj • thetypeandexactmodelloftheappliancej

- the serial number of number after the word - on the rating plate located under the appliance. The serial number is also indicated in the documentation
SERVICE

•yourfulladdressj
• your telephone number
xf any repairs are required please contact and authorized after sales service (to guarantee that original spare parts will be used and repairs carried out correctly)
- W " W V K W
- ∅ S··S ∅
- YS KU ∅∅WU ∅
- S VS ∅YK KV XXW W∅ K FFI W K XKYS
- W•WU US • K) S ∅ ∅Y
- U·WS ∅ ∅YKS ∅VK" S ∅ W∅S ∅UW
- V S • K XK SU"SY ∅YK" S W S
- V S • K XK W • V KS • S ∅UW
- W∅W Y FFIK S - ∅Y K
- V WU•S S ∅K XKU ∅X " FF
- VS •FFK W
- SV ∅Y" ∅ " " KYS K W ∅Y X S
- S ∅ W∅S ∅UWKS ∅V KU•WS ∅ ∅Y
- ⚠️ S ISCONNECT THE APPLIANCE FROM THE POWER SUPPLY
- U·WS ∅ ∅Y K WK T K XS UW
- T·W ∅Y
- U·WS ∅ ∅Y K WK T K S
Brand : IGNIS
Model : THK 641 W/IX/N IT
Category : Cooker