
LD-1484T4 - Dishwasher LG - Free user manual and instructions
Find the device manual for free LD-1484T4 LG in PDF.


| Type of product | Dishwasher |
| Brand | LG |
| Model | LD-1484T4 |
| Capacity | 14 place settings |
| Dimensions (approx.) | 600 x 600 x 850 mm (W x D x H) |
| Weight (approx.) | Approx. 50 kg |
| Power supply | 220 - 240 V, 50/60 Hz |
| Installation | Built-in / under-counter installation in a cupboard |
| Water softener | 8 hardness levels H0-H7 |
| Salt container | Requires 1.5 kg of salt plus 1 litre of water at first use |
| Rinse aid dispenser | Adjustable dosage, automatic in final rinse |
| Wash programmes | Quick & Dry, Quick, Eco, Auto, Steam Care, Steam Dual Spray, Steam Power |
| Options | Extra Hot 80°C, Rinse+, Soft/Medium/Strong spray, Half Load, Delay Start 1-19 h |
| Child Lock | Locks control buttons except Power |
| Auto Restart | Resumes from interrupted point after power failure |
| Drying system | Cool Dry cycle for 60 minutes after programme |
| Filter system | Removable mesh, upper STS and outer filters |
| Spray arms | Upper and lower spray arms removable for cleaning |
| Maintenance | Clean filters after each load and spray arms when blocked |
| Safety features | Grounded plug, door-open auto stop, automatic power off |
| Water connection | Cold or hot water up to 65°C; pressure 0.05-0.6 MPa |
| Repairability | User-serviceable filters and spray arms; inlet/drain hoses replaceable by qualified technician |
Frequently Asked Questions - LD-1484T4 LG
User questions about LD-1484T4 LG
0 question about this device. Answer the ones you know or ask your own.
Ask a new question about this device
Download the instructions for your Dishwasher in PDF format for free! Find your manual LD-1484T4 - LG and take your electronic device back in hand. On this page are published all the documents necessary for the use of your device. LD-1484T4 by LG.
USER MANUAL LD-1484T4 LG
Before beginning installation, read these instructions carefully. This will simplify installation and ensure that the dishwasher is installed correctly and safely. Leave these instructions near the dishwasher after installation for future reference.
LD-1485T(W,L,M,B,C,S)4
LD-1484T(W,L,M,B,C,S)4
LD-1483T(W,L,M,B,C,S)4
CONTENTS
CONTENTS....2
IMPORTANT SAFETY INSTRUCTIONS
Important safety instructions......3
Read all instructions before use .....4
Save these instructions......5
INSTALLATION INSTRUCTIONS
Prepare cupboard opening .....7
Preparation for electrical wiring .....7
Preparing the dishwasher for installation....8
Installing the dishwasher in cupboard....8
Installation of drain hose....9
Installation of water inlet hose .....10
Final check and assembling .....10
How to level the dishwasher......10
PARTS NAME...... 11
FUNCTION OF CONTROL BUTTON....12
BEFORE USING FOR THE FIRST TIME
Check and find water hardness level....18
Setting up the softening system level of your dishwasher ....18
Salt Filling 19
Adding Rinse Aid 19
INFORMATION FOR ENERGY TEST ....20
HOW TO USE AND OPERATE
Daily use load 21
Cutlery Rack 22
Cutlery Basket 23
Lower Rack....23
Upper Rack......24
Adding Detergent......26
Refilling 27
Drying 28
Thank you for buying an LG Dishwasher.
Please read your owner's manual carefully, it provides instruction on safe installation, use and maintenance. Retain it for future reference.
Record the model and serial number of your Dishwasher.
Model No.
Serial No.
Date of Purchase
OPERATING SEQUENCE..... 29
PROGRAMME ....30
USERMAINTENANCE INSTRUCTIONS
Storing the dishwasher ....32
Filters 32
Lower Spray Arm 32
Upper Spray Arm 32
Water Inlet....32
TROUBLE SHOOTING GUIDE
Before calling for service ....33
Using SMARTDIAGNOSIS™ ......36
SPECIFICATION ....37
IMPORTANT SAFETY INSTRUCTIONS
READ ALL INSTRUCTIONS AND EXPLANATION OF THE INSTALLATION BEFORE USE
WARNING
For your safety, the information in this manual must be followed to minimize the risk of fire or explosion, electric shock, or to prevent property damage, injury to persons, or death.
Your Safety and the safety of others are very important.
We have provided many important safety messages in this manual and on your appliance. Always read and obey all safety messages.
This is the safety alert symbol.
This symbol alerts you to potential hazards that can kill or hurt you and others. All safety messages will follow the safety alert symbol and either the word DANGER, WARNING or CAUTION.
These words mean:
DANGER
You will be killed or seriously injured if you don't immediately follow instructions.
WARNING
You can be killed or seriously injured if you don't follow instructions.
CAUTION
You may be slightly injured or cause damage to the product, if you do not follow instructions.
All safety messages will tell you what the potential hazard is, tell you how to reduce the chance of injury, and tell you what can happen if the instructions are not followed.
IMPORTANT SAFETY INSTRUCTIONS
■ Read all instructions before use
WARNING
To reduce the risk of fire, electric shock, or injury to persons when using the dishwasher, follow basic precautions, including the following:
- Please read this manual carefully before using the dishwasher for the first time.
- This manual contains very important notes regarding the installation, use and maintenance of your dishwasher.
- The manufacturer can not be responsible for problems caused by ignoring these safety and caution instructions.
- This dishwasher is designed for normal indoor, domestic household use.
- Do not use the dishwasher for industrial or commercial use, or other non domestic purpose.
- The appliance is not intended for use by young children or infirm persons without supervision.
-
Check packaging and the dishwasher immediately for signs of transport damage. If the appliance is damaged, do not put it into use but contact your supplier without delay.
-
This appliance is intended to be used in household and similar applications such as;
- Staff kitchen areas in offices and other non food retail working environments;
- Farm houses;
- By clients in hotels, motels and other residential type environments;
- Bed and breakfast type environments.
- If this product is used for commercial or mobile purposes, it is not warranted. (Example: Public places such as restaurants, eateries or cafes, boats, mobile homes and caravans.) If the product is installed outside the normal service area, any cost of transportation involved in the repair of the product, or the replacement of a defective part, shall be borne by the owner.
▶ During installation
- Electrical connection must be in accordance with the rating label.
- Electrical safety is only guaranteed when the earth system of your house is in accordance with the related local regulations. (Do not use an extension cable or cord.)
-
If the hot water exceeds 65° C, adjust the water heater setting. If the hot water temperature can not be maintained below 65° C, the dishwasher must be connected to cold water.
-
If power supply cord is damaged, it must only be replaced by the manufacturer or its service agent or a similar qualified person in order to avoid a hazard.
- This appliance must be positioned so that the plug is accessible.
- The appliance is to be connected to the water mains using new hose-sets and that old hose-sets should not be reused.
▶ During use
- Only suitable household utensils should be placed in the dishwasher.
(Please avoid utensils; that are non-heat-resistant, metal decorated, etc.)
IMPORTANT SAFETY INSTRUCTIONS
■ Read all instructions before use
WARNING
To reduce the risk of fire, electric shock, or injury to persons when using the dishwasher, follow basic precautions, including the following:
- Do not use any kinds of solvent in your dishwasher. They may cause an explosion or fire.
- Do not spray water on the appliance. It may cause the failure of electric parts or electric shock.
- Do not push down or sit on the door when the door is opened. It may cause damage or failure of your dishwasher.
-
Do not use the detergent for hand washing. Dishwasher detergent should be used for normal operation.
-
This appliance is fitted with a safety function that automatically stops the operation of the dishwasher when it is exposed to abnormal electrical disturbance on its mains.
- Dishwasher detergents are extremely alkaline. They can be extremely dangerous if swallowed.
Avoid detergent contact with skin and eyes and keep children away from the dishwasher when the door is open.
Check that the detergent receptacle is empty after completion of each wash cycle.
▶ Child Safety
- Controls may be locked using Child Lock mode to prevent all the settings from being changed by a child.
-
For safety reasons, the Power button will still be operative with the Child Lock engaged.
-
Keep children away from detergents and rinse-aids.
- Do not allow children to operate the dishwasher.
- Young children should be supervised to ensure that they do not play with the appliance.
■ Save these instructions
GROUNDING INSTRUCTIONS
This appliance must be grounded. In the event of malfunction or breakdown, grounding will reduce the risk of electric shock by providing a path of least resistance for electric current. This appliance is equipped with a cord having an equipment-grounding conductor and grounding plug. The plug must be plugged into an appropriate outlet that is properly installed and grounded in accordance with all local codes and standards.
- Do not use an adapter this will defeat the grounding plug.
- If you don't have the proper outlet, consult an electrician.
IMPORTANT SAFETY INSTRUCTIONS
WARNING
Improper connection of the equipment-grounding conductor can result in electric shock.
Check with a qualified electrician or serviceman if you are in doubt as to whether the appliance is properly grounded. Do not modify the plug provided with the appliance - if it does not fit the outlet, have a proper outlet installed by a qualified electrician.
CAUTION
CAUTION concerning the Power cord
- Most appliances recommend they be placed upon a dedicated circuit; that is, a single outlet circuit which powers only that appliance and has no additional outlets or branch circuits. Check the specification page of this owner's manual to be certain.
- Do not overload wall outlets. Overloaded wall outlets, loose or damaged wall outlets, extension cords, frayed power cords, or damaged or cracked wire insulation are dangerous. Any of these conditions could result in an electric shock or fire.
- Periodically examine the cord of your appliance, and if its appearance indicates damage or deterioration, unplug it, discontinue use of the appliance, and have the cord replaced with an exact replacement part by an authorized servicer.
- Protect the power cord from physical or mechanical abuse, such as being twisted, kinked, pinched, closed in a door, or walked upon. Pay particular attention to plugs, wall outlets, and the point where the cord exits the appliance.
If the appliance is supplied from a cord extension set or an electrical portable outlet device, the cord extension set on electrical portable outlet device must be positioned so that it is not subject to water splashing or ingress of moisture.
CAUTION
The instructions shall state the substance of the following :
This appliance is not intended for use by persons (including children) with reduced physical, sensory or mental capabilities, or lack of experience and knowledge, unless they have been given supervision or instruction concerning use of the appliance by a person responsible for their safety.
Children should be supervised to ensure that they do not play with the appliance.
INSTALLATION INSTRUCTIONS
WARNING
- A qualified electrician/plumber or competent person should carry out any electrical/plumbing work required to install this appliance.
■ Prepare cupboard opening
- This dishwasher is designed to fit the size shown as below.
- Select a location as close to the sink as possible for ease of connection to the water and drain pipes.
- To ensure good drainage, the dishwasher should not be installed more than 1 meter away from the sink.
- If the dishwasher is installed in a corner, a minimum of 5cm of space is required between the washer and an adjacent cabinet or wall.

CAUTION
- Any bare wood surrounding the dishwasher should be sealed with a waterproof paint or sealant to prevent swelling.
■ Preparation for electrical wiring
CAUTION
- For personal safety, remove house fuse or open circuit breaker before installation.
- Do not use an extension cord or adapter plug with this appliance.
Electrical and earthing connections must comply with the national electrical code/provincial and municipal code and/or other local codes.
- This appliance must be supplied with correct rating voltage and hertz as shown on instruction manual, and connected to an individual, properly earthed branch circuit, protected by a minimum 15 amp circuit breaker or time delay fuse. Wiring must be 2 wires with Earth.
- The power plug must be in a accessible location adjacent to and not behind the dishwasher and within 1.2 meters of the dishwasher side. (See page 9 Fig.A)
- The power plug must be correctly earthed, if in doubt, have it checked by a qualified Electrician. No other appliance should be connected to the same plug outlet by a double adapter or similar plug.
Dangerous voltage
5036

To indicate hazards arising from dangerous voltages.
Note- in case of an application warning sign, the rules according to ISO 3864 should be adhered to.
INSTALLATION INSTRUCTIONS
■ Preparing the dishwasher for installation
- Lay the dishwasher on its back.
- Adjust the legs to the required height as shown in below figure.

- To reduce noise attach the strip to the machine base.
(LD-1485 & LD-1484 models only)
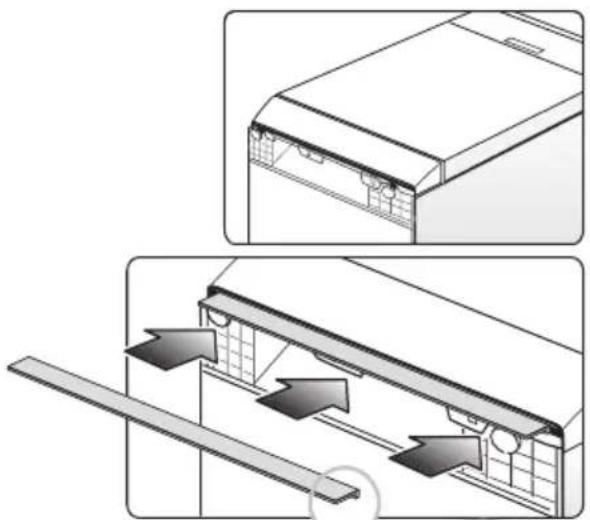
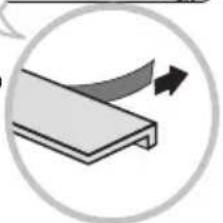
Remove the adhesive cover and attach the strip to the machine base, hiding the legs. Trim the edges if desired.
■ Installing the dishwasher in cupboard
- Before sliding the dishwasher into the cupboard opening, all necessary height and balancing adjustments should be made using a spanner.
- Slide the dishwasher into the cabinet, opening carefully. Make sure that the drain hose inside the cabinet is not kinked or stretched.
CAUTION
- If the height of the cupboard is below 850mm, you can remove the top table by unscrewing the 2 screws. (Two from rear)
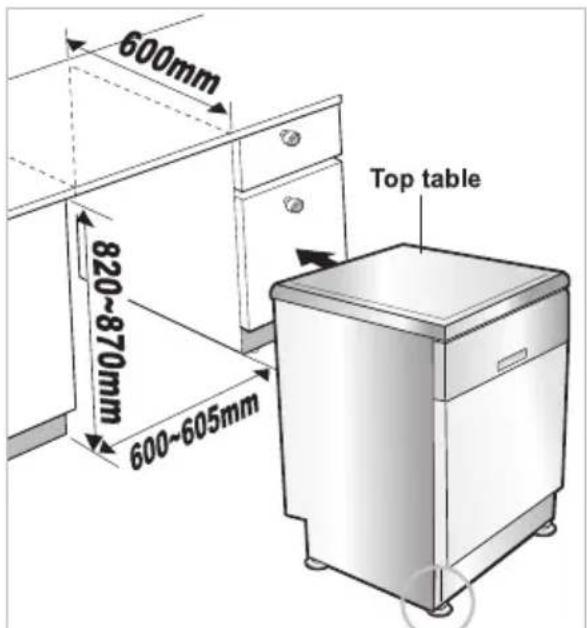
The bottom of the strip should touch the floor.

INSTALLATION INSTRUCTIONS
■ Installation of drain hose
- If the end of drain hose does not fit to the drain line, use a rubber connector (not supplied) that is resistant to heat and detergent.
- This should be available from a plumbing shop or a hardware store.
- There are two typical connections as shown in Figure A, B.
The S trap spigot must be drilled out cleanly and free of obstruction to its maximum internal diameter, if used for drainage.
Connection to Waste spigot
Check the waste spigot when initially installing. An "OE" error can occur when the waste spigot below the sink is not drilled out properly.
Please ensure the waste spigot connection to this drain hose has been completely drilled out before connecting and securing.

To prevent siphoning, one of the following methods must be used:
When the drain hose is connected to a sink S trap or waste disposal unit, the hose must be looped up to the underside of the bench top and secured.

Fig. A
When the drain hose is connected to a separate standpipe, it is essential that an airtight connection be made. Refer to Fig.B
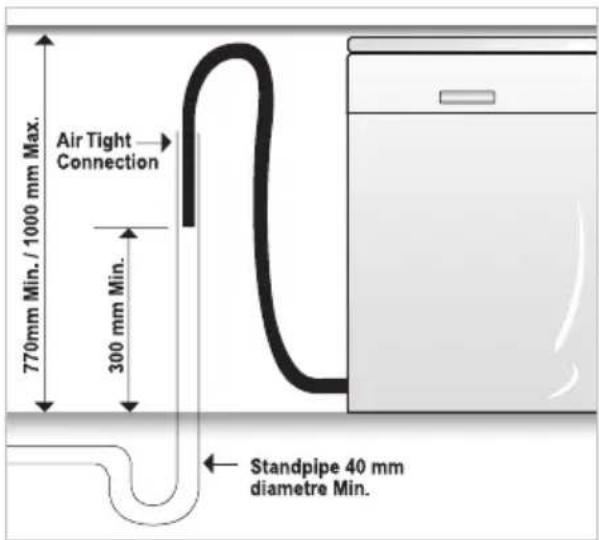
Fig. B : Drainage connection - stand pipe.
Drain hose Extension
Extend drain hose as shown below.

CAUTION
- When you connect or extend drain hose, make sure that the drain hose is not kinked.
(Bends should have a 40 mm radius.)
INSTALLATION INSTRUCTIONS
■ Installation of water inlet hose How to level the dishwasher
▶ Some models consist of an inlet valve combined with a hose. (Fig. A)
▶ Connect the water supply hose to the water tap. (Fig. B)
After connecting the inlet hose to the tap, turn on the tap to flush out foreign substances (dirt, sand or sawdust) in the water lines. Let water drain into a bucket, and check the water temperature.
Connect the supply hose to the water inlet valve.


- This dishwasher may be fed with either hot or cold water. If the water can not be maintained below 65°C, the dishwasher must be connected to cold water.
- When connecting, you may use sealant tape or sealing compound to avoid water leaks.
• Make sure that the line is not kinked or sharply bent. - It is recommended that the new inlet hose be used and not an existing or old hose.
■ Final check and assembling
- Securely hand tighten supply hose to the water supply.
Plug the power supply cord into an earthed electrical point and switch on.
- After installing and prior to using the dishwasher with crockery, we recommend that you use the dishwasher on Quick mode to rinse through. At this stage it is useful to ensure that there are no operating problems or water leaks.
When the dishwasher is used for the first time, there may be a loud noise, if this happens, turn off the power and restart the dishwasher.
After installing the dishwasher, you may notice a slight sticking of the door to the dishwasher, when you open or close the door. If this does happen you need to adjust the level of the dishwasher.
Case 1. In case the door is slanted to the right

- If the door slants to the right, see fig. C follow these instructions:
1) Unscrew(counter-clockwise) the left leg of the back side and correct the level.
2) Check the opening of door and repeat if necessary until the door opens and closes properly.
- When the product is correctly leveled, there should be no slant, stickiness or rubbing sound.
Case 2. In case the door is slanted to the left

- If the door slants to the left, see fig. D follow these instructions:
1) Check the opening of the door to hear if there is a sticking or rubbing sound.
2) Check the opening of door and repeat if necessary until the door opens and closes properly.
- When the product is correctly leveled, there should be no slant, stickiness or rubbing sound.


- Control Panel
- Door Handle
- Front Cover
- Lower Cover
- Display Window
- Power Button
- Drain Hose
- Inlet Hose
- Power Cord
-
Adjustable Leg
-
Upper Rack
- Cutlery Basket
- Detergent And Rinse Aid Dispenser
- Vapor Vent Cover
- Upper Spray Arm
- Lower Spray Arm
- Filter ASM
- Lower Rack
- Salt Container Cap
- Cutlery Rack
- Steam Nozzle (Steam models only)
Accessories


Funnel Noise Strip
(LD-1485 & LD-1484 models only)
■ MODEL : LD-1485T(W,L,M,B,C,S)4

① Programme
- Press the cycle that corresponds to your desired wash cycle.
② Rinse
- Repeated pressing of the Rinse button will select Extra Hot, Rinse+, Extra Hot & Rinse+.
- If you select the Extra Hot(80°C) function, the operating temperature will be up to 80°C. (Eco, Auto, Steam Care, Steam Dual Spray, Steam Power)
- When you select Rinse + (+) an additional rinse cycle is added.
③ Child Lock (
• Used to lock or unlock the control buttons to prevent all the settings from being changed by a child.
- To activate or release the Child Lock function, press the Child Lock button for 3 seconds while the dishwasher is in operation.
- All controls will be disabled except the Child Lock and Power buttons.
- Turning off the dishwasher will not reset the Child Lock function. You must release the Child Lock before you can operate the dishwasher.
④ Spray
- With each press, the water spray intensity level is changed to Soft ( ), Medium( ) and Strong( ) in a sequence. (Only Eco, Steam Care and Steam Dual Spray)
⑤ Half load
• In case of a small load, use the upper or lower rack to save energy.
- With each press, select Upper(↑) or Lower(↓) rack only. (Except Quick & Dry, Steam Power)
- In case you don't select this button, the machine always defaults to vario washing, which operates upper and lower spray arm alternately.

⑥ Delay Start
- If you want to delay the start of the selected programme, press this button.
- Pressing this button will increase the starting time by 1 hour increments.
• The delay start time can be adjusted from 1 hour to 19 hours.
⑦ Power
- For operating, press this button first for power on.
• After the programme has completed, this button automatically switches off for safety and energy saving. - The unit will automatically turn off if the programme is interrupted and not resumed, or started within 4 minutes.
- In case of irregular mild power surges to the machine, the power may be automatically turned off for safety.
- To turn the power off during a programme, press the Power button twice.
⑧ Beep On/Off
• The dishwasher must be switched on.
- The beep on/off function can be set by pressing the Spray and Delay Start button simultaneously for a few seconds. "ON" or "OFF" will be displayed retrospectively.
⑨ Steam(
- The Steam symbol light will stay on when the Steam course has been selected.
⑩ Indicator
Child Lock.
S • Refill with special salt.
• Refill with rinse aid.
NOTE
The Dishwasher can be used without salt if not required, however, the hardness level will need to be set to H0 so that the indicator does not remain lit. (See page 18.)
⑪ Time Left
- Before starting, the display window shows the running time of the selected programme.(except for the Auto programme)
• After starting, the display window shows the remaining time. - If the dishwasher has a problem, the error type will be displayed. (OE, FE, IE, AE(EI), HE, LE, tE, nE)
- If these error letters are displayed, please refer to the trouble shooting on page 34 and follow the guide.
■ MODEL : LD-1484T(W,L,M,B,C,S)4

① Programme
- Press the cycle that corresponds to your desired wash cycle.
② Rinse
- Repeated pressing of the Rinse button will select Extra Hot, Rinse+, Extra Hot & Rinse+.
- If you select the Extra Hot(80°C) function, the operating temperature will be up to 80°C. (Eco, Auto, Steam Care, Steam Dual Spray, Steam Power)
- When you select Rinse + (+) an additional rinse cycle is added.
③ Child Lock (
• Used to lock or unlock the control buttons to prevent all the settings from being changed by a child.
- To activate or release the Child Lock function, press the Child Lock button for 3 seconds while the dishwasher is in operation.
- All controls will be disabled except the Child Lock and Power buttons.
- Turning off the dishwasher will not reset the Child Lock function. You must release the Child Lock before you can operate the dishwasher.
④ Spray
- With each press, the water spray intensity level is changed to Soft ( ), Medium( ) and Strong( ) in a sequence. (Only Eco, Steam Care and Steam Dual Spray)
⑤ Half load
- In case of a small load, use the upper or lower rack to save energy.
- With each press, select Upper(↑) or Lower(↓) rack only. (Except Quick & Dry, Steam Power)
- In case you don't select this button, the machine always defaults to vario washing, which operates upper and lower spray arm alternately.
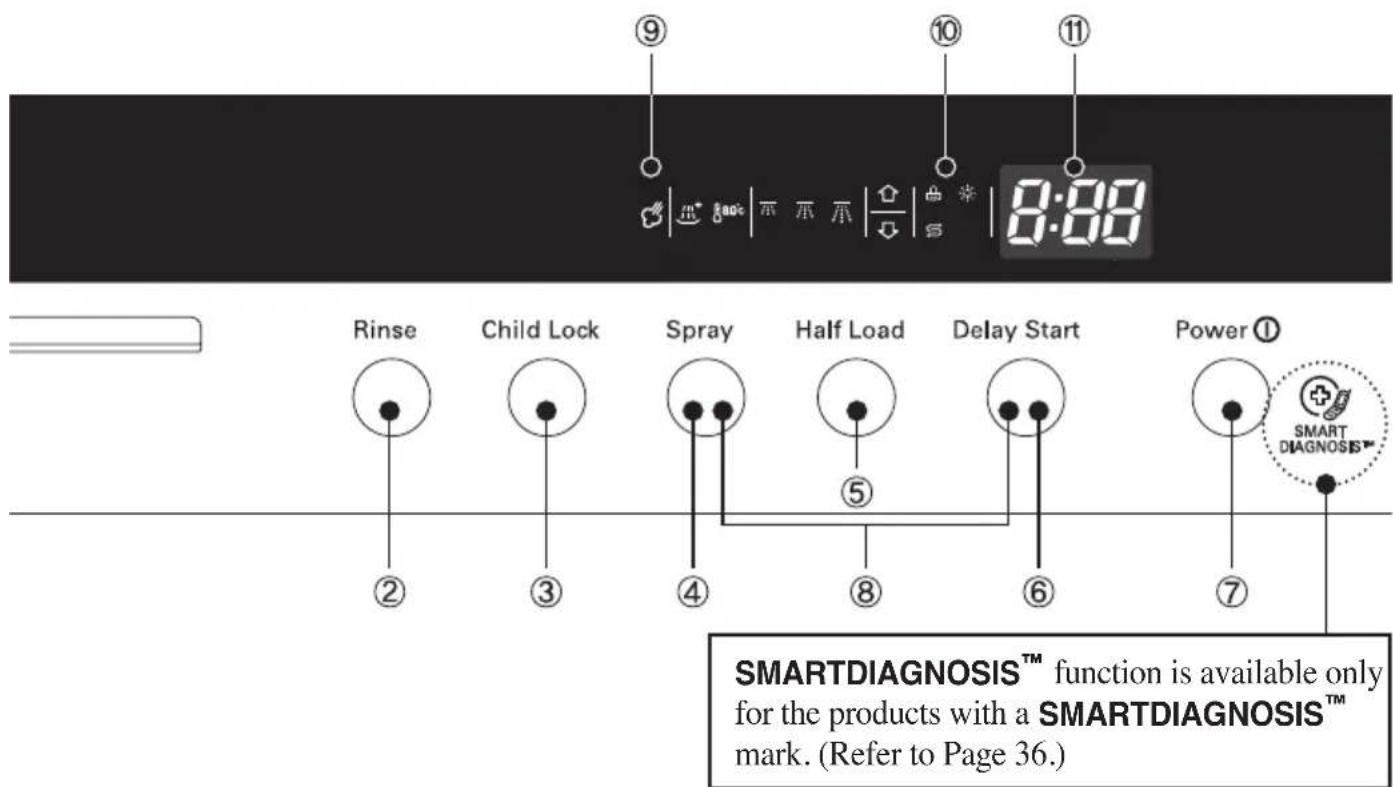
⑥ Delay Start
- If you want to delay the start of the selected programme, press this button.
- Pressing this button will increase the starting time by 1 hour increments.
• The delay start time can be adjusted from 1 hour to 19 hours.
⑦ Power
- For operating, press this button first for power on.
• After the programme has completed, this button automatically switches off for safety and energy saving. - The unit will automatically turn off if the programme is interrupted and not resumed, or started within 4 minutes.
- In case of irregular mild power surges to the machine, the power may be automatically turned off for safety.
- To turn the power off during a programme, press the Power button twice.
⑧ Beep On/Off
• The dishwasher must be switched on.
- The beep on/off function can be set by pressing the Spray and Delay Start button simultaneously for a few seconds. "ON" or "OFF" will be displayed retrospectively.
⑨ Steam(
- The Steam symbol light will stay on when the Steam course has been selected.
⑩ Indicator
Child Lock.
S • Refill with special salt.
• Refill with rinse aid.
NOTE
The Dishwasher can be used without salt if not required, however, the hardness level will need to be set to H0 so that the indicator does not remain lit. (See page 18.)
⑪ Time Left
- Before starting, the display window shows the running time of the selected programme.(except for the Auto programme)
• After starting, the display window shows the remaining time. - If the dishwasher has a problem, the error type will be displayed. (OE, FE, IE, AE(EI), HE, LE, tE, nE)
- If these error letters are displayed, please refer to the trouble shooting on page 34 and follow the guide.
■ MODEL : LD-1483T(W,L,M,B,C,S)4

① Programme
- Press the cycle that corresponds to your desired wash cycle.
② Rinse
- Repeated pressing of the Spray and Half Load button will select Extra Hot, Rinse+, Extra Hot & Rinse+.
- If you select the Extra Hot(80°C) function, the operating temperature will be up to 80°C. (Eco, Auto, Care, Dual Spray)
- When you select Rinse+(m+) an additional rinse cycle is added.
③ Child Lock (
• Used to lock or unlock the control buttons to prevent all the settings from being changed by a child.
- To activate or release the Child Lock function, press the Child Lock button for 3 seconds while the dishwasher is in operation.
- All controls will be disabled except the Child Lock and Power buttons.
- Turning off the dishwasher will not reset the Child Lock function. You must release the Child Lock before you can operate the dishwasher.
④ Spray
- With each press, the water spray intensity level is changed to Soft ( ), Medium( ) and Strong( ) in a sequence. (Only Eco, Care and Dual Spray)
⑤ Half load
- In case of a small load, use the upper or lower rack to save energy.
- With each press, select Upper(↑) or Lower(↓) rack only. (Except Quick & Dry)
- In case you don't select this button, the machine always defaults to vario washing, which operates upper and lower spray arm alternately.

⑥ Delay Start
- If you want to delay the start of the selected programme, press this button.
- Pressing this button will increase the starting time by 1 hour increments.
- The delay start time can be adjusted from 1 hour to 19 hours.
⑦ Power
- For operating, press this button first for power on.
• After the programme has completed, this button automatically switches off for safety and energy saving. - The unit will automatically turn off if the programme is interrupted and not resumed, or started within 4 minutes.
- In case of irregular mild power surges to the machine, the power may be automatically turned off for safety.
• To turn the power off during a programme, press the Power button twice.
⑧ Indicator

NOTE
The Dishwasher can be used without salt if not required, however, the hardness level will need to be set to H0 so that the indicator does not remain lit. (See page 18.)
⑨ Time Left
- Before starting, the display window shows the running time of the selected programme.(except for the Auto programme)
• After starting, the display window shows the remaining time. - If the dishwasher has a problem, the error type will be displayed. (OE, FE, IE, AE(EI), HE, LE, tE, nE)
- If these error letters are displayed, please refer to the trouble shooting on page 34 and follow the guide.
⑩ Beep On/Off
• The dishwasher must be switched on.
- The beep on/off function can be set by pressing the Spray and Delay Start button simultaneously for a few seconds. "ON" or "OFF" will be displayed retrospectively.
Hardness setting
※ Check your water hardness and set the softening system level before operating your dishwasher. If in doubt, please contact your water Service or utility provider.
Step 1. Check and find water hardness level
Method 1
1) Check the water hardness in your area.
(Your water utility company can help you with this.)
2) Set the softening system level of your dishwasher according to the water hardness level.
Refer to Step 2.
Method 2
1) Check your water hardness by using a test strip. (☐)
2) Test Procedure
① Immerse all reaction zones of the test strip for approx.1sec (not in running water!).
② Shake off excess liquid from the strip and wait for 1min.
Then, the green colour of the reaction zone will change to the red-violet.
③ Count the number of red-violet from the strip.
< Water hardness level >
| Number of the areas(red-violet) | Hardness range | Water quality | Softening system level | ||||
| °d | °e | °f | mmol/l(Ca+Mg) | mg/lCa | |||
| 1 | <7 | <9 | <12,5 | <1,3 | <50 | soft | H0, H1 |
| 2 | 7 - 14 | 9 - 17,5 | 12,5 - 25 | 1,3 - 2,5 | 50 - 100 | moderately hard | H2, H3 |
| 3 | 14 - 21 | 17,5 - 26 | 25 - 37 | 2,5 - 3,8 | 100 - 150 | hard | H4, H5 |
| 4 | >21 | >26 | >37 | >3,8 | >150 | very hard | H6, H7 |
| °dH | °FH | °CClarke | mmol/l | *L |
| 0-3 | 0-6 | 0-4 | 0-6 | H0 |
| 4-6 | 7-11 | 5-8 | 0,7-1,1 | H1 |
| 7-9 | 12-16 | 9-11 | 1,2-1,6 | H2 |
| 10-12 | 17-21 | 12-15 | 1,7-2,1 | H3 |
| 13-16 | 22-29 | 16-20 | 2,2-2,9 | H4 |
| 17-21 | 30-37 | 21-26 | 3,0-3,7 | H5 |
| 22-30 | 38-54 | 27-38 | 3,8-5,4 | H6 |
| 31-50 | 55-89 | 39-62 | 5,5-8,9 | H7 |
(*L : Softening system level)
1°e = 14.25mg / l CaCO3
1°f = 10mg / l CaCO3
1°d = 10mg / l CaO (= 1,78) (= 1,25°e)
3) Now set the softening system level of your dishwasher according to the water hardness level. Refer to Step 2.
Step 2. Setting up the softening system level of your dishwasher
Adjust the water softener to the setting corresponding to the water hardness level in your area. The water softener has 8 adjustment levels.
The dishwasher is programmed at the factory for a water hardness level of H0 . This can be checked and altered by using the buttons on the control panel.
- First, ensure the dishwasher is off.
- Press Half Load and Power button simultaneously and keep them pressed.
- To change the setting:
Simply press the Half Load button, then the figure will change one by one. The display will change between H0 and . H7 - Once the hardness setting is correctly adjusted, press the Delay Start button. The hardness setting is then saved.
NOTE
The salt dispenser refill lamp will remain lit when empty, unless the Hardness setting is set to HO for soft water.
BEFORE USING FOR THE FIRST TIME
Step 3. Salt Filling
This model has a water softener to soften hard water. Please read these notes carefully for correct operation.
In order to provide satisfactory rinsing results, the dishwasher requires soft water, i.e., containing little or no lime, otherwise water stains will be left behind on the dishes and interior containers. If the tap water exceeds a certain level of hardness, it must be softened, i.e., decalcified. This is achieved by adding a special salt to the water softener inside the dishwasher. The required amount of salt is set up according to how hard your tap water is.
NOTE
Water softer salt can be purchased from Salt distributors.
■ Filling with Salt (Adding salt is only necessary in Hard water areas.)
Fill the regenerating salt container before starting the washing programme.
Once you have filled with salt you must run the Quick course immediately to remove salt and salt water around the tub in order to prevent corrosion.
- Remove the lower rack and unscrew the cap of the salt container.
- Before using your dishwasher for the first time, it is necessary to Pour 1.5kg of salt and 1 litre of water in to the container.
Otherwise salt refill lamp always turn on during operation, unless the Hardness level is set to H0 (see page 18).
Use a funnel for ease and clean filling, ensuring that coarse salt or regenerating salt intended for water softening is used.
• After filling, wipe off any spilled salt to seal the cap properly.
- Screw the cap tightly to prevent any suds from penetrating into the container.

Step 4. Adding Rinse Aid
For filling
To fill the Rinse Aid chamber, push the rinse aid button. Fill the container to the maximum level with a good quality Rinse Aid, then close the cap.
The Rinse Aid is automatically dispensed during the final rinse cycle.
The dosage is factory set to suit most installations. If, after washing, you notice cloudy spots, streaks or water marks on your glassware, it may be necessary to increase the setting. To do this, remove the cap and rotate the indicator arrow to a higher setting then replace the cap. If the glass is smeared or foam is present on the bottom of the glass or the bottom of the machine, select a lower setting.


INFORMATION FOR ENERGY TEST(AS/NZS 2007)
■ Appliance loaded in accordance with standard specifications.
• Capacity : 14 place settings
• Comparability course : Eco and Soft Spray
- Rinse Aid setting : 4
- Reference cleaner : 25g of detergent onto the inside surface of the door.
- Door is opened at the end of the drying cycle for the drying performance test. (Door position: Open 50 mm)
- Height-adjustable Rack-U must be inserted into the uppermost position.
- Cutlery Basket

- Cutlery Rack

- Upper Rack

- Lower Rack

HOW TO USE AND OPERATE
■ Daily use load
- Cutlery Basket

- Upper Rack

- Cutlery Rack

- Lower Rack

CAUTION
- Do not place pots or pans with plastic handles in the washer as the handles may deteriorate due to the heat and detergent.
• Water proof or long lasting lipstick smudges on glasses may not be removed during the wash.
HOW TO USE AND OPERATE
For a better washing performance, always load the dishwasher according to the instructions.
■ Before loading items into the dishwasher.
- Clean off large particles of food, in particular insoluble items such as bones, pips etc.
- Items with burnt on food should be soaked prior to loading in the dishwasher.
■ While you load items into the dishwasher.
- Load all items with the opening down. (Make sure that water does not collect in a deep base.)
- Deep based items should be placed at an angle to help water run off and dry properly.
• Make sure that all items do not touch each other.
Take care not to obstruct the rotation of the spray arms. (Check for free rotation of the spray arms by hand after loading the racks.)
■ Plastic items do not dry as well as steel or porcelain items.
NOTE
Non Dishwasher Safe Items
The combination of high water temperatures and dishwasher detergent may damage particular items, therefore we do not recommend using the dishwasher to wash the following:
■ Copper or anodised aluminium
■ Hand painted silver or gold leaf crockery
■ Wood or bone handled utensils
■ Iron or non rust proof utensils
■ Plastic items which are not dishwasher safe
■ Expensive ware such as silver and dishes with golden rings
■ Fragile item such as crystal glasses
1. Cutlery Rack
The cutlery rack is suitable for flatware and most cooking or serving utensils.

Knife, fork and spoon handles should be positioned between the tines.


WARNING
- Be careful when loading and unloading sharp-edged items. Load sharp knives with the blade down in order to reduce the risk of injury.
■ Height Adjustable tray
Each side tray can be adjusted independently to a high or low position to accommodate different sizes of utensils or cutlery.


HOW TO USE AND OPERATE
■ Removable Cutlery Rack
The entire cutlery rack can be removed if more space is needed on the upper rack for larger items.
NOTE
Always remove cutlery from the rack before removing the rack.

Pull the rack out to the end of the rails, then lift the front of the rack so the rollers clear the stop on the end of the rail. The rack can now be slid forward and removed from the rails.
2. Cutlery Basket
Place forks and spoons in the cutlery basket with their handles downwards.


For Large utensils, such as whisks, the cover can be opened by being unhinged. Take care not to obstruct the rotation of the spray arm.


The cutlery shouldn't be longer than 18cm. (In this case, use the cutlery rack.)
The basket can be split along its length, increasing the lower rack's loading versatility.

Slide two baskets in opposite directions, then pull them apart.
WARNING
• To prevent injuries, place knives and other utensils with sharp points on the cutlery rack.
- If you want to load them in the cutlery basket, place them with the pointed edges facing downwards.
3. Lower Rack
The lower rack is suitable for dinner plates, soup bowls, dishes, pots, pans, lids and even a grill tray.
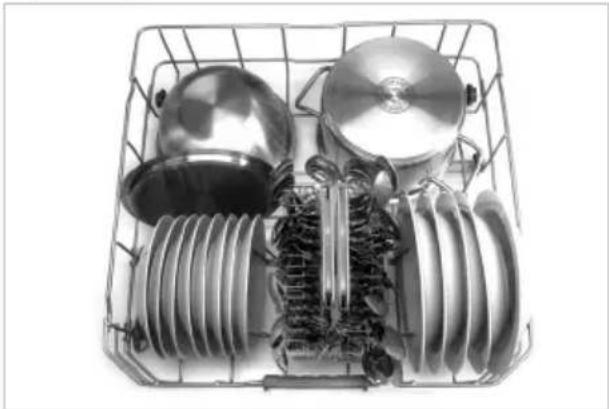
Plates should be positioned upright and facing the centre of the rack and pots, pans and large dishes must be turned upside down.
HOW TO USE AND OPERATE
Take care not to obstruct the rotation of the spray arms.


To make it easier to load larger dishes, the front row of tines can be folded down.
How to fold down


The front side rows are composed with a pair of tine rows.
Each pair can be folded separately to load large dishes, especially bowls.
To make the space between two tines wider, fold down the rear row of each pair.
Fold down the back side rows of tines to load pots.
• E.g.) Loading dishes

Fold up whole tines.
• E.g.) Loading bowls

Fold down the rear row of each pair of tines.
• E.g.) Loading pots

Fold down whole tines.
4. Upper Rack
The upper rack is suitable for delicate items such as, small plates, long cutlery, cups, glasses and dishwasher safe plastic items.

Plates should be positioned upwards with the plate bottom facing the front of the rack.
Cups, glasses and bowls must be positioned upside down.
HOW TO USE AND OPERATE
Take care not to obstruct the rotation of the spray arm under the upper rack.

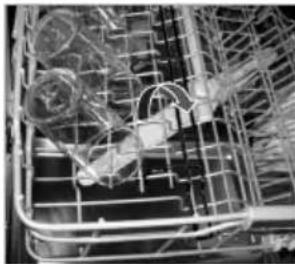
To make it easier to load larger cups or glasses, the left side row of tines can be folded down. For the upper rack's position, dishes shouldn't be larger than 25cm with the upper position, nor 20cm with the lower position.
How to fold down
- Pull up the tine · Rotate the tine


Long stem glassware can be placed without interference from the lowered tines.
The cup racks can be folded up out of the way for tall crockery items.

■ Adjusting the height of the upper rack
The height of the upper rack can be adjusted when you load glasses with long stems or tall crockery items.
- Move the upper rack to the lower position

Pull up the levers on either side of the rack.
- Move to upper position

Lift the rack upward.
There is a 45mm gain in height when the upper rack is moved to the lower position.

After adjusting the rack levels, check that the spray arms are free to rotate.
WARNING
- Before adjusting, ensure the rack is empty of all crockery. Otherwise crockery may get damaged or you may get injured.
With the lower position of the upper rack, check if the bottom part of upper rack including spray arm is not disturbing items on the lower rack. - When the upper rack is in the lower position, push in the upper rack first, and the lower rack later.
(Pull out the lower rack first, and the upper rack later.)
HOW TO USE AND OPERATE
5. Adding Detergent
- Detergent must be put into the detergent chamber before starting every programme.
- Please follow the manufacturer's instructions within the manual, when determining the correct amount of detergent to use.
- If your dishes are moderately dirty, you may use slightly less detergent than recommended.
- Chambers hold up to 50g including pre-wash chamber.
- The amount of detergent required depends on the programme. Please refer to the guide table.
■ Model : LD-1485 & LD-1484
| PROGRAMME | AMOUNT OF DETERGENT | |
| Pre-wash(Onto the door) | Main-wash(Dispenser) | |
| Quick & Dry 5g | 20g | |
| Quick - 10g | ||
| Eco - 25g | ||
| Auto 7g 25g | ||
| Steam Care - 20g | ||
| Steam Dual Spray | 5g 30g | |
| Steam Power - 35g | ||
■ Model : LD-1483
| PROGRAMME | AMOUNT OF DETERGENT | |
| Pre-wash(Onto the door) | Main-wash(Dispenser) | |
| Quick & Dry 5g | 20g | |
| Quick - 10g | ||
| Eco - 25g | ||
| Auto 7g 25g | ||
| Care - 20g | ||
| Dual Spray 5g | 30g | |
- The detergent is dispensed automatically during the operation.
- The chamber lid remains open after operation.
NOTE
Detergent Information
- Use only the detergent intended for household dishwashers. (Ordinary hand-washing detergent should not be used, because the foam will interfere with proper operation.)
- When using some dishwasher tablets, the dispenser may not open due to their excessive size.
- If this happens, place the tablet onto the floor of the tub.


When using tablets, place them onto the inside surface of the door, or the base of the washer. The use of some combined detergent/rinse aid tablets can cause the dispenser to remain shut during the wash due to their size. Do not use liquid rinse aid if using tablets that have built in rinse aid.
HOW TO USE AND OPERATE
WARNING
• The detergent used is a special Dishwasher detergent and like all household chemicals it should be treated as harmful and kept out of reach of children.
After completion of the wash programme, the detergent compartment should be checked and any remaining detergent removed.
CAUTION
Using combined detergent products (ex.3 in 1)
• Some products integrated with rinse aid work best with specific programmes only. You will obtain optimum rinsing and drying results by using conventional rinse aids.
• The use of Dishwasher Tablet products may also cause the soap dispenser to remain shut, therefore failing to dispense the soap tablet.
These combined detergent products can alternatively be placed next to the filter base prior to starting the wash cycle. Please contact the detergent manufacturer if the drying performance is very poor or you find white foam, when you use the combined detergent products.
The rinse aid dial should be set to minimum when using wash tablets with built in rinse aid.
Excessive rinse aid can cause foaming at the end of the wash.
We do not warrant the complaints that are directly related to the use of these products. Do not use liquid rinse aid if using tablets containing a rinse aid agent.
6. Refilling
■ For refilling Rinse Aid
Depending on the dosage setting and the number of washes, the chamber may need to be topped up, approximately once a month. The rinse aid level can be checked by two methods.
- By the indicator window on the dispenser when the dishwasher door is fully open.
● Black indicates sufficient Rinse Aid ○ Clear indicates Rinse Aid required

Rinse-Aid Indicator
Adjust Lever (Rinse)
- By the light on the control panel, being lit, when the dishwasher is working on.
LD-1485

LD-1484
LD-1483

When the lamp is lit, it means the rinse aid is almost empty. Refill the Rinse Aid chamber as soon as possible.
NOTE
Rinse Aid Information
- Rinse Aid is necessary to remove spots and streaks of the water from dishes as well as improved drying. Using the correct amount will improve wash performance. However, using too much can produce excess foam leading to possible water leaks.
HOW TO USE AND OPERATE
■ For refilling Salt
When the salt container is empty, the salt refill lamp will automatically turn on during operation, unless the Hardness level has been set to H0. (see page 18.) The salt should be refilled after the cycle has finished.
We recommend the salt refilling should always be carried out, as mentioned on page 19, prior to starting the next operation. This will immediately thin and drain away any excess salt solution.

When the lamp is lit, this means that the salt aid is almost empty. If necessary, refill the Salt Aid chamber as soon as possible.
NOTE
• After filling with salt, it may take a little while before the indicator light turns off.
- When the control is set to HCl it is not necessary to fill up with salt as no salt is consumed while the dishwasher is operating, nor will the salt indicator light up when the salt container is empty. If the control is set between Hand, then salt must be added to the salt container.
WARNING
- Do not pour detergent into the salt container. This will destroy the water softener.
7. Drying
■ To assist drying, we recommend that the door be partially opened after the cycle.
The display will indicate Cd(cool dry) for a further 60 minutes after the end of the cycle time. It can be interrupted or terminated by simply opening the door.
■ The use of rinse aid is recommended for optimum drying results.
■ Select the Extra Hot option to get better drying results.
OPERATING SEQUENCE
1. Press the Power button
2. Check there is rinse aid and salt
The corresponding indicator light will illuminate if refilling is required.
3. Open the door and check the filters
Ensure they are clean and properly positioned. (See User Maintenance Instructions)
4. Load the dishes
Remove any excess food.
Pull the lower rack out and arrange the dishes and cutlery.
Pull the upper rack out and arrange the cups, glasses, etc.

CAUTION
- Do not load the items in upper rack when the lower rack is pulled out and loaded.
5. Ensure the spray arms can freely rotate
6. Measure out detergent
Add the required amount of detergent into the dispenser and close the lid.
7. Setting and starting the programme
Press the programme button to select the desired programme.
After 10 seconds, the machine will start. If necessary, select the option function corresponding to the desired programme. The indicator lights of the programme and all the phases of the programme will come on. Before starting, the display window shows the running time of the selected programme.
After starting, the display window shows the remaining time (with the exception of the Auto cycle).
The time in the display window will start to decrease minute by minute.
If the door is opened during the programme a safety device ensures that the machine stops.
Once the door is re-closed the programme will start from where it was interrupted.
8. At the end of the washing programme
End is displayed on the digital display and a buzzer sounds.
And the dishwasher automatically switches off for safety and energy saving later.

CAUTION
- Empty the lower rack first and then the upper one; this will avoid water dripping from the upper rack onto the dishes below.

WARNING
- In general it is not advisable to open the door while the machine is working.
- If the door is opened, a safety device ensures that the machine stops.
- Care must be taken if the door is opened during the hot phase or immediately after a programme has finished, as steam may escape.

CAUTION
- The door should not be left in the fully position since this could present a tripping hazard.
PROGRAMME (Model : LD-1485 & LD-1484)
▶ Running time may vary according to the water temperature, water pressure and voltage.
▶ Running time doesn't include Cool Dry - 60min.
| Programme | WASH RINSE | DRY | COOL DRY | ||||
| Pre Wash | Main Wash | Rinse 1 Rinse 2 | Heating Rinse | ||||
| Quick & Dry | 65°C | 70°C | |||||
| Quick | 60°C | 65°C | |||||
| Eco | 40°C | 41°C | |||||
| Auto | The programme sequence is optimised and adapted in accordance with how dirty the dishes are. | ||||||
| Steam Care | 50°C | 70°C | |||||
| Steam Dual Spray | 45°C | 60°C | 70°C | ||||
| Steam Power | 45°C | 70°C | 70°C | ||||
▶ Quick & Dry
This programme offers good washing performance within 60 minutes.
To assist drying, we recommend to open the door partially when you see small amounts of wet streaks or drops after the cycle.
Opening the door right after the cycle may set off the inbuilt High temperature alarm.
Quick
Is best used for lightly soiled recently used dishes and cutlery.
Eco
This program offers the most efficient energy and water consumption for a good washing performance on a moderately soiled load, but compromises the drying result as it uses very little energy. Eco and Soft Spray program is the one to be used for a normally soiled load.
▶ Auto
During the Auto program, the degree of soiling in the dishes is determined by the amount of clouding of the water. According the degree of soiling, the program automatically adjusts the
washing time, temperature, level of water jet and the number of rinses.
As a result, the energy and water consumption is kept as low as possible.
The "F" on display means that the sensor is sensing the status of the dishwasher.
▶ Steam Care
This cycle adds the gentle power of steam to boost the cleaning power of the delicate cycle. The cycle is adequate for effectively cleaning delicate items like fine china or stemware.
▶ Steam Dual Spray
This cycle washes the upper and lower racks at different spray intensities in conjunction with the gentle power of steam. The lower rack is washed with a strong spray for hard to clean items, while the upper rack is washed with a medium spray for more delicate items. This provides optimum cleaning performance for mixed loads, including fine china and stemware.
▶ Steam Power
This cycle adds the strong power of steam to boost the cleaning power of the intensive cycle. The cycle is suitable for effectively cleaning heavily soiled items like pots and pans.
■ Auto Restart
If the dishwasher is turned off by a power failure, it will restart from the position it stopped at, and resume accordingly when you press the Power button again.
PROGRAMME (Model : LD1483)
▶ Running time may vary according to the water temperature, water pressure and voltage.
▶ Running time doesn't include Cool Dry - 60min.
| Programme | WASH RINSE | DRY | COOL DRY | ||||
| Pre Wash | Main Wash | Rinse 1 Rinse 2 | Heating Rinse | ||||
| Quick & Dry | 65°C 70°C | ||||||
| Quick | 60°C 65°C | ||||||
| Eco | 40°C 41°C | ||||||
| Auto | The programme sequence is optimised and adapted in accordance with how dirty the dishes are. | ||||||
| Care | 50°C 70°C | ||||||
| Dual Spray | 45°C 60°C 70°C | ||||||
▶ Quick & Dry
This programme offers good washing performance within 60 minutes.
To assist drying, we recommend to open the door partially when you see small amounts of wet streaks or drops after the cycle.
Opening the door right after the cycle may set off the in built High temperature alarm to indicate high residual temperatures inside the Dishwasher.
Quick
Is best used for lightly soiled recently used dishes and cutlery.
Eco
This program offers the most efficient energy and water consumption for a good washing performance on a moderately soiled load, but compromises the drying result as it uses very little energy. Eco and Soft Spray program is the one to be used for a normally soiled load.
▶ Auto
During the Auto program, the degree of soiling in the dishes is determined by the amount of clouding of the water. According to the degree of soiling, the program automatically adjust the washing time, temperature, level of water jet and the number of rinses.
As a result, the energy and water consumption is kept as low as possible.
The "F" on display means that the sensor is sensing the status of the dishwasher.
▶ Care
This cycle is suitable for effectively cleaning delicate items like fine china or stemware.
▶ Dual Spray
This cycle washes the upper and lower racks at different spray intensities. The lower rack is washed with a strong spray for hard to clean items, while the upper rack is washed with a medium spray for more delicate items. This provides optimum cleaning performance for mixed loads, including fine china and stemware.
■ Auto Restart
If the dishwasher is turned off by a power failure, it will restart from the position it stopped at, and resume accordingly when you press the Power button again.
USER MAINTENANCE INSTRUCTIONS
To prevent trouble and poor operation, it is important to check filters and spray arms at regular intervals.
■ Storing the dishwasher
- If you are not using the dishwasher for a long time, run a Quick & Dry cycle without detergent. When the cycle is finished, clean the dishwasher according to the USER MAINTENANCE INSTRUCTIONS to remove the food debris at the bottom of the dishwasher and prevent odors and close the door only after the washer is completely dry.
■ Filters
- Remove the lower rack first.
- Turn the mesh filter counterclockwise.
• Take out the mesh filter, upper STS filter and outer filter.
• We recommend to clean them and run the Quick & Dry cycle without detergent at least once a week. - Replace them in the reverse order.

NOTE
• After each cycle, clean the filter for a better washing result.
- For best wash performance, clean the filter after each load. If food debris remains in the filter, it may cause odor.
- Before starting, check that the filter is assembled well. If the filter is not assembled correctly, you might have a poor cleaning result.
■ Lower Spray Arm
- Check that the water jet holes are not blocked.
- If cleaning is required, remove the arm by pulling up.
- Clean the spray arm and replace it by pushing down securely.


■ Upper Spray Arm
- Pull the upper rack forwards.
- Check that the water jet holes are not blocked.
- If cleaning is required, remove the arm by unscrewing the nut.
- Clean the spray arm and replace it in the reverse order.


■ Water Inlet
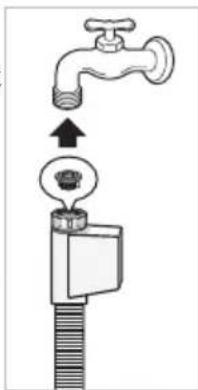
- A filter is incorporated in the connection of the valve on the water inlet hose. If insufficient water flows into the dishwasher, check that the filter is not blocked.
- Cleaning the filter
- Disconnect the dishwasher from the mains supply. Switch off at the mains socket and remove the plug.
- Turn off the tap.
- Unscrew the inlet hose.
- Remove the filter from connection.
- Clean the filter in the supply hose under running water.
- Refit the filter, making sure it is sitting correctly.
- Reconnect the inlet hose to the tap.
- Turn on the tap.
- If there is a leak, the inlet hose might not be on securely, or it may have been screwed on at an angle. Unscrew and reconnect the water inlet valve correctly.
Never over tighten the inlet valve or use mechanical devices to tighten. - Reconnect power supply.
TROUBLE SHOOTING GUIDE
- If a problem occurs check below to see whether this can be solved.
- In the unlikely event that the problem cannot be rectified, please contact the manufacturer.
■ Before calling for service
| Problem Possible Causes Solution | ||
| No lights come on when the power is turned on. | Plug is not properly inserted into the socket.Fuses blown or circuit breaker tripped.The electricity from the house was cut off. | Check the plug.Check the electricity.Call for service. |
| The control button won't operate except for the Power button. | Child Lock function is activated. | Check the Child Lock indicator.Press the Child Lock button for 3 seconds to release the Child Lock function. |
| The machine does not start. | Door is not fully closed.The start button is not pressed. | Close the door.Press the start button. |
| The spray arms do not rotate smoothly. | The mounting of the spray arms is blocked by food particles. | Clean the holes of the spray arm. |
| White deposits are left on washed items and on the stainless steel tub after the wash has finished. | The amount of detergent or rinse-aid is set incorrectly.The salt container is empty.The salt container cap is not securely screwed on.Water Hardness setting may need to be increased. | Check the detergent or rinse-aid and adjust the dispenser dial setting accordingly.Check the salt container or cap. |
| Streaks are left on glassware. | Too little Rinse-Aid dispensed. | Fill the rinse-aid.Adjust the level of rinse-aid dispensed. |
| Dry results are not satisfactory. | Too little Rinse-Aid dispensed. | |
| Washing results are not satisfactory. | Incorrect amount of detergent.Plates and utensils incorrectly arranged or overloaded.Filters are clogged.Water jet holes of spray arms blocked.Spray arm's rotation obstructed by utensils.Unsuitable programme selected. | |
■ Before calling for service
| Problem | SolutionPossib | |
| The display shows OE code. (Water has not drained away.) | · The drain hose is kinked or incorrectly installed.· The filter is clogged.· Motor trouble.(Washing motor or Drain motor)· Waste spigot connection under the sink has not been drilled out. | · Straighten hose(s).· Clean the filter.· If you can not solve the problem, call for service.· Drill out the drain waste spigot diaphragm to the correct size. |
| The display shows IE code. | · Water is not supplied.· Water tap is not opened.· Water sensor malfunction. | · Check the water tap.· If you can not solve the problem, call for service. |
| The display shows AE(EI) code. (Drain pump is automatically operated.) | · Water is leaking from the hose connections.· Damage to the unit has been caused by a water leak. | · Close the water tap and unplug the power plug.· Call for service. |
| The display shows FE code. (Drain pump is automatically operated.) | · Excessive water is supplied, which is more than the normal water level.· There is a problem with the inlet valve. | |
| The display shows HE code. | · The water heater circuit is not operating. | |
| The display shows tE code. | · Thermistor trouble or very high inlet water temperature. | |
| The display shows LE code. | · Motor trouble. | |
| The display shows nE code. | · Vario motor trouble. |
TROUBLE SHOOTING GUIDE
• These are not error codes indicating a malfunction.
■ Before calling for service
| Code Description | |
| The display shows PF code | This indicates there was a power failure. This function protects the dishwasher in the event that the power goes out or the power to the unit is disrupted. When power is returned, and a button is pushed, this will display for 3 seconds and then go away. |
| The display shows Cd code | Cd means Cool-dry. This is an additional drying cycle to assist drying performance. This cycle runs for a further 60 minutes after the course has finished. It can be interrupted at any time by opening the door. |
| The display shows CL code | CL means Child-Lock. This function is used to lock or unlock the control buttons to prevent all the settings from being changed by a child. It can only be activated during the wash cycle. |
| The display shows F code | When the unit is displaying F, the sensor is measuring the water clarity. After 5 minutes of sensing (except draining and filling), the unit's display will then show the processing time. |
| The display shows numbers between 1 ~ 19 | This is not an error code, but indicates the setting of the delay start. To cancel the function, turn the power off, or to change the course and option, open the door and select another course and option. Countdown will then continue after door is closed again. |
| Buzzing sound. (High Temperature Alarm) | This is not an error. When you open the door right after a steam or heated wash, rinse or dry, a buzzing sound will alert you of any high residual temperatures inside the washer. |
| Odor | If the dishwasher is not used daily, we recommend to run a Quick cycle once or twice a day until you have a full load. In case odor still persists, run a vinegar rinse through an Auto cycle by putting 2cups(500ml) of white vinegar in an upright measuring cup in the lower rack, without detergent. For Regular maintenance tips, refer to the USER MAINTENANCE INSTRUCTIONS. |
TROUBLE SHOOTING GUIDE
NOTE
SMARTDIAGNOSIS™ function is available only for the products with a SMARTDIAGNOSIS mark. If using a mobile phone with static option, the smart diagnosis function might not operate.
■ Using SMARTDIAGNOSIS™
- Only use this feature when instructed to do so by the call centre.
The transmission sounds similar to a fax machine, and so has no meaning except to the call centre. - SMARTDIAGNOSIS™ can not be activated if the dishwasher does not power up. If this happens, then troubleshooting must be done without SMARTDIAGNOSIS™.
If you experience problems with your dishwasher, call the Customer information centre. Follow the call centre agent's instructions, and do the following steps when requested:

-
Press the Power button to turn on the dishwasher. Do not press any other buttons.
-
When instructed to do so by the call centre, place the mouthpiece of your phone very close to the Power button. (Max. 10mm)

- [LD-1485 & LD-1484 Models]
Press and hold the Rinse button for three seconds, while Holding the phone mouthpiece to the icon or Power button.
[LD-1483 Model]
Press and hold the Spray and Half Load button for three seconds, while Holding the phone mouthpiece to the icon or Power button.
- Keep the phone in place until the tone transmission has finished.
This takes about 6 seconds, and the display will count down the time.
- For best results, do not move the phone while the tones are being transmitted.
- If the call centre agent is not able to get an accurate recording of the data, you may be asked to try again.
-
Pressing the Power button during the transmission will shut off the SMARTDIAGNOSIS™.
-
Once the countdown is over and the tones have stopped, the machine will display END and turn off automatically after a few seconds.
Resume your conversation with the call centre agent, who will then be able to assist you using the information transmitted for analysis during the call to Customer information centre.
■ Smart Diagnosis is a troubleshooting feature designed to assist, not replace, the traditional method of troubleshooting through service calls. The effectiveness of this feature depends upon various factors, including, but not limited to, the reception of the cellular phone being used for transmission, any external noise that may be present during the transmission, and the acoustics of the room where the machine is located. Accordingly, LG does not guarantee that Smart Diagnosis would accurately troubleshoot any given issue.

| Capacity | 14 Place settings |
| Weight | See rating label |
| Power Supply | See rating label |
| Power Consumption | See rating label |
| Water Feed Pressure | 0.05 ~ 0.6 MPa |
The maximum permissible inlet water pressure, in megapascals
The minimum permissible inlet water pressure, in megapascals
(This is necessary for the correct operation of the appliance)
MEMO
MEMO

LG
Life's Good

- CONTENTS
- CONTENTS....2
- IMPORTANT SAFETY INSTRUCTIONS
- INSTALLATION INSTRUCTIONS
- PARTS NAME...... 11
- FUNCTION OF CONTROL BUTTON....12
- BEFORE USING FOR THE FIRST TIME
- INFORMATION FOR ENERGY TEST ....20
- HOW TO USE AND OPERATE
- THANK YOU FOR BUYING AN LG DISHWASHER
- OPERATING SEQUENCE..... 29
- PROGRAMME ....30
- USERMAINTENANCE INSTRUCTIONS
- TROUBLE SHOOTING GUIDE
- SPECIFICATION ....37
- READ ALL INSTRUCTIONS AND EXPLANATION OF THE INSTALLATION BEFORE USE
- WARNING
- YOUR SAFETY AND THE SAFETY OF OTHERS ARE VERY IMPORTANT
- DANGER
- CAUTION
- READ ALL INSTRUCTIONS BEFORE USE
- DURING INSTALLATION
- DURING USE
- CHILD SAFETY
- SAVE THESE INSTRUCTIONS
- GROUNDING INSTRUCTIONS
- CAUTION CONCERNING THE POWER CORD
- THE INSTRUCTIONS SHALL STATE THE SUBSTANCE OF THE FOLLOWING
- PREPARE CUPBOARD OPENING
- PREPARATION FOR ELECTRICAL WIRING
- DANGEROUS VOLTAGE
- 5036
- PREPARING THE DISHWASHER FOR INSTALLATION
- INSTALLING THE DISHWASHER IN CUPBOARD
- INSTALLATION OF DRAIN HOSE
- CONNECTION TO WASTE SPIGOT
- DRAIN HOSE EXTENSION
- INSTALLATION OF WATER INLET HOSE HOW TO LEVEL THE DISHWASHER
- FINAL CHECK AND ASSEMBLING
- ACCESSORIES
- FUNNEL NOISE STRIP
- ⑥ DELAY START
- ⑦ POWER
- ⑧ BEEP ON/OFF
- ⑨ STEAM(
- ⑩ INDICATOR
- NOTE
- ⑪ TIME LEFT
- ⑧ INDICATOR
- ⑨ TIME LEFT
- ⑩ BEEP ON/OFF
- HARDNESS SETTING
- STEP 1. CHECK AND FIND WATER HARDNESS LEVEL
- METHOD 1
- METHOD 2
- STEP 2. SETTING UP THE SOFTENING SYSTEM LEVEL OF YOUR DISHWASHER
- STEP 3. SALT FILLING
- STEP 4. ADDING RINSE AID
- FOR FILLING
- INFORMATION FOR ENERGY TEST(AS/NZS 2007)
- DAILY USE LOAD
- NON DISHWASHER SAFE ITEMS
- CUTLERY RACK
- HEIGHT ADJUSTABLE TRAY
- REMOVABLE CUTLERY RACK
- CUTLERY BASKET
- LOWER RACK
- UPPER RACK
- HOW TO FOLD DOWN
- ADJUSTING THE HEIGHT OF THE UPPER RACK
- ADDING DETERGENT
- DETERGENT INFORMATION
- USING COMBINED DETERGENT PRODUCTS (EX.3 IN 1)
- REFILLING
- FOR REFILLING RINSE AID
- RINSE AID INFORMATION
- FOR REFILLING SALT
- DRYING
- OPERATING SEQUENCE
- PRESS THE POWER BUTTON
- CHECK THERE IS RINSE AID AND SALT
- OPEN THE DOOR AND CHECK THE FILTERS
- LOAD THE DISHES
- ENSURE THE SPRAY ARMS CAN FREELY ROTATE
- MEASURE OUT DETERGENT
- SETTING AND STARTING THE PROGRAMME
- AT THE END OF THE WASHING PROGRAMME
- PROGRAMME (MODEL : LD-1485 & LD-1484)
- QUICK & DRY
- QUICK
- ECO
- AUTO
- STEAM CARE
- STEAM DUAL SPRAY
- STEAM POWER
- AUTO RESTART
- PROGRAMME (MODEL : LD1483)
- CARE
- DUAL SPRAY
- USER MAINTENANCE INSTRUCTIONS
- STORING THE DISHWASHER
- FILTERS
- LOWER SPRAY ARM
- UPPER SPRAY ARM
- WATER INLET
- USING SMARTDIAGNOSIS™
- [LD-1483 MODEL]
- MEMO
Brand : LG
Model : LD-1484T4
Category : Dishwasher