USER MANUAL 55HM5245K SHARP
Instruction manual
Smart UHD TV
Important Safety Instructions


To prevent spread of fire, keep candles or other open flames away from this product at all times
Please read these instructions. All of the safety and operating instructions should be read before the appliance is operated.
\~ - Alternating current
☐ - This equipment is a Class II or double
insulated electrical appliance. It has been designed in such a way that it does not require a safety connection to electrical earth.
Warnings
- Television sets with 40" screens or larger must be lifted and carried by at least 2 people.
- This television does not contain any parts that are serviceable by the user. In the event of a fault, contact the manufacturer or authorised service department.
- Exposing the internal parts of the TV may endanger your life. The manufacturers guarantee does not extend to faults caused by repairs carried out by unauthorised third parties.
- Do not use the TV set immediately after unpacking. Wait until the TV warms up to room temperature before using it.
- To reduce the risk of fire, electric shock or damage to the TV, do not expose it to dust, rain or moisture. Never expose the TV to dripping or splashing and do not place objects filled with liquids on or near the TV.
- Do not connect any external devices (DVD player, games console etc.) when the TV is switched on. Disconnect both the TV and device from the mains before connecting. Only switch appliances on when the connection process is complete.
- Do not place the television in a confined space and do not obstruct the ventilation openings at the rear of the television.
- When installing on a wall, ensure the TV is at least 5cm from the wall for ventilation.
- Always ensure that the TV's ventilation openings are not covered with items such as newspapers, table-cloths, curtains, etc.
- Dispose of this television and any components including batteries in an environmentally friendly manner. If in doubt, please contact your local authority for details of recycling.
- Ensure this TV is used in moderate climates only.
- In cases of electrostatic discharge (ESD) the TV may operate incorrectly. If this happens, turn the set off at the mains and then turn back on again after 30 seconds. The set should now work normally.
• TV operating Conditions:
- Temperature from +10°C to +35°C
- Humidity no more than 80% (at a temperature of 25°C)
WARNING: Never place a television set on an unstable surface. The TV set may fall causing serious personal injury or death. Many injuries, particularly to children, can be avoided by taking simple precautions such as:
- Use cabinets or stands recommended by the manufacturer of the television set.
- Only use furniture that can safely support the television set.
- Ensure the television set is not overhanging the edge of the supporting furniture.
- Do not place the television set on tall furniture (for example, cupboards or bookcases) without anchoring both the furniture and the television set to a suitable support.
- Do not place the television set on cloth or other materials that may be located between the television set and supporting furniture.
- For maximum safety while using your set, it is recommended to fit anti-tip straps. These are designed to be attached between the wall/secure surface and the VESA mounts on the television. These are available from major retailers and websites and are an easy and inexpensive way of ensuring that your set stays safely upright.
- Please educate children about the dangers of climbing on furniture to reach the television set or its controls.
- If your existing television set is being retained and relocated, the same considerations as above should be applied.
Safety
- For your safety, this appliance is fitted with a fused 3 pin mains plug. Should the fuse need to be replaced, ensure that any replacement is of the same amperage and approved with the BSI mark.
- Never try and replace the mains plug unless you have adequate qualifications and are legally authorised to do so. In the event that a replacement mains cable is required, contact the manufacturer for a suitable replacement.
- Never use the television if it is damaged in any way.
- Always place the television on a flat level surface avoiding anywhere which may be subject to strong vibration.
- The ideal distance to watch the television is from approximately 2.5-3 times the length of the diagonal measurements of the TV screen away.
- Ensure the television is not placed on top of the power cable as the weight of the television may damage the cable and cause a safety hazard.
- Never place mobile phones, speakers or any other device which may cause magnetic or radio interference, near the television. If interference is apparent, move the device causing the interference away from the television.
- To disconnect the set from the mains, remove the mains plug from the socket.
- Ensure that the mains plug is always easily accessible.
- When handling the set do not grip the LCD screen/glass.
- Do not pull the set when mounted on a bracket. If using a moveable bracket, adjust via the bracket and not the TV set.
- Do not place this set above a heat source.
WARNING: Excessive volume when using earphones and headphones can cause damage to hearing.
Important Safety Instructions

Maintenance
- To clean your TV, wipe with a soft, dry cloth. If the surfaces are extremely dirty, use a soft cloth dampened with a weak detergent solution.
- Never use alcohol, paint thinner or benzene to clean this unit.
- Before using a chemically treated cloth, read the instructions that came with the cloth carefully.
CAUTION: If water or other liquid enters the television through the display panel surface, a malfunction may occur.

Packaging
- The safest way to transport your item is in the original box/packaging - please save your packaging for this.
- You will need the original box/packaging in the event of warranty/service repair or support. We are unable to carry out warranty/service if you are unable to package the item correctly.
The extended use of fixed image program material can cause a permanent "shadow image" on the LCD/LED panel, also known as "screen burn".
This "shadow image" can appear in the background during normal viewing. This type of irreversible LCD/LED panel deterioration can be limited by observing the following steps:
- Reduce the brightness/contrast setting to a minimum suitable viewing level.
- Do not display the fixed image for extended periods of time.
- Turn the power off when not in use.
Examples of images that are more likely to cause "screen burn" are as follows (this is not an exhaustive list):
- TV channel logos: e.g. shopping channel logos and pricing displays - especially if they are bright and stationary. Moving or low-contrast graphics are less likely to cause ageing of the screen.
- Time displays.
- Teletext: Do not view a static page for a long period of time
• TV/DVD menus: e.g. listings of DVD disc content.
- Pause mode: Do not leave the TV in pause mode for long periods of time, e.g. when watching DVDs or videos.
Important: Once 'shadow image/screen burn' occurs, it will never disappear and is not repairable under warranty.
How do I dispose of this product?
UK: Waste electrical products should not be disposed of with household waste. Please dispose of the product at a designated collection point for recycling of WEEE. For your nearest facilities, please see www.recycle-more.co.uk or ask store for details.
ROI: Waste electrical products should not be disposed of with household waste. Separate disposal facilities exist. Check with your local authority or retailer for recycling advice.
Batteries
- CAUTION: Risk of explosion if the battery is replaced with an incorrect type.
- Do not expose batteries to high temperatures, excessive heat, prolonged sunshine or fire as this may cause leakage, explosion or ignition.
- Observe the correct polarity when inserting batteries.
- Do not use different types of batteries together or mix old and new batteries.
- Dispose of batteries in an environmentally friendly way.
- Certain regions may regulate the disposal of batteries. Please consult your local authority.


UKCA Statement:
Hereby, Sharp Consumer Electronics Poland sp. z o.o. declares that this LED TV is in compliance with the essential requirements and other relevant provisions of the Radio Equipment Regulations 2017.
The full text of the EU declaration of conformity is available by following the link:
www.sharpconsumer.com/documents-of-conformity/
CE Statement:
Hereby, Sharp Consumer Electronics Poland sp. z o.o. declares that this LED TV is in compliance with the essential requirements and other relevant provisions of RED Directive 2014/53/EU.
The full text of the EU declaration of conformity is available by following the link: www.sharpconsumer.com/documents-of-conformity/
This equipment may be operated in all EU countries.
The 5 GHz WLAN(Wi-Fi) function of this equipment may only be operated indoors.
Wi-Fi max transmitter power:
100 mW at 2.400 GHz - 2.4835 GHz
100 mW at 5.150 GHz - 5.250 GHz
100 mW at 5.250 GHz - 5.350 GHz
100 mW at 5.470 GHz - 5.730 GHz
100 mW at 5.735 GHz - 5.835 GHz
Bluetooth max transmitter power: 10 mW at 2.402 GHz - 2.480 GHz
TRADEMARKS
HDMI TM
HIGH DEFINITION MULTIMEDIA INTERFACE
The terms HDMI, HDMI High-Definition Multimedia Interface, HDMI Trade dress and the HDMI Logos are trademarks or registered trademarks of HDMI Licensing Administrator, Inc.
Dolby
VISION·ATMOS
Dolby, Dolby Vision, Dolby Atmos, and the double-D symbol are registered trademarks of Dolby Laboratories Licensing Corporation. Manufactured under license from Dolby Laboratories. Confidential unpublished works. Copyright © 2012–2024 Dolby Laboratories. All rights reserved.

© 2024 Xperi Inc. All Rights Reserved. TiVo and the TiVo logo are trademark(s) or registered trademark(s) of Xperi Inc. or its subsidiaries in the United States and other countries. All other trademarks and content are the property of their respective owners.
Bluetooth®
The Bluetooth® word mark and logos are registered trademarks owned by Bluetooth SIG, Inc.
Microsoft PlayReady™
This product contains technology subject to certain intellectual property rights of Microsoft. Use or distribution of this technology outside of this product is prohibited without the appropriate license(s) from Microsoft.
Content owners use Microsoft PlayReady™ content access technology to protect their intellectual property, including copyrighted content. This device uses PlayReady technology to access PlayReady-protected content and/or WMDRM-protected content. If the device fails to properly enforce restrictions on content usage, content owners may require Microsoft to revoke the device's ability to consume PlayReady-protected content. Revocation should not affect unprotected content or content protected by other content access technologies. Content owners may require you to upgrade PlayReady to access their content. If you decline an upgrade, you will not be able to access content that requires the upgrade.
CONTENTS
Important Safety Instructions 3-4
Trademarks 5
Securing to a wall 7
GETTING STARTED 8-24
Connecting External Device - Wired & non wired .....8-13
Connecting Headphones - Wired & non wired ..... 13
Playing Content stored on a USB Device 14
Inputting Text 15
Remote Control 16-17
First Time Installation 18-22
USING THE TV 23-34
Voice Control 23
Home Screen 24-25
Television Menu 26-34
Picture 27
Sound 29
Inputs 30
Network 31
Live TV 32
System 33
Legal 34
DTV, FREELY 35-39
Using Freely (Wi-Fi Only) 35
Using Freely (Wi-Fi - Aerial Hybrid)....36
Using Freely (Wi-Fi and Satellite Hybrid) 37
TV Guide 37
Freely Mini Guide 38
Freely Button / Freely Browser 39
LIVE TV 40-41
Channel List 40
Editing the Channel List 40
Favourites List 40
Parental Controls 41
FACTORY RESET 42
TROUBLESHOOTING GUIDE....43-45
SECURING THE TV TO A WALL
Securing the TV to a wall with anti-tip straps
For maximum safety in the home, when using a TV with its stand, anti-tip straps should be fitted. These are available from major retailers & websites and are an easy, inexpensive and effective way of ensuring your TV stays safely upright. Straps are designed to be attached to the rear of the TV and then tethered to the wall or furniture the TV is stood on, these are fitted as follows.
Using one or both of the top wall-mounting holes and screws fasten one end of the fastening cord/s to the TV. (the screws are already supplied in the wall mounting holes)
Secure the other end of the fastening cord/s to your wall. (you will need screws/fixings suitable for your wall type - available separately from most DIY stores).
![graph TD A["Computer monitor A"] -->|Line 1| B["Switch"] A -->|Line 2| C["Switch"] B -->|Line 3| D["Switch"] C -->|Line 4| E["Switch"] style A fill:#f9f,stroke:#333 style B fill:#bbf,stroke:#333 style C fill:#bfb,stroke:#333 style D fill:#ffb,stroke:#333 style E fill:#fbf,stroke:#333](/content/2026/08/1614666/images/5cb7534f6b51cbd837e9bcc647ca9ee3c7411b5d9c8992b9eaeb3ba132fcbdfe.jpg)

Note: Please ensure that children do not climb on the TV set.
Note: When handling the set do not grip the LCD Panel.
Note: Do not pull the set when mounted on a bracket. If using a moveable bracket, adjust via the bracket and not the set.
The Royal Society for the Prevention of Accidents is urging people to take care with flat-screen televisions. RoSPA stated in 2010 that "Toddlers are particularly at risk of pulling flat-screen televisions on to themselves. They are unsteady on their feet and are attracted by colourful television images."
The risk is increased as televisions become lighter.
Wall mounting & Viewing Angle
IMPORTANT - Before drilling any holes in the wall ensure you are not drilling where there could be any electrical wires, water or gas pipes.
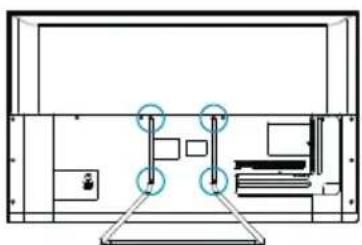
- Remove the four screws located at the back of the TV set.
- The wall mount can now be easily attached to the mounting holes, located on the back of the TV, using the same four screws removed.
Note: This diagram to the left is an example of screw positions. Due to model variations, please ensure you check your TV for the exact location of the wall mounting screw positions.


Important: If wall mounting this TV, only use the screws already provided in the wall mounting holes. Using other screws which are longer could cause irreparable damage to the internal parts. When using a wall bracket, please ensure the screws in the back of the TV set are not over tightened.
CONNECTING EXTERNAL DEVICES - WIRED
Before turning your set on, it is recommended that your external devices are connected before continuing with the first-time installation process. Depending on the source connectivity on your television, follow the guidance below when connecting external devices.
HDMI Connection
For optimum picture quality, we recommend connecting your device to the television using an HDMI cable.


External Device

HDMI cable (not supplied)*
*Be sure to use an authorised HIGH-SPEED HDMI cable bearing the HDMI logo.
HDMI CEC-Compatible Devices
If an HDMI CEC-compatible device (e.g., Blu-ray player, AV receiver) is connected with an HDMI cable, you can operate the device with the televisions remote control. We recommend using the HDMI (ARC) connection when used with an AV receiver – please refer to the ARC section of this Operation Manual.
Activating HDMI CEC
- Turn on the connected device.
- To enable HDMI control, press the 🎨 (TiVo) button, then select [Settings] > [Inputs], scroll down and activate [HDMI CEC].
- Activate HDMI control on the connected device.
Features Available to Compatible CEC Devices
Blu-ray/DVD player
- Automatically turns the television on and switches the input to the connected Blu-ray/DVD player when the Blu-ray/DVD player starts to play.
• Automatically turns the connected Blu-ray/DVD player off when you turn the television off.
- Controls menu operation [ARROW] buttons, playback and track selection of the connected Blu-ray/DVD player through the TV's remote control.
AV Receiver
- Automatically turns the connected AV receiver on and switches the sound output from the TV speaker to the audio system when you turn the TV on. This function is only available if you have previously used the AV receiver to output the TV's sound.
- Automatically switches the sound output to the AV receiver by turning the AV receiver on when the TV is turned on.
• Automatically turns the connected AV receiver off when you turn the TV off.
- Adjust the volume and mute functions via the [VOL+/−] and [MUTE] buttons on your television remote control.
Video Camera
- Automatically turns the TV on and switches the input to the connected video camera when the camera is turned on.
• Automatically turns the connected video camera off when you turn the TV off.
- Controls menu operation [ARROW] buttons, playback, e.g. [PLAY] button of the connected video camera through the TV's remote control.
Note: Not all devices with HDMI input/output are HDMI CEC compatible. For information about CEC compatibility, refer to the instruction manual of the device.
Refer to "HDMI connection (ARC/eARC supported)" section of this manual for information relating to connecting an HDMI (ARC) enabled device.
Component video Connection
If your external device has component video jacks/sockets, connect them to the television using a mini component video cable and an audio cable.
Mini AV Source
![graph LR A["External Device"] --> B["AV in"] B --> C["Composite video/audio cable (not supplied)"] B --> D["Composite video/audio adapter cable (not supplied)"] C --> E["Video CVBS"] D --> E E --> F["L"] E --> G["R"] E --> H["Video"]](/content/2026/08/1614666/images/22203fd6fe6644f1958177720d1b5377b891de53f22bbf35379c1c1b0fd0a16e.jpg)
USB Devices (wired)
You can connect wired USB devices such a mouse and keyboard via the USB sockets on the rear of the set.

Note: We are unable to guarantee connection of a wired USB device. Use of USB hubs is not recommended.
Connecting an External Audio Device
You can connect audio systems such as AV receivers or sound bars to the television. Select a connection method below according to the specifications of the audio system you want to connect.
- Connecting with an HDMI cable. for Details, carefully read HDMI Connection (ARC supported).
- Connecting with a digital optical cable.
- Connecting with an audio cable.
Note: Refer to the instruction manual of the device to be connected.
HDMI Connection (ARC Supported)
Connecting the television and audio system with an HDMI cable. This is the recommended method of connecting an external audio device.
Use an HDMI cable to link the HDMI input terminal on the TV marked with "eARC" to the HDMI input on the external audio device bearing the "ARC" or "eARC" text.

A AV Receiver or Soundbar
B HDMI cable (not supplied)*

Note: To ensure proper operation of the eARC function, use an HDMI cable labelled "HDMI High Speed with Ethernet" or better.
Additional settings for HDMI ARC connection
For this connection to work, HDMI CEC must be enabled on the TV. To do this, press 🎨TiVo) button, then select [Settings] > [Inputs], scroll down and activate [HDMI CEC].
Additional settings for HDMI ARC/eARC connection
HDMI ARC must be activated in the menu. To activate it, press the 🎨 (TiVo) button, then select [Settings] > [Sound] > [Audio Output Path] and make sure that [HDMI eARC] is selected.
Control of volume can be achieved via the TV remote control (CEC must be turned on).
When ARC/eARC is working, the sound from the TV speakers will be muted.
If your connected audio system is not producing sound, it is possible that it does not support the required codecs. In such cases, you can try allowing the TV to decode the sound. Press the 🎨 (TiVo) button and select [Settings] > [Sound] > [Digital Audio Format] > [PCM].
Differences between ARC and eARC explained
If your external audio system only supports the HDMI ARC function, the TV will only be able to transmit compressed audio with a maximum of 5.1 channels.
If your external audio system supports the HDMI eARC function, the TV will be able to transmit uncompressed audio with a maximum of 7.1 channels. Transmission of object sound, such as Dolby Atmos and DTS:X, is also supported.
Digital Audio (Optical)
Connecting your television and audio system with a digital optical cable.
Connect to the audio system digital optical input terminal.
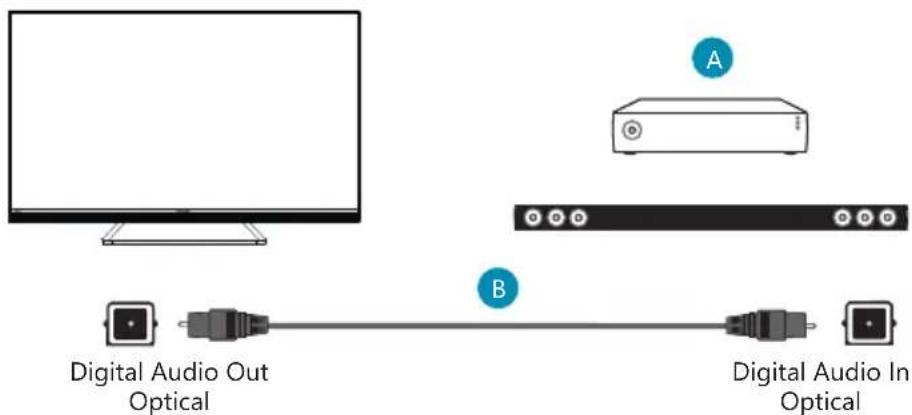
A AV Receiver or Soundbar
B Audio Optical cable (not supplied)
When using the digital optical output for an audio connection, it is important to disable the TV's internal speakers to avoid any echo effects. To do this, press 🎨 (TiVo) button and select [Settings] > [Sound] > [Audio Output Path] > [Optical S/PDIF]. This will disable the TV's internal speakers.
If your connected audio system is not producing sound, it is possible that it does not support the required codecs. In such cases, you can try allowing the TV to decode the sound. Press the 🎨 (TiVo) button and select [Settings] > [Sound] > [Digital Audio Format] > [PCM].
RCA Analogue Audio Cable
Connect to the audio system's audio input terminal.

A AV Receiver or Soundbar
B Audio cable (not supplied)*
Note: The output audio level is dependent upon the headphone level. The volume level on the connected audio system must be turned up.
Connecting Headphones
You can connect wired headphones to the TV.

When wired headphones are connected to the 3.5mm jack socket on the rear of the set, the internal speakers will cut out. The volume of the sound which comes from the headphones is controlled via the remote control using the [VOL+] and [VOL-] buttons.
Connecting Bluetooth Accessories
Pairing the device
You can connect Bluetooth devices such as gamepads to the TV. Please note that Bluetooth soundbars and Bluetooth headphones are not supported. Follow these steps to pair your Bluetooth device:
- Put the Bluetooth device into pairing mode. Refer to the device's user manual for instructions.
- In the TV settings menu, go to [System] > [Bluetooth Accessories].
- From the list of devices, select your device and press [OK].
- Select the option [Pair].
Disconnecting the device
If you want to disconnect your Bluetooth device but keep it paired with the TV, follow these steps:
- In the TV settings menu, go to [System] > [Bluetooth Accessories].
- Select the device you want to disconnect and press [OK].
- Select the option [Disconnect].
Note: To reconnect the device, follow above steps 1 and 2, then select option [Connect].
Unpairing the device
If you want to remove your Bluetooth device from the list completely, follow these steps:
- In the TV settings menu, go to [System] > [Bluetooth Accessories].
-
Select the device you want to unpair and press [OK].
-
Select the option [Unpair].
PLAYING CONTENT STORED ON A USB DEVICE
USB
Connect a USB storage device to the USB port of the television to enjoy photo, music, and video files stored on the device.
-
Connect the USB storage device to your TV.
-
If the TV is on, you will see a notification at the bottom of the screen about the connected USB drive. Select the option [Open] to browse the USB. Alternatively, you can select USB from the inputs menu.
-
Browse the list of folders and files and select the desired file.
-
Press [OK] and playback will start.
Note: Depending on the image dimension, file size, and number of files in a folder, some photo images or folders take time to display.
Displaying the contents of the USB device may take some time depending on the content.
While accessing the USB device, do not disconnect power from the television or USB device as the data may be corrupted.
Depending on the file, playback may not be possible.
Some photos and movies may be magnified, resulting in low picture quality. Depending on the size and aspect ratio, images may not be displayed in full screen.
It may take a long time to display a photo, depending on the file or settings.
The USB ports on the television support FAT32 and NTFS file systems.
If your digital still camera does not work with your television, try the following:
- Set the USB connection settings on your camera to Mass Storage.
- Copy the files from the camera to a USB flash drive, then connect the drive to the television.
INPUTTING TEXT
On -Screen Keyboard
The on-screen keyboard lets you type text like a Wi-Fi password or movie title using your remote control. Highlight the character you want using the ARROW buttons and press OK.
If you press and hold the OK button for one second on a selected character, this will display the associated national characters with accents or diacritical marks.

Using the Remote Control
You can operate many of the televisions features by using the [UP], [DOWN], [LEFT], [RIGHT] and [OK] buttons on the remote control.
The following remote control buttons are used to navigate the menus:
- [BACK]: Takes you one step back in the menu. Press and hold to exit from the menu or app and return to the source or Home screen.
- [ARROW BUTTONS]: Navigate around the options on the screen.
• [OK]: Selects the option highlighted or selected.
REMOTE CONTROL

(Option 1)
Note: The type of remote control supplied with your TV may vary depending on the model, country or region of sale.
- (standby) – Switch on the TV when in standby or vice versa.
-
INPUT – Displays the input/source menu.
-
NUMBER BUTTONS - 0-9 to select a TV channel directly.
-
(mute) - Mutes the sound or vice versa.
-
GUIDE – Opens the 7 day TV guide (digital TV mode).
-
(Settings) – Opens the Settings menu.
-
(apps) – Opens the apps menu.
-
INFO – Short press: Press once to view information about the program you are currently watching. Press again to display the TV channel list. Long press: Opens Sharp Life Portal.
-
(▲/▼/◄/►/OK) – Allows you to navigate the on-screen menus and adjust the system settings to your preference.
-
BACK – Short press: Step back in the menu. Long press: Exit the currently displayed menu or application.
-
(TiVo) – Displays the TV's home screen.
-
FREELY – (UK models) Short press: Access the Freely service. Only available in the UK. (EU models) Long Press: A list of apps opens. Select the app you want to assign to this button for quick access. Short press: Launches the remembered app.
-
VOL (+/-) - Tilt to increase/decrease the sound level.
-
CH (+/-) - Tilt to switch to the next/previous channel in the sequence.
-
NETFLIX – Access the Netflix App.
-
Prime video – Access the Prime video App.
-
DISNEY+ - Access to the Disney+ app.
-
YOUTUBE – Access to the YouTube app.
-
AUDIO – Opens audio track menu.
-
SUB – Turns on/off subtitles at the bottom of the screen.
-
TEXT - Turns teletext on/off.
-
TV – Switches the TV to the last watched input.
-
▶ Play/pause media.
-
◀Play in fast rewind mode.
-
▶ Play in fast forward mode.
-
■ Stop playback.
-
COLOUR BUTTONS – Execute corresponding function at that time.

(Option 2)
Note: The type of remote control supplied with your TV may vary depending on the model, country or region of sale.
- (standby) – Switch on the TV when in standby or vice versa.
- INPUT – Displays the input/source menu.
- NUMBER BUTTONS - 0-9 to select a TV channel directly.
- (mute) - Mutes the sound or vice versa.
- GUIDE – Opens the 7 day TV guide (digital TV mode).
- (Settings) – Opens the Settings menu.
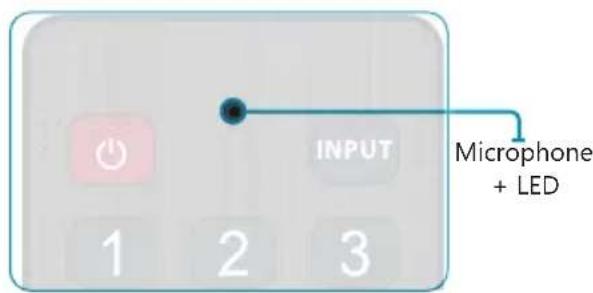
- (microphone) – Search for content and control the TV by voice. Press and hold the button, then speak into the microphone.
- INFO – Short press: Press once to view information about the program you are currently watching. Press again to display the TV channel list. Long press: Opens Sharp Life Portal.
- (▲/▼/◄/►/OK) – Allows you to navigate the on-screen menus and adjust the system settings to your preference.
- BACK – Short press: Step back in the menu. Long press: Exit the currently displayed menu or application.
- (TiVo) – Short press: Displays the TV's home screen. Long press: Opens the apps menu.
- FREELY – (UK models) Short press: Access the Freely service. Only available in the UK. (EU models) Long Press: A list of apps opens. Select the app you want to assign to this button for quick access. Short press: Launches the remembered app.
- VOL (+/-) - Tilt to increase/decrease the sound level.
- CH (+/-) - Tilt to switch to the next/previous channel in the sequence.
- NETFLIX – Access the Netflix App.
- Prime video – Access the Prime video App.
- DISNEY+ - Access to the Disney+ app.
- YOUTUBE – Access to the YouTube app.
- AUDIO - Opens audio track menu.
- SUB – Turns on/off subtitles at the bottom of the screen.
- TEXT - Turns teletext on/off.
- TV – Switches the TV to the last watched input.
- ▶ Play/pause media.
- ◀Play in fast rewind mode.
- ▶ Play in fast forward mode.
- ■ Stop playback.
- COLOUR BUTTONS – Execute corresponding function at that time.
FIRST TIME INSTALLATION
When the TV is turned on for the first time it will enter installation mode. It is recommended that all steps are completed to ensure correct operation. Use the BACK button on your remote control to return to the previous screen.
Note: The basic installation steps may vary slightly depending on your model and/or country of use. Due to software updates, the look and feel of the television start up procedure and subsequent menus may be subject to change.
To navigate through the options when in the first-time installation mode, use the buttons on your remote control as shown here:

The TV control button is located under LED light on the front of the TV.

Switch on the television by pressing the on/off button on the bottom of the LED light.
Full First Time Installation
When the TV is turned on for the first time it will enter installation mode. It is recommended that all steps are completed to ensure correct operation. Use the [BACK] button on your remote control to return to the previous screen.

- Select your preferred on-screen display language. This sets the language in which menus and information displays. If you wish to change it later, you can do so in the [System] menu.

- Select the country where your TV is physically located to ensure appropriate content availability and features.
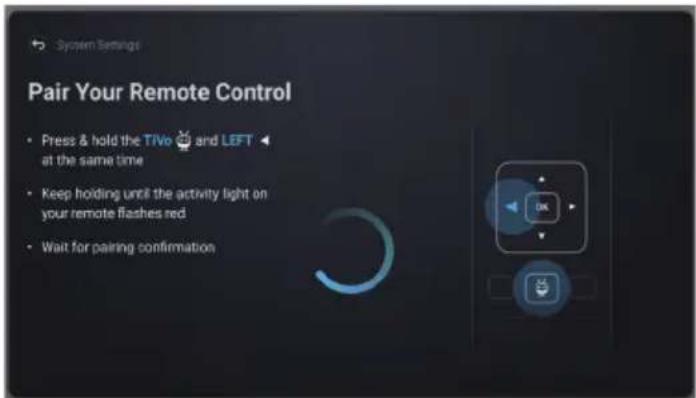
- This step is only for models with voice control.
Note: Only remote controls with a button featuring the microphone symbol 🤒 support voice control.
Select the option [Connect] to pair your remote with the TV. On the next screen, you will be prompted to press and hold the left arrow button and the 🎨 (TiVo) button simultaneously. When a message about successful pairing appears, you can release the buttons.
If you do not wish to pair your remote, select the option [Skip this step]. In this case, the remote control will work only in standard IR mode, and voice control will not be possible. You will be able to pair the remote control later via the [System] menu.

- Set up your TV to be in Home or Demo mode. Home mode is the default setting for normal use.

- If your TV is connected via a LAN cable and DHCP is enabled on your router, you will receive confirmation of a successful network connection.
If your TV is not connected via a LAN cable, it will prompt you to select and log into a Wi-Fi network. Choose your network and follow the on-screen instructions to enter your Wi-Fi password. Ensure the password is entered accurately. Upon successful entry, the TV will connect to your network and subsequently access the internet if available.

-
In this step, select one of the available options:
-
[Eco] – Energy-saving option. The picture is darker, which may not be optimal for daylight viewing.
- [Enhanced] – Brighter picture and many convenient features, such as instant wake-up from standby, are enabled. The drawback is increased power consumption during TV operation and in standby.
- [Custom] – Allows you to choose which features you wish to enable.
Note: You can customise all your options later from the main menu.

By selecting [Custom] you can change the following options:
- [Networked Standby] – Enables convenient features such as automatic updates while the TV is in standby mode or waking up the TV via other devices.
- [Picture Mode] – Selection of picture presets. This can be changed later via the main menu.

- On this screen, you can review the detailed terms of service. Scroll down and select one of the options. However, if you decline, some smart functions of the TV will be unavailable.

- Choose your preferred settings on this screen and proceed to the next step by selecting [Submit].

- In this step, you can set viewing restrictions for children. To do this, select the option [Set Maturity Restriction]. You will be able to set up viewing restrictions based on age.

- You will be asked to create a PIN before progressing to the next step. Please remember the PIN, as it will be used when accessing various functions on the TV, including during lock or parental control usage.
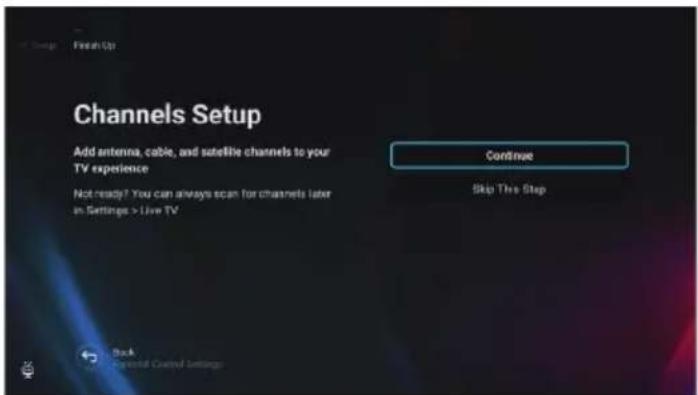
- If you have an antenna cable connected to one of the TV's tuners, select [Continue], choose one of the applicable options, and initiate the tuning process. While your TV is tuning, the display will provide updates on the progress and indicate the number of digital channels being received. If you do not have an antenna connected, select the [Skip This Step] option.

- Once you reach this screen, your TV is ready to use. Choose one of the options to start.
VOICE CONTROL
Voice Control
Note: The information below applies only to models provided with a remote control featuring a microphone. Such remotes have a button with a microphone symbol:
Pairing the Remote Control
To use voice control, the remote and the TV must be paired. This pairing is usually done during the initial setup of the TV. If you skipped this part of the setup, you can manually pair the remote by following these steps:
- Press the (settings) button to open the settings menu.
- Go to [System] > [Remote Control].
- A screen with pairing instructions will be displayed.
- Press and hold the [left arrow] button and the ⚙ (TiVo) button simultaneously. When a message about successful pairing appears, you can release the buttons.
- Your remote is now paired with your TV.
Searching Content with Your Voice
When your remote is paired, you can now use your voice to search for content. Follow these steps:
- Press and hold the (microphone) button.
- Speak naturally into the direction of the remote while continuing to hold down the microphone button.
- Release the button when you finish speaking.
Voice control search is extremely powerful and intelligent. The following are a few examples of voice control terms/phrases:
- "Bourne Movies"
- "Tom Hanks Comedies"
- "I'll be back" or "Live from New York"
- "Go to My Shows"
- "Go to Settings"
- "Turn on closed captions"

HOME SCREEN
The home screen serves as the central hub for accessing various features and content on your TV. It provides a user-friendly interface that allows you to navigate and explore different apps, recommendations, and settings with ease.

The home screen layout consists of several rows, each offering different features and options. Starting from the top, you can see these rows:
[Trending] – This row displays a list of trending movies and shows. Above the selected content, you can see on which streaming apps it is available. Press [OK] on selected content to choose from which streaming service to play the content. In the same menu, you can also add the selected content to the watchlist if you wish to watch it later.
[My Apps] – This row contains a list of your favourite apps, which are easily accessible directly from the home screen. At the end of the row is an option to manage the apps, where you can decide which apps will be visible on the home screen. This setting also affects content recommendations. Content of the apps removed from the [My Apps] row will not be displayed on the home screen.
[Control carousel] – This row contains useful shortcuts:
[Live TV] – Switches the source to live TV.
[Guide] – Opens the electronic programme guide for your tuned TV channels.
[All Apps] – Opens the list of all available apps. Here you can select and launch any of the available applications.
[Inputs] – Opens the list of TV inputs.
[Life Portal] – Launches the smart portal containing the electronic manual and information about Sharp recommended products.
[Settings] – Opens the TV settings menu.
[Further rows] – These rows contain recommended content based on user preferences, popular shows, trending movies, and new releases.
Main Menu
The main menu is available on the Home screen. Simply press the [TiVo) button to enter the Home screen, then press the [left arrow] button to display the menu.
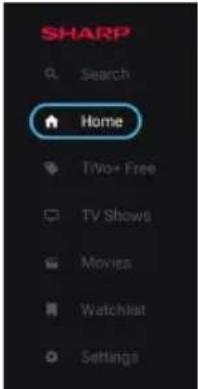
The main menu contains these items:
[Search] – A search function that allows you to find content across streaming apps.
[Home] - A shortcut for returning to the home screen.
[TiVo+ Free] – Displays the list of free & popular content and free apps.
[TV Shows] – Displays a list of TV shows, each row containing different categories.
[Movies] – Displays a list of movies, each row containing different categories.
[Watchlist] – List of content you added to the watchlist via home screen.
[Settings] – Opens TV settings menu.
Changing the Position of an App in My Apps
You can reorder the apps to move the ones you use most often to the front of My Apps.
Procedure
- Go to the My Apps carousel.
- Highlight the app you want to reposition.
- Press & hold OK until left and right arrows displays.
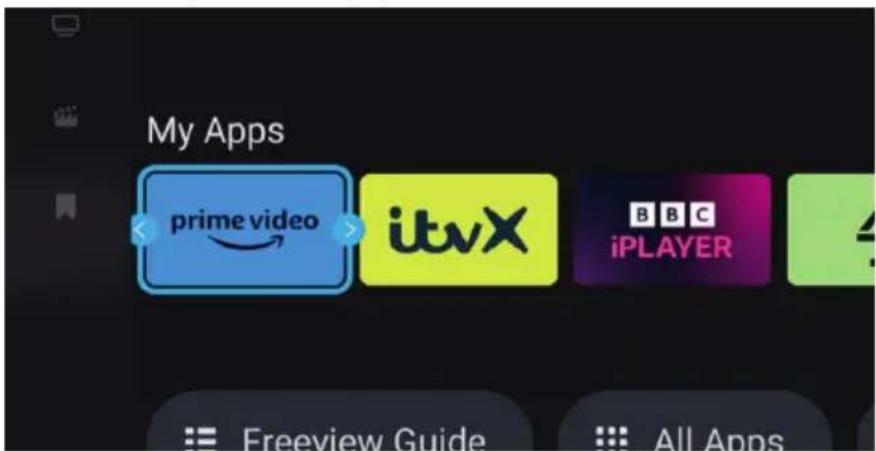
- Move the app along My Apps to the position you want.
Adding or Removing an App in My Apps
- Go to the My Apps carousel.
- In My Apps, scroll to the rightmost app in the carousel and press [OK].
- The [Manage Apps] menu will display.
- In this menu, you can select which apps will be displayed in the My Apps carousel and which will not.
Note: Content from displayed apps can appear in your recommendations.
You can access the settings menu below by pressing the ⏻Settings) button.
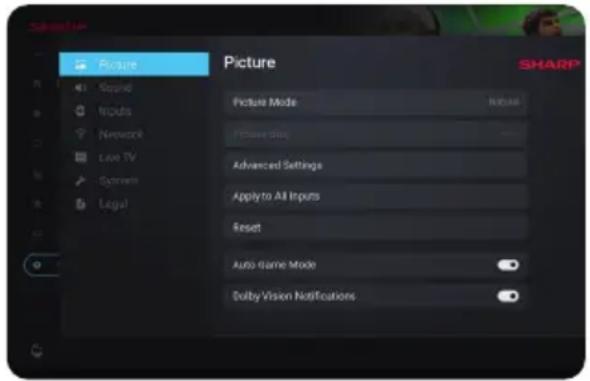
Options are:
Picture Change the picture mode.
Sound Control the speaker output when used with audio devices.
Network Manage Internet connection.
Inputs Edit the input menu. Rename / hide input sources.
Live TV Allows you to re-tune the TV.
System Control other TV settings.
Legal
Review terms and conditions, view and manage consents and advertisement relevancy.
Note: For a more detailed explanation of these options, refer to the sections in the next pages.
To access the main menu, press the (settings) button on the remote control.
Use the scroll (▲/▼/◄/►) buttons to navigate within the menus.
To confirm a setting, press the [OK] button.
To go back one step in the menu, press the [BACK] button.
To exit a menu at any time, press and hold the [BACK] button.
Picture
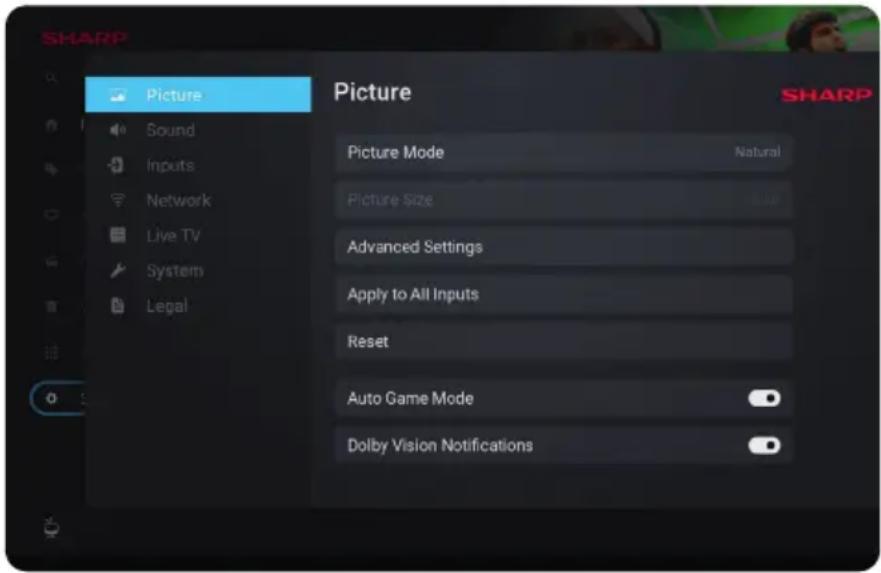
To access the Picture menu, press the ⚙ (settings) button on the remote and select [Picture]. Please note that picture settings are configured individually for each input source. If you want to change the picture settings for a specific input, you must first switch to that input. Within this menu, you'll find the following options:
[Picture mode] – Choose from the following presets:
[Eco] – Default option, featuring lowered backlighting to decrease power consumption.
[Natural] – Recommended settings for general use.
[Dynamic] - Enhances image saturation and sharpness.
[Movie] - Adjusted for lighter colours and reduced brightness.
[Sports] – Optimises picture quality for sports broadcasts.
[Game] – Optimal for gaming, turning off post-processing to minimize input lag.
[Custom 1] / [Custom 2] – Personal picture mode which you can customize manually based on your preferences.
Note: When playing HDR content, items in [Picture mode] will be replaced by options specific to HDR video.
[Picture Size] – Options for picture aspect ratio.
[Auto] – Automatically displays the best picture format so the picture is in the correct position. Black lines may appear at the top/bottom and/or sides.
[16/9] – Displays a 4:3 picture at a 16:9 size; the picture is stretched horizontally and vertically. This crops out some of the top and bottom of the picture.
[4/3] – Displays a 16:9 picture at a 4:3 size; the picture is shortened horizontally. Sidebars appear on both edges of the screen. Displays the 4:3 picture in its original size. Side bars are shown to fill the 16:9 screen.
[Fit to Screen] – Displays a picture in the full screen mode. 16:9 signal will be displayed in original proportion. Other picture formats will be stretched to fill the screen.
[Advanced Settings] – Contains settings that allow you to customize picture quality.
[Apply to All Inputs] – Selecting this option will apply the current picture settings to all video inputs.
[Reset] – This option allows you to restore the default video settings.
[Auto Game Mode] – When this mode is enabled, the TV automatically detects when a gaming console or PC is connected and actively playing a game. It then switches to a preset mode that reduces input lag and enhances the gaming experience.
[Dolby Vision Notifications] – If enabled, a notification will appear on the screen when Dolby Vision content starts playing.
Advanced Settings
[Backlight] – Adjust the screen brightness by increasing or decreasing the panel backlight.
[Brightness] – Increases or decreases overall picture brightness.
[Contrast] - Adjusts the balance between black and white levels.
[Color] – Increases colour intensity from black and white.
[Sharpness] - Enhances or reduces image sharpness.
Brightness & Details
[Gamma] - Adjusts the tones between the bright and dark parts of the image.
[Dynamic Backlight] – This setting modifies the backlight intensity according to the scene's brightness. It enhances bright scenes by increasing the backlight and dims it for dark scenes. You can select from various levels to control the effect's strength.
[Local contrast] – Automatically adjusts the contrast levels of the image based on the content being displayed. The purpose is to enhance the overall picture quality by making dark scenes darker and bright scenes brighter.
[Adaptive Luma Control] – Dynamic video contrast enhancement to adjust the Luma level of the picture signal automatically.
[Resolution Enhancement] – This image processing mode sharpens the picture and removes noise. It's recommended for use with low-quality video sources.
Colour Fine-Tuning
[Color Temperature] – Affects warmth or coolness of the image. Choose from the following presets:
[Cool] – Increases the blue tones in the image.
[Neutral] – Default colour temperature settings.
[Warm] – Increases the red tones in the image.
[Color Shift] – Adjusts the hue or tint of the picture to correct any color imbalances. This can help ensure that the colors, especially skin tones, appear natural and that the overall color balance of the image is accurate.
[Low Blue Light] – Enabling this option reduces the emission of blue light, potentially helping to prevent eye strain when reading text. Blue light from TVs can also suppress the release of melatonin, affecting sleep. If you experience sleep issues, consider turning on this feature.
[Colour Space] – This option allows you to switch between different colour space standards, defining the range of colours a display can accurately reproduce. Only available in SDR mode.
[Noise & Artifacts] – Settings to decrease noise and remove artifacts in the picture.
[Noise reduction] - Filters and reduces image noise (interference).
[MPEG Noise Reduction] – Reduces block noise and mosquito noise caused by digital compression.
[10-bit Colour Reproduction] – Reduces the colour banding effect in content with high colour gradients.
[Calibration] – Advanced picture settings for expert users.
[2 Point White Balance Correction] – Enables or disables the application of 2-point white balance settings.
[Calibrate 2 Point] – Adjusts the 2-point white balance correction by changing RGB offset and gain.
[11 Point White Balance Correction] – Enables or disables the application of 11-point white balance settings.
[Calibrate 11 Point] – Fine-tunes the white balance correction with precision by adjusting the contrast of the three primary colours.
[Colour Tuner] – Enables or disables the application of colour rendering settings.
[Calibrate Colour Rendering] – Expert settings to fine-tune the colour accuracy of the picture.
[Reset Calibration] – Restores all calibration settings to their default values.
Sound
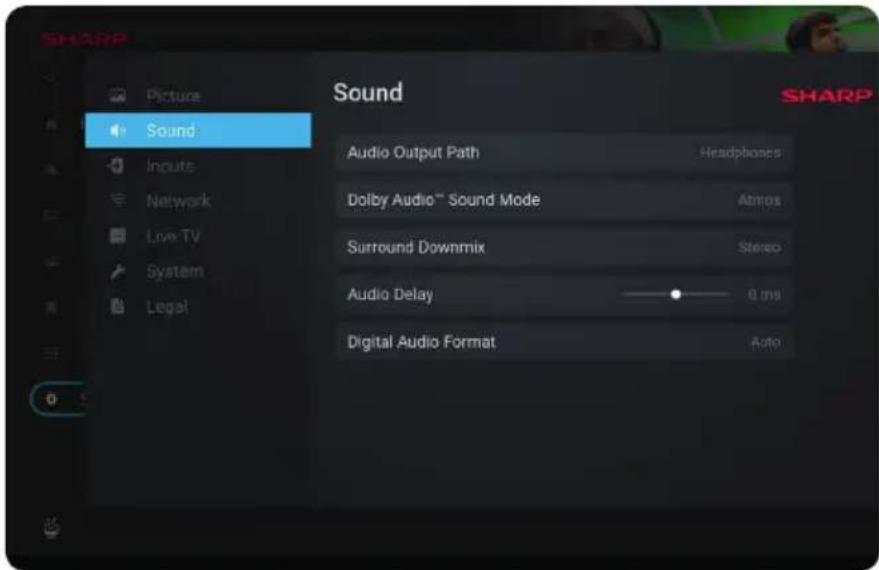
To access the Sound menu, press the ⚙ (settings) button on the remote and select [Sound]. Within this menu, you'll find the following options:
[Audio output path] – Configures how audio is routed from your TV to external audio devices such as soundbars, home cinema systems, or headphones.
[Internal TV Speaker] – Audio is played through the TV's built-in speakers.
[Optical S/PDIF] - Audio is played on the device connected via optical cable.
[HDMI eARC] – Audio is played on the ARC/eARC-compatible device connected via HDMI cable.
[Headphones] – Sends audio through a standard headphone jack to external speakers or headphones.
Note: Connecting headphones or an ARC/eARC-compatible device automatically switches the audio output to that device. However, you can override the output via this menu at any time. For example, even if headphones are connected, you can switch the sound to be outputted to the internal TV speakers.
[Dolby Audio™ Sound mode] – Select one of the preset sound profiles.
[Off] - All audio enhancements are off.
[Custom] – Gives you manual control over special audio parameters:
[Speaker virtualisation] – Allows you to turn on the Dolby surround sound effect.
[Volume levelling] – Dolby's solution to reduce fluctuating volume levels across various types of content and inputs.
[Dialogue Enhancement] – Enhances speech by emphasizing it over background noise for improved clarity.
[Reset Custom Sound Mode] – Restores audio settings to their default configurations.
[Standard] - Optimises sound quality for general content.
[Atmos] – Activates Dolby Atmos, providing a more immersive sound experience with height channels.
[Movie] – Optimises surround sound suitable for movies.
[Music] – Optimises sound for listening to music.
[Sports] – Simulates the larger space of a stadium or other venue.
[Game] – Enhances sound effects for a more immersive gaming experience.
[Night] – Reduces loud sounds while maintaining clarity, ideal for late-night viewing.
[Voice] – Enhances voice clarity by reducing background sound.
[Surround Downmix] – This menu controls how surround sound will be played on the TV speakers.
[Stereo] – Only the left and right channels will be played from the speakers. The center and surround channels will be ignored.
[Surround Compatible] – The left, right, and surround channels will be played from the speakers.
[Audio Delay] – Adjusts the audio delay to synchronize picture and sound for external speakers connected via a digital audio output.
[Digital audio format] – Configure settings for the digital audio output.
[Auto] - Automatically selects the optimal settings.
[Bitstream] – The audio stream will be processed by the device connected via the digital output (soundbar, AV receiver, etc.).
[PCM] – The audio stream will be processed by the TV.

To access the Inputs menu, press the ⚙ (settings) button on the remote and select [Inputs]. Please note that this menu is dedicated to source setup. To switch to a different source, press the [INPUT] button.
[Reordering the Sources]
- Select the source that you wish to move to a different position.
- Press and hold the [OK] button.
- Use the arrow buttons to move the source to a new position.
- Press [OK] to confirm the new position.
Editing the Sources
Select the source you wish to edit and press the [OK] button briefly. A menu with edit options will appear:
[Change Name] – Renames the source. For example, you can rename the source to reflect the type of connected device.
[Change Icon] – Lets you select one of the preset icons for the edited source.
[Hide on Input Panel] – Makes the edited source invisible in the source list.
[Reset] – Restores the default name and settings for the edited source.
[Change HDMI EDID version] – This item allows you to switch the mode of the selected HDMI input. If you're not receiving picture or sound from the connected HDMI device, you can manually change to a different EDID version.
[Auto] – The TV automatically selects the optimal option. If you're not receiving picture and/or sound via HDMI, try manually selecting other options.
[HDMI 1.4] – Recommended when the TV is connected to a device with an HDMI 1.4 output or lower, such as a Full HD Blu-Ray player or DVD player.
[HDMI 2.1] – Recommended when the TV is connected to a device with an HDMI 2.0 output or better, like a 4K Blu-ray player. This setting also enables HDR content.
Note: All of the above settings affect the appearance of the source list.
[HDMI CEC]
Enable or disable HDMI CEC function. This feature enables you to control devices connected via HDMI using the TV remote control.
Network

To access the Network menu, press the ⚙ (settings) button on the remote and select [Network]. Within this menu, you'll find the following options:
[Wired Network] – Displays information about the wired network connection.
[Wireless Network] – Displays the wireless network to which the TV is connected and the list of available networks. If you wish to connect to a different wireless network, select it from the list. If you are connecting to the network for the first time, you will be prompted to enter the password via the on-screen keyboard. Further options are available:
[Scan networks] – Rescan all wireless networks in the area.
[Enter network name] – Allows you to manually add a Wi-Fi network. This is necessary if you have set up an invisible/hidden wireless network on your router.
When you select the wireless network to which you are currently connected, you will get the following options:
[Disconnect] – Disconnects the TV from the current network and remembers the password.
[Disconnect and forget password] – Disconnects the TV from the current network and forgets the password.
To reconnect, you will be prompted to enter the password again.
[Network Configuration] - Define the network connection rules for the TV.
[Automatic] – The TV will automatically connect to the network if DHCP is enabled on the router.
[Manual] – Manually configure the IP settings.
Live TV

To access the Live TV menu, press the ⚙ (settings) button on the remote and select [Live TV]. Within this menu, you'll find the following options:
[Channels Configuration] – Settings for channel tuning.
[Source Type] – Select the reception type you wish to edit or tune.
[Antenna] – Select this option if you wish to edit or tune antenna channels.
[Cable] – Select this option if you wish to edit or tune cable channels.
[Satellite] – Select this option if you wish to edit or tune satellite channels.
[Scan for Channels] – Menu from which you can scan for channels via one of your TV tuners.
[Antenna Scan] – Tuning options for antenna channels.
[Cable Scan] – Tuning options for cable channels.
[Satellite Scan] – Tuning options for satellite channels.
[Manage Channels] – Access the menu to manage channels, enabling you to hide or mark channels as favourites. Depending on the country selected during initial setup, channel reordering may also be available.
[Auto Channels Update] – While the TV is in standby, it will check for changes in the TV network once per day. If necessary, it will update the current channels and store new channels.
[Configure Cl+] - Settings for the CA module and Cl+ card.
[Configure Freely] – Setting for the Freely app. Available only in the UK.
[Subtitles] – Settings for digital TV subtitles.
[Auto-select Subtitles] – When this option is on, the TV will automatically display subtitles in the languages set in the options below (if available).
[Primary Subtitles Language] – Preferred language for subtitles.
[Secondary subtitle language] – Secondary subtitle language, selected if subtitles in the primary language are not available.
[Hard of Hearing Subtitles] – Displays captions at the bottom of the screen for viewers with hearing impairments.
[Audio] – Settings for digital TV audio.
[Primary Audio Language] – Preferred audio language when multiple options are available.
[Secondary Audio Language] – Secondary audio language, selected if audio in the primary language is not available.
[Audio description] – Additional sound track for the visually impaired. Available only on selected digital TV content.
[Spoken subtitles] – Turns on/off the reading of subtitles aloud in a spoken voice.
[Audio Description Volume] – Volume control for the [Audio Description] track.
[Interactive TV Apps] – Settings for interactive TV apps.
[Enable HbbTV] – Enables or disables HbbTV (Hybrid Broadcast Broadband TV), which offers interactive TV services such as video-on-demand, catch-up TV, interactive advertising, games and more. When HbbTV is enabled, you can access it on the currently viewed channel by pressing the red button on the remote control. Please note that each channel has its own HbbTV app, and some channels may not have HbbTV available.
[Block 3rd party cookies] – Enabling this setting will block 3rd party cookies, preventing third parties from tracking your online activity.
System

To access the System menu, press the ⚙ (settings) button on the remote and select [System]. Within this menu, you'll find the following options:
[System Information] – Displays information about the TV, operating system, as well as different IDs used by TiVo or by 3rd party apps.
[Software Updates] – Management of software updates.
[Check for Updates] – Manually check for software updates. If new software is found, you will have the option to install it.
[What's New] – Information about changes in the new software. This option is visible only after an update.
[Automatic Updates] – Enable or disable automatic updates. When the TV is not in use or is in standby mode, it will automatically search for new software updates. If a new update is found, it will be automatically downloaded and installed without any user confirmation.
[Language] – Selects the menu language. For models with voice remote control, the selected menu language will also be set for voice recognition.
[Country] – Displays the country you selected during the initial setup. The country setting can only be changed during the initial setup after performing a factory reset.
[Time & Time Zone] – Options for
[Time Source] – Set the source from which information about time and date will be obtained automatically.
[Time Zone] – Option to select your time zone, if your country has multiple.
[Parental Controls] – When entering this menu, you will be asked to enter the PIN. If you did not create a PIN during the first-time installation, you will be asked to create one now. In this menu, you will see the following options:
[Parental controls] – Allows you to enable or disable parental controls.
[Manage Maturity Restrictions] – Choose a rating level up to which content can be watched without entering a PIN.
[TV] – Set restrictions for TV channels.
[Streaming] – Restrictions that apply to recommendations and search results in your TiVo experience.
[Remove Unrated Content] – Hides content without rating information.
[Bluetooth Accessories] – Displays a list of available and connected Bluetooth devices. This menu allows you to pair, unpair, or disconnect Bluetooth accessories, such as gamepads.
[Remote control] – You can pair your voice remote via this option to enable voice control. Please follow the on-screen instructions to pair your remote.
[Power On Screen] – Determines what appears on the screen after turning on the TV. You can choose between the home screen or the last watched input.
[Power & Energy Saving] – Energy saving options:
[Auto Power Off] – Controls the amount of time the TV will continue to operate without any buttons being pressed on the remote control before going into standby.
[Networked standby] – Configuration for the ability to wake up the TV from the network via a mobile device. Please note that activating this function will increase the TV's power consumption in standby mode.
[Power Down] – Turns off the TV, similar to pressing the Standby button on the remote.
[Restart] – Restarts the TV. Rebooting your TV is an effective method to resolve some issues. No settings will be deleted.
[Factory Reset] – Restores the TV to its factory default settings. Performing a reset will erase all data, settings, and personalization.
Legal

To access the Legal menu, press the ⚙ (settings) button on the remote and select [Legal]. In this menu you can:
- Review terms and conditions
- View and manage consents – this may enable or disable certain TV features depending on your choices
- Set up rules for advertisement relevancy
- See information about open source software used in the TV
- See manufacturer information
DTV, FREELY
Using Freely (Wi-Fi Only)
Freely enables you to stream live television without the need for a digital aerial. It also provides access to catch-up television services and allows playback from the start of a live programme.
All you need is a Wi-Fi connection.
Note: If you connect via Wi-Fi, you will receive over 24 channels, including live streams of all BBC, ITV, Channel 4, and Channel 5 stations.
Watch this space as Freely works with broadcasters to expand and improve the service, making it even easier to watch your fave shows!
Once you have completed the first-time installation without using a digital terrestrial aerial and select Live TV, you will see the Freely installation prompt:

Once the Freely button is pressed, you will see the following:


Press the [OK] button on your remote to install Freely. After installation, the following screen will appear automatically:
Press [OK] to continue with the installation. You will then be prompted to accept Freely's Terms & Conditions and informed that a TV licence is required to watch live TV.
Full Privacy Policy on Freely can be found at www.freely.co.uk/privacy
Using Freely (Wi-Fi – Aerial Hybrid)
If you connect via Wi-Fi and plug in an aerial, you will receive a wider range of channels listed in the TV guide, as well as access to all on-demand content. The channels you receive may vary depending on your location and the transmitter you are connected to.
To ensure proper aerial functionality, check that it is connected to your TV, in good condition, and pointed in the correct direction toward a transmitter.
A high-gain digital aerial is recommended for trouble-free digital terrestrial TV viewing.
If you are experiencing problems with your Freely services, visit the website below for further information:
https://www.freely.co.uk/help

Freely is only available in the UK. Areas receiving Saorview transmission will not support Freely or its services.
Using Freely (Wi-Fi and Satellite Hybrid)
If you are connecting the TV to Wi-Fi and Satellite, you will need to switch between Live TV (Freely) and Live TV (Satellite) using the [INPUT] or [SOURCE] button on your remote.
Satellite tuning with tune in hundreds of channels that are available on the specific Satellite you have chosen to tune in.
TV Guide
While using Freely, the Electronic Programme Guide (EPG) is available while in the Live TV mode.
It provides information about forthcoming programmes. You can view the start and end time of all programmes and on all channels for the next 7 days.
To enter the EPG, press the [GUIDE] button on your remote control.
Press the [GUIDE] button to leave programme guide.
When the EPG is entered, a screen like the one below will appear.
![Freely BBC News 8:05AM TO 12:05AM ECSTART AVAILABLE Twenty-four hours a day, the latest national and international stories as they break. [S] [HD] TOOMY 10:00AM 10:30AM 11:00AM 11:30AM 1 ONE ○ Morning Live SAS: Catching the CrimL... Homes Under the Hamme 2 TWO ○ BBC News 3 utv1 HD ○ This Morning 4 H…](/content/2026/08/1614666/images/3685939f9cb3e89922f7cf14df15865c0758d9f76fecda973a8506c551a2cfdb.jpg)
The synopsis in the top left will change as you navigate around the guide with the [ARROW] buttons on the remote control.
In the middle of the display is the programme listing, which is shown in time order, half hour
If you would like to quickly scan through the channels, press the [CH+] or [CH-] buttons to quickly move up or down through the listings.
Using the [RIGHT ARROW] button will move forward in time.
Pressing the [BACK] button will go straight to the current programme.
Pressing the [BACK] button for a second time will go back to Channel 1 on the EPG.
Freely Mini Guide
Pressing the [OK] button on your remote will produce the Freely Mini Guide.

As shown above, you can select to;
- Browse: Browse additional freely content – See page “**”
- Navigate: Navigate up and down through the channel list
- Info & Episodes: This provides Info Synopsis & information whether the programme provides subtitle and audio description with additional information on resolution [SD or HD]
- Restart: Loads on-demand Channel player.
- Subtitle: On/Off - White Circle Black S = On / Black Circle White S = Off
Audio Description: On/Off - White Circle Black AD = On / Black Circle White AD = Off
Note: For Full functionality of the EPG, A Reliable & Consistent connection to the internet is required. Without internet on-demand EPG will not work.
If the [Freely] button is pressed on the remote control, the set will display the Freely Browser tab.

From the Browse section, you can select live TV channels or apps available on Freely. You can browse by top picks, binge-worthy box sets, movies, dramas, and much more.


Note: Some apps may require additional registration. This is a simple process, and you will be informed of the correct website to visit to complete the registration.
LIVE TV
Channel List
The channel list on your TV is where you can access all your available TV channels in one convenient location. Follow these instructions to access and manage your channel list:
- Press the [INPUT] button on your remote control to open the list of inputs.
- Select your Live TV from the list. It may be marked as [Antenna], [Cable] or [Satellite].
- Press the [INFO] button to see basic information about the current program.
Press [INFO] one more time and the channel list appears.
- Use the left and right arrow buttons to scroll through the list. Press [OK] to start watching the selected channel.
Editing the Channel List
Through channel management, you can hide and favourite channels.
- Press the (settings) button to open the settings menu.
- Go to [Live TV] > [Channels Configuration] > [Manage Channels].
- The channel management screen will be displayed.
- To hide a specific channel from the channel list, mark the channel in the column with the [crossed-out eye] symbol.
- To add a specific channel to the favourites list, mark the channel in the column with the [heart] symbol.
- To unhide a channel or remove it from favourites, unmark it in the respective column.
Favourites List
The favourites list on your TV provides quick access to your most-watched TV channels. Follow these instructions to access and manage your favourites list:
Adding or removing channels from your favourites list
- Press the (settings) button to open the settings menu.
- Go to [Live TV] > [Channels Configuration] > [Manage Channels].
- The channel management screen will be displayed.
- To add a specific channel to the favourites list, mark the channel in the column with the [heart] symbol.
- To remove a channel from the favourites list, unmark it in the same column.
Using the favourites list
- While watching TV, press the [INFO] button twice to display the channel list.
- On the remote control, press down arrow and select [Filters].
- Select option [Favourites].
- Now every time you press the [INFO] button twice, only your favourite channels will be displayed instead of the standard channel list.

Note: If you want to display all channels in the channel list, repeat the above steps, but in step 3 select the option [All].
Parental Controls
This TV offers parental control options that allow you to restrict access to certain content and apps. By setting up parental controls on your TV, you can help ensure that your children are only accessing age-appropriate content and using the device in a safe and responsible manner. Here's how you can set up parental controls on your TV:
- Press the (settings) button to open the settings menu.
- Then go to [System] > [Parental Controls].
- Enter your PIN. If you have not created a TV PIN yet, you will be asked to create one now.
Note: Please remember your PIN. You will need it to activate/deactivate parental controls or to access restricted content when parental controls are enabled.
You can change these options in the Parental Control menu:
[Parental controls] – Allows you to enable or disable parental controls.
[Manage Maturity Restrictions] – Choose a rating level up to which content can be watched without entering a PIN.
[TV] – Set restrictions for TV channels.
[Streaming] – Restrictions that apply to recommendations and search results in your TiVo experience.
[Remove Unrated Content] – Hides content without rating information.
FACTORY RESET
Before disposing of, reselling or gifting the TV, a factory reset is required. Otherwise, unauthorised persons could gain access to your personal data.
Performing a factory reset on the TV will restore the device to its original factory settings, erasing all data, settings, and personalization. Here's how to do a factory reset:
- Press the (Settings) button on your remote control.
- Go to [System] > [Factory Reset].
- Then confirm by selecting [Reset].
After the last step, the factory reset is performed, and you are greeted by the first installation screen when the TV restarts.
TROUBLESHOOTING GUIDE
If a full restart of the TV is required
If you have trouble, such as the picture not displaying on the screen or the remote control not working, reset the television with the following procedure.
If an external USB device is connected to the TV, disconnect the USB device from the TV before resetting.
Power Reset
Restart the TV with the remote control.
Press the 🎨 (TiVo) button, then select Settings > System > Power & Energy Saving > Restart
Unplug the AC power cord (mains lead).
If the problem persists after step 1, unplug the TV power cord (mains lead) from the electrical outlet and wait for 2 minutes. Then plug the power cord (mains lead) back into the electrical outlet.
Note: Your personal settings and data will not be lost after the TV restarts.
Factory Data Reset
If the problem persists after a power reset, try a factory data reset.
Note: Performing a factory reset on the TV will restore the device to its original factory settings, erasing all data, settings, and personalization.
Press the 🎨 (TiVo) button, then select Settings > System > Factory Reset > Reset.
After the factory reset process completes successfully, your television will proceed into the first time installation mode.
No colour/Dark picture/Colour is not correct/Picture is too bright
You can adjust colour tone, brightness and picture quality on your TV from the Picture menu in Settings.
Press the ⚙ (settings) button, then select Picture.
In this menu you can make manual picture adjustments.
If you want to reset the picture settings, select [Reset] option.
No picture or sound from connected external device (Blu-ray player, gaming console)
Ensure the external device is powered on.
If the external device is connected via HDMI, try changing the EDID version:
Press the ⚙ (settings) button, then go to Inputs > HDMI (select the HDMI input to which the external device is connected) > Change HDMI EDID Version. Select a different option from the current one (HDMI 1.4 or HDMI 2.1).
Distorted picture/The screen flickers
You can check the connection and position of the antenna (aerial) and external devices.
Check the antenna aerial/cable connection.
Keep the antenna aerial/cable away from other connecting cables.
When installing an optional device, leave some space between the device and the TV.
Make sure that the antenna (aerial) is connected using a high quality 75-ohm coaxial cable.
Check the troubleshooting guide for the connected device.
There are icons and text on the edges of the screen
In this case, the TV might be in store demo mode.
To disable demo mode, you must reset the TV to factory defaults and reinstall. Press the 🎨 (TiVo) button, then select Settings > System > Factory Reset > Reset.
After the factory reset process completes successfully, your television will proceed into the first time installation mode.
Cannot operate the current screen after the on-screen keyboard is displayed
To return to operation of the screen behind the on-screen keyboard, press the [BACK] button on the remote control.
Some channels are blank
The channel is for scrambled/subscription service only. Subscribe to a pay TV service.
The channel is used only for data (no picture or sound).
Contact the broadcaster for transmission details.
No sound but good picture
Check the volume control.
Press 📋 or [VOL+] button to cancel muting.
Press the 🎨 (TiVo) button, then select Settings > Sound Audio Output Path > TV Speaker.
Remove any headphones.
The TV cannot connect to the Internet/Network
If the Wi-Fi network does not connect or disconnects, try the following.
Press the 🎨 (TiVo) button and check that the following setting is enabled. Settings > Network > Wireless Network.
Check the installation location of the TV and Wi-Fi router. Signal condition may be affected by the following:
Other Wi-Fi devices, microwaves, fluorescent lights, etc. that may be located nearby.
There are floors or walls between the Wi-Fi router and television.
Turn the Wi-Fi router off and then on again.
If the network name (SSID) of the Wi-Fi router to which you want to connect is not displayed, select [Enter Network Name] to enter a network name (SSID).
If the problem is not resolved even after the procedures above or if you cannot connect even with a wired network, check the status of the network connection.
Setting Live TV as the default Power-On Screen
Depending on the settings the TV may always start on the Home screen. You can change the default starting screen to the last-watched source by following these steps:
Press the 🎨 (TiVo) button, then go to Settings > System > Power-On Screen and select the option [Last Used Input].
The remote control does not operate.
Check if the TV is working properly.
Press the power button on the television to determine if the problem is with the remote control or not.
Check if the remote control is working properly.
Point the remote control at the remote control sensor located at the front of the television.
Keep the remote control sensor area clear from obstacles.
Fluorescent light can interfere with remote control operation; try turning off any fluorescent light.
Check that the orientation of each battery matches the positive (+) and negative (-) symbols in the battery compartment.
Battery power may be low. Remove the remote control cover and replace the batteries with new ones.
It is not possible to control the TV with voice
To use your voice to control the TV, you need a remote control which has a button, in addition the television must be paired to this remote control.
If your remote is not paired with the TV yet, please follow the steps below:
-
Press the ⚙ (settings) button to open the settings menu.
-
Go to [System] > [Remote Control].
-
A screen with pairing instructions will be displayed.
-
Press and hold the [left arrow] button and the 🎨 (TiVo) button simultaneously. When a message about successful pairing appears, you can release the buttons.
-
Your remote is now paired with your TV.
I cannot access Freely
To enable Freely to operate correctly, you must have the set tuned in and set up in the UK and installed as country setting UK. In addition, it needs to be connected to the internet.
Why am I not able to use letters in my PIN?
Your PIN is a quick code used for accessing some of the higher functions of your set. This only contains numbers so that they can be entered using your remote control keypad.
Can I set parental controls?
Parental controls are possible when receiving digital television channels (should this service be provided by the broadcaster).
What do I do if my apps do not work?
First check that your TV is connected to the internet, if it is, ensure that the internet connection is consistent and reliable. If this does not resolve the issue, remove the mains supply from the set and turn back on a few minutes later.
If this does not work, restart the TV via Settings > System > Power & Energy Saving > Restart.
PAGE LEFT INTENTIONALLY BLANK
PAGE LEFT INTENTIONALLY BLANK

SHA/MAN/0561

CE
Sharp Consumer Electronics Poland sp. z o.o.
Ostaszewo 57B, 87-148 Łysomice, Poland
www.sharpconsumer.eu
SHARP