
Dinamica ECAM350.50.B - Coffee machine DELONGHI - Free user manual and instructions
Find the device manual for free Dinamica ECAM350.50.B DELONGHI in PDF.
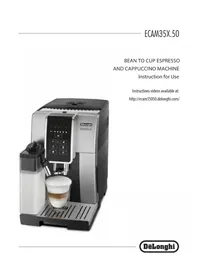


| Brand | DeLonghi |
| Model | Dinamica ECAM350.50.B |
| Product Type | Automatic bean-to-cup coffee machine |
| Colour | Black |
| Dimensions (W x H x D) | 26.5 x 43.5 x 36 cm |
| Weight | 9.5 kg |
| Power | 1450 W |
| Voltage | 220-240 V, 50-60 Hz |
| Water Tank Capacity | 1.8 L |
| Coffee Bean Container Capacity | 300 g |
| Pump Pressure | 15 bar |
| Milk System | LatteCrema system with removable milk carafe |
| Display | TFT colour display with touch icons |
| Grinder | Built-in steel burr grinder with adjustable settings |
| Number of Recipes | 16 one-touch beverages |
| Removable Brew Unit | Yes |
| Descaling | Automatic descaling programme |
| Energy Saving | Eco mode with automatic switch-off |
| Safety Features | Child safety lock and anti-drip system |
| Maintenance | Removable drip tray and water tank, dishwasher-safe parts |
| Spare Parts | Long-term availability from DeLonghi authorised service centres |
Frequently Asked Questions - Dinamica ECAM350.50.B DELONGHI
User questions about Dinamica ECAM350.50.B DELONGHI
0 question about this device. Answer the ones you know or ask your own.
Ask a new question about this device
Download the instructions for your Coffee machine in PDF format for free! Find your manual Dinamica ECAM350.50.B - DELONGHI and take your electronic device back in hand. On this page are published all the documents necessary for the use of your device. Dinamica ECAM350.50.B by DELONGHI.
USER MANUAL Dinamica ECAM350.50.B DELONGHI
BEAN TO CUP ESPRESSO
AND CAPPUCCINO MACHINE
Instruction for Use
Instructions videos available at:
http://ecam35050.delonghi.com/


![graph TD B["Component B"] --> B1["B1"] B --> B2["B2"] B --> B3["B3"] B --> B4["B4"] B --> B5["B5"] B --> B6["B6"] B6 --> B7["B7"] B8["B8"] --> C["×"] B9["B9"] --> C B10["B10"] --> C C --> D["2x"] D --> E["×"] E --> F["B11"] B12["B12"] --> G["×"] B13["B13"] --> G G --> H["×"] H --> I["B15"] B14["B14"…](/content/2026/08/1609912/images/56112af6aecddba1622ddc0b6121dbbffe22d282655792f3af9f56c8acd30e64.jpg)

CONTENTS
1. INTRODUCTION......5
1.1 Letters in brackets....5
1.2 Troubleshooting and repairs....5
2. DESCRIPTION......5
2.1 Description of the appliance ....5
2.2 Description of control panel ....5
2.3 Description of the accessories....5
2.4 Description of the milk container .....5
3. SETTING UP THE APPLIANCE......6
4. TURNING THE APPLIANCE ON......6
5. TURNING THE APPLIANCE OFF ....7
6. SETTING WATER HARDNESS....7
7. SETTING TEMPERATURE ....7
8. AUTO-OFF....7
9. ENERGY SAVING......7
10. BEEP 8
11. DEFAULT VALUES (RESET) 8
12. RINSING......8
13. MAKING COFFEE......8
13.1 Adjusting the coffee mill 8
13.2 Tips for a hotter coffee....8
13.3 Making coffee using coffee beans .....9
13.4 Temporarily varying the coffee aroma......9
13.5 Preparing coffee with pre-ground coffee ....10
13.6 Customizing aroma and quantity .....10
14. MAKING CAPPUCCINOS AND MILK-BASED COFFEES....10
14.1 Filling and attaching the milk container.....10
14.2 Adjusting the amount of froth....11
14.3 Making milk beverages automatically.....11
14.4 Customizing milk beverages .....11
14.5 Cleaning the milk container after use .....12
15. DELIVERING HOT WATER 12
16. CLEANING....12
16.1 Cleaning the machine .....12
16.2 Cleaning the internal circuit 12
16.3 Cleaning the coffee grounds container......13
16.4 Cleaning the drip tray and condensate tray .13
16.5 Cleaning the inside of the machine .....13
16.6 Cleaning the water tank....14
16.7 Cleaning the coffee spouts 14
16.8 Cleaning the pre-ground coffee funnel .....14
16.9 Cleaning the infuser 14
16.10 Cleaning the milk container .....15
16.11 Cleaning the hot water nozzle....15
17. DESCALING....15
18. SETTING WATER HARDNESS....17
18.1 Measuring water hardness....17
18.2 Setting water hardness .....17
19. WATER SOFTENER FILTER 17
19.1 Installing the filter ....17
19.2 Replacing the filter....18
20. TECHNICAL DATA....18
20.1 Tips for Energy Saving 18
21. EXPLANATION OF LIGHTS......20
22. TROUBLESHOOTING 23
1. INTRODUCTION
Thank you for choosing this bean to cup espresso and cappuccino machine.
We hope you enjoy using your new appliance. Take a few minutes to read this Instruction for Use. This will avoid all risks and damage to the appliance.
1.1 Letters in brackets
The letters in brackets refer to the legend in the description of the appliance on pages 2-3.
1.2 Troubleshooting and repairs
In the event of problems, first try and resolve them by reading the information given in the section "22. Troubleshooting"
If this does not resolve the problem or you require further information, you should consult customer services by calling the number given on the annexed "Customer Service" sheet.
If your country is not among those listed on the sheet, call the number given in the guarantee. If repairs are required, contact De'Longhi customer services only. The addresses are given in the guarantee certificate provided with the machine.
2. DESCRIPTION
2.1 Description of the appliance
(page 2 - A)
A1. Beans container lid
A2. Pre-ground coffee funnel lid
A3. Beans container
A4. Pre-ground coffee funnel
A5. Grinding adjustment dial
A6. Cup shelf
A7. button: to turn the appliance on and off (standby)
A8. Hot water connection nozzle
A9. Coffee spouts (adjustable height)
A10. Condensate tray
A11. Coffee grounds container
A12. Cup tray
A13. Drip tray water level indicator
A14. Tray grille
A15. Drip tray
A16. Water tank lid
A17. Water tank
A18. Water softener filter housing
A19. Infuser door
A20. Infuser
A21. Power cord
2.2 Description of control panel
(page 2 - B)
A number of icons on the touch screen have a double function. This is indicated in brackets in the description.
B1. Indicator light

- blinking for 5 seconds then permanently alight: jug needs cleaning
- blinking: position the froth adjustment dial on CLEAN / jug cleaning in progress
B2. light:
- blinking: reposition the grounds container (A11)
- permanently alight: the grounds container needs emptying
B3. light:
- blinking: position the water tank (A17)
- permanently alight: insufficient water in the tank
B4. Indicator light ⚠️: general alarm, see section “21. Explanation of lights”)
B5. Indicator light
- blinking: descaling in progress
- permanently alight: descaling required
B6. Indicator light ⬤: pre-ground function
B7. Indicator light ⚙️ ⚙️ ⚙️ ⚙️ : coffee aroma
B8. Icon ⬆ aroma selection
B9. Icon2x: to make 2 cups of "espresso"
B10. Icon 📋: to make "Espresso"
B11. Icon to make "Coffee"
B12. Icon 📁: to make "Cappuccino"
B13. Icon to make "Latte macchiato"
B14. Icon LSC:
- to make "Hot milk": with milk container in place
- to make "Hot water": with hot water spout in place (ESC: press to exit the function in progress)
B15. Icon OK: to perform a rinse cycle.
(OK: press to confirm the function)
2.3 Description of the accessories
(page 3 - C)
C1. Reagent strip (*if provided)
C2. Pre-ground coffee measure(*if provided)
C3. Descaler (*if provided)
C4. Water softener filter (*if provided)
C5. Cleaning brush (*if provided)
C6. Hot water spout
2.4 Description of the milk container
(page 3 - D)
D1. Froth adjustment and CLEAN dial
D2. Milk container lid
D3. Milk container
D4. Milk intake tube
D5. Frothed milk spout (adjustable)
3. SETTING UP THE APPLIANCE
Please note:
- The first time you use the appliance, rinse with hot water all removable accessories which may come into contact with water or milk.
- Possible traces of coffee in the mill are the result of operating tests performed on the appliance before sale, proof of the meticulous care and attention we invest in our products.
- You should customise water hardness as soon as possible following the instructions in section "18. Setting water hardness".

- Connect the appliance to the mains supply (fig. 1).
- Remove the water tank (A17), fill to the MAX line with fresh water (fig. 2) then return it to its position (fig. 3);
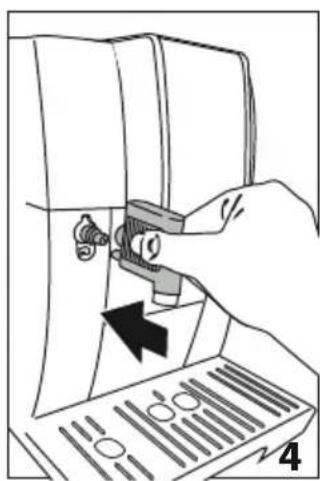
- Check that the hot water spout (C6) is connected to the nozzle (A8) (fig. 4) and place a container (fig. 5) of minimum capacity 200 ml underneath the hot water spout and the coffee spout;


- The indicator light △ (B4) and the ⚫ OK icon (B15) blink. Press the ⚫ OK icon (B15): the machine will deliver hot water.
The coffee machine is now ready for normal use.
Please note:
- When using the appliance for the first time, 4-5 cappuccinos need to be made before it starts to give satisfactory results.
- When making the first 4-5 cappuccinos, it is normal to hear the noise of boiling water. After this, the noise becomes less.
- To enjoy your coffee even more and improve the performance of your appliance, we recommend installing a water softener filter (C4) as described in section "19. Water softener filter". If your model is not provided with a filter, you can request one from De'Longhi customer services.
4. TURNING THE APPLIANCE ON
Every time the appliance is turned on by pressing the on/off button (A7), it automatically performs a preheat and rinse cycle which cannot be interrupted. The appliance is not ready for use until the cycle has been completed.
Danger of scalding!
During rinsing, a little hot water comes out of the coffee spouts (A9) and is collected in the drip tray (A15) underneath. Take care to avoid contact with splashes of water.
- To turn the machine on, press the button (A7) (fig. 6). All of the indicator lights and the icons will shine on the control panel, and all the beverage icons then blink.

The machine proceeds to run a rinse cycle; besides heating the boiler, this serves to circulate hot water around the internal circuits so that they are warmed up as well.
Once the heating cycle has ended, the coffee beverage and OK icons become active and light up; if the milk container (D3) is in position, the icons indicating the milk beverages will also be active.
5. TURNING THE APPLIANCE OFF
Whenever the machine is turned off after being used to make coffee, it performs an automatic rinse cycle.
Danger of scalding!
During rinsing, a little hot water flows from the coffee spouts (A9). Take care to avoid contact with splashes of water.
• To turn the appliance off, press the button (A7) (fig. 6);
- If provided for, the appliance performs a rinse cycle then goes off (stand-by).
Please note:
If you will not be using the appliance for some time, unplug it from the mains socket:
- first turn the appliance off by pressing the button (fig. 6);
6. SETTING WATER HARDNESS
For instructions on setting water hardness, see section "18. Setting water hardness".
7. SETTING TEMPERATURE
To change the temperature of the water used for making coffee (low, medium, high), proceed as follows:
- With the machine off (in standby mode) but still plugged into the electrical power supply;
- Press and hold the icon (B) until the indicators on the touch screen (B) light up;
- Press the icon(B10);
- Press the icon again to select the desired temperature :
| low | |
| medium | |
| high |
- Press the ⚫ OK icon (B15) to confirm (or ⬇ ESC (B14) to exit without making any change).
The lights go off.
The appliance returns to "standby" and the temperature is now programmed.
8. AUTO-OFF
THE time can be changed so that the appliance switches off after being idle for 15 or 30 minutes, or after 1, 2 or 3 hours.
To re-programme Auto-off, proceed as follows:
- With the machine off (in standby mode) but still plugged into the electrical power supply;
- Press and hold the icon (B) until the icons on the touch screen (B) light up;
- Press the icon(B11);
- Press the icon again to select the desired time interval:
| 15 min. | |
| 30 min. | |
| 1 hour | |
| 2 hours | |
| 3 hours |
- Press the OK icon (B15) to confirm (or ESC (B14) to exit without making any change). The lights go off.
The auto-off time is now programmed.,
9. ENERGY SAVING
Use this function to enable or disable energy saving. This mode is active by default, reducing energy consumption while the machine is on in compliance with current European regulations. To change the setting, proceed as follows:
- With the machine off (in standby mode) but still plugged into the electrical power supply;
-
Press and hold the icon (B9) until the indicators on the touch screen (B) light up.
-
Press the icon (B13);
-
Press the icon again to enable/disable the function:
.● ● ● ● ● function enabled .● ● ● ● ● function disabled
- Press the Ⓞ OK icon (B15) to confirm (or ⏻ ESC (B14) to exit without making any change). The lights go off.
The energy saving setting is now programmed.
Please note:
- In energy saving mode, a few seconds may elapse before the first coffee is delivered as the appliance must heat up again.
10. BEEP
This function enables or disables the beep. Proceed as follows:
-
With the machine off (in standby mode) but still plugged into the electrical power supply;
-
Press and hold the icon (B) until the indicators on the touch screen (B) light up.
-
Press the icon to enable/disable the function:
function enabled
• function disabled
- Press the OK icon (B15) to confirm (or ESC (B14) to exit without making any change). The lights go off.
The beep is now programmed.
11. DEFAULT VALUES (RESET)
This function resets all settings (temperature, auto-off, water hardness, energy saving and all quantity settings are reset to the default values).
-
With the machine off (in standby mode) but still plugged into the electrical power supply;
-
Press and hold the icon (B) until the indicators on the touch screen (B) light up.
-
Press the icon (B12): the beans (B7) on the touch screen will blink;
-
Press the OKeton (B15) to reset the default values (or ESC (B14) to exit without making any change). The lights go off.
The settings and quantities of the beverages have been reset to the default values.
12. RINSING
Use this function to deliver hot water from the coffee spouts (A9) to clean and heat the appliance's internal circuit.
Place a recipient under the coffee and hot water spouts.
Important! Danger of scalding.
Do not leave the appliance unattended while hot water is being delivered.
1) To activate the function, press OK(B15);
2) After a few seconds, hot water is delivered from the coffee spouts, cleaning and heating the appliance's internal circuit.
3) To interrupt the function manually, press OK again.
Please note:
- If the appliance is not used for more than 3-4 days, when switched on again, we strongly recommend performing 2/3 rinses before use;
- AFTER cleaning, it is normal for the coffee grounds container (A11) to contain water.
13. MAKING COFFEE
13.1 Adjusting the coffee mill
The coffee mill is set by default to prepare coffee correctly and should not require regulating initially.
However, if after the first few attempts it becomes apparent that the coffee is either too weak and not creamy enough, or emerges too slowly (drop by drop), this can be corrected by adjusting the grinding adjustment dial (A5) (fig. 7).

Please note:
The grinding adjustment dial must be used only when the coffee mill is in operation.
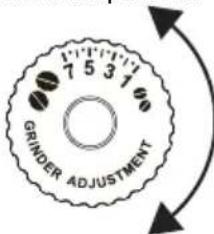
If the coffee is delivered too slowly or not at all, turn one click clockwise towards 7. For fuller bodied creamier coffee, turn one click anticlockwise towards 1 (do not turn more than one click at a time otherwise the coffee could be delivered a drop at a time).
The effect of the adjustment will be noticed only after making a further 2 cups of coffee, at least. If this adjustment does not produce the desired result, turn the dial another click.
13.2 Tips for a hotter coffee
To make a hotter coffee, proceed as follows:
• perform a rinse cycle by pressing OK (B15);
- warm the cups with hot water using the hot water function (see section "15. Delivering hot water");
- increase the coffee temperature (see section "18. Setting water hardness").
13.3 Making coffee using coffee beans
Important!
Do not use green, caramelised or candied coffee beans as they could stick to the coffee mill and make it unusable.
- Fill the beans container (A3) (fig. 8) with coffee beans;
-
Place under the coffee spouts (A19):
-
1 cup, to make 1 coffee (fig. 9);
- 2 cups, to make 2 coffees.


- Lower the spouts as near as possible to the cup. This makes a creamier coffee (fig. 10);

- Then select your required coffee:
| Recipe Quantity | Programmable quantity | Default aroma |
| Espresso (B10) | ≈ 40 ml from ≈ 20 to ≈ 180 ml | ● ● ● ● ● |
| Coffee (B11) | ≈ 180 ml from ≈ 100 to ≈ 240 ml | ● ● ● ● ● |
| 2x (B9)+Espresso (B10) | ≈ 40 ml x 2 cups | ● ● ● ● ● |
- Preparation begins and the indicator corresponding to the selected icon blinks on the touch screen (B).
Please note:
• To make 2 cups of "espresso" at the same time:
- Press the icon(B9): the icons corresponding to the beverages available light up, and the 2icon blinks. Press (P10): preparation begins.
Alternatively, proceed as follows:
- Press : preparation begins and the icon blinks for a few seconds. Press the 2icon while it is blinking.
- While the machine is making coffee, delivery can be interrupted at any moment by pressing the coffee icon.
- As soon as delivery has ended, to increase the quantity of coffee in the cup, simply press and hold the icon corresponding to the beverage selected. The selected icon switches to fast blink.
Once the coffee has been made, the appliance is ready to make the next beverage.
Please note:
- Indicator lights may appear on the control panel (B) during use. Their meaning is given in section "21. Explanation of lights.
- For hotter coffee, see section "13.2 Tips for a hotter coffee".
- If the coffee is delivered a drop at a time, too weak and not creamy enough or too cold, read the tips in section "22. Troubleshooting".
- To customise the beverages according to personal taste, see section "13.6 Customizing aroma and quantity".
13.4 Temporarily varying the coffee aroma
To vary the aroma of the coffee temporarily, press (B8):
| EXTRA LIGHT | |
| LIGHT | |
| MEDIUM | |
| STRONG | |
| X-STRONG | |
| (see “13.5 Preparing coffee with pre-ground coffee”) |
Please note:
- The variation in aroma is not saved and the next time a beverage is delivered automatically, the appliance selects the default value.
- If a few seconds elapse between temporary customising of the aroma and delivery of the beverage, the aroma returns to the default value.
13.5 Preparing coffee with pre-ground coffee
Important!
- Never add pre-ground coffee when the machine is off or it could spread through the inside of the machine and dirty it. This could damage the machine.
- Never use more than 1 level measure (C2) as it could dirty the inside of the coffee machine or block the funnel (A4).

Please note:
When using pre-ground coffee, only one cup can be made at a time.
-
Press the button (B8) repeatedly, until the indicator light (B6) appears.
-
Make sure the funnel is not blocked, then add one level measure of pre-ground coffee (fig. 11).

-
Place a cup under the coffee spouts (A9) (fig. 9);
-
Then select your required coffee:
| Recipe Quantity | |
| Espresso (B10) | ≈ 40 ml |
| Coffee (B11) | ≈ 180 ml |
- Preparation begins and the indicator light corresponding to the selected icon blinks on the touch screen (B).
Please note:
If "Energy Saving" mode is active, you may have to wait a few seconds before the first coffee is delivered.
13.6 Customizing aroma and quantity
The appliance is set by default to make coffee with a standard aroma and quantity (see table in section "13.3 Making coffee using coffee beans").
To customize the coffee, proceed as follows:
- Place a sufficiently large cup or glass under the coffee spouts (A19);
- Press ⬆ (B8) to select the desired aroma (see section "13.4 Temporarily varying the coffee aroma");
- Press and hold the icon corresponding to the coffee to be customized: the icon blinks and all the alarm indicator lights also blink;
- Release the icon. The icon blinks and the appliance starts delivering coffee;
- As soon as the coffee in the cup reaches the required level, press the coffee icon again.
The aroma and quantity of coffee in the cup has now been programmed.
14. MAKING CAPPUCCINOS AND MILK-BASED COFFEES
Please note:
- To avoid milk with poor froth or large bubbles, always clean the milk container lid (D2) and hot water connection nozzle (A8) as described in sections "14.5 Cleaning the milk container after use", "16.10 Cleaning the milk container" and "16.11 Cleaning the hot water nozzle".
14.1 Filling and attaching the milk container
- Remove the lid (D2) (fig. 12);


- Fill the milk container (D3) with a sufficient quantity of milk, not exceeding the MAX level marked on the container (fig. 13). Each mark on the side of the container corresponds to 100ml of milk;
Please note:
- For a denser and more evenly distributed froth, always use skimmed or partially skimmed milk at refrigerator temperature (about 5 °C).
- If "Energy Saving" mode is enabled, you may have to wait a few seconds before the first cappuccino is delivered.
- Make sure the milk intake tube (D4) is correctly inserted in the bottom of the milk container lid (fig. 14)

- Place the lid back on the milk container;
- Remove the hot water spout (C6) from the nozzle (A8) (fig. 15);
- Attach the container to the connection nozzle and push as far as it will go (fig. 16). The machine emits a beep (if enabled);


- Place a sufficiently large cup under the coffee spouts (A9) and the frothed milk spout (D5). Adjust the length of the milk spout. To move it nearer the cup, simply pull it downwards (fig. 17).
- Follow the instructions below for each function.
14.2 Adjusting the amount of froth
Turn the froth adjustment dial (D1) to adjust the amount of froth on the milk delivered while making cappuccinos and milk-based coffees (fig. 18).
![graph TD A["INSERT"] --> B["CLEAN"] B --> C["→"] C --> D["←"] D --> E["→"] E --> F["→"] F --> G["→"] G --> H["→"] H --> I["→"] I --> J["→"] J --> K["→"] K --> L["→"] L --> M["→"] M --> N["→"] N --> O["→"] O --> P["→"] P --> Q["→"] Q --> R["→"] R --> S["→"] S --> T["→"] T --> U["→"] U --> V["→"] V --…](/content/2026/08/1609912/images/42428edd6f9cde10fc13df5a6308e59475d410c3fd6147db0675b36d89c60e92.jpg)
| Dial position | Description Recommended for... |
 | No froth HOT MILK (not frothed) |
 | Min. froth LATTE MACCHIATO |
 | Max. froth CAPPUCCINO / HOT MILK (frothed) |
14.3 Making milk beverages automatically
- Fill the milk container (D) and attach it as described above;
-
Select the required beverage:
-
: Cappuccino (B12)
- : Macchiato (B13)
-
: Hot Milk (B14)
-
After a few seconds, the appliance starts preparing the selected beverage automatically.
- Depending on the beverage selected, the appliance delivers one or two ingredients automatically.
Please note:
- To interrupt preparation and delivery, if so desired, press the icon relative to any other beverage. Conversely, to interrupt the first step and pass straight on to the second, press the icon of the selected beverage.
- Do not leave the milk container out of the refrigerator for long periods. The warmer the milk (5°C is ideal), the poorer the quality of froth produced.
14.4 Customizing milk beverages
To customize milk beverages, proceed as follows:
- Place a sufficiently large cup or glass under the coffee spouts (A19);
-
Press and hold the icon corresponding to the beverage to be customized: the icon blinks and all the alarm indicator lights also blink;
-
Release the icon: the icon blinks and the appliance starts delivering the beverage;
- Once the amount of liquid in the cup is as desired (milk and/or coffee), press the selected icon a second time: the flow will cease.
The quantity of the beverage in the cup has now been programmed.
14.5 Cleaning the milk container after use
Important! Danger of scalding
When cleaning the internal tubes of the milk container (D), a little hot water and steam leak out of the milk spout (D5). Take care to avoid contact with splashes of water.
Every time a drink is prepared with milk, the lid of the milk container (D2) must be cleaned afterwards. Clean as described to eliminate all milk residues (or press VSC (B14) to postpone the cleaning operation until later):
- Leave the milk container (D) in the machine (it does not have to be emptied);
- Place a cup or other recipient under the frothed milk spout;
- Turn the froth adjustment dial (D1) to "CLEAN" (fig. 19). Cleaning stops automatically;


- Turn the dial back to one of the froth selections;
- Remove the milk container and always clean the steam connection nozzle (A8) with a sponge (fig. 20).
Please note!
- To prepare a number of cappuccinos or milk-based coffees, clean the milk container after preparing the last of the beverages: in this instance press 📄C (B14) to go back to the main menu.
• The milk container can be kept in the refrigerator. - In certain cases, the appliance will need to heat up before the container can be cleaned.
15. DELIVERING HOT WATER
Important! Danger of scalding.
Never leave the machine unattended when hot water is being released.
- Make sure the hot water spout (C6) is attached correctly;
- Place a container under the water spout (as close as possible to avoid splashes) (fig. 5);
- Press E(B14);
- The machine delivers about 250 ml of hot water, then delivery stops automatically. The icon blinks during delivery, To interrupt the flow of hot water from the spout, press ESC (B14).
Please note:
- If "Energy Saving" mode is active, there may be a few seconds pause before hot water is delivered.
16. CLEANING
16.1 Cleaning the machine
The following parts of the machine must be cleaned regularly:
- the appliance's internal circuit;
- coffee grounds container (A11);
- drip tray (A15) and condensate tray (A10);
- water tank (A17);
- coffee spouts (A9);
- pre-ground coffee funnel (A4);
- infuser (A20), accessible after opening the infuser door (A19);
- milk container (D);
- hot water connection nozzle (A8);
Important!
- Do not use solvents, abrasive detergents or alcohol to clean the coffee machine. With De'Longhi superautomatic coffee machines, no chemical products are required for cleaning purposes.
- None of the components of the appliance can be washed in a dishwasher with the exception of the drip tray grille (A14) and milk container (D).
- Do not use metal objects to remove encrustations or coffee deposits as they could scratch metal or plastic surfaces.
16.2 Cleaning the internal circuit
If the appliance is not used for more than 3/4 days, before using it again, we strongly recommend switching it on and:
- running 2/3 rinse cycles by pressing OK(B15);
- release hot water for a few seconds (section "15. Delivering hot water").
Please note:
Water may find its way into the grounds container (A11) during the above rinse procedure: this is quite normal.
16.3 Cleaning the coffee grounds container
When the indicator light (B2) appears on the touch screen, the container must be emptied and cleaned. The appliance cannot be used to make coffee again until the grounds container (A11) has been cleaned. Even if the grounds container is not full, the message indicating that it should be emptied will be displayed 72 hours after the first coffee has been prepared (for the 72 hours to be calculated correctly, the machine must never be turned off by unplugging the power cord).
Important! Danger of scalding
If you make a number of cappuccinos one after the other, the metal cup tray (A12) becomes hot. Wait for it to cool down before touching it and handle it from the front only.
To clean (with the machine on):
- Remove the drip tray (A15) (fig. 21), empty and clean.

- Empty the grounds container (A11) and clean thoroughly to remove all residues left on the bottom. This can be done using the spatula incorporated into the brush (C5).
- Check the red condensate tray (A10) and empty if necessary;
Important!
When removing the drip tray, the grounds container must be emptied, even if it contains few grounds.
If this is not done, when you make the next coffees, the grounds container will fill up more than expected and clog the machine.
16.4 Cleaning the drip tray and condensate tray
Important!
The drip tray (A15) is fitted with a level indicator (A13) (red) showing the amount of water it contains (fig. 22).

Before the indicator protrudes from the cup tray (A12), the drip tray must be emptied and cleaned, otherwise the water may overflow the edge and damage the appliance, the surface it rests on or the surrounding area.
To remove the drip tray:
- Remove the drip tray and grounds container (A11) (fig. 21);
- Remove the cup tray (A12) and drip tray grille (A14), then empty the drip tray and grounds container and wash all components;
- Check the red condensate tray (A10) and empty if necessary;
- Replace the drip tray complete with grille and the grounds container.
16.5 Cleaning the inside of the machine
Danger of electric shock!
Before cleaning internal parts, the machine must be turned off (see section "5. Turning the appliance off") and unplugged from the mains power supply. Never immerse the machine in water.
- Check regularly (about once a week) that the inside of the appliance (accessible after removing the drip tray (A15)) is not dirty. If necessary, remove coffee deposits with the brush (C5) and a sponge;
- Remove all residues with a vacuum cleaner (fig. 23).

16.6 Cleaning the water tank
- Clean the water tank (A17) regularly (about once a month) and whenever the water softener filter (C4) is replaced, using a damp cloth and a little mild washing up liquid;
- Remove the filter (C4) and rinse under running water;
- Replace the filter (if installed), fill the tank with fresh water and replace;
- Release 100 ml of water.
16.7 Cleaning the coffee spouts
- Clean the coffee spouts (A9) regularly with a sponge or cloth (fig. 24A);
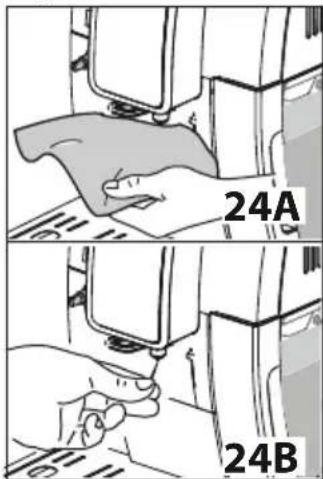
- Check the holes in the coffee spout are not blocked. If necessary, remove coffee deposits with a toothpick (fig. 24B).
16.8 Cleaning the pre-ground coffee funnel
Check periodically (about once a month) that the pre-ground coffee funnel (A4) is not blocked. If necessary, remove coffee deposits with the brush (C5) supplied.
16.9 Cleaning the infuser
The infuser (A20) must be cleaned at least once a month.
Important!
The infuser cannot be extracted while the machine is on.
- Make sure the machine is correctly turned off (see section "5. Turning the appliance off");
- Remove the water tank (A17);
- Open the infuser door (A19) (fig. 25) on the right side of the appliance;


- Press the two coloured release buttons inwards and at the same time pull the infuser outwards (fig. 26);
- Soak the infuser in water for about 5 minutes, then rinse under the tap;
Important!
RINSE WITH WATER ONLY
NO DETERGENTS - NO DISHWASHER
Do not use detergents when cleaning the infuser, as they could damage it.
- Use the brush (C5) to remove any coffee residues left in the infuser housing, visible through the infuser door;
- After cleaning, replace the infuser by sliding it onto the internal support, then push the PUSH symbol fully in until it clicks into place;
Please note:
If the infuser is difficult to insert, before insertion, adapt it to the right size by pressing the two levers (fig. 27).

- Once inserted, make sure the two coloured buttons have snapped out;
- Close the infuser door;
- Put the water tank back.
16.10 Cleaning the milk container
Clean the milk container (D) after use, every time that milk is prepared, as described below:
- Remove the lid (D2);
- Remove the milk spout (D5) and intake tube (D4) (fig. 28);

-
Turn the froth adjustment dial (D1) anticlockwise to the "INSERT" position (fig. 29) and pull off upwards;
-
In a dishwasher (recommended): Rinse all components and the container with hot running water (at least 40° C), then place them in the top basket of the dishwasher and run a programme at 50° C, e.g. standard ECO. By hand: Rinse all components and the container with hot running water (at least 40° C), then immerse all the components in hot tap water (at least 40° C) with a mild/neutral washing-up liquid for at least 30 minutes. Rinse thoroughly with hot tap water.

-
Rinse inside the froth adjustment dial seat with running water (fig. 31);
-
Check that the intake tube and milk spout are not clogged with milk residues;
-
Replace the dial (in correspondence to the word "INSERT"), spout and milk intake tube;
-
Place the lid back on the milk container (D3).
16.11 Cleaning the hot water nozzle
Each time you prepare milk, clean the connection nozzle (A8) with a sponge to remove milk residues from the gaskets (fig. 20).
17. DESCALING
Important!
- Before use, read the instructions and the labelling relative to the descaler product, which are indicated on the pack (included with certain models and/or available for purchase from authorized service centres).
- Use De'Longhi descaler only. Using unsuitable descaler and/or performing descaling incorrectly may result in faults not covered by the manufacturer's guarantee.
Descaler could damage delicate surfaces. If the product is accidentally spilt, dry immediately.
| To descale | |
| Descaler De’Longhi | “EcoDecalk” descaler |
| Container Recommended capacity: 1.8 | |
| Time ~45min | |
Descale the machine when the indicator (B5) lights up on the panel.
To proceed with descaling immediately, if preferred, follow the instructions from point 1. To postpone the descaling procedure until later, press ESC (B14): the indicator (B5) on the touch screen remains alight as a reminder that the appliance needs to be descaled.
To start the descaling procedure:
- Take out the water tank (A17), remove the water softener filter (C4) and empty the water from the tank.
- Pour the descaler into the tank up to level A (corresponding to a 100 ml pack) marked on the inner surface of the tank (fig. 32), then add water (1 litre) up to level B (fig. 33) and put the water tank back.
![graph TD A["EcoDecalk"] --> B["Spashing"] B --> C["Drinking"] C --> D["Pouring"] D --> E["Disinfection"] E --> F["Receiving"]](/content/2026/08/1609912/images/f9c4e670a0c74193877232ae9332628f46b604d82681d6af463b1976ea640d7b.jpg)
-
Remove, empty and replace the drip tray (A15) and the grounds container (A11).
-
Place an empty container with a minimum capacity of 1.8 litres under the hot water spout (C6) and coffee spouts (A9) (fig. 34); Press ☑ (B15);

Important! Danger of scalding
Hot water containing acid flows out of the coffee spouts and hot water spout. Take care to avoid contact with splashes of this solution.
- The descale programme starts and the descaler liquid comes out of the hot water and coffee spouts. A series of rinses is performed automatically to remove all the scale residues inside the coffee machine. This is the longest phase and may account for more than half the total descaling time.
After completing the descaling cycle, the appliance is ready to be rinsed through with clean water.
- Empty the container used to collect the descaler solution. Remove the water tank from the machine, empty it and rinse under running water, then fill with clean water up to the MAX level (fig 35) and reposition it in the machine.

-
Empty the container used to collect the descaler solution, then position it under the coffee spout and the hot water spout (fig. 34);
-
Press OK(B15);
-
Hot water is delivered first from the coffee spouts, then from the hot water spout;
-
When the water in the tank has run out, empty the container used to collect the rinsing water;
-
Take out the water tank and fill with fresh water up to the MAX level.
-
If the water softener filter was removed, replace it in its housing in the water tank, and reposition the tank in the appliance;
-
Empty the container used to collect the descaler solution, then position it under the hot water spout.
-
Press OK (B15).
-
Hot water comes out of the hot water spout;
-
At the end of the second rinse, remove, empty and replace the drip tray (A15) and grounds container (A11).
-
Empty the container used to collect the rinse water; remove the water tank from the machine, empty it and rinse under running water, then fill with clean water up to the MAX level and reposition it in the machine.
The descaling cycle is now complete.
Please note!
- If the descaling cycle is not completed correctly (e.g. power failure or disconnection from power supply), the machine will prompt it to be completed when switched on again.
- WATER may find its way into the grounds container (A11) during the descaling cycle: this is quite normal;
- If the water tank has not been filled to the MAX level, at the end of descaling, the appliance requests a third rinse to guarantee that the descaler solution has been completely eliminated from the machine's internal circuits.
- The appliance may request descaling cycles at very short intervals. This is normal and due to the appliance's advanced control system.
- THE descaling procedure can also be started by pressing and holding the Icon (B8).
18. SETTING WATER HARDNESS
The descaling alert is displayed after a period of time established according to water hardness.
The machine is set by default for a hardness level of 4. The machine can also be programmed according to the actual hardness of the local water supply, so that the descaling procedure will be required less frequently.
18.1 Measuring water hardness
-
Remove the "TOTAL HARDNESS TEST" reagent strip (C1) from its pack;
-
Immerse the strip completely in a glass of water for about one second;
-
Remove the strip from the water and shake lightly. After about a minute, 1, 2, 3, or 4 red squares will appear, de-
pending on the hardness of the water. Each square corresponds to 1 level;
| Reagent strip Water | hardness | Corresponding setting |
 | low | |
 | medium | |
 | high | |
 | maximum |
18.2 Setting water hardness
- With the machine off (in standby mode) but still plugged into the electrical power supply;
- Press and hold the icon (B9) until the indicator lights appear on the touch screen (B);
- Press the icon(B8);
- Press the on again to select the water hardness level;
- Press the OK icon (B15) to confirm (or ESC (B14) to exit without making any change). The lights go off.
The machine is now reprogrammed with the new water hardness setting.
19. WATER SOFTENER FILTER
To use the filter correctly, follow the instructions below.
19.1 Installing the filter
- Remove the filter (C4) from the packaging. The date indicator disk varies according to the filter provided.
- Turn the date indicator disk (see fig. 36) until the next two months of use are displayed.

Please note
The filter lasts about two months if the appliance is used normally. If the coffee machine is left unused with the filter installed, it will last no longer than 3 weeks.
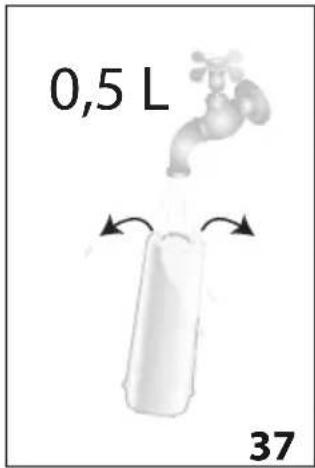
- To activate the filter, run tap water through the hole in the filter as shown in fig. 37 until water comes out of the openings at the side for more than a minute;
- Remove the tank (A17) from the appliance and fill with water;
- Insert the filter in the water tank and immerse it completely for about ten seconds, sloping it and pressing it lightly to enable the air bubbles to escape (fig. 38).


- Insert the filter in the filter housing (A18) and press fully home (fig. 39);
- Close the tank with the lid (A16) (fig. 40), then replace the tank in the machine;

- Attach the hot water spout (C6). Position a container (of at least 500 ml capacity) under the hot water spout (A20)
- Press the EIcon (B14) to deliver hot water.
- Release at least 500 ml of water, then press ESC again (B14) to stop the flow.
The filter is now activated and the coffee machine can be used.
19.2 Replacing the filter
After two months (see date indicator) or when the appliance has not been used for 3 weeks, you should replace the filter:
- Extract the tank (A17) and exhausted filter (C4);
- Take the new filter out of its pack and proceed as illustrated in points 2 to 10 of the previous section.
The new filter is now activated and the coffee machine can be used.
20. TECHNICAL DATA
Voltage: 220-240 V\~ 50/60 Hz max. 10A
Absorbed power: 1450W
Pressure: 1.5MPa (15 bars)
Max. water tank capacity: 1.8l
Size LxDxH: 240x440x360 mm
Cord length: 1250 mm
Weight: 9.5 kg
Max. beans container capacity: 300 g
De'Longhi reserves the right to modify the technical specification and styling of its products at any moment, without compromising their functionality and quality.
20.1 Tips for Energy Saving
To reduce energy consumption, after delivering one or more beverages:
- removethe milk container or the accessories.
- Set auto-off to 15 minutes
- Enable Energy Saving
-
Always carry out the descaling cycle when prompted by the machine.
-
EXPLANATION OF LIGHTS
| LIGHTS DISPLAYED POSSIBLE CAUSE REMEDY | ||
 BLINKING BLINKING | The machine is warming up or cooling down. | Wait |
 | The coffee maker is ready for use. Proceed | with selection of the desired beverage and the relative options. |
 | ||
 | ||
 PERMANENTLY ALIGHT PERMANENTLY ALIGHT | ||
 PERMANENTLY ALIGHT PERMANENTLY ALIGHT | Insufficient water in the tank (A17). Fill the | tank and position it correctly, pushing it fully home so that it clicks into place. |
 BLINKING BLINKING | The tank (A17) is missing or not correctly in place. | Position the tank correctly, pushing it fully home so that it clicks into place. |
 PERMANENTLY ALIGHT PERMANENTLY ALIGHT | The grounds container is full. Empty the | grounds container and the drip tray (A15), clean, and reposition in the machine (fig.16). Important: when removing the drip tray, the grounds container must always be emptied, however little it may have been filled. If this is not done, it can happen that the grounds container will fill up more than expected when further coffees are prepared, causing the machine to clog. |
 BLINKING BLINKING | The grounds container is missing or not correctly in place. | Insert the drip tray (A15) complete with grounds container and press fully home. |
 BLINKING BLINKING | The hot water spout is not inserted, or is inserted incorrectly. | Attach the water spout securely, pushing fully home. |
 BLINKING BLINKING | The milk container is not inserted correctly. | Position the milk container securely, pushing fully home. |
| The milk container has been inserted with the froth adjustment dial in the CLEAN position. | Turn the froth adjustment dial to one of the milk froth selection positions. | |
  BLINKING BLINKING  | The grinding is too fine and the coffee is delivered too slowly or not at all. | Repeat coffee delivery and turn the grinding adjustment dial (A5) (fig. 8) one click clockwise towards 7 while the coffee mill is in operation. If after making at least 2 coffees delivery is still too slow, repeat the correction procedure, turning the grinding adjustment dial another click until delivery is correct (see section: "13.1 Adjusting the coffee mill"). If the problem persists, attach the hot water spout and release a little water until the flow is steady and uniform, pressing ESC (B14). |
| If the water softener filter (C4) is present, an air bubble may have been released inside the circuit, obstructing delivery | Attach the hot water spout and release a little water until the flow is steady and uniform, pressing ESC (B14). | |
 BLINKING BLINKING | The pre-ground coffee used is too fine, so that the coffee is delivered too slowly or not at all | Make the coffee again using less pre-ground coffee, or a different type of coffee. If the problem persists, attach the hot water spout and release a little water until the flow is steady and uniform, pressing ESC (B14). |
| If the water softener filter (C4) is present, an air bubble may have been released inside the circuit, obstructing delivery | Attach the hot water spout and release a little water until the flow is steady and uniform, pressing ESC (B14). | |
 FENMANENTLET ALIGHT FENMANENTLET ALIGHT  BLINKING BLINKING | Too much coffee has been used | Select a lighter taste by pressing (E8) or reduce the quantity of pre-ground coffee. |

| INDICATOR LIGHTS DISPLAYED POSSIBLE CAUSE REMEDY | ||
PERMANENTLY ALIGHT BLINKING BLINKING | The coffee beans have run out Fill the beans container (A3) (fig. 9). | |
| The pre-ground coffee funnel is clogged (A2). | Empty the funnel with the help of the brush (C5) as described in section "16.8 Cleaning the pre-ground coffee funnel". | |
PERMANENTLY ALIGHT BLINKING BLINKING | The "pre-ground coffee" function has been selected without placing any pre-ground coffee in the funnel | Place pre-ground coffee in the funnel or deselect the "pre-ground" function (fig. 12). |
| The pre-ground coffee funnel is clogged. Empty the funnel with the help of the brush (C5) as described in section "16.8 Cleaning the pre-ground coffee funnel". | ||
 BLINKING BLINKING | The water circuit is empty | Press the icon (B15) to fill the water circuit. |
| PERMANENTLY ALIGHT | The inside of the appliance is very dirty Clean the machine thoroughly, as described in section "16. Cleaning". If the message is still displayed after cleaning, contact a customer service centre. | |
 BLINKING BLINKING | The infuser (A8) has not been replaced after cleaning | Insert the infuser as described in section "16.9 Cleaning the infuser". |
 PERMANENTLY ALIGHT PERMANENTLY ALIGHT | Indicates that the machine must be descaled | Descaling is required. Press ESC (B14) to postpone descaling or press the icon (B15) to start the procedure (see section "17. Descaling"). |
| PERMANENTLY ALIGHT | Indicates that the machine must be descaled | The descaling procedure needs to be performed as soon as possible (see section "17. Descaling"). |
 BLINKING BLINKING | Indicates that descaling is in progress. Wait until the procedure has been completed (see section "17. Descaling"). | |
| INDICATOR LIGHTS DISPLAYED | POSSIBLE CAUSE REMEDY | |
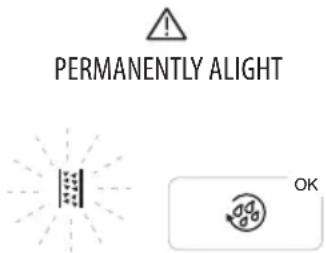 BLINKING BLINKING | Descaling has been interrupted. | The procedure must be completed before the machine can be used. Press the 6K icon (B15) to start the procedure. |
22. TROUBLESHOOTING
Below is a list of some of the possible malfunctions.
If the problem cannot be resolved as described, contact customer services.
| PROBLEM POSSIBLE CAUSE REMEDY | ||
| The appliance does not come on | It is not plugged into the mains socket. Connect | the plug to the power socket. |
| The coffee is not hot. The cups were not preheated. Warm the cups by rinsing them with hot water (Please note: you can use the hot water function). | ||
| Coffee temperature setting too low. Set a higher coffee temperature in the menu. | ||
| The coffee is weak or not creamy enough. | The coffee is ground too coarsely. Turn the grinding adjustment dial (A5) one click anticlockwise towards 1 while the coffee mill is in operation (fig. 7). Continue one click at a time until coffee delivery is satisfactory. The effect is only visible after delivering 2 coffees (see section “13.1 Adjusting the coffee mill”). | |
| The coffee is unsuitable. Use coffee for espresso machines. | ||
| Coffee not fresh. The coffee pack has been opened for too long and has lost its taste. | ||
| → | ||
| The coffee is delivered too slowly or a drop at a time. | The coffee is ground too finely. Turn the grinding | adjustment dial (A5) one click clockwise towards "7" while the coffee mill is in operation (fig. 7). Continue one click at a time until coffee delivery is satisfactory. The effect is only visible after delivering 2 coffees (see section "13.1 Adjusting the coffee mill"). |
| The appliance will not make coffee | The appliance has detected impurities in its internal circuits. | Wait for the appliance to be ready again and reselect the required beverage. Contact customer services if the problem persists. |
| Coffee does not come out of one or both spouts. | The coffee spouts (A9) are blocked. Clean the nozzles with a cloth. Any encrusted deposits can be removed with a toothpick, if necessary. | |
| The infuser (A20) cannot be removed | The appliance has not been turned off correctly | Turn the appliance off by pressing the button (A7) (fig. 6) (see section "5. Turning the appliance off"). |
| At the end of descaling, the appliance requests a third rinse | During the two rinse cycles, the water tank has not been filled to the MAX level. | Follow the instructions displayed by the appli-ance, but first empty the drip tray (A15) to avoid the water overflowing. |
| The frothed milk has large bubbles | The milk is not cold enough or is not semi-skimmed. | Use skimmed or semi-skimmed milk at refrigerator temperature (about 5°C). If the result is not as you wished, try changing brand of milk. |
| The froth adjustment dial (D1) is incorrectly adjusted. | Adjust following the instructions in section "14.2 Adjusting the amount of froth" | |
| The milk container lid (D2) or froth adjustment dial (D1) are dirty | Clean the milk container lid and control knob as described in the section "16.10 Cleaning the milk container". | |
| The hot water connection nozzle (A8) is dirty Clean the connection nozzle as described in section "16.11 Cleaning the hot water nozzle" | ||
| The milk does not come out of the milk spout (D5) | The lid (D2) of the milk container lid is dirty | Clean the milk container lid as described in sec-tion "16.10 Cleaning the milk container" |

Register Now

www.delonghi.com/register

- BEAN TO CUP ESPRESSO
- AND CAPPUCCINO MACHINE
- INSTRUCTION FOR USE
- CONTENTS
- INTRODUCTION
- DESCRIPTION
- SETTING UP THE APPLIANCE
- TURNING THE APPLIANCE ON
- TURNING THE APPLIANCE OFF
- SETTING WATER HARDNESS
- SETTING TEMPERATURE
- AUTO-OFF
- ENERGY SAVING
- BEEP
- DEFAULT VALUES (RESET)
- RINSING
- MAKING COFFEE
- MAKING CAPPUCCINOS AND MILK-BASED COFFEES
- DELIVERING HOT WATER
- CLEANING
- DESCALING
- WATER SOFTENER FILTER
- TECHNICAL DATA
- EXPLANATION OF LIGHTS
- TROUBLESHOOTING
- LETTERS IN BRACKETS
- TROUBLESHOOTING AND REPAIRS
- DESCRIPTION OF THE APPLIANCE
- DESCRIPTION OF CONTROL PANEL
- DESCRIPTION OF THE ACCESSORIES
- DESCRIPTION OF THE MILK CONTAINER
- PLEASE NOTE
- DANGER OF SCALDING
- IMPORTANT! DANGER OF SCALDING
- ADJUSTING THE COFFEE MILL
- TIPS FOR A HOTTER COFFEE
- MAKING COFFEE USING COFFEE BEANS
- IMPORTANT
- TEMPORARILY VARYING THE COFFEE AROMA
- PREPARING COFFEE WITH PRE-GROUND COFFEE
- CUSTOMIZING AROMA AND QUANTITY
- FILLING AND ATTACHING THE MILK CONTAINER
- ADJUSTING THE AMOUNT OF FROTH
- MAKING MILK BEVERAGES AUTOMATICALLY
- CUSTOMIZING MILK BEVERAGES
- CLEANING THE MILK CONTAINER AFTER USE
- CLEANING THE MACHINE
- CLEANING THE INTERNAL CIRCUIT
- CLEANING THE COFFEE GROUNDS CONTAINER
- CLEANING THE DRIP TRAY AND CONDENSATE TRAY
- CLEANING THE INSIDE OF THE MACHINE
- DANGER OF ELECTRIC SHOCK
- CLEANING THE WATER TANK
- CLEANING THE COFFEE SPOUTS
- CLEANING THE PRE-GROUND COFFEE FUNNEL
- CLEANING THE INFUSER
- CLEANING THE MILK CONTAINER
- CLEANING THE HOT WATER NOZZLE
- MEASURING WATER HARDNESS
- INSTALLING THE FILTER
- REPLACING THE FILTER
- TIPS FOR ENERGY SAVING
Brand : DELONGHI
Model : Dinamica ECAM350.50.B
Category : Coffee machine