
R4 MultiTrak - Uncategorized ZOOM - Free user manual and instructions
Find the device manual for free R4 MultiTrak ZOOM in PDF.


| Manufacturer | Zoom |
| Model | R4 MultiTrak |
| Product Type | Portable Multitrack Recorder |
| Recording Capability | Up to 4 simultaneous tracks |
| Built-in Microphones | Stereo condenser microphones |
| Audio Inputs | 2 combo XLR/TRS with +48V phantom power |
| Audio Outputs | 1/8" stereo headphone/line output |
| Sample Rate | Up to 96 kHz / 32-bit float |
| Storage Media | SD/SDHC/SDXC (up to 1 TB) |
| Display | 2.8" TFT color LCD |
| Built-in Effects | Reverb, delay, compressor, amp simulation |
| Power Source | 4 x AA batteries or USB-C bus power |
| Battery Life | Approximately 10 hours (AA alkaline) |
| Connectivity | USB-C (audio interface, file transfer), headphone out, line out |
| Dimensions | Approx. 70 x 138 x 34 mm |
| Weight | Approx. 280 g (without batteries) |
| Included Accessories | USB-C cable, AA batteries (test), quick guide |
| Maintenance & Cleaning | Wipe with soft, dry cloth; avoid liquids and dust |
| Safety | Remove batteries if not used for long periods; keep away from moisture |
| Spare Parts & Repairability | User-replaceable SD card and batteries; internal repairs by Zoom service center |
Frequently Asked Questions - R4 MultiTrak ZOOM
User questions about R4 MultiTrak ZOOM
0 question about this device. Answer the ones you know or ask your own.
Ask a new question about this device
Download the instructions for your Uncategorized in PDF format for free! Find your manual R4 MultiTrak - ZOOM and take your electronic device back in hand. On this page are published all the documents necessary for the use of your device. R4 MultiTrak by ZOOM.
USER MANUAL R4 MultiTrak ZOOM
You must read the Usage and Safety Precautions before use.
©2023 ZOOM CORPORATION
Copying or reprinting this manual in part or in whole without permission is prohibited.
Product names, registered trademarks and company names in this document are the property of their respective companies. All trademarks and registered trademarks in this document are for identification purposes only and are not intended to infringe on the copyrights of their respective owners.
Proper display is not possible on grayscale devices.
Notes about this Operation Manual
You might need this manual in the future. Always keep it in a place where you can access it easily.
- The contents of this document and the specifications of the product could be changed without notice.
- The illustrations and display screens in this document could differ from the actual product.
- Recording from copyrighted sources, including CDs, records, tapes, live performances, video works and broadcasts, without permission of the copyright holder for any purpose other than personal use is prohibited by law. Zoom Corporation will not assume any responsibility related to infringements of copyrights.
Trademarks
- Microsoft and Windows are trademarks of the Microsoft group of companies.
- iPadOS, Lightning and Mac are trademarks of Apple Inc.
- IOS is a registered trademark or trademark of Cisco Systems, Inc. and associated companies in the USA and other countries and is used under license.
• The microSDXC logo is a trademark of SD-3C LLC. - USB Type-C is a trademark of the USB Implementers Forum.
Terms used in this manual
- Effect
A wide variety of effects can be applied to sounds, including distortion, chorus and reverb. By adjusting effect parameters, you can create your own original sounds.
- Bounce
This is the process of combining audio data from multiple tracks or files into one stereo or mono file. The R4 is a 4-track multitrack recorder (MTR). By combining the audio already recorded on tracks 1–4 into a separate track called the bounce track, however, additional new recordings can be added. The bounce track can be layered repeatedly.
- Project
The R4 manages recording and playback data in units called projects. The audio files assigned to tracks, panning and other settings, are saved in project files. Up to 1000 projects can be created on a single card.
- Multitrack recorder (MTR)
A recorder that can record and play multiple tracks is called a multitrack recorder (MTR). The R4 can simultaneously record up to 2 tracks and simultaneously play up to 4 tracks.
Notes about this Operation Manual....2
Terms used in this manual....3
R4 overview....6
Achieving high audio quality throughout recording and editing....6
Functions of parts....10
Overview of screens that appear....15
Using menu screens.... 16
Recording process....19
Making preparations....22
Inserting microSD cards....22
Supplying power....23
Connecting input equipment....25
Turning the power on/off 27
Setting up when first turned on....28
Using the tuner....30
Tuner type options....32
Setting the rhythm (pattern/click)....33
Rhythm pattern types....34
Recording....35
Opening projects.... 35
Making input settings....37
Making track settings....41
Starting and stopping recording....43
Partially re-recording (punch-in recording)......44
Combining recorded tracks in a bounce track (bouncing)...... 46
Using effects....48
Using insert effects.... 49
Using send effects....52
Playing recordings....54
Starting and stopping playback.... 54
Managing projects....55
Folder and file structure on microSD cards....55
Opening the Project Menu....57
Changing project names.... 58
Duplicating projects....60
Deleting projects....62
Assigning files to tracks....64
Exporting projects as audio files.... 66
Deleting files....69
Using as an audio interface....70
For Windows....70
Connecting computers, smartphones and tablets....71
Disconnecting from computers, smartphones and tablets....75
Transferring files to computers and other devices....76
Connecting computers, smartphones and tablets.... 76
Disconnecting from computers, smartphones and tablets....79
Managing microSD cards....80
Checking microSD card information....80
Formatting microSD cards....82
Testing microSD cards....84
Making various settings....86
Setting the date and time....86
Setting the type of batteries used....88
Setting display power saving....89
Setting the display brightness....90
Setting the function that automatically turns the power off....91
Restoring factory default settings....93
Managing the firmware....94
Checking the firmware versions....94
Updating the firmware....95
Checking the latest information about the R4....96
Appendix....97
Troubleshooting....97
Block diagram....99
Specifications.... 101
The R4 is a compact 4-track MTR designed for musicians that enables musical ideas to be captured anytime anywhere. The bounce function enables repeat recording to capture more than 4 tracks using the 2 XLR/TS combo inputs, the built-in mic and the onboard effects. 32-bit float technology frees you from monitoring levels when recording and allows you to focus on the creative aspects of music production.
Achieving high audio quality throughout recording and editing
With the dual A/D converter circuits and support for 32-bit float WAV files, the R4 can maintain the highest audio quality from recording to editing in a DAW or other software.
Recording
Dual A/D converter circuits enable recording sounds from quiet to loud without making gain adjustments.

Editing in DAWs and other software
Since 32-bit float WAV file format is used for recording, the same audio quality is retained during editing.

Dual A/D converter circuit overview
For each input circuit, the R4 has two A/D converters with different input gains. This design enables high-quality audio recording without the need to adjust gain settings, a step that is normally indispensable.
Providing amazing dynamic range
By combining two A/D converters, a wide dynamic range not possible with a single A/D converter has been realized.
![graph TD A["Conventional equipment"] --> B["Dual AD converters"] C["Airplane"] --> D["Drums"] E["Nearby thunder"] --> F["Drums"] G["Inside train"] --> H["Grand piano"] I["Shouting"] --> J["Grand piano"] K["Noisy street"] --> L["Chimes"] M["Ordinary conversation"] --> N["Chimes"] O["Whispering"] -->…](/content/2026/08/1607733/images/b85b071b4d3a6da1de93d0912cdf4696f064ea66cafacdb454175f6b65673877.jpg)
Switching between two A/D converters
The R4 constantly monitors data from the two A/D converters, and automatically selects the one that provides the best recording results.

32-bit float WAV file overview
32-bit float WAV files have the following advantages over conventional 16/24-bit WAV files. Thanks to these advantages, the sound quality during recording can be retained when editing afterward using a DAW or other software.
Resolution advantage
32-bit float WAV files have the advantage of being able to maintain high resolution even with quiet sounds. As a result, quiet sounds can be made louder when editing after recording without degrading their quality.
16/24-bit WAV

■32-bit float WAV

Clipping advantage
If a waveform sounds clipped when output from the R4 or in a DAW, it can be edited after recording to lower its volume and restore an unclipped waveform because the data in the 32-bit float WAV file itself is not clipped.
16/24-bit WAV
Clipped recording


Volume lowered
Still clipped

■32-bit float WAV
Clipped recording


Volume lowered
Not clipped

Functions of parts
Front and back
Front
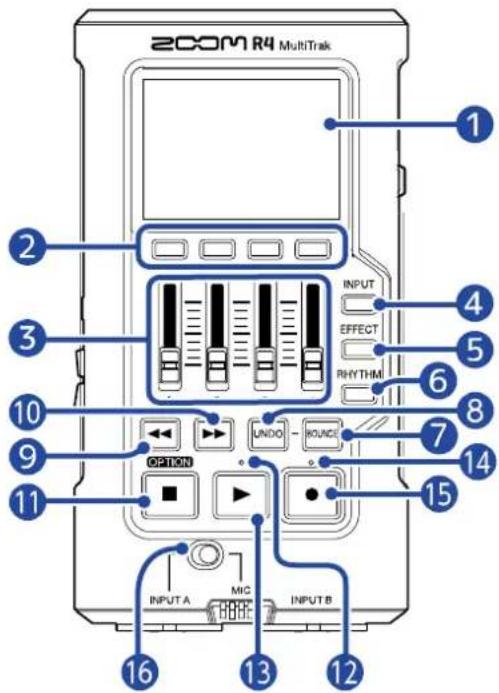
■ Back

1 Display
This shows various types of information.
2 TRACK/FUNCTION buttons
Use these to operate the icon shown at the bottom edge of the display.
3 Faders
Use these to adjust track signal levels.
4 INPUT button
This opens the INPUT SELECT Screen.
→ Selecting tracks for recording
5 EFFECT button
This opens the Effect Setting Screen.
→ Using effects
6 RHYTHM button
This opens the Rhythm Screen.
→ Setting the rhythm (pattern/click)
7 BOUNCE button
Use this to combine (bounce) 4 tracks that have already been recorded in the BOUNCE track and clear tracks 1–4.
8 UNDO button
Restore recordings to the state just before the previous bounce.
9 Search backward button
Press briefly to move the playback position backward. Press continuously to move backward rapidly.
10 Search forward button
Press briefly to move the playback position forward. Press continuously to move forward rapidly.
11 Stop button
Press this to stop recording and playback.
Press when stopped to move the playback position to the file beginning.
Press and hold when stopped to show the Option Menu at the bottom of the display. (The option menu is shown while this is being pressed.)
12 Play indicator
This lights during playback.
13 Play button
This starts file playback.
14 Recording indicator
This lights during recording.
15 Record button
This starts recording.
16 INPUT A/MIC (built-in) switch
| Switched to INPUT A Sound from the device connected to the INPUT A jack will be input. | |
| Switched to MIC Sound from the built-in | mic will be input. |
17 Battery cover
Open this when installing or removing AA batteries.
18 Tripod mounting threads
This can be used to attach the R4 to a tripod, for example. The diameter is 1/4 inch.
Left, right and front sides
■ Right side

■ Left side

1 USB port (Type-C)
Connect this to a computer, smartphone or tablet to transfer files or use as a USB audio interface. This supports operation on USB bus power.
2 microSD card slot
Insert a microSD card here.
3 POWER button
This turns the power on/off.
4 Headphone/line out jack
Connect headphones with a stereo mini plug here.
5 VOLUME buttons
Use these to adjust the volume output from the headphone/line out jack.
Front

1 INPUT A jack
Connect a mic or instrument here. This can be used with XLR and TS connectors.
NOTE
The polarity assignments of the INPUT A and INPUT B jacks are as follows.

② Built-in mic
Use this to record acoustic instruments and vocals.
3 INPUT B jack
Connect a mic or instrument here. This can be used with XLR and TS connectors.
Overview of screens that appear
Home Screen
This screen appears whenever the unit is started (except the first time). This screen is shown during ordinary playback and recording.

Option Menu Screen
Press and hold when the Home Screen is open to show this. When this is shown, press a button to use the corresponding function.
When is released, this will stop being shown at the bottom of the display.

Settings Screen
Press store Option Menu Screen to open this.

Using menu screens
Menu screen operation example
In the following example, we explain the beginning of the procedures to switch USB connection mode.
- Press and hold when the Home Screen is open.
This opens the Option Menu.

- While pressing , press the TRACK/FUNCTION button beneath .

This opens the Settings Menu.
HINT
In the rest of this manual, this operation is written as "While pressing press."
SETTING
- Use the TRACK/FUNCTION buttons beneath and to move the cursor to "USB".

HINT
In the rest of this manual, this operation is written as "Use

4. Press the TRACK/FUNCTION button beneath . ENTER

This selects the item and switches the screen.
HINT
In the rest of this manual, this operation is written as "Use

5. Use and to select "Audio Interface" and use to confirm.
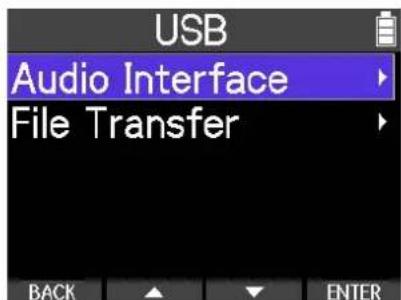
This selects the item and switches the screen.
ENTER
Returning to the previous screen
1. Press the TRACK/FUNCTION button beneath . BACK

This reopens the previous screen.
Returning to the Home Screen
1. Press the INPUT, or EFFECT button. RHYTHM

This closes the menu and reopens the Home Screen.
Recording process
This chart illustrates a flow of operations from turning on the R4 to completing recording.
For detailed procedures, see the explanation pages for each operation.
| Prepare to record | Load microSD card and turn recorder power on | • Inserting microSD cards• Supplying power• Turning the power on |
| Make settings first time turned on | • Setting up when first turned on | |
| Create new project | • Creating new projects | |
Connect guitar and/or mic   | • Connecting input equipment | |
Select tracks for recording  | • Selecting tracks for recording | |
Connect headphones and adjust monitoring volume  | • Monitoring input/ playback sounds | |
Use effects Play rhythm patterns  | • Using insert effects• Setting the rhythm (pattern/click) | |
| Record | Record | Starting and stopping recording |
| Stop recording and play back to check | Starting and stopping playbackReturn to the step with the above and repeat the procedures to record additional tracks as necessary. | |
| Adjust levels of each trackThe following can also be done.Apply echo/reverbAdjust EQ | Making track settings | |
| To re-record just one part...Record using punch in/out | Partially re-recording (punch-in recording)Return to the step with the above and repeat the procedures to record additional tracks as necessary. | |
| When tracks 1-4 are already used...Combine tracks in BOUNCE track | Combining recorded tracks in a bounce track (bouncing)Return to the step with the above and repeat the procedures to record additional tracks as necessary. | |
| Export project as audio file | Exporting projects as audio files |
Record
| Playback and check | Playback and checkexported audio file | • Starting and stopping playback |
An SD card is always necessary when recording.
Inserting microSD cards
- When the power is off, open the microSD card slot cover. Then, insert a microSD card with its connectors facing down all the way into the slot.

To remove a microSD card, push it further into the slot and then pull it out.
- Close the microSD card slot cover.
NOTE
• Always make certain that the power is off when inserting or removing a microSD card. Inserting or removing a card while the power is on could result in data loss.
- When inserting a microSD card, be sure to insert it with the correct orientation and side up.
- Recording and playback are not possible when a microSD card is not loaded in the R4.
- Always format microSD cards in order to maximize their performance after purchasing them new or using them with a different device. (→ Formatting microSD cards)
- The supported recording media are as follows.
microSDHC: 4 GB - 32 GB
microSDXC: 64 GB - 1 TB
Supplying power
The R4 can be operated using power from a power supply connected to the USB port (AC adapter, USB bus power or portable battery) or AA batteries.
A power supply connected to the USB port will be used instead of AA batteries when available.
Installing batteries
To power the R4 with batteries, install 4 AA batteries.
- After turning off the power, remove the cover on the bottom and install the batteries.

- Reattach the bottom cover.
NOTE
- Use only one type of battery (alkaline, NiMH or lithium) at a time.
- Set the type of battery used correctly so that the amount of remaining battery charge can be shown accurately. (→ Setting the type of batteries used)
- If the batteries lose their charge, turn the power off immediately and install new batteries. The remaining battery charge is always shown (on most screens) when operating on battery power.
Connecting an AC adapter
Connect the cable of the specified AC adapter (AD-17) to the USB port (Type-C). Then, plug the AC adapter into an outlet.

Using other power supplies
The R4 can be operated using bus power from a computer connected to the USB port (Type-C). A 5V portable battery (commercially-available) can also be used for power.

Connecting input equipment
Connecting mics and guitars to INPUT A/B
Mics and guitars can be connected to the INPUT A and INPUT B jacks.
■ Connecting mics
Connect dynamic and condenser mics to the XLR plugs of INPUT A and INPUT B.

Phantom power can be supplied to condenser mics.
■ Connecting guitars and basses
Connect guitars and basses to the TS plugs of INPUT A and INPUT B.

NOTE Connect to the INPUT A jack to use the built-in effects of the R4 when recording.
■ Connecting synthesizers and other stereo output devices
When connecting a stereo output device, connect its L output jack to the INPUT A jack and its R jack to the INPUT B jack.
Two adjacent tracks can be stereo-linked. This enables two tracks to be handled as one stereo pair.
(→Enabling stereo linking)

Connection example
Recording audio is possible in the following kinds of situations.
Overdubbing electric guitar, bass, vocals and other parts by one person
A rhythm track prepared and loaded in advance or one of the rhythm sounds included in the R4 can be played along with while recording guitar.
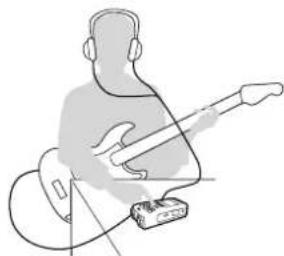
Recording acoustic guitar and vocals with two people and overdubbing chorus
parts
By layering recordings, this can be utilized fully in small-scale music production.

Turning the power on/off
Turning the power on
- Press until the recording and playback indicators light.

After the startup screen appears on the display, the Home Screen will open.

The first time the power is turned on after purchase, as well as after the R4 has been reset to factory defaults, screens to set the date and time, for example, will open. Make the settings when they do.
→ Setting up when first turned on
NOTE
- The R4 can be set to automatically turn off if it is not used for a specific amount of time. (→ Setting the function that automatically turns the power off)
- If "No SD Card!" appears on the display, confirm that a microSD card is inserted properly. (→ Inserting microSD cards)
- If "Invalid SD Card!" appears on the display, the card is not formatted correctly. Format the microSD card or use a different card. (→ Formatting microSD cards, Inserting microSD cards)
Turning the power off
- Press and hold . POWER
The display will become blank and the power will turn off.
NOTE
The R4 is saving the current settings while "Saving data..." is shown. Do not disconnect the AC adapter or remove batteries while "Saving data..." is shown.
Setting up when first turned on
The first time the power is turned on after purchase, as well as after the R4 has been reset to factory defaults, the initial setting screens will open. Make the various settings.
- Setting the date and time The date and time are included in recording files.
- Setting the type of batteries used Select the type of battery used in the R4 so that the amount of remaining battery charge can be shown accurately.
- Use and to select the desired setting, and use to confirm.
ENTER
![Date/Time YYYY MM DD [2023] 01 01 00 : 00 OK ENTER](/content/2026/08/1607733/images/f8c6a39a665622ddd3a19f0b2d62f3eade9dc8e271fbbcd52043ae45a0447033.jpg)
- Use and to select a setting value, and use to confirm.


-
Repeat steps 1–2 to set the date and time.
-
After setting all items, use and to select, and use to confirm.


NOTE
If power is not supplied for a while, the stored date and time settings will be reset. If the Date/Time Setting Screen appears during startup, set them again.
HINT
The date and time setting can also be changed later from the Menu screen. (→ Setting the date and time)
5. Use and to select the battery type, and use to confirm.

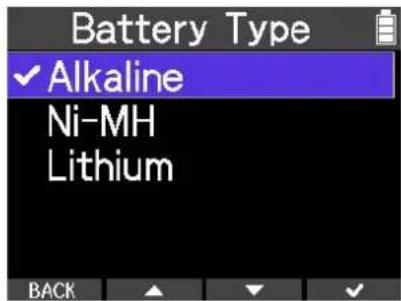
| Setting Explanation | |
| Alkaline Alkaline batteries | |
| Ni-MH Nickel-metal hydride batteries | |
| Lithium Lithium batteries |
HINT
The battery type setting can also be changed later from the Menu screen. (→ Setting the type of batteries used)
Using the tuner function, you can tune guitars and other instruments.
- Press and hold when the Home Screen is open.
This opens the Option Menu.

- While pressing , press . TUNER
This opens the Tuner Screen.
NOTE
Sound through the input selected by the INPUT A/MIC (built-in) switch will be detected by the tuner.
- Press, and to set each of the items, CALIB
Press these buttons to cycle through their setting values.

Setting values
| Button Explanation |
| TYPE This selects the tuner type, for example, chromatic. |
| FLAT Flat tuning of up to three semitones is possible. |
| CALIB This sets the standard pitch of A. |
NOTE
- Flat tuning cannot be used when the tuner type is "Chromatic".
• The standard pitch can be set from 435 to 445 Hz.
4. Play the open string that you want to tune and adjust its pitch.
The pitch detuning with the nearest note name or string number will be shown. If the pitch is low

If the pitch is high

Tuner type options
| String number/noteDisplay Explanat | ||||||||
| 7 6 | 5 4 3 2 | 1 | ||||||
| Chromatic The name of the nearest note (in semitones) and the amount of detuning are shown. | - - - | - - - - | ||||||
| Guitar Standard guitar tuning with a 7th string B E A D G B E | ||||||||
| Bass Standard bass guitar tuning with a 5th string | -- B | E A D G | ||||||
| Open A Open A tuning (open strings play A chord) | - E A | E A C# | E | |||||
| Open D Open D tuning (open strings play D chord) | - D A | D F# | A D | |||||
| Open E Open E tuning (open strings play E chord) | - E B | E G# | B E | |||||
| Open G Open G tuning (open strings play G chord) | - D G | D G B | D | |||||
| DADGAD | Alternate tuning often used for tapping and other techniques | - D A | D G A | D | ||||
Setting the rhythm (pattern/click)
A pattern, click or other sound can be played as a guideline to make keeping time easier when recording an instrument or during playback.
-
Press on the Home Screen. This opens the Rhythm Screen.
-
Use and to select the item to adjust, and use to confirm.

1 This sets whether the rhythm pattern is on or off during recording/playback.
② This sets the rhythm pattern.
3 This sets the tempo.
4 This sets the volume of the rhythm.
5 This sets the precount.
- Use and to change the setting value, and use to confirm.

- When finished making settings, press RHYTHM This reopens the Home Screen.
NOTE
If Rhythm playback or the Pre Count is on, the playback position format shown on the Home Screen will change to bars and beats.
Rhythm pattern types
| Number Pattern name | Time signature | Number Pattern name | Time signature | Number Pattern name | Time signature |
| 1 GUIDE 4/4 29 R&B2 4/4 57 Cajon1 4/4 | |||||
| 2 Click 4/4 4/4 30 70's Soul 4/4 58 Cajon2 4/4 | |||||
| 3 Click 3/4 3/4 31 90s Soul 4/4 59 Cajon3 4/4 | |||||
| 4 Click 5/4 5/4 32 Motown 4/4 60 Bossa1 4/4 | |||||
| 5 Click 1/4 1/4 33 HipHop 4/4 61 Bossa2 4/4 | |||||
| 6 8Beats1 | 4/4 | 34 Disco | 4/4 | 62 Samba1 | 4/4 |
| 7 8Beats2 | 4/4 | 35 Pop | 4/4 | 63 Samba2 | 4/4 |
| 8 8Beats3 | 4/4 | 36 PopRock | 4/4 | 64 Salsa1 | 4/4 |
| 9 16Beats1 | 4/4 | 37 IndiePop | 4/4 | 65 Salsa2 | 4/4 |
| 10 16Beats2 | 4/4 | 38 EuroPop | 4/4 | 66 CubaGrv1 | 4/4 |
| 11 16Beats3 | 4/4 | 39 NewWave | 4/4 | 67 CubaGrv2 | 4/4 |
| 12 Rock1 | 4/4 | 40 OneDrop | 4/4 | 68 Djembe1 | 4/4 |
| 13 Rock2 4/4 41 Steppers 4/4 69 Djembe2 4/4 | |||||
| 14 Rock3 | 4/4 | 42 Rockers | 4/4 | 70 Breaks1 | 4/4 |
| 15 ROCABLY | 4/4 | 43 Ska | 4/4 | 71 Breaks2 | 4/4 |
| 16 R'n'R | 4/4 | 44 2nd Line | 4/4 | 72 Breaks3 | 4/4 |
| 17 HardRock | 4/4 | 45 Country | 4/4 | 73 House | 4/4 |
| 18 HeavyMtl | 4/4 | 46 Shuffle1 | 4/4 | 74 Techno1 | 4/4 |
| 19 MtlCore | 4/4 | 47 Shuffle2 | 4/4 | 75 Techno2 | 4/4 |
| 20 Punk | 4/4 | 48 Blues1 | 4/4 | 76 DanceHall | 4/4 |
| 21 FastPunk | 4/4 | 49 Blues2 | 4/4 | 77 12/8 Grv | 12/8 |
| 22 Emo | 4/4 | 50 Jazz1 | 4/4 | 78 Waltz | 3/4 |
| 23 TomTomBt | 4/4 | 51 Jazz2 | 4/4 | 79 JazWaltz1 | 3/4 |
| 24 Funk1 | 4/4 | 52 NuJazz1 | 4/4 | 80 JazWaltz2 | 3/4 |
| 25 Funk2 | 4/4 | 53 NuJazz2 | 4/4 | 81 CtWalz1 | 3/4 |
| 26 FunkRock | 4/4 | 54 Fusion | 4/4 | 82 CtWalz2 | 3/4 |
| 27 JazzFunk | 4/4 | 55 Swing1 | 4/4 | 83 5/4 Grv | 5/4 |
| 28 R&B1 4/4 56 Swing2 4/4 | |||||
Opening projects
Creating new projects
- Press and hold when the Home Screen is open.
This opens the Option Menu.

- While pressing , press . NEW PRJ

This creates a new project and returns to the Home Screen.
NOTE
After creating a project, its name can be changed and files can be assigned to its tracks. (→ Managing projects)
Opening existing projects
-
Open the project menu.
(→ Opening the Project Menu) -
Use and to select "Project List" and use to confirm.
ENTER

This opens the Project List Screen.
- Use and to select the item to change, and use to confirm.
ENTER

This opens the options menu for the project.
- Select "Open".
This loads the selected project.

Making input settings
Connecting input equipment
Connect mics and guitars, for example.
NOTE
The R4 supports Hi-Z input. Guitars, for example, can be connected directly.
- Connect the equipment to be recorded to INPUT A or INPUT B.

- Set the INPUT A/MIC (built-in) switch.
Select whether the input source is the INPUT A jack or the built-in mic.

NOTE
When set to MIC, INPUT A will be shown as "MIC" on the INPUT SELECT Screen.
Selecting tracks for recording
The tracks that record INPUT A and INPUT B can be assigned.
Input Select Screen

1 Current status of each track
The colors show the current status of each track.
1 Track that is currently recording or in recording standby
1 Empty track
1 Track that has previously recorded audio
2 Input assigned to each track
INPUT A is assigned to track 1, and INPUT B is assigned to track 2 in the example above.
-
Select the input to assign to each track.
-
Press to stop recording.
- Press INPUT on the Home Screen.
Press the button to cycle through the input sources that can be assigned to the track.

Select input sources according to the connected equipment
| Setting Explanation | |
| - | Use when nothing is connected (when not recording) |
| INPUT A | Use when connecting a guitar or dynamic mic to the INPUT A jack |
| INPUT A | Use when connecting a condenser mic to the INPUT A jack |
| INPUT B | Use when connecting a dynamic mic to the INPUT B jack |
| INPUT B | Use when connecting a condenser mic to the INPUT B jack |
NOTE
• Each INPUT can only be assigned to a single track. (An INPUT cannot be assigned to multiple tracks.)
- Phantom power will be supplied if OUTPUT A SELECT EQUIP ELECT these when connecting equipment that requires phantom power.
- Do not supply phantom power to equipment that is not compatible with it. Doing so could damage the equipment.
Monitoring input/playback sounds
- Make input settings and connect equipment.
→ Selecting tracks for recording
→ Connecting input equipment
2. Connect headphones.

3. Input audio from connected equipment.
To listen to the sound of already recorded tracks, press the button to play them.
4. Adjust the volume.

The volume level is shown at the left side of the screen while the volume is being adjusted.

Enabling stereo linking
Two adjacent tracks can be stereo-linked. This enables two tracks to be handled as one stereo pair.
- Stereo links can only be set for track pairs 1/2 and 3/4.
-
Stereo-linked tracks have the following characteristics.
-
Odd-numbered tracks are assigned to the L channel while even-numbered tracks are assigned to the R channel, and the PAN setting is disabled.
- The fader of the odd-numbered track adjusts the volume. The fader of the even-numbered track has no effect.
- The following parameters are linked.
Fader, EQ (High/Middle/Low), Echo, Reverb
NOTE
Even if stereo-linked tracks are recorded, the recording data for each track will be saved as mono files.
In the following example, we explain how to stereo-link tracks 1 and 2.
- When the Home Screen is open, simultaneously press the TRACK/FUNCTION buttons beneath the two tracks to be stereo-linked.

The stereo-linking icon will appear on the screen.

Repeat the same procedure to disable the stereo link.
NOTE
The stereo-linking setting cannot be changed during recording or playback.
Making track settings
The equalizer, left-right balance and effects can be set for each track.
NOTE
These track settings do not affect the recorded data itself. They are applied to the sound when it is played back. However, these effects are applied when tracks are bounced. (For details about the bounce function, see "Combining recorded tracks in a bounce track (bouncing)").
- When the Home Screen is open press the TRACK/FUNCTION button beneath the track that you want to set.

This opens the Track Settings Screen.
- Use and to select the item to adjust, and use to confirm.
ENTER

1 These adjust the High, Middle and Low frequency equalizer bands.
② This adjusts the left-right balance.
3 This adjusts the amount of echo (sound heard after a delay).
4 This adjusts the amount of reverb (sound of reverberations).
- Use and to change the setting value, and use to confirm.

- When finished making settings, press BACK This reopens the Home Screen.
5. Making settings for other tracks.
Repeat from step 1 to make desired settings for other tracks.
Equalizer setting values
- High

This adjusts the boost/cut of high-frequency equalization.
Type: shelving
Gain range: -15 dB - +15 dB
Frequency: 10 kHz
- Middle

This adjusts the boost/cut of mid-frequency equalization.
Type: peaking
Gain range: -15 dB - +15 dB
Frequency: 2.5 kHz
- Low

This adjusts the boost/cut of low-frequency equalization.
Type: shelving
Gain range: -15 dB - +15 dB
Frequency: 100 Hz
Starting and stopping recording
1. Press the button.
When recording starts to a track selected as a recording destination, the recording indicator will light.

The elapsed recording time is shown while recording.
2. Press the button to stop recording.
Recording will stop.
NOTE
Bouncing/exporting is not possible if a track exceeds a maximum recording time of 93 minutes.
Partially re-recording (punch-in recording)
Punching in/out is a function that can be used to rerecord parts of already recorded tracks. "Punching in" is switching track status from playback to recording. "Punching out" is switching track status from recording to playback.
Pressing during playback will start re-recording from that position.
Overview of punch in/out recording

- Determine the track to be re-recorded and make input settings.
On the Input Select Screen, select “—” for all tracks that will not be re-recorded.
→ Making input settings
HINT
The key to successfully re-recording with good sound is to have conditions, including mic distance and guitar volume, be as similar to in the original recording as possible.
- Move the playback position to a little before where you want to start the re-recording.
→ Starting and stopping playback
HINT
When punching in, starting to sing or play a little before the point where you actually want to start re-recording will make the transmission smoother when recording starts from that point.
- Press the button to start playback.
→ Starting and stopping playback
-
Press the button at the desired position to start recording.
-
Press the button at the desired position to stop recording.
This will stop recording, but playback will continue.
- Press the button to stop playback.
- Press the button to play the recorded part.
Combining recorded tracks in a bounce track (bouncing)
"Bouncing" is a function for mixing multiple tracks and recording them to another track called a "bounce track".
NOTE
• The maximum number of bounces is 99.
- If bouncing is conducted when rhythm pattern playback is enabled, the rhythm pattern will also be mixed into the bounce track.
- Bouncing is not possible if a track exceeds a maximum recording time of 93 minutes.
- Press to stop recording.
- Press BOUNCE on the Home Screen.
- Use and to select the type of bounce and use to confirm.

ENTER
- Quick Bounce
This quickly executes the bounce. Sound cannot be adjusted while bouncing.
• Real Time Bounce
Bouncing occurs as the actual recorded audio is processed in real-time. Select this if you want to adjust track signal levels by operating the faders while bouncing.

The Bounce Screen will open.
After bouncing completes, tracks 1–4 will become empty.

Select to cancel bouncing.
- Press the button to play the Bounce track.
Confirm that the result of bouncing is as intended.
If it is not as desired, press the button to restore the state immediately before bouncing.
The R4 includes effects that are equivalent to those in ZOOM multi-effects products. A variety of effects can be combined and used on sounds.
The R4 has two main effect types.
| Display Effect type Sound affected | |
| INPUT A/MIC Effect Insert effect | This only affects sound input from INPUT A or the built-in mic.This is only applied when recording. It does not affect sound after recording. |
| Echo/Reverb Send effect | This is set for tracks.This does not affect recorded files. |
Illustration of these two effect types
![graph TD A["INPUT A"] --> B["Insert effects"] B --> C["Sound input through INPUT A or built-in mic"] C --> D["Recording data on tracks 1–4"] D --> E["Send effects"] E --> F["Playback sound of tracks 1–4"] F --> G["Playback sound from headphone output"]](/content/2026/08/1607733/images/e300d74b975a2c9e0ec89b9a1e2a0f21d84063eeff67aba8c21544253807979d.jpg)
Using insert effects
Effects can be set for use on INPUT A or the built-in mic during recording. Two effects can be chosen from dozens of types and their parameters can be adjusted. Settings and adjusted effects are saved with each project.
NOTE
Insert effects are applied to the input selected with the INPUT A/MIC (built-in) switch.
Setting effects
- Press EFFECT on the Home Screen.
This opens the insert effect setting screen.
- When the cursor is on the effect name, press . ENTER
![Input A/MIC Effect 1079 PREAMP [Preamp-1] Drive Tone COMP-1 Sense Attack BACK ENTER](/content/2026/08/1607733/images/952c7cfab9c78fcc410bbdc8561d9065cfcf2cab301f91eba23887e2612f21b8.jpg)
- Use and to select the effect type and use to confirm.

NOTE
See the ZOOM website (zoomcorp.com) for details about effects.
- Use to move the cursor to the first parameter and use to select it. ENTER

- Use and to adjust the parameter and use to confirm.


- Use to move the cursor to the second parameter and use to select it. ENTER

- Use and to adjust the parameter and use to confirm.


- Select and move the cursor to the second effect.
- Repeat steps 2–7 and adjust the parameters of the second effect.
This reopens the Home Screen.
NOTE
Press when the cursor is on an effect icon to bypass that effect.


Using send effects
The two types of effects that can be used as send effects are Echo and Reverb.
Adjusting the amount of Echo/Reverb
- Open the track settings and adjust the Echo or Reverb level.
→ Making track settings

Adjusting Echo/Reverb parameters
- Press to stop recording/playback.
- Press and hold when the Home Screen is open.
This opens the Option Menu.

- While pressing , press . SETTING
This opens the Settings Menu.
- Use and to select "Echo/Reverb" and use to confirm.
ENTER

This opens the Echo/Reverb Settings Screen.
- Use and to select an item, and use to confirm.
ENTER

- Use and to adjust the parameter.

| Item Setting explanation | |
| Echo Time This sets the delay | time of the echo. |
| Echo Repeat This sets the amount that the echo repeats. | |
| Reverb Decay This is the length of the reverb decay sound. | |
- Press . BACK
This reopens the Echo/Reverb Settings Screen.
Starting and stopping playback
1. Press .
This plays the selected file. Press this again to stop.

2. Press to stop playback.
This stops playback. Press this again when stopped to move the playback position to the file beginning.
Other playback operations
| Button Brief press While pressing continuously | ||
 | The playback position will move backward. | Search backward |
 | The playback position will move forward. | Search forward |
Projects created on the R4 are saved on the microSD card.
The names of projects saved on microSD cards can be changed. These projects can also be copied and deleted.
Folder and file structure on microSD cards
When recording with the R4, folders and files are created on microSD cards in the following manner.
![graph TD A["Root"] --> B["20230101_001.WAV"] A --> C["Shuffle_Drum.WAV"] D["R4_Project"] --> E["20230101_001"] D --> F["20230101_002"] D --> G["20230103_001"] H["TRACK1_01.WAV"] --> I["3"] J["TRACK2_01.WAV"] --> K["3"] L["TRACK3_01.WAV"] --> M["3"] N["R4PRJDATA.r4prj"] --> O["4"]](/content/2026/08/1607733/images/875d01b9a2dcf38d5bed866945af1a7d3155f2e70b38fed6faa559d239eb8799.jpg)
1 Exported audio file, WAV file for loading
Save audio files that you want to load on the R4 anywhere outside the R4_Project folder.
Exported audio files are saved in the Root folder as explained in "Exporting projects as audio files".
2 Project folders
These contain project recording data and settings.
Folders are created with names from "yyyymmdd_001" to "yyyymmdd_999".
3 Audio files recorded for each track
Audio files are created with names as follows.

① Track number
② Number of recording after bouncing or removing the assigned file
Example: After recording track 4, bouncing and then recording again, the file name would be
"TRACK4_02.WAV".
4 Project file
Project specific settings are saved in this file.
Opening the Project Menu
Manage projects on the Project Menu Screen.
- Press and hold when the Home Screen is open.
This opens the Option Menu.

- While pressing , press . SETTING
This opens the Settings Menu.
- Use and to select "Project" and use to confirm. ENTER

This opens the Project Menu Screen.
- Use and to select an item, and use to confirm. ENTER

Select to return to the previous screen.
Changing project names
-
Open the Project Menu. (→ Opening the Project Menu)
-
Use and to select "Project List" and use to confirm.
ENTER

This opens the Project List Screen.
- Use and to select the project to change, and use to confirm.
ENTER

This opens the options menu for the project.
- Select "Rename".

This opens the character input screen.
- Input the name.
Use and to select the character to input and use to confirm.
√

NOTE
Project names can have up to 13 characters.
6. Select when done inputting.
This reopens the Project List Screen.
Duplicating projects
-
Open the Project Menu. (→ Opening the Project Menu)
-
Use and to select "Project List" and use to confirm.
ENTER

This opens the Project List Screen.
- Use and to select the item to change, and use to confirm.
ENTER

This opens the options menu for the project.
- Select "Copy".

This opens the character input screen.
- Input the name.
Use and to select the character to input and use to confirm.


NOTE
Project names can have up to 13 characters.
6. Select when done inputting.
This completes duplication and reopens the Project List Screen.
Deleting projects
-
Open the Project Menu. (→ Opening the Project Menu)
-
Use and to select "Project List" and use to confirm.
ENTER

This opens the Project List Screen.
- Use and to select the item to delete, and use to confirm.
ENTER

This opens the options menu for the project.
- Select "Delete".

This opens a confirmation screen.
- Select "Delete".

This deletes the project and reopens the Project List Screen.
Assigning files to tracks
Recording files of existing projects and audio files saved on the microSD card can be assigned to a project. If you have received only audio files, for example, you can load them into an R4 project and continue production work.
- Open the project with tracks to which you want to assign files or create a new project.
(→ Opening existing projects)
(→ Creating new projects)
(→ Duplicating projects)
- Press and hold when the Home Screen is open.
This opens the Option Menu.

- While pressing , press . FILE
This opens the File Assign Menu.
- Use and to select the track for assignment, and use to confirm.
ENTER

- Use and to select an item, and use to confirm.
ENTER

| Setting Explanation |
| Project Load from an existing project |
| SD Card Load a file from the microSD card |
| Clear Track Remove the file assigned to the track |
NOTE
The file formats that can be assigned are WAV and MP3.
- Use to return to the previous screen.
Exporting projects as audio files
Projects can be exported as audio files. Exported audio files are saved in the root directory of the microSD card.
The following settings can be selected for exported files.
File format: WAV, MP3
Bit depth: 16-bit, 24-bit, 32-bit float
Normalization: Off, On
NOTE
- If exporting is conducted when rhythm pattern playback is enabled, the rhythm pattern will also be mixed into the audio file.
-
Exporting is not possible if a track exceeds a maximum recording time of 93 minutes.
-
Open the Project Menu.
(→ Opening the Project Menu)
- Use and to select "Export" and use to confirm.
ENTER

- Use and to select the desired file format for exporting, and use
ENTER to confirm.

- Use and to select the desired bit depth for exporting, and use to confirm.
ENTER

NOTE
When exporting as MP3, the bit depth is fixed at 128 kbps.
- Use and to select whether to normalize and use to confirm. Select "On" to normalize.
ENTER

HINT
Normalization is a function that determines the loudest volume of the audio data and raises the level as much as possible without causing distortion.
- Use and to select "Execute" and use to confirm.
ENTER

This starts exporting.

After it completes, the Project Menu Screen will reopen.
Deleting files
Audio files that are not needed can be deleted.
-
Open the Project Menu.
(→ Opening the Project Menu) -
Use and to select "File Delete" and use to confirm.
ENTER

This opens a file list screen.
- Use and to select the file to delete, and use to confirm.
ENTER

- Use and to select "Delete", and use to confirm.


Signals input through the R4 can be sent to a computer, smartphone or tablet, and signals played from these devices can be output from the R4.
No drivers are necessary for use with smartphones, tablets and Mac computers.
A driver is necessary for use with Windows.
For Windows
- Download the R4 Driver to the computer from zoomcorp.com.
NOTE
The latest R4 Driver can be downloaded from the above website.
- Launch the installer and follow the instructions to install the R4 Driver.
NOTE
See the Product Driver Installation Guide included in the driver package for detailed installation procedures.
Connecting computers, smartphones and tablets
1. Press and hold when the Home Screen is open.
This opens the Option Menu.

2. While pressing , press . SETTING
This opens the Settings Menu.
3. Use and to select "USB" and use to confirm.
ENTER

4. Use and to select "Audio Interface" and use to confirm.
ENTER

5. Use and to select the device being connected, and use to confirm.


| Setting Explanation | |
| PC/Mac Connect to a computer. | |
| Mobile Device Connect to a smartphone or tablet.Use batteries to power the R4. | |
NOTE
Bus power operation might not be possible depending on the USB bus power supply capability of the computer. In such cases, select "Mobile Device" and use batteries to power the unit.
- Use a USB cable (Type-C) to connect the R4 with a computer, smartphone or tablet.
![graph TD A["Device ①"] --> B["USB (Type-C)"] C["Device ②"] --> D["Device ③"] B --> E["USB Cable Link"] D --> F["Device ③"] style A fill:#f9f,stroke:#333 style C fill:#ccf,stroke:#333 style B fill:#cfc,stroke:#333 style D fill:#fcc,stroke:#333 style E fill:#ffc,stroke:#333 style F fill:#fcc,stroke:#3…](/content/2026/08/1607733/images/4d77c985587728e508cef2fc2df0bdc14a9c83256bed947edbaed7e11837745e.jpg)
1 Smartphone/tablet (Android/iPhone/iPad)
2 iPhone/iPad (Lightning connector)
3 Computer (Windows/Mac)
NOTE
- Use a USB cable that supports data transfer.
- A Lightning to USB 3 Camera Adapter is necessary to connect to an iOS/iPadOS device with a lighting connector.
Making mix settings for input audio
The USB audio signal routing can be set.
1. Press on the Audio Interface Screen.
Pressing switches it Off and On.
| Setting Screen Explanation | ||
| Off Sound |  | t to channel 1 andthrough INPUT B to channel 2 of the connected device as separate mono files. This is convenient when, for example, recording guitar and vocals as separate tracks in a DAW or other software. |
| On Sound |  | through INPUTB are mixed to mono and sent to the connected device as two channels. This is convenient when, for example, streaming a performance with guitar and vocals. |
Setting direct monitoring
This directly outputs the sound being input to the R4 before sending it to the computer, smartphone or tablet. This enables monitoring without latency.
Set this to "On" to enable the direct monitoring function.
1. Press on the Audio Interface Screen.
Pressing switches it On and Off.
![graph LR A["A"] -->|IN 1| B["B"] B -->|IN 2| A style A fill:#f9f,stroke:#333 style B fill:#bbf,stroke:#333](/content/2026/08/1607733/images/b6674668050367fb2e82d91dc79c6f7e9effc1f92f21d20a615d6c206e2b92a8.jpg)
Setting the bit depth
The bit depth used to send audio to a computer, smartphone or tablet can be set when this is used as an audio interface. 24-bit or 32-bit float can be selected.
1. Press on the Audio Interface Screen.
Pressing switches the bit depth.
![graph LR A["Input A"] -->|IN 1| B["Output B"] B -->|IN 2| C["Output C"] style A fill:#f9f,stroke:#333 style B fill:#f9f,stroke:#333 style C fill:#ccf,stroke:#333](/content/2026/08/1607733/images/8edfbe8a486044dd68887dd661252338ab394c43ff1712fbbada61929cd303a7.jpg)
NOTE
Precautions when using 32-bit float format
• Always confirm that the app being used on the computer, smartphone or tablet supports 32-bit float format before use.
- Before connecting the R4 to headphones or another external device, minimize the R4 headphone volume.
- A driver is necessary to use 32-bit float format with Windows. Download the driver from the ZOOM website (zoomcorp.com).
Disconnecting from computers, smartphones and tablets
1. Select on the Audio Interface Screen.
![graph TD A["Device A"] -->|1| C["+"] B["Device B"] -->|2| C["+"] C["+"] -->|IN 1| D["Computer"] C["+"] -->|IN 2| E["Computer"] style C fill:#f9f,stroke:#333 style D fill:#ccf,stroke:#333 style E fill:#ccf,stroke:#333](/content/2026/08/1607733/images/148a2f2dc30811da1fab94d7f2abec9f1b64f1c93dbefd32d44d4047908fe53b.jpg)
2. Use and to select "Exit" and use to confirm.


This disconnects from the computer, smartphone or tablet.
3. Disconnect the USB cable connecting the R4 and the computer, smartphone or tablet.
Transferring files to computers and other devices
When the R4 is connected to a computer, smartphone or tablet, files on the microSD card can be checked and moved.
Connecting computers, smartphones and tablets
- Press and hold when the Home Screen is open.
This opens the Option Menu.

- While pressing , press . SETTING
This opens the Settings Menu.
- Use and to select "USB" and use to confirm. ENTER

- Use and to select "File Transfer" and use to confirm.

- Use and to select the device being connected, and use to confirm.


| Setting Explanation | |
| PC/Mac Connect to a computer. | |
| Mobile Device Connect to a smartphone or tablet.Use batteries to power the R4. |
This opens the File Transfer Screen.
![graph LR A["Payment"] --> B["USB"] B --> C["Laptop"] C --> D["Mobile Device"] style A fill:#f9f,stroke:#333 style B fill:#ccf,stroke:#333 style C fill:#cfc,stroke:#333 style D fill:#fcc,stroke:#333](/content/2026/08/1607733/images/03810831ea1ebd9bcccce6156d717d82d115d22ce87dc53e2908bebdb6507bc6.jpg)
- Use a USB cable (Type-C) to connect the R4 with a computer, smartphone or tablet.
![graph TD A["Device ①"] --> B["USB (Type-C)"] C["Device ②"] --> D["Laptop"] E["Device ③"] --> F["Laptop"] B --> G["USB Cable Link"] D --> H["USB Cable Link"] G --> I["DC 5V"] H --> J["micro XC"] I --> K["POWER"] J --> L["micro XC"]](/content/2026/08/1607733/images/cd0183c4efe9ba9ca44c055f4dacfbc0d682faaea2256aad178a335bac72aed4.jpg)
1 Smartphone/tablet (Android/iPhone/iPad)
2 iPhone/iPad (Lightning connector)
3 Computer (Windows/Mac)
NOTE
- Use a USB cable that supports data transfer.
-
A Lightning to USB 3 Camera Adapter is necessary to connect to an iOS/iPadOS device with a lighting connector.
-
Use the computer, smartphone or tablet to work with files saved on the microSD card.
Disconnecting from computers, smartphones and tablets
1. Disconnect on the computer, smartphone or tablet.
- Windows: Select the R4 with "Safely Remove Hardware".
- macOS: Drag the R4 icon to the Trash and drop it.
- Smartphone/tablet: Refer to the operation manual of that device.
2. Press . BACK
![graph LR A["Card"] -->|USB| B["Laptop"] B --> C["Network"] C --> D["Back"]](/content/2026/08/1607733/images/b2e291b632411cf5124f0891f2ee8cf8f1204f73f9ed9a2b5a3db4cf05af71aa.jpg)
This opens a confirmation screen.
3. Use and to select "Execute" and use to confirm.

4. Disconnect the USB cable connecting the R4 and the computer, smartphone or tablet.
NOTE
Always conduct the ejection procedures in step 1 before disconnecting the USB cable.
Checking microSD card information
The open space on microSD cards can be checked.
- Press and hold when the Home Screen is open.
This opens the Option Menu.

- While pressing , press . SETTING
This opens the Settings Menu.
-
Use and to select "SD card" and use to confirm. ENTER Settings Project Echo/Reverb SD Card USB System BACK ENTER
-
Use and to select "Remaining" and use to confirm. ENTER SD Card Remaining Format Performance Test BACK ENTER
This shows the open space on the card.

Formatting microSD cards
To maximize the performance of a microSD card, use the R4 to format it.
NOTE
- If writing to the microSD card becomes slow and errors occur, backing up its data to a computer, for example, and formatting the card might improve performance.
- Be aware that all data on the microSD card will be deleted when it is formatted.
1. Press and hold when the Home Screen is open.
This opens the Option Menu.

2. While pressing , press . SETTING
This opens the Settings Menu.
3. Use and to select "SD card" and use to confirm.
ENTER

4. Use and to select "Format" and use to confirm.
ENTER

5. Use and to select "Execute" and use to confirm.


This formats the microSD card.
NOTE
- The microSD card formatting screen can also be opened by pressing while turning the power on.
• Always format microSD cards in order to maximize their performance after purchasing them new or using them with a different device.
Testing microSD cards
The writing speed of a microSD card can be tested to confirm performance has no issues when saving data recorded by the R4.
A Quick Test can be done in a short amount of time, while a Full Test examines the entire microSD card.
- Press and hold when the Home Screen is open.
This opens the Option Menu.
- While pressing, press.
This opens the Settings Menu.
- Use and to select an item, and use to confirm.
Proceed with the following selections.
SD Card > Performance Test
- Use and to select "Quick Test" or "Full Test", and use to confirm.
- Quick Test: This is a simple test that can be completed in a short amount of time
- Full Test: This test is more thorough than a quick test. The amount of time required for the test will be shown when it starts.
- Use and to select "Execute" and use to confirm.

The card performance test will start.

The result of the test will be shown when it completes.

HINT
- During the test, can be used to cancel it.
- During a full test, can be used to pause the test and to restart it. RESTART
6. After the test result is shown, press . BACK
This will return to the previous screen.
NOTE
Even if a performance test result is "OK", there is no guarantee that writing errors will not occur. This information is just to provide guidance.
Setting the date and time
Use this to set the date and time added to recording files.
- Press and hold when the Home Screen is open. This opens the Option Menu.

-
While pressing , press . SETTING This opens the Settings Menu.
-
Use and to select an item, and use to confirm. Proceed with the following selections. System > Date/Time

-
Use and to select an item, and use to confirm. ENTER Date/Time YYYY MM DD 2023 01 01 00 : 00 OK BACK ENTER
-
Use and to select a value, and use to confirm. Date/Time YYYY MM DD 2023 01 01 00 : 00 OK BACK - + ✓
-
Repeat steps 4–5 to set the date and time.
- After setting all items, use and to select, and use to confirm.


NOTE
If power is not supplied for a while, the stored date and time settings will be reset. If the Date/Time Setting Screen appears during startup, set them again.
HINT
The first time the power is turned on after purchase, this screen opens automatically.
Setting the type of batteries used
Select the correct type of battery used in the R4 so that the amount of remaining battery charge can be accurately shown.
- Press and hold when the Home Screen is open.
This opens the Option Menu.

- While pressing ,press . SETTING This opens the Settings Menu.
- Use and to select an item, and use to confirm. Proceed with the following selections. System > Battery Type
- Use and to select an item, and use to confirm. Battery Type ✓ Alkaline Ni-MH Lithium BACK
| Setting Explanation | |
| Alkaline Alkaline batteries | |
| Ni-MH Nickel-metal hydride batteries | |
| Lithium Lithium batteries |
HINT
The first time the power is turned on after purchase, the Battery Type setting opens automatically after the date and time is set
Setting display power saving
In order to prevent power consumption when using batteries, the display backlight can be set to dim when no operation is conducted for a set amount of time. This is on by default.
1. Press and hold when the Home Screen is open.
This opens the Option Menu.

2. While pressing ,press . SETTING This opens the Settings Menu.
3. Use and to select an item, and use to confirm. Proceed with the following selections. System > Power Saving

4. Use and to select an item, and use to confirm.


| Setting Explanation |
| Off The display backlight always stays bright. |
| On (30sec) The backlight will dim after 30 seconds pass without operation. |
Setting the display brightness
The brightness of the display can be adjusted.
- Press and hold when the Home Screen is open.
This opens the Option Menu.

- While pressing , press . SETTING
This opens the Settings Menu.
- Use and to select an item, and use to confirm.
Proceed with the following selections.
System > LCD Brightness
ENTER
- Use and to select the brightness level, and use to confirm.


Setting the function that automatically turns the power off
The R4 can be set to automatically turn off if it is not used for a specific amount of time. This is on by default.
To keep the power on at all times, turn off the automatic power saving function.
- Press and hold when the Home Screen is open.
This opens the Option Menu.

- While pressing , press . SETTING
This opens the Settings Menu.
- Use and to select an item, and use to confirm.
Proceed with the following selections.
System > Auto Power Off

- Use and to change the setting value, and use to confirm.


| Setting Explanation | |
| Off The power will not turn off automatically. | |
| On The power will automatically turn off if it is unused for 10 hours. |
NOTE
Under the following conditions, the power will not turn off automatically regardless of this setting.
• During recording and playback
- When using the R4 as an audio interface
- When the R4 file transfer function is in use
- During execution of a card test
Restoring factory default settings
The settings of the R4 can be restored to their factory defaults.
- Press and hold when the Home Screen is open.
This opens the Option Menu.

- While pressing , press . SETTING
This opens the Settings Menu.
- Use and to select an item, and use to confirm.
Proceed with the following selections.
System > Factory Reset

- Use and to select "Execute" and use to confirm.


This will restore the R4 to its factory default status and turn the power off.
NOTE
- Resetting will restore all settings to their factory defaults. Be certain before using this function.
• After resetting the R4 to its factory default state, initial settings will be shown the next time it is turned on.
→ Setting up when first turned on
Checking the firmware versions
The firmware versions used by the R4 can be checked.
- Press and hold when the Home Screen is open.
This opens the Option Menu.

- While pressing , press . SETTING
This opens the Settings Menu.
- Use and to select an item, and use to confirm.

Proceed with the following selections.
System > Firmware
This shows the firmware versions.

Updating the firmware
The R4 firmware can be updated to the latest versions.
Files for the latest firmware updates can be downloaded from the ZOOM website (zoomcorp.com).
Follow the instructions in the "R4 Firmware Update Guide" on the R4 download page.
Checking the latest information about the R4
A 2D code for help related to the R4 can be shown on its display.
- Press and hold when the Home Screen is open.
This opens the Option Menu.

- While pressing , press . SETTING
This opens the Settings Menu.
- Use and to select an item, and use to confirm.
Proceed with the following selections.
System > Help
This shows the 2D code.

- Use a smartphone or tablet, for example, to read the 2D code shown on the HELP Screen.

zoomcorp.com/help/R4
Troubleshooting
If you think that the R4 is operating strangely, check the following items first.
Recording/playback trouble
There is no sound or output is very quiet
- Check the orientation of the mic or the volume settings of the connected equipment.
- Check the headphone connection. (→ Left, right and front sides)
- Confirm that the headphone volume is not lowered. (→ Monitoring input/playback sounds)
- Confirm that the channel faders are not too low. (→ Front and back)
- Check the R4 input source settings. (→ Making input settings)
- Check phantom power settings. (→ Selecting tracks for recording)
- Confirm that the INPUT A/MIC (built-in) switch is set as intended. (→ Front and back)
- Confirm that the level meters are rising above a certain level. (→ Home Screen)
Built-in mic sound is distorted
- The level of the sound being input through the mic is too high. Move the R4 built-in mic and the sound source further apart.
INPUT A/B sound is distorted
- Adjust the volume of the connected device, and confirm that the R4 input source setting is correct. (→ Making input settings)
Recording is not possible
- Confirm that the INPUT A/MIC (built-in) switch is set as intended. (→ Front and back)
- Confirm that the connected device is connected correctly. (→ Connecting mics and guitars to INPUT A/B)
- Check recording track settings. (→ Making input settings)
- Confirm that the microSD card has open space. (→ Checking microSD card information)
- Confirm that a microSD card is loaded properly in the card slot.
- Confirm that the microSD card has no problems and can be used with the R4. (→ Testing microSD cards)
The recorded sound breaks up
- Use the R4 to format the microSD card. (→ Formatting microSD cards)
- Confirm that the microSD card has no problems and can be used with the R4. (→ Testing microSD cards)
- We recommend using microSD cards that have been confirmed to operate with this recorder. See the ZOOM website (zoomcorp.com) for information about microSD cards that have been confirmed to work with this unit.
Recorded sound cannot be heard or is very quiet
- Confirm that the track faders are not too low. (→ Front and back)
Cannot use tuner
- Confirm that the INPUT A/MIC (built-in) switch is set as intended. (→ Front and back)
Other trouble
The recorder is not recognized by a computer, smartphone or tablet connected using the USB port.
- Use a USB cable that supports data transfer.
- The operation mode must be set on the R4 to allow the computer, smartphone or tablet to recognize it. (→ Connecting computers, smartphones and tablets, Transferring files to computers and other devices)
- During use as an audio interface, if the bit depth is set to 32-bit float format, confirm that the computer, smartphone or tablet and the app support 32-bit float format.
- Even if "ZOOM R4" cannot be selected in the computer Sound settings, the R4 can be used as a 32-bit float audio interface if it is selected as an audio or input/output device in an app that supports 32-bit float format.
- A dedicated driver is necessary to use 32-bit float format with Windows. Download the driver from the ZOOM website (zoomcorp.com).
Battery operation time is short
Making the following settings could increase the battery operation time.
- Correctly set the type of batteries used. (→ Setting the type of batteries used)
- Turn off unused inputs. Stop phantom power supply to unused inputs. (→ Making input settings)
- Set the display to dim when no operation is conducted for a certain amount of time. (→ Setting display power saving)
- Reduce the display brightness. (→ Setting the display brightness)
- Due to their characteristics, using rechargeable nickel metal hydride batteries (especially high-capacity ones) or lithium batteries should enable longer use than alkaline batteries when power consumption is high.
Date and time are frequently reset
- If power is not supplied by an AC adapter or batteries for some time, date and time settings will be reset. If the Date/Time Setting Screen appears during startup, set them again. (→ Setting the date and time)
Block diagram
![graph TD subgraph INPUT A / Built-in Mic A1["+48V"] --> B1["Built-in Mix"] B1 --> C1["Dual A/D"] C1 --> D1["CLIP"] D1 --> E1["TUNER"] E1 --> F1["Insert"] F1 --> G1["REC DATA 1 to SD CARD"] G1 --> H1["Input Select"] H1 --> I1["TRACK 1-4"] I1 --> J1["EQ"] J1 --> K1["EQ"] K1 --> L1["EQ"] L1 --> M1["HIG…](/content/2026/08/1607733/images/94adcffa442dac06a817b080836b71eb51ff70a99df97d4365c2dfeaba20f1a3.jpg)
![graph LR subgraph AIF_MODE A1["Built-in Mic"] --> B1["Dual A/D"] B1 --> C1["+48V"] B1 --> D1["HI-Z (TS ONLY)"] D1 --> E1["Dual A/D"] E1 --> C1 end subgraph INPUT_A / Built_in_Mic A2["+48V"] --> B2["HI-Z (TS ONLY)"] B2 --> C2["Dual A/D"] C2 --> E2["FADER 1 - 4"] C2 --> D2["Output"] end subgraph OUTPU…](/content/2026/08/1607733/images/7f1a092ac74ee7d21ada1b519162facfd7d5d91f2134b2a980f791f4d1ea27a8.jpg)
Specifications
| Input and output channels | Built-in mic (mono) 1 Inputs | ||
| XLR/TS inputs (mono) 2 | |||
| Output Headphones 1 | |||
| Inputs | XLR/TS inputs | Connectors 2 XLR/TS combo jacks(Balanced, XLR: 2 HOT) | |
| Input gain No adjustment required (dual A/D converter circuit used) | |||
| Input impedance XLR: 2.3 kΩTS: 1 MΩ | |||
| Maximum input level XLR: +4 dBuTS: +10 dBu | |||
| Phantom power +48 V (switchable separately for INPUTS A and B) | |||
| Equivalent input noise XLR: -120 dBu or less (IHF-A)TS: -107 dBu or less (IHF-A) | |||
| Frequency response XLR: -0.5/+0.0 dB, 20 Hz - 20 kHzTS: -0.2/+0.0 dB, 20 Hz - 20 kHz | |||
| Built-in mic input | Directionality Omnidirectional | ||
| Input gain No adjustment required (dual A/D converter circuit used) | |||
| Maximum sound pressure input | 115 dB SPL | ||
| Output Headphones | Connector 1 stereo 3.5mm mini jack | ||
| Output impedance 10 Ω | |||
| Maximum output level | 20 mW + 20 mW (into 32Ω load) | ||
| Recorder | Maximum simultaneous recording tracks | 2 | |
| Recording format | WAV: 48kHz, 32-bit float, mono | ||
| Recording media | Cards compatible with microSDHC specifications4 GB - 32 GBCards compatible with microSDXC specifications64 GB - 1 TB | ||
| Display | 2" full-color LCD (240 × 320) | ||
| USB | Connector | USB Type-CNote: Use a USB cable that supports data transfer. USB bus power is supported. | |
| Audio interface function | Class USB 2.0 High Speed | ||
| Sampling frequency 48 kHz | |||
| Bit Rate 24-bit or 32-bit float | |||
| Input/output channels 2 in/2 out | |||
| Mass storage function USB 2.0 High Speed | |||
| Power supply | Batteries: 4 AA (alkaline, lithium, or rechargeable NiMH)AC adapter: ZOOM AD-17 (5V/1.0A)• USB bus power is supported. | ||
| Estimated continuous operation time using batteries | Recording 1 track, playing 1 track, phantom power off, headphones into 32Ω load,power saving on | Alkaline batteries: about 7 hoursNiMH batteries (1900 mAh): about 6 hoursLithium batteries: about 14 hours• The above values are approximate.• Continuous battery operation times were determined using in-house testing methods. They will vary greatly according to use conditions. | |
| Power consumption | 5 W | ||
| External dimensions | 74 mm (W) × 138 mm (D) × 36 mm (H) | ||
| Weight (including batteries) 287 g | |||
Note: 0 dBu = 0.775 Vrms



- NOTES ABOUT THIS OPERATION MANUAL
- TRADEMARKS
- TERMS USED IN THIS MANUAL
- EFFECT
- BOUNCE
- PROJECT
- MULTITRACK RECORDER (MTR)
- ACHIEVING HIGH AUDIO QUALITY THROUGHOUT RECORDING AND EDITING
- RECORDING
- EDITING IN DAWS AND OTHER SOFTWARE
- DUAL A/D CONVERTER CIRCUIT OVERVIEW
- PROVIDING AMAZING DYNAMIC RANGE
- SWITCHING BETWEEN TWO A/D CONVERTERS
- BIT FLOAT WAV FILE OVERVIEW
- RESOLUTION ADVANTAGE
- BIT WAV
- CLIPPING ADVANTAGE
- FUNCTIONS OF PARTS
- FRONT AND BACK
- FRONT
- BACK
- DISPLAY
- TRACK/FUNCTION BUTTONS
- FADERS
- INPUT BUTTON
- EFFECT BUTTON
- RHYTHM BUTTON
- BOUNCE BUTTON
- UNDO BUTTON
- SEARCH BACKWARD BUTTON
- SEARCH FORWARD BUTTON
- STOP BUTTON
- PLAY INDICATOR
- PLAY BUTTON
- RECORDING INDICATOR
- RECORD BUTTON
- BATTERY COVER
- TRIPOD MOUNTING THREADS
- LEFT, RIGHT AND FRONT SIDES
- RIGHT SIDE
- LEFT SIDE
- USB PORT (TYPE-C)
- MICROSD CARD SLOT
- POWER BUTTON
- HEADPHONE/LINE OUT JACK
- VOLUME BUTTONS
- INPUT A JACK
- NOTE
- OVERVIEW OF SCREENS THAT APPEAR
- HOME SCREEN
- OPTION MENU SCREEN
- SETTINGS SCREEN
- USING MENU SCREENS
- MENU SCREEN OPERATION EXAMPLE
- HINT
- PRESS THE TRACK/FUNCTION BUTTON BENEATH . ENTER
- USE AND TO SELECT "AUDIO INTERFACE" AND USE TO CONFIRM
- RETURNING TO THE PREVIOUS SCREEN
- PRESS THE TRACK/FUNCTION BUTTON BENEATH . BACK
- RETURNING TO THE HOME SCREEN
- PRESS THE INPUT, OR EFFECT BUTTON. RHYTHM
- RECORDING PROCESS
- RECORD
- INSERTING MICROSD CARDS
- SUPPLYING POWER
- INSTALLING BATTERIES
- CONNECTING AN AC ADAPTER
- USING OTHER POWER SUPPLIES
- CONNECTING INPUT EQUIPMENT
- CONNECTING MICS AND GUITARS TO INPUT A/B
- CONNECTING MICS
- CONNECTING GUITARS AND BASSES
- CONNECTING SYNTHESIZERS AND OTHER STEREO OUTPUT DEVICES
- CONNECTION EXAMPLE
- OVERDUBBING ELECTRIC GUITAR, BASS, VOCALS AND OTHER PARTS BY ONE PERSON
- RECORDING ACOUSTIC GUITAR AND VOCALS WITH TWO PEOPLE AND OVERDUBBING CHORUS
- PARTS
- TURNING THE POWER ON/OFF
- TURNING THE POWER ON
- TURNING THE POWER OFF
- SETTING UP WHEN FIRST TURNED ON
- USE AND TO SELECT THE BATTERY TYPE, AND USE TO CONFIRM
- PLAY THE OPEN STRING THAT YOU WANT TO TUNE AND ADJUST ITS PITCH
- SETTING THE RHYTHM (PATTERN/CLICK)
- OPENING PROJECTS
- CREATING NEW PROJECTS
- OPENING EXISTING PROJECTS
- MAKING INPUT SETTINGS
- SELECTING TRACKS FOR RECORDING
- INPUT ASSIGNED TO EACH TRACK
- MONITORING INPUT/PLAYBACK SOUNDS
- CONNECT HEADPHONES
- INPUT AUDIO FROM CONNECTED EQUIPMENT
- ADJUST THE VOLUME
- ENABLING STEREO LINKING
- MAKING TRACK SETTINGS
- MAKING SETTINGS FOR OTHER TRACKS
- EQUALIZER SETTING VALUES
- STARTING AND STOPPING RECORDING
- PRESS THE BUTTON
- PRESS THE BUTTON TO STOP RECORDING
- PARTIALLY RE-RECORDING (PUNCH-IN RECORDING)
- COMBINING RECORDED TRACKS IN A BOUNCE TRACK (BOUNCING)
- USING INSERT EFFECTS
- SETTING EFFECTS
- USING SEND EFFECTS
- ADJUSTING THE AMOUNT OF ECHO/REVERB
- ADJUSTING ECHO/REVERB PARAMETERS
- STARTING AND STOPPING PLAYBACK
- PRESS
- PRESS TO STOP PLAYBACK
- FOLDER AND FILE STRUCTURE ON MICROSD CARDS
- OPENING THE PROJECT MENU
- CHANGING PROJECT NAMES
- SELECT WHEN DONE INPUTTING
- DUPLICATING PROJECTS
- DELETING PROJECTS
- ASSIGNING FILES TO TRACKS
- EXPORTING PROJECTS AS AUDIO FILES
- DELETING FILES
- FOR WINDOWS
- CONNECTING COMPUTERS, SMARTPHONES AND TABLETS
- PRESS AND HOLD WHEN THE HOME SCREEN IS OPEN
- WHILE PRESSING , PRESS . SETTING
- USE AND TO SELECT "USB" AND USE TO CONFIRM
- USE AND TO SELECT THE DEVICE BEING CONNECTED, AND USE TO CONFIRM
- MAKING MIX SETTINGS FOR INPUT AUDIO
- PRESS ON THE AUDIO INTERFACE SCREEN
- SETTING DIRECT MONITORING
- SETTING THE BIT DEPTH
- DISCONNECTING FROM COMPUTERS, SMARTPHONES AND TABLETS
- SELECT ON THE AUDIO INTERFACE SCREEN
- USE AND TO SELECT "EXIT" AND USE TO CONFIRM
- DISCONNECT THE USB CABLE CONNECTING THE R4 AND THE COMPUTER, SMARTPHONE OR TABLET
- TRANSFERRING FILES TO COMPUTERS AND OTHER DEVICES
- DISCONNECT ON THE COMPUTER, SMARTPHONE OR TABLET
- PRESS . BACK
- USE AND TO SELECT "EXECUTE" AND USE TO CONFIRM
- CHECKING MICROSD CARD INFORMATION
- FORMATTING MICROSD CARDS
- USE AND TO SELECT "SD CARD" AND USE TO CONFIRM
- USE AND TO SELECT "FORMAT" AND USE TO CONFIRM
- TESTING MICROSD CARDS
- AFTER THE TEST RESULT IS SHOWN, PRESS . BACK
- SETTING THE DATE AND TIME
- SETTING THE TYPE OF BATTERIES USED
- SETTING DISPLAY POWER SAVING
- WHILE PRESSING ,PRESS . SETTING THIS OPENS THE SETTINGS MENU
- USE AND TO SELECT AN ITEM, AND USE TO CONFIRM. PROCEED WITH THE FOLLOWING SELECTIONS. SYSTEM > POWER SAVING
- USE AND TO SELECT AN ITEM, AND USE TO CONFIRM
- SETTING THE DISPLAY BRIGHTNESS
- SETTING THE FUNCTION THAT AUTOMATICALLY TURNS THE POWER OFF
- RESTORING FACTORY DEFAULT SETTINGS
- CHECKING THE FIRMWARE VERSIONS
- UPDATING THE FIRMWARE
- CHECKING THE LATEST INFORMATION ABOUT THE R
- TROUBLESHOOTING
- RECORDING/PLAYBACK TROUBLE
- THERE IS NO SOUND OR OUTPUT IS VERY QUIET
- BUILT-IN MIC SOUND IS DISTORTED
- INPUT A/B SOUND IS DISTORTED
- RECORDING IS NOT POSSIBLE
- THE RECORDED SOUND BREAKS UP
- RECORDED SOUND CANNOT BE HEARD OR IS VERY QUIET
- CANNOT USE TUNER
- OTHER TROUBLE
- THE RECORDER IS NOT RECOGNIZED BY A COMPUTER, SMARTPHONE OR TABLET CONNECTED USING THE USB PORT
- BATTERY OPERATION TIME IS SHORT
- DATE AND TIME ARE FREQUENTLY RESET
- BLOCK DIAGRAM
Brand : ZOOM
Model : R4 MultiTrak
Category : Uncategorized