
EV-2726-N3WQ - Surveillance Camera Enforcer - Free user manual and instructions
Find the device manual for free EV-2726-N3WQ Enforcer in PDF.


| Type of product | Security Camera |
| Brand | Enforcer |
| Model | EV-2726-N3WQ |
| Sensor resolution | 3 MP (2048 x 1536) |
| Video compression | H.265+ / H.264 |
| Night vision | IR LEDs, up to 30 m (98 ft) |
| Lens type | 2.8 mm fixed focal lens |
| Field of view | 95° horizontal |
| Power supply | DC 12V ± 10% or PoE (802.3af) |
| Power consumption | Max. 6 W |
| Network interface | 10/100 Mbps Ethernet (RJ-45) |
| Wireless connectivity | Wi-Fi 802.11 b/g/n (2.4 GHz) |
| Storage | microSD slot (up to 256 GB) |
| Weatherproof rating | IP66 (outdoor use) |
| Housing material | Aluminium and UV-resistant plastic |
| Dimensions (W x D x H) | 70 x 70 x 125 mm (2.8 x 2.8 x 4.9 in) |
| Weight | 450 g (15.9 oz) |
| Operating temperature | -30 °C to +60 °C |
| Motion detection | Yes, with Smart AI subject recognition |
| Built-in microphone | Yes, for two-way audio |
| Mobile app support | iOS and Android (Enforcer View) |
| Security features | Password protection, WPA2 encryption, HTTPS |
| Maintenance | Clean lens with a soft dry cloth |
| Spare parts and repairability | Modular design; lens, IR board, and motherboard replaceable |
| Included accessories | Mounting bracket, screws, waterproof connectors, quick start guide |
Frequently Asked Questions - EV-2726-N3WQ Enforcer
User questions about EV-2726-N3WQ Enforcer
0 question about this device. Answer the ones you know or ask your own.
Ask a new question about this device
Download the instructions for your Surveillance Camera in PDF format for free! Find your manual EV-2726-N3WQ - Enforcer and take your electronic device back in hand. On this page are published all the documents necessary for the use of your device. EV-2726-N3WQ by Enforcer.
USER MANUAL EV-2726-N3WQ Enforcer

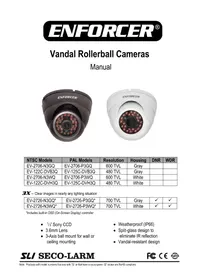
| NTSC Models | PAL Models | Resolution | Housing | DNR | WDR |
| EV-2706-N3GQ | EV-2706-P3GQ | 600 TVL | Gray | ||
| EV-122C-DVB3Q | EV-125C-DVB3Q | 480 TVL | Gray | ||
| EV-2706-N3WQ | EV-2706-P3WQ | 600 TVL | White | ||
| EV-122C-DVH3Q | EV-125C-DVH3Q | 480 TVL | White |
3X – Clear images in nearly any lighting situation
| EV-2726-N3GQ* | EV-2726-P3GQ* | 700 TVL | Gray | √ | √ |
| EV-2726-N3WQ* | EV-2726-P3WQ* | 700 TVL | White | √ | √ |
*Includes built-in OSD (On-Screen Display) controller
• 1/3 " Sony CCD
- 3.6mm Lens
- 3-Axis ball mount for wall or ceiling mounting
- Weatherproof (IP66)
- Split-glass design to eliminate IR reflection
• Vandal-resistant design
SLI SECO-LARM
Specifications:
| Model | NTSC | EV-122C-DVB3Q EV-122C-DVH3Q | EV-2706-N3GQ EV-2706-N3WQ | EV-2726-N3GQ EV-2726-N3WQ |
| PAL | EV-125C-DVB3Q EV-125C-DVH3Q | EV-2706-P3GQ EV-2706-P3WQ | EV-2726-P3GQ EV-2726-P3WQ | |
| CCD | 1/3 " Sony Super HAD II | 1/3 " Sony EXview HAD II | ||
| Resolution | 480 TV lines | 600 TV lines | 700 TV lines | |
| Pickup elements | NTSC | 510x492 | 768x494 | 976x494 |
| PAL | 500x582 | 752x582 | 976x582 | |
| DNR (2D-NR and 3D-NR) | No | Yes | ||
| WDR | No | Yes | ||
| OSD Control | No | Yes | ||
| Scanning system | 2:1 interlace, V: 59.94Hz, H: 15.734KHz | |||
| Sync | Internal | |||
| Video output | 1V p-p composite output, 75 ohms | |||
| Lens | 3.6mm | |||
| # of IR LEDs | 24 (850nm) | |||
| IR Range | Up to 50' (15m) | |||
| Minimum illumination | LEDs OFF | 0.05 Lux | 0.02 Lux | 0.03 Lux |
| LEDs ON | 0 Lux | |||
| Gamma correction | 0.45 | |||
| S/N Ratio | >48dB | >52dB | ||
| DSS (Digital Slow Shutter) | 256x | |||
| Shutter control | Auto Electric Shutter (AES), 1/60~1/100,000 s | |||
| Gain control | Auto | |||
| White balance | Auto | |||
| Operating voltage | 12VDC ±10% | |||
| Current draw | LEDs OFF | 130mA | 100mA | 150mA |
| LEDs ON | 300mA | 270mA | 450mA | |
| IP Rating | IP66 | |||
| Operating temperature | -4°~122° F (-20°~50° C) | |||
| Dimensions | 311/16 "x35/32" (94x80 mm) | |||
| Cable length | 38" (98cm) | |||
| Weight | 14-oz (400g) | |||
Parts List:
1 x Camera
1 x Manual
4 x Screws
4 x Screw anchors
1 x DC Plug with terminal block 1 x Hex wrench
Dimensions:

Optional Mounting
Brackets (Sold separately):
| Wall Mount | |
| Gray: EV-DWSGQ | |
| White: EV-DWSWQ | |
| Ceiling Mount | |
| Gray: EV-DCSGQ | |
| White: EV-DCSWQ | |
| Conduit Box | |
| Gray: EV-DSSGQ | |
| White: EV-DSSWQ |
Overview:
![graph TD A["Case"] --> B["ENFORCER®"] B --> C["Camera ball"] C --> D["Screws (Only 2 shown. Use all 4 when installing.)"] D --> E["Base"] E --> F["OSD Controller (3X Models only)"] F --> G["DC Jack"] G --> H["DC Plug with terminal block"] H --> I["Female BNC connector"]](/content/2026/08/1586945/images/0140b240f64b99ca4d11b2513239a09b631aae596fb3ff6e7215b5ff7aa58817.jpg)
Before Starting:
- Please read this manual carefully and keep it for future reference.
- Use the camera within the given temperature and electricity limits.
-
Do not point the camera at the sun. Heat could damage the camera, even when not in use.
-
Do not drop the camera or subject it to strong vibrations.
- Do not mount the camera in areas exposed to radiation, strong magnetic fields, or strong electrical signals.
Installation:
- Run a 12VDC power supply wire and a video cable with a male BNC connector through the wall to where the camera is to be mounted.
- Loosen the set screws with the included hex wrench and remove the case from the base.
NOTE: The camera ball is NOT attached to the case or the base. It sits loose inside the case. Therefore, be very careful when removing the case from the base. Do not drop the camera ball.
- Mount the base to the wall using the four included mounting screws. If the wall is made of dry wall, brick, or similar material, it may be necessary to use the included plastic screw anchors.
-
Run the camera's BNC and power connectors through the camera base, and connect to the video and power wires that were run through the wall.
-
Put the case over the cameral ball onto the base. Be careful to not drop the camera ball.
- Holding the case loosely on the base, turn the camera ball to the desired direction.
NOTE: Before securing installation, make sure to check both the day and night images. Adjust the camera ball in a way so that there are no objects blocking or obscuring the camera's view.
- 3X Models Only: Use the OSD controller joystick to adjust camera settings (see the separate OSD manual).
- Once the ball is pointing in the desired direction, tighten the outer case ring to secure the camera in its position.
- Do a final test of the video camera and monitor.
Troubleshooting:
| The screen is black | Check that the camera is powered upCheck that the power supply's polarity is correctCheck that the monitor is powered upCheck that the video cable connecting the camera to the monitor is connected properly |
| The image is foggy or washed out at night | Check that there are no objects very close to the cameraCheck that there are no highly reflective objects in the scene |
| The screen image is dim | Clean the lens using a soft, clean clothCheck that the light source is adequate |
| The screen image has poor contrast | Adjust the monitor's contrast knobChange the position of the camera |
| The screen image flickers | Change the position of the camera |
| The screen image is distorted | Change the position of the camera |
| The camera case is hot | Check that the correct power supply is in use |
| IR LEDs do not turn on | Check that the correct power supply is in use |
IMPORTANT
Users and installers of this product are responsible for ensuring this product complies with all national, state, and local laws and statutes related to monitoring and recording audio and video signals. SECO-LARM will not be held responsible for the use of this product in violation of any current laws or statutes.
WARNING
Stop using the camera if you see a malfunction such as smoke or unusual heat, as it could cause fire or electric shock. Do not open the case of this device, as there are no field-serviceable components inside.
FCC COMPLIANCE STATEMENT
Information to the user: This equipment has been tested and found to comply with the limits for a class B digital device, pursuant to part 15 of the FCC rules. These limits are designed to provide reasonable protection against harmful interference when the equipment is operated in a commercial environment. This equipment generates, uses, and can radiate radio frequency energy and, if not installed and used in accordance with the instruction manual, may cause harmful interference to radio communications. Operation of this equipment in a residential area is likely to cause harmful interference in which case the user will be required to correct the interference at his or her own expense.
WARRANTY: This SECO-LARM product is warranted against defects in material and workmanship while used in normal service for a period of one (3) year from the date of sale to the original customer. SECO-LARM's obligation is limited to the repair or replacement of any defective part if the unit is returned, transportation prepaid, to SECO-LARM. This Warranty is void if damage is caused by or attributed to acts of God, physical or electrical misuse or abuse, neglect, repair or alteration, improper or abnormal usage, or faulty installation, or if for any other reason SECO-LARM determines that such equipment is not operating properly as a result of causes other than defects in material and workmanship. The sole obligation of SECO-LARM and the purchaser's exclusive remedy, shall be limited to replacement or repair only, at SECO-LARM's option. In no event shall SECO-LARM be liable for any special, collateral, incidental, or consequential personal or property damages of any kind to the purchaser or anyone else.
NOTICE
The information and specifications printed in this manual are current at the time of publication. However, the SECO-LARM policy is one of continual development and improvement. For this reason, SECO-LARM reserves the right to change specifications without notice. SECO-LARM is also not responsible for misprints or typographical errors.
Copyright © 2012 SECO-LARM U.S.A., Inc. All rights reserved. This material may not be reproduced or copied, in whole or in part, without the written permission of SECO-LARM.
SECO-LARM U.S.A., Inc.
16842 Millikan Avenue, Irvine, CA 92606
Tel: 800-662-0800 / 949-261-2999
Website: www.seco-larm.com
E-mail: sales@seco-larm.com

PICSN4
MiBallMountCamera_1208.docx


Brand : Enforcer
Model : EV-2726-N3WQ
Category : Surveillance Camera