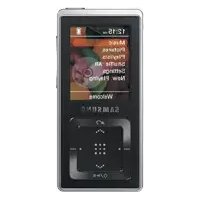
YP-Z5FZB - Mp3 player SAMSUNG - Free user manual and instructions
Find the device manual for free YP-Z5FZB SAMSUNG in PDF.


| Type de produit | Portable digital audio player (MP3 player) |
| Marque | Samsung |
| Modèle | YP-Z5FZB |
| Capacité de stockage | 2 GB internal flash memory |
| Écran | 1.8-inch color TFT LCD display |
| Formats audio pris en charge | MP3, WMA, OGG |
| Radio FM | Built-in FM tuner with 20 presets |
| Enregistrement vocal | Built-in microphone for voice recording |
| Interface | USB 2.0 for fast file transfer |
| Autonomie de la batterie | Up to 30 hours of audio playback |
| Alimentation | Internal rechargeable lithium-polymer battery |
| Dimensions (L × H × P) | 42.2 × 89.6 × 12.3 mm (approx.) |
| Poids | 50 g (approx.) |
| Fonctions principales | Music playback, playlist creation, ID3 tag support, 8 EQ presets, FM radio, voice recording |
| Entretien et nettoyage | Clean the exterior with a soft dry cloth; avoid moisture and extreme temperatures |
| Sécurité | Do not disassemble, expose to water, or use non-approved chargers |
| Pièces détachées et réparabilité | No user-replaceable parts; battery is internal and non-removable |
| Informations générales | Compatible with Windows and Mac operating systems via USB mass storage |
Frequently Asked Questions - YP-Z5FZB SAMSUNG
User questions about YP-Z5FZB SAMSUNG
0 question about this device. Answer the ones you know or ask your own.
Ask a new question about this device
Download the instructions for your Mp3 player in PDF format for free! Find your manual YP-Z5FZB - SAMSUNG and take your electronic device back in hand. On this page are published all the documents necessary for the use of your device. YP-Z5FZB by SAMSUNG.
USER MANUAL YP-Z5FZB SAMSUNG
YP-Z5F
For Your Safety Read this manual carefully to ensure proper use of the product and to avoid any danger or physical damage.

WARNING
Failing to heed the product instructions may cause serious injury.
Product Use
Improper use can result in explosion, fire or electric shock.

Do not disassemble, repair or modify this product on your own.

Do not get the product wet or drop it in water.
If the product gets wet, do not switch it on. Contact a Service Center.

Do not place the product in damp, dusty or sooty areas, as it could result in fire or electric shock.

Do not leave the product in areas above 35° C( 95° F) (such as a sauna or inside a parked car).
During the summer the temperature inside a car may rise up to 80° C( 176° F).
To avoid your hearing damage
Using the earphone or headphone for an extended time can cause a serious damage to your hearing.
If you are exposed to a sound in higher than 85db for an extended time, you will be adversely affected on your hearing. The higher the sound is, the more seriously damaged your hearing is (an ordinary conversation is made in 50 to 60 db and the noise level on the road is approximately 80 db). You are strongly advised to set the volume level to medium (the medium level is usually less than 2/3 of the maximum).
If you feel a ringing in the ear(s), lower the volume or stop using the earphone or headphone.
To avoid a risk of traffic accident
Do not use the earphone while you are driving a bicycle, automobile or motorcycle.
Otherwise it can cause a serious accident and, furthermore, it is prohibited by the law in some areas. Using the earphone on the way, in particular, on the crosswalk can lead to a serious accident.
For your safety, make sure the earphone cable should not get in the way of your arm or other surrounding objects while you are taking exercise or a walk.

CAUTION
Failure to follow all instructions lead to physical injuries or damage to the product.
Product Use
Take care to avoid product malfunction and physical damage.

When wearing the product around your neck, take care not to exert excessive force on the neck string.
Management of Important Data

Be sure to backup important data.
Please be aware that we claim no responsibility for damage from data loss due to breakdown, repair or other causes.
Avoid malfunction

Do not cause excessive impact on the product by dropping it. Do not place heavy objects on top of the product.

Prevent any foreign particles or dust from entering into the product.

Always use the accessories provided by or approved by Samsung.

Do not spray water on the product. Never clean the product with chemical substances such as benzene or thinner, as it may cause fire, electric shock or deteriorate the surface.

Do not place the product near magnetic objects, as it may cause a malfunction.
Contents
For Your Safety 2
Contents 4
Chapter 1. Preparation
Product Features ....7
Checking the Product and Accessories ....8
Components 8
Screen Display Information 10
Button Functions....11
Charging the battery....13
Basic Use ....14
Chapter 2. Loading Your Desired File
Loading Your Desired File 18
Loading Your Desired File......18
Installing Media Studio....19
Connecting to your PC......21
Adding Files/Folders in Media Studio...22
Adding Files/Folders in
Media Studio with Autoscan......24
Transferring Files with Media Studio ....26
Using as a Removable Disk ....28
Disconnecting from your PC....29
Chapter 3. | Multmedio funtion
Listening to Music....31
Listening to Music....31
To Play a Playlist 34
Shuffle Play (Random Repeat)......35
Checking the Music Information......38
Picture Viewing ....39
Picture Viewing....39
Picture Enlarging/Slideshow Viewing ......40
Listening to FM Radio 41
Listening to FM Radio 41
Setting a Frequency 43
Setting FM Radio......46
Recording....48
Voice Recording 48
Chapter 4. | Setup
Setup 51
Audio Setup 51
Display Setup 52
Slideshow Setup 53
Repeat Setup....54
Timer Setup 55
Language Setup 56
Reset 57
Checking the System Infomation....58
Chapter 5. Troubleshooting
System Reset......60
Troubleshooting....61
Chapter 6. Appendix
Menu Tree 65
Manual USB Driver Installation....66
Product Specifications....69
MP3 PLAYER
Chapter 1. Preparation
Product Features 7
Checking the Product and Accessories ....8
Components 8
Screen Display Information ....10
Button Functions....11
Charging the battery....13
Basic Use 14
Product Features
Freedom of my favorite selection with your player!
■ You can easily search for music files by the artist, album or genre and make you own selection of favorite songs in Playlist.
Supporting Various File Formats!
■ Supports various file formats including MP3, WMA and Ogg.
■ You can enjoy photo files in different formats on the display by converting them into JPG.
Touchpad Mechanism!
- Put your finger on the touchpad and move or press it slightly to select a file or function that you want to use.
Longer Play Time and Shorter Downloading!
■ A fully charged battery can operate the player in a maximum of 39 hours.
■ The player supports USB 2.0 capability, much faster than USB 1.1, to enable faster communication with the PC.
3D Surround Sound! High-Definition Quality!
■ The player has built-in DNSe (Digital Natural Sound engine), Samsung's unique sound technology for richer sound.
Ergonomic Design!
■ Experience the good sense of grip and easy operation.
Checking the Product and Accessories
Components
Front, Right Side and Top

Bottom

Checking the Accessories
The following diagrams are a guide and may differ slightly from the actual product appearance.

Player Earphones USB Cable


Installation CD
■ Design of accessories is subject to change for the purpose of improvement, without notice.
Checking the Product and Accessories
Screen Display Information

1 Current Time Display
2 Album Title Display
3 Album Display
4 Sound Mode Display
5 File Type Display (MP3, WMA etc)
6 Play Status Bar
7 Play Time Display
8 Play/Pause Display
9 Music Title Display
10 Battery Display
11 Street Mode Display
12 Repeat Play Display
13 Total Play Time Display
14 Current Music Number/Total Number Display

NOTE
■ The screen pictures are for illustration purposes only. The actual screen may differ.
Checking the Product and Accessories
Button Functions
Buttons Functions and Use

■ Long press for power on/off.
■ Short press for play/pause.

■ Long press to move to the Menu screen.
■ Short press to move to the previous screen.

■ Long press to scan to a point on the current track.
■ Short press to move to the previous track or to play the current track from the start.

■ Long press to scan to a point on the current track.
■ Short press to move to the next track.

■ Push in the direction of the arrow to lock the button functions.

■ Press with a pointed object to reset.

■ Press to reduce/increase the volume.
Checking the Product and Accessories
Button Functions (Continued)
Buttons Functions and Use

■ Moving up, down, left and right and Function Selection
Tap on the top or bottom side to move up or down by one selection.
Tap on the left or right side to move left or right by one selection (Picture mode).
Tap and hold on top or bottom side to move up or down continuously.
Press the center of the Touchpad to select the function and move to the next screen.
* The touchpad works better when pressed lightly with a fingertip.


CAUTION
■ Do not use any sharp object other than your fingers to operate the touchpad. Otherwise, touchpad may be damaged.
■ Do not press on the [Touch Pad] if your fingers are not clean.
Charging the battery
Fully charge the battery before using the player for the first time or when the it has not been used for a while.

1 Connect the USB cable to the USB port (ψ) on your PC.
2 Connect the other end of the USB cable to the Power/USB Connection Port on the bottom of the player.
■
■ When connected with the USB cable, it takes about 4 hours for a full charge although this may vary depending on your PC environment.
Battery Use
■ Recharge and store within the temperature range of 5°C\~35°C(40°F\~95°F).
- Do not overcharge (longer than 12 hours). Excessive charging or discharging may shorten the battery's life.
■ Battery life naturally shortens slowly over time as it is a consumable item.

NOTE
■ Charging may take more time if there is another USB device connected to your PC.
If the player displays "low battery", actual charging may start after a short period of time when you connect to your PC.
Basic Use
Turning the Power On & Off

Turning the Power On Press and hold the [] button
■ Power is turned on.
Turning the Power Off Press and hold the [] button
■ Power is turned off.

NOTE
■ Screen Display window is automatically turned off when none of the buttons have been pressed for a preset period of time (Default: 1 minute) in the pause mode. You can set the time duration before closing the Screen Display window. ▶page 52
Playing Music

1 Press and hold the [] button to move to the Menu screen.
2 Tap on the [····] to select
■ The Music Menu will appear.
3 Tap on the [···] to select a music file of your choice.
4 Press the [Touch Pad].
■ The music file will begin playing.

NOTE
■ Press the [ ] button to move to the previous screen.
■ Press and hold the [ ] button to move to the Menu screen.
Volume Control

Press the [ + , - ] button on the side of the unit.
■The Volume Status Bar will appear.
- Press the + button to increase the volume or the – button to decrease it.
Lock Function

In Hold mode, all buttons are disabled. This function is useful when you are walking or jogging.
1 Push the [HOLD] button on the top of the unit in the direction of the arrow.
2 Push the [HOLD] button in the opposite direction of the arrow to release the Lock function.
Basic Use (Continued)
Reset Function

If a product malfunction occurs, you can re-initialize the system by pressing the Reset hole. ▶page 60
Earphone Connection
▶ Top

MP3 PLAYER
Chapter 2. Loading Your Desired File
Loading Your Desired File 18
Loading Your Desired File....18
Installing Media Studio....19
Connecting to your PC......21
Adding Files/Folders in Media Studio...22
Adding Files/Folders in
Media Studio with Autoscan......24
Transferring Files with Media Studio ....26
Using as a Removable Disk ....28
Disconnecting from your PC......29
Loading Your Desired File
Loading Your Desired File
To play music files in the player, first transfer music files in MP3, WMA, Ogg and other supported formats from your PC.
Follow the steps below to transfer files.
Transferring Music Files
■ Transfer files on your PC to the player using Media Studio ▶ Page 26
■ Transfer files on your PC to the player using the “Copy” and “Paste” functions (removable disk) ▶ Page28
Loading Your Desired File
Installing Media Studio
Use Media Studio to transfer music files from your PC to the player.

CAUTION
If Media Studio is not installed automatically
■ Install the program on PCs running Windows 2000 or Windows XP after logging on with the Administrator account. Please refer to the PC user manual on how to log on with the Administrator account.
Before you start!
Insert the installation CD provided with the player into the CD-ROM drive.

1 Click
Loading Your Desired File
Installing Media Studio (Continued)
![Sensorservix Studio 1 Start Copping File Review ratings before copying files. The setup program starts copying program files using the following information. Click [CUSTOM] to install after setup installation settings or click [NDIT] to start copying files with the current settings. Current Settings…](/content/2026/08/1584456/images/3e907cb49452385225e71f21d372f1ae5f0538208111c1748e35fbcbf39f2927.jpg)
2 Click .
■Media Studio installation starts.

3 After installation is complete, click .
■ An icon is created on the desktop after installation is complete and Media Studio starts.
■If the Autoscan Confirm window appears, refer to page 25 and customize settings.
Before you start!
Use the USB Cable provided when connecting the product to your PC.

1 Connect the USB cable to the USB port ( ) on your PC.
2 Connect the other end of the USB cable to the Power/USB Connection Port on bottom of the player.
-
PC Requirements
For use in conjunction with your PC, the following is required:
■ Pentium 300MHz or higher
■ Windows 98SE/2000/XP
■ 100MB of free hard disc space
USB Port 2.0
■ DirectX 9.0 or higher
■ CD Rom Drive (2X or higher)

CAUTION
■ If you connect the player through a USB hub, the connection may be unstable. Please connect the player to the computer directly.
Loading Your Desired File
Adding Files/Folders in Media Studio

Please refer to Help for more information on how to use Media Studio.
- Click


- FOR YOUR SAFETY READ THIS MANUAL CAREFULLY TO ENSURE PROPER USE OF THE PRODUCT AND TO AVOID ANY DANGER OR PHYSICAL DAMAGE
- WARNING
- PRODUCT USE
- TO AVOID YOUR HEARING DAMAGE
- TO AVOID A RISK OF TRAFFIC ACCIDENT
- CAUTION
- MANAGEMENT OF IMPORTANT DATA
- BE SURE TO BACKUP IMPORTANT DATA
- AVOID MALFUNCTION
- CONTENTS
- CHAPTER 1. PREPARATION
- CHAPTER 2. LOADING YOUR DESIRED FILE
- CHAPTER 3. | MULTMEDIO FUNTION
- CHAPTER 4. | SETUP
- CHAPTER 5. TROUBLESHOOTING
- CHAPTER 6. APPENDIX
- MP3 PLAYER
- PRODUCT FEATURES
- FREEDOM OF MY FAVORITE SELECTION WITH YOUR PLAYER
- SUPPORTING VARIOUS FILE FORMATS
- TOUCHPAD MECHANISM
- LONGER PLAY TIME AND SHORTER DOWNLOADING
- 3D SURROUND SOUND! HIGH-DEFINITION QUALITY
- ERGONOMIC DESIGN
- CHECKING THE PRODUCT AND ACCESSORIES
- COMPONENTS
- FRONT, RIGHT SIDE AND TOP
- BOTTOM
- CHECKING THE ACCESSORIES
- SCREEN DISPLAY INFORMATION
- BUTTON FUNCTIONS
- BUTTONS FUNCTIONS AND USE
- BUTTON FUNCTIONS (CONTINUED)
- MOVING UP, DOWN, LEFT AND RIGHT AND FUNCTION SELECTION
- CHARGING THE BATTERY
- BATTERY USE
- BASIC USE
- TURNING THE POWER ON & OFF
- PLAYING MUSIC
- VOLUME CONTROL
- LOCK FUNCTION
- BASIC USE (CONTINUED)
- RESET FUNCTION
- EARPHONE CONNECTION
- LOADING YOUR DESIRED FILE
- TRANSFERRING MUSIC FILES
- INSTALLING MEDIA STUDIO
- IF MEDIA STUDIO IS NOT INSTALLED AUTOMATICALLY
- BEFORE YOU START
- INSTALLING MEDIA STUDIO (CONTINUED)
- 2 CLICK
- 3 AFTER INSTALLATION IS COMPLETE, CLICK
- PC REQUIREMENTS
- ADDING FILES/FOLDERS IN MEDIA STUDIO
- TO ADD FILES
- TO ADD FOLDERS
- ADDING FILES/FOLDERS IN MEDIA STUDIO WITH AUTOSCAN
- HOW TO SETUP AUTOSCAN OPTIONS
- TRANSFERRING FILES WITH MEDIA STUDIO
- USING AS A REMOVABLE DISK YOU CAN USE THE PLAYER AS A REMOVABLE STORAGE DEVICE
- NOTE
- WHAT IS DRM
- DISCONNECTING FROM YOUR PC
- CHAPTER 3. MULTIMEDIA FUNCTION
- MUSIC MENU
- LISTENING TO MUSIC
- LISTENING TO MUSIC (CONTINUED)
- TO PAUSE
- TO SEARCH WITHIN A TRACK
- TO MAKE YOUR OWN PLAYLIST
- TO PLAY A PLAYLIST
- SHUFFLE PLAY (RANDOM REPEAT)
- SHUFFLE PLAY ALL MUSIC
- SHUFFLE PLAY BY TYPE
- SHUFFLE MENU
- CHECKING THE MUSIC INFORMATION
- PHOTO VIEWING
- PICTURE ENLARGING/SLIDESHOW VIEWING
- PICTURE ENLARGING
- SLIDESHOW VIEWING
- TO USE MUTE FUNCTION
- LISTENING TO FM RADIO (CONTINUED)
- TO AUTOMATICALLY SEARCH FOR FREQUENCIES
- TO MANUALLY SEARCH FOR FREQUENCIES
- SETTING A FREQUENCY
- TO AUTOMATICALLY SET FREQUENCIES
- TO CANCEL DURING SETTING
- SETTING A FREQUENCY (CONTINUED)
- TO MANUALLY SET FREQUENCIES
- TO SEARCH FOR FREQUENCIES IN PRESET MODE
- LISTENING TO FM RADIO
- TO DELETE PRESETS
- TO SET FM SENSITIVITY
- TO SET FM REGION
- RECORDING
- VOICE RECORDING
- FILE NAMES DURING RECORDING
- LISTENING TO RECORDING FILE
- TO DELETE RECORDING FILE
- CHAPTER 4. SETUP
- SETUP 51
- SETUP
- AUDIO SETUP
- WHAT IS DNSE
- BUTTON FUNCTIONS FOR SETUP
- DISPLAY SETUP
- REPEAT SETUP
- TIMER SETUP
- SETTING CURRENT TIME
- LANGUAGE SETUP
- CHECKING THE SYSTEM INFOMATION
- REGARDING THE BUILT-IN MEMORY
- CHAPTER 5. | TROUBLESHOOTING
- SYSTEM RESET
- TROUBLESHOOTING
- TROUBLESHOOTING (CONTINUED)
- MENU TREE
- MANUAL USB DRIVER INSTALLATION
- IF AN ERROR OCCURS DURING INSTALLATION OF THE USB DRIVER
- MANUAL USB DRIVER INSTALLATION (CONTINUED)
- IN WINDOWS 98SE
- PRODUCT SPECIFICATIONS
- CONTACT SAMSUNG WORLD WIDE
- LICENSE
- EUROPE ONLY
Brand : SAMSUNG
Model : YP-Z5FZB
Category : Mp3 player