BHC-412FR - Hammock Bliss Outdoors - Free user manual and instructions
Find the device manual for free BHC-412FR Bliss Outdoors in PDF.


| Product Type | Hammock |
| Brand | Bliss Outdoors |
| Model | BHC-412FR |
| Recommended Use | Camping, hiking, and backyard lounging |
| Capacity | 1 person |
| Maximum Weight Capacity | 250 lbs (113 kg) |
| Dimensions (Open) | 108 x 40 inches (274 x 102 cm) |
| Dimensions (Packed) | 7 x 5 x 4 inches (18 x 13 x 10 cm) |
| Weight | 1.6 lbs (725 g) |
| Fabric Material | High-tenacity polyester |
| Suspension Type | Rope-free straps with carabiners |
| Included Accessories | 2 nylon tree straps, 2 aluminum carabiners, travel sack |
| Setup Time | 3 to 5 minutes |
| Weather Resistance | Water-resistant and UV-resistant |
| Breathability | Airy mesh fabric for ventilation |
| Compactness | Packs down small for easy transport |
| Care Instructions | Hand wash with cold water and mild detergent; air dry |
| Safety Features | Reinforced stitching and triple-seam construction |
| Frame Material | No frame required; hangs from trees |
| Usage Conditions | Designed for outdoor use in mild weather |
Frequently Asked Questions - BHC-412FR Bliss Outdoors
User questions about BHC-412FR Bliss Outdoors
0 question about this device. Answer the ones you know or ask your own.
Ask a new question about this device
Download the instructions for your Hammock in PDF format for free! Find your manual BHC-412FR - Bliss Outdoors and take your electronic device back in hand. On this page are published all the documents necessary for the use of your device. BHC-412FR by Bliss Outdoors.
USER MANUAL BHC-412FR Bliss Outdoors
READ THIS BEFORE ASSEMBLING, INSTALLING, & USING THIS PRODUCT
⚠️ CAUTION: If you are not familiar with construction, hardware or the use of tools, please use a qualified general contractor to install. Improper installation may cause injury.
SAFETY FIRST: Before entering a hammock chair, inspect your hammock chair, hardware, installation points and objects supporting your hammock chair for wear or weakness. Proceed carefully and take your time getting into and out of your hammock chair. Any hammock chairs may tip if your weight isn't centered. A hammock chair is not a playground swing or a trampoline. Excessive swinging and other rough play may result in falls and may wear out your hammock chair and hardware prematurely. Small children should not play unsupervised in your hammock chair.
⚠️ CAUTION: Falling and Strangulation Hazard! Hammock Chairs can be unstable. Be careful entering and exiting your hammock chair as injury may result. Children can become entangled in hammock strings. Do not leave children unattended in the hammock chair.
WEIGHT CAPACITY: 250 lbs (113.4 kgs)
INCLUDED HARDWARE:
• Twisting Eyescrew and hook
- S-hook
• Molly
- Chain
NOTE: Before use, check for excessive rusting or twisting in hardware
CONNECTING THE SPREADER BAR: To securely connect the spreader bar, snap one half to the other half until you hear a click or snap. Check spreader bar to make sure it is secure before hanging the hammock chair by pulling back and forth on both ends (Fig. 1).
Fig. 1

⚠ BEFORE ENETERING A HAMMOCK CHAIR: Please make sure rope loops are securely in the grooves that are at the ends of the spreader bar prior to entering your hammock chair (Fig. 2).

CARE AND MAINTENANCE:
- Hammock Care and Maintenance: To prevent mildew and increase the useful life of your hammock chair, store it in a dry location during seasons and time periods when it is not in use. Avoid keeping in direct sunlight and rain for long durations. Some fading may occur.
- Cleaning: Your hammock chair is hand washable with cold water and a mild detergent or soap. Do not use harsh chemical cleaners or bleach. Rinse well and let it dry thoroughly before storing. Keep rope and loops away from fabric while cleaning.
- Wood Finish: To extend the usable life of the wood spreader bars, we recommend you varnish or oil it regularly, at least once per year.
- Storage: Make sure the hammock chair is completely dry before storing in a dry location.
HANGING INSTRUCTIONS:
Since most hammock chairs are hand crafted, you should measure the overall height of your hammock chair, in order to determine the best hanging option for use.
- Tree Mounting: A hardwood tree with a branch a minimum of 12" in diameter is needed. Appropriate hardware like an eye screw and hook, or a tree strap and S-hook are needed for support and attachment to tree. Chains and S-hooks are recommended but may not be necessary for adjusting height of chair.
IMPORTANT: WHEN USING EYESCREWS, MAKE SURE TO TIGHTLY SCREW EACH EYE SCREW ALL THE WAY IN THE TREE.
- Hammock Chair Stand: When trees and posts are not available, the simplest way to use your hammock chair is on a hammock chair stand. The overall height of the stand should be about 2' taller than the overall height of your chair (Fig. 1). To check if your hammock chair fits on your stand, hang the chair on the stand and adjust to fit according to the "hanging guidelines" section, and on the diagram above.
Fig. 3

- Hanging Guidelines: A twisting eyescrew and hook have been provided to help you hang your hammock chair correctly. Using the hook, attach the chair through the hammock chair loop. Tightly screw in the eye screw all the way through the tree at a hanging point at least 6 feet minimum height from the ground. W—ith use, your hammock chair might stretch and may need further adjusting.
INSTALLATION:
HANGING HARDWARE (FIG. 4):
Fig. 4

Molly

Twisting eyescrew and hook
RECOMMENDED TOOLS (NOT INCLUDED) (FIG. 5):
Fig. 5


Electric drill 5/16" drill bit
Screwdriver
(for leverage why tightening)

Note: Ideally, screwdriver shaft should be at least 6" inches long by 1/4" thick
If you have any questions or comments, please call the Bliss Hammocks® customer service department at:
1-800-695-2626
©2022 Bliss Hammocks® is a registered trademark of Snow Joe, LLC | Made in China
- Pre-drill 2-inch deep pilot hole using a 5/16" straight bit into the bottom of a hardwood tree branch that is at least 6 feet above the ground (Fig. 6). Hardwood tree branch should have at least a 12" diameter or a circumference that is greater than 37.5".

- Fully insert Molly into pilot hole then hand tighten eye screw into the molly (Fig. 7).

- To facilitate tightening, use a screwdriver to rotate Eye Screw clockwise by threading it through the eye screw's hole (Fig. 8).

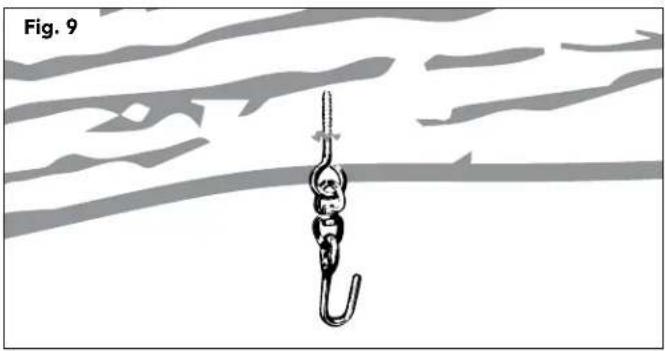
- Make sure to tighten eye screw enough to cover all threads (Fig. 9).


Brand : Bliss Outdoors
Model : BHC-412FR
Category : Hammock