
AL-1640 - Photocopier SHARP - Free user manual and instructions
Find the device manual for free AL-1640 SHARP in PDF.


| Type of product | Digital photocopier |
| Brand | Sharp |
| Model | AL-1640 |
| Copy speed | 16 copies per minute (A4) |
| Print resolution | 600 x 600 dpi |
| First copy out time | Approx. 8 seconds |
| Warm-up time | Approx. 45 seconds |
| Maximum paper size | A4 / Letter |
| Paper input capacity | 250-sheet paper tray |
| Paper output capacity | 100-sheet output tray |
| Reduction / enlargement | 50% to 200% in 1% increments |
| Continuous copy quantity | Up to 99 copies |
| Dimensions (W x D x H) | 518 x 442 x 405 mm |
| Weight | 19.5 kg |
| Power source | 220-240 V AC, 50/60 Hz |
| Maximum power consumption | 1.2 kW |
| Maintenance & cleaning | Clean the platen glass and active glass regularly; replace toner cartridge when indicated. |
| Safety features | CE certified; automatic power save mode |
| Spare parts and repairability | Consumable toner and drum units are user-replaceable; modular design for serviceability |
| General information | Designed for small-office desktop copying; optional printer and scanner kits available for expanded functionality. |
Frequently Asked Questions - AL-1640 SHARP
User questions about AL-1640 SHARP
0 question about this device. Answer the ones you know or ask your own.
Ask a new question about this device
Download the instructions for your Photocopier in PDF format for free! Find your manual AL-1640 - SHARP and take your electronic device back in hand. On this page are published all the documents necessary for the use of your device. AL-1640 by SHARP.
USER MANUAL AL-1640 SHARP
FOR YOUR PROTECTION...
To aid in reporting this compact copier in case of loss or theft, please record below the model number and serial number located on the back of the unit. We also suggest you record all the information listed and retain for future reference.
MODEL NUMBER____ SERIAL NUMBER ____
DATE OF PURCHASE
Dealer
Address ____ City ____
State ____ Zip ____ Telephone ____
Service Station
Address ____ City ____
State Zip Telephone
For location of the nearest Sharp Authorized Service, or to obtain product literature, accessories, or supplies,
please call 1 - 800 - BE-SHARP
For customer assistance, please visit http://www.sharp-usa.com on the World Wide Web or call 1-(630)378-3590.
CONTENTS
Page
INTRODUCTION
This copier has been designed to provide convenient copying features in a minimum amount of office space and with maximum operational ease. To get full use of all copier features, be sure to familiarize yourself with this manual and the copier.
For quick reference during copier use, keep this manual in a handy location.

This copier can be used as a laser printer. However, This manual describes only the copier features. For description of the printer features, see the printer manual.
Conventions used in this ma1nual
In this manual, the following icons are used to provide the user with information pertinent to the use of the copier.

the user that injury to the user or damage to the copier may result if the contents of the warning are not properly followed.

ns the user that damage to the copier of one of its components may result if the contents of the caution are not properly followed.

provide information relevant to the regarding specifications, functions, performance, operation and such, that may be useful to the user.
Indicates a letter displayed in the copy
q Htity display.

GETTING STARTED
- CAUTIONS 2
- MAIN FEATURES .... 3
• PART NAMES AND FUNCTIONS 4 - Overall layout .... 4
- Operation panel .... 6
• COPIER INSTALLATION 8 - CAUTIONS ON HANDLING 9
- CHECKING PACKED COMPONENTS AND ACCESSORIES 10
- SET-UP 11
- LOADING COPY PAPER 13
GETTING STARTED
MAKING COPIES
• NORMAL COPYING 16
- REDUCTION/ENLARGEMENT/ZOOM 18
- BYPASS FEED (special paper) 20
- TWO-SIDED COPYING 22
- XY ZOOM 23
• B/W REVERSE 25
• DUAL PAGE COPY 26
- INTERRUPTING A COPY RUN 27
• AUTOMATIC EXPOSURE ADJUSTMENT ..... 28
• TONER SAVE MODE 29
MAKING COPIES
STATUS INDICATORS
• TD CARTRIDGE REPLACEMENT 30
- DRUM CARTRIDGE REPLACEMENT 32
• 8V MISFEED REMOVAL 34
STATUS INDICATORS
GENERAL INFORMATION
- USER PROGRAMS 38
• POWER SAVE MODES 40 - USER MAINTENANCE 42
• COPIER TROUBLE? 44
• SUPPLIES 46 - Types and sizes of copy paper 46
– Supply part numbers 46
– Genuine supplies statement 47 - MOVING INSTRUCTIONS 48
- SPECIFICATIONS 49
- INDEX 51
GENERAL INFORMATION
CAUTIONS
Follow the cautions below when using this copier.

- The fusing area is hot. Exercise care in this area when removing misfed paper.
- Do not look directly at the light source. Doing so may damage your eyes.

- The socket-outlet shall be installed near the equipment and shall be easily accessible.
- Place the copier on a firm, level surface.
- Do not install the copier in a humid or dusty location.
- When the copier is not used for a long time, for example, during prolonged holidays, turn the power switch off and remove the power cord from the outlet.
- When moving the copier, be sure to turn the power switch off and remove the power cord from the outlet.
- Do not cover the copier with a dust cover, cloth or plastic film while the power is on. Doing so may prevent heat dissipation, damaging the copier.
SAFETY PRECAUTIONS
This Digital Copier is rated Class 1 and complies with 21 CFR 1040.10 and 1040.11 of the CDRH standards. This means that the copier does not produce hazardous laser radiation. For your safety, observe the precautions below.
- Do not remove the cabinet, operation panel or any other covers.
- The copier's exterior covers contain several safety interlock switches. Do not bypass any safety interlock by inserting wedges or other items into switch slots.

Use of controls or adjustments or performance of procedures other than those specified herein may result in hazardous laser radiation exposure.
MAIN FEATURES
① High-speed laser copying
- First-copy time is only 7.2 seconds (except in a power save mode or immediately after power on).
- Copying speed is 16 copies/min., which adapts to business use, allowing improvement of working efficiency.
② High-quality digital image
• High-quality copying at 600 dpi is performed.
- In addition to the automatic exposure mode, the manual exposure can be adjusted in five steps.
- The photo mode copying function allows clear copying of delicate halftone original images such as monochrome photos and color photos. Photo mode is adjustable in five steps.
③ Substantial copying features
- Zoom copying from 50% to 200% in 1% increments can be performed.
- Continuous copying of maximum 99 sheets can also be performed.
- Useful special features such as the XY zoom, black and white reverse, and dual page copy are available.
- Toner save mode reduces toner consumption by approximately 10%.
④ Scan once/ Print many
- The copier is equipped with a 1-page memory buffer. This memory allows the copier to scan an original 1 time only and make up to 99 copies. This feature allows for improved workflow, reduced operating noise from the copier and reduced wear and tear on the scanning mechanism, which provides for a higher reliability.
⑤ Printer feature
• This copier can be used as a lazer printer.
⑥ Environmentally friendly design
- Paper output tray is housed in the copier for space saving.
- Preheat mode and auto power shut-off mode are provided to reduce power consumption.

This copier does not have an internal calendar or clock. This copier will not be affected by the year 2000.
PART NAMES AND FUNCTIONS
Overall layout

① Platen cover
Place the original on the original table and close the platen cover before copying starts.
② Original table
Place the document to be copied here.
③ Handles
Use to move the copier.
4 Power switch
Press to turn copier power on and off.
⑤ Operation panel
All copier controls are located here for easy operation.
⑥ Paper output tray
Finished copies are deposited in the paper output tray.
⑦ Front cover
Open to remove misfeeds and for copier servicing.
8 Paper tray
Holds 250 sheets of copy paper.
⑨ Side cover
Open to remove misfeeds and to service the copier.
⑩ Side cover handle
Lift and pull to open the side cover.
⑪ Bypass tray guides
Adjust to the width of the copy paper.
⑫ Bypass tray
Special papers (including transparency film) and copy paper can be fed from the bypass tray.
⑬ Bypass tray extension
Pull out when feeding large paper such as 8-1/2" x 14" and 11" x 17".
⑭ Charger cleaner
Use to clean the transfer charger.

⑮ Drum cartridge handle
Hold to pull out the drum cartridge.
⑯ Drum cartridge
Copy images are formed on the photoconductive drum.
⑰ TD cartridge lock release lever
Use to unlock the TD cartridge.
18 TD cartridge strap
Lift to remove the TD cartridge.
⑲ TD cartridge
Contains toner.
20 Roller rotating knob
Turn to remove misfed paper.
② Fusing unit release levers
Lower to remove misfed paper.

Warning
The fusing unit is hot.
Take care in removing paper.
② Paper guide
Open to remove misfed paper.
Accessories
Operation manual.... 1
TD cartridge 1
Charger cleaner....1

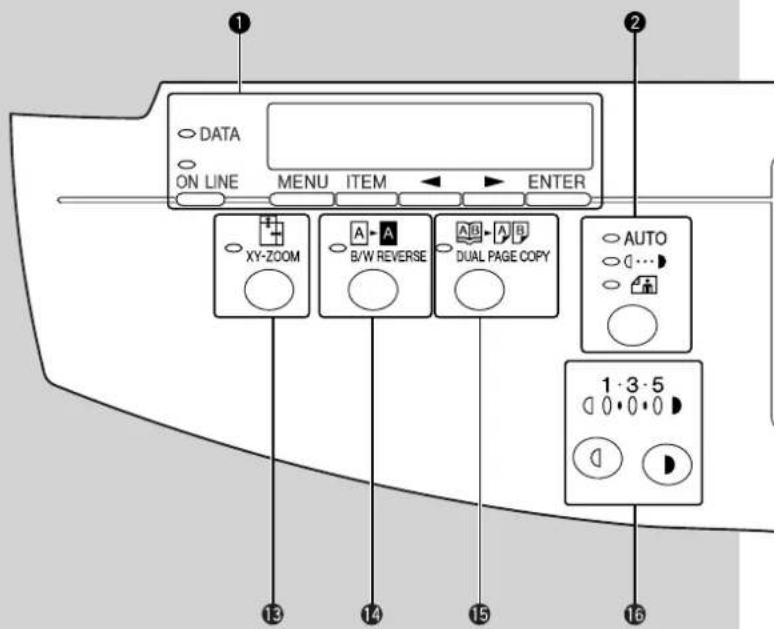
① Operation panel and keys for printer functions
See the printer manual.
② AUTO/MANUAL/PHOTO ( AUTO / 0 ) key
and indicators (p. 15)
Use to sequentially select the exposure modes: AUTO,
MANUAL ( 0 .orPHOTO ( ).
③ ORIGINAL SIZE ENTER key and indicators
Use to input the original size.
4 PAPER SIZE indicators
Light up to show the selected copy paper size.
5 Alarm indicators
□ : Paper required indicator (p.13)
8V : Misfeed indicator (p.28)
⋮ : TD cartridge replacement required indicator (p.24)
○ : Drum replacement required indicator (p.26)
6 AUTO PAPER SELECT indicator
If the bypass tray was previously selected, the AUTO PAPER SELECT function will select the tray for copying if the original size and copy ratio are matched to the paper in the cassette.
7 Paper feed location/misfeed location indicators (p. 28)
The selected paper feed location is shown by a lit indicator (○).
The misfeed location indicator (◀) blinks when a misfeed has occurred.
8 INTERRUPT key and indicator (p. 21)
Interrupts a copy run.
⑨ PAPER SIZE ENTER key (p.12)
Use to set the paper size in a tray.
10 Copy quantity display
Displays the specified copy quantity during the ready condition and displays the copy countdown as copies are made. Also see items 22 and 24.
1 CLEAR ALL ( CA ) key
Clears all selected settings and returns the copier to the initial settings.
12 POWER SAVE ( ② ) indicator (p. 34)
Lights up when the copier is in the preheat mode or in the auto power shut-off mode.
13 XY-ZOOM key and indicator (p. 21)
Use to change the horizontal and vertical copy ratios independently.
14 B/W REVERSE key and indicator (p. 23)
Press to reverse the black and white areas.
15 DUAL PAGE COPY key and indicator (p. 24)
Use to make individual copies of two originals placed side by side on the original table.
16 Light( Ⓞ ) and dark( ) keys and indicators (p. 15)
Use to adjust the MANUAL ( ⌊⋯) or PHOTO ( 📁)
exposure level.

17 AUTO IMAGE key and indicator
Press for automatic copy ratio selection.
18 TRAY SELECT ( - ) key (p. 15)
Use to manually select a paper tray.
19 PRESET RATIO selector keys and indicators (p. 17)
Use to sequentially select preset reduction/enlargement copy ratios: 50%, 64%, 77%, 95%, 100%, 121%, 129%, 141%, 200%.
20 ZOOM indicator (p.17)
Lights up when a zoom ratio is set.
② Zoom keys (p. 17)
Use to select any reduction or enlargement copy ratio from 50% to 200% in 1% increments.
22 Copy ratio display ( % ) key (p. 17)
Press and hold down during standby to display the copy ratio in the copy quantity display.
②3 Copy quantity keys
Use to select the desired copy quantity or to make user program entries.
24 CLEAR ( © ) key
Clears the copy quantity display or terminates a copy run.
Press during standby to display the total number of copies made to date.

Note: 11" x 17" size copies are counted as two copies.
25 START ( ◎ ) key and indicator
Copying is possible when the indicator is on. Press to start copying.
Initial settings
The copier assumes the initial settings when it is first turned on, when the CLEAR ALL (CA) key is pressed, or approximately one minute* after the last copy is made in any mode.
- Copy ratio: 100%
- Exposure: Automatic
- Copy quantity: 0
• Paper feed station: Previously selected paper tray
* This time (auto clear time) can be changed. See page 32, USER PROGRAMS.
COPIER INSTALLATION
Improper installation may damage the copier. Please note the following during initial installation and whenever the copier is moved.

Caution
If the copier is moved from a cool place to a warm place, condensation may form inside the copier. Operation in this condition will cause poor copy quality and malfunctions. Leave the copier at room temperature for at least 2 hours before use.
Do not install your copier in areas that are:
• damp, humid, or very dusty
• exposed to direct sunlight
- poorly ventilated
- subject to extreme temperature or humidity changes, e.g., near an air conditioner or heater.
The copier should be installed near an accessible power outlet for easy connection.
Be sure to connect the power cord only to a power outlet that meets the specified voltage and current requirements. Also make certain the outlet is properly grounded.

Note
Connect the copier to a power outlet which is not used for other electric appliances. If a lighting fixture is connected to the same outlet, the light may flicker.


Be sure to allow the required space around the machine for servicing and proper ventilation.
A small amount of ozone is produced within the copier during operation. The emission level is insufficient to cause any health hazard.
NOTE:
The present recommended long term exposure limit for ozone is 0.1 ppm (0.2 mg/m 3 ) calculated as an 8 hr. time-weighted average concentration.
However, since the small amount that is emitted may have an objectionable odor, it is advisable to place the copier in a ventilated area.
CAUTIONS ON HANDLING
Be careful in handling the copier as follows to maintain the performance of this copier.
Do not drop the copier, subject it to shock or strike it against any object.
Do not expose the drum cartridge to direct sunlight.
Doing so will damage the surface (green portion) of the drum cartridge, causing poor copy quality.


Store spare supplies such as drum cartridges and TD cartridges in a dark place without removing from the package before use.
If they are exposed to direct sunlight, poor copies may result.
Do not touch the surface (green portion) of the drum cartridge.
Doing so will damage the surface of the cartridge, causing smudges on copies.
CHECKING PACKED COMPONENTS AND ACCESSORIES
Open the carton and check to ensure that the following components and accessories are included.
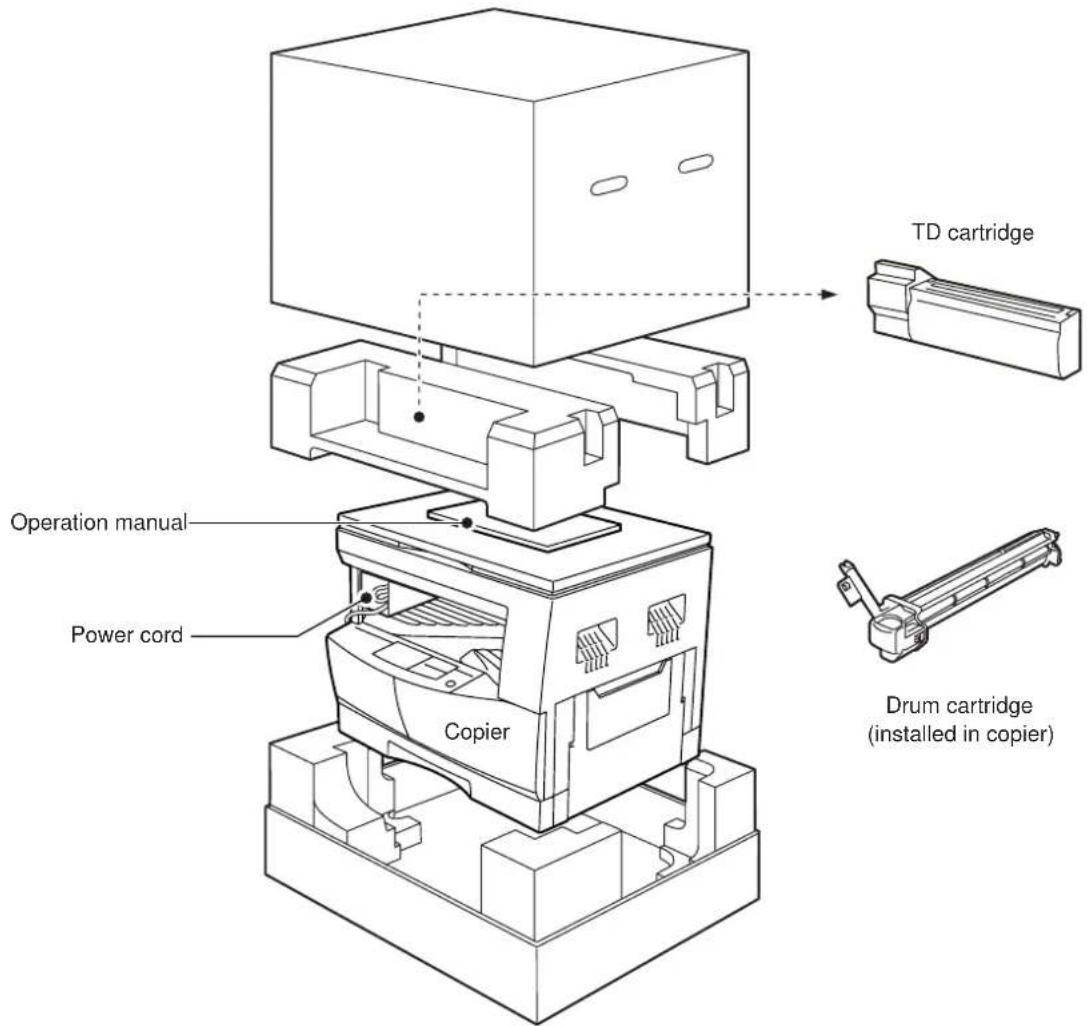

- If anything is not included or is damaged, contact our Technical Assistance Department at 1-(630)378-3590.
- Save the carton and packing materials. These can be re-used for transporting the machine, should it be necessary.
Unpacking

Be sure to lift by the handles on both sides of the copier by two persons to unpack the copier and carry it to the installation location.
SET-UP
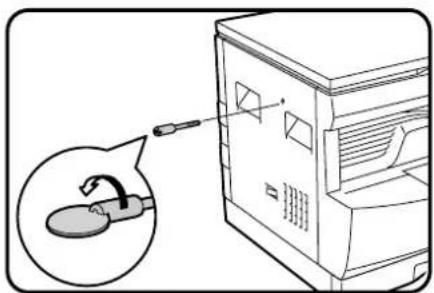
1 Remove all pieces of tape, then open the platen cover and remove the protective material.
2 Use a coin (or other suitable object) to remove the screw.

Store the screw in the paper tray as described in step 6 because it must be used if the copier has to be moved. (p. 42)
3 Install the TD cartridge.
- For installation of the TD cartridge, see steps 1 and 2 and steps 4 to 7 of TD CARTRIDGE REPLACEMENT on pages 24 and 25.

4 Gently lift and pull out the paper tray until it stops.

5 Remove the pressure plate lock. Rotate the pressure plate lock in the direction of the arrow to remove it while pressing down the pressure plate of the paper tray.


6 Store the pressure plate lock which has been removed in step 5 and the screw which has been removed in step 2 in the front of the paper tray.
- To store the pressure plate lock, rotate the lock to fix it on the relevant location.
- For the AL-1621, follow steps 4 to 6 for both the upper and lower trays except for storage of the screw.
7 Ensure that the power switch of the copier is in the OFF position. Plug the power cord into the nearest outlet.

If you use the copier in a country other than the country where the copier was purchased, you will need to make sure that your local power supply is compatible with your model. If you plug the copier into an incompatible power supply, irreparable damage to the copier will result.

Only insert the power cord into a properly grounded wall socket. Do not use extension cords or power strips.

Connect the copier to a power outlet which is not used for other electric appliances. If a lighting fixture is connected to the same outlet, the light may flicker.

8 Turn the power switch on.
9 Load copy paper. • When loading copy
- When loading copy paper for the first time, be sure to turn the power switch on in advance.
- For loading copy paper, see steps 2 to 4 of LOADING COPY PAPER on page 13. To change the paper size from the factory default size, see pages 14 and 15.

LOADING COPY PAPER
To save space, this copier has been designed with an adjustable front-loading tray, which is easily opened for paper loading. For best results, use only SHARP recommended paper. (See page 00.)
The paper required (Indicator will light up when there is no copy paper in the selected paper feed station, or when the selected paper tray is not installed or is improperly installed.

Note
When the paper size is changed in a paper tray, the size of the paper must be entered by steps 8 through 11 on page 15. If not, the edges of copies may become smudged with toner. Also, the AUTO PAPER SELECT and the AUTO IMAGE features will not function properly.

1 Gently lift and pull out the paper tray until it stops.

2 Push the pressure plate down until it locks in place.
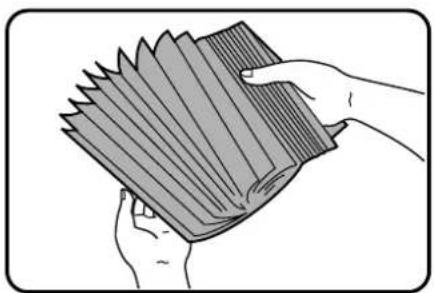
3 Fan the copy paper and insert it into the tray. Make sure the edges go under the corner hooks.
- If you change to a different size of copy paper, the tray must be adjusted. See the next page.

- Set the paper along the guides.
- The tray holds up to 250 sheets of 21 lb. bond paper. Do not load paper above the maximum height line.
4 Push the paper tray firmly back into the copier.
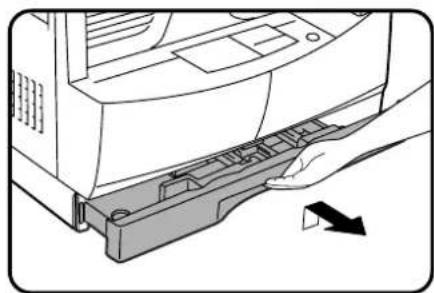


Changing the copy paper size in the tray
1 Gently lift and pull out the paper tray until it stops.
2 Push the pressure plate down until it locks in place.
3 Squeeze the lock lever of the front guide and slide the front guide to match the width of the paper.
4 Move the left guide to the appropriate slot as marked on the tray.
- When using 11" x 17" copy paper, store the left guide in the slot at the left front of the paper tray.
5 Load copy paper into the tray.
6 Place the appropriate label to indicate the selected paper size into the recess on the right front side of the paper tray.
7 Push the paper tray firmly back into the copier.

8 To set the selected paper size, press the PAPER SIZE ENTER (☐ ENTER) key.
- The selected paper feed location indicator will blink and the corresponding paper size (which is currently set) indicator will light up steadily. All other indicators will go out.

9 Use the ORIGINAL SIZE ENTER (key to select the paper size which is set.
- Each time the ORIGINAL SIZE ENTER (ENTER) pressed, a paper size will be indicated with a paper size indicator.

10 Press the START (⑤key and then the PAPER SIZE ENTER (□ENTER) key.
NORMAL COPYING


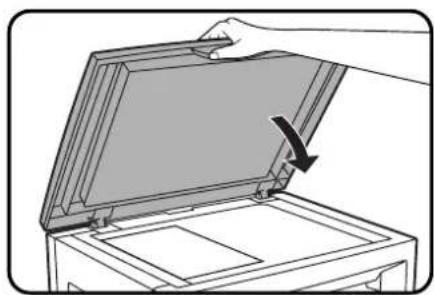

1 Turn the power switch on. It will take about 35 seconds for
- It will take about 35 seconds for the copier to warm up. However, you can make desired settings and press the START (☐) key during warm-up. Copying will start after warm-up.
- If the power is already on and all indicators except the POWER SAVE indicator are off the copier is in the auto power shut-off mode. Press the START key in this case. See page 45. POWER SAVE MODES.
2 Place an original face down on the original table, and align it with the original size scale.
- Image loss (max. 5/32" (4 mm)) can occur at the leading and trailing edges of the copies. Also image loss (max. 5/32" (4 mm) in total) can occur along the other edges of the copies.
3 Close the document feeder cover.
4 Ensure that the copy paper size in the paper tray is the same size as the original.
- If a tray of the required size is not installed, use the bypass tray and press the TRAY SELECT (⊖) key to select the bypass tray.
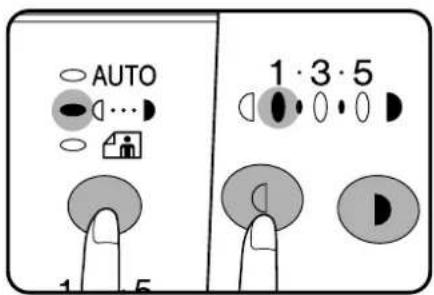
5 Adjust the copy density. • This copier has three exposure
- This copier has three exposure modes to choose from — AUTOMATIC (AUTO), MANUAL (Q. and PHOTO ( ).
- Automatic exposure is the standard initial setting for this copier. In this mode, the characteristics of the original are "read" by the exposure system and adjustments are automatically made. This optimizes the contrast of the copied images by reducing the effect of colored or shaded background areas. See page 30 to adjust the automatic exposure level.
- For manual copy density adjustment, press the AUTO/MANUAL/PHOTO (AUTO / 0) key select MANUAL () and adjust with the light (④) and dark ( ) keys as desired.
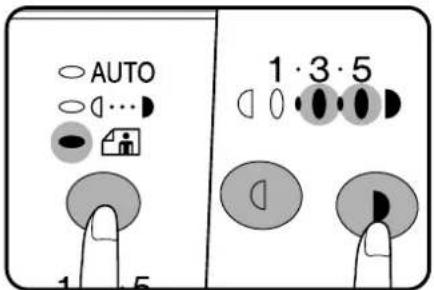
- For photographs, select PHOTO ( ) and then adjust with the light ( ① ) and dark ( ) keys as desired.
- There are 5 exposure steps indicated by 3 indicator lights. (The indicators light up one or two at a time.)
If exposure level 2 is selected, the two left-handmost indicators for that level will light up simultaneously. Also, if level 4 is selected, the two right-handmost indicators for that level will light up simultaneously.

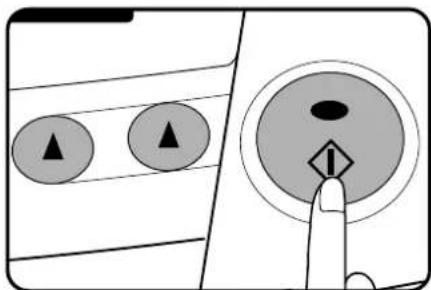
6 Set the number of copies using the two copy quantity (▲, keys.
- Press the right copy quantity key to set the units digit from 0 to 9. This key will not change the tens digit.
- Press the left copy quantity key to set the tens digit from 1 to 9.
- A single copy can be made with the initial setting, i.e., when "0" is displayed.
- Press the CLEAR ( )key to clear an entry if a mistake is made.
7 Press the START (key. The number in the copy quant
- The number in the copy quantity display will decrease by 1 each time a copy is made.
- Press the CLEAR ( ) key to stop copying in the middle of a run.
- To repeat the same copy sequence for a different original, simply replace the original and press the START (☐) key.
How to remove the platen cover
The platen cover can be removed to allow copying of bulky objects. To remove it, simply lift the platen cover straight up.
• To reattach the platen cover, reverse the above procedure.


REDUCTION/ENLARGEMENT/ZOOM
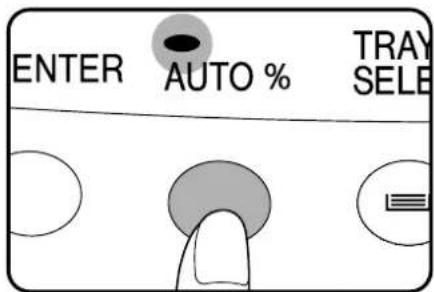
Reduction and enlargement ratios can be selected either automatically with the AUTO IMAGE (AUTO %) key or manually with the PRESET RATIO selector ( √ , keys and/or the zoom ( , ) keys The zoom function enables precise copy ratio selection from 50% to 200% in 1% increments.
Automatic


1 Place the original on the original table and close the platen cover.
2 When using the original table, press the ORIGINAL SIZE ENTER (ENTER) key until the indicator for the size of the original on the original table lights up.
3 Use the TRAY SELECT ( ) key to select the paper tray with the desired paper size.
- This feature will not work when copy paper of non-standard size is used or the bypass tray is used.
4 Press the AUTO IMAGE (Aukey). The copy ratio will be automatically s
- If the size and orientation of the original do not correspond to standard reduction/enlargement ratios for the selected paper tray, then the ORIGINAL SIZE indicator will blink.
- If a PRESET RATIO indicator is blinking, part of the original image may not be copied.
5 Enter the number of copies. 6 Press the START (key.

- To cancel the automatic reduction/enlargement mode, press the AUTO IMAGE (AUTO %) key again.
- When copying from the SPF with this feature, the automatic reduction/enlargement mode will be automatically canceled after copying is complete.
Manual


1 Place the original on the original table and close the platen cover.
2 Use the PRESET RATIO selector ( ☑ keys and the zoom ( ☑ , ☑ keys to select the desired copy ratio.
- To select a preset reduction or enlargement copy ratio, press the √ or Ⓞy repeatedly until the indicator for the desired copy ratio is lit.
A. Preset reduction ratios are: 95%, 77%, 64%, and 50%.
B. Preset enlargement ratios are: 121%, 129%, 141%, and 200%.
C. Zoom ratios: Any ratio from 50% to 200% can be set, in 1% increments. Press the √ or key to set the approximate ratio, then press the ⏱ key to decrease the ratio or the ⏱ key to increase the ratio.
- When a zoom (key is pressed, the ZOOM indicator will light up and the zoom ratio will be displayed in the copy quantity display for at least two seconds.
- To verify a zoom setting without changing the zoom ratio, press and hold down the copy ratio display ( % ) key. When the key is released, the display will return to the copy quantity display.
- To decrease or increase the zoom ratio rapidly, press and hold down the ⏰ or ⏻key. However the value will stop at the preset reduction or enlargement ratios. To move beyond these ratios, release the key and then press and hold it down again.
D. Same-size reset: Press the or√key repeatedly until the copy ratio returns to 100%.
3 Ensure that copy paper of the desired size is installed in the paper tray.
4 Set the number of copies and press the START () key.
BYPASS FEED (special paper)
The bypass tray is used to copy onto transparency film, labels, and other special purpose papers. Up to 100 sheets of standard copy paper can be set in the bypass tray.

Note
For special purpose papers, the original image must be smaller than the paper or media for copying.
If the original image is bigger than the paper or media, this may cause smudges on the edges of the copies.
Also for standard copy paper, smudges may appear if the copy paper is not at least as large as the original image.

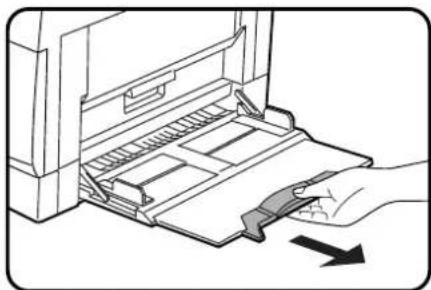


1 Unfold the bypass tray.
- When feeding 8-1/2" x 14" or 11" x 17" sized paper, extend the bypass tray.
2 Set the paper guides to the copy paper width.
3 Insert the copy paper (print face down) all the way into the bypass tray.
- Up to 100 sheets of standard copy paper measuring from 5-1/2" x 8-1/2" to 11" x 17" can be loaded in the bypass tray.
- Transparency film, labels, and other special purpose papers (except envelopes) must be fed individually. Up to 10 envelopes can be set.
- When adding paper, first remove remaining paper, combine it with the paper to be added and then reload as a single stack.
- When loading envelopes, make sure that they are straight and flat.

4 Press the TRAY SELECT () key to select the bypass tray.

5 Leave the copy quantity at 0 if using special papers. Set the number of copies if using standard copy paper or envelopes.
6 Press the START (key.
TWO-SIDED COPYING
Two-sided copies can be made on this copier using the bypass tray.


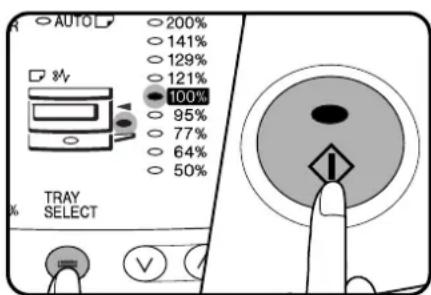
1 Place the first original on the original table and make a copy.
- The first copy can be made using any of the paper feed stations.
2 Replace the first original with the second original and close the document feeder cover.
- Make sure that the first and second originals are oriented in the same way on the original table.
- When the originals are placed horizontally, make sure that the first and second originals are oriented in the reverse way on the original table.

3 Turn the first copy over left to right and place it into the bypass tray.
- Be sure to feed the copies one sheet at a time.
4 Use the TRAY SELECT ( ) key to select the bypass tray.
5 Press the START (key.
XY ZOOM
Original Copy

The XY ZOOM feature allows the horizontal and vertical copy ratios to be changed independently.
To use the XY ZOOM feature with the DUAL PAGE COPY feature, set the DUAL PAGE COPY feature first and then the XY ZOOM feature. (Enlargement cannot be set.)
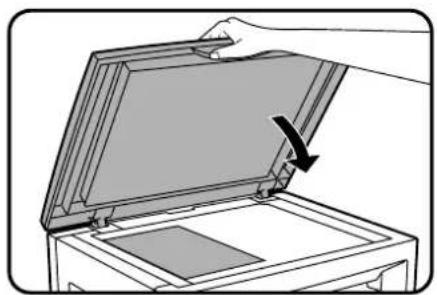
1 Place the original on the original table and close the platen cover.

2 Press the XY-ZOOM (key. • The current value for the vertical
- The current value for the vertical direction will be displayed in the copy quantity display.

3 Use the PRESET RATIO selector (▼) keys and zoom (▽), ▶keys to change the copy ratio in the vertical direction.
- Press a PRESET RATIO selector (or) key to set an approximate ratio, then press the √ key to decrease the ratio or key to increase the ratio. The copy ratio will be displayed in the copy quantity display.

4 Press the copy ratio display (⑧key.
- The selected ratio for the vertical direction will be entered and the current value for the horizontal direction will be displayed in the copy quantity display.


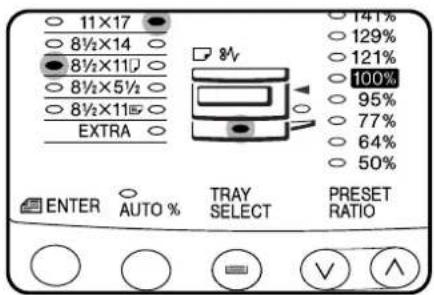

5 Use the PRESET RATIO selector ( √ keys and zoom ( √ , ) keys to change the copy ratio in the horizontal direction in a similar manner as for the vertical direction.
6 Press the copy ratio display ( ) key. • The selected ratio for the horizontal direction
- The selected ratio for the horizontal direction will be entered and the display will change to the copy quantity display.
- To verify the copy ratios, press and hold down the copy ratio display ( % ) key. The vertical and horizontal ratios will be alternately displayed.
7 Ensure that copy paper of the desired size is installed in the paper tray.
- If the bypass tray was previously selected, the tray will be automatically selected if the original size and copy ratio are matched to the paper in the cassette.
8 Set the number of copies and press the START() key.

Note
- To change the copy ratios again, press a PRESET RATIO selector ( √ , ) key or a zoom ( , √ ≈ ) key. Then, perform step 3 and the succeeding steps.
- To cancel this function, press the XY-ZOOM (key again.
B/W REVERSE
Original Copy
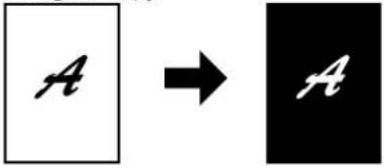
The B/W REVERSE feature is used to reverse black and white areas.
- When the B/W REVERSE feature is selected, the exposure mode will be automatically set to the MANUAL mode. Other exposure modes cannot be selected.
Even if this feature is canceled, the MANUAL mode will not automatically be canceled.

1 Place the original in the document feeder tray or on the original table.

2 Press the B/W REVERSE (A key.

Check the copy paper size.
- If the bypass tray was previously selected, the tray will be automatically selected if the original size and copy ratio are matched to the paper in the cassette.
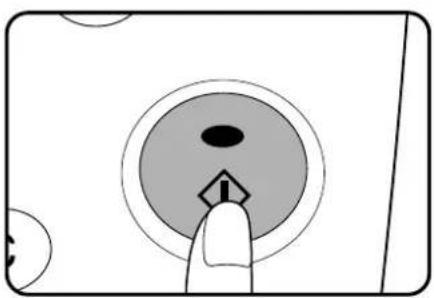
4 Make all other desired copier selections and press the START (💡) key.
DUAL PAGE COPY

The DUAL PAGE COPY feature produces individual copies of two documents placed side by side on the original table. It is especially useful when copying books and other bound documents. If the AUTO IMAGE feature has been selected, this feature cannot be selected.
To use the DUAL PAGE COPY feature with the XY ZOOM feature, set the DUAL PAGE COPY feature first and then the XY ZOOM feature. (Enlargement cannot be set.)

1 Place the originals on the original table with the center of the two pages aligned with the paper size index (☐ 8 1/2 ). Close the platen cover.
- Set the page to be copied first to the right of the paper size index mark.

2 Press the DUAL PAGE COPY (A key B Check to be sure that 8-1/2" x 11" size copy p

3 Set the number of copies and press the START () key.
INTERRUPTING A COPY RUN
INTERRUPT is used to interrupt a long copy run so that another job can be done.

1 Press the INTERRUPT ( )key.
• The copier will return to the initial settings.
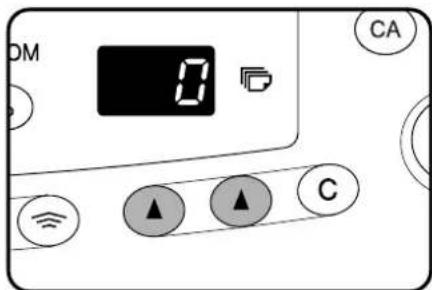
2 When the copier stops, remove the original(s) and set the original(s) for interrupt copying.
3 Select the desired available copier functions.
4 Set the number of copies.
5 Press the START (key.

6 When all INTERRUPT copies are finished, press the INTERRUPT (☐) key again to cancel the INTERRUPT mode, and remove the original used for interrupt copying.
- The previous copy quantity, copy ratio, copy density, and paper size will be automatically restored.
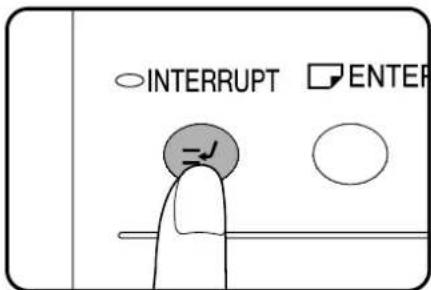
7 Replace the original for the interrupted job and press the START ( ⏻ ) key to resume copying.
AUTOMATIC EXPOSURE ADJUSTMENT
The automatic exposure level can be adjusted to suit your copying needs.
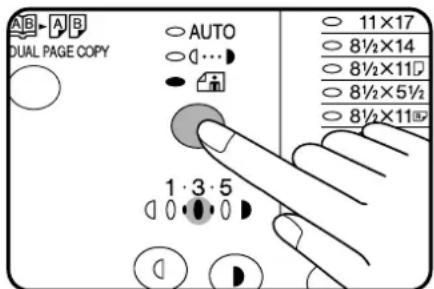

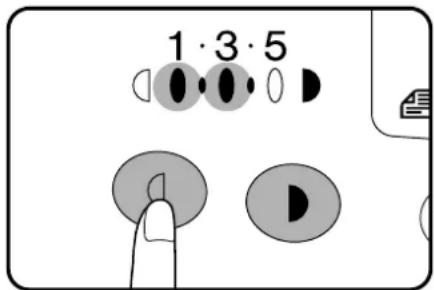

1 Press the AUTO/MANUAL/PHOTO (AUTOkey…) to select the PHOTO (💡) mode.
2 Press and hold down the AUTO/MANUAL/PHOTO (/AUTO 0…) / Key for approximately 5 seconds.
- The PHOTO ( indicator will go out and the AUTO indicator will begin to blink.
- One or two exposure indicators corresponding to the current automatic exposure level will light up. The factory default setting is level "3".
3 Press the light (or dark () key to lighten or darken the automatic exposure level as desired.
4 Press the AUTO/MANUAL/PHOTO (AUTOkey:…) The AUTO indicator will stop blinking and will light up steady
- The AUTO indicator will stop blinking and will light up steadily.
- This automatic exposure level will remain in effect until you change it again by this procedure.
TONER SAVE MODE
This mode reduces toner consumption by approximately 10% in the automatic and manual exposure modes. Copies will be lighter but still adequate for general use. Selection of this mode does not affect the PHOTO (图标) mode. Follow the procedure below for setting the toning level.

1 Press the AUTO/MANUAL/PHOTO (AUTOkey…) to select the MANUAL (☐…) mode.

2 Press and hold down the AUTO/MANUAL/PHOTO (/AUTO ⬆…) / key for approximately 5 seconds.
- The MANUAL ( ) indicator will go out and the PHOTO ( ) indicator will begin to blink.
- The exposure indicator marked "5" will light up, indicating that the standard toner mode is active.

To enter the toner save mode, press the light () key.
- The exposure indicator marked "1" will light up, indicating that the toner save mode is selected.

Press the AUTO/MANUAL/PHOTO (/A) key...
- The PHOTO (图标) indicator will stop blinking and will light up steadily. The toner save mode is now active.
- To return to the standard mode, repeat the procedure but use the dark (☐) key to select exposure level "5" in step 3.

TD CARTRIDGE REPLACEMENT
If the machine detects an insufficient amount of toner being added, copying will stop and the machine will add toner. During this time the START key indicator will blink. When sufficient toner has been added the indicator will remain on steadily indicating that copying can be resumed. However, if toner addition continues for a maximum of two minutes, the TD replacement required indicator will light up in addition to the START key being lighted steadily.
This indicates that the toner supply is low and a new cartridge will be needed soon. If copying is continued, the copies will gradually become lighter until the copier stops and the TD cartridge replacement indicator begins to blink, indicating that the cartridge must be replaced. Replace the TD cartridge by following the procedure below.
For best copying results, be sure to use only SHARP Genuine Supplies which are designed, engineered and tested to maximize the life and performance of SHARP copiers. Look for the Genuine Supplies label on the toner package.

GENUINE SUPPLIES

1 Open the bypass tray. Lift slightly on the side cover and slide the cover out until it stops.

2 Push gently the right side of the front cover to open the cover.
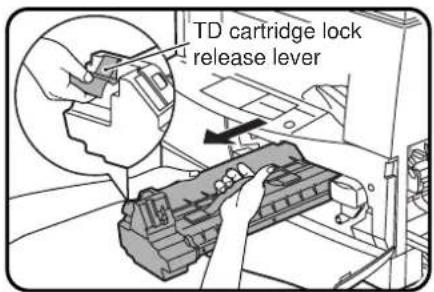
3 Lift the TD cartridge lock release lever and pull the cartridge out until the green strap handle can be grasped by the right hand. Lift the cartridge by the handle while supporting it with the left hand at the green label position to remove it.
- Dispose of the old TD cartridge in accordance with local regulations.
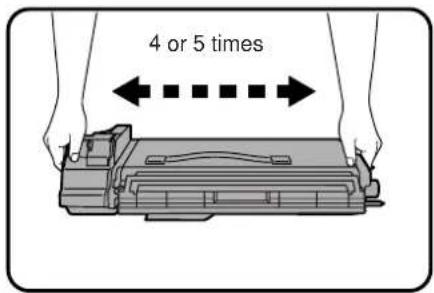
4 Remove the new TD cartridge from the bag. Hold the cartridge on both sides and shake it horizontally four or five times.
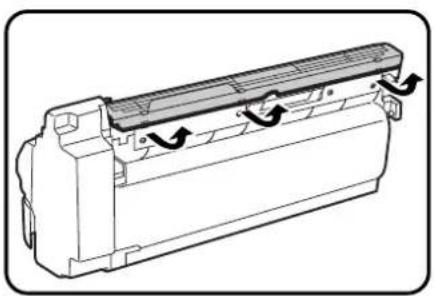
5 Remove the protective cover from the TD cartridge by unlatching three cover hooks from the holes on the cartridge and then pulling the cover in the direction indicated by the arrow in the illustration.

6 Gently insert the TD cartridge along the guides until it locks in place.


If dirt or dust is adhered to the TD cartridge, remove it before installing the cartridge.

7 Close the front cover by pushing both sides with your hands and then close the side cover by pressing the handle on the cover. The indicator will go out.

When closing the covers, be sure to close the front cover securely and then close the side cover. If the covers are closed in the wrong order, the covers may be damaged.

DRUM CARTRIDGE REPLACEMENT
The useful life of the drum cartridge is approximately 30,000 copies. When the internal counter reaches approximately 29,000 copies, the drum replacement required (☐) indicator will light up indicating that replacement of the drum cartridge will be needed soon. When the indicator begins to blink, replace the drum cartridge by following the procedure given below.

Caution
Do not remove the protective cover on the drum portion (black paper) of a new drum cartridge before use. The cover protects the drum against external light.
For best copying results, be sure to use only SHARP Genuine Supplies which are designed, engineered and tested to maximize the life and performance of SHARP copiers. Look for the Genuine Supplies label on the drum package.

GENUINE SUPPLIES
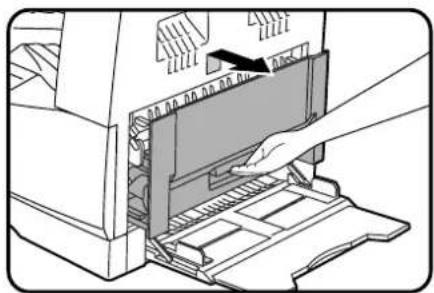


1 Open the bypass tray. Lift slightly on the side cover and slide the cover out until it stops.
2 Push gently the right side of the front cover to open the cover.
3 Lift the TD cartridge lock release lever and pull the cartridge out until the green strap handle can be grasped by the right hand. Lift the cartridge by the handle while supporting it with the left hand at the green label position to remove it.
4 Grasp the handle of the drum cartridge and gently pull the cartridge out.
- Dispose of the old drum cartridge in accordance with local regulations.

5 Remove the new drum cartridge from the protective bag and gently insert the lead end of the drum cartridge along the guides.

Do not touch the surface of the drum (green portion) of the cartridge. Doing so may cause smudges on the copies.

6 Remove the protective cover from the drum cartridge and then push the cartridge all the way into the copier.

7 Gently install the TD cartridge. To install the TD cartridge, see page 24, TD CARTRIDGE REPLACEMENT.

8 Close the front cover by pushing both sides with your hands and then close the side cover by pressing the handle on the cover. The drum replacement required (☐) indicator will go out.

When closing the covers, be sure to close the front cover securely and then close the side cover. If the covers are closed in the wrong order, the covers may be damaged.

MISFEED REMOVAL
The copier will stop when a misfeed occurs. The misfeed (Indicator will blink.
If paper is accidentally torn during removal, be sure to remove all pieces.
Be careful not to damage the photoconductive drum.


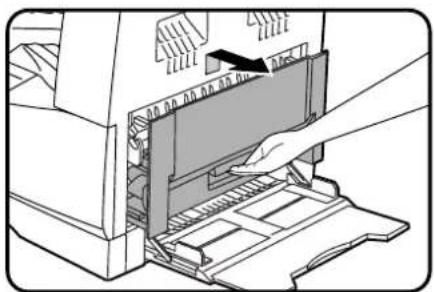
Misfeed in the bypass tray
1 Gently pull the misfed paper out.
2 Lift slightly on the side cover and slide the cover out until it stops. Close the side cover by pressing the handle on the cover.
• The misfeed ( indicator will go out.
Misfeed in the copier
1 Open the bypass tray. Lift slightly on the side cover and slide the cover out until it stops.
2 Check the misfeed location. Remove the misfed paper following the instructions for each location in the illustration below.
If the misfed paper is seen from this side, proceed to "C. Misfeed in the transport area".
If paper is misfed here, proceed to "A. Misfeed in the paper feed area".

If paper is misfed here, proceed to "B. Misfeed in the fusing area".


A. Misfeed in the paper feed area
1 Push gently the right side of the front cover to open the cover.
2 Carefully remove the misfed paper. Turn the roller rotating knob in the direction of the arrow to assist in removing it.

The fusing unit is hot. Take care in removing paper.

Do not touch the surface of the drum (green portion) of the drum cartridge when removing the misfed paper. Doing so may damage the drum and cause smudges on copies.
3 Close the front cover by pushing both sides with your hands and then close the side cover by pressing the handle on the cover.
• The misfeed (Indicator will go out.

When closing the covers, be sure to close the front cover securely and then close the side cover. If the covers are closed in the wrong order, the covers may be damaged.
B. Misfeed in the fusing area
1 Push gently the right side of the front cover to open the cover.


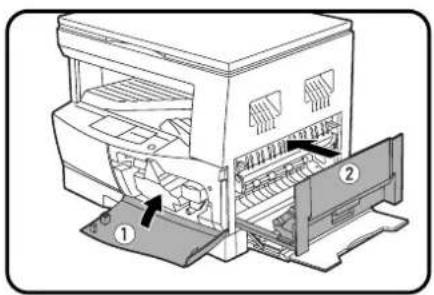


2 Turn the roller rotating knob in the direction of the arrow.
3 Carefully remove the misfed paper. Lower the fusing unit release levers to allow easier removal. Return the release levers to their operating positions.

The fusing unit is hot. Take care in removing paper.

- Do not touch the surface of the drum (green portion) of the drum cartridge when removing the misfed paper. Doing so may damage the drum and cause smudges on copies.
- Be careful about unfixed toner on the misfed paper.
4 Close the front cover by pushing both sides with your hands and then close the side cover by pressing the handle on the cover.
• The misfeed ( indicator will go out.

When closing the covers, be sure to close the front cover securely and then close the side cover. If the covers are closed in the wrong order, the covers may be damaged.
C. Misfeed in the transport area
1 Open the paper guide by pressing down the projection on either side of the guide and remove the misfed paper.

The fusing unit is hot. Take care in removing paper.
2 If the misfed paper cannot be removed by the previous step but is visible in the paper output area, remove the paper by pulling it into the paper output area.

3 Close the side cover by pressing the handle on the cover.
• The misfeed (Indicator will go out.

Misfeed in the paper tray
Before opening the paper tray, be sure to open the bypass tray, lift slightly on the side cover and slide the cover out until it stops, and then perform steps 1 to 3 described in the "A. Misfeed in the paper feed area" section.
1 Gently lift and pull out the paper tray and remove the misfed paper.

2 Close the paper tray.

3 Lift slightly on the side cover and slide the cover out until it stops. Close the side cover by pressing the handle on the cover.
• The misfeed ( indicator will go out.
USER PROGRAMS
The user programs allow the parameters of certain functions to be set, changed, or canceled as desired.
List of user programs
This copier has the following user programs.
| Program No. | Program name Description |
| 1 Auto clear time Sets the auto clear time. The copier returns to the initial settings when the auto clear time elapses after the last copy is made. | |
| 2 Preheat mode Sets the time that elapses before the copier enters the preheat mode after any operation is made. See page 44. | |
| 3 Auto power shut-off Sets the time that elapses before the copier enters the auto power shut-off timer mode after any operation is made. See page 44. | |
| 4 Stream feeding mode Enables or disables the stream feeding mode. For description of the stream feeding mode, see page 17. | |
| 5 Auto power shut-off Enables or disables the auto power shut-off mode. See page 44. setting | |
| 8 Auto paper select mode Enables or disables the auto paper selection. See page 16. | |


Setting the user programs
1 Press and hold the light ( key for more than 5 seconds until all the alarm indicators ( ∴ , , and &ν ) blink and “--” appears in the copy quantity display.
2 Enter a program number using the left copy quantity ( Ⓞ ) key.
- The selected program number will blink in the copy quantity display.
- If a mistake is made in steps 2 to 4, press the CLEAR () key. The copier will return to step 2.
- The program numbers are shown in the table above.
For example, to change the setting of the auto power shut-off timer, enter 3.
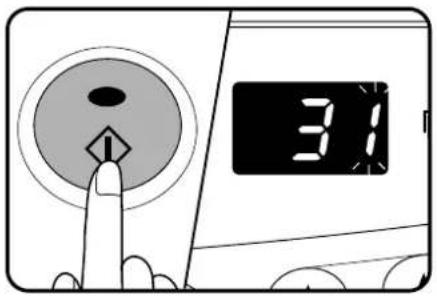
3 Press the START (key. • The entered program number
- The entered program number will be steadily lit on the left side of the copy quantity display and the currently selected parameter number for the program will blink on the right side.

4 Select the desired parameter using the right copy quantity ( Ⓞ ) key.
- The entered parameter number will blink on the right side of the copy quantity display.
• The parameters are shown in the table below.
For example, to change the setting of the auto power shut-off timer to 60 min., enter 2.
| Program name Parameters | |||||
| Auto clear time | 0 ⇔ OFF5 ⇔ 10 sec. | 1 ⇔ 30 sec. | *2 ⇔ 60 sec. | 3 ⇔ 90 sec. | 4 ⇔ 120 sec. |
| Preheat mode | 0 ⇔ OFF | 1 ⇔ 30 sec. | 2 ⇔ 60 sec. | *3 ⇔ 90 sec. | 4 ⇔ 120 sec. |
| Auto power shut-off timer | *1 ⇔ 30 min. | 2 ⇔ 60 min. | 3 ⇔ 90 min. | 4 ⇔ 120 min. | 5 ⇔ 240 min. |
| Stream feeding mode | *0 ⇔ OFF | 1 ⇔ ON | |||
| Auto power shut-off setting | 0 ⇔ OFF | *1 ⇔ ON | |||
| Auto paper select mode | 0 ⇔ OFF | *1 ⇔ ON | |||
Factory default settings are indicated with an asterisk (*).

Note
If you select "0" (OFF) in a program, the corresponding function will be disabled.

5 Press the START (key. • The right-hand number in the
- The right-hand number in the copy quantity display will be steadily lit and the entered value will be stored.
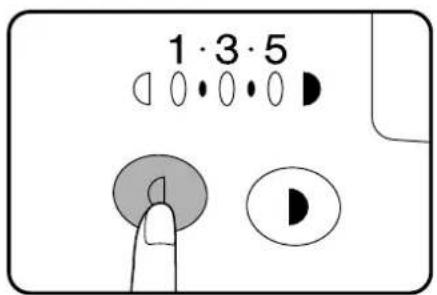
6 To continue with other user programs, press the CLEAR (©) key and then repeat steps 2 to 5. To exit the user program mode, press the light (④) key.
- All the alarm indicators will go out.
POWER SAVE MODES
The copier has two power save modes to reduce overall power consumption thereby reducing the cost of operation. In addition, these modes conserve natural resources and help reduce environmental pollution. The two power save modes are preheat mode and auto power shut-off mode.
- User programs
The preheat activation time and the auto power shut-off time have been preset at the factory to 90 sec. for preheat mode and 30 min. for auto power shut-off mode. These times can be changed using user programs. It is suggested that you set appropriate times according to the actual usage of the copier. (See page 32.)

Preheat mode
When the copier enters the preheat mode, the POWER SAVE (2) indicator will light up and other indicators will remain on or off as before. In this condition, the fuser in the copier is maintained at a lower heat level, thereby saving power. The preheat level is, however, high enough to allow the copier to come to a ready condition or begin copying within 10 seconds after any key input or copier operation such as paper tray operation is performed.
Auto power shut-off mode
When the copier enters the auto power shut-off mode, the POWER SAVE indicator will light up and all other indicators will go out. The auto power shut-off mode saves more power but requires a longer time to warm up before copying can begin.

As an ENERGY STAR® Partner, SHARP has determined that this product meets the ENERGY STAR® guidelines for energy efficiency.
Setting the power save modes
The time that elapses before the copier enters a power save mode after any operation is made can be set manually. This time is set with user program No. 2 for the preheat mode and user program No. 3 for the auto power shut-off mode. For these settings, see page 32.
- The copier will enter the preheat mode first and then the auto power shut-off mode after a preset time has elapsed when no copier operation has been made.
- If conflicting settings are made with user programs No. 3 and No. 5, the last program set will have priority.
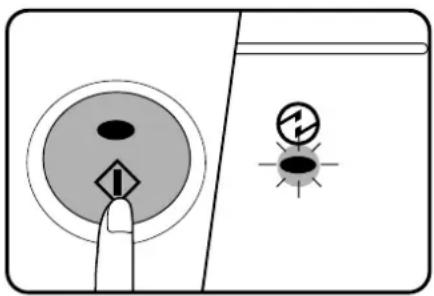
Copying from the preheat mode
Make desired copier selections and press the START (💡) key using the normal copying procedure.
- When any key input is made or any other copier operation is made, the POWER SAVE (②) indicator will start to blink.
- When the START (⑥) key is pressed, the START key ( ) ◎ indicator will go out and copying will start within 10 seconds. The POWER SAVE (⑦) indicator will go out when copying starts.
USER MAINTENANCE
Proper care is essential for clean, sharp copies. Please take a few minutes to regularly clean your copier.
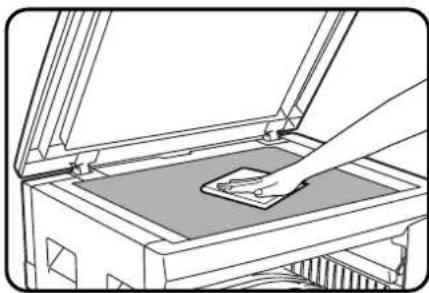
Original table and platen cover
Stains or dirt on the original table or platen cover will also be copied. Wipe the original table and platen cover with a soft, clean cloth.
- If necessary, dampen the cloth with water. Do not use thinner, benzene, or similar volatile cleaning agents.


Bypass tray paper feed roller
If misfeeds occur frequently when feeding postcards, envelopes, thick paper, etc. through the bypass tray, wipe the blue paper feed roller at the feed slot of the bypass tray with a soft, clean cloth dampened with alcohol or water.
Transfer charger
If copies start becoming streaky or blotchy, the transfer charger may be dirty. Clean the charger. The cleaning method is described on the next page.

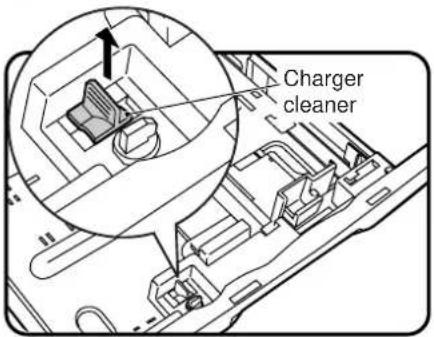

1 Turn the power switch off.
2 Open the bypass tray. Lift slightly on the side cover and slide the cover out until it stops.
3 Gently lift and pull out the paper tray and take the charger cleaner out by holding the tab.
4 Set the charger cleaner onto the transfer charger and gently slide the cleaner in the direction indicated by the arrow two or three times.

Caution
Slide the charger cleaner from one end to the other end along the groove of the transfer charger. If the cleaner is stopped on the way, smudges on copies may occur.
- If the white sheet metal is smudged with toner, wipe it with a soft, clean cloth.
5 Return the charger cleaner to its original position. Close the paper tray. Close the side cover by pressing the handle on the cover.
6 Turn the power switch on.
COPIER TROUBLE?
| Problem Solution | ||
| Copier does not operate. | • Copier plugged in? | Plug the copier into a grounded outlet.See page 8. |
| • Power switch ON? | Turn the power switch ON.See page 15. | |
| Copies are too dark or too light. | • Copy density properly adjusted? | See pages 15 and 22. |
| Blank copies | • Is the original placed face down? | Place the original face down on the original table. |
| Copies smear if rubbed. | • Paper too heavy? | Use copy paper within the specified range.See page 40. |
| • Paper damp? | Replace with dry copy paper.Be sure to store copy paper in a dry location.See page 41. | |
| Striped copies | • Is transfer charger clean? | Clean the transfer charger. See page 37. |
| Paper misfeeds frequently. | • Non-standard paper used? | Use standard paper. If using special paper, feed the paper through the bypass tray.See pages 18 and 40. |
| • Paper properly installed? | Make sure the paper is properly installed. See pages 13 and 18. | |
| • Pieces of paper inside copier? | Remove all pieces of misfed paper.See page 28. | |
| • Paper curled or damp? | Store copy paper flat in the wrapper in a dry location. See page 41. | |
| Copies are smudged or dirty. | • Original table or platen cover dirty? | Clean regularly. See page 36. |
| • Original smudged or blotchy? | Use a clean original. | |
| Power is on but copying is not possible. | • Is the POWER SAVE ( indicator blinking? | Wait until warm-up is complete.Warm-up time is approximately 35 seconds. |
| • Is the indicator on? | Copy paper is needed. See page 13,LOADING COPY PAPER. | |
| • Is linking in the copy quantity display? | The TD cartridge is not installed. Install the TD cartridge. | |
| • Is dily lit in the copy quantity display? | Side cover is open.Close the front and side covers securely. | |
| • Is the indicator blinking? | The TD cartridge must be replaced. See page 24, TD CARTRIDGE REPLACEMENT. | |
| • Is the indicator blinking? | A misfeed has occurred. See page 28,MISFEED REMOVAL. | |
| • Is the START key ( indicator blinking? | Toner replenishment takes up to 2 minutes.Wait until the START key ( ) indicator stops blinking. | |
| Lighting fixture flickers. | • Is the same power outlet used for the lighting fixture and the copier? | Connect the copier to a power outlet which is not used for other electric appliances. |

Be sure to use only genuine SHARP parts and supplies.
Please contact your SHARP service center immediately if a problem persists after checking the above.
Self-diagnostic function
An automatic self-diagnostic function is built into the copier. Should the copier malfunction, the self-diagnostic function will locate the problem and stop the copier to prevent damage. An alphanumeric code will appear in the copy quantity display.
Example
Should the copier completely stop and a letter and a number appear alternately, contact your SHARP service center immediately.

SUPPLIES
Types and sizes of copy paper
| Size Weight Capacity | Special paper | (21 lb. bond paper) | ||
| Paper tray 5-1/2" x | 8-1/2" 15 lbs. to 21 lbs. to 11" x 17" | 250 sheets | ||
| Bypass tray Ordinary paper: 15 lbs. to 34 lbs.* 100 sheets Transparency film, 5-1/2" x 8-1/2" (Ordinary paper) labels, envelopes** to 11" x 17" Envelopes: Commercial 10 (4-1/8" x 9-1/2") International DL (110 x 220 mm) International C5 (162 x 229 mm) | ||||
* For paper weighing from 28 to 34 lbs., 8-1/2" x 11" is the maximum size that can be fed through the bypass tray.
** Do not use envelopes that have metal clasps, plastic snappers, string closures, windows, linings, self-adhesive patches or synthetic materials. These will cause physical damage to the copier.
- For best results, use only paper recommended by SHARP.
- Special papers except envelopes must be fed one sheet at a time through the bypass tray. Up to 10 envelopes can be set at one time.
Supply part numbers
When ordering supplies, please use the correct part numbers as listed below.

Note
Be sure to use only genuine SHARP parts and supplies.
Supply list
| Supply Part number | Usable life | |
| TD cartridge AL-160TD | Approx. | 15,000 sheets* |
| Drum cartridge | AL-160DR | Approx. 30,000 sheets |
*Based on copying onto letter-type paper at 6% toned area (The life of the TD cartridge which has been included in the copier at the factory is approximately 5,000 sheets.)
Genuine supplies statement
Standard supplies for this copier that are to be replaced by the user are copy paper, TD cartridge, and drum cartridge.
For best copying results, be sure to use only SHARP Genuine Supplies which are designed, engineered and tested to maximize the life and performance of SHARP copiers. Look for the Genuine Supplies label on the TD cartridge and drum cartridge.

GENUINE SUPPLIES
Photoconductive drum
The AL-1600/AL-1610 Copiers have advanced process control technology which improves copy quality uniformity. This feature stabilizes copy quality throughout the life of the photoconductive drum by automatically compensating for the changes in drum characteristics due to wear, operator use patterns, and environmental conditions. The automatic adjustments are made in response to a sensor that detects the reflectance characteristics of a special area of the drum.

This feature requires drums containing the special reflectance area (recommended SHARP genuine photoconductive drum), to prevent low image density copies from poor process control and possible damage to the machine. If you use other drums, the process control system cannot run properly.
Proper storage
1. Store the supplies in a location that is:
- clean and dry,
• at a stable temperature,
• not exposed to direct sunlight.
2. Store copy paper in the wrapper and lying flat.
- Paper stored out of the wrapper or in packages standing on end may curl or get damp, resulting in paper misfeeds.
MOVING INSTRUCTIONS
When moving this copier, follow the procedure below.

When moving this copier, be sure to remove the TD cartridge in advance.
1 Turn the power switch off and disconnect the power cord.
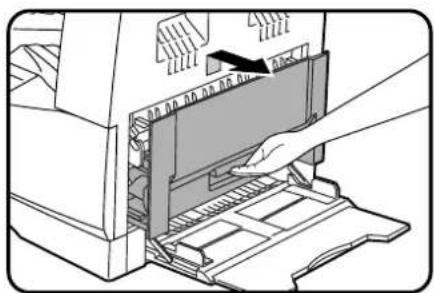
2 ① Open the bypass tray. Lift slightly on the side cover and slide the cover out until it stops. ② Push gently the right side of the front cover to open the cover.

3 Lift the TD cartridge lock release lever and pull the cartridge out until the green strap handle can be grasped by the right hand. Lift the cartridge by the handle while supporting it with the left hand at the green label position to remove it.
4 Close the front cover by pushing both sides with your hands and then close the side cover by pressing the handle on the cover.

When closing the covers, be sure to close the front cover securely and then close the side cover. If the covers are closed in the wrong order, the covers may be damaged.

5 Gently lift and pull out the paper tray until it stops.
6 Push the center of the pressure plate down until it locks in place and lock the plate using the pressure plate lock which has been stored in the front of the paper tray.
7 Use a coin (or suitable object) to attach to the left side of the copier the screw that has been stored in the front of the paper tray.

When shipping the copier, the screw must be reinstalled to prevent shipping damage.

8 Push the paper tray back into the copier.
9 Close the bypass tray. Attach the packing materials and tape which were removed during installation of the copier. See page 11, SET-UP.
10 Pack the copier into the carton. See page 10, CHECKING PACKED COMPONENTS AND ACCESSORIES.
SPECIFICATIONS
| Type Digital copying machine, desktop | |
| Copy system Dry, electrostatic transfer | |
| Originals Sheets, bound documents | |
| Original sizes Max. 11" x 17" | |
| Copy sizes Max. 11" x 17" | Min. 5-1/2" x 8-1/2"Image loss: Max. 5/32" (4 mm) (leading and trailing edges)Max. 5/32" (4 mm) (along other edges in total) |
| Copying speed 16 copies/min.(at 100% copy ratio) 12 copies/min. (8-1/2" x 11")10 copies/min. (8-1/2" x 14")9 copies/min. (11" x 17") | |
| Continuous copy Max. 99 copies; subtractive counter | |
| First-copy time 7.2 sec. (except in a power save mode) | |
| Warm-up time Approx. 35 sec. | |
| Copy ratio Variable: 50% to 200%, in 1% increments (total 151 steps)Fixed preset: 50%, 64%, 77%, 95%, 100%, 121%, 129%, 141%, 200% | |
| Exposure system Moving optical source, slit exposure (stationary platen) with automatic exposure function | |
| Copy paper feed | One paper tray with automatic feed (250 sheets), one bypass tray with automatic feed (100 sheets) |
| Fusing system | Heat rollers |
| Developer system | Magnetic brush development |
| Light source | Xenon lamp |
| Resolution Scan: 400 dpi | Output: 600 dpi |
| Gradation | Scan: 256 levelsOutput: 2 levels |
| Power supply | AC 120V, 60 Hz, 11 amperes |
| Power consumption | Max. 1.5 kW |
| Overall dimensions 23-15/64" (W) x 20-23/32" (D)(with bypass tray folded) (590 mm (W) x 526 mm (D)) | |
| Weight Approx. 70.6 lbs. (32 kg)TD and drum cartridges included | |
| Copier dimensions 23-15/64" (W) x 20-23/32" (D) x 18-33/64" (H)(590 mm (W) x 526 mm (D) x 470 mm (H)) | |
| Operating conditions Temperature: 59°F to 86°F (15°C to 30°C)Humidity: 20% to 85% | |
First-copy time and warm-up time may differ depending on operating conditions, such as power-supply voltage and room temperature.

As a part of our policy of continuous improvement, SHARP reserves the right to make design and specification changes for product improvement without prior notice. The performance specification figures indicated are nominal values of production units. There may be some deviations from these values in individual units.
INDEX
A
Auto clear 7
Automatic exposure adjustment 22
Auto power shut-off mode 34
B
Bypass tray 18
C
Cautions on handling 9
Copier trouble? 38
Copying
-large original 16
– normal 15
- reduction/enlargement. 17
- through bypass tray 18
-two-sided 20
Copy paper 13,40
Copy quantity 16
Copy ratio 17
D
Dark key 15
Drum cartridge
-indicator 26
- replacement 26
E
Enlargement 17
Exposure adjustment 15
F
Features. 3
Fixed copy ratio 17
Fusing unit release lever 30
|
Initial settings 7
Interrupt 21
L
Light key.... 15,32
Loading copy paper 13
M
Maintenance
-user maintenance 36
Manual exposure 15
Manual feeding 18
Misfeed removal
- bypass tray.... 28
-in the copier. 28
-paper tray. 31
N
Names
- operation panel 6
-part 4
0
Operation panel 6
Original table 4
P
Packed components 10
Paper
- loading.... 13
– special 18
– specifications.... 40
Paper output tray. 4
Paper size 40
Paper tray 13
Part names 4
Photo mode 16
Platen cover 4
Power cord 10, 12
Power on 15
Power save modes 34
Power switch 15
Preheat mode 34
R
Reduction 17
Replacement
- drum cartridge 26
- TD cartridge 24
S
Screw....11,42
Special paper 18
Specifications
-copier. 43
-paper 40
Status indicators 24
Supply
– life 40
- part number 40
- storage 41
T
TD cartridge replacement 24
Toner save mode.... 23
Total number of copies 6
Troubleshooting 38
Two-sided copying 20
U
User maintenance
- bypass tray paper feed roller 36
- original table 36
- platen cover 36
- transfer charger 36
User programs 32
Z
Zoom. 17
SHARP
MATERIAL SAFETY DATA SHEET
Section 1. Product Identification
Product:
AL-160TD (Black Toner)
Section 2. Supplier's Name and Address
Sharp Corporation
22-22 Nagaike-cho, Abeno-ku, Osaka, Japan
Local suppliers are listed below. Please contact the nearest supplier for additional information.
| (Country) (Name and Telephone Number) | |
| U.S.A. Sharp Electronics CorporationTelephone number for information: 1-800-237-4277Emergency telephone number: 1-800-255-3924 | |
| Canada Sharp Electronics of Canada Ltd.Telephone number for information: 905-890-2100Emergency telephone number: 1-800-255-3924 | |
| United Kingdom Sharp Electronics (U.K.) Ltd.Telephone number for information: 01923-474013 |
Section 3. Ingredients
| Ingredients | CAS No. | Proportion | OSHA PEL | ACGIH TLV | Other Limits |
| Styrene-Acrylate copolymer | 29497-14-1 | >88% | Not listed | Not listed | None |
| Carbon black | 1333-86-4 | <6.0% | 3.5mg/m3 | 3.5mg/m3 | None |
| Iron oxide | 1309-38-2 | <4.5% | Not listed | Not listed | None |
| Metal Complex dye | 109125-51-1 | <1.5% | 0.5mg/m3 | 0.5mg/m3 | None |
| 109125-50-0 | |||||
| 84179-66-8 |
Section 4. Hazardous Identification (Emergency Overview)
Toner is a fine, black powder possessing no immediate hazard. There are no anticipated carcinogenic effects from exposure based on animal tests performed using toner. When used as intended according to instructions, studies do not indicate any symptoms of fibrosis will occur.
Section 5. Health Hazard Data
| Route(s) of Entry: | Inhalation?Yes | Skin?No | Ingestion?Possible but very unusual. |
| Health Hazards: | Acute oral toxicity---- LDL0of this toner is over 2,000mg/kg.Mutagenicity ---- The result of Ames test is negative. | ||
| Carcinogenicity: | In 1996 the IARC reevaluated carbon black as a Group 2B carcinogen (possible human carcinogen). This classification is given to chemicals for which there is inadequate human evidence, but sufficient animal evidence on which to base an opinion of carcinogenicity. The classification is based upon the development of lung tumors in rats receiving chronic inhalation exposures to free carbon black at levels that induce particle overload of the lung. Studies performed in animal models other than rats did not show any association between carbon black and lung tumors. Moreover, a two-year cancer bioassay using a typical toner preparation containing carbon black demonstrated no association between toner exposure and tumor development in rats. | ||
| Chronic Effect:: | In a study in rats of chronic inhalation exposure to a typical toner, a mild to moderate degree of lung fibrosis was observed in 92% of the rats in the high concentration (16mg/m3) exposure group, and a minimal to mild degree of fibrosis was noted in 22% of the animals in the middle (4mg/m3) exposure group, but no pulmonary change was reported in the lowest (1mg/m3) exposure group, the most relevant level to potential human exposures. | ||
Signs and Symptoms of Exposure: Minimal irritation to respiratory tract may occur as with exposure to any non-toxic dust.
Medical Conditions Generally Aggravated by Exposure: None
Emergency and First Aid Procedures:
Inhalation; Remove to fresh air. If effects occur, consult medical personnel.
Eye; In case of contact, immediately flush eyes with water for 15 minutes.
Section 6. Physical Chemical Characteristics
| Boiling / Melting Point: Not applicable | Specific Gravity: 1.1 |
| Vapor Pressure: Not applicable | Solubility in Water: Negligible |
| Vapor Density: Not applicable PH: Not applicable | |
| Evaporation Rate: Not applicable Viscosity: Not applicable | |
| Appearance: Fine powder Color: Black | |
| Odor: Odorless |
Section 7. Fire and Explosion Data
| Flash Point (Method Used): Not applicable | |
| Ignition Temperature: | >350°C |
| Flammable Limits: | (LEL); Not applicable (UEL); Not applicable |
| Extinguishing Media: | CO2 , dry chemical, foam or water |
| Special Fire Fighting Procedure: | None |
| Unusual Fire and Explosion Hazard: | This material has no unusual fire or explosion hazards. |
| Sensitivity to Mechanical Impact: | None |
| Sensitivity to Static Charge: | None |
Section 8. Reactivity Data
| Stability: | Stable |
| Incompatibility (Material to Avoid): | None |
| Hazardous Decomposition: | CO and NOx |
| Hazardous Polymerization: | Will not occur. |
Section 9. Precautions for Safe Handling and Use
| Personal Protection Information (Respiratory, Eye Protection and Protective Glove):Use of a dust mask is recommended when handling a large quantity of toner or during long term exposure, as with any non-toxic dust. | |
| Engineering Control / Ventilation: Not required. | |
| Work / Hygienic Practice: | Inhalation should be minimized as with any non-toxic dust. |
| Steps to be taken in case of Spill or Leak: | Sweep up or clean up with vacuum cleaner. |
| Waste Disposal Method: | Waste material may be dumped or incinerated under conditions which meet all federal, state and local environmental regulations. |
Section 10. Regulatory Information
| NFPA Rating (U.S.A.):WHMIS Legislation (Canada):Transport Information:UN No.: | Health = 1This product is not a controlled product.This product is not a hazardous material.None allocated. | Flammability = 1 | Reactivity = 0 |
Section 11. Other Information
| References: | IARC (1996) IARC Monographs on the Evaluation of the Carcinogenic Risk of Chemicals to Humans, Vol. 65, Printing Process and Printing inks, Carbon Black and Some Nitro Compounds, Lyon, pp-149-261H. Muhle, B. Bellmann, O. Creutzenberg, C. Dasenbrock, H. Ernst, R. Kilpper, J. C. MacKenzie, P. Morrow, U. Mohr, S. Takenaka, and R. Mermelstein (1991) Pulmonary Response to Toner upon Chronic Inhalation Exposure in Rats. Fundamental and Applied Toxicology 17, pp. 280-299 |
SHARP
MATERIAL SAFETY DATA SHEET
Section 1. Product Identification
Product
AL-160TD(Black Developer)
Section 2. Supplier's Name and Address
Sharp Corporation
22-22 Nagaike-cho, Abeno-ku, Osaka, Japan
Local suppliers are listed below. Please contact the nearest supplier for additional information.
| (Country) (Name and Telephone Number) | |
| U.S.A. Sharp Electronics CorporationTelephone number for information: 1-800-237-4277Emergency telephone number: 1-800-255-3924 | |
| Canada Sharp Electronics of Canada Ltd.Telephone number for information: 905-890-2100Emergency telephone number: 1-800-255-3924 | |
| United Kingdom Sharp Electronics (U.K.) Ltd.Telephone number for information: 01923-474013 |
Section 3. Ingredients
| Ingredients | CAS No. | Proportion | OSHA PEL | ACGIH TLV | Other Limits |
| Iron powder | 7439-89-6 | >92.5% | Not listed | Not listed | None |
| Styrene-Acrylate copolymer | 29497-14-1 | <7.0% | Not listed | Not listed | None |
| Carbon black | 1333-86-4 | <0.5% | 3.5mg/m3 | 3.5mg/m3 | None |
Section 4. Hazardous Identification (Emergency Overview)
Developer is a black powder containing small amounts of toner, and possessing no immediate hazard. There are no anticipated carcinogenic effects from exposure based on animal tests performed using toner.
Section 5. Health Hazard Data
| Route(s) of Entry: | Inhalation? | Skin? | Ingestion? |
| No | No | Possible but very unusual. | |
| Health Hazards: | Acute oral toxicity---- LDL0 of this toner which is included in this developer is over 2,000mg/kg.Mutagenicity ---- The toner, which is included in this developer, has been tested on Ames test. The result is negative. | ||
| Carcinogenicity: | In 1996 the IARC reevaluated carbon black as a Group 2B carcinogen (possible human carcinogen). This classification is given to chemicals for which there is inadequate human evidence, but sufficient animal evidence on which to base an opinion of carcinogenicity. The classification is based upon the development of lung tumors in rats receiving chronic inhalation exposures to free carbon black at levels that induce particle overload of the lung. Studies performed in animal models other than rats did not show any association between carbon black and lung tumors.While there have been no studies to date using developer, a two-year cancer bioassay using a typical toner preparation containing carbon black (a small amount of toner is included in the developer mixture) demonstrated no association between toner exposure and tumor development in rats. | ||
Signs and Symptoms of Exposure: Minimal irritation to respiratory tract may occur as with exposure to any non-toxic dust.
Medical Conditions Generally Aggravated by Exposure: None
Emergency and First Aid Procedures:
Inhalation; Remove to fresh air. If effects occur, consult medical personnel.
Eye; In case of contact, immediately flush eyes with water for 15 minutes.
Section 6. Physical Chemical Characteristics
| Boiling / Melting Point: Not applicableVapor Pressure: Not applicableVapor Density: Not applicable PH: Not applicableEvaporation Rate: Not applicable Viscosity: Not applicableAppearance: Fine powder Color: BlackOdor: Odorless | Specific Gravity: about 7.3Solubility in Water: Negligible |
Section 7. Fire and Explosion Data
| Flash Point (Method Used): Not applicable | |
| Ignition Temperature: | >350°C |
| Flammable Limits: | (LEL); Not applicable (UEL); Not applicable |
| Extinguishing Media: | CO2 , dry chemical, foam or water |
| Special Fire Fighting Procedure: | None |
| Unusual Fire and Explosion Hazard: | This material has no unusual fire or explosion hazards. |
| Sensitivity to Mechanical Impact: | None |
| Sensitivity to Static Charge: | None |
Section 8. Reactivity Data
| Stability: | Stable |
| Incompatibility (Material to Avoid): | None |
| Hazardous Decomposition: | CO and NOx |
| Hazardous Polymerization: | Will not occur. |
Section 9. Precautions for Safe Handling and Use
| Personal Protection Information (Respiratory, Eye Protection and Protective Glove): | |
| None required under normal use. | |
| Engineering Control / Ventilation: Not required. | |
| Work / Hygienic Practice: | Not required. |
| Steps to be taken in case of Spill or Leak: | Sweep up or clean up with vacuum cleaner. |
| Waste Disposal Method: | Waste material may be dumped or incinerated under conditions which meet all federal, state and local environmental regulations. |
Section 10. Regulatory Information
| NFPA Rating (U.S.A.): | Health = 1 | Flammability = 1 | Reactivity = 0 |
| WHMIS Legislation (Canada): | This product is not a controlled product. | ||
| Transport Information: | This product is not a hazardous material. | ||
| UN No.: | None allocated. | ||
Section 11. Other Information
| References: | IARC (1996) IARC Monographs on the Evaluation of the Carcinogenic Risk of Chemicals to Humans, Vol. 65, Printing Process and Printing inks, Carbon Black and Some Nitro Compounds, Lyon, pp-149-261H. Muhle, B. Bellmann, O. Creutzenberg, C. Dasenbrock, H. Ernst, R. Kilpper, J. C. MacKenzie, P. Morrow, U. Mohr, S. Takenaka, and R. Mermelstein (1991) Pulmonary Response to Toner upon Chronic Inhalation Exposure in Rats. Fundamental and Applied Toxicology 17, pp. 280-299 |
MEMO
MEMO
WARNING:
FCC Regulations state that any unauthorized changes or modifications to this equipment not expressly approved by the manufacturer could void the user's authority to operate this equipment.
Note:
This equipment has been tested and found to comply with the limits for a Class A digital device, pursuant to Part 15 of the FCC Rules. These limits are designed to provide reasonable protection against harmful interference when the equipment is operated in a commercial environment. This equipment generates, uses, and can radiate radio frequency energy and, if not installed and used in accordance with the operation manual, may cause harmful interference to radio communications. Operation of this equipment in a residential area is likely to cause harmful interference in which case the user will be required to correct the interference at his own expense.
- FOR YOUR PROTECTION
- CONTENTS
- INTRODUCTION
- CONVENTIONS USED IN THIS MA1NUAL
- GETTING STARTED
- MAKING COPIES
- STATUS INDICATORS
- GENERAL INFORMATION
- CAUTIONS
- SAFETY PRECAUTIONS
- MAIN FEATURES
- ① HIGH-SPEED LASER COPYING
- ② HIGH-QUALITY DIGITAL IMAGE
- ③ SUBSTANTIAL COPYING FEATURES
- ④ SCAN ONCE/ PRINT MANY
- ⑤ PRINTER FEATURE
- ⑥ ENVIRONMENTALLY FRIENDLY DESIGN
- PART NAMES AND FUNCTIONS
- OVERALL LAYOUT
- ① PLATEN COVER
- ② ORIGINAL TABLE
- ③ HANDLES
- POWER SWITCH
- ⑤ OPERATION PANEL
- ⑥ PAPER OUTPUT TRAY
- ⑦ FRONT COVER
- PAPER TRAY
- ⑨ SIDE COVER
- ⑩ SIDE COVER HANDLE
- ⑪ BYPASS TRAY GUIDES
- ⑫ BYPASS TRAY
- ⑬ BYPASS TRAY EXTENSION
- ⑭ CHARGER CLEANER
- ACCESSORIES
- INITIAL SETTINGS
- COPIER INSTALLATION
- DO NOT INSTALL YOUR COPIER IN AREAS THAT ARE
- NOTE
- CAUTIONS ON HANDLING
- CHECKING PACKED COMPONENTS AND ACCESSORIES
- UNPACKING
- SET-UP
- STORE THE PRESSURE PLATE LOCK WHICH HAS BEEN REMOVED IN STEP 5 AND THE SCREW WHICH HAS BEEN REMOVED IN STEP 2 IN THE FRONT OF THE PAPER TRAY
- ENSURE THAT THE POWER SWITCH OF THE COPIER IS IN THE OFF POSITION. PLUG THE POWER CORD INTO THE NEAREST OUTLET
- TURN THE POWER SWITCH ON
- LOAD COPY PAPER. • WHEN LOADING COPY
- LOADING COPY PAPER
- CHANGING THE COPY PAPER SIZE IN THE TRAY
- TO SET THE SELECTED PAPER SIZE, PRESS THE PAPER SIZE ENTER (☐ ENTER) KEY
- USE THE ORIGINAL SIZE ENTER (KEY TO SELECT THE PAPER SIZE WHICH IS SET
- PRESS THE START (⑤KEY AND THEN THE PAPER SIZE ENTER (□ENTER) KEY
- NORMAL COPYING
- TURN THE POWER SWITCH ON. IT WILL TAKE ABOUT 35 SECONDS FOR
- PLACE AN ORIGINAL FACE DOWN ON THE ORIGINAL TABLE, AND ALIGN IT WITH THE ORIGINAL SIZE SCALE
- CLOSE THE DOCUMENT FEEDER COVER
- ENSURE THAT THE COPY PAPER SIZE IN THE PAPER TRAY IS THE SAME SIZE AS THE ORIGINAL
- ADJUST THE COPY DENSITY. • THIS COPIER HAS THREE EXPOSURE
- SET THE NUMBER OF COPIES USING THE TWO COPY QUANTITY (▲, KEYS
- PRESS THE START (KEY. THE NUMBER IN THE COPY QUANT
- HOW TO REMOVE THE PLATEN COVER
- REDUCTION/ENLARGEMENT/ZOOM
- AUTOMATIC
- MANUAL
- BYPASS FEED (SPECIAL PAPER)
- UNFOLD THE BYPASS TRAY
- SET THE PAPER GUIDES TO THE COPY PAPER WIDTH
- INSERT THE COPY PAPER (PRINT FACE DOWN) ALL THE WAY INTO THE BYPASS TRAY
- TWO-SIDED COPYING
- XY ZOOM
- PRESS THE COPY RATIO DISPLAY ( ) KEY. • THE SELECTED RATIO FOR THE HORIZONTAL DIRECTION
- ENSURE THAT COPY PAPER OF THE DESIRED SIZE IS INSTALLED IN THE PAPER TRAY
- SET THE NUMBER OF COPIES AND PRESS THE START() KEY
- B/W REVERSE
- DUAL PAGE COPY
- INTERRUPTING A COPY RUN
- AUTOMATIC EXPOSURE ADJUSTMENT
- TONER SAVE MODE
- TD CARTRIDGE REPLACEMENT
- DRUM CARTRIDGE REPLACEMENT
- MISFEED REMOVAL
- MISFEED IN THE BYPASS TRAY
- MISFEED IN THE COPIER
- MISFEED IN THE TRANSPORT AREA
- MISFEED IN THE PAPER TRAY
- USER PROGRAMS
- LIST OF USER PROGRAMS
- SETTING THE USER PROGRAMS
- PRESS THE START (KEY. • THE ENTERED PROGRAM NUMBER
- SELECT THE DESIRED PARAMETER USING THE RIGHT COPY QUANTITY ( Ⓞ ) KEY
- PRESS THE START (KEY. • THE RIGHT-HAND NUMBER IN THE
- TO CONTINUE WITH OTHER USER PROGRAMS, PRESS THE CLEAR (©) KEY AND THEN REPEAT STEPS 2 TO 5. TO EXIT THE USER PROGRAM MODE, PRESS THE LIGHT (④) KEY
- POWER SAVE MODES
- PREHEAT MODE
- AUTO POWER SHUT-OFF MODE
- SETTING THE POWER SAVE MODES
- COPYING FROM THE PREHEAT MODE
- MAKE DESIRED COPIER SELECTIONS AND PRESS THE START (💡) KEY USING THE NORMAL COPYING PROCEDURE
- USER MAINTENANCE
- ORIGINAL TABLE AND PLATEN COVER
- BYPASS TRAY PAPER FEED ROLLER
- TRANSFER CHARGER
- COPIER TROUBLE
- SELF-DIAGNOSTIC FUNCTION
- EXAMPLE
- SUPPLIES
- SUPPLY PART NUMBERS
- GENUINE SUPPLIES STATEMENT
- PHOTOCONDUCTIVE DRUM
- PROPER STORAGE
- STORE THE SUPPLIES IN A LOCATION THAT IS
- STORE COPY PAPER IN THE WRAPPER AND LYING FLAT
- MOVING INSTRUCTIONS
- SPECIFICATIONS
- INDEX
- A
- B
- C
- D
- E
- F
- L
- M
- N
- P
- R
- S
- T
- U
- Z
- SHARP
- MATERIAL SAFETY DATA SHEET
- SECTION 1. PRODUCT IDENTIFICATION
- SECTION 2. SUPPLIER'S NAME AND ADDRESS
- SECTION 4. HAZARDOUS IDENTIFICATION (EMERGENCY OVERVIEW)
- PRODUCT
- MEMO
- WARNING
Brand : SHARP
Model : AL-1640
Category : Photocopier