Lift-A 3339 - Griddle Fire Magic - Free user manual and instructions
Find the device manual for free Lift-A 3339 Fire Magic in PDF.


| Product Type | Built-in outdoor gas griddle |
| Brand | Fire Magic |
| Model | Lift-A 3339 |
| Width | 33 inches (84 cm) |
| Depth | 22 inches (56 cm) |
| Height | 10 inches (25 cm) |
| Weight | Approximately 60 lbs (27 kg) |
| Fuel Type | Natural gas or liquid propane (convertible) |
| Heat Output | 32,000 BTU/h stainless steel burners |
| Ignition | Electronic push-button ignition |
| Cooking Surface | Heavy-duty 33 x 18 inch stainless steel griddle plate |
| Construction | Commercial-grade 304 stainless steel |
| Temperature Control | Dual-zone heat control with infinite setting valves |
| Grease Management | Removable drip tray and grease cup |
| Maintenance | Easy-clean stainless steel surfaces; scrape and wipe after use |
| Safety Features | Thermocouple gas shut-off and heat-resistant knobs |
| Warranty | Limited lifetime warranty on stainless steel components |
| Installation | Designed for built-in outdoor kitchen installation |
| Accessories | Optional rotisserie kit and cutting board sold separately |
Frequently Asked Questions - Lift-A 3339 Fire Magic
User questions about Lift-A 3339 Fire Magic
0 question about this device. Answer the ones you know or ask your own.
Ask a new question about this device
Download the instructions for your Griddle in PDF format for free! Find your manual Lift-A 3339 - Fire Magic and take your electronic device back in hand. On this page are published all the documents necessary for the use of your device. Lift-A 3339 by Fire Magic.
USER MANUAL Lift-A 3339 Fire Magic
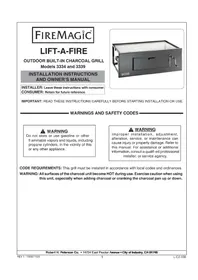
INSTALLATION INSTRUCTIONS AND OWNER'S MANUAL
INSTALLER: Leave these instructions with consumer.
CONSUMER: Retain for future reference.

IMPORTANT: READ THESE INSTRUCTIONS CAREFULLY BEFORE STARTING INSTALLATION OR USE.
WARNINGS AND SAFETY CODES
WARNING
Do not store or use gasoline or other fl ammable vapors and liquids, including propane cylinders, in the vicinity of this or any other appliance.
WARNING
Improper installation, adjustment, alteration, service, or maintenance can cause injury or property damage. Refer to this manual. For assistance or additional information, consult a qualified professional installer, or service agency.
CODE REQUIREMENTS: This grill must be installed in accordance with local codes and ordinances.
WARNING: All surfaces of the charcoal unit become HOT during use. Exercise caution when using this unit, especially when adding charcoal or cranking the charcoal pan up or down.
REPLACEMENT PARTS LIST
| Item | Description Part No. Qty. Part No. | 3334 3339Qty. | |
| 1. | Stainless steel grill oven (optional) 23733 1 3731 1 | ||
| 2. | Warming rack (optional) | 3673S 1 | 3671S 1 |
| 3. | Charcoal pan | 3304 2 3302 1 | |
| 4. | Stainless steel cooking grids (set of 2 or 3) | 3543-S-3 1 | 3537-S-2 1 |
| 5. | Grill assembly | 3330-55 1 | 3335-55 1 |
| 6. | Crank | 3301 1 3301 1 | |
Replacement parts can be ordered from your local Fire Magic® dealer.
3334 model shown
IMPORTANT
Remove all packing material and discard prior to use.

Robert H. Peterson Co. • 14724 East Proctor Avenue, • City of Industry, CA 91746
SPECIFICATIONS
| Specifi cation Value Value | 3334 series 3339 series | |
| Counter opening height 12' 12" | ||
| Counter opening width 32 | 1/4 " 24 | 3/4 " |
| Counter opening depth 19 | 3/4 " 17 | 3/4 " |
Table 1 - Enclosure cutout dimensions
INSTALLATION REQUIREMENTS
This grill is designed FOR OUTDOOR USE ONLY.
DO NOT use this unit under unprotected fl ammable surfaces. DO NOT use this appliance inside a building, garage, or any other enclosed area. It must not be used in or on recreational vehicles or boats.
Important: For installation in non-combustible enclosures only.
INSTALLATION
GRILL INSTALLATION
- Simply slide the unit into your grill opening.
- Fit the crank handle into the hole on the front right side of the face. Aligning it carefully, screw it into the nut on the frame (see Fig. 4-1). After installation, crank the handle in and out to raise and lower the charcoal pan.
GRILL OVEN (optional)
Align the grill oven (Fig. 4-2) over the grill and rest it in place. Reference the PARTS LIST for orientation.
COOKING GRIDS (purchased separately)
Place the cooking grids (puchased separately) onto the grill. Reference the PARTS LIST for orientation.
Note: When a grill oven is used; the cooking grids are placed onto the oven frame.
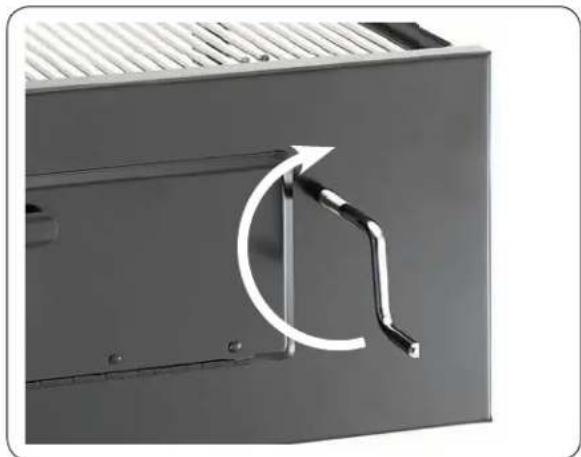
Fig. 4-1

Fig. 4-2
OPERATION
Simple to use, this elegant charcoal grill has the added benefit of an adjustable charcoal pan to allow you to change the height of the charcoal while cooking, and gives you the ability to add fuel without having to remove the cooking grids. This enables the outdoor chef to be in complete control of the cooking heat at the grilling surface.
WARNING
All surfaces of the charcoal unit become HOT during use. Exercise caution when using this unit, especially when adding charcoal or cranking the charcoal pan up or down.

Fig. 5-1
- Remove the cooking grids and pile your charcoal on the charcoal pans. Avoid spillage.
WARNING: When adding charcoal, spread it across the charcoal pan evenly and DO NOT exceed a height of 1" above the charcoal pan. Excessive amounts of charcoal may cause over heating and damage to your grill.
- Follow the instructions supplied with your charcoal/fuel for lighting.
- Use the access door to add or spread out your coals while cooking.
CAUTION: Use long-handled insulated barbecuing tools to prevent burns from hot metal or coals.
- Turning the crank handle raises or lowers the pan to increase or decrease the grilling heat as desired.
GRILL NOTES PAGE
Please use this page to record any information about your grill that you may want to have at hand.
CARE AND CLEANING
CARE AND CLEANING
APPLIANCE MUST BE COMPLETELY COOL WHEN CLEANING. DO NOT SPRAY ANY CLEANER OR LIQUIDS ON THE APPLIANCE WHEN HOT.
Empty the charcoal pans of all ash and drippings after each use.
Clean the grill with a water and mild soap solution.
OPTIONAL STAINLESS STEEL GRILL OVEN
Stainless steel surfaces when exposed to temperatures produced by the grilling process will change color. The stainless steel will change color from silver to brown and blue. This can be removed by using Fire Magic Stainless Steel Cleaner (part #3581-1).
Clean your appliance by first using Fire Magic Barbecue and Grill Cleaner (part #3580-1) to remove grease and dirt. Always wipe with the grain (See Fig. 7-1). Next, use Fire Magic Stainless Steel Cleaner (part #3581-1) to restore the stainless steel color. Finish by wiping your appliance down using Fire Magic Polish Wipes (part #3586-1).
Clean your appliance at least once a month.
If your appliance is installed in a seaside (salt air) or poolside (chlorine) location, it will be more susceptible to corrosion and must be maintained/cleaned more frequently. Do not store chemicals (such as chlorine or fertilizer) near your stainless steel appliance.
Due to the nature of stainless steel, surface iron oxide deposits may appear. Do not be alarmed – these deposits are removable with stainless-steel cleaner through prompt and periodic maintenance. If not attended to promptly, permanent pitting may occur.
The inside of the oven may be cleaned periodically with oven cleaner if desired. Follow the oven cleaner instructions for proper use.
Be careful not to get oven cleaner on the outside surface of the appliance as it can permanently damage the fi nish.
By following these recommendations, you will enjoy the beauty and convenience of your appliance for many years to come.

Fig. 7-1 - Wipe with grain
PROTECTING YOUR APPLIANCE FROM THE WEATHER
An optional cover will protect your appliance when not in use. (Allow to cool before covering.)
Please specify the model number and serial number of your appliance when ordering a cover.
QUALITY CHECK
Quality Check Date:
Model#:
Serial#:
Inspector:
Robert H. Peterson Co. • 14724 East Proctor Avenue • City of Industry, CA 91746

- WARNINGS AND SAFETY CODES
- WARNING
- REPLACEMENT PARTS LIST
- IMPORTANT
- SPECIFICATIONS
- INSTALLATION REQUIREMENTS
- INSTALLATION
- GRILL INSTALLATION
- GRILL OVEN (OPTIONAL)
- COOKING GRIDS (PURCHASED SEPARATELY)
- OPERATION
- GRILL NOTES PAGE
- CARE AND CLEANING
- OPTIONAL STAINLESS STEEL GRILL OVEN
- PROTECTING YOUR APPLIANCE FROM THE WEATHER
- QUALITY CHECK
- QUALITY CHECK DATE
Brand : Fire Magic
Model : Lift-A 3339
Category : Griddle