MDoubleTracker - Audio software MeldaProduction - Free user manual and instructions
Find the device manual for free MDoubleTracker MeldaProduction in PDF.


| Product type | Audio software effect plugin (double tracking) |
| Version | Latest version compatible with modern DAWs |
| Compatible operating systems | Windows 7+ and macOS 10.12+ |
| Plugin formats | VST, VST3, AU, AAX Native |
| Primary function | Simulates double-tracked vocals and instruments with natural width |
| Processing | High-quality modulation, pitch variation and phase alignment |
| Presets | Multiple factory presets for instant and complex effects |
| User interface | Resizable UI with built-in level meters and correlation meter |
| Modulation | Dual modulation generators with editable LFO shapes |
| Stereo processing | Supports true stereo to mono, mid/side and stereo widening |
| CPU usage | Optimized with full sample rates up to 192 kHz |
| License type | Freeware with optional paid upgrade to Pro version |
| Installation size | Approximately 10 MB after installation |
| Update | Regular updates via MeldaProduction installer |
| Support | Online manual and community forum access |
| Cleaning | No physical cleaning required; keep plugin library tidy in DAW |
| Safety | No hardware risks; ensure DAW session saved before processing |
| Repair policy | Free updates and plugin reinstallation via MeldaProduction account |
Frequently Asked Questions - MDoubleTracker MeldaProduction
User questions about MDoubleTracker MeldaProduction
0 question about this device. Answer the ones you know or ask your own.
Ask a new question about this device
Download the instructions for your Audio software in PDF format for free! Find your manual MDoubleTracker - MeldaProduction and take your electronic device back in hand. On this page are published all the documents necessary for the use of your device. MDoubleTracker by MeldaProduction.
USER MANUAL MDoubleTracker MeldaProduction
MDoubleTracker is a marvelous natural sounding artificial stereo expander based on some pretty old techniques used for decades on some hardware modules such as Eventide H3000. We just polished it a bit and provided a few more controls as usual. In most cases you simply insert the plugin onto guitars, vocals or just any material that needs to sound big and let the plugin do the magic. Presets should be the first aid if it doesn't sound as good as you'd like. And if even that fails, then the following information may give you the necessary pointers.
One important thing that needs to be noted - unlike MStereoSpread and MStereoGenerator, the algorithm of MDoubleTracker is not mono compatible. That may be a problem, if you suspect your audio may be collapsed to mono on some playback equipment. While problems with mono compatibility are pretty common and cannot be avoided, it's worth checking how the results would sound in mono, and MDoubleTracker has a handy switch for that.
How does MDoubleTracker work
MDoubleTracker tries to simulate the good old trick of recording the same performance multiple times, panning one to the left and the other to the right. That produces the classig big sound commonly used on guitars and vocals for example. While recording the same performance multiple times is very tedious, complex and error-prone process, producing such a thing automatically provides an extremely efficient alternative.
To do that, MDoubleTracker uses a system of variating delaylines to pitch-shift each channel just a little bit, up on one side, down on the other. Additionally it can delay each channel differently and the difference between channels is slowly evolving. As a result, different signals are produced for both left and right (and potentially surround) channels, creating a sensation of the performance being just a little bit different on each side, enough to produce the big wide stereo sound. When Dry/Wet may be used to create sort of a phasing / chorusey effect, useful creatively.

Presets
Presets
Presets button shows a window with all available presets. A preset can be loaded from the preset window by double-clicking on it, selecting via the buttons or by using your keyboard. You can also manage the directory structure, store new presets, replace existing ones etc. Presets are global, so a preset saved from one project, can easily be used in another. The arrow buttons next to the preset button can be used to switch between presets easily.
Holding Ctrl while pressing the button loads a random preset. There must be some presets for this feature to work of course.
Presets can be backed up by 3 different methods:
A) Using "Backup" and "Restore" buttons in each preset window, which produces a single archive of all presets on the computer.
B) Using "Export/Import" buttons, which export a single folder of presets for one plugin.
C) By saving the actual preset files, which are found in the following directories (not recommended):
Windows: C:\Users{\username}\AppData\Roaming\MeldaProduction
Mac OS X: /Library/Application support/MeldaProduction
Files are named based on the name of the plugin like this: " {pluginname}.presets", so for example MAutopan.presets or MDynamics.presets. If the directory cannot be found on your computer for some reason, you can just search for the particular file.
Please note that prior to version 16 a different format was used and the naming was " {pluginname}presets.xml". The plugin also supports an online preset exchange. If the computer is connected to the internet, the plugin connects to our server once a week, submits your presets and downloads new ones if available. This feature is manually maintained in order to remove generally unusable presets, so it may take some time before any submitted presets become available. This feature relies on each user so we strongly advise that any submitted presets be named and organised in the same way as the factory presets, otherwise they will be removed.

Left arrow
Left arrow button loads the previous preset.

Right arrow
Right arrow button loads the next preset.

Randomize
Randomize button loads a random preset.

Randomize
Randomize button (with the text 'Random') generates random settings. Generally, randomization in plug-ins works by selecting random values for all parameters, but rarely achieves satisfactory results, as the more parameters that change the more likely one will cause an unwanted effect. Our plugins employ a smart randomization engine that learns which settings are suitable for randomization (using the existing presets) and so is much more likely to create successful changes.
In addition, there are some mouse modifiers that assist this process. The smart randomization engine is used by default if no modifier keys are held.
Holding Ctrl while clicking the button constrains the randomization engine so that parameters are only modified slightly rather than completely randomized. This is suitable to create small variations of existing interesting settings.
Holding Alt while clicking the button will force the engine to use full randomization, which sets random values for all reasonable automatable parameters. This can often result in "extreme" settings. Please note that some parameters cannot be randomized this way.

Panic
Panic button resets the plugin state. You can use it to force the plugin to report latency to the host again and to avoid any audio problems. For example, some plugins, having a look-ahead feature, report the size of the look-ahead delay as latency, but it is inconvenient to do that every time the look-ahead changes as it usually causes the playback to stop. After you tweak the latency to the correct value, just click this button to sync the track in time with the others, minimizing phasing artifacts caused by the look-ahead delay mixing with undelayed audio signals in your host. It may also be necessary to restart playback in your host.
Another example is if some malfunctioning plugin generates extremely high values for the input of this plugin. A potential filter may start generating very high values as well and as a result the playback will stop. You can just click this button to reset the plugin and the playback will start again.

Settings
Settings button shows a menu with additional settings of the plugin. Here is a brief description of the separate items.
Licence manager lets you activate/deactivate the plugins and manage subscriptions. While you can simply drag & drop a licence file onto the plugin, in some cases there may be a faster way. For instance, you can enter your user account name and password and the plugin will do all the activating for you.
There are 4 groups of settings, each section has its own detailed help information: GUI & Style enables you to pick the GUI style for the plug-in and the main colours used for the background, the title bars of the windows and panels, the text and graphs area and the highlighting (used for enabled buttons, sliders, knobs etc).
Advanced settings configures several processing options for the plug-in.
Global system settings contains some settings for all MeldaProduction plugins. Once you change any of them, restart your DAW if needed, and it will affect all MeldaProduction plugins.
Dry/Wet affects determines, for Multiband plug-ins, which multiband parameters are affected by the Global dry/wet control.
Smart interpolation adjusts the interpolation algorithm used when changing parameter values; the higher the setting the higher the audio quality and the lower the chance of zippering noise, but more CPU will be used.

WWW
WWW button shows a menu with additional information about the plugin. You can check for updates, get easy access to support, MeldaProduction web page, video tutorials, Facebook/Twitter/YouTube channels and more.
Sleep indicator informs whether the plugin is currently active or in sleep mode. The plugin can automatically switch itself off to save CPU, when there is no input signal and the plugin knows it cannot produce any signal on its own and it generally makes sense. You can disable this in Settings / Intelligent sleep on silence both for individual instances and globally for all plugins on the system.
Plugin toolbar
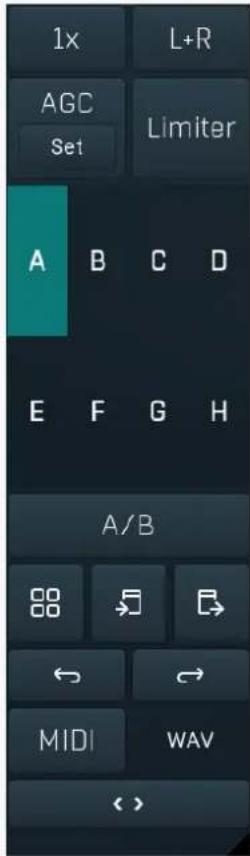
Plugin toolbar provides some global features, A-H presets and more.
1x
Oversampling
Oversampling can potentially improve sound quality by processing at a higher sample rate. Processors such as compressors, saturators, distortions etc., which employ nonlinear processing generate higher harmonics of the existing frequencies. If these frequencies exceed the Nyquist rate, which equals half of the sampling rate, they get mirrored back under the Nyquist rate. This is known as aliasing and is almost always considered an artifact. This is because the mirrored frequencies are no longer harmonic and sound as digital noise as this effect does not physically occur in nature. Oversampling reduces the problem by temporarily increasing the sampling rate. This moves the Nyquist frequency which in turn, diminishes the level of the aliased harmonics. Note that the point of oversampling is not to remove harmonics, we usually add them intentionally to make the signal richer, but to reduce or attenuate the harmonics with frequencies so high, that they just cannot be represented within the sampling rate.
To understand aliasing, try this experiment: Set the sampling rate in your host to 44100 Hz. Open MOscillator and select a "rectangle" or "full saw" waveform. These simple waveforms have lots of harmonics and without oversampling even they become highly aliased. Now select 16x oversampling and listen to the difference. If you again select 1x oversampling, you can hear that the audio signal gets extensively "dirty". If you use an analyzer (MAnalyzer or MEqualizer for example), you will clearly see how, without oversampling, the plugin generates lots of inharmonic frequencies, some of them which are even below the fundamental frequency. Here is another, very extreme example to demonstrate the result of aliasing. Choose a "sine" shape and activate 16x oversampling. Now use a distortion or some saturation to process the signal. It is very probable that you will be able to hear (or at least see in the analyzer) the aliased frequencies.
The plugin implements a high-quality oversampling algorithm, which essentially works like this: First the audio material is upsampled to a higher sampling rate using a very complicated filter. It is then processed by the plugin. Further filtering is performed in order to remove any frequencies above the Nyquist rate to prevent aliasing from occurring, and then the audio gets downsampled to the original sampling rate.
Oversampling also has several disadvantages of which you should be aware before you start using it. Firstly, upsampled processing induces latency (at least in high-quality mode, although you can select low-quality directly in this popup), which is not very usable in real time applications. Secondly, oversampling also takes much more CPU power, due to both the processing being performed
at a higher sampling rate (for 16x oversampling at 44100 Hz, this equates to 706 kHz!), and the complex filtering. Finally, and most importantly, oversampling creates some artifacts of its own and for some algorithms processing at higher sampling rates can actually lower the audio quality, or at least change the sound character. Your ears should always be the final judge.
As always, use this feature ONLY if you can actually hear the difference. It is a common misconception that oversampling is a miraculous cure all that makes your audio sound better. That is absolutely not the case. Ideally, you should work in a higher sampling rate (96kHz is almost always enough), while limiting the use of oversampling to some heavily distorting processors.
L+R
Channel mode
Channel mode button shows the current processing channel mode, e.g. Left+Right (L+R) indicates the processing of left and right channels. This is the default mode for mono and stereo audio material and effectively processes the incoming signal as expected. However the plugin also provides additional modes, of which you may take advantage as described below. Mastering this feature will give you unbelievable options for controlling the stereo field.
Note that this is not relevant for mono audio tracks, because the host supplies only one input and output channel.
Left (L) mode and Right (R) mode allow the plugin to process just one channel, only the left or only the right. This feature has a number of simple uses. Equalizing only one channel allows you to fix spectral inconsistencies, when mids are lower in one channel for example. A kind of stereo expander can be produced by equalizing each side differently. Stereo expansion could also be produced by using a modulation effect, such as a vibrato or flanger, on one of these channels. Note however that the results would not be fully mono compatible.
Left and right channels can be processed separately with different settings, by creating two instances of the plugin in series, one set to 'L' mode and the other to 'R' mode. The instance in 'L' mode will not touch the right channel and vice versa. This approach is perfectly safe and is even advantageous, as both sides can be configured completely independently with both settings visible next to each other.
Mid (M) mode allows the plugin to process the so-called mid (or mono) signal. Any stereo signal can be transformed from left and right, to mid and side, and back again, with minimal CPU usage and no loss of audio quality. The mid channel contains the mono sum (or centre), which is the signal present in both left and right channels (in phase). The side channel contains the difference between the left and right channels, which is the "stereo" part. In 'M mode' the plugin performs the conversion into mid and side channels, processes mid, leaves side intact and converts the results back into the left and right channels expected by the host.
To understand what a mid signal is, consider using a simple gain feature, available in many plugins. Setting the plugin to M mode and decreasing gain, will actually lower or attenuate the mono content and the signal will appear "wider". There must be some stereo content present, this will not work for monophonic audio material placed in stereo tracks of course. Similarly amplifying the mono content by increasing the gain, will make the mono content dominant and the stereo image will become "narrower".
As well as a simple gain control there are various creative uses for this channel mode.
Using a compressor on the mid channel can widen the stereo image, because in louder parts the mid part gets attenuated and the stereo becomes more prominent. This is a good trick to make the listener focus on an instrument whenever it is louder, because a wider stereo image makes the listener feel that the origin of the sound is closer to, or even around them.
A reverb on the mid part makes the room appear thin and distant. It is a good way to make the track wide due to the existing stereo content, yet spacey and centered at the same time. Note that since this effect does not occur naturally, the result may sound artificial on its own, however it may help you fit a dominant track into a mix.
An equalizer gives many possibilities - for example, the removal of frequencies that are colliding with those on another track. By processing only the mid channel you can keep the problematic frequencies in the stereo channel. This way it is possible to actually fit both tracks into the same part of the spectrum - one occupying the mid (centre) part of the signal, physically appearing further away from the listener, the other occupying the side part of the signal, appearing closer to the listener.
Using various modulation effects can vary the mid signal, to make the stereo signal less correlated. This creates a wider stereo image and makes the audio appear closer to the listener.
Side (S) mode is complementary to M mode, and allows processing of only the side (stereo) part of the signal leaving the mid intact. The same techniques as described for M mode can also be applied here, giving the opposite results.
Using a gain control with positive gain will increase the width of the stereo image.
A compressor can attenuate the side part in louder sections making it more monophonic and centered, placing the origin a little further away and in front of the listener.
A reverb may extend the stereo width and provide some natural space without affecting the mid content. This creates an interesting side-effect - the reverb gets completely cancelled out when played on a monophonic device (on a mono radio for example). With stereo processing you have much more space to place different sounds in the mix. However when the audio is played on a monophonic system it becomes too crowded, because what was originally in two channels is now in just one and mono has a very limited capability for 2D
placement. Therefore getting rid of the reverb in mono may be advantageous, because it frees some space for other instruments.
An equalizer can amplify some frequencies in the stereo content making them more apparent and since they psycho acoustically become closer to the listener, the listener will be focused on them. Conversely, frequencies can be removed to free space for other instruments in stereo.
A saturator / exciter may make the stereo richer and more appealing by creating higher harmonics without affecting the mid channel, which could otherwise become crowded.
Modulation effects can achieve the same results as in mid mode, but this will vary a lot depending on the effect and the audio material. It can be used in a wide variety of creative ways.
Mid+Side (M+S) lets the plugin process both mid and side channels together using the same settings. In many cases there is no difference to L+R mode, but there are exceptions.
A reverb applied in M+S mode will result in minimal changes to the width of the stereo field (unless it is true-stereo, in which case mid will affect side and vice versa), it can be used therefore, to add depth without altering the width.
A compressor in M+S mode can be a little harder to understand. It basically stabilizes the levels of the mid and side channels. When channel linking is disabled in the compressor, you can expect some variations in the sound field, because the compressor will attenuate
the louder channel (usually the mid), changing the stereo width depending on the audio level. When channel linking is enabled, a compressor will usually react similarly to the L+R channel mode.
Exciters or saturators are both nonlinear processors, their outputs depend on the level of the input, so the dominant channel (usually mid) will be saturated more. This will usually make the stereo image slightly thinner and can be used as a creative effect.
How to modify mid and side with different settings? The answer is the same as for the L and R channels. Use two instances of the plugin one after another, one in M mode, the other in S mode. The instance in M mode will not change the side channel and vice versa.
Left+Right(neg) (L+R-) mode is the same as L+R mode, but the right channel's phase will be inverted. This may come in handy if the L and R channels seem out of phase. When used on a normal track, it will force the channels out of phase. This may sound like an extreme stereo expansion, but is usually extremely fatiguing on the ears. It is also not mono compatible - on a mono device the track will probably become almost silent. Therefore be advised to use this only if the channels are actually out of phase or if you have some creative intent.
There are also 4 subsidiary modes: Left & zero Right (L(R0)), Right & zero Left (R(L0)), Mid & zero Side (M(S0)) and Side & zero Mid (S(M0)). Each of these processes one channel and silences the other.
Surround mode is not related to stereo processing but lets the plugin process up to 8 channels, depending on how many the host supplies. For VST2 plugins you have to first activate surround processing using the Activate surround item in the bottom. This is a global switch for all MeldaProduction plugins, which configures them to report 8in-8out capabilities to the host, on loading. It is disabled by default, because some hosts have trouble dealing with such plugins. After activation, restart your host to start using the surround capabilities of the plugins. Deactivation is done in the same way. Please note that all input and output busses will be multi-channel, that includes side-chain for example. For VST3/AU/AAX plugins the activation is not necessary.
First place the plugin on a surround track - a track that has more than 2 channels. Then select Surround from the plug-in's Channel Mode menu. The plugins will regard this mode as a natural extension of 2 channel processing. For example, a compressor will process each channel separately or measure the level by combining the levels of all of the inputs provided. Further surround processing properties, to enable/disable each channel or adjust its level, can be accessed via the Surround settings in the menu.
Ambisonics mode provides support for the modern 3D systems (mostly cinema and VR) with up to 64 channels (ambisonics 7th order). Support for this is still quite rare among the DAWs, so this needs to be activated in all DAWs using the Activate ambisonics item in the bottom. This is a global switch for all MeldaProduction plugins, which configures them to report 64in-64out capabilities to the host, on loading. After activation, restart your host to start using the ambisonics capabilities of the plugins. Deactivation is done in the same way. Please note that all input and output busses will be multi-channel, that includes side-chain for example.
First place the plugin on an ambisonics track, supported are all orders from 1st (4 channels) to 7th (64 channels). Then select Ambisonics from the plug-in's Channel Mode menu. Finally select the Ambisonics settings in the menu and configure the Ambisonics order and other settings if needed. The plugins will regard this mode as a natural extension of 2 channel processing. For example, a compressor will process each channel separately or measure the level by combining the levels of all of the inputs provided.

AGC
AGC button enables or disables the automatic gain control - the automatic adjustment of the output volume such that it matches the input volume. Human hearing is very adaptable. In fact differences in loudness, for example when loading a preset, may go unnoticed and instead be perceived by the listener as "better sounding", leading to a misjudgement. This feature should prevent this effect, thus allowing the listener to focus on the sonic qualities only.
AGC works by measuring input and output loudness, and then compensating for the difference while also taking into account any induced latency. The loudness measurement follows the ITU and EBU specifications with an RMS of 400ms, meaning that the reaction time is 400ms. This is very important, as you should be aware that AGC needs time to properly adjust after any change of settings. Also note that this is a nonlinear operation. It may cause some distortion due to the long measurement time. It should be negligible though.
AGC makes sense in most applications including reverberation and equalization for example. However, in some cases it can work against the plugin. A simple example of this is a tremolo, where the plugin manipulates output volume. If the tremolo rate is slow enough, say 1Hz, it makes the period longer than the actual AGC measurement time. So whenever the tremolo changes audio level, the AGC starts compensating for it. This can of course be used creatively, since AGC will always be a little "late", but it is definitely not a desired outcome in normal use.
Another example of this is compression. When used with short attack and release times, AGC can effectively compensate for the attenuation of the compressor. However when the attack and release times are higher than 100ms, the compressor's reaction time becomes too slow, and in conjunction with AGC, severe pumping can occur.
As a general rule of thumb as for all audio processing tasks, use it only if you know you need it. AGC is a powerful tool that can make your workflow easier, but it can also be damaging.

Set
Set button uses the AGC (automatic gain compensation) processor to calculate the ideal output gain to ensure that the output audio loudness is equal to the input level. To use it, simply enable playback in your host and click the button. The plugin's output gain will be adjusted to match the input and output levels as closely as possible.
If the AGC is already enabled, the change will be instant and you can disable the AGC afterwards. Typically you will browse presets, generate random settings etc. During the entire time you will have AGC enabled to prevent you from experiencing different output loudness levels. When you find a sonically ideal setup, you simply click the Set button to set the output gain automatically and disable the AGC as you won't need it anymore.
If the AGC is not already enabled, clicking the Set button displays a window with progress bar for a few seconds, while the plugin temporarily enables AGC and analyses input and output of the plugin. After that the AGC is disabled again.
To get the best results, you should feed the plugin with some "universal" signal. If you are processing a specific instrument, play a typical part, a chorus in case of vocals for example. If you are creating presets designed for general use, white/pink noise may be the best signal to use.

Limiter
Limiter button enables or disables the safety limiter. Its purpose is to protect you from peaks above 0dB, which can have damaging effects to your processing chain, your monitors and even your hearing.
It is generally advised to keep your audio below 0dB at all times in all stages of your processing chain. However, several plugins may cause high level outputs with certain settings, often due to unprevented resonances with specific audio materials. The safety limiter prevents that.
Note that it is NOT wise to enable this "just in case". As with any processing, the limiter requires additional processing power and modifies the output signal. It is a transparent single-band brickwall limiter, but you still need to be careful when using it.

A-H presets selector
A-H presets selector controls the current A-H preset. This allows the plugin to store up to 8 sets of settings, including those parameters that cannot be automated or modulated. However it does not include channel mode, oversampling and potentially some other global controls available from the Settings/Settings menu.
For example, this feature can be used to keep multiple settings, when you are not sure about the ideal configuration When you change any parameter, only the currently selected preset is modified.
The four buttons below enable you to switch between the last 2 selected sets using the A/B button, morph between the first 4 sets using the morphing button and copy & paste settings from one preset to another (via the clipboard).
It is also possible to switch between the presets using MIDI program change messages sent from your host. The set selected depends on the Program Change number: 0 selects A, 7 selects H, 8 selects A, 15 selects H and so on.

A/B
A/B button switches between the active and previously active A-H preset (not necessarily the A and B presets themselves). To compare any 2 of the A-H presets, select one and then the other. Clicking this button will then switch between these two. You can do the same thing by clicking on the particular presets, but this makes it easier, letting you close your eyes and just listen.

Morph
Morph button lets you morph between the A, B, C and D settings. Morphing only affects those parameters that can be automated or modulated; that does include most of the parameters however. When you click this button, an X/Y graph is shown allowing you to drag the position indicator to any position between the letters A, B, C and D. The closer you drag the indicator to one of the letters, the closer the actual settings are to that preset.
Please note that this will overwrite and change the preset that is currently selected, so it is best to select a new preset e.g. 'E', then use the morphing method. This way you will define the settings for A, B, C and D, morph between them, and store the result in 'E' without any modification of the original A, B, C and D presets.
Please note that the ABCD morphing itself cannot be automated and that, while morphing, the changes to the underlying parameters are not notified to the host (there may be hundreds of change events).

Copy
Copy button copies the current settings to the system clipboard. Other presets, oversampling, channel mode and other global settings are not copied.
Hold Ctrl to save the settings as a file instead. That may be necessary for complex settings, which may be too long for system clipboard to handle. It may also be advantageous when you want to send the settings via email. You can load the settings by drag & dropping them to a plugin or holding Ctrl and clicking Paste.

Paste
Paste button pastes settings from the system clipboard into the current preset. Hold Ctrl to load the settings from a file instead. Hold Shift to paste the settings to all of the A-H slots at once.

Undo
Undo button reverts the last change. Only changes to automatable or modulatable parameters and global settings (load/randomize) are stored.

Redo
Redo button reverts the last undo operation.

WAV
WAV button lets you process a file using the plugin with current settings. You can either click the button and select a file, or drag & drop the file (or multiple files) onto the button. If you let the plugin process WAV files, these will be saved with the original settings. If you use a different file type (such as MP3), the plugin will create WAV files with 32-bit bits-per-sample floating point.
Please note that the files will be overwritten, so make a copy first if you want to keep the original.

Collapse
Collapse button minimizes or enlarges the panel to release space for other editors.

DRY/WET
100.0%
Dry/Wet
Dry/Wet defines how powerful the effect is, thus this is the ratio between dry and wet signals. In most cases you will want to keep this at 100%, since with lower values you a phase cancellation will occur, leading to a sort of phasey results, which can however sound interesting on guitars for example.
Range: 0.00% to 100.0%, default 100.0%

FOCUS
200.0 Hz
Focus
Focus defines the minimal frequency used for the stereo expansion. You can use this to get rid of widening and phasiness in the low part of spectrum.
Human brains are adjusted to resolve phase below about 1kHz. Frequencies above are just too quick for the brain to catch the time differences accurately. This has the disadvantage, that big changes in phase in lower frequencies can cause dispersion, especially for transient signals. For example acoustic bass drums may sound almost synthetic when passed through the stereo expansion algorithm with a high number of bands. By setting Min frequency to say 100Hz you can usually get rid of these artifacts. This is only relevant if you are looking for the most natural results of course.
Range: Off to 20.0 kHz, default Off

SPACE
50.0%
Space
Space controls the delay sizes used by the algorithm ending with a feeling of smaller (lower values) or bigger (higher values) space. You can control the stereo field character with this parameter.
Range: 0.00% to 100.0%, default 50.0%

SATURATION
0.00%
Saturation
Saturation defines the amount of saturation applied to the stereo expanded signal. Saturation naturally generates higher harmonics, which makes the signal richer and exciting. As a secondary result, this may cause the stereo field to appear even wider. However be cautious with this, as saturation is technically a form of distortion.
Range: 0.00% to 100.0%, default 0.00%

OUTPUT
0.00 dB
Output gain
Output gain defines the power modification applied to the output signal, which is useful to make the output signal similar in loudness to the
Algorithm panel

Algorithm panel contains more advanced parameters of the underlying algorithm. For most audio materials you will be fine with defaults or presets, but if you need more control, here you can access every aspect of the technology.
Mono
Mono
Mono switch lets you audition the output collapsed to mono. Since the algorithm is not mono compatible (similarly to true double tracking), this is a handy feature that lets you adjust the parameters for maximum mono compatibility, if that is a relevant property for your audio results.
Depth
50.0%
Depth
Depth defines the length of the delays being used. Longer delays provide more natural results and spaceness, but also the tightness gets lost.
Range: 0.00% to 100.0%, default 50.0%
Depth width
0.00%
Depth width
Depth width controls the difference of the depth between channels. This way you can make both channels more different hence appearing wider and bigger.
Range: -100.0% to 100.0%, default 0.00%
Delay
25.0%
Delay
Delay lets you delay the stereo signals to the dry signal. This can be thought as a form of variating haas delay, which naturally creates a stereo width. It doesn't really have any useful effect (except for the delay itself) when the Dry/Wet is 100% and Delay width is 0%. Range: 0.00% to 100.0%, default 25.0%
Delay width
0.00%
Delay width
Delay width controls the difference of the delay between channels. This way you can make both channels more different hence appearing wider and bigger.
Range: -100.0% to 100.0%, default 0.00%
Detune
25.0%
Detune
Detune defines the pitch shift applied on both channels. The higher the shift, the more different both channels are, but also more "honky tonky" the results sound, especially when mixed with the dry signal using Dry/Wet. The default settings are pretty low and provide nicely smooth and natural results in most cases.
Range: 0.00% to 100.0%, default 25.0%
Detune width
0.00%
Detune width
Detune width controls the difference of the detuning between channels. The algorithm naturally detunes both channels oppositely, but this way you can make both channels even more different hence appearing wider and bigger. And it gets especially useful for surround processing.
Range: -100.0% to 100.0%, default 0.00%
Slope
6dB/oct A
◀ ▶
Slope
Slope defines the slope of each band transition and is used only by analog crossovers (including the linear-phase versions). It essentially controls the separation between the bands - the higher the slope, the lower the overlap between bands. Higher slopes require more CPU power and exhibit higher phase shift, which may be a problem especially when percussive materials. In these cases it may be necessary to switch to a linear-phase version.
Interesting exception to the classic rule are the 6dB/oct crossovers, which are linear-phase by nature (while still being zero latency), because the bands compensate for each other's phase shift. A side-effect of this is that the signal level in each band is much higher than using other crossovers, so you may expect these crossovers sound considerably different to the other modes.

Global meter view
Global meter view provides a powerful metering system. If you do not see it in the plug-in, click the Meters or Meters & Utilities button to the right of the main controls. The display can work as either a classical level indicator or, in time graph mode, show one or more values in time. Use the first button to the left of the display to switch between the 2 modes and to control additional settings, including pause, disable and pop up the display into a floating window. The meter always shows the actual channels being processed, thus in M/S mode, it shows mid and side channels.
In the classical level indicators mode each of the meters also shows the recent maximum value. Click on any one of these values boxes to reset them all.
In meter indicates the total input level. The input meter shows the audio level before any specific processing (except potential oversampling and other pre-processing). It is always recommended to keep the input level under 0dB. You may need to adjust the previous processing plugins, track levels or gain stages to ensure that it is achieved.
As the levels approach 0dB, that part of the meters is displayed with red bars. And recent peak levels are indicated by single bars.
Out meter indicates the total output level. The output meter is the last item in the processing chain (except potential downsampling and other post-processing). It is always recommended to keep the output under 0dB.
As the levels approach 0dB, that part of the meters is displayed with red bars. And recent peak levels are indicated by single bars.
Width meter shows the stereo width at the output stage. This meter requires at least 2 channels and therefore does not work in mono mode. Stereo width meter basically shows the difference between the mid and side channels.
When the value is 0%, the output is monophonic. From 0% to 66% there is a green range, where most audio materials should remain.
From 66% to 100% the audio is very stereophonic and the phase coherence may start causing problems. This range is colored blue. You may still want to use this range for wide materials, such as background pads. It is pretty common for mastered tracks to lie on the edge of green and blue zones.
Above 100% the side signal exceeds the mid signal, therefore it is too monophonic or the signal is out of phase. This is marked using red color. In this case you should consider rotating the phase of the left or right channels or lowering the side signal, otherwise the audio will be highly mono-incompatible and can cause fatigue even when played back in stereo.
For most audio sources the width is fluctuating quickly, so the meter shows a 400ms average. It also shows the temporary maximum above it as a single coloured bar.
If you right click on the meter, you can enable/disable loudness pre-filtering, which uses EBU standard filters to simulate human perception. This may be useful to get a more realistic idea about stereo width. However, since humans perceive the bass spectrum as lower than the treble, this may hide phase problems in that bass spectrum.

Time graph
Time graph button switches between the metering view and the time-graphs. The metering view provides an immediate view of the current values including a text representation. The time-graphs provide the same information over a period of time. Since different time-graphs often need different units, only the most important units are provided.

Pause
Pause button pauses the processing.

Popup
Popup button shows a pop-up window and moves the whole metering / time-graph system into it. This is especially useful in cases where you cannot enlarge the meters within the main window or such a task is too complicated. The pop-up window can be arbitrarily resized. In metering mode it is useful for easier reading from a distance for example. In time-graph mode it is useful for getting higher accuracy and a longer time perspective.

Enable
Enable button enables or disables the metering system. You can disable it to save system resources.

Collapse
Collapse button minimizes or enlarges the panel to release space for other editors.

Collapse
Collapse button minimizes or enlarges the panel to release space for other editors.
Utilities

Map
Map
Map button displays all current mappings of modulators, multiparameters and MIDI (whichever subsystems the plugin provides).
1:
50.0%
三
Multiparameter
Multiparameter button displays settings of the multiparameter. The multiparameter value can be adjusted by dragging it or by pressing Shift and clicking it to enter a new value from the virtual keyboard or from your computer keyboard.
Click on the button using your left mouse button to open the Multiparameter window where all the details of the multiparameter can be set. Click on it using your right mouse button or click on the menu button to the right to display an additional menu with learning capabilities - as described below.

Menu
Menu button shows the smart learn menu. You can also use the right mouse button anywhere on the multiparameter button.
Learn attaches any parameters, including ranges. Click this, then move any parameters through the ranges that you want and click the multiparameter button again to finish. While learning is active, "REC" is displayed on the multiparameter button and learning mode is ended by clicking the button again.
Clear & Learn clears any parameters currently in the list then attaches any parameters, including ranges. Click this, then move any parameters through the ranges that you want and click the multiparameter button again to finish. While learning is active, "REC" is displayed on the multiparameter button and learning mode is ended by clicking the button again.
Reset resets all multiparameter settings to defaults.
Quick Learn clears any parameters currently in the list, attaches one parameter, including its range and assigns its name to the multiparameter. Click this, then move one parameter through the range that you want.
Attach MIDI Controller opens the MIDI Settings window, selects a unused parameter and activates MIDI learn. Click this then move the MIDI controller that you want to assign.
Reorder to ... lets you change the order of the multiparameters. This can be useful when creating active-presets. Please note that this feature can cause problems when one multiparameter controls other multiparameters, as these associations will not be preserved and they will need to be rebuilt.
In learning mode the multiparameter does not operate but rather records your actions. You can still adjust every automatable parameter and use it normally. When you change a parameter, the plugin associates that parameter with the multiparameter and also records the range of values that you set.
For example, to associate a frequency slider and make a multiparameter control it from 100Hz to 1KHz, just enable the smart learn mode, click the slider then move it from 100Hz to 1KHz (you can also edit the range later in the Multiparameter window too). Then disable the learning mode by clicking on the button.

Lock
Lock button displays the settings of the global parameter lock. Click on it using your left mouse button to open the Global Parameter Lock window, listing all those parameters that are currently able to be locked. Click on it using your right mouse button or use the menu button to display the menu with learning capabilities - Learn activates the
learning mode, Clear & Learn deletes all currently-lockable parameters and then activates the learning mode. After that, every parameter you touch will be added to the lock. Learning mode is ended by clicking the button again. The On/Off button built into the Lock button enables or disables the active locks.
Preset selector

Preset management window provides management for your presets.
Backup
Backup
Backup button lets you backup presets for all MeldaProduction software into a single file, so you can transfer it to a different machine and restore the presets there for example.
Restore from backup
Restore from backup
Restore from backup button lets you restore presets for all MeldaProduction software from a single file created by the Backup button.
Folders tree

Folders tree lets you organize your presets into any number of folders. Use the buttons at the bottom of the window to create, rename or delete sub-folders. Note that these are not actual files & folders on disk, but are records in the preset database.
Auto-open
Auto-open
Auto-open switch makes the tree automatically open selected items, so that all sub-folders are visible, whenever you select one. This makes it easier to browse through large structures containing many folders. The switch also makes the browser show all presets available in the selected folder including all sub-folders (except when you select the root folder).
Open all
Open all
Open all button expands the whole tree, so you can see all of the folders. This may be handy when editing large preset structures.
Close all
Close all
Close all button collapses the whole tree except for the root folder. This may be handy when editing large preset structures.
Add
Add
Add button creates a new folder in the tree
Rename
Rename
Rename button lets you rename the selected folder.
Delete
Delete
Delete button deletes the folder including all the presets and subfolders in it.
Export
Export
Export button lets you export the selected folder including all presets and sub-folders into a file, which you can then transfer to any computer. Or just use as a back-up.
Import
Import
Import button lets you import a file containing presets and sub-folders and add it to the selected folder. The importer will ask you whether to destroy the original contents, so that the new presets replace previous ones, or to keep both.
Presets list

Presets list contains all presets available in the selected folder. Double-click on a preset or use Load button to load a preset. Use the buttons at the bottom of the list to perform additional changes. Please note that these are not actual files & folders on disk, but are records in the preset database.

Favourite
Favourite button toggles the 'favourite' indicator for the selected preset.

Show
Show
Show button shows only the favourite presets and hides the others.

Sort
Sort button shows the presets sorted alphabetically.

Random
Random button selects and loads a random preset from the current folder. This way you can quickly browse the presets in the folder in a completely random order.

Previous
Previous button selects and loads the previous preset from the current folder.

Next
Next button selects and loads the next preset from the current folder.
Submit preset
Submit preset
Submit preset button submits the selected preset to the online exchange servers and retrieves all the presets currently in the database. This feature serves as an online database of presets available for all the user community. Please do not submit garbage presets.
Download presets
Download presets
Download presets button retrieves all the presets currently in the database. This feature serves as an online database of presets available for all the user community. Please consider participating by submitting your presets as well.
Load
Load
Load button loads the specified preset. Please note that you can do the same thing by double-clicking the preset itself or pressing the Enter key.
Add
Add
Add button creates a new preset using the current settings.
Rename
Rename
Rename button lets you rename the selected preset.
Replace
Replace
Replace button replaces the selected preset by one with current settings.
Delete
Delete
Delete button deletes the selected preset.
Search

Search
Search filters the list of available presets to those containing the keywords in name or information.
Clear
Clear
Clear button deletes all text in the search field.

information
Preset information field contains optional information about the preset, which you can edit when creating or renaming the preset.
Plugin settings

Plugin settings window offers more advanced settings and is available via the Settings button.
Licence panel
Licence manager
Licence panel lets you manage licences on this computer.
Licence manager
Activate
Activate button lets you activate your licence for the plugin on this computer.
GUI & Style panel

GUI & Style panel lets you configure the plugin's style (and potentially styles of other plugins) and other GUI properties.
Style
Style
Style button lets you change the style for this particular plugin.
Random style
Random style
Random style button selects a random style with random editor mode.
Default style
Default style
Default style button reverts to the default style and default size of the GUI. Hold the Ctrl key while clicking to revert all MeldaProduction
software products, not just the current plugin.
Select current style as default
Select current style as default
Select current style as default button stores the current style as the default for all MeldaProduction software. This is used for the other plugins that are currently using the default style; that is, those plugins for which you have NOT selected a specific style. Please note that if you have already selected a specific style for a particular plugin, then it won't be changed until you use the Default style button.
GPU acceleration
Enabled
◀ ▶
GPU acceleration
GPU acceleration controls how much the GPU is used for visual rendering to save CPU power.
Enabled mode provides maximum speed and lets the GPU perform as many drawing operations as possible.
Compatibility mode uses the GPU for drawing, but doesn't use modern technologies for maximum performance. Use it if you experience occasional problems with drawing, the usual case for older ATI graphics cards. With Pro Tools on OSX this mode is always used instead of Enabled mode due to compatibility problems with this host.
Disabled mode disables GPU acceleration completely, drawing is then performed by the CPU. Use only if you experience technical difficulties.
A known problem may occur when using multiple displays with multiple graphical interfaces. When moving the plugin window from one display to another, it may stop displaying correctly until you move it back to the original display.
Frames per second
40
Frames per second
Frames per second controls the refresh rate of the visual engine. The higher the number is the smoother everything is, but the more CPU it requires. You might want to lower this value if your computer is running out of CPU power.
Enable high DPI support
Enable high DPI / retina support
Enable high DPI / retina support enables the plugin to use the high resolution on high DPI (Windows) and retina (OSX) devices. It is enabled by default and detected automatically, if the host allows it. If you run into any problems, you can disable it using this option. It may be desired if you use multiple displays where only some of them feature the high resolution making the image on the low resolution ones look ugly.
If you disable this option, on Windows the high DPI device detection will be ignored and the plugin will probably appear very small. You can manually compensate for it by using a bigger style. On OSX disabling this option will disable the high DPI rendering, resulting in the classic blurry look of non-compliant applications. Changes take effect after you restart the host.
Enable colorization
Enable colorization
Enable colorization enables the plugin to change the colors of certain elements overriding your style settings. Plugins use that to highlight different parts of the graphics interface for easier workflow. You may want to disable it if you just feel it's not for you. This particular option is relevant only for controls - knobs, sliders, checkboxes etc.
Enable colorization for panels
Enable colorization for panels
Enable colorization for panels enables the plugin to change the colors of certain elements overriding your style settings. Plugins use that to highlight different parts of the graphics interface for easier workflow. You may want to disable it if you just feel it's not for you. This particular option is relevant only for containers - panels, graphs etc.
Allow default colors by plugin type
Allow default colors by plugin type
Allow default colors by plugin type is on by default and makes the plugin select its default colors depending on the type of the Plugin. Hence for instance equalizer will always be green. This is done by selecting one of the first 8 color presets for the current style, so the actual colors depend on selected style and its presets. You may want to disable this if you for example want all plugins to look the same including the style and colors. It is necessary to restart your host for a change to this option to take effect.
Allow style changes if the editor is too big
Allow style changes if the editor is too big
Allow style changes if the editor is too big is on by default and makes the plugin change its style, editor mode and other settings if it finds out it is too big to fit the current screen resolution.
Clear window settings cache
Clear window settings cache
Clear window settings cache button deletes stored states of all popup windows on all MeldaProduction software. The window settings mostly contain positions and sizes, but in some cases also the data inside the popup windows. You can use this feature if something goes wrong, a window doesn't appear at all, problems like that. While this shouldn't happen and it's generally better to contract our support, this button provides a potential quick fix.
Plugin settings panel
PLUGIN SETTINGS

- Intelligent sleep on silence
- Randomizer loudness compensation
Smart bypass
MIDI thru
Sample-accurate event processing
Latency reporting
Latency: 0 samples, 0.0 ms
Plugin settings panel contains settings that control the behaviour of this plugin instance. These are properties that rarely need to be changed, so they have been moved here.
- Intelligent sleep on silence
Intelligent sleep on silence
Intelligent sleep on silence option provides a huge CPU saver by automatically disabling the plugin processing if the input is silent and if the plugin doesn't generate some signal on its own. This makes the plugins take virtually no CPU if there is no need for them to actually process anything. Disable this if you run into any problems with them.
- Randomizer loudness compensation
Randomizer loudness compensation
Randomizer loudness compensation enables the automatic detection of loudness after new settings have been generated using the main Random button and using the output gain of the plugin to get some predefined level. This is useful in most cases since normally randomized settings can produce various output levels, so this can mitigate the problem.
Smart bypass
Smart bypass
Smart bypass enables the high quality crossfading bypass system, which ensures a smooth transition between the processed and dry signals. You may want to disable it if you are using settings with latency on a plugin, which demands lots of CPU power, which would otherwise need to perform processing even when bypassed, which is pretty much the only downside of the smart bypassing algorithm.
MIDI thru
MIDI thru
MIDI thru makes the plugin pass all input MIDI through to its MIDI output. That is often advantageous in DAWs such as Reaper, which naturally pass MIDI from one plugin to the next.
Sample-accurate event processing
Sample-accurate event processing
Sample-accurate event processing makes the plugin schedule every event such as MIDI or automation to their accurate locations with sample accuracy, if the host allows it.
For example, if the block size in your host's audio settings is 1024 samples, this means the plugin is probably processing blocks of 1024 samples, in 44100 Hz sampling rate it is about 23ms. If this setting is disabled, any change in automation, MIDI, modulation etc. may then be granularized to 23ms (once per block), which means that you will not be able to recognize events that occur say 10ms apart from each other. When this setting is enabled however, the plugin divides processing blocks to sub-blocks and processes the events at their correct positions. This may, of course, require more CPU power.
Latency reporting
Latency reporting
Latency reporting makes the plugin report latency to the DAW, if any. Normally this is enabled, but in certain live situations you may want to disable this, so that the DAW stops compensating the latency on other tracks. It has no effect if the plugin is placed on master track.
Global system settings panel
GLOBAL SYSTEM SETTINGS

- Intelligent sleep on silence (global)
Right click sets default value
Tablet mode
Enable keyboard input
Collapse plugin toolbar
Set default settings
Reset default settings
Global system settings panel contains settings which are applied to all plugins on this computer.
- Intelligent sleep on silence (global)
Intelligent sleep on silence (global)
Intelligent sleep on silence (global) is a global switch, which disables the Auto disable on silence feature in all plugins on the system. It is provided "just in case" something goes wrong.
Right click sets default value
Right click sets default value
Right click sets default value makes the engine set default value to a parameter when you right click on it. By default, a menu is displayed instead, with an option to set the default value, but potentially with more features. When this is disabled, you can still set a default value by holding ctrl/cmd when right clicking the control.
Tablet mode
Tablet mode
Tablet mode enables better support for tablets at the expense of the mouse. Enable this if you are using a tablet to control the plugins and it is behaving incorrectly.
Enable keyboard input
Enable keyboard input
Enable keyboard input enables the keyboard input for the main plugin window. You may want to disable if the plugin intercepts spacebar key (often used by the host for playback enable/disable and your host doesn't allow for the problem itself.
Collapse plugin toolbar
Collapse plugin toolbar
Collapse plugin toolbar makes all plugins collapse the plugin toolbar containing more advanced features such as channel modes, A-H presets, oversampling, safety limiter etc. It is enabled by default to make the user interfaces cleaner and easier to grasp for beginners.
Set default settings
Set default settings
Set default settings button stores the current plugin settings as the defaults, so that when you open a new instance of the plugin, these settings will be loaded automatically.
Reset default settings
Reset default settings
Reset default settings button removes the defaults that you set using Set default settings button, so that when you open a new instance of the plugin, the factory defaults will be loaded.
Advanced global settings panel
ADVANCED GLOBAL SETTINGS

Saturation antialiasing
Forward unused keyboard input to DAW
Silence when busy
Store resampled files
Show confirmations for destructive actions
Online check for updates and tutorials
Anonymous online platform reporting
CPU benchmark
System info
Advanced global settings panel contains advanced settings which are applied to all plugins on this computer.
Saturation antialiasing
Saturation antialiasing
Saturation antialiasing enables a global support for antialiasing in saturation algorithms available in many of the plugins. These require additional CPU processing, however significantly reduce aliasing artifacts without a need for oversampling.
Forward unused keyboard input to DAW
Forward unused keyboard input to DAW
Forward unused keyboard input to DAW makes the plugin forward unused keyboard events to the DAW from its popups. If this is disabled, pressing say spacebar commonly used to start/stop playback won't work if a popup window is active. Enabling this makes this work and it is optional just in case your DAW does something unexpected.
Silence when busy
Silence when busy
Silence when busy makes all plugins silence the output when something time consuming is being performed in background and the
plugin needs to wait for it. For instance, in modular plugins such as MXXX, adding a module requires lots of changes in the entire engine, so it is performed in background and while the plugin is inconsistent state, it is temporarily bypassed. Sometimes however, when performing live, bypassing makes the dry signal go through and that may not be wanted. So you can enable this option, and the plugin will silence the output instead.

Store resampled files
Store resampled files
Store resampled files allows the plugins create audio files for sampling rates being used if they differ from the original file sampling rate. It is used only by a few plugins, but it can improve the loading performance a lot at the cost of some additional storage on the hard drive. Disable this option if you are short on free space.

Show confirmations for destructive actions
Show confirmations for destructive actions
Show confirmations for destructive actions makes the plugin display a confirmation window whenever you are going to change the plugin settings irreversibly when using a feature, for example: when resetting your settings.

Online check for updates and tutorials
Online check for updates and tutorials
Online check for updates and tutorials lets the plugin ask about once a week if there is a new version or tutorial available so you can be easily kept up to date.

Anonymous online platform reporting
Anonymous online platform reporting
Anonymous online platform reporting helps us maximize compatibility with your operating system and host. If enabled, our plugins will send information about the system and host that you are using. We can use this information to find out which plugins and platforms are used the most and maximize testing and support there. Platform reporting is completely anonymous and requires only minimal internet connection time (a few kB once a week).
CPU benchmark
CPU benchmark
CPU benchmark button calculates the performance of the plugin with the current settings.
System info
System info
System info button displays some technical information about the build and the machine.
Compatibility settings panel
COMPATIBILITY SETTINGS


Storage compatibility mode for V15
Automation compatibility mode for V10
Compatibility settings panel contains advanced settings you rarely need unless you run into some problems when using multiple versions or old projects.
Storage compatibility mode for V15
Storage compatibility mode for V15
Storage compatibility mode for V15 reverts to the older and much slower storage system used by version 15 and older. Use this if you want to open your projects or presets on older version of MeldaProduction plugins.
Automation compatibility mode for V10
Automation compatibility mode for V10
Automation compatibility mode for V10 reverts the set of automation parameters back to version 10 and earlier. Use this if you need the plugins to work with projects, which contain automation, made using version 10 or older. In version 11 the list of automatable parameters have been highly simplified and reorganized and multiparameters are provided for the vast number of hidden parameters. This should speed up loading, improve workflow with the plugins and improve compatibility with various hosts.
Smart interpolation panel

Smart interpolation panel controls the depth of the smart interpolation algorithm, which controls the parameters in order to provide maximum audio quality and lower the chance of zipper noise. Smart interpolation is engaged whenever you change any parameter via the GUI, modulators, multiparameters, MIDI or automation.
Many parameters can be automated easily and the plugin responds with sample-accurate results. However, several parameters need exhaustive pre-processing when changed. In these cases, the parameters are not updated every sample, but, for example, once every 32 samples. This highly reduces CPU usage, but affects the output quality.
With modulators the situation is more complicated. Besides the updating issue, the modulator itself can perform some pretty advanced processing, hence it is better to perform the processing in blocks. However, the bigger the block, the less often the modulator updates those parameters associated with it and the resulting modulation is less accurate. In a way you can say that the modulator is slower and lazier. This may actually be wanted, so when it comes to modulators it is not true that a better mode always means better output quality.
The smart interpolation mode controls the maximum number of samples being processed before the parameters are updated. Minimal mode uses 2048 samples and rarely will do anything unless processing offline. Normal mode uses 256 samples and usually is enough to achieve good quality results. High mode uses 32 samples and provides perfect quality for most cases. It is also a good compromise between CPU usage and audio quality, so it is the default. Very high mode uses 4 samples and you will rarely need it. Extreme mode uses 1 sample, which means that everything is updated after every single sample. This provides the highest possible accuracy and quality you can ever achieve, however it requires lots of CPU and it is very unlikely that you will ever need it. If you use this mode and still hear audio artifacts, then either what you are hearing is actually CPU overload, or you are doing something that is not physically possible.
The higher the mode, the quicker the parameter updates, but the more the CPU load.
Please note that modulating certain parameters without artifacts is impossible. For example, when modulating a delay very quickly, the physics of such a process just cannot occur in the natural world and the results are appropriately unnatural. These physically impossible processes usually manifest themselves as distortion or zipper noise.
MultiParameter editor

Multiparameter is a powerful structure, which can speed up your workflow significantly and even perform automatic tasks, often useful when performing in real-time for example. Essentially a multiparameter is a controller which controls other parameters, in fact, an unlimited number of them. Each parameter has limits and potentially a transformation curve for more advanced processing. By manually moving the multiparameter (or automating/modulating it) you can control all of the associated parameters at once.
This is just the beginning, but it is worth demonstrating how it could be used. We will show it on a vibrato effect. MVibratoMB (and partly MVibrato) is very good at simulating rotary speakers. A rotary speaker traditionally contains a speed switch, or in our case we will think of it as a speed knob - a control that alters the spin speed of the rotary. This would normally be the Rate parameter of the vibrato. However, when the rate is increased, the vibrato starts changing the pitch too much, sounding a little too "honky-tonk". We can compensate for this by lowering the Depth parameter. As it is not very convenient to control 2 parameters at once, we use a multiparameter to control both parameters with appropriate ranges (ascending for the Rate and descending for the Depth).
Besides this basic usage, multiparameters can also work as triggers and switches. Set a multiparameter's mode to Trigger or Switch and it stops being a slider and becomes a button. When you click the button, the multiparameter starts moving on its own - over the dialled-in switch time it will increase its value (and also the values of any associated parameters) to a maximum and, in the case of trigger mode, then decrease it back to a minimum. In switch mode clicking the button again, the multiparameter decreases back to the minimum value. To make the multiparameter into a simple switch, we can set the switch time to minimum, but in this case we want to extend the functionality in our rotary example.
As mentioned, rotary speakers often have a speed switch. Once switched on, the speed starts increasing until it reaches the "fast" setting, and when switched off, the speed starts decreasing to the original "slow" rate. All we need to do to replicate this functionality is to set the multiparameter's mode to 'switch'.
A real rotary actually has 2 speakers, one for low frequencies and the other for the higher ones. As you might expect, these do not have the same spin rate nor do they speed up or slow down equally either. Here is where we can start showing the true potential of multiparameters.
To simulate this, we have to use two bands of MVibratoMB, the first one will simulate the lower reproductor, and the second will be the higher. We use the first multiparameter to control the first band's rate in the same way as described in the example above. Similarly, we use the second multiparameter to control the second band's rate. Now we have 2 switches and can make each band speed-up or slow-down separately, but we want just one switch for both bands. To do this, we use a third multiparameter to control the first and second multiparameters, in switch mode again but with a 0ms switch time. Pressing the button of the 3rd multiparameter instantly activates the other 2 multiparameters, they both start speeding-up, over a different time period as we requested. Pressing the button again, releases it which also instantly releases the first 2 multiparameters and they start slowing down. Just like the real thing.
Now that we have shown you what is possible with multiparameters, it is worth mentioning that they are used extensively for building devices on the easy screens of most Melda plugins. Every multiparameter given a name in the Information panel will be shown on the Easy screen (if the plugin has one). Check our online video tutorials to get more information about multiparameters and building
devices.
It is also worth mentioning that you can access the multiparameter settings directly from easy screen by holding Ctrl+Alt and clicking on the target control. It may simplify building devices. Note that this may not work for some editor modes such as meters or bar graphs.

Presets
Presets
Presets button displays a window where you can load and manage available presets. Hold Ctrl when clicking to load a random preset instead.

Left arrow
Left arrow button loads the previous preset.

Right arrow
Right arrow button loads the next preset.

Randomize
Randomize button loads a random preset.

Copy
Copy button copies the settings onto the system clipboard.

Paste
Paste button loads the settings from the system clipboard.

Map
Map button displays all current mappings of modulators, multiparameters and MIDI (whichever subsystems the plugin provides).
Behaviour

Randomizer
Randomizer switch is available only for Trigger mode and it makes the multiparameter produce random values for each associated parameters. This is useful to implement some sort of randomization feature, which covers a set of parameters. You usually want to set the Switch time to 0, so that the randomization is instant, but longer values may be useful for some creative effects.

XY-pad between banks
XY-pad between banks switch is available only for Banks mode and it lets you create XY pads, that would interpolate between 3 or more banks that you specify. With 4 banks the engine creates a classic XY pad, where the 1st bank belongs to the left top corner, 2nd to the right top, 3rd to left bottom and 4th to the right bottom. With more banks the engine creates a circular pad with vertices associated to
individual banks.
Please note that in order for this to work, the multiparameter actual needs 2 multiparameters (X and Y values), hence must NOT be the last one and it occupies the next multiparameter as well. It is recommended to name the next multiparameter and associate it to some parameters, ideally the same ones, just to make sure the engine won't remove it. But in fact only the first multiparameter will actually be working.
NORMAL
SWITCH
TRIGGER
BANKS
METER
Mode
Mode controls the behaviour of the multiparameter.
Normal mode makes the multiparameter work like any other control.
Switch mode hides the slider and shows a button instead. The button has 2 states. By pushing the button, the multiparameter value starts rising from 0% to 100% over a specified time interval. By pushing it again the value starts falling back to 0%. You could do the same thing having the multiparameter in normal mode and moving the slider from left to right and then back, but mode this performs that automatically and maintains a constant time period.
Trigger mode is similar to switch mode, but the button has only a single state and when you push it, the value automatically goes from 0% to 100% and then back without any need to push the button again.
Banks mode is very different. A multiparameter in banks mode keeps several states (called banks) for all of the parameters, much like A-H presets, but only with a limited set of parameters. The multiparameter then morphs between the banks or can be set to switch directly between them (no interpolated values). This is a marvellous way to control many parameters with complex settings by using a single multiparameter.
Let's explain the banks mode in more detail. Say you switch a multiparameter to banks mode, learn a few parameters and set the number of banks to 4. Then bank 1 contains a value for all of the parameters. Similarly bank 2 contains a different value for each of them. And so on. If you set the multiparameter slider to 0%, the associated parameters will be set to values in bank 1. If you set the slider to 100%, bank 4 will be used. If you set the slider to 33.3%, bank 2 will be used. And what if you select 50%? Then it will be halfway between bank 2 and bank 3.
You can have many banks, you can edit each of them, generate random settings etc. So let's say you want to create some complex movement. You use a multiparameter in banks mode, select a reasonable number of banks. You can edit each of them, but it is easier to use the randomization button to generate random settings for each of them. Then every time you move the multiparameter, all of the associated parameters will move, somewhere between the banks. You can then use a modulator or automation to slowly adjust the multiparameter.
Meter mode makes the multiparameter work as a meter. Instead of controlling other parameters it starts following the value of them. You can then use that to implement a simple meter on the easy screen (if the plugin has one).

Speed
Speed controls the interpolation time. When it is zero and you change the multiparameter value, the associated parameters are adjusted immediately. If this is non-zero however, the actual parameters won't change immediately but will interpolate over time. The speed value is actually the time needed to go from minimum to maximum or vice versa. So if this is 1 second and the current value is say 0% and you click 100%, it will take 1 second for the multiparameter to get there.
This feature is provided mainly because changing some parameter via MIDI or mouse may cause unnecessary zipper noise or inaccuracies due to low MIDI precision. Using the interpolation you can somewhat slow everything down, so that the artifacts become negligible. It can also be used creatively. The default value has been experimentally tested to avoid all artifacts for most parameters.

Switch time
Switch time defines the time needed to switch from the minimum value to the maximum one, or conversely. It is used only in switch and trigger modes.

Steps
Steps lets you create an arbitrary number of equi-distant steps for the multiparameter values. While this technically limits the possibilities of the multiparameter by limiting the number of accessible values, it is sometimes easier to choose from a predefined number of options than from the full range. If you want to use different ranges between the steps, use the Banks mode with Interpolate values disabled.
Percents

Value mode
Value mode defines the units displayed on the multiparameter.
Percents mode lets the multiparameter display percentages between 0% to 100%.
Percents (-100% to 100%) displays percentages between -100% to 100%.
By first parameter mode uses the current value of the first parameter that is controlled by the multiparameter. For example, if you want to control a plugin gain, but also in addition to the changed gain control other parameters, you may still want to call the multiparameter "gain " and the units should be decibels as usual, not percentages which do not make much sense for such a multiparameter.
By bank name displays the name of the nearest bank. In some controls, such as switchers, it is possible to display the set of the values as a menu. The menu is created automatically and it even creates groups for better clarity, based on the prefix of the bank names. You can use ' # ' (hashtag surrounded by spaces) to define the groups manually like this: "group # name". For example, you can name one bank "Main group # First bank" and another "Main group # Second bank", and these will be displayed in a single group in the menu. If you are going to use this method, make sure the ' # ' sequence is present in each bank's name.
By bank name interpolated considers name of all banks numbers. It then interpolates between them and displays the result as a number.
By bank name interpolated log is similar, but interpolates the values in logarithmic domain.considers name of all banks numbers. It's useful for units, which are naturally logarithmics, such as frequency.
By bank number shows the index of the nearest bank.
Expression lets you formulate the value -> text and back using mathematical expressions and can be used for some more complex MPs or if you need some custom units.
Default
50.0%
Default
Default controls the default value of the multiparameter. You can edit it directly or just set the MP into its reasonable default and click the Set current value. Most GUI components created for the multiparameter respond to right-click by setting the default value in the same way that other parameters do. It is essential for user experience when building your own devices.
Set current value
Set current value
Set current value stores the current value as the default one for the multiparameter.
Origin
0.00%
Origin
Origin informs the GUI engine of the origin of the value. For instance, a default value for panorama is in the center and it is logical that visual elements controlling panorama should somehow highlight the center position. If, for example, you are using a value button to edit the panorama, by default it displays the current value using a bar starting from the left side (being the origin defined as minimum) towards the actual value, but here it is better to display the bar from the center towards the current value, whether it is on the left or right of the center. Therefore the center should be the origin.
Set current value
Set current value
Set current value stores the current value as the origin for the multiparameter.
Set center
Set center
Set center sets the center (50%) as the origin for the multiparameter. This is often the case for parameters such as gain and panorama, so it deserves a dedicated button. It is supported only for knobs.
Value to text
Value to text is available only with Expression Value mode and lets you enter a text featuring mathematical expressions to produce the units. This can be used for more complex multiparameters. The text itself is just another text, but it can contain substrings of this structure:
{expression}
or
{expression;decimals}
where expression is the actual mathematical expression and decimals is the number of decimal places in the resulting value. Here is the list of variables available for each expression:
x = the multiparameter value in 0..1
sr = current sampling rate
Functions and features of the expressions are available below. Now let's see a few examples:
Test: {x} - produces "Test: 0.12" (with MP value 0.1234)
x (x*100;0%) - produces "0.12 (12%)" (with MP value 0.1234)
{ffrom01(x);1} Hz - produces say "215.56 Hz" ("20.0 Hz" for MP value 0 and "20000.0 Hz" for MP value 1)
{todb(sqr(x));4} dB - produces "-12.0412 dB" for 0.5. "sqr" is used to mimic the transformation used in pretty much every Volume parameter in MeldaProduction plugins.
Expression evaluator uses traditional C/C++ style formatting, which is natural for most people. It provides arithmetics, logical and conditional operators. Following terms are supported:
Constants: pi, e, sqrt2, ln2
Arithmetic operators:
-a inverts the sign, e.g. "-x" produces +2 for x=-2
a+b= addition
a-b = subtraction
a*b = multiplication
a/b = division
a%b = modulo, remainder after division
a^b = power, e.g. "2^3" produces 2*2*2 = 8
Arithmetic functions:
min(a,b) = minimum of both values
max(a,b) = maximum of both values
limit(a,min,max) = a limited into the interval min..max
to01(a,min,max) = converts "a" as min..max to 0..1
from01(a,min,max) = converts "a" as 0..1 to min..max
tom11(a,min,max) = converts "a" as min..max to -1..1
fromm11(a,min,max) = converts "a" as -1..1 to min..max
Basic mathematic functions: abs(x) = absolute value , e.g. abs(-3) = 3 sqr(x) = xx sqrt(x) = square root exp(x) = natural exponential ex (x) = natural logarithm log10(x) = logarithm with base 10 log(x, base) = logarithm with specified base inv(x) = 1/x sgn(x) = sign of x, -1 or 0 or +1 depending on xx round(x) = rounding to the nearest value floor(x) = rounding to the nearest lower value, e.g. floor(-2.3) = -3 ceil(x) = rounding to the nearest higher value, e.g. ceil(-2.3) = -2 rand(x) = random value from 0 to x
Functions for specific units:
f01(a) = converts "a" as frequency from 20...20000 into log scale 0..1
ffrom01(a) = converts "a" as 0..1 (log scale) to frequency from 20...20000
todb(a) = converts "a" as multiplier to dB value by calculating "20*log10(a)"
fromdb(a) = converts "a" as dB value to multiplier by calculating "10^(a/20)"
Trigonometric functions: (x) , (x) , (x) , (x) , (x) , (x) , (x) , (x) , (x)
Logical operators:
a==b = comparison producing 1 if "a" and "b" are equal, 0 otherwise
a!=b = comparison producing 1 if "a" and "b" are NOT equal, 0 otherwise
a<b = comparison producing 1 if "a" is lower than "b", 0 otherwise
a<=b = comparison producing 1 if "a" is lower or equal to "b", 0 otherwise
a>b = comparison producing 1 if "a" is greater than "b", 0 otherwise
a>=b = comparison producing 1 if "a" is greater or equal to "b", 0 otherwise
!a = logical negation, 0 produces 1, 0 otherwise
a&&b = logical AND, produces 1 if both "a" and "b" are nonzero
a||b = logical OR, produces 1 if any of "a" and "b" are nonzero
a^^b = logical XOR, produces 1 if "a" and "b" are logically different
a ? b : c = if a is nonzero, then the result is b, otherwise it is c}}
Text to value
Text to value is available only with Expression Value mode and lets you convert a number user enters as a text input into the multiparameter value in 0..1. This can be used for more complex multiparameters. Unlike Value to text here you need to enter a single expression, no need for any other text. If the resulting value exceeds the 0..1 interval, it is automatically limited. Here is the list of variables available for the expression:
x = the value the user entered
sr = current sampling rate
Functions and features of the expressions are available below. Now let's see a few examples: x - sets MP to 0.1234 if the user entered "0.1234"
x/100 - sets MP to 0.1234 if the user entered "12.34" (or "12.34%" for example)
fto01(x) - sets MP to the proper frequency in log scale, e.g. 20 is translated to 0, 20000 to 1
fromdb(sqrt(x)) - sets MP to 0.5 if the user entered "-12.0412" (or "-12.0412 dB" for example). "sqrt" is used to mimic the transformation used in pretty much every Volume parameter in MeldaProduction plugins.
Expression evaluator uses traditional C/C++ style formatting, which is natural for most people. It provides arithmetics, logical and conditional operators. Following terms are supported: Constants: pi, e, sqrt2, ln2
Arithmetic operators:
-a inverts the sign, e.g. "-x" produces +2 for x=-2
a+b = addition
a-b = subtraction
a*b = multiplication
a/b = division
a%b = modulo, remainder after division
a^b = power, e.g. "2^3" produces 2*2*2 = 8
Arithmetic functions:
min(a,b) = minimum of both values
max(a,b) = maximum of both values
limit(a,min,max) = a limited into the interval min..max
to01(a,min,max) = converts "a" as min..max to 0..1
from01(a,min,max) = converts "a" as 0..1 to min..max
tom11(a,min,max) = converts "a" as min..max to -1..1
fromm11(a,min,max) = converts "a" as -1..1 to min..max
Basic mathematic functions: ( \text{abs}(x) = \text{absolute value} ) , e.g. ( \text{abs}(-3) = 3 \text{ sqr}(x) = x*x \text{ sqrt}(x) = \text{square root exp}(x) = \text{natural exponential } e^x \text{ ln}(x) = \text{natural logarithm log10}(x) = \text{logarithm with base 10 log}(x, \text{base}) = \text{logarithm with specified base inv}(x) = 1/x \text{ sgn}(x) = \text{sign of } x, -1 \text{ or } 0 \text{ or } +1 \text{ depending on } x*x \text{ round}(x) = \text{rounding to the nearest value floor}(x) = \text{rounding to the nearest lower value}, \text{ e.g. floor}(-2.3) = -3 \text{ ceil}(x) = \text{rounding to the nearest higher value}, \text{ e.g. ceil}(-2.3) = -2 \text{ rand}(x) = \text{random value from 0 to
X
Functions for specific units:
f01(a) = converts "a" as frequency from 20...20000 into log scale 0..1
ffrom01(a) = converts "a" as 0..1 (log scale) to frequency from 20...20000
todb(a) = converts "a" as multiplier to dB value by calculating "20*log10(a)"
fromdb(a) = converts "a" as dB value to multiplier by calculating "10^(a/20)"
Trigonometric functions: (x) , (x) , (x) , (x) , (x) , (x) , (x) , (x) , (x)
Logical operators:
a==b = comparison producing 1 if "a" and "b" are equal, 0 otherwise
a!=b = comparison producing 1 if "a" and "b" are NOT equal, 0 otherwise
a<b = comparison producing 1 if "a" is lower than "b", 0 otherwise
a<=b = comparison producing 1 if "a" is lower or equal to "b", 0 otherwise
a>b = comparison producing 1 if "a" is greater than "b", 0 otherwise
a>=b = comparison producing 1 if "a" is greater or equal to "b", 0 otherwise
!a = logical negation, 0 produces 1, 0 otherwise
a&&b = logical AND, produces 1 if both "a" and "b" are nonzero
a||b = logical OR, produces 1 if any of "a" and "b" are nonzero
a^^b = logical XOR, produces 1 if "a" and "b" are logically different
a ? b : c = if a is nonzero, then the result is b, otherwise it is c}}
Appearance

Name

Name
Name specifies the name of the multiparameter, which is shown on the multiparameter button. The name is also used for devices - the multiparameter serves as a parameter for the device (on the Easy screen). If no name is specified or if the first character is an *, then the parameter is hidden. This is useful if you need some internal multiparameters which you don't want to show on the Easy screen for some reason.
Group

Group
Group can be used to put some multiparameters into the same group, which results in them being placed in the same panel on the Easy screen (the device editor). Additionally you can actually place the groups into tabs by setting group to "tabname#groupname". The name of the tab needs to be there only for the first parameter of the new group. This makes it possible to build a complex devices with dozens of parameters.
Editor mode
Normal

Editor mode
Editor mode controls the way the multiparameter are to be displayed on the Easy screen.
Normal is the default mode and is represented by a small knob or button.
Big mode is similar, but uses a big knob or big button.
Button mode displays a value button, which is usually more compact than knobs.
Check-boxes makes the multiparameter displayed as a set of checkboxes (also called radio buttons). It is relevant only in Banks mode.
Check-boxes horiz & below is similar but displays the checkboxes in a single row, hence horizontally. Below mark makes the label underneath the actual checkbox.
Switcher and Selectors are useful for selecting a number of discrete values and similarly to check-boxes these are working only in
Banks mode.
Title button places the control into the title bar of the panel to which it belongs.
Title enable button places the control into the title bar of the panel to which it belongs and makes it a standard enable button (which also makes all controls within the panel unavailable if it is itself disabled).
XY pad creates a 2 dimensional XY pad control, that edits this multiparameter in the X axis and the next multiparameter in the Y axis.
There are multiple versions of this control, all of them differ only by size.
Spacer is a helper mode for device design, which doesn't display anything and only keeps empty space.
Meter creates a simple meter instead. You will probably want to set the multiparameter to Meter mode as well or attach it to a modulator. Meters don't really control anything and their purpose is purely to get a visual feedback. The meters can be horizontal or vertical and they can be up or down. Up is the usual choice useful for peak meters for example. Down is useful for gain reduction meters.
Bars start/end mode creates an editor, similar to step sequencer editor, where each parameter has its own bar. The Bars start starts the editor and all multiparameters are then added to it until a multiparameter with Bars end mode is found or until there are no remaining multiparameters. Note that this kind of editor doesn't show units and may have several other limitations.
Order is a very specific editor for Order modules available in modular systems such as MXXX. It lets you provide an processing order editor on the easy screen. To use it, attach the MP to Order parameter of the Order module and edit the MP information field, so that it contains all the items to be ordered, separated by ';'. The number of items must match the number of items in the Order module, otherwise the order won't work properly. You can also include colors for each item separated by # (hexa or one of the predefined set: Dynamics, Distortion, Modulation, Stereo, Spectral, Synthesis, Instrument, MDrummer, Reverb, Delay, EQ, Filter, Saturation, Limit, Time, Pitch, FX) and enable MP indices.
Example of the info: Compressor#Dynamics;EQ#EQ;Limiter#007F7F;Something
Panel type
Panel 1

Panel type
Panel type defines the type of panel in which multiple controls of the same group are placed. These differ only in their graphics display.
Color

Color
Color defines colorization for the element on the Easy screen (if the plugin has one). The feature is disabled if the Alpha value of the color is 0. Using this feature often increases memory consumption of the plugin, so make sure you use it only if necessary and try to use as low a number of different colors as possible. It is recommended to use only the snapshot colors to make sure the same colors are used in most cases, reducing the memory consumption. It is also highly recommended to use colors with a value (lightness) of 128 (the middle value), which makes sure that the lightness of the elements won't be changed. This works best for most styles. Please note that the style may be configured to simply ignore this color, so there may be no change at all. If you use this feature, make sure that you test it with all styles.
For the sake of workflow the colors have predefined meanings. It's highly recommended to follow this standard:
Orange - dynamics
Green - equalization, filtering
Brown/yellow - reverb, delay
Blue - modulation
Red - limiting, saturation, distortion
Cyan/yellow - stereo
Purple/pink - time, pitch, unison...
Grey - utilities, tools
Group color

Set
Group color
Group color defines colorization for the group panel on the Easy screen (if the plugin has one) and is ignored for all multiparameters except for the first one in a group. The feature is disabled if the Alpha value of the color is 0. Using this feature often increases memory consumption of the plugin, so make sure you use it only if necessary and try to use as low number of different colors as possible. It is recommended to use only the snapshot colors to make sure the same colors are used in most cases, reducing the memory consumption. It is also highly recommended to use colors with a value (lightness) of 128 (the middle value), which makes sure that the lightness of the elements won't be changed. This works best for most styles. Please note that the style may be configured to simply ignore this color, so there may be no change at all. If you use this feature, make sure you test it with all styles.
For the sake of workflow the colors have predefined meanings. It's highly recommended to follow this standard:
Orange - dynamics
Green - equalization, filtering
Brown/yellow - reverb, delay
Blue - modulation
Red - limiting, saturation, distortion
Cyan/yellow - stereo
Purple/pink - time, pitch, unison...
Grey - utilities, tools
Set
Set
Set button sets the color and group color for all multiparameters in the same group. It is pretty sensible to do that as all controls should look similar within each group. This can also be done by editing each parameter, but this way is easier.

Visible
Visible
Visible checkbox controls if the parameter is visible on the Easy screen (if the plugin has one). Its effect is similar to the '*' prefix in the parameter name, but the multiparameter's name is also available to the plug-in host. This is useful when you wish to automate that multiparameter from the host but not show it on the Easy screen. This parameter can also be attached to another multiparameter for
example in order to change the GUI somehow.

Enabled
Enabled
Enabled switch enables/disables the multiparameter. If disabled, it is grayed on the easy screen.

Same row
Same row
Same row checkbox defines if the parameter should be displayed next to the previous one on the Easy screen. Otherwise it will be placed on the next row. This setting serves as a hint and the plugin may ignore it, if it is impossible to do.

Resizable
Resizable X
Resizable X switch lets you specify if the panel could be resized. It is on by default to make sure everything gets resized, however when using multiple panels next to each other, it may be advantageous to disable resizing of some of them to save space. Otherwise each panel's size is proportional to number of controls it contains, which could make some of the panels larger than actually necessary.

Resizable
Resizable Y
Resizable Y switch lets you specify if the panel could be resized vertically. It is off by default to make sure everything has the minimum size it requires, but for aesthetic reasons you may want to make all groups on the same row the same size even if the controls inside them are not.

Randomizable
Randomizable
Randomizable option defines if the multiparameter can be randomized on the easy screen. You may want to disable this for input/output gain for example.

Show name
Show name
Show name option lets you show or hide the name of the multiparameter for some editor modes. The option has no effect for several editor modes.

Stepped / Continuous
Stepped / Continuous
Stepped / Continuous option tells the engine that the multiparameter can be in 2 modes, stepped or continuous. If so, it is assumed that you either used Banks mode or Steps to produce some sort of predefined set of values for the stepped mode. By enabling this option you allow the engine to convert the multiparameter to continuous mode by either ignoring the steps or interpolating the bank values. It can be used when designing devices.

Lockable
Lockable
Lockable option creates a lock button next to the parameter on the Easy screen, allowing the user to browse through presets without this parameter changing. Please note that this feature is available only for some editor modes.
When the parameter is first locked on the Easy screen it is added to the set of lockable parameters (which are listed in the Global Lock window).

Separate collapse
Separate collapse
Separate collapse checkbox makes the panel collapsable separately on the Easy screen. By default it is disabled and that makes the engine find all panels on the same row and collapse all of then or none of them.

Functional when disabled
Functional when disabled
Functional when disabled switch makes the multiparameter work even when disabled. This may be useful in some complex scenarios, where you need to make the MP control the target parameters and only use the Enabled flag to grey out the controls on the easy screen.

Fine control
Fine control
Fine control switch makes the multiparameter editor steps extra small, which is useful, when you need very high precision. This is often handy when using banks mode with many banks interpolating.

Advance
Advanced
Advanced switch makes the multiparameter 'advanced', disabled by default. If such an multiparameter exists, the engine also creates a button to show/hide all advanced multiparameters. In effect this lets you create a simple GUI with optional advanced controls.

Store
Store
Store makes the multiparameter stored. Relevant when creating devices. In some rare cases you may want to disable this, e.g. if the value is a meter or somehow it just doesn't need to be save at all.

Store in presets
Store in presets
Store in presets makes the multiparameter stored in presets. Relevant when creating devices. In some cases you may want to store the value, but ignore it when browsing presets. For instance, input gain may be ignored if the user is supposed to set the gain to some predefined value and then browse the presets without changing that gain.

Controls MPs
Controls MPs
Controls MPs informs the engine that this MP is controlling other multiparameters. As such it shouldn't be 'invoked' unless it is explicitly touched by the user. This is relevant for example when it is used in a device with a device presets - loading a device preset invokes all relevant MPs, so that the state of the device is remembered properly, but invoking this one would actually make things incorrect.

Include in doc
Include in doc
Include in doc makes the multiparameter's help included in the documentation / panel help. You may want to disable this if there are multiple 'identical' controls with the exact same help info, for all of them except for one.
Edit information about the multiparameter
Edit information
about the multiparameter
Edit information about the multiparameter lets you edit the information displayed as help for the multiparameter control on the easy screen. It can use a simplified HTML format, but in practice only following tags are likely to be useful:
= bold text
= italic text
For example:
When Order control is used, the first line of the information can contain additional info of ";" separated individual items in the following format:
name{#hexcolor}{*index of the enable MP} where {} denotes an optional item.
For example: Reverb;EQ#7F0000;Flanger#007F00*3
In this example, the order is probably used to control order of effects. When the order MP value is set to 0, Reverb is the first, with no specific color and no MP to enable/disable it. Flanger is next, the color is red, but no enable either. Finally Flanger is the third, it is green and MP3 is used to enable/disable it.
Parameters panel

Parameters panel configures how the multiparameter assigns values to the target parameters.
Add
Add button adds a parameter to the list of controlled parameters. Alternatively you can use the learn feature available by right-clicking the multiparameter button.

Delete
Delete button deletes the selected parameter from the list of controlled parameters.
Make first
Make first
Make first button moves the selected parameter to the first item in the list. This is useful for sake of the By first parameter value mode, which makes the multiparameter show the units of the first parameter in the list. Please note that if you have some other multiparameter, modulator or another subsystem access the ranges of individual parameters, this function will reorder them, so these connections will no longer be correct.
Learn
Learn
Learn button starts or stops the learning. Click it, then move some parameters in the plugin, then click it again. Learning can also be accessed from the global multiparameter menu.

Up
Up button moves the selected parameter up one item, if possible. This may be useful when keeping things organized, but please note that if you have some other multiparameter, modulator or another subsystem access the ranges of individual parameters, this function will reorder them, so these connections will no longer be correct.

Down
Down button moves the selected parameter down one item, if possible. This may be useful when keeping things organized, but please note that if you have some other multiparameter, modulator or another subsystem access the ranges of individual parameters, this function will reorder them, so these connections will no longer be correct.
Parameter
Dry/Wet
Parameter
Parameter defines the target parameter which is being modulated. The set contains all automatable parameters.
Name

Name
Name lets you name the parameter somehow and may be helpful in situations, where there are many parameters being edited without obvious meanings.
Assignable parameter ranges
Assignable parameter ranges
Assignable parameter ranges allows you to assign parameter ranges of several first parameters to other subsystems such as multiparameters or modulators. By default it is disabled, which removes all the relevant parameters to save valuable resources. This feature is available only if automation compatibility mode for V10 is disabled.
Transformation shape

Transformation shape
Transformation shape button displays the graph editor, which lets you tweak the shape of the curve used to control the selected parameter. The X axis shows the original values, the Y axis defines the results. Please note that this takes some CPU, therefore you have to enable it using the enable button in the title bar.
Range mode
Interval

Range
mode
Range mode defines how the parameter range is selected. While sometimes it is better to specify minimum and maximum, other times it is better to use a nominal center and depth (% of full scale). This control allows you to define which one it will be.
Up and down mode makes the values go above and below the selected Value, which is considered the center. The interval is made smaller if necessary.
Full range mode is similar, except the range is symmetrically constrained, so the selected Value may not be the center anymore.
Up/down only modes goes from the selected value up/down only.
Let's compare these 4 modes. Taking a value of -12dB value, with a depth of 75% and a scale of +/- 24dB. The nominal range is therefore = +/-24 dB * 75% = 36dB. With values of 0%, 50% and 100% the outputs are:
Up and down: -24, -12, 0 (range constrained to 12 dB either side)
Full range: -24, -6, 12 (range limited to minimum, but not constrained)
Up only: -12, 6, 24 (range not constrained = +/-24 dB * 75% = 36dB)
Down only: -12, -18, -24 (range limited to minimum)
Interval mode is the most simple one and goes from Value to Maximal value.

VALUE
0.00%
Value
Value defines the center of the target parameter's range or the minimum if the Range mode is set to Interval.

MAX
100.0%
Maximal value
Maximal value defines the upper limit of the target parameter's range. It is available only if the Range mode is set to Interval. This value can be lower than Value. 0% is always mapped to reference>Value and 100% to reference>Maximal value.
Depth defines size of the target parameter's range. It is used only if the Range mode is not set to Interval.
Invert
Invert
Invert checkbox inverts the target parameter's range, so that minimum becomes maximum and vice versa.
Use first parameter's range
Use first
parameter's range
Use first parameter's range makes the parameter display use the same range as the first parameter in the list. This is often useful if want to control the range in some way and apply the range to multiple parameters.
Parameter expression
PARAMETER EXPRESSION
Enable

Parameter expression panel lets you provide an algebraic expression for computing the final parameter value. Here are several predefined variables you can use in your expressions (# denotes a positive integer number):
x contains the current multiparameter value (in Meter mode it contains the parameter value);
p# contains the current value of the parameter number # in the parameter list (e.g. "p2+p3" computes the sum of values of parameters 2 and 3 in the parameter list);
mp# contains the current value of the multiparameter number #.
For example, an expression "(x+p2+mp5)/3.0" calculates the average of the values of the current multiparameter, parameter number 2 in the parameter list, and the multiparameter with index 5.

Post
Post button toggles whether the transform and min/max range are applied to the value x before evaluating the expression (Postprocessing mode, button on), or to the result of evaluating the expression (Preprocessing mode, button off, default).
Cyclic mode
Cyclic mode
Cyclic mode switches the multiparameter into so-called cyclic mode. If you have say 4 banks, called A, B, C and D, and gradually increase the multiparameter value, it starts with A, then interpolates to B, then to C and finally to D. But after that you cannot interpolate back to A, because D is the last one, the maximum value. In cyclic mode the multiparameter behaves as if there were a clone of A at the end, hence after D is reached, the multiparameter interpolates back to A and creates a full circle A->B->C->D->A. This is handy for example if you use a saw wave modulator to drive the multiparameter and want to repeat the sequence of the banks.

Interpolate values
Interpolate values
Interpolate values controls if the parameter value is to be interpolated between the bank values or if it will take the value from the nearest bank. For example, when bank A contains the value 0% for the parameter and bank B contains 100% and you set the multiparameter to 30%, then when interpolation is enabled, 30% is selected for that parameter, when the interpolation is disabled, the nearest value, 0%, is selected. If you want the parameter to step from one bank value to another then disable interpolate values.
Set interpolate to all parameters
Set interpolate to all parameters buttons
Set interpolate to all parameters buttons sets the interpolate values setting for all parameters controlled by that multiparameter.
Bank control panel

Bank control panel is available only in Banks mode and contains tools to define the banks between which the multiparameter is interpolating. The multiparameter stores parameter values for each bank. Here you can load and save these values.
Each bank has 5 buttons and a value for each controlled parameter. Click the load button to load the bank values into the plug-in. If you want to change say bank 3, you first click its load button, change whatever you need and resave the settings.
By clicking the save button you overwrite the bank's settings from those currently set in the plug-in. A typical approach to define the multiparameter's behaviour is to set the number of banks, then go to the plugin editor, set all associated parameters to the values you would like to have in bank 1 and click the save button for bank 1, then modify the parameters to whatever you want in bank 2 and click the save button for bank 2, etc.
You can also use the Random button to generate random values using the smart-randomization engine for each of the banks.
And the menu button enables you to re-order the banks
For each bank, the values for each parameter are shown and can be changed as desired.
Number of banks 4
Number of banks
Number of banks controls the number of settings that the multiparameter stores for all parameters. By changing the multiparameter value all associated parameters are then modified according to these settings. Please note that when you change the number of banks, the multiparameter will behave differently, because the multiparameter's range from 0% to 100% will now be distributed between a different number of presets. If you had automated the multiparameter value in your host for example you will almost certainly need to edit / rewrite the automation envelope.
Value power 1.0000
Value power
Value power lets you post-process values for each bank by specific power function. This either leads to higher values for low powers, or lower values for high powers. The same thing can be implemented using transforms, but this is much easier considering the potential number of parameters you may have there. It is especially useful for circular XY pads. Use trial-and-error approach to set this up to your liking.
XY power 3.0000
XY power
XY power is used only if XY-pad between banks is enabled and controls how the engine produces values for individual parameters.
The higher the number is, the more will the engine separate them. Use trial-and-error approach to set this up to your liking.
≡ Menu
Menu
Menu button provides some additional features for processing the entire set of banks.
Sort banks (up) reorders the banks so that the values of the selected parameter are in increasing order.
Sort banks (down) reorders the banks so that the values of the selected parameter are in decreasing order.
Reverse reverses the order of banks, so that the first bank contains values of the previously last one and so on.
Interpolate lets you change the number of banks, but keeps the values as they are now by calculating values of parameter for all banks. It is usually useful when you want to provide 'banks in between current banks', without manually calculating the new values.
Auto-gain (if available) temporarily enables AGC and automatically sets up the main plugin gain to each bank so that all banks provide similar output loudness. To use it, ensure that the main gain parameter is attached to the multiparameter, start playback of your sound material and press this button. It will take several seconds to complete depending on the number of the banks.
Set names by values sets the names for each bank to the values of the selected parameter. It may be handy when replicating existing parameters for example.

Load
Load button loads the bank settings by setting all associated parameters to the values in the particular bank.

Save
Save button saves the current values of all associated parameters into the particular bank. So you can edit all those parameters in the plugin then click the save button to store them in the bank.

Randomize
Randomize button loads random settings to the bank using the smart randomization engine. Only parameters associated with the multiparameter are randomized.
Generally, randomization in plug-ins works by selecting random values for all parameters, but rarely achieves satisfactory results, as the more parameters that change the more likely one will cause an unwanted effect. Our plugins employ a smart randomization engine that learns which settings are suitable for randomization (using the existing presets) and so is much more likely to create successful changes.
In addition, there are some mouse modifiers that assist this process. The smart randomization engine is used by default if no modifier keys are held.
Holding Ctrl while clicking the button constrains the randomization engine so that parameters are only modified slightly rather than completely randomized. This is suitable to create small variations of existing interesting settings.
Holding Alt while clicking the button will force the engine to use full randomization, which sets random values for all reasonable automatable parameters. This can often result in "extreme" settings. Please note that some parameters cannot be randomized this way.
Hold Shift while clicking the button to undo the previous randomization.

Menu
Menu button provides some additional options related to the bank.

Name
Name button lets you rename the bank.
Name check
Name check button lets you rename the bank. This is a secondary name used for controls such as checkboxes and selectors if defined.
Parameter lock editor

Lock provides a simple way to keep some parameters unchanged when using randomization or browsing presets. You can still change these locked parameters by adjusting the control directly. You simply use the learn feature (right click) in the same way you would with modulators or multiparameters, and touch every parameter you want to keep locked. You can also select them directly in the Parameter Lock window where you can also save them as presets, copy & paste etc. Learning mode is ended by clicking the button again. Please note that this list is not saved with global plugin presets for obvious reasons. The parameters can be locked or unlocked directly in the list or by clicking the lock button associated with the parameter on the Easy screen.

Presets
Presets button displays a window where you can load and manage available presets. Hold Ctrl when clicking to load a random preset instead.

Left arrow
Left arrow button loads the previous preset.

Right arrow
Right arrow button loads the next preset.

Randomize
Randomize button loads a random preset.

Copy
Copy button copies the settings onto the system clipboard.

Paste
Paste button loads the settings from the system clipboard.
Parameters panel

Parameters panel configures the list of the parameters which are locked.

Add
Add button adds a parameter to the list of locked parameters. Alternatively you can use the learn feature available by right-clicking the paramlock button for example.

Delete
Delete button deletes the selected parameter from the list of controlled parameters.

Learn
Learn button starts or stops the learning. Click it, then move some parameters in the plugin, then click it again. Learning can also be accessed from the global parameter lock menu.
MIDI editor

MIDI settings window lets you configure, how the plugin reacts to various MIDI messages. You can use MIDI controllers or MIDI notes and you can also configure a controller to switch between presets, which is especially useful for realtime performances.

Presets
Presets
Presets button displays a window where you can load and manage available presets. Hold Ctrl when clicking to load a random preset instead.

Left arrow
Left arrow button loads the previous preset.

Right arrow
Right arrow button loads the next preset.

Randomize
Randomize button loads a random preset.

Copy
Copy button copies the settings onto the system clipboard.

Paste
Paste button loads the settings from the system clipboard.

Map
Map button displays all current mappings of modulators, multiparameters and MIDI (whichever subsystems the plugin provides).
CONTROLLERS MAIN CONTROLLERS NOTES PRESET SWITCH Tab
selector
Tab selector switches between subsections.
Controllers panel

Controllers panel contains settings of MIDI controllers.
Do not load from presets
Do not load from presets
Do not load from presets button disables loading the controllers from presets. This may be handy if you have configured specific MIDI controllers with target parameters and you want to browse the presets without the need to configure them every time. Please note that some presets may rely on specific controllers though. For example, if a preset requires a velocity controller to provide velocity-dependent response, this option will avoid loading it, so the preset won't be complete, until you reconfigure it.
Last note-on channel only
Last note-on channel only
Last note-on channel only button makes the engine more suitable for voice-per-channel devices. These devices are able to send different controllers for each note you press, which however means that these could collide. This option makes the engine pass only the controllers that are related to the last note you pressed. For classic keyboards it is not relevant as you will usually use a single MIDI channel to transmit both the controllers and notes. Some more modern keyboard controllers will allow you to select one MIDI channel for the notes and a different one (or the same one) for the controllers.
Controllers

Reset
Reset
Reset button resets the selected controller to undefined state.

Up
Up button moves the selected controller up one item, if possible. This may be useful when keeping things organized, but please note that if you have some multiparameter, modulator or another subsystem access the ranges of individual controllers, this function will reorder them, so these connections will no longer be correct.

Down
Down button moves the selected controller down one item, if possible. This may be useful when keeping things organized, but please note that if you have some multiparameter, modulator or another subsystem access the ranges of individual controllers, this
function will reorder them, so these connections will no longer be correct.
Select target parameter
ParameterIndex
ParameterIndex button lets you choose the parameter being controlled. The set contains all automatable parameters.
MIDI

Learn
Learn
Learn enables or disables MIDI learn. When enabled, the plugin listens to both the MIDI CC messages from the controllers that you touch and the target parameters that you touch and associates the last-touched of each with the selected slot. You can perform several mappings by selecting another slot, adjusting a hardware controller. Then adjusting a target parameter, and repeating those steps for each mapping desired.
Channel
All
◀
▶
Ch
an
nel
Channel defines the controller MIDI channel.
Controller
Globa
00
1 Mo
dul
atio
W
wheel
∴ m = 3/11
◀
▶
Controller
Controller defines the source controller.
Values

Range mode
Interval
◀
▶
Range mode
Range mode defines how the parameter range is selected. While sometimes it is better to specify minimum and maximum, other times it is better to use a nominal center and depth (\% of full scale). This control allows you to define which one it will be.
Up and down mode makes the values go above and below the selected Value, which is considered the center. The interval is made smaller if necessary.
Full range mode is similar, except the range is symmetrically constrained, so the selected Value may not be the center anymore.
Up/down only modes goes from the selected value up/down only.
Let's compare these 4 modes. Taking a value of -12dB value, with a depth of 75% and a scale of +/- 24dB. The nominal range is therefore = +/-24 dB * 75% = 36dB. With values of 0%, 50% and 100% the outputs are:
Up and down: -24, -12, 0 (range constrained to 12 dB either side)
Full range: -24, -6, 12 (range limited to minimum, but not constrained)
Up only: -12, 6, 24 (range not constrained = +/-24 dB * 75% = 36dB)
Down only: -12, -18, -24 (range limited to minimum)
Interval mode is the most simple one and goes from Value to Maximal value.

Value
Value defines the center of the target parameter's range or the minimum if the Range mode is set to Interval.

MAX VALUE
100.0%
Maximal value
Maximal value defines the upper limit of the target parameter's range. It is available only if the Range mode is set to Interval. This value can be lower than Value. 0% is always mapped to reference>Value and 100% to reference>Maximal value.

DEPTH
100.0%
Depth
Depth defines size of the target parameter's range. It is used only if the Range mode is not set to Interval.

Invert
Invert
Invert checkbox inverts the controller shape, so the minimum becomes the maximum etc.

Interpolated
Interpolated
Interpolated makes the controller value interpolated over the time using the smart interpolation. This approach ensures there won't be abrupt changes, which could lead to clicks and pops. However sometimes you may want to apply these changes immediately - for example when changing ADSR based on the note velocity, in which case this parameter should be disabled.

Toggle
Toggle
Toggle mode makes the controller switch between the maximum and minimum of the target parameter whenever triggered. By default triggering it means going from values below 50% to above 50%. By enabling Trigger you can make it perform the trigger every time the value is changed.

Trigger
Trigger
Trigger mode makes the controller automatically produce maximum and the minimum right after it. It can be handy with some buggy MIDI controllers providing buttons, which however do not send value 0, and only repeat value 127. Trigger makes it behave like the minimum was actually sent by the MIDI controller a little bit after the original message.
Main controllers panel

Main controllers panel lets you define the set of main MIDI controllers on your MIDI device. These are not stored with the presets, so using them lets you easily switch between MIDI controllers, create presets that will work for users of other MIDI controllers etc. Using the Main controllers is no different than using the standard MIDI controllers, but the extra 'layer' can make things simple when using multiple controllers and also in general situations where your MIDI device has several controllers with quite 'random' numbers.

Presets
Presets
Presets button displays a window where you can load and manage available presets. Hold Ctrl when clicking to load a random preset instead.

Left arrow
Left arrow button loads the previous preset.

Right arrow
Right arrow button loads the next preset.

Randomize
Randomize button loads a random preset.
Global 001 Modulation wheel

Controller
Controller defines the MIDI controller associated to this Main controller.
Learn
Learn
Learn enables or disables MIDI learn. When enabled, the plugin listens to the controllers you touch and associates them to the main controller.
Notes panel

Notes panel contains settings of MIDI note controllers, if you want to control parameters using MIDI keys.
Note controllers

Reset
Reset
Reset button resets the selected controller to undefined state.

Up
Up button moves the selected controller up one item, if possible. This may be useful when keeping things organized, but please note that if you have some multiparameter, modulator or another subsystem access the ranges of individual controllers, this function will reorder them, so these connections will no longer be correct.

Down
Down button moves the selected controller down one item, if possible. This may be useful when keeping things organized, but please note that if you have some multiparameter, modulator or another subsystem access the ranges of individual controllers, this function will reorder them, so these connections will no longer be correct.
Select target parameter
Learn
Learn enables or disables MIDI learn. When enabled, the plugin listens to both the notes you touch and the parameters you touch and associates them with the selected slot.
MIDI
![MIDI Learn ? Channel All Note 48 [C3] Note min 0 (C-1) Note max 127 [G9] Functional outside note range](/content/2026/07/1555366/images/8b18eba82f4404a77d457a258eec6bf501d8d8c64b6d1c7dde46930e80c5d805.jpg)
Channel
All

Channel
Channel defines the controller MIDI channel.
Note
48 [C3]
Note
Note defines the controller's target MIDI note. It is used only in On/off and Switch modes, which you can set using Mode parameter (in the Values panel).
Note min
0 (C-1)
Note min
Note min controls the lowest note to be used by a controller in Linear or Logarithmic mode. The minimum value of the target parameter will then be associated to this note.
If both Note min and Note max parameters are default, the plugin takes the actual frequency of each note, and transforms it into the range 20Hz to 20kHz, which is the range used by all equalizers and filters, so that you can literally play a parameter on a MIDI keyboard. If you change either of these 2 parameters however, the plugin takes the range of notes as the requested interval. This is useful for example if you have a small MIDI keyboard used for soloing and you want increase some parameter the higher you play. In the default mode it would be difficult, since the range of frequencies is much bigger than the range of your MIDI keyboard. Set the Note min and Note max to C0 and B0 respectively, the Mode to Logarithmic and select a suitable target parameter (Dry/Wet is fine). Send MIDI notes in the specified range to the plugin and you will see the target parameter increase (by 9.09% (= 100 / (12-1)) for a 100% range).
Note max
127 (G9)
Functional outside note range
Functional outside note range makes the note controller work even if the note isn't in the specified range, clamping the value to the minimum or maximum.
Values

Mode
Logarithmic

Mode
Mode controls how the controller works.
Key takes the note index and transforms it into 0..1, which is the output of any controller. This mode is useful for scale switches for example - if you want to use MIDI keys to change values linearly.
Key (in octave) is similar but it has only 12 values - one per each key and it doesn't matter which octave you press it in.
Linear converts the notes into frequencies and then transform them into the linear scale from 20Hz to 20kHz.
Logarithmic converts the notes into the frequencies and then into the logarithmic scale from (20) to (20000) . A typical use case is when you want to control an equalizer band using a MIDI keyboard. Since EQ frequencies work in logarithmic scale, this mode makes both things compatible and the EQ frequency will be set to the note frequency.
On/off modes react only to single notes and can be used for triggers. When the Note On is received the parameter is changed to its Max value and when the Note Off is received the parameter is changed to its Min value. So this mode can also be used to change between any 2 parameter values.
Switch modes are similar, but only recognize when a note is pressed. The Note Offs are ignored. Note Ons select the Max value and Min value alternately. In all octaves mode it doesn't matter which octave is used. For example, this is useful when you want to use any note C to switch something on and off.
Velocity modes do not actually follow the note number being pressed, but it's velocity instead. While you can do the same thing with normal MIDI controllers using the special Velocity controllers, this one allows you to select only some notes to follow.

SHIFT
0
Shift
Shift lets you shift the original note up or down by the specified number of semitones.

MIN VALUE
0.00%
Min value
Min value defines the minimum value for the target parameter.

MAX VALUE
100.0%
Max value
Max value defines the maximum value for the target parameter.
Enable MIDI program change
Enable
MIDI program change
Enable MIDI program change enables processing program change MIDI message.
Preset previous/next trigger panel

Preset previous/next trigger panel lets you select a MIDI controller, which will switch presets. It provides the same action as clicking the arrows next to the main preset button. When the controller value gets below 33%, the previous preset is loaded. When the controller value gets above 66%, the next preset is loaded.
Learn
Learn
Learn enables or disables MIDI learn.
Channel All
Channel
Channel defines the controller MIDI channel.
Controller Global 000 Bank select
Controller
Controller defines the source controller.
Simulate program change via controller panel

Simulate program change via controller panel lets you select a MIDI controller, that will work as program change, for convenience. You can use it then to switch between A-H presets or presets via panel below.

Learn
Learn enables or disables MIDI learn.

Channel
Channel defines the controller MIDI channel.

Controller
Controller defines the source controller.

Number of values
Number of values defines the number of programs to switch between. By default Program change MIDI standard offers 128 programs. However it may by too many and could be hard to actually control with the specific controller. Hence you can lower the number of actual programs.
Program change in presets panel

Program change in presets panel enables the MIDI program change processing. If disabled, the plugin follows Program Change messages by changing the A-H presets. The obvious disadvantage is that this way there are just 8 presets. By enabling this feature the plugin stops selecting A-H presets and rather loads different presets from the specified preset folder, including all sub-folders. The default folder is called "Programs". To use it, you simply need to create a preset folder called Programs and put the presets into it. Note that the order matters of course. And you can change the folder name at any time, so you can have several sets of selectable presets.

Folder
Folder defines the preset folder from which the presets for program-change MIDI messages are taken.

Channel
Channel defines the program change MIDI channel.
Used controls
Here we discuss the general properties of all application controls. As a most important rule you should note, that you can always use any question mark button or F1 (or Ctrl+F1 or Ctrl+H) key with the mouse cursor over a specified control to get detailed information about what it does and how to use it.
Value button
Depth
50.0%
Value button is an alternative to the knobs and its main advantage is that it is very small. In some cases the button simply serves as a clickable item and a menu is shown when clicked. However the mouse wheel and other controls still do work.
- Click and drag using the left mouse button to change the value.
- Right mouse button shows a menu with additional options. Hold ctrl/cmd to select the default value.
- Mouse wheel, arrow keys and vertical drag using middle mouse button or using left mouse button while holding Ctrl modifies the value more precisely.
- Home key configures the minimal possible value, conversely end key setups the maximal one.
- Esc or Backspace keys restore the original value when either one is pressed during dragging.
- Shift + left mouse button or double-click using left mouse button lets you edit the value as text. You can use the virtual keyboard or type on your computer keyboard. In some cases this shows a menu with all possible values instead.
- Alt + press then release measures the time between the press and the release and applies it as time/frequency tap. Usable only for certain values of course.
Switcher
Slope
6dB/oct A

Switcher is an alternative to a tracker or knob control, but it has a limited set of values.
- Left mouse button shows a menu with list of all possible values. This function might be unavailable in certain cases when the number of possible values is too high.
- Right mouse button shows a menu with additional options. Hold ctrl/cmd to select the default value.
- Up and Down arrow keys, buttons in the control and mouse-wheel increase or decrease the value.
Knob

DRY/WET
100.0%
Knob simulates physical knobs used to edit various values.
- Click and drag using the left mouse button to change the value.
- Right mouse button shows a menu with additional options. Hold ctrl/cmd to select the default value.
- Mouse wheel, arrow keys and vertical drag using middle mouse button or using left mouse button while holding Ctrl modifies the value more precisely.
- Home key configures the minimal possible value, conversely end key setups the maximal one.
- Esc or Backspace keys restore the original value when either one is pressed during dragging.
- Shift + left mouse button or double-click using left mouse button lets you edit the value as text. You can use the virtual keyboard or type on your computer keyboard. In some cases this shows a menu with all possible values instead.
- Alt + press then release measures the time between the press and the release and applies it as time/frequency tap. Usable only for certain values of course.
Installation, activation, introduction to audio plugins
Installation
All MeldaProduction plugins are currently available for Windows and Mac OS X operating systems, both 32-bit and 64-bit versions. You can download all software directly from our website. Since the installation procedures for the two operating systems are quite different, we will cover each one separately.
The download files for the effects include all the effects plug-ins and MPowerSynth. During the installation process you can select which plug-ins or bundles to install. If you have not licensed all of the plugins in a bundle then you just need to activate each plugin separately.
If you have multiple user accounts on your computer, always install the software under your own account! If you install it under one account and run it under a different one, it may not have access to all the resources (presets for example) or may not even be able to start.
Installation on Windows
All plugins are available for VST, VST3 and AAX interfaces. The installer automatically installs both the 32-bit and 64-bit versions of the plugins.
Note: Always use 32-bit plugins in 32-bit hosts, or 64-bit plugins in 64-bit hosts. 64-bit plugins cannot work in 32-bit hosts even if the operating system is 64-bit. Conversely, never use 32-bit plugins in 64-bit hosts. Otherwise they would have to be 'bridged' and, in some hosts, can become highly unstable.
You can select the destination VST plugins paths on your system. The installer will try to detect your path, however you should check that the correct path has been selected and change it if necessary. In all cases it is highly recommended to use the current standard paths to avoid any installation issues:
32-bit Windows:
C:\Program files\VstPlugins
64-bit Windows:
C:\Program files (x86)\VstPlugins (for 32-bit plugins)
C:\Program files\VstPlugins (for 64-bit plugins)
If your host provides both VST and VST3 interfaces, VST3 is usually preferable. If a plugin cannot be opened in your host, ensure the plugin file exists in your VST plugin path and that if your host is 32-bit, the plugin is also 32-bit, and vice versa. If you experience any issues, contact our support via info@meldaproduction.com
Installation on Mac OS X
All plugins are available for VST, VST3, AU and AAX interfaces. Installers create both 32-bit and 64-bit versions of the plugins.
If your host provides multiple plugin interface options, VST3 is usually preferable. If you experience any issues, contact our support via info@meldaproduction.com
Most major hosts such as Cubase or Logic should work without problems. In some other hosts the keyboard input may be partly non-functional. In that case you need to use the virtual keyboard available for every text input field. You may also experience various minor graphical glitches, especially during resizing plugin windows. This unfortunately cannot be avoided since it is caused by disorder in Mac OS X.
Uninstallation on Windows
The Uninstaller is available from the Start menu and Control panel, in the same way as for other applications. If you don't have any of these for any reason, go to Program files / MeldaProduction / MAudioPlugins and run setup.exe.
Uninstallation on OSX
The Uninstaller is available from Applications / MeldaProduction / MAudioPlugins / setup.app.
Deleting all data, presets etc.
Even if you uninstall the plugins, some data will be left behind - because of potential crossdependencies or because these are your presets, settings, configurations etc. If you want to wipe out everything, please manually delete following folders:
Windows:
C:\ProgramData\MeldaProduction
Performance precautions
In order to maximize performance of your computer and minimize CPU usage it is necessary to follow a few precautions. The most important thing is to keep your buffer sizes (latency) as high as possible. There is generally no reason to use latency under 256 samples for 44kHz sampling rates (hence 512 for 96kHz etc.). Increasing buffer sizes (hence also latency) highly decreases required CPU power. In rare cases increasing buffer sizes may actually increase CPU power, in which case you can assume your audio interface driver is malfunctioning.
You should also consider using only necessary features. Usually the most CPU demanding features are oversampling and modulation of certain parameters. You can reduce modulation CPU usage at the cost of lower audio quality in Settings/Settings/Modulator protection.
Troubleshooting
The plugins are generally very stable, there are known problems however.
GPU compatibility
The software uses hardware acceleration to move some of the processing (mainly GUI related) from your CPU (processor) to your GPU (graphics processing unit). It is highly recommended to use a new GPU, as it will provide higher performance improvements, and update your GPU drivers. Older GPUs are slower and may not even provide required features, so the software will have to perform all calculations in the main CPU. We also have had extremely bad experiences with GPUs from ATI and despite the fact that software is now probably bulletproof, it is recommended to use NVidia GPUs as there has not been a single case of a problem with them.
If you experience problems with your GPU (crashing, blank/dysfunctional GUI), and that you cannot disable the GPU acceleration from the plugin's Settings window itself, download this file:
http://www.meldaproduction.com/download/GPU.zip
And place the GPU.xml included in the zip into
Windows: C:\Users{username}\AppData\Roaming\MeldaProduction
Mac OS X: \~/Library/Application support/MeldaProduction
Memory limits of 32-bit platform
Most hosts are now 64-bit ready, however some of them are not or users willingly choose 32-bit edition, because the required plugins are not 64-bit ready yet. All our software is 64-bit ready. Please note that you must NOT use the 64-bit plugins in 32-bit hosts, even if you have a bridge. If you are stuck with a 32-bit host for any reason, note that there is a memory limit (about 1.5 GB), which you may not exceed. This can happen if you load too many samples or different plugins for example. In that case the host may crash. There is no other solution than to use a 64-bit host.
Updating
You can use "Home/Check for updates" feature in any of the plugins. This will check online if there is a newer version available and open the download page if necessary.
To install a newer (or even older) version you simply need to download the newest installer and use it. There is no need to uninstall the previous version, the installer will do that if necessary. You also do not need to worry about your presets when using the installer. Of course, frequent backup of your work is recommended as usual.
Using touch-screen displays
Touch screen displays are supported on Windows 8 and newer and the GUI has been tweaked to provide a good workflow. Up to 16 connections/fingers/inputs are supported. Any input device such as touch-screens, mouse, tablets are supported. These are the main gestures used by the plugins:
- Tap = left click
- Double tap = double click
- Tap & hold and quickly tap next to it with another finger = right click. Tap & hold is a classic right-click gesture, however that doesn't provide a good workflow, so came up with this method, which is much faster and does not collide with functionality of some elements.
Purchasing and activation
You can purchase the plugin from our website or any reseller, however purchasing directly from our website is always the quickest and simplest option. The software is available online only, purchasing is automatic, easy and instant. After the purchase you will immediately receive a keyfile via email. If you do not receive an e-mail within a few minutes after your purchase, firstly check your spam folder and if the email is not present there, contact our support team using info@meldaproduction.com so we can send you the licence again.
To activate the software simply drag & drop the licence file onto the plugin. Unfortunately some hosts (especially on Mac OS X) either do not allow drag & drop, or make it just too clumsy, so you can use Home/Activate in any of the plugins and follow the instructions. For more information about activation please check the online video tutorial.
You are allowed to use the software on all your machines, but only you are allowed to operate the software. The licences are "to-person" as defined in the licence terms, therefore you can use the software on all your computers, but you are the only person allowed to operate them. MeldaProduction can provide a specialized licence for facilities such as schools with different licence terms.
Quick start with your host
In most cases your host will be able to recognize the plugin and be able to open it the same way as it opens other plugins. If it doesn't, ensure you did installation properly as described above and let your host rescan the plugins.
Cubase
Click on an empty slot (in mixer or in track inserts for example) and a menu with available plugins will be displayed. VST2 version is located in MeldaProduction subfolder. However VST3 version is recommended and is located in the correct folder along with Cubase's factory plugins. For example, dynamic processors are available from the "Dynamics" subfolder.
To route an audio to the plugin's side-chain (if it has one), you need to use the VST3 version. Enable the side-chain using the arrow button in the Cubase's plugin window title. Then you can route any set of tracks into the plugin's side-chain either by selecting the plugin as the track output or using sends.
To route MIDI to the plugin, simply create a new MIDI track and select the plugin as its output.
Logic
Choose an empty insert slot on one of your audio tracks (or instrument tracks for example) and select the plugin from the popup menu. You will find it in the Audio Units / MeldaProduction folder.
To route an audio to the plugin's side-chain (if it has one), a side-chain source should be available in the top of the plugin's window, so simply select the source track you want to send to the plugin's side-chain.
To route MIDI to the plugin, you need to create a new Instrument track, click on the instrument slot and select the plugin from AU MIDI-controlled Effects / MeldaProduction. The plugin will receive MIDI from that track. Then route the audio you want to process with the plugin to this track.
Studio One
Find the plugin in the Effects list and drag & drop it onto the track you would like to insert the plugin to.
To route an audio track to the plugin's side-chain (if it has one), first enable the side-chain using the "Side-chain" button in the Studio One's plugin window title. Then you can route any set of tracks into the plugin's side-chain from the mixer.
To route MIDI to the plugin, simply create a new MIDI track and select the plugin as its output.
Digital performer
In the Mixing Board, find an empty slot in the track you would like to insert the plugin to. Click on the field and select the plugin from the effects list.
To route an audio track to the plugin's side-chain (if it has one), choose the track you want to send using Side-chain menu, which appears at the top of the DP's plugin window.
To route MIDI to the plugin, simply create a new MIDI track in the Track view and select the plugin as its output.
Reaper
Click on an empty slot in the mixer and a window with available plugins will be displayed. Select the plugin you want to open by double clicking on it or using Ok button.
It is highly recommended to select all MeldaProduction plugins in the plugin window the first time you open it, click using your right mouse button and enable "Save minimal undo states". This will disable the problematic Undo feature, which could cause glitches whenever you change certain parameters.
To route an audio track to the plugin's side-chain (if it has one), click on I/O button of the side-chain source track in the mixer. Routing window will appear, there you click "Add new send" and select the track the plugin is on. In the created send slot select the channels (after the "=" mark) for the send, in stereo configuration 3/4 for example. Note that this way the whole track receives the side-chain signal and all plugins with it. It is possible to send it to a single plugin only, but it is more complicated, please check the Reaper's documentation about that.
To route MIDI to the plugin, create a new MIDI track and do the same thing as with side-chain, except you don't need to change output channels.
Live
In Session view, select the track you would like to insert the plugin to. At the left top of Ableton Live's interface, click on the Plug-in Device Browser icon (third icon from the top). From the plug-ins list choose the plugin (from MeldaProduction folder), double click on it or drag & drop it into the track.
The X/Y grid usually doesn't provide any parameters of the plugin. This is because the plugins have too many of them, so you have to select them manually. Check Live's documentation for more information.
To route an audio to the plugin's side-chain (if it has one), select the track you want to send to the side-chain and in the 'Audio To' menu, choose the audio track that has the plugin on it. Then in the box just below that select the plugin from the menu.
NOTE: Live does NOT support any interface correctly, it doesn't use the reported buses properly, hence it doesn't work with surround capable plugins. Therefore you need to use VST version, which reports only stereo capabilities by default.
To route MIDI to the plugin, create a new MIDI track and in the 'MIDI to' menu, choose the audio track that has the plugin on it. Note that in Live only the first plug-in on any track can receive MIDI.
ProTools
In the mixer click an empty slot to insert the plugin to and select the plugin from the tree. The plugin may be present multiple times, once for each channel configuration (mono->stereo etc.). As of now ProTools do not arrange them in the subfolders, which is a workflow dealbreaker, but we cannot do anything about it. The huge empty space on top of each plugin window, which occupies so much of the precious display area, is part of ProTools and every plugin window and again we cannot do anything about it. In some cases you may experience CPU overload messages, in which case please contact Avid for support. Note that ProTools 10 and newer is supported. RTAS compatibility for PT9 and older will never be added.
To route an audio to the plugin's side-chain (if it has one), open the plugin, click on the No key input button in the plugin title and select the bus you want the audio taken from. You might need to remember the bus number, unless your ProTools version supports bus renaming. ProTools doesn't support stereo (or surround) side-chains at all.
To route MIDI to the plugin, create a new MIDI track and in the mixer click the output field for that track and select the plugin, which should already be in the menu.
FL Studio
First make sure plugins are scanned, either a full scan through the Plugin Manager or an automatic fast scan when you open the Plugin Database section of the browser in FL. The scanned plugins will show up in the Plugin Database > Installed section of the FL browser. The Effects and Generators sections in the Plugin Database will show all "favorite" plugins. These can be checked and unchecked in the Plugin Manager or added in some other ways. These favorites also show up in the Add menu, the menu for the "+" button in the channel rack, when you right click an existing channel button to replace or insert, in the plugin slot menu in the mixer and in the plugin picker (F8). The menus with favorite plugins also have a "More" choice that will show all scanned plugins. The full explanation is in our help file, on the page Installing Plugins.
To route an audio to the plugin's side-chain, first set up the mixer: make sure the track you want to receive audio from is sent to the track the plugin as a sidechain (help). Then set up the plugin wrapper: choose the desired input on the Processing tab of the wrapper options.
To route MIDI notes to the plugin, first configure the sender: choose a MIDI port for the input device in the MIDI settings (for a hardware device), or an output port in the wrapper options (for a VST plugin that produces MIDI). For the receiving plugin, set the input port in the wrapper options to the same value you chose in step 1.
To route MIDI controllers, the procedure is different. The usual method in FL is to link CC messages to plugin parameters (help file). VST plugins will also have 128 CC parameters published (through the wrapper) that can be links this way. Those will send the specified CC MIDI message to the plugin, instead of changing a published parameter.
GUI styles, editor modes and colors
MeldaProduction plugins provide a state of the art styling engine, which lets you change the appearance to your liking. The first time you run the plugins a style wizard will appear and let you choose the style and other settings. It may not be available in ProTools and other problematic hosts.
By default each plugin has a certain color scheme, which differs based on what kind of plugin is that. Also, sections of some plugins are colorized differently, again, based on what kind of section is that (this can be disabled in global settings). Despite you can change the colors anyhow you want, it is advantageous to keep the defaults as these are standardized and have predefined meaning, so just by looking at a plugin's color you can immediately say what kind of plugin and section is that. Same rules apply when designing devices for easy screens. This is the current set of colors:
Dynamics = orange
Equalization, filtering = green
Reverb, delay = brown/yellow
Modulation = blue
Distortion, limiting = red
Stereo = cyan/yellow
Time, pitch, unison... = purple/pink
Tools = grey
Special colors:
Synchronization = grey
Detection = blue/green
Side-chain = green
Effects = red
Advanced stuff = grey

MELDA production The only limit is your imagination
About MeldaProduction
The best sound on the market, incredible workflow and versatility beyond your imagination. We create the deepest and the most powerful audio plugins with unbelievable sound and tons of unique features you cannot find anywhere else.
Innovative Thinking
At MeldaProduction, we make the most advanced tools for music production and audio processing. We get inspired by the whole range of tools from the ancient analog gear to the newest digital creations, but we always push forward.
We've always felt the audio industry is extremely conservative, still relying on the prehistoric equipment making the job unnecessarily slow and complicated. That's why we invent new technologies, which make audio processing easier, faster, better sounding and more creative.
Sound Matters
In the world full of audiophiles you just need superb audio quality. And that's why we spend so much time perfecting audio algorithms until they sound unbeatable. Everything from dynamic filters to spectral dynamic processing. Our technologies just sound perfect.
Inspiring User Interface
Modern user interfaces must not only be easy and quick to use, but also versatile and the whole visual appearance should inspire you. MeldaProduction plugins provide the most advanced GUI engine on the market. It is still the first and only GUI engine, which is freely resizable and styable. Our plugins can look as an ancient vintage gear, if you are working on old-school rock music. Or as super-modern
Easy to Use, Yet Versatile
The only limit is your imagination. Our plugins are with absolutely no doubt the most powerful and versatile tools on the market. Yet we managed to make the plugins easy to use via the devices and smart randomization system. But when you are ready, you are one click away from the endless potential the plugins provide.
Never-Ending Improvements
Most companies create a plugin, sell it and abandon it. We improve our plugins, add features, optimize... until there is nothing left to improve and there are no more ideas. Unfortunately that hasn't happened yet :). And the best thing is that the updates are free-for-life!
MeldaProduction was founded in 2009 by Vojtech Meluzin and is based in Prague, Czech Republic.
www.meldaproduction.com
info@meldaproduction.com
MeldaProduction (c) 2017


- HOW DOES MDOUBLETRACKER WORK
- PRESETS
- LEFT ARROW
- RIGHT ARROW
- RANDOMIZE
- PANIC
- SETTINGS
- WWW
- PLUGIN TOOLBAR
- X
- OVERSAMPLING
- L+R
- CHANNEL MODE
- AGC
- SET
- LIMITER
- A-H PRESETS SELECTOR
- A/B
- MORPH
- COPY
- PASTE
- UNDO
- REDO
- WAV
- COLLAPSE
- DRY/WET
- FOCUS
- SPACE
- SATURATION
- OUTPUT
- OUTPUT GAIN
- ALGORITHM PANEL
- MONO
- DEPTH
- DEPTH WIDTH
- DELAY
- DELAY WIDTH
- DETUNE
- DETUNE WIDTH
- SLOPE
- DB/OCT A
- ◀
- GLOBAL METER VIEW
- TIME GRAPH
- PAUSE
- POPUP
- ENABLE
- UTILITIES
- MAP
- MULTIPARAMETER
- MENU
- LOCK
- PRESET SELECTOR
- BACKUP
- RESTORE FROM BACKUP
- FOLDERS TREE
- AUTO-OPEN
- OPEN ALL
- CLOSE ALL
- ADD
- RENAME
- DELETE
- EXPORT
- IMPORT
- PRESETS LIST
- FAVOURITE
- SHOW
- SORT
- RANDOM
- PREVIOUS
- NEXT
- SUBMIT PRESET
- DOWNLOAD PRESETS
- REPLACE
- SEARCH
- CLEAR
- INFORMATION
- PLUGIN SETTINGS
- LICENCE PANEL
- LICENCE MANAGER
- ACTIVATE
- GUI & STYLE PANEL
- STYLE
- RANDOM STYLE
- DEFAULT STYLE
- SELECT CURRENT STYLE AS DEFAULT
- GPU ACCELERATION
- ENABLED
- FRAMES PER SECOND
- ENABLE HIGH DPI SUPPORT
- ENABLE HIGH DPI / RETINA SUPPORT
- ENABLE COLORIZATION
- ENABLE COLORIZATION FOR PANELS
- ALLOW DEFAULT COLORS BY PLUGIN TYPE
- ALLOW STYLE CHANGES IF THE EDITOR IS TOO BIG
- CLEAR WINDOW SETTINGS CACHE
- PLUGIN SETTINGS PANEL
- INTELLIGENT SLEEP ON SILENCE
- RANDOMIZER LOUDNESS COMPENSATION
- SMART BYPASS
- MIDI THRU
- SAMPLE-ACCURATE EVENT PROCESSING
- LATENCY REPORTING
- GLOBAL SYSTEM SETTINGS PANEL
- GLOBAL SYSTEM SETTINGS
- INTELLIGENT SLEEP ON SILENCE (GLOBAL)
- RIGHT CLICK SETS DEFAULT VALUE
- TABLET MODE
- ENABLE KEYBOARD INPUT
- COLLAPSE PLUGIN TOOLBAR
- SET DEFAULT SETTINGS
- RESET DEFAULT SETTINGS
- ADVANCED GLOBAL SETTINGS PANEL
- ADVANCED GLOBAL SETTINGS
- SATURATION ANTIALIASING
- FORWARD UNUSED KEYBOARD INPUT TO DAW
- SILENCE WHEN BUSY
- STORE RESAMPLED FILES
- SHOW CONFIRMATIONS FOR DESTRUCTIVE ACTIONS
- ONLINE CHECK FOR UPDATES AND TUTORIALS
- ANONYMOUS ONLINE PLATFORM REPORTING
- CPU BENCHMARK
- SYSTEM INFO
- COMPATIBILITY SETTINGS PANEL
- COMPATIBILITY SETTINGS
- STORAGE COMPATIBILITY MODE FOR V
- AUTOMATION COMPATIBILITY MODE FOR V
- SMART INTERPOLATION PANEL
- MULTIPARAMETER EDITOR
- DEVICES
- BEHAVIOUR
- RANDOMIZER
- XY-PAD BETWEEN BANKS
- NORMAL
- SWITCH
- TRIGGER
- BANKS
- METER
- MODE
- SPEED
- SWITCH TIME
- STEPS
- PERCENTS
- VALUE MODE
- DEFAULT
- SET CURRENT VALUE
- ORIGIN
- SET CENTER
- VALUE TO TEXT
- TEXT TO VALUE
- APPEARANCE
- NAME
- GROUP
- EDITOR MODE
- BANKS MODE
- PANEL TYPE
- PANEL
- COLOR
- GROUP COLOR
- VISIBLE
- SAME ROW
- RESIZABLE
- RESIZABLE X
- RESIZABLE Y
- RANDOMIZABLE
- SHOW NAME
- STEPPED / CONTINUOUS
- LOCKABLE
- SEPARATE COLLAPSE
- FUNCTIONAL WHEN DISABLED
- FINE CONTROL
- ADVANCE
- ADVANCED
- STORE
- STORE IN PRESETS
- CONTROLS MPS
- INCLUDE IN DOC
- EDIT INFORMATION ABOUT THE MULTIPARAMETER
- EDIT INFORMATION
- ABOUT THE MULTIPARAMETER
- PARAMETERS PANEL
- MAKE FIRST
- LEARN
- UP
- DOWN
- PARAMETER
- ASSIGNABLE PARAMETER RANGES
- TRANSFORMATION SHAPE
- RANGE MODE
- INTERVAL
- RANGE
- VALUE
- MAX
- MAXIMAL VALUE
- INVERT
- USE FIRST PARAMETER'S RANGE
- USE FIRST
- PARAMETER'S RANGE
- PARAMETER EXPRESSION
- POST
- CYCLIC MODE
- INTERPOLATE VALUES
- SET INTERPOLATE TO ALL PARAMETERS
- SET INTERPOLATE TO ALL PARAMETERS BUTTONS
- BANK CONTROL PANEL
- NUMBER OF BANKS
- VALUE POWER
- XY POWER
- ≡ MENU
- LOAD
- SAVE
- NAME CHECK
- PARAMETER LOCK EDITOR
- MIDI EDITOR
- SELECTOR
- CONTROLLERS PANEL
- DO NOT LOAD FROM PRESETS
- LAST NOTE-ON CHANNEL ONLY
- CONTROLLERS
- RESET
- SELECT TARGET PARAMETER
- PARAMETERINDEX
- MIDI
- VALUES
- MAX VALUE
- INTERPOLATED
- TOGGLE
- MAIN CONTROLLERS PANEL
- NOTES PANEL
- NOTE CONTROLLERS
- NOTE
- NOTE MIN
- FUNCTIONAL OUTSIDE NOTE RANGE
- SHIFT
- MIN VALUE
- MIDI PROGRAM CHANGE
- PRESET PREVIOUS/NEXT TRIGGER PANEL
- CHANNEL
- CONTROLLER
- SIMULATE PROGRAM CHANGE VIA CONTROLLER PANEL
- NUMBER OF VALUES
- PROGRAM CHANGE IN PRESETS PANEL
- FOLDER
- USED CONTROLS
- VALUE BUTTON
- SWITCHER
- KNOB
- INSTALLATION, ACTIVATION, INTRODUCTION TO AUDIO PLUGINS
- INSTALLATION
- INSTALLATION ON WINDOWS
- INSTALLATION ON MAC OS X
- UNINSTALLATION ON WINDOWS
- UNINSTALLATION ON OSX
- DELETING ALL DATA, PRESETS ETC
- PERFORMANCE PRECAUTIONS
- TROUBLESHOOTING
- GPU COMPATIBILITY
- MEMORY LIMITS OF 32-BIT PLATFORM
- UPDATING
- USING TOUCH-SCREEN DISPLAYS
- PURCHASING AND ACTIVATION
- QUICK START WITH YOUR HOST
- CUBASE
- LOGIC
- STUDIO ONE
- DIGITAL PERFORMER
- REAPER
- LIVE
- PROTOOLS
- FL STUDIO
- GUI STYLES, EDITOR MODES AND COLORS
- MELDA PRODUCTION THE ONLY LIMIT IS YOUR IMAGINATION
- ABOUT MELDAPRODUCTION
- INNOVATIVE THINKING
- SOUND MATTERS
- INSPIRING USER INTERFACE
- EASY TO USE, YET VERSATILE
- NEVER-ENDING IMPROVEMENTS
Brand : MeldaProduction
Model : MDoubleTracker
Category : Audio software