
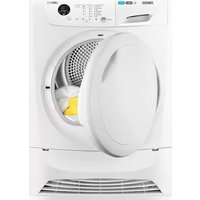
TCS 675 EW - Tumble dryer ZANUSSI - Free user manual and instructions
Find the device manual for free TCS 675 EW ZANUSSI in PDF.


| Product Type | Tumble Dryer |
| Brand | Zanussi |
| Model | TCS 675 EW |
| Drying Capacity | 6.5 kg |
| Drying System | Condenser with Heat Pump |
| Energy Efficiency Class | B |
| Annual Energy Consumption | 504 kWh |
| Noise Level | 65 dB(A) |
| Dimensions (Height x Width x Depth) | 85 cm x 60 cm x 60 cm |
| Weight | 42 kg |
| Power Supply | 230 V / 50 Hz |
| Power Consumption | 2100 W |
| Drying Programs | Cotton, Synthetics, Delicates, Wool, Mixed, Quick, Eco |
| Additional Functions | Delay Start, Anti-crease, Time Dry, Sensor Dry |
| Condenser Cleaning | Manual cleaning required after each cycle |
| Filter Cleaning | Lint filter must be cleaned after each cycle |
| Water Tank | Removable, capacity approx. 4 L |
| Child Lock | Yes |
| Spare Parts Availability | Common parts available from authorized service centers |
| Warranty | 2 years (standard) |
Frequently Asked Questions - TCS 675 EW ZANUSSI
User questions about TCS 675 EW ZANUSSI
0 question about this device. Answer the ones you know or ask your own.
Ask a new question about this device
Download the instructions for your Tumble dryer in PDF format for free! Find your manual TCS 675 EW - ZANUSSI and take your electronic device back in hand. On this page are published all the documents necessary for the use of your device. TCS 675 EW by ZANUSSI.
USER MANUAL TCS 675 EW ZANUSSI

Important Safety Information
It is most important that this instruction book should be retained with the appliance for future reference. Should the appliance be sold or transferred to another owner, or should you move house and leave the appliance, always ensure that the book is supplied with the appliance in order that the new owner can get to know the functioning of the appliance and the relevant warnings.
These warnings have been provided in the interest of safety. You MUST read them carefully before installing or using the appliance.
Installation
■ This appliance is heavy. Care should be taken when moving it.
■ It is dangerous to alter the specifications or attempt to modify this product in any way.
■ Any electrical work required to install this appliance should be carried out by a qualified electrician or competent person.
■ Care must be taken to ensure that the appliance does not stand on the electrical supply cable.
■ If the machine is situated on a carpeted floor, please adjust the feet in order to allow air to circulate freely.
■ If the tumble dryer is placed on top of a washing machine, it is compulsory to use the stacking kit (optional accessory).
Child Safety
■ This appliance is designed to be operated by adults. Children should not be allowed to tamper with the controls or play with the product.
■ Pets and children have been known to climb into tumble dryers. Please check your drum before use.
- Keep all packaging well away for children.
Use
■ Do not overload the appliance (see programme chart).
■ Clothes which are dripping wet should not be placed in the dryer.
■ As some bulky items such as duvets and eiderdowns should be dried in large commercial machines because of their bulk, check with the manufacturer of the item if it is suitable for drying in a domestic machine, even if the dry weight of the item is within the limit advised.
■ Do not dry canvas shoes or sports shoes, as they could get stuck between the door and the drum, thus blocking the latter.
■ Please make sure that no gas lighters have accidentally been left in pockets of garments to be loaded into appliance.
■ Danger of explosion: Never tumble dry items that have been in contact with inflammable solvents (petrol, methylated spirits, dry cleaning fluid and the like). As these substance are volatile, they could cause an explosion. Tumble dry only items washed with water.
■ In order to avoid danger of fires caused by excessive drying, do not use appliance to dry the following items:
■ Cushions, quilts and the like (these items accumulate heat).
■ Items containing rubber foam or materials similar to rubber foam.
■ Leave the door slightly ajar when the appliance is not being used. This will allow the seal to be preserved.
■ Clean fluff filter after using tumble dryer. To prevent fire risks, do not use the appliance if the fluff filter is damaged or without the filter.
■ Under no circumstances should you attempt to repair the machine yourself. Repairs carried out by inexperienced persons may cause injury or serious malfunctioning. Contact your local Zanussi Service Centre. Always insist on genuine Zanussi spare parts.
Contents
For the User
Important Safety Information 2
■ Installation 2
■ Child Safety 2
■ Use 2
Your New Tumble Dryer 4
Description of the Appliance 4
The Control Panel 5
■ Water reservoir 5
■ Mains-on light 5
■ Buttons 5
■ Control lights 5-6
■ Programme selector dial 6
■ Electronic Controlled Programmes 6
■ Timed Programmes 6
Programme Chart 7
Operating Sequence 8
■ Load the laundry 8
■ Switch the machine on 8
■ Select the drying time or programme 8
■ Select the required options 8
■ Start the machine 8
■ When drying is completed 8
Hints & Tips on Drying 10
Maintenance and Cleaning 11
■ External cleaning 11
■ Cleaning fluff filter 11
■ Cleaning the condenser unit 11
■ Emptying the water reservoir 11
Something Not Working 12
Service and Spare Parts 12
Customer Care 12
Guarantee Conditions 13
Zanussi Service Force 14-15
For the Installer
Installation Instructions 16
Technical Specifications 16
■ Positioning 17
■ Stacking kit (optional accessory) 17
■ Door reversal 17
■ Electrical connection 18
Guide to use the Instruction Book
The following symbols will be found in the text to guide you throughout the instructions:
Safety instructions
i Hints and tips
Environmental information

Your New Tumble Dryer
This tumble dryer will give your wash that soft, relaxed feel whatever the weather.
Extremely high quality standards both during development and manufacturing guarantee a long service life for your appliance.
Maximum economy in the operation of your dryer is achieved through very frugal electricity consumption and short drying times.
Energy saving tips
To save energy we recommend that you follow these hints:
■ Try to load the maximum capacity of the machine as small loads are uneconomical.
■ Always load well spun laundry. The higher the spin speed, the lower the electricity consumption and the shorter the drying times.
■ Do not over-dry laundry, this avoids creasing and saves energy.
■ Clean the filter regularly to avoid excessive drying times and high electricity consumption.
■ Ventilate the room well. The room temperature should not exceed +35°C during drying.

In the interest of the environment
■ Materials marked with the symbol are recyclable.
■ Check with your local Council or Environmental Health Office to see if there are facilities in your area for re-cycling this appliance.
■ When the appliance is to be scrapped, cut off the power supply cable and make the door closing device unusable to prevent young children from being trapped inside.
■ Help to keep your country tidy - use authorised disposal sites for your old appliance.
How do we help to protect the environment? We use recycled paper!
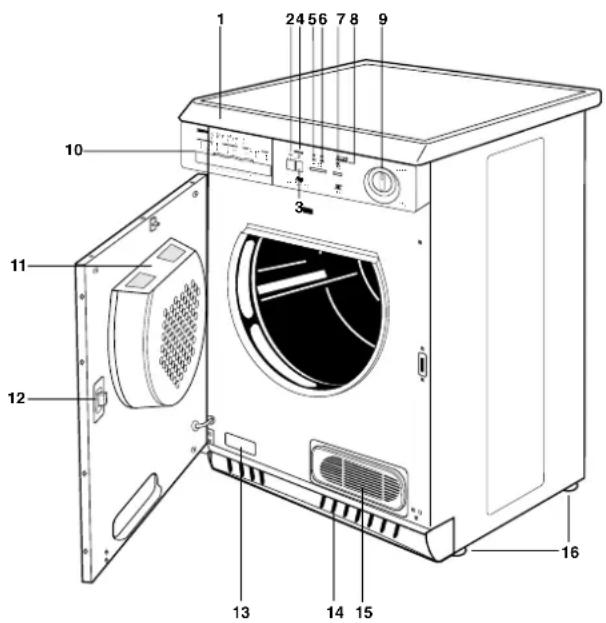
Description of the Appliance
1 Worktop
2 Door Open Button
3 «On-Off » Button
4 Mains-On Light
5 «Low Temperature» Button
6 «Buzzer off» Button
7 «Start» Button
8 Control lights
9 Programme Selector Dial
10 Water reservoir
11 Fluff Filter
12 Door Catch
13 Rating Plate
14 Ventilation Grille
15 Condenser Unit
16 Adjustable Feet
The Control Panel

I Water Reservoir
When the tumble dryer is being used, the condensed water is collected in a special container. To empty the reservoir, please refer to “Maintenance” chapter.
2 Programme Chart
This will help you to select the correct programme for drying.
3 Door open button 0-1
Depress this button to open the door. Should the door be opened while appliance is working, the tumble dryer will stop functioning. Depress START button to resume drying after closing the door.
4 ON-OFF Button ①
This button is used to switch the dryer on. At the end of the programme, release this button by pressing it again to switch the dryer off.
5 Mains-On Light
It comes on when the appliance is switched on (ON-OFF button pressed down) and goes out when this button is released.
6 Low Temperature Button ↓
Pressing this button allows drying to be performed at a lower temperature, for delicate items.
The corresponding pilot light 7 comes on and an acoustic sound is heard.
This option can also be used for time controlled drying.
7 Low Temperature Light
It comes on when the low temperature button is pressed.
8 Buzzer OFF Button
A buzzer sounds when buttons 6-8 and 10 are pressed and during the anti-creasing phase.
Press this button when selecting the programme if you wish to switch the buzzer off.
When the water reservoir is full, the buzzer will sound for 1 minute even if you have depressed button ⚠.
9 Buzzer Off Light
It comes on when you press the corresponding button.
10 Start Button
Press this button for about 1 second to start the dryer after having selected the drying programme. An acoustic sound rings.
If the door is opened while the programme is running, this button must be pressed again after closing the door in order to re-start the programme from the point at which it was interrupted.
This button must also be pressed after a power cut and after having re-inserted the water reservoir if it has been emptied in the middle of the programme. In both cases light (depending on the phase in progress) flashes to remind you that the start button needs to be pressed again.
II "Drying" Light 📊
This light indicates that the machine is performing the drying phase.
12 "Cooling" Light
This light indicates that the appliance is in the cooling phase. At the end of drying, there is a 10 minute cooling phase to cool the laundry.
If light law is flashing, this means that the Start Button needs to be pressed again for the programme to resume.
I 3 "End of Programme" Light ↗
This light flashes at the end of the cooling phase and during the anti-releasing phase together with light .
I4 "Full Tank" Light
This light flashes when the water reservoir is full.
The reservoir can also be emptied during a programme.
In this case, after having fitted back in place, the start button must be pressed again for the programme to resume.
15 Programme Selector Dial
It allows you to select electronically controlled or time controlled drying.
Turn the dial to the required programme or time.
To cancel a programme which is running, turn the programme selector dial to "0".
At the end of drying, turn the selector dial to "0" before removing the laundry.
Electronic Controlled Programmes
These operate by means of dampness sensors. All you have to do is to set the selector dial for the programme required and the laundry will be dried to the selected degree of dryness.
Timed Programmes
They can be used to finish off drying if necessary. Select the 60 minute programme for cottons or the 30 minute programme for synthetics.
Programme Chart
Electronic Controlled Programmes
| Type of laundry: | Degree of drying required | Max. amount of laundry in kg | Programme |
| Cotton & linen | Extra dry | 6 | A |
| Store dry | 6 | B(*) | |
| Lightly damp | 6 | C | |
| Iron dry | D(*)6 | ||
| Machine iron dry | 6 | E | |
| Extra drySynthetics | 2.5 | F | |
| Store dry | G(*)2.5 | ||
| Lightly damp | 2.5 | H |
(*) According to CEI 1121 standards.
Timed Programmes
| Type of laundry: | Drying time | Max. amount of laundry in kg | Programme selector dial position |
| Cotton & linen | 60 min | 6 60' | |
| 30 minSynthetcs | 30'2.5 | ||
Never overfill the drum (do not load large quilts, for example).
Drying times vary according to:
■The type of laundry
■The size of the load
■The degree of spinning prior to drying
■The degree of drying required
Fresh & Cool
This position on programme selector dial can be used to freshen the laundry (e.g. to remove a persistent odour of moth-balls).
Load
It is often difficult to estimate the weight of items to be dried. We therefore recommend that you adopt the following guidelines:
■cotton, linen: drum full but not too tightly packed
■synthetics: drum no more than half full
Operating Sequence
Before using your tumble dryer for the first time, we recommend you place a few damp cloths inside the appliance and dry for approximately 30 minutes. There may be dust inside a brand new tumble dryer.
I. Load the laundry
Open the door by pressing the relevant button. Load the items one at a time, shaking them out loosely and close the door. Please check the laundry does not get caught between the door and filter.

2. Switch the machine on
Press the ON-OFF Button ☑the mains-on light comes on.

3. Select the drying time or the drying programme
Turn the selector dial to the desired programme or time.

4. Select the required options
Depress Buzzer Off and/or Low Temp. Button, if you have to dry particularly delicate items.

5. Start the machine
Depress START button for 1 second, the machine starts operating and the drying light comes on.
To change a programme already in progress, turn the selector dial to "0", select the new programme and then depress START button.

Important!
If the drying programme has to be stopped before it reaches the end, we recommend that you turn the programme selector dial to position (cooling) and wait until the end of this phase before removing the laundry. This will avoid a build-up of heat inside the appliance.
6. When drying is completed
The machine stops automatically. The control lights ↗ and ≈ are flashing.
Turn the selector dial to "0", the control lights go out. Release ON-OFF Button (the mains-ON light goes out) and immediately remove the laundry.
Anticrease phase
If you do not remove the laundry at the end of the programme, the machine will automatically carry out an “anticrease” phase for approx 30 mins. During this period the drum will rotate at regular intervals to avoid creasing and the buzzer will sound for 1 second every 10 seconds, unless you have depressed the BUZZER OFF button. The lights land with flash alternatively.
Empty the water reservoir and clean the filter after every drying programme.
A clean filter ensures correct functioning of the appliance.
Hints & Tips on Drying
Before placing articles of laundry in your tumble dryer, check the care labels to ensure they are recommended for tumble drying.
Care Labels you may find on your laundry
normal drying (high temperature)
delicate drying (low temperature)
do not tumble dry
☐ may be tumble dried

Do not overload the appliance.
Here is a list of the approximate weight of some common laundry items.
Sheet 700 to 1000 g
Pillowcase 100 to 200 g
Tablecloth 400 to 500 g
Table Napkin 50 to 100 g
Kitchen Towel 70 to 120 g
Linen Hand Towel 100 to 150 g
Hand Towel 150 to 250 g
Bath Towel 700 to 1000 g
Bathrobe 1000 to 1500 g
Shirt 200 to 300 g
Apron 150 to 200 g
■ Always load well spun laundry. The higher the spin speed the lower the electricity consumption and the shorter the drying time.
■ DO NOT load dripping wet laundry into the dryer. Roll the article in a towel or spin to remove excess water.
■ Close poppers and zips and fasten any buttons.
■ Sort the laundry. Separate synthetics from cotton/linens, and dry separately.
■ Remove the laundry immediately after the programme has finished.
■ Use a fabric conditioning sheet to reduce static. We recommend the sheet is pinned to an article of laundry (using a safety pin).
■ Mix the load i.e. large and small articles.
■ When drying large items such as sheets, we recommend you periodically stop the dryer to redistribute the load.
DO NOT use the tumble dryer to dry the following:
■ Articles contaminated with inflammable substances e.g. petrol, cleaning solvents, cooking oil, fats or hair lacquer.
■ Woollen and synthetic/wool mixtures unless the item is labelled as suitable for tumble drying.
■ Very delicate articles such as silk.
■ Very large and bulky items such as duvets or sleeping bags.
Maintenance and Cleaning
You must disconnect the appliance from the electricity supply, before you can carry out any cleaning or maintenance work.
External cleaning
Use only soap and water and then dry thoroughly. From time to time, apply a little wax furniture cream with a soft cloth.
Important: do not use methylated spirit, diluents or similar products.
Cleaning the filter
The tumble dryer cannot operate efficiently with a clogged filter. The filter collects all the fluff which forms during drying and it is therefore essential to remove and clean this filter after each drying programme.

You should not be alarmed by the amount of fluff which collects on the filter; this is due to normal wearing of the fabrics dried and not to incorrect operation of your machine. Rubbing of the fibres during normal wear and washing forms fluff. If laundry is dried on a line, this fluff simply flies away, whereas inside the tumble dryer it collects together and swells considerably as a result of the drying action.
Cleaning the condenser unit
Clean the air condenser periodically, 3 or 4 times a year depending on how frequently the dryer is used. Pull out the condenser, holding it at the top, and remove all fluff. Clean it with a brush and rinse it under the shower if necessary.


Also clean the outside, removing all fluff. Clean the rubber seal round the porthole door and the seal of the condenser in the inner door with a damp cloth.
Emptying the water reservoir
Water extracted from the laundry condenses inside the machine and is collected in a reservoir.
The reservoir must be emptied after each drying cycle to ensure efficient operation when the machine is next used.
If this is not done a safety device trips: pilot light on the control panel comes on and the programme stops, leaving the laundry damp.
The reservoir can be emptied even in the middle of a programme. After inserting the reservoir depress START button to re-start the programme.

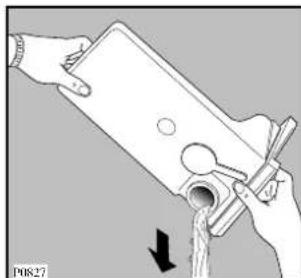
The reservoir must be re-inserted correctly.
Handy tip: The condensed water may be used in a steam iron or to top up a battery, etc. In this case it must be filtered (e.g. through a coffee filter).
Something Not Working
Certain problems are due to lack of simple maintenance or oversights, which can be solved easily without calling out an engineer. Before contacting your local Service Centre, please carry out the checks listed below.
IMPORTANT: if you call out an engineer to a fault listed below, or to repair a fault caused by incorrect use or installation, a charge will be made even if the appliance is under guarantee.
| Symptom Possible causes | |
| The tumble dryer does not start | ■ The door has not been closed.■ The plug is not properly inserted in the power socket.■ There is no current at the socket.■ The main fuse or the fuse in the plug has blown.■ The ON-OFF button has not been pressed.■ A drying time or programme has not been selected.■ The water reservoir is full or not properly inserted (the pilot light ☐on).■ The START button has not been depressed. |
| Drying takes too long or laundry is not dry enough. | ■ The laundry has not been spun properly.■ The filter and/or air condenser are clogged up.■ The room temperature is too high.■ The selected programme was not suitable for the laundry■ There is too much laundry inside the appliance.■ The dryer is not correctly installed. |
Service & Spare Parts
In the event of your appliance requiring service, or if you wish to purchase spare parts, please contact your local Zanussi Service Force Centre by telephoning:
0870 5 929929
Your telephone call will be automatically routed to the Service Force Centre covering your post code area.
The addresses are listed on the following pages. Before calling out an engineer, please ensure you have read the details under the heading “Something Not Working”.
When you contact the Service Force Centre you will need to give the following details:
- Your name, address and post code
- Your telephone number
- Clear and concise details of fault
- The model and serial number of the appliance (found on the rating plate - see picture, page 4).
- The purchase date
Customer Care
For general enquiries concerning your Zanussi appliance or for further information on Zanussi products, please contact our Customer Care Department by letter or telephone as follows:
Customer Care Department
Zanussi
55-77 High Street
Slough
Berkshire
SL1 1DZ
Tel 08705 727727*
or visit our website at www.zanussi.co.uk
* calls to this number may be recorded for training purposes.
Guarantee Conditions
Standard guarantee conditions
We, Zanussi undertake that if, within 12 months of the date of the purchase, this Zanussi appliance or any part thereof is proved to be defective by reason only of faulty workmanship or materials, we will, at our option, repair or replace the same FREE OF ANY CHARGE for labour, materials or carriage on condition that:
■ The appliance has been correctly installed and used only on the electricity supply stated on the rating plate.
- The appliance has been used for normal domestic purposes only, and in accordance with the manufacturer's instructions.
■ The appliance has not been serviced, maintained, repaired, taken apart or tampered with, by any person not authorised by us.
All service work under this guarantee must be undertaken by a Zanussi Service Force Centre.
Any appliance or defective part replaced shall become the Company's property.
This guarantee is in addition to your statutory and other legal rights.
Home visits are made between 8.30am and 5.30pm Monday to Friday. Visits may be available outside these hours in which case a premium will be charged.
Exclusions
This guarantee does not cover:
■ Damage or calls resulting from transportation, improper use or neglect, the replacement of any light bulbs or removable parts of glass or plastic.
■ Costs incurred for calls to put right an appliance which is improperly installed or calls to appliances outside the United Kingdom.
■ Appliances found to be in use within a commercial environment, plus those which are subject to rental agreements.
■ Products of Zanussi manufacture which are NOT marketed by Zanussi.
European guarantee
If you should move to another country within Europe then your guarantee moves with you to your new home subject to the following qualifications:
■ The guarantee starts from the date you first purchased your product.
■ The guarantee is for the same period and to the same extent for labour and parts as exists in the new country of use for this brand or range of products.
■ The guarantee relates to you and cannot be transferred to another user.
■ Your new home is within the European Community (EC) or European Free Trade Area.
■ The product is installed and used in accordance with our instructions and is only used domestically, i.e. a normal household.
■ The product is installed taking into account regulations in your new country.
Before you move please contact your nearest Customer Care Centre, listed below, to give them details of your new home. They will then ensure that the local Service Organisation is aware of your move and able to look after you and your appliances.
France Senlis +33 (0)344 62 29 99
Germany Nurnberg +49 (0)911 323 2600
Italy Pordenone +39 (0)1678 47053
Sweden Stockholm +46 (0)8 738 79 50
UK Slough +44 (0)1753 219897
SERVICEFORCE
To contact your local Service Force Centre telephone 08705 929 929
| CHANNEL ISLANDS | ISLE OF LEWIS | ND Macleod16 James StreetStornowayIsle of Lewis PA87 2QW | NORTH EAST | ||
| GUERNSEY | Guernsey ElectricityPO Box 4Vale, GuernseyChannel Islands GY1 3AD | GATESHEAD | Unit 356aDukesway CourtDukeswayGateshead NE11 0BH | ||
| KELSO | 2, 6 & 8 WoodmarketKelsoBordersTD5 7AX | ||||
| JERSEY | Jersey Electricity CompanyHaut De L'ormeRue De Haut De L'ormeTrinityJerseyChannel Islands JE3 5FG | GRIMSBY | 15 Hainton AvenueGrimsbyN. E. LincsDN32 9AS | ||
| ORKNEY | 7 King StreetKirkwallOrkneyKW15 1JF | ||||
| SCOTLAND | PERTH(OWN SALES) | Scottish Hydro ElectricCentral WarehouseInveralmondPerth PH1 3AF | Unit 1Boulevard Industrial EstateHullHU3 4AY | ||
| ABERDEEN | 54 Claremont StreetAberdeen AB10 6RA | LEEDS | 64-66 Cross Gates RoadCross GatesLeedsLS15 7YS | ||
| AUCHTERMUCHTY | 33a BurnsideAuchtermuchtyFife KY14 7AJ | SHETLAND(OWN SALES) | 3-4 Carlton PlaceLerwickShetlandZE1 0PW | Unit 23Northfield WayAycliffe Industrial ParkNewton AycliffeDL5 6EJ | |
| BLANTYRE | Unit 5Block 2Auchenraith Ind. EstateRosendale WayBlantyre G72 0NJ | SHETLAND(OWN SALES) | Bolts Shetland26 North RoadLerwickShetland ZE1 0PE | Pennine HouseRoman Ridge RoadSheffieldS9 1GB | |
| DUMFRIES | 93 Irish StreetDumfriesDG1 2 PQ | WHALSAY(OWN SALES) | Leask ElectricalHarisdaleSymbister, WhalsayShetland ZE2 9AA | ||
| DUNOON | 7 Hill StreetDunoonArgyllPA23 7AL | NORTHERN IRELAND | NORTH WEST | ||
| BELFAST | Owenmore HouseKilwee Business ParkDunmurryBelfastBT17 0HD | ||||
| EDINBURGH | Unit 12Dumbryden Ind. Estate2 Dumbryden RoadEdinburghEH14 2AB | BIRKENHEAD | 1 Kelvin ParkDock RoadBirkenheadCH41 1LT | ||
| CARLISLE | Unit 7James Street WorkshopsJames StreetCarlisleCumbria CA2 5AH | ||||
| GLASGOW | Unit 4Wellington RoadBishopriggsGlasgow G64 2SA | CARDIFF | WALESUnit 4Guardian Industrial EstateClydesmuir RoadCardiffCF2 2QS | South Quay Ind. EstateDouglasIsle of ManIM1 5AT | |
| INVERNESS | Unit 3BISmithton Ind. EstateSmithtonInverness IV2 7WL | BOLTON | Unit BCentral Industrial EstateSt Marks StreetBoltonBL3 6NR | ||
| CLYWD | Unit 6-7 Coed ParcAbergele RoadRhuddlanClwydLL18 5UG | Unit 250Dawson PlaceBamber BridgePrestonLancashire PR5 8AL | |||
| ISLE OF ARRAN | R HaggertyBruachBlackwaterfootIsle of Arran | PRESTON | Unit 20 Haigh ParkHaigh AvenueStockportSK4 1QR | ||
| ISLE OF BARRA | J Zerfah244 BruernishIsle of BarraWestern Islands HS9 5QY | DYFED | Unit 9St. Clears Business ParkTenby RoadSt. ClearsCarmarthenSA33 4JW | ||
| ISLES OF BUTE | Walker EngineeringGlenmhorUpper Serpentine RoadRothesayIsle of Bute PA20 9EH | OSWESTRY | Plas Ffynnon WarehouseMiddleton RoadOswestrySY11 2PP | ||
SERVICEFORCE
To contact your local Service Force Centre telephone 08705 929 929
| MIDLANDS | LONDON & EAST ANGLIA | SOUTH EAST | |||
| BIRMINGHAM | 66 Birch Road EastWyrley Trading EstateWittonBirminghamB6 7DB | BECKENHAM | 11a Gardner Ind. EstateKent House LaneBeckenhamKent BR3 1QZ | ASHFORD | Unit 2Bridge Road Business CentreBridge RoadAshfordKent TN23 1BB |
| BOURNE | Pinfold RoadBournePE10 9HT | CHELMSFORD | Hanbury RoadWidford Ind. EstateChelmsfordEssexCM12 3AE | FLEET | Unit 1Redfields Ind. EstateChurch CrookhamFleetHampshire GU13 0RD |
| BRIDGNORTH | 68 St. Mary's StreetBridgnorthShropshireWV16 4DR | COLINDALE | Unit 14Capitol ParkCapitol WayColindaleLondon NW9 0EQ | HAYWARDSHEATH | 21-25 Bridge RoadHaywards HeathSussex RH16 1UA |
| GLOUCESTER | 101 Rycroft StreetGloucesterGL1 4NB | ELTHAM | 194 Court RoadMottinghamElthamLondon SE9 4EW | TONBRIDGE | Unit 30Deacon Trading EstateMorley RoadTonbridgeTN9 1RA |
| HEREFORD | Units 3 & 4Bank BuildingsCattle marketHarefordHE4 9HX | ENFIELD | 284 Alma RoadEnfieldLondonEN3 7BB | ||
| HIGHAM FERRERS | 30 High StreetHigham FerrersNorthantsNN10 8PL | GRAVESEND | Unit B4Imperial Business EstateWest MillGravesendKentDA11 0DL | SOUTH WEST | |
| ILKESTON | Unit 2Furnace RoadIlkeston DE7 5EP | BARNSTAPLE | Main RoadFremingtonBarnstapleNorth Devon EX31 2NT | ||
| LEICESTER | Unit 7Oaks Industrial EstateCoventry RoadNarboroughLeicestershireLE9 5GF | IPSWICH | Unit 6CElton Park Business CentreHadleigh RoadIpswichIP2 0DD | BOURNEMOUTH | 63-65 Curzon RoadBournemouthDorsetBH1 4PW |
| LINCOLN | Unit 8Clifton StreetStone Field ParkLincolnLN5 8LQ | LETCHWORTH | 16-17 Woodside Ind. ParkWorks RoadLetchworthHertsSG6 1LA | BRIDGEWATER | 6 Herswell Business ParkSalmon ParadeBridgwaterSomerset TA6 5PY |
| NEWCASTLEUNDER LYME | 18-21 Croft RoadBrampton Ind. EstateNewcastle under LymeStaffordshireST5 0TW | LONDON | 2 - 4 Royal LaneYiewsleyWest DraytonMiddlesexUB7 8DL | BRISTOL | 11 Eldon WayEldonwall Trading EstateBristolBS4 3QQ |
| REDDITCH | 13 Thornhill RoadNorth Moons MoatRedditchWorcestershireB98 9ND | MAIDENHEAD | Reform RoadMaidenheadBerkshireSL6 8BY | EMSWORTH | 266 Main RoadSouthbourneEmsworthPO10 8JL |
| MOLESEY | 10 Island Farm AvenueWest MoleseySurreyKT8 2UZ | ISLE OF WIGHT | Unit 8Enterprise CourtRyde Business ParkRydeIsle of Wight PO33 1DB | ||
| TAMWORTH | Unit 3Sterling ParkClaymoreTamworthB77 5DQ | NEWBURY | 9 Pipers CourtBerkshire DriveThatchamBerkshireRG19 4ER | NEWTON ABBOT | Unit 2Zealey Ind. EstateKingsteigntonNewton AbbotTQ12 3TD |
| WORCESTER | Units 1 & 2Northbrooks CloseGregorys Mill Ind. EstateWorcesterWR3 8BP | NORWICH | 2b Trafalgar StreetNorwichNR1 3HN | REDRUTH | Unit 7DPool Ind. EstateDruids RoadRedruthCornwall TR15 3RH |
| SUNBURY | Unit 1aThe SummitHanworth RoadSunbury on ThamesTW16 5DB | ||||
Installation Instructions
It is dangerous to alter the specifications or attempt to modify this product in any way.
⚠️ Care must be taken to ensure that the appliance does not stand on the electrical supply cable.
⚠️ Any electrical work required to install this appliance should be carried out by a qualified electrician or competent person.
Technical Specifications
| DIMENSIONS Height 85 cm (33.5") | Width 60 cm (23.6")Depth 60 cm (23.6") | |
| POWER SUPPLY VOLTAGE 230-240 V/50 HzTOTAL POWER ABSORBED 2650 W (13A) | ||
| MAXIMUM RECOMMENDED LOAD Cotton, linen 6 kg (13 lbs)Synthetics, delicates 2.5 kg (5.5 lbs) | ||
| DRUM VOLUME 108 l | ||
| CONSUMPTIONS Cotton, linen 3.64 kWh (5 kg store dry)Cotton, linen 3 kWh (5 kg iron dry) |

This appliance complies with the following E.E.C. Directives:
- 73/23 EEC of 19.2.73 (Low Voltage Directive) and subsequent modifications;
- 89/336 EEC of 3.5.89 (Electromagnetic Compatibility Directive) and subsequent modifications.
Positioning
It is recommended that, for your convenience, the dryer is positioned close to your washing machine.
The tumble dryer must be installed in a clean place, where dirt does not build up.
Air must be able to circulate freely all round the appliance. Do not obstruct the front ventilation grille or the air intake grilles in the back of the machine.
To keep vibration and noise to a minimum when the dryer is in use, it should be placed on a firm, level surface.
Once in its permanent operating position, check that the dryer is absolutely level with the aid of a spirit level. If it is not, raise or lower the four adjustable feet until it is.

The feet must never be removed.
Do not restrict the floor clearance through deep-pile carpets, strips of wood or similar. This might cause heat build-up which would interfere with the operation of the appliance.
Important
When operating the tumble dryer, the room temperature must not exceed 35° C, as it may affect the performance of the appliance.
Stacking kit
A special stacking kit is available through your dealer, to enable the mounting of the dryer on top of your washing machine.

Door reversal
To make it easier to load or unload the laundry the door can be reversed.
This operation must be carried out by qualified personnel.
Please contact the nearest Zanussi Service Centre.
Electrical connection
Any electrical work required to install this appliance should be carried out by a qualified electrician or competent person.

WARNING: THIS APPLIANCE MUST BE EARTHED.
The manufacturer declines any liability should this safety measure not be observed.
Before switching on, make sure the electricity supply voltage is the same as that indicated on the appliance's rating plate. (See picture, page 4).
The appliance is supplied with a 13amp plug fitted. In the event of having to change the fuse in the plug supplied, a 13amp ASTA approved (BS1363A) fuse must be used.
Should the plug need to be replaced for any reason, proceed as described below.
The wires in the mains lead are coloured in accordance with the following code:
Green and Yellow - Earth
Blue - Neutral
Brown - Live
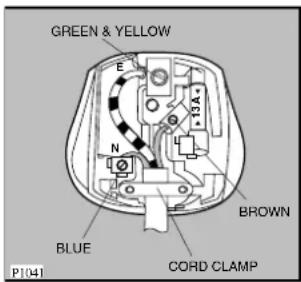
The wire coloured green and yellow must be connected to the terminal marked with the letter «E» or by the earth symbol of coloured green and yellow.
The wire coloured blue must be connected to the terminal «N» or coloured black.
The wire coloured brown must be connected to the terminal marked «L» or coloured red.
Upon completion there must be no cut, or stray strands of wire present and the cord clamp must be secure over the outer sheath.

WARNING:
A cut off plug inserted into a 13 amp socket is a serious safety (shock) hazard.
Ensure that the cut off plug is disposed of safely.
Permanent connection
In the case of permanent connection it is necessary that you install a double pole switch between the appliance and the electricity supply (mains), with a minimum gap of 3mm between the switch contacts and of a type suitable for the required load in compliance with the current electrical regulations.
The switch must not break the yellow and green earth cable at any point.
From the Electrolux Group. The world's No. 1 choice.
The Electrolux Group is the world's largest producer of powered appliances for kitchen, cleaning and outdoor use. More than 55 million Electrolux Group products (such as refrigerators, cookers, washing machines, vacuum cleaners, chain saws and lawn mowers) are sold each year to a value of approx. USD 14 billion in more than 150 countries around the world.
- IMPORTANT SAFETY INFORMATION
- INSTALLATION
- CHILD SAFETY
- USE
- CONTENTS
- FOR THE USER
- YOUR NEW TUMBLE DRYER
- DESCRIPTION OF THE APPLIANCE
- THE CONTROL PANEL
- PROGRAMME CHART
- OPERATING SEQUENCE
- HINTS & TIPS ON DRYING
- MAINTENANCE AND CLEANING
- SOMETHING NOT WORKING
- SERVICE AND SPARE PARTS
- CUSTOMER CARE
- GUARANTEE CONDITIONS
- ZANUSSI SERVICE FORCE
- FOR THE INSTALLER
- INSTALLATION INSTRUCTIONS
- TECHNICAL SPECIFICATIONS
- GUIDE TO USE THE INSTRUCTION BOOK
- ENERGY SAVING TIPS
- IN THE INTEREST OF THE ENVIRONMENT
- I WATER RESERVOIR
- DOOR OPEN BUTTON
- ON-OFF BUTTON ①
- MAINS-ON LIGHT
- LOW TEMPERATURE BUTTON ↓
- LOW TEMPERATURE LIGHT
- BUZZER OFF BUTTON
- BUZZER OFF LIGHT
- START BUTTON
- II "DRYING" LIGHT 📊
- COOLING" LIGHT
- I 3 "END OF PROGRAMME" LIGHT ↗
- I4 "FULL TANK" LIGHT
- PROGRAMME SELECTOR DIAL
- ELECTRONIC CONTROLLED PROGRAMMES
- TIMED PROGRAMMES
- FRESH & COOL
- LOAD
- LOAD THE LAUNDRY
- SWITCH THE MACHINE ON
- SELECT THE DRYING TIME OR THE DRYING PROGRAMME
- SELECT THE REQUIRED OPTIONS
- START THE MACHINE
- IMPORTANT
- WHEN DRYING IS COMPLETED
- ANTICREASE PHASE
- CARE LABELS YOU MAY FIND ON YOUR LAUNDRY
- DO NOT OVERLOAD THE APPLIANCE
- DO NOT USE THE TUMBLE DRYER TO DRY THE FOLLOWING
- EXTERNAL CLEANING
- CLEANING THE FILTER
- CLEANING THE CONDENSER UNIT
- EMPTYING THE WATER RESERVOIR
- SERVICE & SPARE PARTS
- STANDARD GUARANTEE CONDITIONS
- EXCLUSIONS
- THIS GUARANTEE DOES NOT COVER
- EUROPEAN GUARANTEE
- SERVICEFORCE
- POSITIONING
- STACKING KIT
- DOOR REVERSAL
- ELECTRICAL CONNECTION
- WARNING: THIS APPLIANCE MUST BE EARTHED
- WARNING
- PERMANENT CONNECTION
- FROM THE ELECTROLUX GROUP. THE WORLD'S NO. 1 CHOICE
Brand : ZANUSSI
Model : TCS 675 EW
Category : Tumble dryer