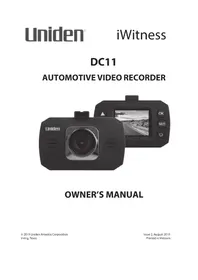
DC11 - Camcorder UNIDEN - Free user manual and instructions
Find the device manual for free DC11 UNIDEN in PDF.


| Product Type | Digital Camcorder |
| Model | DC11 |
| Brand | Uniden |
| Dimensions (Approx.) | 5.5 x 2.5 x 2.5 inches |
| Weight (Approx.) | 0.5 lbs |
| Power Source | Rechargeable Lithium-ion battery or 4x AA batteries |
| Recording Media | SD/SDHC memory card (up to 32GB) |
| Video Resolution | 720p HD at 30fps |
| Still Image Resolution | 5 Megapixels (interpolated) |
| Digital Zoom | 4x digital zoom |
| Display | 2.7-inch LCD screen |
| Functions | Video recording, playback, photo capture, time-lapse, motion detection |
| Connectivity | USB 2.0, AV output, HDMI mini |
| Maintenance | Clean lens with soft cloth; store in dry place; charge battery fully before first use |
| Safety | Do not expose to water or extreme temperatures; use only specified charger |
| Spare Parts and Repairability | Spare batteries and chargers available; contact Uniden support for repairs |
| General Information | Ideal for personal video recording; compatible with Windows and Mac |
Frequently Asked Questions - DC11 UNIDEN
User questions about DC11 UNIDEN
0 question about this device. Answer the ones you know or ask your own.
Ask a new question about this device
Download the instructions for your Camcorder in PDF format for free! Find your manual DC11 - UNIDEN and take your electronic device back in hand. On this page are published all the documents necessary for the use of your device. DC11 by UNIDEN.
USER MANUAL DC11 UNIDEN
OWNER'S MANUAL
IMPORTANT SAFETY INSTRUCTIONS
- Uniden does not represent this product to be waterproof. Do not expose this product to rain or moisture.
- This product is intended for use in a motor vehicle. Don’t install the device where it will block the driver’s view of the road (including the mirrors) or the deployment of the airbag.
- Keep your attention on the road! Don’t try to operate or focus on any device while driving. If you have to concentrate on the device, pull off the road for a few minutes.
- Ensure that the camera lens is kept clean and there is nothing blocking the lens.
- Don’t leave the device in direct sunlight for a long period of time or where the temperature could go above 140° F ( 60° C).
CONTENTS
IMPORTANT SAFETY INSTRUCTIONS ...... 2
OVERVIEW 5
FEATURES....5
WHAT'S IN THE BOX? 6
CONTROLS AND INDICATORS....7
INSTALLATION AND POWER UP 9
ATTACHING THE WINDSHIELD MOUNT....9
INSTALLING THE MICROSD CARD....9
POWERING UP THE DC11....10
Save Current Recording....12
Record Mode Menu....12
PHOTO MODE 14
Photo Mode Menu 14
PLAYBACK MODE 16
Playback Mode Menu....16
Adjust Playback Volume 16
SETUP MENU 16
CONNECTING TO A PC 18
MASS STORAGE....18
TROUBLESHOOTING 19
SPECIFICATIONS....20
ONE-YEAR LIMITED WARRANTY 23
The Uniden DC11 is an ultra-compact recorder that can be set up to continuously capture high quality video even in low light conditions. The built-in G-Sensor system triggers the camera to instantly begin recording if the vehicle is bumped or scraped. The DC11 can even record outside the vehicle for the duration of the internal battery's power.
FEATURES
• 1.5" color screen
• High Definition Recording
- G-Sensor
- Loop Recording
- Auto Power Off
- Date and Time Stamp
- Records onto microSD Card (8GB included)
- Internal Rechargeable Battery (up to 10 minutes)
WHAT'S IN THE BOX?

If any items are missing or damaged, get answers 24/7 at our website: www.uniden.com.
CONTROLS AND INDICATORS
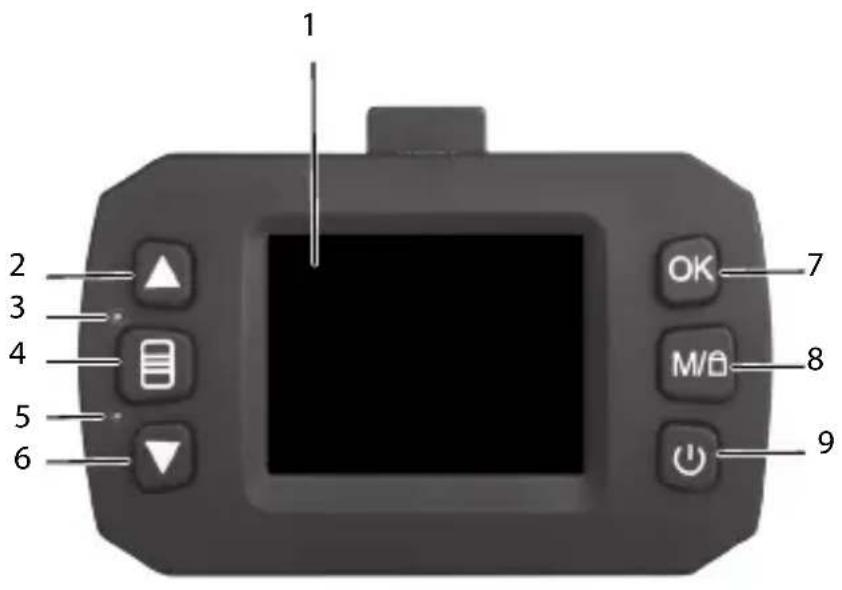

| No. | Item Description | |
| 1 | LCD | |
| 2 | UP | ▲ In Record mode, zoom in.In Menu list, move the cursor one line up. |
| 3 | LED Red - (Steady On) Not RecordingRed - (Flashing) Recording | |
| No. | Item Description | |
| 4 | MENU | When not recording, opens the Menu. |
| 5 | LED Blue - Ind | icates charging |
| 6 | DOWN▼ | In Record mode, zoom out.In Menu list, move the cursor one line down. |
| 7 | OK In Record | mode, press this button to start/stop video recording.Use this button to capture an image in Photo mode.Confirm a menu selection.Confirm changes in the settings. |
| 8 | M / ☉ | While recording, press to lock (save from overwrite) the current recording.Use this button to shift between Record, Photo, and Playback mode. |
| 9 | POWER Press | to turn power on.Press & hold to turn power off.In Record mode, press to turn Infrared LEDs (night vision) on/off. |
| 10 | Bracket Slot | Fit the bracket hook of the windshield mount. |
| 11 | Reset If the d | device fails to operate, try resetting the device. Press the reset button using a pin or unfolded paperclip. |
| 12 | Mic Records | sound |
| 13 | Lens | |
| No. | Item Description | |
| 14 | USB Port Connect External Power & charge batteryConnect to PC for data (microSD card) transfer | |
| 15 | Speaker | |
| 16 | Card Slot microSD card slot | |
INSTALLATION AND POWER UP
ATTACHING THE WINDSHIELD MOUNT
- Insert the windshield mount bracket hook into the bracket slot on the top of the DC11.
- After inserting the hook, slide it down until it locks in position.
- Press the suction cup flat against the windshield.
- Push the suction lock up until it snaps into place and tighten the locking collar to secure.
- Gently pull on the mount to make sure it is secure.
INSTALLING THE MICROSD CARD
A compatible microSD card (8GB supplied) is required to record and store videos and photos.
The unit can support microSDHC cards (High Capacity microSD) up to 32GB in capacity. Uniden recommends using a good quality microSDHC card of at least 8GB capacity (included) and minimum Class 10 speed.
Insert a formatted microSD card gently in the slot on the side of the unit. To remove the card from the slot, press
the edge of the microSD card inwards for it to pop out and then pull it out of the slot.
POWERING UP THE DC11
Only use the DC car adapter that comes with your device. Any other adapter might damage the device.
- Refer to your car's owner's manual to verify where the power outlets are on and around the dashboard. Locate an outlet that supplies 12V electric power when the key is in the ON or ACC position.
- Connect the car adapter to the camera and to the that power outlet.
- Start the car. The camera turns on automatically and begins recording. (Press OK to stop recording.) When the car's engine is turned off, the camera will automatically turn off in a few seconds.
Charge the camera for at least 15 minutes after it is turned on for the first time or after it has been turned off for more than three weeks.
- At other times, press the button to turn it on.
Press and hold the ⏻ button to turn it off.
The unit charges the battery whenever power is detected through the USB port. When the unit is being charged, the red LED glows. It will automatically turn off when the unit has been charged completely. The unit will take about 90 minutes to charge completely. The Battery Status icon tells you how full the battery is.



Empty Low Half Full
Full
OPERATING THE DC11
The DC11 operates in three modes: Record mode, Photo mode, and Playback mode. These modes also have menus to help you configure recording and taking photos. Press M/ until you access the mode you want. An icon appears in the upper left corner of the screen for each mode.


Record Mode Photo Mode Playback Mode
RECORD MODE
To record video, verify that a valid microSD card (8GB supplied) is inserted in the microSD slot.
Inserting or removing the microSD card when the unit is recording causes the device to shut down.
Recording
When connected to a car charger, the unit automatically goes into Record mode and starts recording. The icon displays on the screen, with a flashing red dot beside it to indicate recording is in progress.
If the unit is not recording, press OK to start recording.
A flashing red dot appears next to the icon. To stop recording, press OK and the red dot disappears, indicating that the recording has stopped.
Save Current Recording
You can save the file that is currently recording so that it will not be overwritten if space is needed. While recording, press M/; the icon appears on the screen. This indicates that the recording has been locked and will not be overwritten by new video clips.
Press OK to stop recording. The icon disappears from the screen.
Record Mode Menu
You cannot access menus when the unit is recording. To access the Record menus, stop recording by pressing OK.
In Record, Photo, or Playback mode, press the Menu key ( ) once to access the menu settings for that particular mode. Press it twice to display the Setup menu.
The Setup menu is common to all modes. See page 16.
Press ▲ and ▼ to scroll through the various settings and then press OK to select. Press ☐ again to exit the Menu.
| Option Description | |
Resolution Sets the video resolution. (Maximum resolution = 1080FHD)  | |
Loop Recording | Loop recording allows you to set video file length (1, 2, or 3, minutes; 3 minutes shown on icon). Selecting a file length activates loop recording. When the microSD card fills up, it loops back to the oldest file and records over it.If you select OFF, video file length defaults to 3 minutes. When the microSD card fills up, a Card Full message displays and recording stops. |
EV(Exposure) , ,  | Sets the brightness sensitivity. |
Motion Detection | Turn this setting on to allow the recorder to start recording when it detects movement. |
Audio Turns audio recording on/off. | |
Date Stamp Enables/disables the date and time on the image files. | |
Gsensor Detects significant or sudden movement; automatically locks the current recording. | |
Button Sound | Turns on sounds when you press keys. |
PHOTO MODE
The DC11 lets you take snapshots of live video that is not recording. You cannot take a snapshot of live video while it is recording. You also cannot take a snapshot of recorded video playing back.
To take a snapshot:
- Verify that a valid microSD card is inserted in the microSD slot.
- Press M/ to select Photo mode; displays in the upper left corner.
- Press OK. The unit takes a snapshot of live video.
Photo Mode Menu
Like the Record mode menu, press the Menu key ( ) once to access the menu settings for the Photo mode. Press it twice to display the Setup menu.
The Setup menu is common to all modes. See page 16.
| Option Description | |
Capture Mode | Sets the time gap for capturing an image. For example, if you select 2s, then 2 seconds will be the delay between the OK button being pressed and the image being captured. |
Resolution Defines the image resolution. | |
Sequence | Activates continuous shooting mode; you get up to 3 shots in one click. |
| Quality Defines the quality of the images you capture. | |
| Sharpness Defines the clarity of detail in the images you capture. | |
White Balance | Establishes the conditions to capture an image based on the options given. |
Color | Adjust photo color. |
| ISO Increases or decreases the camera's light sensitivity. | |
EV (Exposure) | Sets the brightness sensitivity. |
Anti-Shaking | Reduces the camera shake and captures a better quality image. |
Quick Review | Sets the time duration the image displays on the screen after it has been captured. |
PLAYBACK MODE
This mode lets you play back recorded video or view snapshots.
- Press M/ until either (Playback) or ▶ (Snap-shot) displays in the upper left corner of the screen.
- Press OK to view the recorded file/snapshot or ▲ /▼ to scroll through the recorded files/snapshots.
Playback Mode Menu
Press the Menu key (☐) once to access the Playback mode options. Scroll up or down and then press OK to select an option for the snapshot/video currently displaying.
- Delete. Delete the current file displayed or delete all files.
- Protect. Lock/unlock the current file displayed or lock/unlock all files.
Adjust Playback Volume
Playback Volume controls display on the video playback screen ( [icon] Increase or decrease the volume through the ▲ / ▼ keys.
SETUP MENU
Press Menu key (☐) twice to access the Setup menu in any mode. The icon is highlighted in the upper left corner.
| Option Description | |
Set Date/ Time | Changes the date and time by using the relevant ▲ and ▼ keys, and then press OK to confirm. |
Auto Power Off | Sets the time duration to automatically power off the unit when idle. |
Language | Select English (default), French, Spanish, or Portuguese. |
Light Frequency | Select 50Hz or 60Hz (default) and press OK. |
Screen Saver | Sets the time to automatically turn off the LCD after the recording starts. |
Image Rotation | Rotates the image. |
Format Formats  | ats the microSD card. |
Default Setting | Returns all the settings back to the factory defaults. |
Firmware Version | Version number of the installed firmware. |
CONNECTING TO A PC
If you connect the DC11 to a PC (using the supplied USB cable), the DC11 displays various options. Scroll to select Mass Storage.
MASS STORAGE
The Mass Storage option lets you manage and view the microSD card contents on the PC.
- Connect the DC11 to the PC with the USB cable.
- Select the Mass Storage option on the DC11.
- On your computer, navigate to your network drives; the DCAM is detected on the PC as an external drive. Select it to view the DCIM folder.
- Click on the DCIM folder to open and view recordings/images arranged in folders according to the specified date. The locked/protected recordings have file names beginning with “SOS,” thus enabling you to easily distinguish them from the rest of the recordings.
TROUBLESHOOTING
| General Problems Possible Solutions | |
| Camera does not turn off when the car is turned off. | Check your vehicle's owner's manual to verify that you have connected the camera to a power outlet that only operates when the key is in the ON or ACC position.If you have connected your camera accordingly and it still remains on when the car is turned off, go to www.uniden.com for assistance. |
| The unit cannot take photos or record videosThe unit automatically stops when recording | ·Ensure that the microSD card is formatted properly and inserted correctly.·Use the recommended type of microSD card (minimum 8GB Class 10) |
| Video is unclear Ensure that | there are no fingerprints or dirt on the lens. Ensure that the lens is always kept clean. |
| Dark images while recording water/sky | Adjust the EV setting. |
| Color of the images is not good | Set the ‘white balance’ setting to automatic. |
| Cross-stripe interference in an image | Verify that Frequency option (Setup/Frequency) is set to 60Hz (North America). |
| The unit crashes Using a pin | in or an unfolded paper clip, press and hold the Reset button to restart the unit. |
SPECIFICATIONS
Screen 1.5 in. LCD
RAM DDR1
Operating Windows 2000/XP/Vista/7/8/8.1
Systems Mac OS 10+/LINUX (webcam/storage)
Supported
Operating 32° F \~ 122° F ( 0° C \~ +50°C)
Temp.
Storage 25° F \~ 140° F ( -10° C \~ +60° C)
Temp.
Size 66mm (L) x 31mm (H) x 41mm (W)
Working 10 \~ 90%
Humidity
Storage microSD (up to 32GB), Class 10 (8G)
microSD card included)
Recording Recording Time: Off, 1 min, 3 min, or 5
Time min
Video 1920x1080/1440x1080/1280x720/848x4
Resolution 80/640x480/320x240
View Angle 140°
Zoom 4X digital zoom
Power Supply • 12V Cigarette Car Charger Input: 12V\~24V Output: DC5V/1A • 110mAh Built-in Lithium Polymer battery (10 min)
Sensor Type 1.3 MP CMOS Image Sensor 1/3" Video Frame 30fps Rate Sound Yes (built-in microphone) Recording Channels 1 G-sensor Yes Video Format AVI
Photo 12M/10M/8M/5M/3M, 2M, VGA, 1.3M Resolution Video Codec MJPG Audio Codec PCM
FCC/INDUSTRY CANADA COMPLIANCE
FCC Compliance
This device complies with Part 15 of the FCC rules. Operation is subject to the following two conditions: (1) This device may not cause harmful interference, and (2) this device must accept any interference received, including interference that may cause undesired operation.
Changes or modifications not expressly approved by the party responsible for compliance could void your authority to operate the equipment.
This device complies with Industry Canada license-exempt RSS standard(s).Operation is subject to the following two conditions: (1) this device may not cause interference, and (2) this device must accept any interference, including interference that may cause undesired operation of the device.
Changes or modifications not expressly approved by the party responsible for compliance could void your authority to operate the equipment.
Important: Save your receipt! Evidence of original purchase is required for warranty service.
WARRANTOR: Uniden America Corporation (“Uniden”) ELEMENTS OF WARRANTY: Uniden warrants, for one year, to the original retail owner, this Uniden Product to be free from defects in materials & craftsmanship with only the limitations or exclusions set out below.
WARRANTY DURATION: This warranty to the original user shall terminate & be of no further effect 12 months after the date of original retail sale. The warranty is invalid if the Product is (A) damaged or not maintained as reasonable or necessary, (B) modified, altered, or used as part of any conversion kits, subassemblies, or any configurations not sold by Uniden, (C) improperly installed, (D) serviced or repaired by someone other than an authorized Uniden service center for a defect or malfunction covered by this warranty, (E) used in any conjunction with equipment or parts or as part of any system not manufactured by Uniden, or (F) installed or programmed by anyone other than as detailed by the owner's manual for this product.
STATEMENT OF REMEDY: In the event that the product does not conform to this warranty at any time while this warranty is in effect, warrantor will either, at its option,
repair or replace the defective unit & return it to you without charge for parts, service, or any other cost (except shipping & handling) incurred by warrantor or its representatives in connection with the performance of this warranty. Warrantor, at its option, may replace the unit with a new or refurbished unit.
THE LIMITED WARRANTY SET FORTH ABOVE IS THE SOLE & ENTIRE WARRANTY PERTAINING TO THE PRODUCT & IS IN LIEU OF & EXCLUDES ALL OTHER WARRANTIES OF ANY NATURE WHATSOEVER, WHETHER EXPRESS, IMPLIED OR ARISING BY OPERATION OF LAW, INCLUDING, BUT NOT LIMITED TO ANY IMPLIED WARRANTIES OF MERCHANTABILITY OR FITNESS FOR A PARTICULAR PURPOSE. THIS WARRANTY DOES NOT COVER OR PROVIDE FOR THE REIMBURSEMENT OR PAYMENT OF INCIDENTAL OR CONSEQUENTIAL DAMAGES. Some states do not allow this exclusion or limitation of incidental or consequential damages so the above limitation or exclusion may not apply to you.
LEGAL REMEDIES: This warranty gives you specific legal rights, & you may also have other rights which vary from state to state. This warranty is void outside the United States of America & Canada.
PROCEDURE FOR OBTAINING PERFORMANCE OF WARRANTY: If, after following the instructions in the owner's manual you are certain that the Product is defective, pack the Product carefully (preferably in its
original packaging). The Product should include all parts & accessories originally packaged with the Product.
Include evidence of original purchase & a note describing the defect that has caused you to return it. The Product should be shipped freight prepaid, by traceable means, to warrantor at:
Uniden America Service
C/O Saddle Creek
743 Henrietta Creek Rd., Suite 100
Roanoke, TX 76262


- OWNER'S MANUAL
- IMPORTANT SAFETY INSTRUCTIONS
- CONTENTS
- IMPORTANT SAFETY INSTRUCTIONS ...... 2
- OVERVIEW 5
- CONTROLS AND INDICATORS....7
- INSTALLATION AND POWER UP 9
- CONNECTING TO A PC 18
- FEATURES
- WHAT'S IN THE BOX
- CONTROLS AND INDICATORS
- INSTALLATION AND POWER UP
- ATTACHING THE WINDSHIELD MOUNT
- INSTALLING THE MICROSD CARD
- POWERING UP THE DC11
- EMPTY LOW HALF FULL
- FULL
- OPERATING THE DC11
- RECORD MODE
- RECORDING
- SAVE CURRENT RECORDING
- RECORD MODE MENU
- YOU CANNOT ACCESS MENUS WHEN THE UNIT IS RECORDING. TO ACCESS THE RECORD MENUS, STOP RECORDING BY PRESSING OK
- PHOTO MODE
- PHOTO MODE MENU
- PLAYBACK MODE
- PLAYBACK MODE MENU
- ADJUST PLAYBACK VOLUME
- SETUP MENU
- CONNECTING TO A PC
- MASS STORAGE
- TROUBLESHOOTING
- SPECIFICATIONS
- FCC/INDUSTRY CANADA COMPLIANCE
- FCC COMPLIANCE
- IMPORTANT: SAVE YOUR RECEIPT! EVIDENCE OF ORIGINAL PURCHASE IS REQUIRED FOR WARRANTY SERVICE
Brand : UNIDEN
Model : DC11
Category : Camcorder