
LBT-D560 - Hi-Fi System SONY - Free user manual and instructions
Find the device manual for free LBT-D560 SONY in PDF.


| Product Type | Hi-Fi System |
| Brand | Sony |
| Model | LBT-D560 |
| Color | Black / Silver |
| Dimensions (Main Unit) | Approx. 420 x 360 x 320 mm (W x H x D) |
| Weight (Main Unit) | Approx. 8.5 kg |
| Speaker Dimensions | Approx. 230 x 360 x 260 mm each |
| Speaker Weight | Approx. 3.2 kg each |
| Power Consumption | 170 W |
| Power Output (Total RMS) | 100 W (2 x 50 W) |
| Supported Media | CD, Cassette, AM/FM Radio |
| CD Playback | CD, CD-R, CD-RW |
| Cassette Deck | Double cassette (play/record) |
| Radio Tuner | AM / FM, 30 presets |
| Inputs | Aux (RCA), Phono (MM) |
| Outputs | Headphone, Speaker terminals |
| Audio Features | Graphic equalizer, Surround sound |
| Remote Control | Included (RM-J1000) |
| Power Supply | AC 120 V / 220-240 V, 50/60 Hz |
| Cleaning | Use a soft dry cloth; avoid solvents |
| Safety | Do not expose to moisture; disconnect during storms |
| Repairability | Spare parts available through Sony service centers |
Frequently Asked Questions - LBT-D560 SONY
User questions about LBT-D560 SONY
0 question about this device. Answer the ones you know or ask your own.
Ask a new question about this device
Download the instructions for your Hi-Fi System in PDF format for free! Find your manual LBT-D560 - SONY and take your electronic device back in hand. On this page are published all the documents necessary for the use of your device. LBT-D560 by SONY.
USER MANUAL LBT-D560 SONY
Compact Hi-Fi Stereo System
Operating instructions
WARNING
To prevent fire, or shock hazard, do not expose the unit to rain or moisture.

This symbol is intended to alert the user to the presence of uninsulated "dangerous voltage" within the product's enclosure that may be of sufficient magnitude to constitute a risk of electric shock to persons.

This symbol is intended to alert the user to the presence of important operating and maintenance (servicing) instructions in the literature accompanying the appliance.
INFORMATION
This equipment has been tested and found to comply with the limits for a Class B digital device, pursuant to Part 15 of the FCC Rules. These limits are designed to provide reasonable protection against harmful interference in a residential installation. This equipment generates, uses, and can radiate radio frequency energy and, if not installed and used in accordance with the instructions, may cause harmful interference to radio communications. However, there is no guarantee that interference will not occur in a particular installation. If this equipment does cause harmful interference to radio or television reception, which can be determined by turning the equipment off and on, the user is encouraged to try to correct the interference by one or more of the following measures:
- Reorient or relocate the receiving antenna.
- Increase the separation between the equipment and receiver.
- Connect the equipment into an outlet on a circuit different from that to which the receiver is connected.
- Consult the dealer or an experienced radio/TV technician for help.
CAUTION
You are cautioned that any changes or modification not expressly approved in this manual could void your authority to operate this equipment.
Note to CATV installer:
This reminder is provided to call CATV system installer's attention to Article 820-40 of the NEC that provides guidelines for proper grounding and, in particular, specifies that the cable ground shall be connected to the grounding system of the building, as close to the point of cable entry as practical.
Owner's Record
The model and serial numbers are located at the rear of the unit. Record the serial number in the space provided below. Refer to them whenever you call upon your Sony dealer regarding this product.
Model No. LBT-D560 Serial No.
Before operating the unit
Remove the transit key on the bottom of the unit by following the instructions on the label, and keep it in a safe place.
The transit key protects the optical system against shock during transportation.

To re-install the transit key when transporting the unit
1 Remove all CDs.
2 Press ≅ OPEN/CLOSE to close the disc tray and confirm that " ∅ (or ∅, ∅ ...) " has disappeared from the display.
3 Turn off the power.
4 Insert the transit key into its hole to lock.
Welcome!
Thank you for purchasing the Sony Hi-Fi Component System. This series is packed with fun features. Here are just a few:
- DBFB (Dynamic Bass Feedback) system that boosts low frequency range audio to provide deep, powerful bass sound
• A preset feature, that lets you store and recall up to 30 of your favorite radio stations
• A graphic equalizer that lets you adjust the audio quality to fit five music types
• A timer that lets you set the CD player, tape player or radio to turn on and off whenever you want
• A dual tape deck that lets you record from the radio, CD player or from the other tape deck and relay play from both decks
• A CD player that lets you play up to 5 CDs in a row
• A remote that lets you control the music from your seat
Table of Contents
Chapter 1: Setting Up
Connecting the Stereo 4
Inserting the Batteries 5
Setting the Clock 6
Chapter 2: the CD Player
Playing CDs (normal play) 7
Playing Tracks in Random Order (shuffle play) 8
Playing Tracks in the Desired Order (program play) 8
Playing Tracks Repeatedly (repeat play) 9
Chapter 3: the Radio
Listening to the Radio 10
Presetting Radio Stations 11
Playing Preset Radio Stations 11
Chapter 4: the Tape Player
Playing a Tape 12
Recording a CD 13
Recording a CD: Specifying Tape Length (time edit) 14
Recording a CD: Specifying Track Order (program edit) 14
Recording From the Radio 15
Recording From Another Tape (dubbing) 15
Chapter 5: Sound Adjustment
Adjusting the Sound 17
Selecting the Audio Emphasis 17
Adjusting the Audio Emphasis 18
Making Your Personal Audio Emphasis File (personal file) 18
Chapter 6: Additional Features
Falling Asleep to Music 19
Waking Up to Music 19
Timer-Recording Radio Programs 20
Connecting Optional Equipment 20
For Your Information
Precautions 21
Troubleshooting Guide 21
Maintenance 22
Specifications 22
Index to Parts and Controls 23
Index (Back cover)
Chapter 1:
Setting Up
Connecting the Stereo
Inserting the Batteries
Setting the Clock
Connecting the Stereo
Use the illustrations below to connect your stereo.
If you want to connect any optional components to the stereo, see "Connecting Optional Equipment" in Chapter 6.
STEP 1 Connecting the Speakers
1 Twist the speaker cable coating and strip it from the end of the cable.
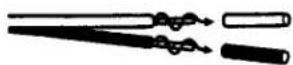
2 Connect the right speaker to R connectors and the left speaker to L connectors with the red cord to + and the black cord to -.

STEP 2 Connecting the Antenna

*Note: Extend it horizontally
To improve the FM reception
Connect an outdoor FM antenna to the FM 75Ω terminal, using a 75-ohm coaxial cable.
Important
Ground the external antenna from h terminal against lightning with the screw clamp. To prevent a gas explosion, do not connect the ground wire to a gas pipe.

To improve the AM reception
After you connect the AM antenna, connect a 6- to 15- meter (20- to 50- feet) insulated wire to the AM terminal. Connect the m terminal to earth.
Important
Ground the external antenna from h terminal against lightning with the screw clamp. To prevent a gas explosion, do not connect the ground wire to a gas pipe.

STEP 3 Connecting the Power
Connect the power cord to a wall outlet after you have made all the above connections.


Inserting the Batteries
Install two size AA (R6) batteries in the supplied remote for remote control.
1 Open the lid.

2 Insert two size AA (R6) batteries. Match the + and - to the diagram in the battery compartment.
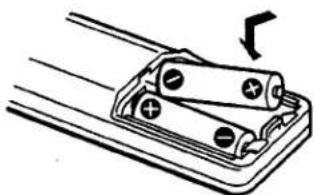
3 Close the lid.
Battery life
You can expect the remote to operate for about six months (using Sony SUM-3 (NS) batteries) before the batteries run down. When the batteries no longer operate the remote, replace all the batteries with new ones.
To avoid battery leakage
If you are not going to use the remote for a long time, remove the batteries to avoid damage caused by corrosion from battery leakage.
Setting the Clock
The built-in clock shows the time in the display.

To check the time while power is on
Press DISPLAY.
The current time appears for a few seconds.
To correct the clock setting
Repeat steps 1 to 5.
1 Keep pressing CLOCK SET until the hour indicator begins flashing.

2 Set the current hour by pressing ▲ or ▼ (CURSOR CONTROL) until the correct hour appears.

3 Press ENTER/NEXT. The minutes indicator begins flashing.
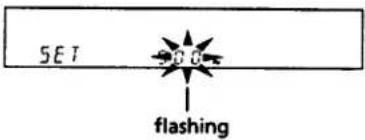
4 Set the current minute by pressing ▲ or ▼ until the correct minute appears.

5 Press ENTER/NEXT. Use the time signal to set the clock accurately. "OK" appears in the display and the clock starts running.

Chapter 2:
the CD Player
Playing CDs (normal play)
Playing Tracks in Random Order (shuffle play)
Playing Tracks in the Desired Order (program play)
Playing Tracks Repeatedly (repeat play)
Playing CDs (normal play)
After you insert up to five CDs at one time, you can play all tracks or discs in the original order consecutively (normal play). Besides, you can play them in four modes: normal, shuffle, program or repeat. Before you play the CD, decrease the sound level by turning the VOLUME control counterclockwise, to prevent damage to the speakers.

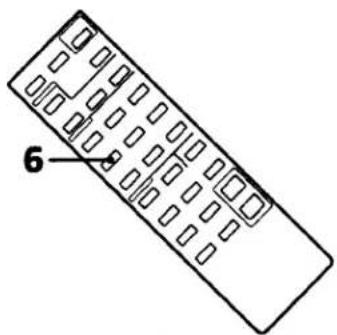
1 Press FUNCTION repeatedly until "CD" appears in the display. CD is selected.
2 Press ≅ OPEN/CLOSE to open the disc trays.
3 Holding the CD by the edge, place the CD on the disc tray with the label side up. (When you play an 8-cm CD, place it without an adaptor on the inner circle of the disc tray.)

4 Press DISC SKIP to place up to four more CDs in the tray. The next tray appears each time you press DISC SKIP. The disc on the front tray will be selected first.
5 Press ≧ OPEN/CLOSE again. The disc number appears in the display.

6 Press CONTINUE on the remote to choose whether to play "1 DISC" or "ALL DISCS".
| Choose | To play |
| 1 DISC | Only a CD you have selected. |
| ALL DISCS | All CDs consecutively in the order of disc number. Empty disc trays are skipped. |

7 Press ▷ (or CD PLAY on the remote) or DISC 1 - 5. Play starts from the beginning of the selected CD.

8 Adjust the volume. Turn VOLUME clockwise to turn up the volume, or counterclockwise to turn down. (Or press VOL +/- on the remote.)
| To | Press |
| Stop play | ■ |
| Pause | □□ |
| Resume play | ▷ or □□ |
| Remove the CD | △ OPEN/CLOSE |
continue to next page →
→ continued
To check the remaining or total playing time
Press DISPLAY repeatedly.
Each time you press DISPLAY while playing a CD, the display changes as follows.
![graph TD A["Playing time on the current track"] --> B["Remaining time on the current track"] B --> C["Remaining time on the CD (1 DISC play mode) or "PLAY" indication (ALL DISCS play mode)"] C --> D["Clock (appears for a few seconds)"]](/content/2026/07/1524525/images/4234f5698e4ac8017b8f958062f55c36c8940c85668b3449c218e0f9e7eb7ee8.jpg)
Note
•“---” appears in the display when the time is 100 minutes or more.
One Touch Play feature
Press CD (function) (or CD PLAY on the remote) when the power is off. You can listen to the last selected CD without pressing any other buttons when a CD is in the player. If no CD is inserted, the system turns on, and "CD no disc" appears in the display.
If you press CD (function) or DISC 1-5 while other source is selected, the CD player is selected and the play starts automatically.
Locating a Specific Track
You can quickly locate any track while playing or pausing a CD.
To locate
| the next or succeeding tracks |
| the current or preceding tracks |
Press
| ▶▶▶▶▶ (or ▶▶▶ on the remote) repeatedly until you find the track |
| or on the remote) repeatedly until you find the track |
Locating a Particular Point in a Track
You can locate a particular point in a track while playing or pausing a CD. Use the buttons on the unit to operate this feature.
| To locate a point | Press |
| While monitoring the sound | ▶▶▶▶ (forward) or ◀◀◀◀ (backward) and hold down until you find the point. |
| Quickly by observing the display during pause | ▶▶▶▶ (forward) or ◀◀◀◀ (backward) and hold down until you find the point. You will not hear the sound during this operation. |
Locating a Specific CD
You can locate the beginning of any CD during play, pause, or stop mode.
To locate the beginning of a particular CD and start playing
Press the corresponding DISC 1-5.
To change to the next CD
Press DISC SKIP.
Playing Tracks in Random Order (shuffle play)
You can play all the tracks on a CD or all CDs in random order.


1 Press FUNCTION repeatedly until "CD" appears in the display.
2 Press SHUFFLE on the remote to choose whether to play "1 DISC" or "ALL DISCS". "ALL DISCS SHUFFLE" or "1 DISC SHUFFLE" appears in the display.

3 Press ▷ (or CD PLAY on the remote). "t" appears and then all the tracks play in random order.
To skip to the next track, press ▶▶▶▶▶. To replay the current track, press ◀◀◀◀◀. You cannot replay the previous track.
To stop playing
Press ■
To cancel shuffle play
Press CONTINUE on the remote.
To select the desired CD
Press DISC 1-5 during "1 DISC SHUFFLE" play.
Playing Tracks in the Desired Order (program play)
You can program up to 32 tracks from all the CDs in the order you want them to be played.
Use the buttons on the remote to do this operation.
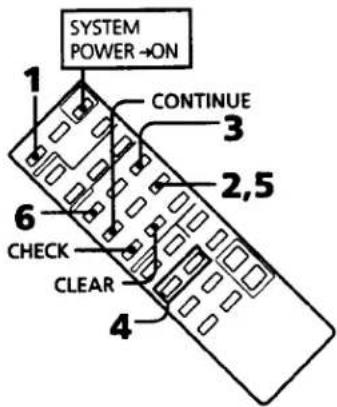
1 Press FUNCTION repeatedly until "CD" appears in the display.
2 Press PROGRAM.
"PROGRAM" appears in the display.
3 Press DISC SKIP repeatedly (or DISC 1 - 5 on the unit) to choose a CD.

4 Press ◀◀ or ▶▶▶ to choose a track. The disc number, track number and the total playing time appear.

5 Press PROGRAM. The chosen track is programmed and its number lights up in the music calendar. If the track number disappears before you press PROGRAM, go back to step 3.
To program additional tracks from the same CD, repeat steps 4 and 5.
To program additional tracks from another CD, repeat steps 3 to 5.

Note • If “- - - - ” appears instead of the total playing time, this means - you have programmed a track number which exceeds 20. - the total time has exceeded 100 minutes.
6 Press CD PLAY (or ▷). All the tracks play in the order you chose.
| To | Press |
| Check the program | CHECK repeatedly*1 |
| Program a pause | □□*2 |
| Stop play | ■ |
| Cancel the program play | CONTINUE*3 |
| Erase a track from the end | CLEAR in stop mode |
| Erase a specific track | CHECK repeatedly so the number of the track lights up, and press CLEAR |
| Erase the entire program | ■ once in stop mode |
*1 After the last track appears, "CHECK End" appears in the display.
*2 "P" appears in the display and the total playing time is reset to 0.00.
*3 The program is erased.
To change the order of programmed tracks
Erase the entire program and create a new one.
The whole program is erased also when: - you select other play modes. - you remove the CDs.
Playing Tracks Repeatedly (repeat play)
The repeat play function repeats a single CD or all CDs in normal, program, and shuffle play. In normal play mode only, the player can also repeat a single track. Use the button on the remote to do this operation.

Repeating all the tracks Press REPEAT once so that "REPEAT" lights up in the display.
| Playing mode | Tracks played |
| Normal play (ALL DISCS) | Repeats all the tracks on all CDs (REPEAT), or the current track (REPEAT 1). |
| Normal play (1 DISC) | Repeats all the tracks on the current CD (REPEAT), or the current track (REPEAT 1). |
| Shuffle play (ALL DISCS) | All tracks on the all CDs are reshuffled. |
| Shuffle play (1 DISC) | All tracks on the CD are reshuffled. |
| Program play | Repeats all the programs in their programmed order. |
Repeating a single track (in normal play only)
Press REPEAT twice while playing the desired track so that "REPEAT 1" lights up in the display.
To cancel repeat play Press REPEAT so that "REPEAT" or "REPEAT 1" disappears from the display.
Chapter 3:
the Radio
Listening to the Radio
Presetting Radio Stations
Playing Preset Radio Stations
Listening to the Radio
When you want to play a radio programme, you can have the tuner automatically scan the radio frequencies and tune in the stations with clear signals. This feature saves your time in searching for stations with clear signals.
However, stations with weak signals may be skipped by automatic tuning. Manually tune in the ones skipped by automatic tuning.


1 Press TUNER/BAND (or BAND on the remote) repeatedly until the band you want appears in the display. As you press this button, the band changes as follows:


2 Press TUNING MODE repeatedly until "AUTO TUNING" appears in the display.

3 Press TUNING (+/-).
The tuner starts scanning radio frequencies, and stops when it finds a clear station. "TUNED" appears in the display window. "STEREO" also appears if the FM station tuned is broadcasting in stereo.

4 If you don't want to listen to the station selected, press TUNING (+/-) to restart the scan.
When the desired station is not tuned in
Automatic tuning may skip the stations with weak signal and continue scanning without a stop. In this case, tune in the station manually.
1 Press TUNING MODE repeatedly until "TUNING" appears in the display.
2 Press TUNING (+/-) repeatedly until the desired station is tuned in.
To improve AM broadcast reception
Reorient the supplied AM loop antenna for AM.

To change the AM tuning interval
The AM tuning interval is preset to 10 kHz in the factory. If you need to change the interval, do as follows:
1 Turn on the power.
2 Change the band to AM.
3 Turn off the power.
4 Turn the power back on while pressing TUNING MEMORY.
After changing the tuning interval, reset the preset AM radio stations.
When an FM program is not clear to receive Press STEREO/MONO on the remote so that "MONO" appears in the display. There will be no stereo effect, but the reception will improve. Press STEREO/MONO on the remote again to restore the stereo effect.
One Touch Play feature
Press TUNER/BAND (or BAND on the remote) when the power is off or when you are listening to another sound source. You can listen to the last received station without pressing any other buttons.
Presetting Radio Stations
You can store radio frequencies in the tuner's memory to tune in your favorite stations quickly. You can preset up to 20 FM stations and 10 AM stations in any order.
Use the buttons on the unit for presetting stations.

1 Press TUNER/BAND (or BAND on the remote) repeatedly until the band you want appears in the display.


2 Press TUNING (+/-) to tune in the station you would like to store.
3 Press TUNING MEMORY.
"MEMORY" appears in the display.

4 Press TUNING (+/-) to display the preset channel number you decided on (1 to 20 for FM, 1 to 10 for AM).
5 Press TUNING MEMORY.
"MEMORY" disappears, and the station is stored at the preset channel number you decided on.

6 Repeat steps 1 to 5 for each station you would like to store.
To erase a stored station
Store a new station at a previously used preset station number. It will erase the old station and replace it with the new station.
If you have trouble storing a station
Make sure "MEMORY" is lit in the display. If not, press TUNING MEMORY again so that "MEMORY" lights up (for about eight seconds) in the display, and then proceed with steps 4 and 5.
Playing Preset Radio Stations
Once you have preset the stations, use the TUNING (+/-) buttons to quickly tune in your favourite stations.


1 Press TUNER/BAND (or BAND on the remote) repeatedly until the band you want appears in the display.


2 Press TUNING MODE repeatedly so that "PRESET" appears in the display.

3 Press TUNING (+/-) (or PRESET (+/-) on the remote) to tune in a preset station. The station frequency appears and the station begins broadcasting.

Chapter 4: the Tape Player
Playing a Tape
Recording a CD
Recording a CD: Specifying Tape Length (time edit)
Recording a CD: Specifying Track Order (program edit)
Recording From the Radio
Recording From Another Tape (dubbing)
Playing a Tape

1 Press FUNCTION repeatedly until "TAPE" appears in the display. TAPE is selected.
2 Press ≅ EJECT to open the tape compartment. Insert a recorded tape in deck A or B with the tape side facing down and the side you want to play facing forward. Push to close the compartment. The tape will start playing from the front side.

3 Press DECK SELECT to select the deck you want to play.
The selected deck indicator lights up.
4 Press DIRECTION MODE to choose single-side, dual-side, or relay play. The DIRECTION MODE setting affects both decks.
| To play | Set DIRECTION MODE to |
| One side of the tape | = |
| Both sides.* | ○ |
| Both decks in succession.** | RELAY |
* The deck stops automatically after repeating the sequence 5 times.
** See "To play both decks in succession (relay play)".
5 Press ▷ (to play the front side) or ◀ (to play the reverse side). The tape starts playing.
| To | Press |
| Stop play | ■ |
| Pause (deck B only) | □□ |
| Resume play after pause | □□ or △ or ▷ |
| Fast forward | ▶▶ for front side,◀◀ or ◀◀ TAPEREWIND* for reverse side |
| Rewind | ◀◀ or ◀◀ TAPEREWIND* for front side,▶▶ for reverse side |
| Remove the cassette | △ EJECT |
* You can use ◀ TAPE REWIND even if TAPE is not selected. To stop rewinding, press this button again.
To play both decks in succession (relay play)
Relay play always follows the following sequence. When the reverse side of the tape in deck B finishes playing, the following sequence continues 4 more times.
![graph TD A["Deck A (Front side)"] --> B["Deck A (Reverse side)"] B --> C["Deck B (Front side)"] C --> D["Deck B (Reverse side)"] D --> A](/content/2026/07/1524525/images/d9317d682c2a4d65b0c7a19c6ba9efa58d719d907e178de2b2b270136894c720.jpg)
1 Press ≅ EJECT and insert recorded tapes in both decks.
2 Press DIRECTION MODE repeatedly until "RELAY" appears in the display.
3 Press ▷ or ◀.
To stop relay play Press ■.
When listening to a tape recorded with the Dolby* B-type noise reduction system Set the DOLBY NR selector to ON. Dolby noise reduction system reduces tape hiss noise in low-level high-frequency signals.
* Dolby noise reduction manufactured under license from Dolby Laboratories Licensing Corporation. "DOLBY" and double-D symbol ☐ are trademarks of Dolby Laboratories Licensing Corporation.
One Touch Play feature
Press TAPE (function) when the power is off or when you are listening to another sound source.
You can listen to the tape without pressing any other buttons when a tape is in the player. If no tape is inserted, the system will just turn on.
Recording a CD
You can record from a CD to a tape. Use TYPE I (normal) or TYPE II (CrO2) tapes. To listen to other sources while recording, you must stop recording.
Recording a CD Automatically
By using CD SYNCHRO button, you can record from a CD to a tape easily. Use the buttons on the unit for this operation.

1 Press ≅ OPEN/CLOSE and place a CD. Then, press ≅ OPEN/CLOSE again to close the tray. Make sure the CD you want to record is on the front tray. Total number of tracks and the total playing time appear in the display.
2 Press ≅ EJECT and insert a blank tape into deck B with the side you want to record on facing forward.
Recording will start from the front side of the tape, unless you have changed the playing direction before recording.
Make sure the tabs on the cassette have not been removed.
3 Select dual or single-sided recording.
| To record | Set DIRECTION MODE to |
| One side | |
| Both sides |
4 When you want to reduce the hiss noise in low-level high-frequency signals, set DOLBY NR to ON.
5 Press CD SYNCHRO.
The ● REC and 10 (pause) lamps light and deck B stands by for recording.
The ▶ lamp lights and the ◀ lamp
flashes for a few seconds, then disappears.
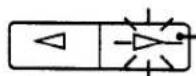
- Side in recording pause mode
If you want to start recording from the reverse side, press ◀ so that the ◀ lamp lights steadily.
6 Press 00 to release recording pause. Recording starts. After about 10 seconds, the CD starts playing. If the last track on side A has abruptly been cut, the track will record again from the beginning on side B when you choose dual-sided recording. If you set DIRECTION MODE to ⇌ or RELAY, recording always stops at the end of the reverse side.
To stop recording Press ■.
Note
- Turn the audio emphasis off when the sound level of the CD you want to record is very high, because it may distort the recording sound.
Adjusting the volume or DBFB will not affect the recording level But these controls will change the sound levels you hear through speakers or headphones.
Recording a CD Manually
You can record a CD as you like, for instance, record just the songs you want or record from the middle of the tape.

1 Press ≅ OPEN/CLOSE and place a CD. Then, press ≅ OPEN/CLOSE again to close the tray. Make sure the CD you want to record is on the front tray. Total number of tracks and the total playing time appear in the display.
2 Press ≅ EJECT and insert a blank tape into deck B with the side you want to record on facing forward.
Recording will start from the front side of the tape, unless you have changed the playing direction before recording.
Make sure the tabs on the cassette have not been removed.
3 Select dual or single-sided recording.
| To record | Set DIRECTION MODE to |
| One side | |
| Both sides | or RELAY |
4 When you want to reduce the hiss noise in low-level high-frequency signals, set DOLBY NR to ON.
5 Press FUNCTION repeatedly until "CD" appears in the display.
6 If you want to record the specific track of the CD, press III.
The CD player pauses for playing.
If you do not need to choose the track, skip to step 7.
7 Press ◀◀◀◀ or ▶▶▶▶▶ to choose the track you want to record.
8 Press ● REC.
The ● REC and 00 (pause) lamps light and deck B stands by for recording. The ▷ lamp lights and the ◀ lamp flashes for a few seconds, then disappears.

Side in recording pause mode
If you want to start recording from the reverse side, press ◀ so that the ◀ lamp lights steadily.
9 Press to release recording pause. Recording starts.
If you set DIRECTION MODE ⇌ or RELAY, recording always stops at the end of the reverse side.
10 Press CD (function). The CD player starts playing.
| To | Press |
| Stop recording | ■ |
| Pause recording | □□ |
Note
- If you want to record the specific tracks of the CD, the "program edit" feature will make it easier.
Adjusting the volume or DBFB will not affect the recording level But these controls will change the sound levels you hear through speakers or headphones.
Recording a CD: Specifying Tape Length (time edit)
You can have the stereo system create programs based on tape length. The CD player makes programs that will fit the tape length. For example, if you use a 46-minute tape to record a 50-minute CD, the CD player will automatically choose tracks that will fit within the 46-minutes, filling as much of the tape as possible. The player will not program those tracks beyond track number 20.

1 Press FUNCTION repeatedly until "CD" appears in the display.
2 Press ≅ OPEN/CLOSE and place a CD. Then, press ≅ OPEN/CLOSE again to close the tray. Make sure the CD you want to record is on the front tray. Total number of tracks and the total playing time appear in the display.
3 Press ≅ EJECT and insert a blank tape into deck B with the side you want to record on facing forward.
Recording will start from the front side of the tape, unless you have changed the playing direction before recording.
Make sure the tabs on the cassette have not been removed.
4 Select dual or single-sided recording.
| To record | Set DIRECTION MODE to |
| One side | |
| Both sides | or RELAY |
5 When you want to reduce the hiss noise in low-level high-frequency signals, set DOLBY NR to ON.
6 Press EDIT on the remote once. "TIME EDIT" appears in the display.
7 Press ◀◀◀◀ or ▶▶▶▶▶ to designate the tape length or "HALF".
Choose the indicator for tapes of corresponding minute length.
Choose "HALF" if you want the CD player to play just half the total playing time of the CD. You cannot select "HALF" when you want to record CD which has more than 20 tracks.
As you press the button, the indicator changes as follows:


8 Press EDIT. The player determines the tracks to be recorded on side A automatically.

9 When you record on both sides, press EDIT again. The player determines the tracks to be recorded on side B.

10 Press CD SYNCHRO. The ● REC and □ (pause) lamps light and deck B stands by for recording. The ▷ lamp lights and the ◁ lamp flashes for a few seconds, then disappears.
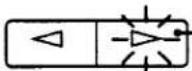
-Side in recording pause mode
If you want to start recording from the reverse side, press ◀ so that the ◀ lamp lights steadily.
11 Press to release recording pause. Recording starts. After about 10 seconds, the CD starts playing. If the last track on side A has abruptly been cut, the track will record again from the beginning on side B when you choose dual-sided recording. If you set DIRECTION MODE to or RELAY, recording always stops at the end of the reverse side.
To stop recording Press ■.
To check the order Press CHECK repeatedly.
To select the desired tracks beforehand
You can place priority on some tracks to be recorded by selecting them before programming them up to 20 tracks. See "Playing Tracks in the Desired Order (program play)". If you have programmed a track number which exceeds 20, you cannot use this feature.
To cancel time edit Press CONTINUE.
Recording a CD: Specifying Track Order (program edit)
You can adjust the total recording time to the tape length while making a program.


1 Following the procedure "Playing Tracks in the Desired Order (programme play)", program the tracks you want to record for side A. Make sure to program the tracks so that the total playing time of side A does not exceed the tape length of one side.
2 Press Ⅲ.
"P" appears in the display and the total playing time is reset to 0.
3 Program the tracks you want to record for side B in the same way as you did for side A.
4 Press ≅ EJECT and insert a blank tape into deck B with the side you want to record on facing forward.
Recording will start from the front side of the tape, unless you have changed the playing direction before recording.
Make sure the tabs on the cassette have not been removed.
5 Select dual or single-sided recording.
| To record | Set DIRECTION MODE to |
| One side | |
| Both sides | or RELAY |
6 When you want to reduce the hiss noise in low-level high-frequency signals, set DOLBY NR to ON.
7 Press CD SYNCHRO.
The ● REC and 00 (pause) lamps light and deck B stands by for recording. The ▷ lamp lights and the ◁ lamp flashes for a few seconds, then disappears.

If you want to start recording from the reverse side, press ◀ so that the ◀ lamp lights steadily.
8 Press 0 to release recording pause. Recording starts. After about 10 seconds, the CD starts playing. If the last track on side A has abruptly been cut, the track will record again from the beginning on side B when you choose dual-sided recording. If you set DIRECTION MODE to or RELAY, recording always stops at the end of the reverse side.
To stop recording Press ■.
To cancel program edit Press CONTINUE.
Recording From the Radio
You can record from the tuner onto a tape. Use TYPE I (normal) or TYPE II (CrO2) tape.

1 Press TUNER/BAND several times until the desired radio band appears.
2 Tune in the radio station you want to record. (See "Listening to the Radio", or "Playing Preset Radio Stations" for details.)
3 Press ≅ EJECT and insert a blank tape into deck B with the side you want to record on facing forward.
Recording will start from the front side of the tape, unless you have changed the playing direction before recording.
Make sure the tabs on the cassette have not been removed.
4 Select dual or single-sided recording.
| To record | Set DIRECTION MODE to |
| One side | |
| Both sides | or RELAY |
5 When you want to reduce the hiss noise in low-level high-frequency signals, set DOLBY NR to ON.
6 Press ● REC.
The ● REC and □□ (pause) lamps light and deck B stands by for recording. The ▷ lamp lights and the ◀ lamp flashes for a few seconds, then disappears.

If you want to start recording from the reverse side, press ◀ so that the ◀ lamp lights steadily.
7 Press ☐ to release recording pause. Recording starts. If you set DIRECTION MODE to ☐ or RELAY, recording always stops at the end of the reverse side.
To stop recording Press ■.
Adjusting the volume or DBFB will not affect the recording level But these controls will change the sound levels you hear through speakers or headphones.
Recording From Another Tape (dubbing)
Dubbing Another Tape Automatically
You can record the whole tape onto another automatically by using high speed dubbing. Use the buttons on the unit and TYPE I (normal) or TYPE II (CrO2) tape for dubbing.

continue to next page →
→ continued
1 Press ≅ EJECT, and insert a recorded tape in deck A with the side you want to play facing forward.
Also, insert a blank tape in deck B with the side you want to record on facing forward.
Recording and playback will start from the front side of the tape, unless you have changed the playing direction before recording.
Make sure the tabs on the cassette in deck B have not been removed.
2 Choose how you want the tape to record and press DIRECTION MODE repeatedly until the desired mode appears.
| Position | Operation |
| Dubbing stops at the end of one side | |
| ↔ | When the tape in one deck comes to the end of the front side, it reverses immediately regardless of the tape position in the other deck. |
| RELAY | When the tape in one deck reaches its end of the front side, it stops until the other tape come to its end, and then both tapes reverse together. |
3 Press HIGH SPEED DUBBING. The ● REC and Ⅲ (pause) lamps light and deck B stands by for recording.
4 Press Ⅲ. Dubbing starts. If you set DIRECTION MODE to ☐ or RELAY, recording always stops at the end of the reverse side.
To stop dubbing
Press ■.
If you select other sound sources while dubbing
Dubbing stops.
Audio emphasis is cancelled while dubbing And it is restored when dubbing is completed.
You do not have to set DOLBY NR selector The tape in deck B is automatically recorded in the same state as tape in deck A.
Dubbing Another Tape Manually
When you want to dub only part of the tape, dub manually at normal speed. Use TYPE I (normal) or TYPE II (CrO2) tape for recording.
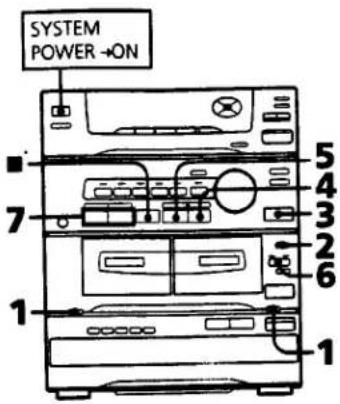
1 Press ≅ EJECT, and insert a recorded tape in deck A with the side you want to play facing forward.
Also, insert a blank tape in deck B with the side you want to record on facing forward.
Recording and playback will start from the front side of the tape, unless you have changed the playing direction before recording.
Make sure the tabs on the cassette in deck B have not been removed.
2 Select dual or single-sided recording.
| To dub | Set DIRECTION MODE to |
| One side | |
| Both sides | or RELAY |
3 Press FUNCTION repeatedly until "TAPE" appears in the display.
4 Press ● REC.
The ● REC and □□ (pause) lamps light and deck B stands by for recording. The ▷ lamp lights and the ◁ lamp flashes for a few seconds, then disappears.

If you want to start recording from the reverse side, press ◀ so that the ◀ lamp lights steadily.
5 Press 00 to release recording pause on deck B.
Recording starts on deck B. If you set DIRECTION MODE to ⊖ or RELAY, recording always stops at the end of the reverse side.
6 Press DECK SELECT to select deck A.
7 Press ▷ or ◀. The tape on deck A starts playing.
To stop dubbing
Press ■ and deck A will stop. Press DECK SELECT to select deck B and Press ■ deck B will stop.
Chapter 5: Sound Adjustment
Adjusting the Sound
Selecting the Audio Emphasis
Adjusting the Audio Emphasis
Making Your Personal Audio Emphasis File (personal file)
Adjusting the Sound
To fully enjoy the sound coming from your stereo system, make the following audio adjustments. See sections following this one for additional sound adjustments.

To adjust the volume
Rotate VOLUME on the unit or press VOL (+/-) on the remote.
To reinforce bass
Press DBFB* repeatedly and choose DBFB or DBFB.
"DBFB ▲|||| " is more effective than "DBFB ▲||".
* DBFB = Dynamic Bass Feedback
To listen through the headphones
Connect the headphones to the PHONES jack. No sound will come from the speakers.
Selecting the Audio Emphasis
Your stereo system has been factory set to five specially recommended audio emphases. Choose from among these five preset settings according to the type of music you are listening to.


1 If the indicator of P.FILE is lit, press P.FILE so that the indicator turns off.
2 Press the desired preset equalizer setting button on the unit or PRESET EQ on the remote repeatedly until the indicator of the desired setting button lights up.
The equalizer setting affects the recording sound level on a tape.
| Press | To get |
| ROCK | Powerful, clear sounds, emphasizing low and high audio |
| POPS | Light, bright sounds, emphasizing high and middle range audio |
| JAZZ | Percussive sounds, emphasizing bass audio |
| CLASSIC | Broad, open sounds with plenty of reverberations |
| DANCE | Sounds similar to a disco by intensifying bass sound |
To cancel the audio emphasis
Press the selected button again (or press PRESET EQ on the remote repeatedly) so that the indicator of the button lights off. Then, "EFFECT OFF" appears in the display.
The audio emphasis except DBFB enhances the recording sound
Therefore, we recommend you to cancel the audio emphasis when recording. If the audio emphasis is on and the sound level of the CD you want to record is very high, the recording sound may become distorted. Otherwise, if you want to record the enhanced sound for special uses such as your car stereo, walkman, etc., turn the audio emphasis on. Also, we recommend you to cancel it when you play a tape recorded with audio emphasis, because the sound may be affected doubly and become distorted if it is left on.
To change the equalizer display
Each time you keep pressing DISPLAY for a few seconds, the equalizer display changes to show one of the four displays below.
If the sound does not come in for about a minute, the spectrum analyzer display turns to a picture. The display is restored when the sound comes in.
![graph TD A["Spectrum analyzer 1"] --> B["Spectrum analyzer 2"] B --> C["Spectrum analyzer 3"] C --> D["Graphic equalizer curve"]](/content/2026/07/1524525/images/211ed282fd317a0ea8a5af52f4267e3be582b968bbf7df06979aaa4c24dbab36.jpg)
frequency range appears in the display, and the level value flashes.
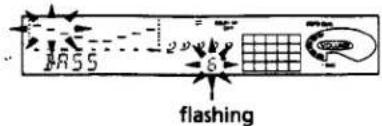
3 Press ▶ or ◀ to select the frequency range you want to change.
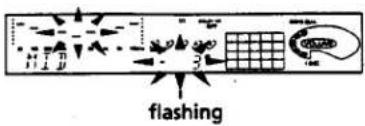
4 Press ▲ or ▼ to raise or lower the level of the frequency range.
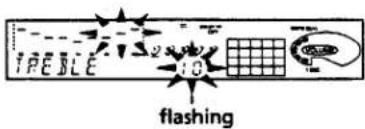
5 Repeat steps 3 and 4 to adjust other frequency ranges.
To create the atmosphere of a movie theater or concert hall
Press SURROUND so that the SUR(||||||||) indicator lights up.
1 Press the desired equalizer setting button.
2 Press SURROUND to activate or deactivate the surround effect to suit your taste.
3 Adjust the sound using CURSOR CONTROL. (See "Adjusting the Audio Emphasis" for details.)
4 Press EQ MEMORY.
"MEMORY" appears and a file number flashes in the display.
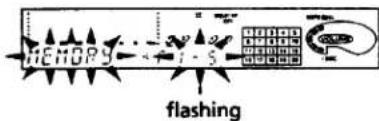
5 Press a file number button that you decide on. "MEMORY" disappears. The adjusted equalizer curve and the surround effect settings are stored at the file number you selected.
To call up the personal file
Press P.FILE so that the indicator of P.FILE lights up and then, press the desired file number button, or press P.FILE on the remote repeatedly.
To hear the effect of the adjustment
Press the selected button repeatedly. You can compare the difference between the adjusted sound (the indicator is lit) and the sound with no equalizer-effect (the indicator is not lit).
Adjusting the Audio Emphasis
This feature lets you arrange the audio emphasis by raising and lowering the level of specific frequency ranges. Use the buttons on the unit to do this operation.

1 Press the desired equalizer setting button.
2 Press one of ◀, ▶, ▲ or ▼ (CURSOR CONTROL).
The graphic equalizer curve and
Making Your Personal Audio Emphasis File (personal file)
You can create a personal file of audio patterns and store them in the memory of the player. Later, call up an audio pattern to play a favourite tape, CD, or radio programme. Create up to five audio files.

Chapter 6:
Additional Features
Falling Asleep to Music
Waking Up to Music
Timer-Recording Radio Programmes
Connecting Optional Equipment
Falling Asleep to Music
You can set the stereo system to turn off automatically so you can go to sleep to music (Sleep timer). Before setting sleep timer, make sure the clock has been set correctly.

1 Play your favourite sound source.
2 Press SLEEP repeatedly to choose how long you want the music to play. "SLEEP" and minutes indication appear in the display. The power will turn off after 90 to 10 minutes depending on the length of time you choose.
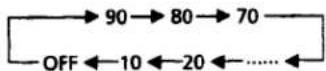
To cancel the sleep timer
Press SLEEP repeatedly until "OFF" appears in the display.
To check the remaining time
Press SLEEP once.
The remaining time appears in minutes for several seconds.
Note
- When the sleep timer is activated, you cannot use the other timer-related function.
Waking Up to Music
You can wake up to music at a preset time. You need only set the timer once. Before setting the timer, make sure the clock has been set correctly. To wake up to the sound of the tuner, preset the station you want to hear beforehand. (See "Presetting Radio Stations".)

1 Prepare the sound source.
To wake up to a radio
Tune in the preset station.
To wake up to the sound of the CD
Insert the CD. If you want to play it from a desired track, make a programme. (See "Playing Tracks in the Desired Order".)
Note
• The stereo system memorizes the last programme you made when you turn off the unit.
To wake up to the sound of the tape
Insert the tape with the side you want to play facing forward. If you insert tapes in both decks, you hear the sound from deck A.
2 Turn VOLUME to adjust the volume.
3 Press TIMER SET.
"SELECT TIMER" appears in the display.
4 Press DAILY.
"DAILY" and "ON" appear and the hour digits flash in the display.

5 Set the hour you want the music to go on by pressing ▲ or ▼ (CURSOR CONTROL), then press ENTER/NEXT. Set the minutes in the same way. "OFF TIME" appears, and the hour digits flash again.

Chapter 6: Additional Features
6 Set the hour you want the music to go off by pressing ▲ or ▼, then press ENTER/NEXT. Set the minutes in the same way, then press ENTER/NEXT.
The sound source flashes.
7 Choose a sound source by pressing ▲ or ▼.
Each time you press the button, the display changes as follows:

8 Press ENTER/NEXT.
The preset items appear in the display sequentially.
9 Press SYSTEM POWER to turn off the system.
At the preset time, the power will go on and the music will play. At the turn-off time, the power will go off again.
To cancel the timer
Press DAILY so that "TIMER" disappears from the display. Press DAILY again to activate the timer.
To check timer settings
Press DAILY twice in succession.
To change timer settings
Repeat steps 1 to 9.
Timer-Recording Radio Programs
You can set the timer to record the radio. This timer works only once for each setting. The volume level is automatically set to the minimum.
Preset the station beforehand. (See "Presetting Radio Stations").
Make sure the clock is set correctly.

1 Press TUNER/BAND repeatedly until the band you want appears in the display.
2 Press TUNING MODE repeatedly until "PRESET" appears in the display.
3 Press TUNING (+/-) (or PRESET (+/-) on the remote) to tune in a preset station.
4 Press TIMER SET.
"SELECT TIMER" appears in the display.
5 Press REC.
"REC" and "ON" appear and the hour digits flash in the display.

6 Set the hour you want to start recording by pressing ▲ or ▼ (CURSOR CONTROL), then press ENTER/NEXT. Set the minutes in the same way. "OFF" appears and the hour digits flash again.
![graph TD A["ON"] --> B{0} B --> C["8"] C --> D["OFF"] D --> E{8+9} E --> F["8+9"] F --> G["off"] style A fill:#f9f,stroke:#333 style D fill:#f9f,stroke:#333 style G fill:#f9f,stroke:#333](/content/2026/07/1524525/images/0ebfc55ddf5b6610a39e68dcb694c38404719453ee0cd6a7478f73f96c17d701.jpg)
7 Set the hour you want to stop recording by pressing ▲ or ▼, then press ENTER/NEXT. Set the minutes in the same way. The preset items appear in the display sequentially.
8 Insert a tape in deck B with the side you want to record facing forward. Recording always starts from the front side. If necessary select the direction mode. You can use TYPE I (normal) or TYPE II (CrO2) tape.
9 Press SYSTEM POWER to turn off the system.
To cancel the timer
Press REC so that "TIMER" disappears from the display. Press REC again to activate the timer.
To check timer settings
Press REC twice in succession.
To change timer settings
Repeat steps 1 to 9.
Note
- The timer does not work if the system power is on.
Connecting Optional Equipment
For greater enjoyment of your stereo system, you can connect other components to the stereo. You can connect:
• a VCR to the VIDEO IN jacks
• a turntable to the PHONO IN jacks
• headphones to the PHONES jack on the front panel
To connect a VCR
1 Connect the VCR or other video equipment to the VIDEO IN jacks.
2 Press FUNCTION repeatedly until "VIDEO" appears in the display. The connected sound source comes through the speakers. You can also record the VCR sound
To connect a turntable
1 Connect the turntable PS-LX56 (optional) to the PHONO IN jacks on the rear panel of the stereo.
2 Press FUNCTION until "PHONO" appears in the display. The turntable sound comes through the speakers.
You can also record the turntable sound.
or Your information
Precautions'
Troubleshooting Guide
Maintenance
Specifications
Index to Parts and Controls
Index
Precautions
If you have any questions or problems concerning your stereo system, please consult your nearest Sony dealer.
On operating voltage
Before operating the stereo system, check that the operating voltage of your stereo system is identical with the voltage of your local power supply.
Operating Voltage
120 V AC, 60 Hz
On safety
- The stereo system is not disconnected from the AC power source (mains) as long as it is connected to the wall outlet, even if the system itself has been turned off.
- Unplug the system from the wall outlet (mains) if it is not to be used for an extended period of time. To disconnect the cord (mains lead), pull it out by the plug. Do not pull the cord itself.
- Should any solid object or liquid fall into the component, unplug the stereo system and have the component checked by qualified personnel before operating it any further.
- Should the AC power cord (mains lead) need to be changed, have it done at a qualified service shop only.
- As the laser beam used in this unit is harmful to the eyes, do not attempt to disassemble the cabinet. Refer servicing to qualified personal only.
- Do not open the disc tray during CD operations. This activates the safety device, stops operations, and starts initializing operations.
On installation
Place the stereo system in a location with adequate ventilation to prevent heat build-up in the stereo system.
On condensation in the CD player component
If the system is brought directly from a cold to a warm location, or is placed in a very damp room, moisture may condense on the lens inside the CD player. Should this occur, the CD player will not operate. Remove the CD and leave the system turned on for about an hour until the moisture evaporates.
To save a tape permanently
To prevent a tape from being accidentally recorded over, break off the cassette tab from side A or B as illustrated. If you later want to reuse the tape for recording, cover the broken tab with adhesive tape.

When you are using a type II (CrO2) cassette, be careful not to cover the detector slots which allow the tape player to automatically detect the type of tape.

Troubleshooting Guide
If you run into any problem using this stereo system, use the following check list. And first check the following points:
• The mains lead is connected firmly.
- The speakers are connected correctly and firmly.
Should any problem persist after you have made the checks below, consult your nearest Sony dealer.
Tuner
"TUNED" flashes in the display.
→ Adjust the aerial.
"STEREO" flashes in the display.
→ Adjust the aerial.
Severe hum or noise.
→ Adjust the aerial.
→ The signal strength is too weak.
Connect the external aerial.
→ Connect the ground wire.
A stereo FM programme cannot be received in stereo.
→ Press STEREO/MONO so that "STEREO" appears.
Tape Player
The tape does not record.
→ No tape in the cassette holder.
→ The tab has been removed from the cassette.
→ The tape has reeled to the end.
The tape does not record nor play back or there is a decrease in sound level.
→ The heads are dirty. Clean them.
→ Magnetic deposits have built-up on the record/playback heads.*
There is excessive wow or flutter, or the sound drops out.
→ The capstans or pinch rollers are contaminated.
The tape does not erase completely.
→ Magnetic deposits have built-up on the record/playback heads.*
Noise increases or the high frequencies are erased.
→ Magnetic deposits have built-up on the record/playback heads.
* See "Maintenance".
CD Player
The CD tray does not close.
→ The CD is not placed correctly.
The CD will not play.
→ The CD is dirty.
→ The CD is inserted label side down.
→ Moisture condensation has built up. Leave the system turned on for about an hour until the moisture evaporates.
Play does not start from the first track.
→ The player is in programme or shuffle mode. Press CONTINUE.
"77" is displayed.
→▶▶▶▶ (or ▶▶▶ on the remote) was repeatedly pressed at the end of the CD. Press ◀◀◀◀◀ (or ◀◀◀ on the remote) to return to the normal display.
General
There is no sound.
→ Rotate VOLUME clockwise.
→ The headphones are connected.
Disconnect them.
Sound comes from one channel or unbalanced left and right volume.
→ Check the speaker connections of the inoperative channel.
The left and right sound are reversed.
→ Check the speaker connection and speaker placement.
Bass is lacking or the location of the musical instruments is apparently imprecise.
→ Check the speaker connection for proper phasing.
There is severe hum or noise.
→ TV or VCR is too close to the stereo
system. Move the stereo system away from the TV or VCR.
"0:00" ("12:00 AM") flashes in the display.
→ A power interruption occurred. Set the clock and preset radio stations again.
The remote does not function.
→ The batteries have run down.
Replace both batteries.
→ There is an obstacle between the remote and the system. Remove the obstacle.
Maintenance
To clean the tape heads and tape path
Contaminated tape heads cause poor recording or sound drop-out in playback. We recommend cleaning after every 10 hours of operation.
Open the cassette holder and wipe the heads, the pinch rollers and the capstans with a cleaning swab slightly moistened with cleaning fluid or alcohol. Wipe the parts shown below:
Deck A

Deck B

Insert a tape when the areas cleaned are completely dry.
To demagnetize the tape heads
After 20 to 30 hours of use, enough residual magnetism will have built up on the heads to begin to cause loss of high frequencies and hiss. At this time, demagnetize the heads and all metal parts in the tape path with a commercially available tape head demagnetizer. Refer to the instructions of
the demagnetizer.
To clean the cabinet
Use a soft cloth slightly moistened with mild detergent solution.
To clean the CD
When a CD is dirty, clean it with a cleaning cloth. Wipe the CD from the centre out.
Notes on CD
- Do not use solvents such as benzene, thinner, commercially available cleaners, or anti-static spray intended for vinyl LPs.
- If there is a scratch, dirt or fingerprints on the CD, it may cause a tracking error.
Specifications
AUDIO POWER SPECIFICATIONS
POWER OUTPUT AND TOTAL HARMONIC DIS- TORTION:
With 8 ohm loads, both channels driven, from 70 - 20,000 Hz; rated 100 watts per channel minimum RMS power, with no more than 0.9 % total harmonic distortion from 250 milliwatts to rated output.
CD player section
System Compact disc digital audio system
Laser Semiconductor laser
Wavelength 780 – 790 nm
Tuner section
FM stereo, FM/AM superheterodyne tuner
FM tuner section
Tuning range 87.5 - 108.0 MHz
Antenna FM wire antenna
Antenna terminals 75 ohm unbalanced
Intermediate frequency
10.7 MHz
AM tuner section
Tuning range
AM: 530 - 1,710 kHz (with the tuning interval set at 10 kHz) 531 - 1,602 kHz (with the tuning interval set at 9 kHz)
Antenna
AM loop antenna External antenna terminals
Intermediate frequency 450 kHz
Cassette deck section
Recording system
4-track 2-channel stereo
Frequency response
(DOLBY NR OFF)
40 - 13,000 Hz (±3 dB), using
Sony TYPE I cassette
40 - 14,000 Hz (±3 dB), using
Sony TYPE II cassette
Wow and flutter
±0.15% W.Peak (IEC)
0.1% W.RMS (NAB)
±0.2% W.Peak (DIN)
Amplifier section
Continuous RMS power output:
100 W+100 W, (8 ohms at 70 -
20,000Hz, 0.9% THD)
inputs
PHONO (phono jack):
Sensitivity 3 mV, impedance
47 kilohms
VIDEO (phono jack):
Sensitivity 300 mV, impedance
47 kilohms
Outputs
'HONES (phone jack):
accept headphones of 8 ohms or more.
PEAKER: accept impedance of 8 to 16
ohms.
speaker section (SS-D560)
peaker system 3-way system
Dimensions
Approx. 270 × 476 × 235 mm
(103/4×183/4×93/8 inches)
(w/h/d)
lass Approx. 5.4 kg (11 lb 15 oz) net
per speaker
upplied accessories
.M loop antenna (1)
emote RM-S300L (1)
ony SUM-3 (NS) batteries (2)
M wire antenna (1)
ieneral
Power requirements
120 V AC, 60Hz
Power consumption
195 w
imensions
Approx. 355 × 425 × 405 mm
(14× 163 / 4× 16 inches) (w / h / d)
incl. projecting parts and controls
lass Approx. 12.0 kg (26 lb 7 oz)
esign and specifications subject to change without notice.
Index to Parts and Controls
Refer to the pages indicated in parentheses for details on how to use the controls.
Front Panel
Tuner section

① SLEEP button (19)
② SYSTEM POWER switch (19)
3 Remote sensor
4 Display window (24)
⑤ CURSOR CONTROL buttons (6, 18, 19, 20)
6 TUNING (+/-) buttons (10, 20)
7 TUNING MEMORY button (11)
8 TUNING MODE button (10, 20)
9 TIMER SET button (19)
10 DAILY button (19)
11 REC button (20)
12 CLOCK SET button (6)
13 ENTER/NEXT button (6, 19)
14 DISPLAY button (6, 8,18)
15 TUNER/BAND button (10, 15)
Amplifier section

① PHONES jack (18, 22)
2 Preset equalizer setting buttons (18)
③ EQ MEMORY button (19)
4 P.FILE button (19)
⑤ VOLUME control (8, 18, 21)
6 FUNCTION button (7,12)
7 DBFB button (17)
8 SURROUND button (18)
Tape player section

① ▷ (front side play)
◀ (reverse side play) buttons (12)
② ▶▶ (fast rightward)
◀◀ (fast leftward) buttons (12)
3 ■ (stop) button (12)
4 (pause) button (deck B only) (12)
5 HIGH SPEED DUBBING button (16)
6 CD SYNCRO button (13)
7 ● REC button (deck B only) (13)
8 DIRECTION MODE button (12)
9 DOLBY NR selector (12)
10 EJECT button (12)
11 Cassette compartments (12)
12 DECK SELECT button (12)
13 TAPE button (12)
14 TAPE REWIND button (12)
CD player

1 ▷ (play) button (7)
2 ◀◀◀◀/▶▶▶▶ (AMS) buttons (7)
3 ■ (stop) button (7)
4 00 (pause) button (7)
5 DISC SELECT 1 - 5 buttons (8)
6 Disc tray (7)
⑦ DISC SKIP button (7)
8 ≅ OPEN/CLOSE button (7, 14)
9 CD button (8, 14)
Rear Panel

① FM 75Ω terminal (4)
2 AM terminal (4)
③ PHONO IN jacks (4)
④ VIDEO IN jacks (20)
5 SPEAKER connectors (4)
6 ground terminal (4)
⑦ AC power cord (4)
Display Window
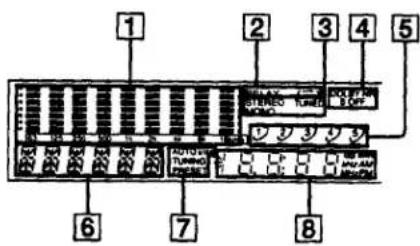

① Spectrum analyzer (18)
② Tape direction indications (12)
3 Tuner indication (10)
4 DOLBY NR indication (12)
5 Disc calendar (7)
⑥ Band/disc/track indications (7, 10, 14, 18, 19)
7 AUTO/TUNING/PRESET/STEP indication (10)
⑧ Frequency/playing time indications (6, 7, 11, 14, 18, 19)
⑨ TIMER DAILY/REC/SLEEP indications (19)
10 DBFB indication (17)
11 SURROUND indication (18)
12 Music calendar (7)
13 CD play mode indication (7)
14 VOLUME indication (7)
Remote

① DISPLAY button (6)
② FUNCTION button (9)
③ BAND button (10, 15)
4 STEREO/MONO button (10)
5 REPEAT button (9)
6 CD PLAY button (9)
7 SHUFFLE button (8)
8 CONTINUE button (7)
⑨ CHECK button (9)
10 TAPE PLAY button (12)
11 CD/TAPE operating buttons
◀▶(play)(7,12)
◀ (fast leftward)/
▶▶ (fast rightward) (12)
AMS * (7)
II (pause) (7, 12)
■ (stop) (7, 12)
* AMS: Automatic Music Sensor.
12 SYSTEM POWER button (8)
13 SLEEP button (19)
14 PRESET (+/-) buttons (10, 20)
15 DISC SKIP button (9)
16 PROGRAM button (9)
17 CLEAR button (9)
18 EDIT button (14)
19 DECK SELECT button (12)
20 PRESET EQ button (17)
21 P.FILE button (18)
22 VOL (volume) buttons (7, 17, 19)
Index
AMS 8
Antnna 4
CD player 7
Clock setting 6
Connecting
the stereo 4
optional equipment 20
Dubbing 16
Inserting batteries 6
Maintenance 22
Multi-disc play 7
Music calendar 7
Normal play 7
Parts identification 23
Personal file 18
Playing
a CD (normal play) 7
a tape 12
preset radio stations 11
several CDs 7
tracks in random order
(shuffle play) 8
tracks in specific order
(programme play) 8
tracks repeatedly 9
Program play 8
Radio stations
presetting 11
tuning in 10
Recording
a CD 13
a radio program 15
another tape (dubbing) 16
Recording CDs
specifying tape length 14
Relay play 12
Repeating CD tracks 9
Scanning stored stations 11
Shuffle play 8
Sleep timer 19
Sound adjusting 18
Tape player 12
Timer
falling asleep to music 19
timer recording 20
waking up to music 19
Tuner playing 10

- COMPACT HI-FI STEREO SYSTEM
- WARNING
- TO PREVENT FIRE, OR SHOCK HAZARD, DO NOT EXPOSE THE UNIT TO RAIN OR MOISTURE
- INFORMATION
- CAUTION
- NOTE TO CATV INSTALLER
- OWNER'S RECORD
- BEFORE OPERATING THE UNIT
- TO RE-INSTALL THE TRANSIT KEY WHEN TRANSPORTING THE UNIT
- WELCOME
- TABLE OF CONTENTS
- CHAPTER 1: SETTING UP
- CHAPTER 2: THE CD PLAYER
- CHAPTER 3: THE RADIO
- CHAPTER 4: THE TAPE PLAYER
- CHAPTER 5: SOUND ADJUSTMENT
- CHAPTER 6: ADDITIONAL FEATURES
- FOR YOUR INFORMATION
- CHAPTER
- SETTING UP
- CONNECTING THE STEREO
- STEP 1 CONNECTING THE SPEAKERS
- STEP 2 CONNECTING THE ANTENNA
- TO IMPROVE THE FM RECEPTION
- IMPORTANT
- TO IMPROVE THE AM RECEPTION
- STEP 3 CONNECTING THE POWER
- INSERTING THE BATTERIES
- BATTERY LIFE
- TO AVOID BATTERY LEAKAGE
- SETTING THE CLOCK
- THE CD PLAYER
- PLAYING CDS (NORMAL PLAY)
- → CONTINUED
- TO CHECK THE REMAINING OR TOTAL PLAYING TIME
- NOTE
- ONE TOUCH PLAY FEATURE
- LOCATING A SPECIFIC TRACK
- LOCATING A PARTICULAR POINT IN A TRACK
- LOCATING A SPECIFIC CD
- TO LOCATE THE BEGINNING OF A PARTICULAR CD AND START PLAYING
- TO CHANGE TO THE NEXT CD
- PLAYING TRACKS IN RANDOM ORDER (SHUFFLE PLAY)
- TO STOP PLAYING
- TO CANCEL SHUFFLE PLAY
- TO SELECT THE DESIRED CD
- PLAYING TRACKS IN THE DESIRED ORDER (PROGRAM PLAY)
- TO CHANGE THE ORDER OF PROGRAMMED TRACKS
- PLAYING TRACKS REPEATEDLY (REPEAT PLAY)
- REPEATING A SINGLE TRACK (IN NORMAL PLAY ONLY)
- THE RADIO
- LISTENING TO THE RADIO
- WHEN THE DESIRED STATION IS NOT TUNED IN
- TO CHANGE THE AM TUNING INTERVAL
- PRESETTING RADIO STATIONS
- TO ERASE A STORED STATION
- IF YOU HAVE TROUBLE STORING A STATION
- PLAYING PRESET RADIO STATIONS
- TO PLAY BOTH DECKS IN SUCCESSION (RELAY PLAY)
- TO STOP RELAY PLAY PRESS
- RECORDING A CD
- RECORDING A CD AUTOMATICALLY
- TO STOP RECORDING PRESS
- RECORDING A CD MANUALLY
- RECORDING A CD: SPECIFYING TAPE LENGTH (TIME EDIT)
- TO SELECT THE DESIRED TRACKS BEFOREHAND
- RECORDING A CD: SPECIFYING TRACK ORDER (PROGRAM EDIT)
- RECORDING FROM THE RADIO
- RECORDING FROM ANOTHER TAPE (DUBBING)
- DUBBING ANOTHER TAPE AUTOMATICALLY
- TO STOP DUBBING
- DUBBING ANOTHER TAPE MANUALLY
- ADJUSTING THE SOUND
- SELECTING THE AUDIO EMPHASIS
- TO CHANGE THE EQUALIZER DISPLAY
- TO CREATE THE ATMOSPHERE OF A MOVIE THEATER OR CONCERT HALL
- TO CALL UP THE PERSONAL FILE
- TO HEAR THE EFFECT OF THE ADJUSTMENT
- ADJUSTING THE AUDIO EMPHASIS
- MAKING YOUR PERSONAL AUDIO EMPHASIS FILE (PERSONAL FILE)
- ADDITIONAL FEATURES
- FALLING ASLEEP TO MUSIC
- TO CANCEL THE SLEEP TIMER
- TO CHECK THE REMAINING TIME
- WAKING UP TO MUSIC
- TO WAKE UP TO A RADIO
- TO WAKE UP TO THE SOUND OF THE CD
- TO WAKE UP TO THE SOUND OF THE TAPE
- TO CANCEL THE TIMER
- TO CHECK TIMER SETTINGS
- TO CHANGE TIMER SETTINGS
- TIMER-RECORDING RADIO PROGRAMS
- CONNECTING OPTIONAL EQUIPMENT
- TO CONNECT A VCR
- TO CONNECT A TURNTABLE
- OR YOUR INFORMATION
- PRECAUTIONS
- TROUBLESHOOTING GUIDE
- MAINTENANCE
- SPECIFICATIONS
- INDEX TO PARTS AND CONTROLS
- INDEX
- ON OPERATING VOLTAGE
- OPERATING VOLTAGE
- ON SAFETY
- ON INSTALLATION
- ON CONDENSATION IN THE CD PLAYER COMPONENT
- TO SAVE A TAPE PERMANENTLY
- TUNER
- TUNED" FLASHES IN THE DISPLAY
- STEREO" FLASHES IN THE DISPLAY
- SEVERE HUM OR NOISE
- A STEREO FM PROGRAMME CANNOT BE RECEIVED IN STEREO
- TAPE PLAYER
- THE TAPE DOES NOT RECORD
- THE TAPE DOES NOT RECORD NOR PLAY BACK OR THERE IS A DECREASE IN SOUND LEVEL
- CD PLAYER
- GENERAL
- CASSETTE DECK SECTION
- AMPLIFIER SECTION
- SPEAKER SECTION (SS-D560)
- UPPLIED ACCESSORIES
- IENERAL
- FRONT PANEL
Brand : SONY
Model : LBT-D560
Category : Hi-Fi System