CWD1510W - Washing machine EDGESTAR - Free user manual and instructions
Find the device manual for free CWD1510W EDGESTAR in PDF.


| Product Type | Portable Washing Machine |
| Brand | EdgeStar |
| Model | CWD1510W |
| Capacity | 1.5 cu ft |
| Dimensions (W x D x H) | 20.5 x 20.5 x 32.5 inches |
| Net Weight | 50 lbs |
| Power Supply | 120V, 60Hz, 10A |
| Water Connection | Cold water only, garden hose adapter |
| Drain Type | Gravity drain or built-in pump |
| Wash Cycles | Normal, Heavy, Gentle, Quick |
| Water Level Options | Low, Medium, High |
| Spin Speed | Up to 700 RPM |
| Lint Filter | Removable and washable |
| Safety Features | Child lock, unbalanced load detection, overflow protection |
| Construction | Stainless steel tub, ABS plastic body |
| Operating Noise | ≤ 60 dB (during wash) |
| Energy Consumption | ~350 kWh/year |
| Water Consumption | ~10 gallons per load |
| Maintenance | Clean lint filter after each use; check hoses monthly |
| Repair Parts Availability | Hoses, pump, belt, lid switch, control board |
| Warranty | 1 year limited |
Frequently Asked Questions - CWD1510W EDGESTAR
User questions about CWD1510W EDGESTAR
0 question about this device. Answer the ones you know or ask your own.
Ask a new question about this device
Download the instructions for your Washing machine in PDF format for free! Find your manual CWD1510W - EDGESTAR and take your electronic device back in hand. On this page are published all the documents necessary for the use of your device. CWD1510W by EDGESTAR.
USER MANUAL CWD1510W EDGESTAR
CWD1510W
Owner's Manual
For more information on other great EdgeStar products on the web, go to http://www.edgestar.com
IMPORTANT SAFETY INFORMATION
Improper handling can cause serious damage to the EdgeStar combo and/or injury to the user. This combo washer/dryer is designed for domestic indoor use only. Do not use the unit for industrial or commercial use. Any other use may invalidate the warranty. Please review the ratings label located on the rear panel of the unit for electrical and other technical data related to this unit. The unit must be used in a properly grounded wall outlet. Please read and follow the safety information listed below to reduce the risk of fire, electric shock or injury.
! WARNING

Electrical Shock Hazard
Connect to a grounded 3 prong outlet with an individual 15 amp branch circuit protected by a 15 amp circuit breaker. Connect to individual branch circuit. Do not remove ground prong. Do not use an adapter. Do not use an extension cord. Failure to follow these instructions can result in electrical shock, fire, or death.
Electrical Safety
- Do not exceed the power outlet ratings.
- It is recommended that the combo washer/dryer be connected on its own circuit.
- A standard electrical supply (115 V, 60Hz), that is properly grounded in accordance with the National Electrical Code and local codes and ordinances is required.
- Do not use outlets that can be turned off by a switch or pull chain.
• Always turn the unit off and unplug it from the outlet when cleaning. - Unplug the unit if it is not going to be used for an extended period of time.
- Do not operate the unit with a power plug that is missing the ground plug, a damaged cord or a loose socket.
- Be sure the combo is properly grounded.
• Never plug or unplug the unit with wet hands.
- Do not bypass, cut or remove the grounding plug.
- Do not use extension cords or power strips with this unit. You may need to contact your electrician if it is necessary to use a longer cord or if you do not have a grounded outlet. Do not modify the power cord's length or share the outlet with other appliances. If you must use an extension cord, use No.14AWG minimum size and rated no less than 1875 watts.
- Do not start or stop the unit by switching the circuit's power on and off.
- If the power cord is damaged, it must be replaced by the manufacturer or a qualified technician.
- Never repair the unit while it is plugged in.
- Immediately unplug the unit if it makes strange sounds, emits an odor or smoke comes out of it, and contact customer service.
- Do not remove any part of the casing unless instructed by an authorized technician.
- You should never attempt to repair the unit yourself.
- Contact EdgeStar Support if the unit needs repair service.
- Before the appliance is removed from service or discarded, remove the door and cut off the power cord.
Note:
- The Important Safeguards and Warnings indicated in this manual do not cover all possible conditions which may occur. Common sense, caution and care must be exercised when installing, maintaining or operating the washing machine.
- Always contact your dealer or service agent or the manufacturer about any problems or conditions that you do not fully understand.

General Safety
- Do not wash articles that have been previously cleaned in, washed in, soaked in, or spotted with gasoline, dry-cleaning solvents, or other flammable or explosive substances, as they give off vapors that could ignite or explode.
- Do not add gasoline, dry-cleaning solvents, or other flammable or explosive substances to the wash water. These substances give off vapors that could ignite or explode.
- Under certain conditions, hydrogen gas may be produced in a hot-water system that has not been used for 2 weeks or more. HYDROGEN GAS IS EXPLOSIVE. If the hot-water system has not been used for such a period, before using a washing machine, turn on all hot-water faucets and let the water flow from each for several minutes. This will release any accumulated hydrogen gas. As the gas is flammable, do not smoke or use an open flame during this time.
- Always unplug the washing machine from the power supply before attempting any service. Disconnect the power cord by grasping the plug, not the cord.
- To reduce the risk of fire-clothes, cleaning rags, mop heads and the like which have traces of any flammable substance, such as vegetable oil, cooking oil, petroleum based oils or distillates, waxes, fats, etc., must not be placed in the washing machine. These items may contain flammable substances which, even after washing, may smoke or ignite in the dryer mode.
- Do not allow children to play on or in the appliance.
- Pets and children may climb into the machine. Check the machine before every operation.
- Glass door or protector may be very hot during operation. Keep children and pets far away from the machine during the operation.
- This machine is not intended for use by persons (including children) with reduced physical, sensory or mental capabilities, or lack of experience and knowledge, unless they have been given supervision or instruction concerning use of the machine by a person responsible for their safety.
- Do not wash fiberglass materials in this unit (such as curtains and window coverings that use fiberglass materials). Small particles may remain in the washing machine and stick to fabrics in subsequent wash loads causing skin irritation.
- Do not reach into the appliance if the tub or agitator is moving.
- Do not install or store this appliance where it will be exposed to the weather.
- Do not tamper with controls.
- Do not repair or replace any part of the appliance or attempt any servicing unless specifically recommended in the user-maintenance instructions or in published user-repair instructions that you understand and have the skills to carry out.
- Never stop a tumble dryer before the end of the program. Always allow the unit to complete the cool down cycle to prolong the life of the unit.
- Disconnect from the power socket before cleaning or maintenance.
- Make sure that all pockets are emptied. Remove all foreign objects from pockets of clothing.
-
Sharp and rigid items such as coins, nails, screws, stones etc. may cause serious damage to this machine.
-
Disconnect power and water supply after operation. Pull out its plug and cut off water supply after the operation. Please check whether the water inside the drum has been drained before opening its door. Please do not open the door if there is any water visible.
- Do not try to repair any internal components by yourself, contact a qualified service technician for non-user repair issues.
- If the plug (power cord) is damaged, it shall be replaced by the manufacturer or a service agent to avoid any danger.
- This machine shall be repaired only by an authorized service center. Only genuine replacement parts should be used.
- This appliance is intended for use only with fabrics that have been washed with water as a cleaning agent.
- To reduce the risk of fire, do not dry articles containing foam rubber or similarly textured materials.
- If connected to a circuit protected by fuses, use time-delay fuses with this appliance.
- Do not climb up and sit on the top cover of the machine.
- Do not lean against the machine door.
- Please do not close the door with excessive forces. If it is found difficult to close the door, please check for obstruction.
Before operating this machine
- IMPORTANT: Before operating this machine, all packaging and transport "shipping" bolts must be removed. Otherwise, the washing machine may be seriously damaged during operation. Please review instructions to ensure proper removal of transportation "shipping" bolts.
- Packing materials may be dangerous to children. Please keep all packing materials out of children's reach.
- Washing machine shall not be installed in bath room or very wet rooms as well as in the rooms with explosive or caustic gases.
- Make sure that the water and electrical connections are in accordance with the installation instructions and local safety regulations.
- Before washing clothes for the first time, the washing machine should be operated in cotton cycle with hot water to remove any contaminants.
- This washing machine is for indoor use only.
Table of Contents
IMPORTANT SAFETY INFORMATION......I
INTRODUCTION ....1
PARTS IDENTIFICATION....2
FRONT VIEW 2
BACK VIEW 3
DETERGENT DISPENSER 4
PREPARATION FOR INSTALLATION....4
ELECTRICAL REQUIREMENTS 5
LOCATION REQUIREMENTS....5
INSTALLATION CLEARANCES 6
Washer Dimensions: 6
TOOLS AND PARTS....7
REMOVE TRANSPORT BOLTS....7
UIINSTALLATION 7
CONNECT INLET PIPE....8
INSTALL INLET PIPE 8
DRAIN SYSTEM OPTIONS: 9
Standpipe drain system....9
Laundry tub drain system 9
Floor drain system....9
LEVEL THE WASHER....10
OPERATING INSTRUCTIONS....12
CONTROL PANEL OVERVIEW 12
Control Knob 12
LED DISPLAY 14
TIPS BEFORE WASHING 16
Washing/Drying Capacity: 18
Start up washing machine....19
Cycle Guide 20
CARE AND MAINTENANCE 20
CLEANING THE EXTERIOR OF THE UNIT 21
CLEANING THE INTERIOR OF THE UNIT 21
CLEANING DETERGENT DISPENSER....21
CLEAN INLET FILTER 22
REMOVE FOREIGN MATTERS FROM COIN TRAP 22
TROUBLESHOOTING TIPS 23
TROUBLESHOOTING TIPS CONTINUED....24
This owner's manual is provided for reference use only. Specifications may change without prior notice. Refer to the product label on the back of your combo for the latest technical information.
INTRODUCTION
Thank you for purchasing this EdgeStar combo washer/dryer. We are glad you chose us. We believe that your purchase of this product opens a relationship between you and EdgeStar. We will provide the customer support needed to nurture that relationship.
This manual contains important information regarding the proper installation, use and maintenance of your combo. Following this manual will ensure that your product will work at its peak performance and efficiency.
Please save the original product packaging in case you need to safely transport your Combo Washer/Dryer.
For Your Records:
Please write down the model number and serial number below for future reference. Both numbers are located on the ratings label on the back of your unit and are required to obtain warranty service. You may also want to staple your receipt to this manual as it is the proof of your purchase, and is also needed for service under your warranty.
Model Number: ____
Serial Number: ____
Date of Purchase: ____
To better serve you, please do the following before contacting customer service:
- If you received a damaged product, immediately contact the dealer that sold you the product.
- Read and follow this instruction manual carefully to help you install, use and maintain your combo washer/dryer.
- Read the troubleshooting section of this manual as it will help you diagnose and solve common issues.
- Visit us on the web at http://www.edgestar.com to register your product, download product manuals, and access additional troubleshooting resources and up-to-date information.
- If you need warranty service, our friendly customer service representatives are available via email at service@edgestar.com or by telephone at 1 (866) 319-5473.
PARTS IDENTIFICATION
Front View

Detergent Dispensing Drawer- There are three compartments: prewash, main wash, and fabric softener.
② Glass Door- Extra-large door with lock. Door automatically locks during operation and features a delay to prevent the door from being opened until water level has lowered and the washer interior has cooled.
③ Leveling Feet- The unit comes with four adjustable leveling feet for spaces with uneven floors. Combo Washer should always be level to efficiently operate.
4 Coin Trap- Objects that either come loose from clothing or were in pockets will pass through wash cycle and end up in the coin trap. The coin trap should be cleared out regularly.
Large Capacity Stainless-Steel Drum- Extra-large capacity drum to efficiently wash and dry. Note: To properly wash and dry the unit should not be overloaded.
6 Control Panel with LED Display-LED Display Panel and Control Dial allow you to choose the correct setting and customize your wash cycle.
Back View

①
Electrical Plug- This unit is supplied with a three prong plug. Please check electrical requirements before connecting the unit.
②
Drain Hose- The drain hose directs the flow of water after the wash cycle. The drain hose should always be properly secured to avoid risk of flooding and/or property damage.
③
Water Inlet Valve- There are two water inlet valves: The left side is hot and the right side is cold. Connect the two hoses bundled with the unit to the tap connection.
Detergent Dispenser
Your washing machine is designed for use with only High-Efficiency (HE) detergents. They are formulated specifically for front-load washers and contain suds-reducing agents.
Using a regular detergent that is not High-Efficiency may cause oversuding and may affect the unit's performance.

Designed specially to use only HE (High-Efficiency) detergent

① Release Tab- To remove the dispenser drawer from unit, push down on the release tab and pull drawer out.
② II -Main Detergent and Bleach Compartment
③ -Fabric Softener Compartment
④ I -Pre-Wash Detergent
PREPARATION FOR INSTALLATION
Electrical Requirements
Failure to follow electrical requirements can cause personal injury, fire, or electrical shock. Install the combo washer/dryer according to the manufacturer's instructions and local codes. To reduce the risk of severe injury or death, follow all installation instructions. Save these instructions even after installation is complete.
Note: When you plan to dispose of this machine in the future, please comply with the local waste disposal regulations. Remove the door so that children and pets will not be trapped in the machine.
- Properly ground in accordance with all local codes and ordinances. If there is a short circuit, proper grounding can reduce the danger of electrical shock.
- It is the responsibility and obligation of the product owner to have a proper outlet installed by a qualified technician.
• This washer is equipped with a properly grounded 3 prong plug. - Do not remove ground prong. Do not use an adapter or extension cord. Plug into a grounded 3 prong outlet.
- Do not overload the outlet with more than one appliance.
Location Requirements
Selecting the proper location for your washer improves performance and minimizes noise and possible washer "walk". Your washer can be installed under a custom counter, or in a basement, laundry room, closet, or recessed area. Proper installation is your responsibility.
You will need:
- A water heater set to deliver 120°F (49°C) water to the washer.
- A grounded electrical outlet located within 6 ft. (1.8 m) of where the power cord is attached to the back of the washer. See "Electrical Requirements."
- Hot and cold water faucets located within 4 ft. (1.2 m) of the hot and cold water fill valves, and water pressure of 20 - 100 psi (137.9 - 689.6 kPa).
- A level floor with a maximum slope of 1" (25 mm) under entire washer.
- Washer should be installed on a rigid, dry, and level surface. Soft floor surfaces such as carpets or surfaces with foam backing are not recommended.
- A sturdy and solid floor to support the washer with a total weight (water and load) of 200 lbs.
- Store and install the washer where it will not be exposed to outdoor weather conditions.
- Do not operate your washer in temperatures below 32° F ( 0° C). Some water can remain in the washer and can cause damage in low temperatures.
- Avoid direct sunlight and make sure there is sufficient ventilation.
- Keep far away from heat sources such as coal or gas.
- Ensure unit is not setting directly on power cord and that the cord is readily accessible.
Installation clearances
- The location must be large enough to allow the washer door to be fully opened.
- Additional spacing should be considered for ease of installation and servicing. The door opens more than 90°, and it is not reversible.
- Additional clearances might be required for wall, door, and floor moldings.
- Additional spacing of 1 inch on all sides of the washer is recommended to reduce noise transfer
- Make sure the combo is installed in a location where you are able to access the electrical outlet.
Washer Dimensions:

The dimensions shown are for recommended spacing and custom undercounter installation.

PARTS INCLUDED
Water Hoses (2)

Transportation
"Shipping" Plugs


NOTE: As you unpack your unit you may find some residual water in the drum and/or coin trap as we test all of our units for quality assurance.
Tools and Parts
Gather the required tools and accessories (Water hoses (2), Transportation "Shipping" Plugs and wrench are supplied with unit) before starting installation.
- 1/4" nut driver or a ratchet with a 1/2" socket
• 11/16" open-end wrench - Needle nose vise grips
- Carpenter's level
• Water Hoses (2)- provided in drum - Cable Tie
- Transportation "Shipping" Hole Plugs (4)- provided in drum
Unpacking the washing machine
Unpack your washer/dryer combo and inspect for damage that may have occurred during transportation. If there is any damage to the washing machine or any item is missing, please contact your dealer immediately. Important, you will need all of your packaging including transportation “shipping” bolts if you need to send back to manufacturer.
Dispose of the packing materials: The packing materials of this machine may be dangerous to children. Once you have inspected machine and find unit satisfactory, please dispose of them properly. Please dispose of the related packing materials according to the relevant local regulations.
Remove transport bolts
Before using this washing machine, transport "shipping" bolts must be removed from the backside of this machine. Please follow the steps below to remove the transport bolts:
- Loosen all bolts and completely remove them along with the bushings (bearings).
- Cover the holes with transport hole plugs.
- Important- Keep the transport "shipping" bolts in case you need for future use.

INSTALLATION
Connect inlet pipe
①
Connect the inlet pipe as indicated in the figure below.
Connect the hot inlet valve to the hot water tap and cold inlet valve to the cold water tap.


Install inlet pipe
②
Connect the elbow to the inlet valve at the backside of washing machine and fasten it turning clockwise. Connect the other end of inlet pipe to the tap and fasten the pipe tightly clockwise.

Note: After connection, if there is any leakage from hose, then repeat the steps to connect inlet pipe. The most common type of tap should be used to supply water. If tap is square or too big, a new tap is required.
Drain System Options:
Standpipe drain system - wall or floor (views A & B) - The standpipe drain requires a minimum diameter of 2" (50 mm). The minimum carry-away capacity can be no less than 17 gal. (64 L) per minute. The top of the standpipe must be at least 24" and no higher than 39" from the bottom of the washer.


Laundry tub drain system (view C) - The laundry tub needs a minimum 20 gal. (76 L) capacity. The top of the laundry tub must be at least 24" above the floor.

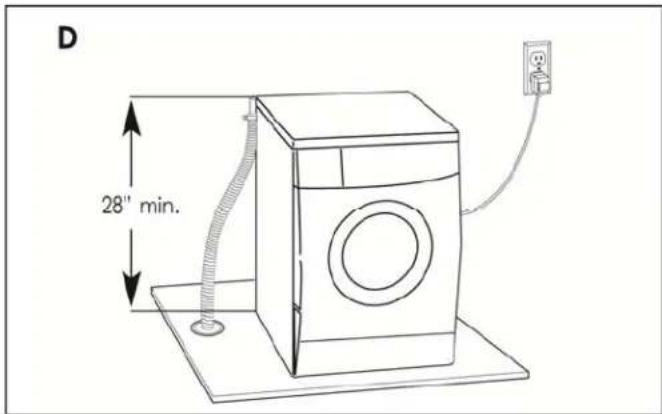
Floor drain system (view D) - The floor drain system requires a siphon break that may be purchased separately. The siphon break must be a minimum of 28" (710 mm) from the bottom of the washer. Additional hoses may be needed.
Level the washer
When positioning the washer/dryer combo, please first check if the legs are closely attached to the cabinet. If not, please turn them to their original positions by hand or with wrench and tighten the nuts with wrench.
After positioning the washing machine, apply pressure on each corner of the combo in sequence. If the unit is unstable when being pressed, the legs must be adjusted to level the machine.


Ensure the positioning status of the machine. Loosen the lock nut with a wrench and turn the leg by hand until it tightly contacts the floor. Hold the leg with one hand and fasten the nut closely to the cabinet with the other hand.
After being locked properly, press down on each corner of unit again to make sure that they have been adjusted properly. If it is still unstable, repeat steps above until unit has no give. At this time, double check by placing a level on top surface of the unit to ensure unit is properly adjusted.

Electrical Connection
- As the maximum current through the unit is 12A when you are using its heating function, please make sure the power supply system (current, power voltage and wire) at your home can meet the normal loading requirements of the electrical appliances.
- Please connect the power to a socket which is correctly installed and properly grounded.
- Make sure the power supply voltage is compatible with the machine's rating label.
- Power plug must match the socket and cabinet must be properly and effectively grounded.
- Do not use a multi-purpose plug or socket as an extension cord.
- Do not touch the electrical cord or plug with wet hands.
- When disconnecting hold the plug tightly and pull. Do not pull power cord forcibly.
- If power cord is damaged or has any sign of wear, a suitable cord must be purchased from manufacturer or service center for replacement.
OPERATING INSTRUCTIONS
Please read the operation instructions carefully to avoid unnecessary service calls and damages to clothes.
Control Panel Overview
Control Knob

Power- Press to start the display panel. If the display is active, press to put the washer into standby mode.
Start/Pause- Press to start desired wash cycle. If the washer is running, pressing it once will pause the washer, press again and hold until two beeps are heard. The door will unlock to add garments. Once garments are loaded, shut the door and press again to restart the wash cycle. NOTE: If the washer is paused and the cycle is not restarted within 10 minutes, the current wash cycle will be cancelled.
Wash Cycles
NOTE: To add dry cycle to any wash cycle press the "Add Dry Time" on the LED control panel.
Cotton/Normal- Select this option for normally soiled cottons and mixed fabrics. The washing period is longer and washes with more agitation. Recommended fabric types- Cotton, jeans, linen, towels, shirts, sheets, etc.
Bulky/ Large- Select this option for larger items such as blankets and comforters. The washing period is longer for this cycle.
Permanent Press- Select this option for articles that have been treated with a chemical to reduce wrinkles. In order to maintain the treated fabric, the dryer will dry at a lower temperature and the machine will wash with less agitation. Recommended article types- Dress shirts/pants, wrinkle free clothing, poly/cotton blend clothing, table cloths, etc.
Delicate- Select this option for fabrics/articles that are more delicate. In this setting your clothes will wash at a lower temperature and a dry cycle cannot be added. Recommended fabric types- Dress shirts/blouses, nylons, sheer or lacy garments.
Hand Wash/ Wool: Select this cycle to wash the wool textiles labeled with "Machine Wash" only. It is suggested to wash only small loads and with wool-safe detergent. In this cycle the tumble action will agitate less and will be at a lower spin speed.
Baby Wear- Select this cycle for lightly soiled or brand new clothing. In this cycle you cannot add a prewash or choose soil level.
Speed Wash- Select this option for baby clothes and people with skin allergies. The wash cycle will automatically have an extra rinse.
Self-Clean- Run the self-clean regularly to remove detergent buildup and other residue from the machine itself. This setting will provide extra high temperature sterilization and help maintain the life and efficiency of this unit.
NOTE: Do not use this cycle with clothes, and do not add detergent or fabrics softener.
Rinse & Spin- Select this option to rinse and spin a load separately from a regular cycle. This can be helpful in preventing fresh stains from setting in fabrics.
Spin- Select this option to spin a load separately from a regular cycle.
Dry Only Cycles
NOTE: The door will remain locked during all dry cycles until the unit reaches a safe temperature.
50 Min Preset- Select this option for a maximum drying time of 50 minutes. This unit is equipped with a dry sensor and will stop if sensor detects that items are dry and ready to be removed. At 50 minutes the unit will automatically stop even if all items are not completely dry.
Cotton/ Normal Dry: This cycle will execute a preset 1200 RPM spin speed and will automatically enter into a drying cycle.
Change Cycles and Options: Not all Options are available with all Cycles. Cycles and Options can be changed any time before "Start/Pause" is pressed.
Cancel Wash- To cancel a wash cycle press [Power] for 3 seconds to stop the cycle. The door will automatically unlock. Change the cycle by pressing Start/Pause once and selecting the desired option.
Drain water "manually"-Press "Power" for approximately 3 seconds then select "Spin" and press and hold "Start/Pause". When the spin is complete, the door will automatically unlock. Items can then be removed from the washer.
LED Display
![graph TD A["Pre-wash"] --> B["Temp."] B --> C["Spin Speed"] C --> D["Soil Level"] D --> E["Delay"] E --> F["Child Lock"] F --> G["Custom Cycle"] G --> H["Extra Rinse"] H --> I["Add Dry Time"] I --> J["17"] I --> K["16"] I --> L["15"] I --> M["14"] I --> N["13"] A --> O["Pre-wash"] B --> P["Temp."] C…](/content/2026/07/1522629/images/0dc0f024299005db6ad5660722619bcb4776a2b858150511a7bef97f8ceefb30.jpg)
① Soil Level Indicator- indicates soil level chosen (See Button 10)
② Cycle Indicator- Indicates at what stage of the wash/dry cycle machine is in:

③ Wash/Cycle Lifecycle Indicator- Reflects time left until end of cycle
④ Feature Indicator- Indicates features that are active:


⑤ Water Temperature- Indicates the selected temperature.
⑥ Spin Speed- Indicates the selected spin speed.
⑦ Pre-wash- Press if you want your cycle to include pre-wash.
⑧ Temperature- Press to increase water temperature in increments of 10 degrees.
⑨
Spin Speed- Press to increase spin speed, the washer drum spins at a speed up to 1200RPM. This reduces drying time and saves energy. Press the button until desired speed is lit, speed increases in increments of 200, 400-1200 rpm. Some fabrics such as delicates require a slower spin speed. High spin speeds are not available on all cycles.
⑩
Soil Level- Press to increase time for heavier soiled items. There are three soil levels, each bar increases the base wash time by five minutes.
⑪
Child Lock- Press the soil level and delay buttons at the same time to unlock/lock control panel.
12
Delay Time- Press to set a delay time for when you want the wash to begin. The delay start light will flash to indicate the delay time. It will start the cycle after (xx) hours.
13
Hour Glass- Indicates time shown is estimated cycle time remaining.
14
Custom Cycle- After you have modified a wash cycle to your preference hold down this button. This cycle will be remembered. You can quickly choose this cycle at the time of your next wash. You can override by holding down the button after a different cycle and set of options is selected.
15
Clock- Indicates estimated time left until end of wash/dry cycle.
16
Extra Rinse- Press button to add an extra rinse cycle to the selected cycle.
⑰
Add Dry Time-Adds a dry cycle to the end of a wash program (not available on all cycles).
Tips before Washing
Check for colorfastness.
Before washing any new garment you should always check to see if the color will bleed to avoid damaging other items in the same wash cycle. Checking for colorfastness is easy. Simply wet one corner of the fabric and let it set for a few minutes. Get a white cloth and press down on the wet part of the garment/item. If any color comes off onto the white cloth, you know the item is not colorfast and will run in the wash cycle. This garment/item should be washed separately.
Certain clothes should not be washed in washer:
These include embossed, resins, furs, fur decorations, clothes that easily wrinkle such as silk, clothes with decorations, handmade items, and fabrics that discolor easily. Never wash clothes that are stained with chemicals such as gasoline, petroleum, benzene, paint thinner and alcohol. These items should be hand washed first. Waterproof items should not be washed such as car covers, ski suits, outside tablecloths, etc.
Please pay attention with regard to detergents
- Low sudsing detergent or washing powder specially formulated for front loading machines should be used according to fiber types (cotton, synthetic fiber, soft products and wool products), colors, washing temperatures, degree of soil and types. Otherwise, excessive bubbles may be generated and overflow from the unit.
- Bleach can be harmful and damage clothes, so it is suggested to use as little as possible.
- Powder detergents can leave residues in the clothes and generate a smell. If using powder detergent an extra rinse is recommended.
- If there is too much detergent or water temperature is too low, detergent does not easily dissolve completely. Make sure to follow the recommended amount to avoid not rinsing properly from clothes and unit.
- Washing will depend on the weight of clothes, degree of soil level, local water hardness as well as the recommendations from the detergent manufacturers. Please consult the water company if you are not clear on your water hardness.
Keep in Mind:
- Once a cycle is loaded it should not be left for a long period of time in order to avoid a moldy smell or causing stains to set in. Clothes should be washed in a timely manner for best care.
- Make sure clothes are washed according to the stated washing temperature to avoid color change/distortion.
- Keep detergents and additives in safe dry places out of reach from children.
- Only use detergents recommended for front loading machines, and do not use regular soap as the residue can remain in clothing after wash and oversuarsing will occur.
- Please take items out of your clothes pockets. Please check the pockets of the clothes to be washed, remove any loose items to avoid possible damage or an unnecessary service call.
NOTE: Do not overload the unit. Proper loading is 1/2 to 2/3 full with similar items for most effective performance.
NOTE: It is normal if your clothes feel slightly damp to the touch even though they are dry. This is entirely normal in the self-condensing drying process. All you have to do is just shake them out a little bit to allow any residual humidity to dissipate (it takes only a few seconds). Then you can fold or hang them as normal.
- Secure fasteners, zippers should be zipped close and buttons or hooks should be fastened. Any loose ribbons or ties should be tied together.
- Clothes should always be washed/separated according to the following characteristics-fabric Type, color, size, and sensitivity. Always wash according to label instructions.
- Clothes with buttons, embroideries, or fraying should be turned inside out before being washed.
- Remove all pins/hooks from article of clothing before being washed.
- It is recommended to put bras with wire hooks in sealed pillowcase to prevent steel wire from bra popping out of bra and into drum causing possible damage.
- Delicate's such as lace, nylons, handkerchiefs, ties, etc. should be washed in a mesh bag to avoid damage.
- In order to get the most effective wash, clean away dusts, stains and pet hair from the clothes prior to loading.
- To protect baby's skin, baby articles should be washed separately from adult clothes. Babywear cycle has an additional rinse in order to thoroughly rinse out detergent as their skin is much more sensitive.
- For parts of clothes that are more easily stained it is recommended to pretreat before wash in order to achieve most ideal washing effect.
Washing/Drying Capacity:
Do not overload the unit; otherwise it may diminish the washing effects. Please confirm the maximum affordable washing quantity according to the following table.
| Fiber Type | Max. Wash Loading Capcity (15 lbs) | Max. Dry Loading Capcity (7 1/2 lbs) |
| Cotton | 15 lbs | 7 1/2 lbs |
| Synthetic / Artificial Fibers | 8 lbs | 4 lbs |
| Wool | 5 1/2 lbs | 2 3/4 lbs |
DO NOT WASH ANY SINGLE LARGE ITEM AS IT WILL DAMAGE UNIT.
Incorrect loading:


Correct Loading (1/2 to 2/3 Fill):

Before washing clothes for the first time, the washing machine should be run through a full cycle with detergent without articles of clothing.
Once you have loaded the washer and added laundry products, you are now ready to wash!
Start up washing machine
① Make sure the unit is connected to power and ensure water lines are connected properly; the tap should be opened completely. Place your sorted wash load into the drum.
② Press the "Power" button. The control panel will illuminate.

③ Turn the cycle selector knob to the desired cycle based on load. The LED display panel will reflect the preset features for that cycle.

4 If you would like to modify any of the preset settings for the chosen cycle press on the individual options until display panel reflects desired settings.
Available Options:
Pre-Wash Delay
Temperature Add Dry Time
Spin Speed Extra Rinse
Soil Level Custom Cycle
Note:
If you have a favorite cycle, once you modify all settings click on "custom cycle" to remember for future cycles. Depending on cycle not all options are available.
5 Press the start/pause button to begin cycle. Once cycle begins the door will automatically lock and wash will begin. Display panel will change to reflect estimated time and stage of wash. At any time you can pause the cycle by pressing on the start/pause button again.

Cycle Guide
| CYCLE GUIDEThis guide shows you the options and preset options for recommended fabric types for each cycle. | |
| Indicates if option is available for specific cycle | |
| Indicates if the "Soil Level" option is available and up to what level. | |
| For Wash/Rinse temp. and Spin Speed the preset temp/spin speed is bolded. | |
| Cycle | Prewash | Wash/Rinse Temp. | Spin Speed | Soil Level | Delay | Custom Cycle | Extra Rinse | Drying |
| Cotton/ Normal | 100 °F90 °FTap Cold | 12001000800600400No Spin | ||||||
| Bulky Large | 100 °F90 °FTap Cold | 12001000800600400No Spin | ||||||
| Permanent Press | 100 °F | 12001000800600400No Spin | ||||||
| Delicate | 90 °FTap Cold | 600400No Spin | ||||||
| Hand Wash / Wool | 90 °FTap Cold | 800600400No Spin | ||||||
| Babywear | 100 °F90 °FTap Cold | 12001000800600400No Spin | ||||||
| Speed Wash | 90 °FTap Cold | 1000800600400No Spin | ||||||
| Self Clean | 175 °F | 400 | ||||||
| Rinse / Spin | 12001000800600400No Spin | |||||||
| Spin | 12001000800600400No Spin | |||||||
| 50 Min Preset | ||||||||
| Cotton/ Normal (Dry Mode) | 12001000800600400No Spin |
CARE AND MAINTENANCE
Periodic cleaning and proper maintenance will ensure efficiency, top performance, and long life and is recommended.
Disconnect plug from outlet and close water tap before performing any cleaning/maintenance to your combo washer/dryer.
Cleaning the exterior of the unit
Never use solvent based, abrasive cleaners, harsh chemicals or steel wool to clean your unit as they can damage the finish. The cabinet and chrome door may be cleaned with a mild detergent and lukewarm water solution such as 2 tablespoons of baking soda to 1 quart of water. Use a soft sponge and rinse with clean water. Wipe with a soft clean towel to prevent water spotting.
During daily use it is recommended to wipe up any spills with dry soft cloth.
Cleaning the interior of the unit
Never use solvent based, abrasive cleaners, harsh chemicals or steel wool to clean the internal drum. During daily use, use a soft cloth to wipe around the door, opening, and rubber seal to remove any excess moisture and to maintain a water tight seal.
To clean the interior of the unit all clothes must be removed from the drum. Select the cycle "Self Clean", you can either use liquid chlorine or power/tablet tub cleaners manufactured for this purpose.
For liquid chlorine add directly to the fabric softener section. For powder tub cleaner add directly to the main detergent section. Lastly for tablet add directly to the wash drum. Press start to initiate "Self Clean" cycle.
After every wash clothes should always be removed to avoid odor and/or mildew from forming.
Cleaning detergent dispenser
Never use solvent based, abrasive cleaners, harsh chemicals or steel wool.
- Remove the detergent dispenser from the unit by pressing on the release tab and pull out drawer.
- Once dispenser drawer is removed remove cap from the fabric softener compartment (pictured below).
- Place drawer under warm tap water and dry with soft cloth.
- Place cap back onto fabric softener and insert dispenser drawer back into the unit.

Clean inlet filter
If tap is fully opened and there is an insufficient amount of water coming through the hose you may need to clean your hoses and inlet filter.
-
Close the tap entirely before cleaning.
-
Select any procedure on control knob and press the "Start/Pause" button and let run for about 40 seconds.
Wall Connection
-
Remove the hot and cold water hose from the wall and back of the unit.
-
Run warm water through both hoses.
-
If your wall connection has a built-in filter, pull out filter with long nose pliers and wash under warm water.
Unit Connection
-
Screw off the inlet pipe from the backside of the machine.
-
Pull out the filter with long nose pliers and wash under warm water.
-
Reconnect the inlet pipe
-
Open the tap and make sure there is no water leakage.
Notes: Generally, the tap filter should be washed first and then the filter to the washing machine.


Remove foreign matters from Coin Trap
Coin Trap can collect small objects from the wash cycle. Clean out the coin trap regularly to ensure normal operation of washing machine.
Step 1: Open coin trap door

Step 2: Turn knob clockwise

Step 3: Pull out coin trap and remove articles

Step 4: Place drain pan under for excess water

TROUBLESHOOTING TIPS
Before Calling for Service
If the unit appears to be malfunctioning, the issue could be solved by following the suggestions in the "Solution" column.
| Issue | Possible Cause | Solution |
| Washing Machine will not start up | Ensure the door is closed tightly.Check if power plug is inserted well.Check to make sure the electrical outlet has power.Check if water supply tap is opened.Check if "Power" button is pressed.Check if "Start/Pause" button is pressed. | |
| Door cannot be opened | Machine's safety protection design is working. The door lock is engaged. | Disconnect Power.Allow unit to cool to safe temperature. |
| Heating fault | NTC (temperature sensor) is damaged and heating pipe is aging. | Can normally wash the clothes, only cannot wash with heating. Contact authorized technician. |
| Water leakage | The connections are not tight. Drain pipe is blocked. | Check and fasten water pipes.Clean drain pipe.Contact authorized technician. |
| Water is leaking from the bottom of the machine | The inlet pipe is not connected firmly. Outlet hose has water leakage or loose hose in unit. | Fix the inlet pipe.Replace the drain hose.Contact authorized technician. |
| Indicator or display does not light | Power is disconnected.PC board or Harness has problems. | Check if the power is shut off and power plug is connected correctly. If not please contact authorized technician. |
| Detergent residues in the detergent dispenser | Washing powder is dampened and is clumped together or using too much detergent. | Thoroughly clean the detergent dispenser and dry with cloth. Use High Efficiency liquid detergent specially for front loading machines. |
| Unsatisfactory washing effects | The clothes are too dirty. Insufficient detergent quantity. The drum is overloaded. Water temperature is too cold. | Make sure you have selected the proper procedure/water temperature according to fabric type and washing label. Add the proper detergent quantity according to the instructions on detergent packaging. It is recommended to use High-Efficiency detergent. |
| Abnormal noise, excessive vibration | Check to make sure the transportation "shipping" bolts have properly been removed.Ensure the unit is installed on a solid and level floor.Check to make sure there are no loose articles left in the drum.Make sure legs are properly adjusted.Ensure unit is not overloaded. |
TROUBLESHOOTING TIPS CONTINUED...
| Status of corresponding Indicators | Description | Reason | Solution | |||
| Temp. 90° | Temp. 60° | Temp. 40° | Temp. Cold | |||
| Off | Off | Off | Flash | Door lock problem | Door is not closed properly. | Restart after the door is closed. |
| Please call an authorized technician if problem persists. | ||||||
| Off | Flash | Off | Off | Water interjecting issue when washing (water interjecting that exceeds 5 mins.) | Tap is not opened all the way, water flows too slowly. Inlet valve filter is blocked. Inlet pipe may be twisted if water is not supplied. | Open the tap fully or wait for the water supply becomes normal. Check inlet valve filter. Straighten the water hoses to ensure there are no twists. |
| Please call an authorized technician if problem persists. | ||||||
| Off | Off | Flash | Flash | Drain problem while washing (drain time exceeds 9 mins.) | Drain hose is blocked or twisted. Drain pump is blocked. | Wash and straighten out drain hose. Wash drain pump filter. |
| Please call an authorized technician if problem persists. | ||||||
| Please call an authorized technician for all other issues. | ||||||
Care Label Appendix
| Graphic Symbol Illustration | Graphic Symbol Illustration | ||
| [6T4Z] | Hand Wash | ☒ | No Machine Wash |
 | Washing (including Machine Wash and Hand Wash) | ☒ | Do not Wash |
 | Dry Clean | ☒ | No Dry Clean |
| [OKXD] | Warmly Dry Clean | ☒ | No Wring |
| [6ZTB] | Bleach | ☒ | No Bleach |
 | Tumble dry | ☒ | Do not Tumble Dry |
 | Iron | ☒ | Do not Iron |
| [0AT7] | Steam Iron | ☒ | Iron with Cloth |
| [TX25] | Medium Temperature and Max. Temperature 150°C | ☐ | Dry after Wash |
 | Line Dry | ☐ | Line Dry in Shade |
SPECIFICATIONS
| Description of product Combo Washer/Dryer | |
| Model CWD1510W | |
| Voltage/Frequency | AC 115V~60Hz |
| Rated Current 12A | |
| Color White cabinet with chrome door | |
| Washing Capacity/ Dry Capacity | 15 lbs. / 7.7 lbs. |
| Drum Size 2.0 cu. ft. | |
| Standard Water Pressure 0.05MPa-1MPa | |
| Weight | 188 lbs. |
Note: Technical data and performance information provided for reference only.
Specifications are subject to change. Check the rating label on the ice maker for the most accurate information.
This product is warranted by EdgeStar and is subject to any conditions set forth as follows:
WHAT IS COVERED:
For a period of ONE (1) YEAR from the date of original retail purchase, EdgeStar will repair or replace any part free of charge including labor that fails due to a defect in materials or workmanship. Labor will be performed free of charge at an authorized EdgeStar repair facility and EdgeStar will supply new, rebuilt, or refurbished parts free of charge. EdgeStar may request a defective part be returned in exchange for the replacement part. All replacement parts or products will be new, remanufactured, or refurbished. All products and parts replaced by EdgeStar under warranty service become the property of EdgeStar. After the 12 month period, EdgeStar will no longer be responsible for labor charges incurred or replacement parts. All defective products and parts covered by this warranty will be repaired or replaced on a mail-in basis to an EdgeStar authorized repair facility.
This warranty applies to the original purchaser only, and only covers defects in workmanship experienced during operation of the product under normal service, maintenance, and usage conditions. This warranty applies to the purchase and use of this product in residential settings within the United States of America.
Exceptions: Commercial or Rental Use Warranty
90 days labor and parts from date of original purchase. No other warranty applies.
WHAT IS NOT COVERED- The following limitations apply to the coverage of this warranty. This warranty does not cover:
-Labor charges for installation, setup or training to use the product.
-Shipping damage, and any damage caused by improper packaging for shipment to an authorized service center, and any damaged caused by improper voltage or any other misuse, including abnormal service, handling, or usage.
-Cosmetic damage such as scratches and dents.
-Normal wear and tear on parts or replacement of parts designed to be replaced, e.g. filters, cartridges, batteries.
-Service trips to deliver, pick-up, or repair, install the product, or to instruct in proper usage of the product.
-Damages or operating problems resulting from misuse, abuse, operation outside environmental specifications, uses contrary to instructions provided in the owner's manual, accidents, acts of God, vermin, fire, flood, improper installation, unauthorized service, maintenance negligence, unauthorized installation or modification, or commercial use.
-Labor, service transportation, and shipping charges for the removal and replacement of defective parts, beyond the initial 12 month period.
-Products that have been modified to perform outside of specifications without the prior written permission of EdgeStar.
-Products lost in shipment, or theft.
-Products sold AS IS or from an unauthorized reseller.
-Products that have had their serial numbers removed, defaced, or with serial numbers that have been invalidated.
-Damage from other than normal household use.
-Replacement or repair of household fuses, circuit breakers, wiring or plumbing.
-Damage to personal property from use of product.
-Damage from service other than from an authorized EdgeStar repair facility.
-Hoses, knobs, lint trays and all attachments, accessories and disposable parts.
-Any service charges not specifically identified as normal such as normal service area or hours.
-Any special or consequential damages arising out of the use of the product.
OBTAINING WARRANTY SERVICE: If you believe your product is defective, contact EdgeStar Customer Support for troubleshooting assistance and warranty service at www.edgestar.com or call 1-866-319-5473. Before contacting Customer Support you are required to have your model number, serial number and proof of purchase available upon request. Once an EdgeStar authorized representative has confirmed that your product is defective and eligible for warranty service, the product must be returned to an EdgeStar authorized repair facility. EdgeStar is not responsible for damage resulting from shipper mishandling or improper packaging. Do not return a defective product to the place of purchase. Products received without a return authorization number will be refused.
THIS WARRANTY IS IN LIEU OF ANY OTHER WARRANTY, EXPRESS OR IMPLIED, INCLUDING WITHOUT LIMITATION, ANY WARRANTY OF MERCHANTABILITY OR FITNESS FOR A PARTICULAR PURPOSE. TO THE EXTENT ANY IMPLIED WARRANTY IS REQUIRED BY LAW, IT IS LIMITED IN DURATION TO THE EXPRESS WARRANTY PERIOD ABOVE. NEITHER THE MANUFACTURER NOR ITS DISTRIBUTORS SHALL BE LIABLE FOR ANY INCIDENTAL, CONSEQUENTIAL, INDIRECT, SPECIAL, OR PUNITIVE DAMAGES OF ANY NATURE, INCLUDING WITHOUT LIMITATION, LOST REVENUES OR PROFITS, OR ANY OTHER DAMAGE WHETHER BASED IN CONTRACT, TORT, OR OTHERWISE. SOME STATES DO NOT ALLOW THE EXCLUSION OF INCIDENTAL OR CONSEQUENTIAL DAMAGES, SO THE ABOVE EXCLUSION MAYNOTAPPLYTOYOU. THIS WARRANTY GIVES YOU SPECIFIC LEGAL RIGHTS. YOU MAY HAVE OTHER RIGHTS THAT VARY FROM STATE TO STATE.
EDGESTAR
EdgeStar Products
500 N. Capital of TX Hwy, Bldg 5
Austin, TX 78746
Toll Free: 1-866-319-5473
Web: http://www.edgestar.com
E-mail: service@edgestar.com
Register your product, download owner's manuals, access additional troubleshooting resources, and obtain more information on other great EdgeStar & Koldfront products on the web at: http://www.edgestar.com
Product contents and specifications may change without notice.
Copyright © 2012 Living Direct, Inc. All rights reserved.
- CWD1510W
- OWNER'S MANUAL
- IMPORTANT SAFETY INFORMATION
- WARNING
- ELECTRICAL SHOCK HAZARD
- ELECTRICAL SAFETY
- NOTE
- GENERAL SAFETY
- BEFORE OPERATING THIS MACHINE
- TABLE OF CONTENTS
- IMPORTANT SAFETY INFORMATION......I
- INTRODUCTION
- PARTS IDENTIFICATION
- DETERGENT DISPENSER
- PREPARATION FOR INSTALLATION
- OPERATING INSTRUCTIONS
- CARE AND MAINTENANCE
- TROUBLESHOOTING TIPS
- TROUBLESHOOTING TIPS CONTINUED
- FOR YOUR RECORDS
- BACK VIEW
- ELECTRICAL REQUIREMENTS
- LOCATION REQUIREMENTS
- YOU WILL NEED
- INSTALLATION CLEARANCES
- PARTS INCLUDED
- TOOLS AND PARTS
- UNPACKING THE WASHING MACHINE
- REMOVE TRANSPORT BOLTS
- INSTALLATION
- CONNECT INLET PIPE
- INSTALL INLET PIPE
- DRAIN SYSTEM OPTIONS
- LEVEL THE WASHER
- ELECTRICAL CONNECTION
- CONTROL PANEL OVERVIEW
- WASH CYCLES
- DRY ONLY CYCLES
- TIPS BEFORE WASHING
- CHECK FOR COLORFASTNESS
- CERTAIN CLOTHES SHOULD NOT BE WASHED IN WASHER
- PLEASE PAY ATTENTION WITH REGARD TO DETERGENTS
- KEEP IN MIND
- WASHING/DRYING CAPACITY
- START UP WASHING MACHINE
- CLEANING THE EXTERIOR OF THE UNIT
- CLEANING THE INTERIOR OF THE UNIT
- CLEANING DETERGENT DISPENSER
- CLEAN INLET FILTER
- WALL CONNECTION
- UNIT CONNECTION
- REMOVE FOREIGN MATTERS FROM COIN TRAP
- BEFORE CALLING FOR SERVICE
- WHAT IS COVERED
- EXCEPTIONS: COMMERCIAL OR RENTAL USE WARRANTY
- WHAT IS NOT COVERED- THE FOLLOWING LIMITATIONS APPLY TO THE COVERAGE OF THIS WARRANTY. THIS WARRANTY DOES NOT COVER
- EDGESTAR
Brand : EDGESTAR
Model : CWD1510W
Category : Washing machine