
AS70GPWF1 - Air purifier LG - Free user manual and instructions
Find the device manual for free AS70GPWF1 LG in PDF.


| Product Type | Air Purifier |
| Model | AS70GPWF1 |
| Brand | LG |
| Coverage Area | Up to 80 m² |
| CADR (Smoke) | 400 m³/h |
| CADR (Dust) | 400 m³/h |
| CADR (Pollen) | 400 m³/h |
| Filtration System | Pre-filter, True HEPA, Deodorization Filter |
| Fan Speeds | 3 Speeds + Auto |
| Noise Level (Min/Max) | 24 dB / 52 dB |
| Power Consumption | 50 W |
| Power Supply | 220-240 V, 50/60 Hz |
| Dimensions (W x D x H) | 360 x 360 x 600 mm |
| Weight | 9.5 kg |
| Display | LED Touch Panel |
| Controls | Touch Buttons, Remote Control |
| Smart Features | Wi-Fi, LG ThinQ App, Voice Control (Google Assistant, Amazon Alexa) |
| Air Quality Sensor | PM2.5, PM10, Odor |
| Timer | 1-8 Hours |
| Sleep Mode | Yes |
| Filter Replacement Indicator | Yes |
| Filter Longevity | Approx. 12 months (depending on usage) |
| Certifications | CADR, Energy Star, RoHS |
| Warranty | 2 Years |
Frequently Asked Questions - AS70GPWF1 LG
User questions about AS70GPWF1 LG
0 question about this device. Answer the ones you know or ask your own.
Ask a new question about this device
Download the instructions for your Air purifier in PDF format for free! Find your manual AS70GPWF1 - LG and take your electronic device back in hand. On this page are published all the documents necessary for the use of your device. AS70GPWF1 by LG.
USER MANUAL AS70GPWF1 LG
Please read this manual carefully before operating your set and retain it for future reference.
Model name: AS70GPWF1

MFL42657823
Rev.00_070516
www.lg.com
2
SAFETY PRECAUTIONS
SAFETY PRECAUTIONS
The precautions related with the safety shown below are to prevent unexpected hazard and damage through safe and accurate operation of the product.

WARNING
If not followed, It may cause death or major injury to the user.

CAUTION
If not followed, it may cause injury to the user or property damage.

WARNING
Installation
- Do not arbitrarily change or extend the power line.
- It may cause fire and electric shock.
- When the socket is damaged or loosened, do not use it.
- It may cause fire and electric shock.
- Do not arbitrarily disassemble, repair, or modify the product.
- It may cause fire and electric shock.
- Do not use the product at the location where moisture or oil are prevailed such as toilet or bathroom, laundry, etc.
- It may cause fire and electric shock.
- When using the multi-socket, do not use several appliances at the same time.
- Excessive use of electric power may cause fire and electric shock.
- When gas is leaked, perform the ventilation by opening the window before operating the air purifier.
- Otherwise, it may cause the explosion, fire, and burn.
- Do not store or use combustible gas or flammable material near the product.
- It may cause fire or product failure.
- If abnormal noise, odor or smoke is coming out from the product, pull out the power plug and contact the customer care center.
- It may cause fire and electric shock.
- Do not place heavy object on the power cord or have power cord squashed under equipment.
- It may cause fire and electric shock.
- Carry out the installation by avoiding direct sunlight, heating appliance, and dampness.
- It may cause the electric shock, fire, and failure.
- Do not place fire source near to the product.
- It may cause fire.
Operation
- Insert securely the power plug up to the end of its plug so that it will not be shaken. - If connection is unstable, it may cause fire.
- Do not arbitrarily change or extend the power line. - It may cause fire and electric shock.
- Do not allow water to be infiltrated into the product. - It may cause fire and electric shock.
- Do not place rug etc. on the power cord. - If heavy object is placed on the rug because the cord is invisible, it may cause fire and electric shock.
- Do not touch the power plug with wet hand. - It may cause electric shock and injury.
- Do not remove the plug by pulling its power cord section. - It may cause fire and electric shock.
- Do not place obstacles at the air suction port or discharge port of the product. - It may cause the product failure.
- Do not use the product where water can be easily splashed. - It may cause fire or electric shock.
- Do not allow children to climb up the product or arbitrarily touch it. - It may cause failure, injury.
- Do not move the product while it is under operation. - It may cause fire and electric shock or partial damage of the product may occur.
- Do not put hands, glue or metal at the air suction port or discharge port of the product. - It may cause product damage, injury, or electric shock.
- Do not install the product at the location where excessive industrial oil smoke or metallic dust is prevailed. - It may cause fire and product failure.
- Do not move the product by grabbing any other parts other than the handle of the product. - The product may partially be damaged.
- If product repair is required, contact the service center. - Arbitrary disassemble or repair may cause electric shock or fire.
- If the product is flooded, make sure to contact the service center. - There is a risk of electric shock or fire.
- Do not apply any impact on the front panel. - It may cause injury, product damage or electric shock.
- Do not let children or people that are difficult to operate the device safely alone operate the product. - It may cause injury or electric shock.
- If the power cord is damaged, request for repair to the service technician to prevent any risk. - If not, It may cause fire, electric shock or product failure.
4
SAFETY PRECAUTIONS

CAUTION
Installation
- When installing near to TV or audio, provide more than 1 m of distance with them. - TV or audio may have malfunction.
- When pulling out the power plug, pull out by grabbing the head of the plug. - It may cause injury or electric shock.
- In kitchen, do not use the product as ventilation fan or hood for range.
- The life will be shortened.
- During the cleaning, make sure to stop the product and pull out the power plug. - The fan is rotating at a high speed, and it may cause injury.
- Avoid places near fire, heating appliances, or under direct sunlight. - It may cause fire.
- Do not use the product to remove toxic gas such as carbon monoxide. - It may cause product failure.
- Install the product at the flat location and do not throw it down or give impact.
- It may cause product failure.
- Provide distance of more than 1.5 m from lighting appliance and more than around 10 cm from the wall.
- It may cause the product discoloration and the cleaning capability may be deteriorated.
- Use only 220 V.
- It may cause fire and electric shock.
- Do not install in transportations (vehicle/vessel, etc.). - It may cause failure.
Operation
- Do not use the product for special usages/places such as preservations of animal/plant, precision equipment, art pieces, etc.
- It may cause property damage.
- Do not clean with strong detergents such as solvents, but use soft cloth. - It may cause fire and product deformation.
- If it is not used for a long period of time, pull out the power plug.
- It may cause product failure or fire.
- Do not operate with wet hand.
- It may cause electric shock.
- Do not climb up or place object on Air Purifier.
- It may cause injury by falling or flip over.
- Make sure to insert the pre filter, and clean the filter every month. - It may cause shortening of the filter life.
- Be sure to insert all the filters before the use and perform regular cleaning of the filter. - Otherwise, It may cause product failure.
- Install the product at the flat location and do not throw it down or give impact.
- It may cause fire or product failure.
- Do not use the power cord as tied.
- Heat generation may cause fire.
- Start cleaning and mending after pulling out the power plug and when the fan stops rotating.
- You may get electric shock or injury.
- Do not use it as a ventilator.
- The product life may be shortened.
- Completely dry the pre filter in a shadow until there is no moisture after washing.
- Otherwise, It may cause failure.
- Do not insert inflammables inside the product.
- It may cause fire or product failure.
- Do not let the moisture emitted from the humidifier directly touch the product.
- It may cause electric shock, fire, or product failure.
- Do not open the rear panel while product is in operation.
- Fan is rotating, and it has a risk of injury.
6
TABLE OF CONTENTS
TABLE OF CONTENTS
2 SAFETY PRECAUTIONS
7 HOW TO INSTALL
7 Selecting installation place
7 Use the air purifier as this.
8 NAME OF THE PARTS
8 Product
9 Operation indicator and control part
10 Filter system
11 HOW TO USE
11 Air cleaning operation
12 Indicator display
14 Ionizer operation
14 Sleep operation
15 Filter cleaning function (Remove large particles.)
15 Lock function
16 Filter check display
17 HOW TO INSTALL FILTERS
17 Filter installation method before use
18 HOW TO CLEAN
19 Filter maintenance method
19 Clean the dustbin
20 How to clean exterior
20 How to clean the sensor
21 HOW TO STORE
22 TROUBLESHOOTING BEFORE CALLING FOR SERVICE
24 PRODUCT SPECIFICATION
HOW TO INSTALL
Selecting installation place
Main Unit
- Place with handy power connections
- Place with no obstacle to clog air inlet
- Place with horizontal surface and rich air circulation

WARNING
There can be product failure if the air purifier is installed on a moving vehicle such as cars, boats and others.

WARNING
This appliance is not intended for use by persons (including children) with reduced physical, sensory or mental capabilities, or lack of experience and knowledge, unless they have been given supervision or instruction concerning use of the appliance by person responsible for their safety.
Children should be supervised to ensure that they do not play with the appliance.
Use the air purifier as this.
- Reduce the use of air purifier if possible when you cook smelly food such as fish grill.
- The vaporized oil from the cooking may affect to the performance and lifetime of the filters, and the smell may stick on the filter as well.
- Maintain a minimum distance of 1 meter from the air purifier when you sleep.
- The fan speed of the air purifier is not that high. However you may feel a chill.
- Do not place in a corner edge.
- Avoid a place surrounded with furniture and electronic equipment, or in a corner edge. The air purifier will not function well if it is installed in a corner edge.
NAME OF THE PART
NAME OF THE PARTS
Product
Sensor part (dust sensor)
Outlet
(Pre filter + Allergen filter + Deodorization filter + HEPA filter)
Cleaning brush for pre filter Do not rotate it with your hand. It may cause failure of product.
Front panel
Power Plug
Air inlet
Dustbin
* Shape of the power cord can be different by country.
* The shape of the sensor could differ by the model.
* The odor sensor measures odors.
Operation indicator and control part

Dust indicator display Speed button Sleep button lonizer button
Start/stop button Use to start and stop the product.
Speed button It adjusts wind volume.
Indicator button It selects micro dust size and displays dust density.
Sleep button It adjusts wind volume for sound sleep and can set the time when the clean lighting is turned off.
Filter clean button Air cleaner operation stops, and as the pre filter cleaning brush rotates, it removes the dust accumulated in the pre filter.
Ionizer button It generates ion and removes various bacteria in the indoor air.
Lock function Pressing the Speed button and the Indicator button together for 3 seconds lock/unlock the lock function
Dust indicator display Show the size of Micro dust particles and its density.
Filter Check display If the Filter Check display on, check if the filter is contaminated, and if it is seriously contaminated, clean or replace the filter.
* Dust particle size guide
PM10 : dust particle size is equal or below 10µm (occurs in the combustion at the site, automobile exhaust, etc.)
PM2.5 : dust particle size is equal or below 2.5µm (consists of ion, carbon compounds, and metal compounds)
PM1.0 : dust particle size is equal or below 1.0μm (cigarette smoke, etc.)
10
NAME OF THE PART
Filter system

| Filter name Function | |
| Pre Filter | It is filter for large particles removal and is done with anti-biotic treatment, which helps the life extension. |
| Allergen filter It absorbs and decomposes allergen which could cause allergy. | |
| Deodorization filter | The comprehensive deodorization filter removes cigarette smoke(odor), putrid food smell, animal hair odor, NO2, toilet odor, alkali & acid smell, organic compound(VOCs). |
| HEPA filter | HEPA filter removes minute particles such as acarid dead body, pollen, cigarette smoke(particles), minute dust, floating fungus, animal hair and so on. |
The filter washing and replacement cycles may depend on the user environment.
NOTE
- If you request filter cleaning to the service center, we will clean it with a charge for actual cost.
- The filter replacement frequency can vary depending on the operational environment.
- The filter composition can vary depending on a model in use.
- If you need more and change filter, please contact the LG service center.
- Nothing but an operation with the filter equipped guarantees a normal air purification process.


HOW TO USE
Air cleaning operation
It cleans the indoor with clean and fresh air.
- Press the ⏻ button to start air cleaning operation
- Press the ⚙ Speed button to select wind speed.
- Pressing the ⚙ Speed button changes wind speed from Auto → Low → Mid → High → Turbo in turn.
![graph LR A["Auto"] --> B["Mid"] B --> C["Low"] C --> D["Mid"] D --> E["High"] E --> F["Turbo"]](/content/2026/07/1518754/images/fbaca1201354cc1d8eecce835a2650ce3fbcb70b75f49d34ce0a9dc4f3dec03b.jpg)
- The mode is set in auto when the product starts its initial operation.
(Under the auto operation mode, wind volume is automatically adjusted depending on the contamination level of indoor air.) - During the sensor stabilization time(30 seconds) after the operation start, cleanliness display is prepared to be displayed at the display.


- After 30 seconds, overall cleanliness and dust density is displayed. Since the odor sensor is stabilized after 2 minutes after operation start, contamination level of PM10, PM2.5, PM1.0 is displayed for cleanliness.
12
HOW TO USE
Indicator display
- Press the ◎ Indicator button and check the density of PM10 / PM2.5 / PM1.0
- Pressing the button each time checks the density of PM10 > PM2.5 > PM1.0 in turn. Pressing the Indicator button during operation displays the density of PM10 / PM2.5 / PM1.0 at the display for 10 seconds.

- Check the dust particle size display window.
- Dust density is displayed based on the dust density window with the highest contamination level.
Example) When PM10 density is 79 (normal), and PM2.5 is 90 (bad), and PM1.0 is 50 (normal), PM2.5 value is displayed for dust density.
Cleanliness is displayed in 4-level color depending on the contamination level of PM10 / PM2.5 / PM1.0 and odor.
(contaminated) Red → Orange → Green → Blue (clean)
- When the displayed cleanliness is above bad/very bad, the cause of bad level (dust/odor) is displayed in addition to cleanliness color display.
Overall cleanliness color is displayed based on the worst level among PM10 / PM2.5 / PM1.0 and odor.
Checking method of overall cleanliness
| Overall cleanliness | Status | Dust density (unit µg/m3 ) | Status | Odor density | ||
| PM 10 PM 2 | .5 PM 1.0 | Level | ||||
| Red | Very Bad | Equal or above 151 | Equal or above 101 | Equal or above 101 | Very strong | 4 |
| Orange | Bad 81~150 51~100 51~100 | Strong 3 | ||||
| Green | Normal 31~80 16~50 16~50 | Normal 2 | ||||
| Blue | Good | Equal or below 30 | Equal or below 15 | Equal or below 15 | Weak 1 | |
* Dust density is displayed in the unit of one from 8 to 999.
When it comes to the dust density values, we referred to the data sheets provided by the sensor supplier.

- Explanation on the display: Since PM1.0 density is Bad(Orange) with 80µg / m3 , display dust at the odor/dust display. Since 'odor' is displayed at the odor/dust display, odor density is also strong. Since PM1.0 is displayed at the dust particle size display, the density level of PM1.0 is higher than that of PM10 or PM2.5
Reference
- PM10 and PM2.5 cleanliness follows the provided by the Ministry of environment(Air KOREA). (2015)
- The overall cleanliness level displayed on the product may be different from a level announced by Ministry of environment(Air KOREA).
- The dust density level for PM1.0 has been displayed in the same manner as the dust density level for PM2.5. (LG Electronics standards)
- The displayed density of PM10 / PM2.5 could differ from the forecast of the Ministry of environment(Air KOREA) and from other measurement devices or products.
- Indicated dust concentration values can differ from each other depending on the differences in dust measuring methods and also from real dust concentration levels.
- The assessment of dust density was made against dust used for LG Electronics standards tests.
- In case you use the product which generates steam and micro particles (humidifier, cooling device, spray, etc.), micro dust density could change.
- Since the cleanliness display shows overall dust and odor, it could differ from the density value of PM10, PM2.5, and PM1.0.
- Even in the same space, the PM10 density value could differ from other products due to air circulation.
- The overall cleanliness display could change in response to the chemicals contained in air freshener, perfume, deodorizer, and cosmetics.
- The displayed dust density value could change depending on the installation environment (affected by sofa, bed, carpet, vacuum cleaner, humidity, smoke, bugs, fats, etc.)
- The displayed density value of PM10/PM2.5/PM1.0 could change depending on the surrounding environment (construction site, road side, plant, etc.)
- The density of micro dust could be measured high near exit doors, windows, and ventilation holes or under the environment where outside air flows in.
- Do not clean the sensor with other materials other than alcohol or water. It may cause product failure.
14
HOW TO USE
lonizer operation
It generates negative ion and removes various bacteria in the air.
- Start the air purifier by pressing the ⏻ button.
-
Press the ⚙ Ionizer button.
-
It removes hazardous substances such as bacteria, virus and others in the air.
- Whenever it is pressed it changes the operation sequence as Ionizer → reset function → Ionizer.

①lon Cluster generation by the polar linkage of water particle in the air
②Sterilization ion encircles various hazardous substances.
③Generation of OH(hydroxyl) that is weak to different chemical reactions
④Reaction between hydroxyl (OH) and hazardous substances
⑤Clean air removed hazardous substances
Sleep operation
It makes quiet and pleasant environment when sleeping.
- Start the air purifier by pressing the ⏻ button.
-
Press the 📞 Sleep button.
-
It changes to low noise operation that fits for sleeping.
- When Sleep Mode is on, Sleep Mode is only displayed.
-
The reservation time can be set in the order of 2 hours → 4 hours → 8 hours → 12 hours → Disable
-
Fan speed at Sleep Mode.
-
If the Sleep button is pressed, it runs automatically as Low fan speed for an hour and the fan speed after is controlled by the air quality.
-
During the Sleep Mode you may change the fan speed in sequence of Auto → Low → Mid → High → Turbo whenever Speed button is pressed.
-
How to disable Sleep Mode: Press the 📁 Sleep button again.
* Once Sleep Mode is set, all other display is off except the Sleep Mode.
Filter cleaning function(Remove large particles.)
When operating Filter Cleaning Function, the purifier operation stops. The cleaning brush for pre filter starts rotating to remove the particles settled on the filter. The particles removed from pre filter come together into the dustbin lower. Clean the dustbin periodically.
Refer to page 19 for the dustbin cleaning.
For automatic operation
- It operates automatically filter cleaning after use for a certain period. You don't need to do separate operation.
- It shows 5 minutes on the operation display and performs cleaning filter for specified time.
- It doesn't activate while sleep operation.
For manual operation
-
Press ☒ Filter Clean button.
-
It starts filter cleaning in 5 seconds.
- It shows 5 minutes on the operation display and performs cleaning filter for specified time.
- Whenever press one time, it switches into Filter Cleaning → Deactivation → Filter Cleaning in order.
- When you want to operate the purifier while cleaning filter, press the Filter Clean button once again to cancel.
Lock function
-
Press the ⏻ button.
-
Press the ✕ Speed button and ✗ Indicator button simultaneously for over 3 seconds.
-
It sets Lock function 📁 with the sound "Ting".
- It may protect the product by unwanted operation by children or others.
- Press the ⚙️ Speed button and ⚙️ Indicator button simultaneously for over 3 seconds to disable the Lock function.
- If press of any button does not work, check for the Lock function and disable the Lock.
- If power cord is unplugged, the lock function is also disabled.
※ Even when the product is stop, you may enable and disable Lock function by pressing
Speed button and Indicator button simultaneously for over 3 seconds.
16
HOW TO USE
Filter check display
-
If the filter check display on, turn off the power of the operating product by pressing ⏻ button and unplug the power cord from the outlet.
-
Open the front panel of the product and check the filter. If the filters are contaminated, clean or replace.
* Please refer to the page 18\~19 for the filter cleaning and replacement method.
Method1. Open the front panel for over 10 seconds.
Method2. Unplug the power cord from power outlet.
※ Since the filter check display is automatically disabled after 24 hours. Thus replace the filter within the time.

HOW TO INSTALL FILTERS
Filter installation method before use
Use the filter after removing the vinyl cover.
- Open the front panel by pulling.

- Remove the filter from the main unit.

- Remove the vinyl cover of the filter.

- Install the filter that vinyl packing is removed.

- Close the front panel.

- Use on a flat surface with no obstacles around the product.

CAUTION
If the vinyl cover is not removed and installed, the product would not blow wind.
18
HOW TO CLEAN
HOW TO CLEAN
- Ensure to shut down before cleaning. Hold knob then pull forward, open the front panel.
- Lift the knob of dustbin to the upper direction to pull it out.
- Pull the filter case out of the main unit.
- Place the filter case down on the even ground and lift the fixed hanger of pre filter to the upper direction to open it.
- Disassemble pre filter.
- Clean the dissembled filter according to the filter cleaning method of the next page.


HEPA filter

CAUTION
• Completely dry the pre filter in a shadow.
- It may cause bad odor if it is used before fully dried.
Filter Maintenance Method
Filter maintenance may vary depending on the environment.
Do not wash Allergen filter, Deodorization filter and HEPA filter with water, but it needs to be replaced when it is severely contaminated. Be careful not to have filter touch water while using the product.
* The Filter Check cycle may be different according to the usage environment.
* If you need more filters, please contact the LG service center.
| Filter Category | Classification | Washing & replacement cycle | Maintenance Method | |
| Pre filter For washing | Around a month washing cycle | You don't need to clean separately, thanks to the filter cleaning function. However, when you clean other filters by the vacuum cleaner, just clean together with this filter. You can use more cleaned one. | Picture 1 | |
| Allergen filter For washing | About a month washing cycle | Using a natural detergent and water to clean it off. | Picture 2 | |
| Deodorization filter | For washing | Around 6 months washing cycle | Soak the filter in warm water for 1 hour. Remove particles from the filter by shaking the water from the filter. | Picture 3 |
| HEPA filter For washing | Around 6 months washing cycle | Rinse washable HEPA filter by shower machine. | Picture 4 | |


Clean the dustbin
Cover the front panel after cleaning dustbin. Please cover it tightly, otherwise it doesn't operate.
- Ensure that you turn off the power while operation. Pull the front panel forward to open.
- Lift the knob of dustbin to the upper direction to pull it out.
- Empty the dustbin.
- To settle the dustbin, you should fit the side hole of dustbin into the guide of large particles filter.


20
HOW TO CLEAN
How to clean exterior
Wipe the air purifier with a soft cloth wrung out in warm water. Especially, the air inlet around can accumulate dust. Clean periodically.

CAUTION
- Do not clean the main body control part and display part with alkali detergent.
- Do not clean the surface of the air purifier using sulfuric acid, hydrochloric acid or organic solvent (thinner, kerosene and others). Do not put stickers on the surface. It may damage surface of the product.
- Wipe with soft cloth when cleaning. There may be exterior damage by scratching or others.
- When cleaning the product, do not let water get into the product inside. Turn off power and unplug the power cord before cleaning. (Always check whether fan is moving.)
How to clean the sensor
Open the sensor cover on the rear side of the product.
Clean the lens with a soak cotton swab with little water and wipe again with a dry cotton swab.


CAUTION
Do not clean the sensor with other materials other than alcohol or water. It may cause product failure.
HOW TO STORE
How to store
If you do not use the product for extended periods of time, keep at dried and shaded place.
- Start the air purifier by pressing the ⏻ button.
- If it has operated over an hour on a fine day, it can remove the moisture and mildews inside the product.
- Stop the air purifier by pressing the ⏻ button and unplug the power cord.
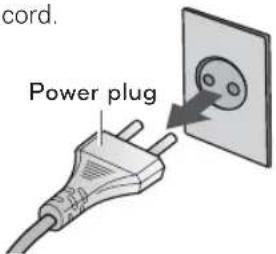
* Shape of the power cord can be different by country.
- Filters have to be removed from the product, enclosed tightly in a vinyl bag and store them in shade place without direct ray.
- If the filters are stored during rainy season, it may cause bad odor.

- Please clean the main body of the air purifier and store it well.
Store the main body after packing with vinyl cover to prevent any dust or foreign substances get in when it has to be kept for extended period of time.
- Wipe with soft cloth when cleaning. There may be exterior damage by scratching or others.
- Store it at a cool place without direct sun ray.

- Do not store the product at the place with high moisture or exposed to direct sun ray.
- It may cause bad odor, deformation, malfunction and others.
TROUBLESHOOTING BEFORE CALLING FOR SERVICE
If there is a problem with the product, check the following cases first before requesting service to the service center.
| SymptomCheckActions | ||
| It does not start at all. | · Isn't the power plug pulled out? · Isn't the voltage too low? | · Insert correctly into the socket. · Check if it is 220V~. |
| Wind amount is small and there is a noise. | · Is the pre filter clogged? · Is dust accumulated on the HEPA filter? | · Clean the pre filter. · Clean the HEPA filter. |
| Air purification does not work well. | · Is the indoor contamination severe? · Is dust accumulated on the pre filter? · Is dust accumulated on the HEPA filter? · Isn't the usage place too wide? · Are there obstacles nearby? · Is the product installed in a corner? | · Ventilate first before usage. · Clean the pre filter. · Clean the HEPA filter. · Use the product appropriate for the usage area. (Avoid places with fluent ventilation such as entrance, window, etc.) · Please remove obstacles. · Please change the installation location. |
| There is a strange odor coming out of air outlet. | · Is it used at a place with a lot of smoke or odor? · Is there abnormal odor from the deodorization filter? | · The air cleaning function may be degraded where there are a lot of smoke or odor. Please use the Air Purifier after ventilation. · Please clean the deodorization filter. |
| There is an odor, but the Indicator lamp does not change. | · Isn't red light turned on in the Indicator lamp? | · Indicator lamp indicates the cleanliness through the odor sensor. Odor sensor may not respond to food odor since it is a sensor detecting contamination gas. But the odor is removed by the deodorization filter. |
| The Indicator lamp is continuously on with red color. | · Doesn't the color change even if it is moved to a clean room? · Did you use spray near the Air Purifier? | · If the quantity of odor is greater than the ability that can be processed by the Air Purifier, the display may not change. · Do not use sprays near the Air Purifier. |
| Button does not work well. | · Is the lock lamp on the operation part turned on? | · Press Speed button and Indicator button together for 3 sec. to reset the lock setting. |
| There has been no change in micro dust concentration. | · Isn't there foreign substance at the sensor? · Are you using in an enclosed area? | · Refer to how to clean the sensor and then clean the dust cleaner. · In an enclosed area, the cleanliness indication levels can stay unchanged. |
| The fine dust concentration value keeps showing high. | · Is the place of installation located where the inflow of air is made constantly? | · In an environment where the inflow of air is made, the concentration value can keep showing high. |
| There is difference between the comprehensive cleanliness level color and dust concentration value. | · Doesn't the odor / dust indicator display 'Odor'? | · The comprehensive cleanliness level evaluates odor and dust concentration comprehensively and then displays. If an odor is strong although the dust concentration is low, the comprehensive cleanliness level may display a different color. |
| There is difference between the Ministry of environment(Air KOREA) guide and comprehensive cleanliness level. | · Is there difference between the Ministry of environment(Air KOREA) | · There can be difference between the Ministry of environment(Air KOREA) guide which indicates an average value during a given period time and comprehensive cleanliness level indicated on the air cleaner which is measured and then displayed on a real time basis. |
| The filter produces odors. | · Doesn't the deodorization filter produce any odor? · Is it an environment which is full of odors? | · The filter replacement frequency can differ depending on the user environment. · The life of the filter can get sharply reduced if it is used for long when you cook food or grill fish / meat. Open the window and ventilate the room as much as possible when you cook food. After ventilation, use the air cleaner in order to accomplish the purpose of eliminating remaining odors. |
| The odor and dust indicator do not display. | · Does the comprehensive cleanliness level turn yellow or green? | · Only when the dust concentration level is Bad / Very Bad or odor concentration Strong / Very Strong, the odor / dust indicator displays a substance as the cause of pollution. |
PRODUCT SPECIFICATION

The external dimension, design and product standard can change to improve the quality of the product.
| Model name AS70GPWF1 | |
| Power supply 220 V~ 50 Hz | |
| Weight of Product 16.2 kg | |
| Appearance Size(mm) 475 (Width) x 680 (Height) x 300 (Depth) | |
| Power consumption 90 W | |
The rating on the manual displays a range for possible usage, so it could be different from the rating on the label, which displays the rating of the using region on the product.



- SAFETY PRECAUTIONS
- WARNING
- CAUTION
- INSTALLATION
- OPERATION
- TABLE OF CONTENTS
- 2 SAFETY PRECAUTIONS
- 7 HOW TO INSTALL
- 8 NAME OF THE PARTS
- 11 HOW TO USE
- 17 HOW TO INSTALL FILTERS
- 18 HOW TO CLEAN
- 21 HOW TO STORE
- 22 TROUBLESHOOTING BEFORE CALLING FOR SERVICE
- 24 PRODUCT SPECIFICATION
- HOW TO INSTALL
- SELECTING INSTALLATION PLACE
- MAIN UNIT
- USE THE AIR PURIFIER AS THIS
- NAME OF THE PARTS
- PRODUCT
- FILTER SYSTEM
- NOTE
- HOW TO USE
- AIR CLEANING OPERATION
- INDICATOR DISPLAY
- REFERENCE
- LONIZER OPERATION
- SLEEP OPERATION
- FILTER CLEANING FUNCTION(REMOVE LARGE PARTICLES.)
- FOR AUTOMATIC OPERATION
- FOR MANUAL OPERATION
- LOCK FUNCTION
- FILTER CHECK DISPLAY
- HOW TO INSTALL FILTERS
- FILTER INSTALLATION METHOD BEFORE USE
- HOW TO CLEAN
- FILTER MAINTENANCE METHOD
- CLEAN THE DUSTBIN
- HOW TO CLEAN EXTERIOR
- HOW TO CLEAN THE SENSOR
- HOW TO STORE
- TROUBLESHOOTING BEFORE CALLING FOR SERVICE
- PRODUCT SPECIFICATION
Brand : LG
Model : AS70GPWF1
Category : Air purifier