
CDX-5270 - Car radio SONY - Free user manual and instructions
Find the device manual for free CDX-5270 SONY in PDF.


| Type de produit | Autoradio avec lecteur CD |
| Marque | Sony |
| Modèle | CDX-5270 |
| Dimensions (L x H x P) | 178 x 50 x 165 mm |
| Poids | 1.3 kg |
| Alimentation | 12 V CC (véhicule) |
| Puissance de sortie | 4 x 25 W (max) |
| Formats audio supportés | CD, CD-R, CD-RW |
| Type de tuner | FM/AM (PLL stéréo) |
| Gammes FM | 87.5 – 108.0 MHz |
| Gammes AM | 531 – 1602 kHz |
| Mémoire de stations | 30 préréglages (FM18 + AM12) |
| Égaliseur | Préréglages (Rock, Pop, Jazz, etc.) |
| Fonctions principales | Lecture CD, RDS, horloge, télécommande incluse |
| Entrée auxiliaire | Mini-jack 3.5 mm avant |
| Sortie preampli | 2 x RCA (avant/arrière) |
| Affichage | LCD rétroéclairé (vert/ambre) |
| Nettoyage | Chiffon doux sec; éviter produits chimiques |
| Pièces détachées | Fusible (5A), façade amovible, télécommande |
| Réparabilité | Indice de réparabilité évalué à 7.5/10 |
Frequently Asked Questions - CDX-5270 SONY
User questions about CDX-5270 SONY
0 question about this device. Answer the ones you know or ask your own.
Ask a new question about this device
Download the instructions for your Car radio in PDF format for free! Find your manual CDX-5270 - SONY and take your electronic device back in hand. On this page are published all the documents necessary for the use of your device. CDX-5270 by SONY.
USER MANUAL CDX-5270 SONY
Operating Instructions page 2
Before operating the unit, please read this manual thoroughly and retain it for future reference.
For installation and connections, see the supplied installation/connections manual.
This instruction manual covers the CDX-5070/5270/5470. The main difference between these three is as follows:
| Optional wireless remote commander | |
| CDX-5270/5470 | can be used |
| CDX-5070 | cannot be used |
When differences occur, they are clearly described in the corresponding sections.
The illustrations of the front panel in this manual are of the CDX-5470.
Owner's Record
The model and serial numbers are located on the bottom of the unit. Record the serial number in the space provided below. Refer to these numbers whenever you call upon your Sony dealer regarding this product.
Model No. CDX-5070 Serial No. ____
Model No. CDX-5270 Serial No. ____
Model No. CDX-5470 Serial No. ____
CAUTION
The use of optical instruments with this product will increase eye hazard.
INFORMATION
This equipment has been tested and found to comply with the limits for a Class B digital device, pursuant to Part 15 of the FCC Rules. These limits are designed to provide reasonable protection against harmful interference in a residential installation. This equipment generates, uses, and can radiate radio frequency energy and, if not installed and used in accordance with the instructions, may cause harmful interference to radio communications. However, there is no guarantee that interference will not occur in a particular installation. If this equipment does cause harmful interference to radio or television reception, which can be determined by turning the equipment off and on, the user is encouraged to try to correct the interference by one or more of the following measures:
— Reorient or relocate the receiving antenna.
— Increase the separation between the equipment and receiver.
—Connect the equipment into an outlet on a circuit different from that to which the receiver is connected.
—Consult the dealer or an experienced radio/TV technician for help.
You are cautioned that any changes or modifications not expressly approved in this manual could void your authority to operate this equipment.
Table of Contents
Features 4
Precautions .... 5
Location and Function of Controls 6
Detaching and Attaching the Front Panel 11
Setting the Clock 12
CD Player Operation
Playing a CD 13
Playing in Other Modes 14
Radio Reception
Tuning in a Station 15
Using the Memory Preset Function 16
Maintenance 18
Specifications 19
Troubleshooting Guide 20
General
- Detachable-front panel enables you to take the front panel away with you when you leave your car. (page 11)
- Caution alarm will be activated if you turn off the ignition key without removing the front panel from the unit.
- Switchable two color illumination (amber and green). (page 8) (CDX-5470 only)
- With the built-in high power amplifier (max. output: 30 W × 4 ch (CDX-5270 and CDX-5470) 20 W × 4 ch (CDX-5070)), you can enjoy a 4-speaker system.
- Line outputs for connecting an optional power amplifier.
- Telephone-mute function for decreasing the volume automatically with a telephone call. (CDX-5470 only)
• Provided with a digital 12-hour clock. (page 12) - Optional wireless remote commander can be used. (CDX-5270/5470)
- Supplied with the S commander. (CDX-5470 only)
- Optional S commander can be used. (CDX-5270 only)
Tuner section
• SSIR (Sony Super Interference Rejection) PLL (Phase-Locked Loop) synthesizer tuner.
- Up to 24 stations can be preset: 18 stations on FM and 6 stations on AM.
• BTM (Best Tuning Memory) function automatically searches and stores the stations with strong signals on the preset number buttons in order of frequency. (page 16)
CD section
- 1 bit DAC (Digital-to-Analog Converter) for a clear sound reproduction.
- Quick recovery mechanism for preventing sound skipping.
- Intro scan function for playing the first 10 seconds of each track. (page 14)
- Repeat play function for listening to a currently playing track repeatedly. (page 14)
- Shuffle play function for playing tracks in random order. (page 14)
- Before operating the unit for the first time or after replacing the car battery, press the reset button with a ball-point pen etc., then start operating the unit.

- If your car was parked in direct sunlight resulting in a considerable rise in temperature inside the car, allow the unit to cool off before operating it.
- If no power is being supplied to the unit, check the connections first. If everything is in order, check the fuse.
- If no sound comes from the speakers of a 2-speaker system, set the fader control to the center position.
- As the laser beam used in this compact disc player is harmful to the eyes, do not attempt to disassemble the cabinet. Refer servicing to qualified personnel only.
Note on moisture condensation
On a rainy day or in a very damp environment, moisture in the atmosphere may condense on the lenses inside the unit. Should this occur, the unit may not operate properly. In such a case, remove the disc inside and wait for about an hour or so until the moisture has evaporated.
If you have any questions or problems concerning your unit that are not covered in this manual, please consult your nearest Sony dealer.
Notes on Compact Discs
This way

A dirty or defective disc may cause sound dropouts in playing. To enjoy optimum sound, handle the disc as follows.
Handle the disc by its edge, and to keep the disc clean, do not touch the surface.
Not this way

Do not stick paper or tape on the labeled surface.
Not this way

Do not expose the discs to direct sunlight or heat sources such as hot air-ducts, or leave them in a car parked in direct sunlight where there can be a considerable rise in the temperature inside the car.
This way

Before playing, clean the discs with an optional cleaning cloth. Wipe each disc from the center of the disc outward.
Do not use solvents such as benzine, thinner, commercially available cleaners or antistatic spray intended for analog discs.

Refer to the pages in ● for details.
① OFF button
Press to turn off the unit.
② Reset button (located on the front side of the unit hidden by the front panel)
Press this button when you use this unit for the first time, when you have changed the car battery, or when the buttons of this unit do not function. Note that when the button is pressed, the memories on the preset number buttons will be erased.
③ Disc Insertion slot ⑮
④ CD (disc play) button ⑬
⑤ FM (radio on/band select) button ⑮
At each pressing, the button changes the band cyclically as follows:

6 ≜ (eject) button 13
⑦ AM (radio on) button ⑮
⑧ RELEASE (front panel release) button ⑪
⑨ Receptor (for the wireless remote commander) (CDX-5270/5470)
MUTE button (CDX-5070 only)
Press to mute the sound momentarily.
Press again to restore the previous volume level. This button will also be canceled in the following cases:
- when the 📄 or OFF button is pressed
— when the ignition key of your car has been turned to the OFF position for more than ten seconds.
10 MUTE button (CDX-5270/5470)
LOUD (loudness) button (CDX-5070 only)
Press to reinforce the bass and treble especially when listening at a low volume level. To cancel the mode, press it again.
11 Display window
12 BTM (best tuning memory) button 16
13 SENS (sensitivity) button
(CDX-5070 only) 19
SENS (sensitivity/loudness) button (CDX-5270/5470)
Press for more than two seconds to reinforce the bass and treble especially when listening at a low volume level. To disengage the button, press it again for more than two seconds (Loudness function).

14 (volume/bass/treble/balance/fader control) buttons
Press to adjust each mode.
15 SEL (control mode select) button
Press to select the desired control mode: BAS (bass), TRE (treble), BAL (balance), FAD (fader) or VOL (volume).
16 DSPL (display change/time set) button 12
At each pressing, the button changes the display modes as follows:
| During CD play | During radio reception |
| Elapsed playing time/track number ↔ Clock | Frequency ↔ Clock |
| Display window | Control mode | Press | Press |
 | Bass control | For less bass | For more bass |
 | Treble control | For less treble | For more treble |
 | Balance control | To decrease the right-speakers' volume | To decrease the left-speakers' volume |
 | Fader control | To decrease the rear-speakers' volume | To decrease the front-speakers' volume |
 | Volume control | For less volume | For more volume |

buttons normally function as the volume control. Adjust the level within three electing the desired control mode with the SEL button. Otherwise, the mode will volume control mode.

| During CD play | During radio reception | ||
| 17 | AMS/SEEK button←←→ ←→ SEE → +→→ | AMS (Automatic Music Sensor) function←←: Press once to locate the beginning of the track being played.→←: Press once to locate the beginning of the next track. Press repeatedly to locate previous or succeeding tracks. | Automatic tuning 13 |
| 18 | MANU button←←→ ←→ SEE → +→→ | Manual search←←: Keep pressed to go back at high speed.→←: Keep pressed to go ahead at high speed. | Manual tuning 15 |
| 19 | INTRO button ←→→ 1 | Intro scan 12 | Preset number buttons 17 |
| 20 | REPEAT button ←→→ 2 | Repeat play 14 | |
| 21 | SHUF button ←→→ 3 | Shuffle play 14 | |
| 22 | 4 5 6 | - | |
23 POWER SELECT switch (located on the bottom of the unit)
See "POWER SELECT Switch" in the installation/connections manual.
Changing the illumination color (CDX-5470 only)
Press the ① button while pressing the SEL button.
Muting the beep tone
Press the 6 button while pressing the SEL button. To obtain the beep tone again, press these buttons once more.
S Commander RM-X1S CDX-5270 (Optional)/5470 (Supplied)

When the POWER SELECT switch is set to the OFF position, the unit cannot be operated with the S commander unless one of the CD, FM and AM buttons of the unit is pressed or a disc is inserted to activate the unit first.
Optional wireless Remote Commander RM-X40 (CDX-5270/5470)

Buttons of the same function as those on the main unit
① OFF button
| During CD play | During radio reception | |
| 4 | AMS (Automatic Music Sensor) button | SEEK (automatic tuning) button 15 |
6 MUTE button
7 (volume/bass/treble/balance/fader control) buttons ⑦ Press to adjust each mode.
⑧ DSPL (display change) button ⑦ ⑫
⑨ SEL (control mode select) button ⑦ Press to select the desired control mode.
Different function buttons
② MODE button
| During CD play | During radio reception |
| No function | At each pressing, the button changes the band. |
| During CD play | During radio reception | |
| 5 | No function | PRESET (preset search) buttonReceives the stations memorized on the preset number buttons.(Preset search function) |
③ SOURCE button
At each pressing, the button changes the source as follows:
→RADIO →CD
When the POWER SELECT switch is set to the OFF position, the unit cannot be operated with the wireless remote commander unless one of the CD, FM and AM buttons of the unit is pressed or a disc is inserted to activate the unit first.
Detaching and Attaching the Front Panel
Detaching the Front Panel
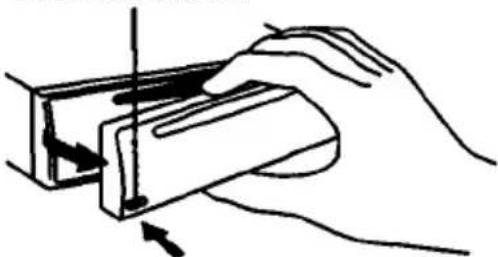
Before detaching the front panel, be sure to press the OFF button first. Then press the RELEASE button to open up the front panel, and detach the panel by pulling it towards you as illustrated.
RELEASE button
Do not drop the panel when detaching it from the unit.
Attaching the Front Panel
Apply the right hand side of the front panel to the unit by attaching part Ⓐ of the front panel to part Ⓑ of the unit as illustrated and push until it clicks.

Do not press hard or apply excessive pressure to the display window of the front panel.
Caution alarm
If you turn the ignition key to the OFF position without removing the front panel, the caution alarm will be activated and a beep sound will be heard for a few seconds.
Notes
- Make sure that the front panel is the right way up when attaching it to the unit. It cannot be attached upside down.
- When attaching the front panel, do not press it hard against the unit. It can be easily attached by pressing lightly.
- Never leave the detached front panel in your car if it is parked in direct sunlight. There could be a considerable rise in temperature inside the car.
- When you carry the front panel with you, put it in the supplied front panel case.
- The display window may become warm while the unit is operated. This is not a sign of a malfunction.

The clock has a 12-hour digital indication.
For example, set it to 10:08.
1 Turn the ignition key to the ON position.
2 Press the DSPL button if the clock indication does not appear.
DSPL
100
3 Press the DSPL button for more than two seconds.
DSPL

While holding down the DSPL button
Press the 📄- 📄S(1x) + 📄 button to set the hour digits. (to go back)(to go forward)

Press the ← - → + ➞ button to set the minute digits. (to go back)(to go forward)

4 The clock starts activating when you take your finger off the DSPL button.
10:08
Notes
- You can set the clock with the unit only.
- If the POWER SELECT switch of the unit is set to the OFF position, the clock cannot be set unless the power is turned on. Set the clock after you have turned on the radio or start CD play.


Ejecting the Disc
Press the ▲ button.
If you press the FM or AM button during CD play
The CD play will stop automatically and the tuner will be activated.
Important
Since the CD system offers a wide dynamic range, the peaks of the high level inputs are recorded with high fidelity and the noise level is very low. Do not turn up the volume while listening to a section with no audio signals or very low level inputs. If you do so, the speakers may be damaged when a section with a peak signal is played.
Notes
- If a disc is already loaded in the unit, never try to insert another disc.
- If you leave the ejected disc in the disc insertion slot after you have pressed the ▲ button, the disc will be automatically retracted into the unit after about 15 seconds in order to protect it.
• To play a 3-inch (8 cm) CD, use the Sony CSA-8 adaptor (not supplied).
- If the MANU button is kept pressed and the end of the disc has been reached, "הַרָרָר" will appear on the display window. Likewise, if the beginning of the disc has been reached, "LLL" will appear on the display window.
At the end of the disc
The track number returns to "1" and CD play is repeated from the beginning of the disc.

Playing the Beginning of Tracks
— Intro Scan Function
Press the ① button to play the first 10 seconds of each track in order.
To cancel the function, press it again.
Playing Repeatedly
— Repeat Play Function
Press the 2 button to repeat the same track.
To cancel the function, press it again.
Playing in Random Order
— Shuffle Play Function
Press the 3 button to play the tracks in random order.
To cancel the function, press it again.
Note
If the INTRO button is pressed during shuffle play, the first 10 seconds of every track will be played randomly.

Searching for the Stations Automatically — Automatic Tuning
1 Select the desired band.

2 Press the SEEK button.

For lower frequencies

For higher frequencies
The scanning stops when a station is received. Press the button repeatedly until the desired station is received.
Tuning in by Adjusting the Frequency — Manual Tuning
Select the desired band, then press the MANU button.
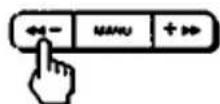
For lower frequencies

For higher frequencies
PREVENTING ACCIDENTS!
While you are driving, the use of the Automatic Tuning and the Memory Preset Tuning is recommended in favor of the Manual Tuning.
When an FM stereo program with a sufficient signal strength is tuned in

The "STEREO" indication will appear.
Avoiding the automatic tuning from stopping on stations too frequently (Local Seek Mode) Press the SENS button lightly to get the "LCL" indication. Only the stations with relatively strong signals can be tuned in. The local seek mode functions only when the Automatic Tuning is in operation.
If FM stereo broadcasting is difficult to receive (Monaural Mode)
Press the SENS button lightly to get the "MONO" indication. The sound will improve, but it will become monaural.
Note (CDX-5270/5470)
- If you press the SENS button for more than two seconds, the loudness function will work. To turn the loudness off, press the button again for more than two seconds.
- You can use the manual tuning with the unit only.

Best receiving stations are automatically searched and memorized on each band (FM1, FM2, FM3 and AM). Up to 6 stations on each band can be stored on the preset number buttons 1 to 6 in order of frequency.
Memorizing the Stations Automatically
— BTM (Best Tuning Memory) Function
1 Select the desired band.

2 Keep the BTM button pressed for more than two seconds.

The BTM function
The BTM function searches all the receivable stations within the currently selected band and memorizes the ones in good receiving conditions in sequence from the lowest frequency.
How to memorize the stations on the preset number buttons
—When there is no preset number indicated on the display window: all the preset number buttons set in the currently selected band will be filled with the memories.
—When there is a preset number indicated on the display window: the unit will memorize the stations on the preset number buttons from the one currently being displayed. For example, when you choose FM2 and preset number 3 is being displayed, the operation will start from preset number 3 on FM2, and stops at preset number 6 on FM3.
The receivable frequency ranges of the FM bands (FM1, FM2, FM3) are the same
Therefore, 18 stations can be memorized on FM.
Note
There may be cases where there are not enough receivable stations due to the lack of stations in the vicinity or weak broadcasting signals. In such cases, the BTM operation may stop without all the buttons being occupied with memories

Up to 6 stations on each band (FM1, FM2, FM3 and AM) can be stored on the preset number buttons in order of your choice.
Memorizing Only the Desired Stations
For example, store a station on the preset number button 1.

Receiving the Memorized Stations
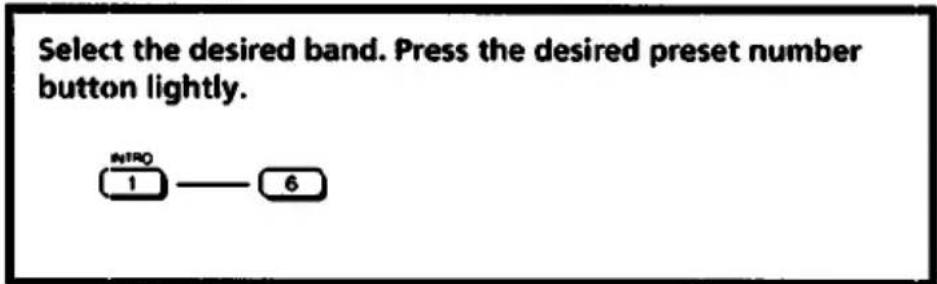
Each preset number button has only one memory location per band
If you try to store another station on the same preset number button, the previously stored station will be erased.
Note
If you keep pressing the preset number button for more than two seconds, the currently received station will be memorized again. To receive the previously memorized station, make sure that the preset number button is pressed only lightly.
Fuse Replacement
When replacing the fuse, be sure to use the one with the correct amperage which will be stated on the fuse case. Never use a fuse whose amperage rating exceeds the one supplied to the unit as this could cause a malfunction of the unit.
Warning
Use the specified amperage fuse. Use of a higher amperage fuse may cause serious damage.
Cleaning the Connectors
The unit may not function properly if the connectors between the unit and the front panel are contaminated with dirt. In order to prevent this from happening, open up the front panel by pressing the RELEASE button then detach it and clean the connectors from time to time.
Clean the connectors with a cotton swab as illustrated. Be sure to clean them with a horizontal motion. Never clean them vertically as this could damage the connecting points.
Main unit

Back of the front panel
Dismounting the Unit
1

Release key (supplied)
2

3

4

AUDIO POWER SPECIFICATIONS
POWER OUTPUT AND TOTAL HARMONIC DISTORTION 12 (7)* watts per channel minimum continuous average power into 4 ohms, 4 channels driven, from 20 – 20,000 Hz with no more than 1% total harmonic distortion.
*CDX-5070 only
Other Specifications
Power amplifier section
| Outputs | Speaker outputs(sure seal connectors) |
| Speaker impedance | 4 - 8 ohms |
| Maximum power output | |
| CDX-5270/547030W × 4 ch (at 4 ohms)CDX-507020 W × 4 ch(at 4 ohms) | |
CD player section
| System | Compact disc digital audio system |
| Frequency response | 10 - 20,000 Hz |
| Wow and flutter | Below the measurable limit |
| Signal-to-noise ratio | 90 dB |
| Laser Diode Properties | |
| Material | GaAlAs |
| Wavelength | 780 nm |
| Emission Duration | Continuous |
| Laser out-put Power | Less than 44.6 μW* |
* This output is the value measured at a distance of 200 mm from the objective lens surface on the Optical Pick-up Block.
Tuner section
| FM | |
| Tuning range | 87.5 – 107.9 MHz |
| Antenna terminal | External antenna connector |
| Intermediate frequency | |
| 10.7 MHz | |
| Sensitivity | 8 dBf |
| Selectivity | 75 dB at 400 kHz |
| Signal-to-noise ratio | 65 dB (stereo), 70 dB (mono) |
| Harmonic distortion at 1 kHz | |
| 0.5% (stereo), 0.3% (mono) | |
| Separation | 35 dB |
| Frequency response | 30 – 15,000 Hz |
AM
| Tuning range | 530 - 1,710 kHz |
| Antenna terminal | External antenna connector |
| Intermediate frequency | |
| 10.71 MHz/450 kHz | |
| Sensitivity | 30 μV |
| Signal-to-noise ratio | 55 dB |
| Harmonic distortion at 1 kHz | |
| 0.3% | |
General
| Tone controls | Bass ± 8 dB at 100 HzTreble ± 8 dB at 10 kHz |
| Power requirements | 12 V DC car battery (negative ground) |
| Current drain | 1 A (CD playback)1.5 A (during disc loading or eject) |
| Operating temperature | |
| Dimensions | -10°C to 50°C (15°F to 120°F)Approx. 186 × 57 × 172 mm(w/h/d)(73/×21/×62/×in.)not incl. projecting parts and controls |
| Mass | Approx. 1.5 kg (3 lb 5 oz.) |
| Supplied accessories | Mounting hardware (1 set)Power connecting cord (1)Front panel case (1)S commander (1) RM-X1S(CDX-5470 only) |
| Optional accessories | Cleaning cloth XP-CD1Compact disc single adaptor CSA-8Wireless remote commanderRM-X40S commander RM-X1S |
| Design and specifications subject to change without notice. | |
Troubleshooting Guide
The following check will assist in the correction of most problems which you may encounter with your unit.
Before going through the check list below, refer back to the connection and operating procedures.
CD operation
| Problem | Cause/Solution |
| CD play does not start. | Dusty or defective disc.The ambient temperature is more than 50°C (120°F). |
| The disc cannot be loaded or is automatically ejected. | A disc is already loaded.The disc is inserted with the labeled side downwards. |
| Do not function. | The built-in micro computer has malfunctioned.→Press the reset button. |
| The sound skips. | The unit is installed at an angle of more than 20 .The unit is not installed on the sturdy part of a car.Dusty or defective disc. |
Radio reception
| Problem | Cause/Solution |
| Preset tuning is not possible. | Memorize the correct frequency.The broadcast is too weak. |
| Automatic tuning is not possible. | The broadcast is too weak. → Use manual tuning. |
| The “STEREO” indication flashes. | Tune in precisely.The broadcast is too weak. → Press the SENS button to enter the MONO mode. |
General
| Trouble | Cause/Solution |
| No sound | Adjust the volume with thebutton.Set the fader control to the center position on the 2-speaker system. |
| Indications do not appear on the display window. | Remove the front panel and clean the connectors. See “Cleaning the Connectors” of “Maintenance” for details. |
Error displays
The following indication will flash for about five seconds.
| Display | Cause | Solution |
| E-04 | The disc is dirty. | Clean the disc. |
| The disc is inserted upside down. | Insert the disc correctly. | |
| E-99 | The CD player cannot be operated because of some trouble. | Press the reset button. |
If the above mentioned solutions do not help to improve the situation, consult your nearest Sony dealer.
Appareil principal

3

4

FM/AM Compact Disc Player

CDX-5070/5270/5470
Installation/Connections
Installation/Connexions
Sony Corporation © 1994 Printed in Japan
Supplied Mounting Hardware
The numbers in the list are keyed to those in the instructions.
The release key ④ is used for dismounting the unit. See the operating instructions manual for details.
- This unit is designed for negative ground 12 V DC operation only.
- Before making connections, disconnect the ground terminal of the car battery to avoid short circuits.
- Connect the yellow and red power input leads only after all other leads have been connected.
- Be sure to connect the red power input lead to the positive 12 V power terminal which is energized when the ignition key is in the accessory position.
- Run all ground wires to a common ground point.
Précautions
When the Unit is Used in a Car with No Accessory Position on the Ignition Key
— POWER SELECT Switch
The illumination on the front panel is factory-set to be turned on even when the unit is not being played. However, this setting may cause some car battery wear if the unit is used in a car with no accessory position on the ignition key.
To avoid this battery wear when using the unit in such a car, set the POWER SELECT switch, located on the bottom of the unit to the OFF position, then press the reset button. The illumination is reset to stay off while the unit is not being played.
Note
The caution alarm for the front panel is not activated when the POWER SELECT switch is set to the OFF position.
S Commander
Commande S

To connect the plug of the S commander securely to the back of the unit, bundle its cord with other connecting cords with the supplied cramper ⑦ as illustrated. When bundling the cords together, make sure that you leave some leeway for the plug end of the S commander's cord so that the plug will not come out when other cords are pulled.
Installing the S Commander
- Choose the mounting location carefully so that the S commander will not interfere with operating the car.
- Do not install the S commander in a place where it may jeopardize the safety of the (front) passenger in anyway.
- When installing the S commander, be sure not to damage the electrical cables etc. on the other side of the mounting surface.
- Avoid installing the S commander where it may be subject to high temperatures, such as from direct sunlight or hot air from the heater etc.
1 Choose the exact location for the S commander to be mounted, then clean the mounting surface area.
2 Mark two positions for the supplied screws. Use the screw holes on the mounting hardware ⑥ to mark the positions.
3 Remove the steering wheel column cover and drill 2 mm diameter holes where you have marked.
4
Warm the mounting surface and the double-sided adhesive tape on the mounting hardware ⑥ to the temperature of 20°C to 30°C (68°F to 86°F), and attach the mounting hardware onto the mounting surface by applying even pressure. Then screw it down with the supplied screws ⑨.
B

Attach a piece of heavy duty tape etc. on the other side of the mounting surface to cover the protruding tips of the screws so that they will not interfere with the electrical cables etc. inside the steering wheel column.
After installing the steering wheel column cover, attach the S commander to the mounting hardware by aligning the three holes on the bottom of the commander to the three catches on the mounting hardware and sliding the commander until it locks into place as illustrated.
Note
If you are mounting the S commander to the steering wheel column, make sure that the protruding tips of the screws on the inner surface of the column do not in anyway hinder or interfere with the movement of the rotating shaft, operative parts of the switches or the electrical cables etc. inside the column.
Remarque
- Do not tamper with the four holes on the upper surface of the unit. They are for tuner adjustments to be done only by service technicians.
- Choose the installation location carefully so that the unit will not hamper the driver during driving.
- Avoid installing the unit where it would be subject to high temperatures, such as from direct sunlight or hot air from the heater, or where it would be subject to dust, dirt or excessive vibration.
- Use only the supplied mounting hardware for a safe and secure installation.
Mounting angle adjustment
Adjust the mounting angle to less than 20° .
How to Detach and Attach the Front Panel
Before installing the unit, detach the front panel.
To detach
Press the RELEASE button to open the front panel, then pull it out.
To attach
Align parts ① and ⑧, and push the front panel until it clicks.
To detach Dépose

Précautions
Mounting Example
Installation in the dashboard
Mounting the Unit in a Japanese Car
This unit may not be installed in some makes of cars. In this case, consult your nearest Sony dealer.
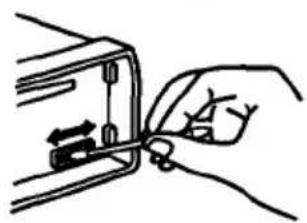
Run a blade along the slits on the back of the front trim and cut it off the unit.
Use the existing parts supplied to your car.
Remarque
When the installation and connections are over, be sure to press the reset button with a ball-point pen etc.
Notes on the control leads
- The power antenna control lead (blue) supplies +12 V DC when you turn on the tuner.
- A power antenna without relay box cannot be used with this unit.
Memory hold connection
When the yellow power input lead is connected, power will always be supplied to the memory circuit even when the ignition key is turned off.
Notes on speaker connection
- Before connecting the speakers, turn the unit off.
- Use speakers with an impedance of 4 to 8 ohms, and with adequate power handling capacities. Otherwise, the speakers may be damaged.
- Do not connect the terminals of the speaker system to the car chassis, and do not connect the terminals of the right speaker with those of the left speaker.
- Do not connect the speakers in parallel.
- Do not connect any active speakers (with built-in amplifiers) to the speaker terminals of the unit. Doing so may damage the active speakers. Therefore, be sure to connect passive speakers to these terminals.
![graph TD A["CDX-5070/5270/5470"] --> B["White Blanc"] A --> C["Gray Gris"] A --> D["Green Vert"] A --> E["Purple Mauve"] B --> F["Left Gauche"] B --> G["Front speakers Haut-parleurs avant"] B --> H["Right Droit"] C --> I["Left Gauche"] C --> J["Rear speakers Haut-parleurs arrière"] C --> K["Right Dr…](/content/2026/07/1516843/images/b7800fc889605dc1279cb279918e7751c6127af2665557055a24f76def72e9e6.jpg)
- OPERATING INSTRUCTIONS PAGE
- OWNER'S RECORD
- CAUTION
- INFORMATION
- TABLE OF CONTENTS
- CD PLAYER OPERATION
- RADIO RECEPTION
- GENERAL
- TUNER SECTION
- CD SECTION
- NOTE ON MOISTURE CONDENSATION
- NOTES ON COMPACT DISCS
- CHANGING THE ILLUMINATION COLOR (CDX-5470 ONLY)
- MUTING THE BEEP TONE
- S COMMANDER RM-X1S CDX-5270 (OPTIONAL)/5470 (SUPPLIED)
- BUTTONS OF THE SAME FUNCTION AS THOSE ON THE MAIN UNIT
- DIFFERENT FUNCTION BUTTONS
- DETACHING AND ATTACHING THE FRONT PANEL
- DETACHING THE FRONT PANEL
- ATTACHING THE FRONT PANEL
- CAUTION ALARM
- NOTES
- EJECTING THE DISC
- IF YOU PRESS THE FM OR AM BUTTON DURING CD PLAY
- IMPORTANT
- AT THE END OF THE DISC
- PLAYING THE BEGINNING OF TRACKS
- INTRO SCAN FUNCTION
- PLAYING REPEATEDLY
- REPEAT PLAY FUNCTION
- PLAYING IN RANDOM ORDER
- SHUFFLE PLAY FUNCTION
- NOTE
- SEARCHING FOR THE STATIONS AUTOMATICALLY — AUTOMATIC TUNING
- TUNING IN BY ADJUSTING THE FREQUENCY — MANUAL TUNING
- PREVENTING ACCIDENTS
- NOTE (CDX-5270/5470)
- MEMORIZING THE STATIONS AUTOMATICALLY
- BTM (BEST TUNING MEMORY) FUNCTION
- THE BTM FUNCTION
- HOW TO MEMORIZE THE STATIONS ON THE PRESET NUMBER BUTTONS
- MEMORIZING ONLY THE DESIRED STATIONS
- RECEIVING THE MEMORIZED STATIONS
- FUSE REPLACEMENT
- WARNING
- CLEANING THE CONNECTORS
- DISMOUNTING THE UNIT
- AUDIO POWER SPECIFICATIONS
- OTHER SPECIFICATIONS
- TROUBLESHOOTING GUIDE
- ERROR DISPLAYS
- CDX
- SUPPLIED MOUNTING HARDWARE
- PRÉCAUTIONS
- WHEN THE UNIT IS USED IN A CAR WITH NO ACCESSORY POSITION ON THE IGNITION KEY
- S COMMANDER
- COMMANDE S
- INSTALLING THE S COMMANDER
- REMARQUE
- MOUNTING ANGLE ADJUSTMENT
- HOW TO DETACH AND ATTACH THE FRONT PANEL
- TO DETACH
- TO ATTACH
- MOUNTING EXAMPLE
- MOUNTING THE UNIT IN A JAPANESE CAR
- NOTES ON THE CONTROL LEADS
- MEMORY HOLD CONNECTION
- NOTES ON SPEAKER CONNECTION
Brand : SONY
Model : CDX-5270
Category : Car radio