TPC7050 - Barcode Reader POSline - Free user manual and instructions
Find the device manual for free TPC7050 POSline in PDF.
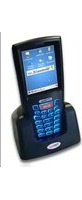


| Product Type | Barcode Reader |
| Model | TPC7050 |
| Brand | POSline |
| Dimensions (approx.) | 17.0 x 7.0 x 8.0 cm (6.7 x 2.8 x 3.1 in) |
| Weight (approx.) | 150 g (5.3 oz) |
| Power Supply | 5V DC via USB cable |
| Interface | USB (USB-HID, USB-VCP) |
| Scan Technology | Laser or CMOS imaging (1D/2D) |
| Scan Angle | Horizontal: 45°, Vertical: 30° |
| Light Source | Visible laser diode (650 nm) or LED illumination |
| Depth of Field | Up to 30 cm for 1D codes |
| Decode Capability | 1D: UPC/EAN, Code 39, Code 128, etc. 2D: QR, Data Matrix, PDF417 |
| Operating Temperature | 0°C to 50°C (32°F to 122°F) |
| Storage Temperature | -20°C to 60°C (-4°F to 140°F) |
| Humidity | 5% to 95% non-condensing |
| Drop Resistance | 1.5 m (4.9 ft) onto concrete |
| Laser Class | Class 1 (eye safe) |
| Maintenance | Clean scan window with a soft, dry cloth. Avoid solvents. |
| Compatibility | Windows, Mac, Linux, Android, iOS (via OTG) |
| Warranty | 1 year (check local distributor) |
| Included Accessories | USB cable, quick start guide, mounting bracket (optional) |
Frequently Asked Questions - TPC7050 POSline
User questions about TPC7050 POSline
0 question about this device. Answer the ones you know or ask your own.
Ask a new question about this device
Download the instructions for your Barcode Reader in PDF format for free! Find your manual TPC7050 - POSline and take your electronic device back in hand. On this page are published all the documents necessary for the use of your device. TPC7050 by POSline.
USER MANUAL TPC7050 POSline
Empower the Bar Code

POSline®
User's Manual
TPC7050 Mobile Computer
(WinCE 4.2 version)
DOC NO. UM-PT805-01
Jan. 2008
Version 1.2
NOTICE: This user's manual may be revised or withdrawn at any time without prior notice.
Copyright 2007, POSline.
All rights reserved.
This manual may not, in whole or in part, be copied, photocopied, reproduced, translated or converted to any electronic or machine readable form without the prior written consent of POSline.
Limited warranty and disclaimers
By opening the package of this product you agree to become bound by the liability and warranty conditions as described below.
Under all circumstances this manual should be read attentively before installing and or using the product. In no event, will POSline be liable for any direct, indirect, consequential or incidental damages arising out of use or inability to use both the hardware and software, even if POSline has been informed about the possibility of such damages.
A serial number appears on all POSline products. This official registration number is strictly related to the device purchased. Make sure that the serial number appearing on your POSline device has not been removed. Servicing by our service department can only be carried out under warranty.
All POSline products are warranted for the legal warranty period after purchase, covering defects in material and workmanship. POSline will repair or, at its opinion, replace products that prove to be defective in material or workmanship under proper use during the warranty period.
POSline will not be liable in case modifications are made by the customer. In such case the standard repair charge will be applicable. The standard charge for repair will also be applicable in case no defect is found at all. These rules also apply for products that are still under warranty. Therefore, you are advised to have the product specifications always at hand.
Trademarks used are property of their respective owners.
Table of Contents
1. INTRODUCTION.... 1
1.1 ABOUT THIS MANUAL .... 1
1.2 USER AND PRODUCT SAFETY 2
1.3 SPECIFICATIONS....4
2. GETTING STARTED....6
2.1 CHECK THE PACKAGE 6
2.1.1 Compact Package 6
2.1.2 Deluxe Package....7
2.2 DETAILED VIEW 8
2.2.1 TPC7050 Mobile Computer....8
2.2.2 Cradle 10
2.3 INSTALLING, REPLACING AND CHARGING BATTERIES 12
2.3.1 Installing / Replacing the Battery Pack.... 14
2.3.2 Charging the Battery Pack with a Power Adapter.... 15
2.3.3 Charging the Battery Pack with Cradle.... 16
2.4 INSTALLING IN A SYSTEM 17
2.4.1 Via USB Cable 17
2.4.2 Via CRD-80 Cradle.... 17
3. OPERATION OF THE MOBILE COMPUTER.... 18
3.1 KEYPAD DESCRIPTION.... 18
3.2 FUNCTION KEY DESCRIPTION 19
3.3 INSTALL CF AND SD CARD.... 20
3.3.1 Inserting a CF Card into the TPC7050.... 20
3.3.2 Inserting an SD card into the TPC7050.... 20
3.4 CONFIGURING TPC7050 SETTINGS 21
3.4.1 Calibrating Touch Screen Alignment.... 21
3.4.2 Adjusting Brightness 22
3.4.3 Muting Sound 22
3.4.4 Using the Stylus.... 22
3.5 ENTERING INFORMATION 23
3.5.1 Entering Information Using a Keypad.... 23
3.5.2 Entering Information Using the Keyboard Input Panel 23
3.5.3 Entering Data via the Bar Code Scanner.... 23
3.6 POWER MANAGEMENT 24
3.6.1 Power Status Indication 24
3.6.2 Saving Battery Power.... 26
3.6.3 Suspend Mode 27
3.6.4 Resume 28
3.7 RESETTING THE TPC7050....28
3.7.1 Performing a Warm Boot.... 28
3.7.2 Performing a Cold Boot.... 28
3.8 DISK ON CHIP 29
3.8.1 DiskOnChip Location.... 29
3.8.2 Saving to Flash.... 29
3.8.3 DiskOnChip Size 30
4. SCANNING....31
4.1 SCAN CONFIGURATION 31
4.2 SCAN DRIVER 32
4.3 SCAN TEST 32
4.4 READING BARCODE 33
4.5 BARCODE READING PROBLEMS.... 34
5. UTILITIES 35
5.1 BACKLIGHT SETTING 35
5.2 FUNCTION KEY SETTING 36
5.3 KEYPAD LED SETTING 37
5.4 SYSTEM RESTORE 37
6. SOFTWARE APPLICATIONS.... 38
6.1 INTERNET EXPLORER....38
6.2 MEDIA PLAYER 38
6.3 MICROSOFT WORDPAD 39
6.4 REMOTE DESKTOP CONNECTION 39
6.5 TRANSCRIBER....39
6.6 WINDOWS EXPLORER 40
7. COMMUNICATION....41
7.1 ACTIVESYNC 41
7.2 INSTALLING MICROSOFT ACTIVESYNC 41
7.3 CONNECTING THE TPC7050 TO ACTIVESYNC 42
7.4 SETTING UP A PARTNERSHIP 43
7.5 CONNECTING THE TPC70-50 44
7.5.1 Synchronizing Data.... 44
7.5.2 Solving Problems during Synchronization.... 44
7.5.3 Searching TPC7050 Contents from a Desktop PC.... 45
8. OVERVIEW OF MICROSOFT WINDOWS CE 4.2....46
8.1 MAIN WINDOWS....46
8.2 TASKBAR 48
8.3 SETTING UP THE TPC7050.... 50
8.3.1 Backlight Settings.... 50
8.3.2 Certificates.... 50
8.3.3 Date/Time 52
8.3.4 Dialing 53
8.3.5 Display 54
8.3.6 Hot Function Key 55
8.3.7 Input Panel.... 55
8.3.8 Internet Options 56
8.3.9 Keyboard....57
8.3.10 Keypad LED 58
8.3.11 LCD PWM Setting.... 58
8.3.12 Mouse 58
8.3.13 Network and Dial-up Connection 59
8.3.14 Owner....59
8.3.15 Password....60
8.3.16 PC Connection 61
8.3.17 Power 62
8.3.18 Regional Settings.... 62
8.3.19 Remove Programs 63
8.3.20 Scan Configuration 64
8.3.21 Storage Manager.... 64
8.3.22 Stylus 65
8.3.23 System 66
8.3.24 System Restore 67
8.3.25 Volume and Sound 67
9. TROUBLE SHOOTING 68
9.1 GENERAL CHECKS 68
9.2 READ OPERATION PROBLEMS 68
9.3 MOBILE COMPUTER PROBLEMS....68
10. APPENDIX: UPDATING THE OS VIA CF CARD.... 70
1. Introduction
Congratulations on purchasing the TPC7050, a Microsoft Windows®CE .Net Mobile Computer. Its special combination of features makes it perfect for use in a wide range of applications.
These features as:
■ Microsoft Windows CE. Net operating system
■ Robust expansion capability
■ Wireless mobility via 802.11b
■ Long battery life
■ Transflective type color LCD display
■ Backlit keypad
1.1 About this Manual
The chapters contained in this manual are:
Chapter 1: Introduction – Presents general information about the TPC7050
Chapter 2: Getting started – Describes basic use of the TPC7050
Chapter 3: Operating the Mobile computer – Describes customizing the TPC7050
Chapter 4: Scanning
Chapter 5: Useful Utilities
Chapter 6: Software Applications
Chapter 7: Communication – Describes using the TPC7050 for different types of communication
Chapter 8: Overview of Microsoft Windows CE 4.2
Chapter 9: Troubleshooting
Chapter 10: Appendix
1.2 User and Product Safety
■ Never use strong pressure on the screen or subject it to severe impact, as the LCD panel can crack and possibly cause personal injury. If the LCD panel is broken, never touch the liquid inside, for such contact can irritate the skin.
Although the TPC7050 mobile computer meets IP54 standards for water and dust resistance, avoid prolonged exposure to rain or other concentrated moisture. Conditions exceeding IP54 standards could result in water or other contaminants entering the TPC7050.
■ Use only the approved AC Adapter with the TPC7050. Use of an unapproved AC Adapter could result in electrical problems, or even cause a fire or an electrical shock to the user.
■ Be sure that only authorized suppliers are allowed to disassemble and reassemble the device. If the device or parts are damaged due to wrong handling, the product and parts warranty is void.
■ Always make back-up copies of all important data. This is easily done using a cable or single cradle (optional) to transfer data to the computer. The manufacturer is not liable for any data damage or data loss caused by deletion or corruption while using this device, or due to a drained battery.
Lithium-ion battery packs may get hot, explode, ignite and/or cause serious injury if abused. Please follow the safety warnings listed below.
Warnings:
♦ Do not place the battery pack in fire or heat the battery.
♦ Do not install the battery pack backwards so the polarity is reversed.
♦ Do not carry or store battery pack together with metal objects.
Do not pierce the battery pack with nails, strike the battery pack with a hammer, step on the battery pack or otherwise subject it to strong impacts or shocks.
♦ Do not solder directly onto the battery pack.
- Do not expose battery pack to liquid, or allow the battery contacts to get wet.
Do not disassemble or modify the battery pack. The battery pack contains safety and protection devices, which, if damaged, may cause the battery pack to generate heat, explode or ignite.
Do not discharge the battery pack using any device except for the specified device. When it is used in devices other than the specified devices, the battery pack can be damaged or its life expectancy reduced. If the device causes any abnormal current to flow, it may cause the battery pack to become hot, explode or ignite and cause serious injury.
In the event the battery pack leaks and fluid gets into the eyes, do not rub the eyes. Rinse well with water and immediately seek medical care. If left untreated, the battery fluid could cause eye damage.
To avoid malfunctions and to ensure years of trouble-free operation, pay attention to the following:
General Use

Do not expose the mobile computer to areas subject to extreme heat such as direct sunlight, near a heater, or in a car – or in areas that are very cold, humid, moist, or dusty.

Do not expose the product to rain or water

Do not subject the product to strong impact, or throw or drop the mobile computer from large heights. Do not allow other mechanical shocks to the product.
Cleaning Instructions

Clean the exterior by wiping it with a soft, dry cloth. Do not use much water.

Do not use thinner, white spirit or other solvents. These can discolor the case and the keys and it has a negative effect on the lifetime of the keys.
Cleaning the Mobile Computer
Clean the scan window periodically for better reading performance, but pay attention to not scratching the window
Cleaning the Cradle
Avoid touching the contacts in the cradle. The contacts must stay as clean as possible to maintain optimal charging capacity. Do not use water when cleaning the cradle. This can cause malfunction of the chargers.
Using the Mobile Computer

Avoid temperature changes. Sudden temperature changes can cause condensation to form on the mobile computer. Using the mobile computer while condensation is present can cause malfunction. Always wait until the condensation clears naturally before attempting operation.

Do not leave the mobile computer in an area where static charge is accumulated or near devices where electromagnetic emission is generated.
Do not place any object on top of the mobile computer. Do not lay the mobile computer face down. Doing so can cause accidental operation of the power key or [ENT] key, which can discharge your batteries or change settings you do not want changed.
Using the Cradle
Do not place any product other than the
TPC7050 mobile computer in the cradle.
Maintenance

There are no user-serviceable parts inside the mobile computer or the cradle. So do not try to take it apart. The manufacturer will not be liable for any damage caused by customers. In case of a malfunction that can not be solved by the trouble-shooting instructions in this manual, please consult our service department.
1.3 Specifications
Performance
OS Windows CE .NET 4.2
CPU Intel PXA-270 (520 MHz)
RAM 64MB SDRAM
ROM 128MB
Display
LCD 3.5" Color TFT LCD with touch panel
Resolution 240 x 320
Scanner
Scanner system Long range CCD scanner 2048 pixels
Resolution 4 mil (0.10mm) min. at PCS 90%
Depth of field 15.5" (UPC/EAN, 13 mil at PCS 90%)
Scanning rate 400 scans/sec
PCS ≥30%
Ambient light 0\~20,000 lux
Readable barcode Code 39, Code 93, Code 11, Code 128, EAN-128, Codabar, UPC A/E, EAN 8/13, UK Plessey, MSI/Plessey, Standard 2 of 5, Interleaved 2 of 5, Telepen, Matrix 2 of 5, China Post Code
Keypad
23 keys with back light
Communication Interface
Standard Interface RS232 & USB
Power supply
Main power Rechargeable Li-ion Battery 3600mAh, 3.7Vdc
Power input Via cradle or direct charging
* Batteries must be charged at a temperature ranging from 0\~+45°C (+32°F to +113°F). At temperatures below 0°C and above +45°C display or battery performance degradation may occur.
Expansion slot
| CF type II slot (for memory expansion and WLAN card) |
| SD/MMC card (for memory expansion) |
Physical and Environmental
| Operation Temperature | -10~50°C |
| Storage Temperature | -20~60°C |
| Battery Charging | 0~45°C |
Temperature
| Humidity | Max 95% RH at 40°C |
| Weight | Approx. 485 g |
| Drop test | 1.2 meters to concrete (Handset) |
| 0.9 meters to concrete (Cradle) |
| ESD +/-15kVDC air discharge |
| +/- 8kVDC direct discharge (contact) |
| +/- 8kVDC indirect discharge (H & V) |
| Sealed standard IP54 |
Agency Listing
| CE, UL (including battery), FCC class B, BSMI, CCC |
Win-CE AP
| MS Web Browser(Internet Explorer), Media Player, MicrosoftWordPad, Remote Connection, Transcriber, Windows Explorer |
Developing Tools
SDK Microsoft Visual tool for VB and VC programming
2. Getting Started
This chapter describes the TPC7050 physical characteristics, how to install and charge the batteries, how to remove and replace the strap assembly and how to start the TPC7050 for the first time.
2.1 Check the package
Carefully remove all protective material from around the TPC7050 and save the shipping container for later storage and shipping.
Depending on the configuration ordered, the TPC7050 shipping container may include:
2.1.1 Compact Package
| v | TPC7050 | v | Quick Reference Guide |
| v | Battery p ack v CD ROM | ||
| v | USB Sync cable | v | Thread |
| v | Power supply | v | Stylus |
| v | Hand strap |

Figure 2-1 Compact Package
2.1.2 Deluxe Package
| v | TPC7050 | v | Hand strap |
| v | Battery p ack v Quick Reference Guide | ||
| v | Cradle | v | CD |
| v | USB Sync cable | v | Thread |
| v | Power supply | v | Stylus |

Inspect the package contents for damage. If any item is missing or damaged, please contact the POSline Technical Support Center immediately.
2.2 Detailed View
The pictures below provide information on the TPC7050's various buttons, ports and other functions.
2.2.1 TPC7050 Mobile Computer
Dimensions of the TPC7050
180mm (L) x 82mm (W) x 43.5mm (H)
Details of the TPC7050
Front

Figure 2-3 The Front of the TPC7050
Back

Figure 2-4 The Back of the TPC7050
1. Touch Screen
Use the stylus to perform specific actions on the touch panel.
2. RS232/ USB Charging Port
The USB port enables sending and receiving files and data with a desktop PC. To transmit files and data, ActiveSync must be installed on the PC.
3. LED Indicators:
LEDs show the current status of the TPC7050. LED indicators signal the following:
| LED status Description | |
| Green The scanner | is reading barcodesCharge complete |
| Red Charging | |
4. Stylus
Use the stylus for selecting items and entering information.
5. CF Cover
The CF Cover protects the CF connector from dust and water.
6. Battery Cover
The battery cover protects the battery pack. Attach the battery cover to leave suspend mode.
7. CCD scanner
The CCD scans barcode.
8. Reset Switch
Use this to reboot OS when a system crash.
2.2.2 Cradle
Dimensions of the CRD-80 Cradle
117.5mm (L) x 113.5mm (W) x 70.5mm (H)
Details of the CRD-80 Cradle
Front

Figure 2-5 The Front of the CRD-80
Back

Figure 2-6 The Back of the CRD-80
1. Mobile Computer Slot
Put the mobile computer in the cradle slot for data transmission or charging
2. Power LED Indicator
| LED status Description |
| Green Power on (mobile computer not in cradle) |
3. Charging LED Indicator
| LED status Description | |
| Red Charging | |
| Green Charging complete | |
4. RS232 / USB and Charging Connector
Connects the multiple function socket on the mobile computer for data transmission and charging
5. Charging Slot
For charging a spare rechargeable battery pack
6. RS-232 C Socket
For connecting to PC serial port through standard RS232 cable
7. USB Socket
For connecting to PC USB port through a standard USB cable
8. DC Input Socket
Input for AC adapter
2.3 Installing, Replacing and Charging Batteries
Wrong use of batteries may cause serious damage to the mobile computer or to the cradle. To avoid damage, it is important to follow the instructions.
Caution: ▶ Insert a fully-charged battery pack before use of the mobile computer.
▶ Never remove the main batteries while the mobile computer is turned on.
Doing so may lose data in the mobile computer.
▶ Use only recommended batteries.
When other batteries are used, defects or other problems can occur. Before installing (new) batteries, please make sure you are using the recommended batteries.
▶ Use the right charger for batteries.
The rechargeable Li-ion battery pack from POSline can be charged in the cradle when either it is in the mobile computer or alone in the charging slot in the back of the cradle.
The life of a battery pack is limited, and charging a battery pack causes it to gradually lose its ability to maintain a charge. If your battery pack requires frequent charging, it probably means it is time to purchase a new one.
▶ A fully charged backup battery can maintain memory (RAM) contents for about 10 minutes, even when the battery pack is removed.
▶ Strictly follow the instructions for installing, charging, and removing the batteries.
The products are not warranted for damage, defects, malfunction, or loss of data, resulting from incorrect use of batteries.
Required batteries:
The mobile computer needs both main battery and backup battery for operation.
Main Battery
The rechargeable battery pack is for normal operations and data storage. When the battery pack power goes low, immediately charge it or replace it with a charged battery pack.
Backup Battery
The built-in battery is for memory backup.
How to charge the POSline rechargeable battery pack in the cradle
- Make sure that the POSline rechargeable battery pack is inserted in the mobile computer. When the mobile computer is placed in the cradle, the rechargeable battery pack charges automatically.
- If you have a spare POSline battery pack, you can replace the empty battery pack with a full battery pack for continuous mobile computer operation. Put the empty battery pack in the charging slot of the cradle. The LED (CHG) on the cradle flashes Red and turns Green when the battery is fully charged.
When to replace or recharge the main battery
There are two conditions that you need to replace the main battery.
- As soon as possible after the battery indicator

appears on the display.
- Before using the mobile computer when it has not been used for an extended period.
Notes:
♦ Charging the Main and Backup Batteries for the First Time
It may take up to 16 hours to fully charge the empty backup battery. The first time charge should be for at least 16 hours to insure a proper charge.
When charging the battery pack, the Power LED on the Mobile computer turns Red. After the battery pack is fully charged, the Power LED turns green.
2.3.1 Installing / Replacing the Battery Pack
How to install or replace the main battery in the mobile computer
Important: Data you enter may not be properly stored until the built-in backup battery has been adequately charged. Please turn on the back up battery switch before you charge the mobile computer.

1 2

If the Mobile Computer has a hand-strap, detach and loosen the hand-strap
[Non-Text]

Rotate the latches to the open position
34

Remove the battery cover. Position the battery pack with the label side toward you
[Non-Text]
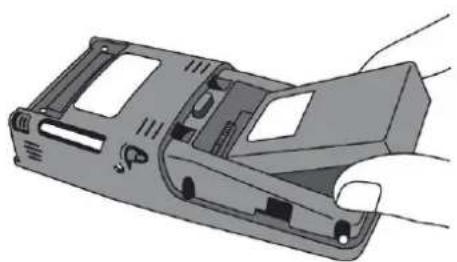
Figure 2-7 Installing / Replacing the Main Battery
Note: Please follow the above procedure in reverse to reassemble the battery cover.
2.3.2 Charging the Battery Pack with a Power Adapter
a) Using a RS232/Charging Cable or USB/Charging Cable
- Plug in the RS232/Charging cable or the USB/Charging cable to the TPC7050
- Connect the AC adapter to the cable's power jack and an electrical outlet.

Figure 2-8 Supplying Power
b) Using a DC-IN Converter
- Plug in the DC-IN Converter to the PDA bottom connector
- Plug in the connector of the power adapter with DC-IN Converter
- Connect the power adapter to a power source

Figure 2-9 Charging with Power Adapter
Notes: ◆ When charging the battery pack, the Power LED on the Mobile computer is Rcd.
When the battery pack is fully charged, the Power LED turns to green.
2.3.3 Charging the Battery Pack with Cradle
a) Leaving the battery pack inside the Mobile computer
- Connect the power adaptor to a power source
- Plug in the connector of the power adapter to the Cradle
- Insert the Mobile computer into the Cradle

Figure 2-10 Charging with Cradle
Note:
When charging the battery pack, the Power LED on the Mobile computer turns Red. After the battery pack is fully charged, the Mobile Computer Power LED turns green.
b) Placing the spare battery pack into the Cradle's spare battery charging slot
- Connect the power adapter to a power source
- Plug in the connector of the power adapter with Cradle
- Insert the battery pack into the Cradle's spare battery slot
Note:
When charging the battery pack in the Cradle's spare battery slot, the Cradle charging LED is Red. After the battery pack is fully charged, the LED turns green.
Caution:
Do not remove the Battery pack for too long from TPC7050 once you have already fully-charged the Battery pack and the backup battery pack and have started to use the TPC7050. Otherwise data stored inside SDRAM memory will be lost. Please keep in mind to turn off the power on Mobile computer when changing the main Battery pack.
2.4 Installing in a System
Notes:
♦ Exercise caution at all times when working with AC-powered equipment.
◆ Turn off your devices before installation.
- Because of the special pin-out of the connectors, use the cables supplied by the manufacturer.
Do not modify the cable provided by the manufacturer. If you need a special cable for some cases, contact your supplier to purchase the right cables or technical support.
System Connection (Data Communication)
The PT series portable data mobile computers let you link to a host computer through an RS-232 cable or the CRD-80 cradle for data communication.
2.4.1 Via USB Cable
The PT series connects directly to the serial port of a host computer via the USB cable.

Figure 2-11 Communication through Cable
2.4.2 Via CRD-80 Cradle
The CRD-80 cradle provides two methods for data transmission: through an RS-232 cable (9-pin connector for PC and 9-pin connector for mobile computer) and through a USB cable.

Figure 2-12 Communication through Cradle
3. Operation of the Mobile Computer
3.1 Keypad Description
The TPC7050 keypad consists of 23 rubber keys, including Cursor key, 0\~9, Alpha key, Function, Escape, Backspace, TAB and Enter key. Please refer to the picture below.

Figure 3-1 Keypad Layout
| Key Define | Function |
| Function Key | The Function key is used to perform alternative key function |
| Scanning | Enable scanner, only if the scan function is required. |
| Power Switch | When the unit is off, pressing the Power key turns the unit on.Alternatively, when the unit is on, this key must be pressed and held down for about two seconds in order to turn the unit off. |
| Shift Left | Cursor moves left |
| Shift Up | Cursor moves up |
| Shift Down | Cursor moves down |
| Shift Right | Cursor moves right |
| Esc | Exit and back to the last layer. |
| Back space | The Backspace key is used to erase previously input characters. |
| TAB | The Tab key is used to toggle between data fields or to place the cursor at pre-determined places in a programming or word processing application. |
| Enter | Item selection confirmed or data input completed |
| Alpha Switch | Transform alphabet and numeral mode. This Alpha key is also used to toggle CAPS at Alpha Mode |
Alpha key
The default when the TPC7050 boots is Numeric Mode on. When you toggle to Alpha Mode, the default condition is CAPS mode off.
Alpha Mode Press alpha to alpha mode, the default condition is CAPS off.
CAPS Press Alpha key twice to toggle CAPS
Key in Press Cursor-UP to enter selected character

default
Number (0\~9 and ·)

Press once
English lowercase letter (a\~z)

Press twice
English capitalization (A\~Z)
3.2 Function Key Description
The function key FN is specially designed for quick access (Hot-key) to some functions. The function key combines with other keys.
■ Available function key combinations
| Key Define Function | |
| FN + [1] | Reserve (user define) |
| FN + [2] | Reserve (user define) |
| FN + [3] | Reserve (user define) |
| FN + [4] | Reserve (user define) |
| FN + [5] | Reserve (user define) |
| FN + [6] | Reserve (user define) |
| FN + [7] | Reserve (user define) |
| FN + [8] | Reserve (user define) |
| FN + [9] | Reserve (user define) |
| FN + [0] | INS Key |
| FN + [.] | DEL Key |
| FN + [up] | Volume + |
| FN + [down] | Volume - |
| FN + [Left] | Increase screen brightness |
| FN + [Right] | Decrease screen brightness |
| FN + [TAB] | Calibration Screen |
3.3 Install CF and SD card
Caution: Make sure you have fully charged the battery before turning the unit on.
3.3.1 Inserting a CF Card into the TPC7050
Insert the CF card face side down
- Open the CF slot cover with a screw driver.
- Insert a correctly oriented CF card.
- Close the CF slot cover and fix two screws.

Figure 3-2 Inserting a CF Card
Note: If the CF card is inserted incorrectly, the CF card unit and its internal data maybe damaged.
3.3.2 Inserting an SD card into the TPC7050
- Open the battery cover.
- Take out the battery pack.
- Insert a correctly oriented SD card.
-
Insert the battery pack.
-
Close the battery cover. Figure 3-3 Inserting an SD Card

Note: When removing an SD card, please press "push" first.
3.4 Configuring TPC7050 Settings
3.4.1 Calibrating Touch Screen Alignment
Pressing the Power key
The TPC7050 welcome screen appears. The Windows CE® screen appears shortly after.

Figure 3-4 Calibration
Calibrating the TPC7050
This screen automatically appears when the unit is powered on for the first time or after the system is reset. This screen can be accessed at any time by pressing the hot key "FN" and "TAB" key. Or by accessing the menus and tab in order of Start"# Settings" # Stylus"# Calibration.
Carefully press and briefly hold stylus on the center of the target. Repeat as the target moves around the screen. Press the Esc key to cancel.

Figure 3-5 Calibration
Whenever the response of the touch screen is poor, or the operations executed do not match your tapping on the touch screen, please recalibrate the alignment of the touch screen using the following method.
-
Press the stylus against the center of the target mark (+ mark) as indicated on the screen. The screen shown to the right appears after you press the stylus against the target at five different locations.
-
Press the Execute key or tap anywhere on the touch screen
Figure 3-6 Calibration
New calibration settings have been measured. Press the Enter key to accept the new settings Press the Esc key to keep the old settings.
3.4.2 Adjusting Brightness
You can use the following procedures to adjust display brightness to make it easier to read under different lighting conditions.
Press the “FN” key and then press the “>” or “<” key. Press the “>” key adjusts brightness for a lighter display, while pressing the “←” key adjusts brightness for a darker display.
To continue making adjustments, press the “→” or “<−” after pressing the “FN” key.
■ Brightness settings are also made by accessing the menu and tab in order of Start →Settings→Touch Panel→Backlight setting.
3.4.3 Muting Sound
You can use the following procedures to adjust sound to make it easier to hear under different working conditions.
Press the “FN” key and press the “↑” or “↓” key. Press the “↑” key adjusts for a louder sound, while pressing the “↓” key adjusts for a softer sound.
To continue making adjustments, press the “↑” or “↓” after pressing the “FN” key.
■ Sound settings are also be made by accessing the menu and tab in order of Start→Settings >Touch Panel >Volume & Sounds
3.4.4 Using the Stylus
The stylus is located next to CF cover or hand-strap on the rear of the TPC7050 as illustrated in figure 2-3 TPC7050 Back view (page 8). The stylus functions the same as a mouse on a PC. Use the stylus to:
- Navigate the display, select menu items and open optional applications.
■ Tap the characters on the soft keyboard panel
■ Hold the stylus on the screen and drag across the screen to select a list of multiple items.
Caution: Never use a pen, pencil, or other sharp object on the display to avoid damaging the touch screen.
3.5 Entering Information
To enter information:
■ Use the keypad
■ Use the keyboard input panel (soft keyboard) to enter text.
■ Scan bar code data into data fields.
■ Use Microsoft ActiveSync to synchronize or copy information form the host computer to the TPC7050. For more information on ActiveSync, refer to Chapter 6.
3.5.1 Entering Information Using a Keypad
The alphanumeric keypads produce the 26-character alphabet (A-Z), number s (0-9), function keys and assorted characters. The keypads default characters/functions are printed white.
3.5.2 Entering Information Using the Keyboard Input Panel
Use the keyboard input panel (soft keyboard) to enter information in any program. To launch the keyboard input panel, press the button on the taskbar. Tap a key to enter a value. Tap a key board input panel button to display or hide the keyboard input panel.
![Input Panel Esc 1 2 3 4 5 6 7 8 9 0 - = ◆ Tab q w e r t y u i o p [ ] CAP a s d f g h j k l ; * Shift z x c v b n m , . / ← Ctl áü ` \ ↓ ↑ ← →](/content/2026/07/1514205/images/02f7b29e7b00441cb55938c1f68f5b6ac74ba5f32592d7895dfdf67ed53f38b3.jpg)
3.5.3 Entering Data via the Bar Code Scanner
The sample bar code scanner application scans data into data fields in the same way data is entered via the keypad.
3.6 Power Management
3.6.1 Power Status Indication
Checking main and Backup Battery Statue
Enter "Power Properties"
If the above mentioned “Plug” or “Battery” icon is displayed, double tap this icon to bring up the “Power Properties” screen.
Or, select Settings/ Control Panel from the Start menu and then double tap the "Power" icon to display "Power Properties".

Figure 3-7 Power Properties
Check Battery Status:
The battery menu item shows the status of the main and backup batteries.

Figure 3-8 Power Properties
Five different icons are displayed on the status bar to indicate the on-board power status.
| Icon Description | |
| No icon: | Indicates there is no external power supply to the TPC7050 but the battery power status is good. |
| “Plug” icon[xx5x] : | Shows external power is in use. The TPC7050 is either plugged-in via the DC 5V/2.5A power adapter or in the cradle. |
“Charging” icon | Indicates that the battery is charging. |
“Battery Low” icon: | Shows there is no external power supply, the battery charge is low. |
| “Battery Very low” icon:[zzxx] , | Indicates the battery is very low. Stop operation and charge the TPC7050 immediately. |
You must charge the battery when the battery “Very Low” icon is displayed. If the “Very Low” icons still show after charging, please contact POSlineTechnical Support.
3.6.2 Saving Battery Power
Automatic shut-down of the TPC7050
The TPC7050 enters idle mode when there is no task or if all tasks are waiting for input. In default setting, the TPC7050 automatically turns itself off if idle for 3 minutes and when there is no external charging power. Press the power button to return the TPC7050 to the same point at the time of automatic shutdown.
In Power Properties, select “Schemes”. Customize automatic shut off time by tapping the arrow to select from a list of time periods. The available time periods are 1, 2, 3, 4, 5, 10, 30 minutes and never.
Activate this function when the TPC7050 is plugged into the power adapter or placed in its cradle by tapping the check box and then tapping the arrow to select from a list of time periods. The available time periods are 1, 2, 3, 4, 5, 10, 30 minutes and never.

Figure 3-9 Power Properties
Backlight Setting
Because the power consumption of the LCD backlight is high, turn off the backlight function when it is not necessary. If a backlight is required, set “automatically turn off the back-light.”
To change the backlight setting, select Settings / Control Panel from the Start menu, and then double tap the "Display" icon.

Tap the "Backlight" menu item to display the following 3 selections:
Automatically turn off the backlight when using battery power:
Tap the check box to toggle this function. Available idle times are: 15 and 30 seconds, and 1, 2, and 5 minutes.
Automatically turn off the backlight when using external power:
Tap the check box to toggle this function. Available idle times are: 15 and 30 seconds, and 1, 2, 5, 10, 15 and 30 minutes.

Figure 3-10 Display Properties
3.6.3 Suspend Mode
The TPC7050 will go into suspend mode when it is idle for a period of time. Customize the idle duration using the Power control panel (refer to Figure “Schemes Tab”). Suspend mode
appears just like you have turned the unit off. Press the key to suspend the TPC7050.
Press the [icon] key again for the TPC7050 to resume its previous state.
Use the Battery Power control panel to set the duration to switch to Suspend mode when the system uses battery power. This saves battery power when the TPC7050 is not in use.
Entering Suspend Mode:
The following puts the TPC7050 in suspend mode:
■ Press
The duration timer for "Switch state to Suspend" expires, which indicates that there has been no use for a specified of time.
■ The battery pack discharges completely.
■ Tap Start > Suspend

Figure 3-11 Suspend Mode

Tap here to put the TPC7050 into suspend mode
3.6.4 Resume
Press
Waking the TPC7050
The default wakeup conditions define what actions wakeup the TPC7050. These setting are configurable and the factory default settings are subject to change / update.
| Status Description Condition for Wakeup | ||
| Power Off | When the TPC7050 is set to suspend mode by pressing Power, this action wakes the TPC7050. | Press Power button |
| Auto Off | When the TPC7050 enters suspend mode by automatic power-off, this action wakes the TPC7050. | Press Power button |
3.7 Resetting the TPC7050
If the TPC7050 stops responding to input, reset it. There are two reset functions, warm boot and cold boot. A warm boot restarts the TPC7050 by closing all running programs. All data that is not saved is lost.
A cold boot also restarts the TPC7050, but erases all stored records and entries from RAM. In addition it returns formats, preferences and other settings to the factory default setting.
Perform a warm boot first. If the TPC7050 still does not respond, perform a cold boot.
3.7.1 Performing a Warm Boot
To perform a warm boot:
- Press "Reset". Do not hold down any other keys or buttons.
- The TPC7050 demo window appears.
Caution: Files that remain open during a warm boot may not be retained.
3.7.2 Performing a Cold Boot
A cold boot restarts the TPC7050 and erases all user stored records and entries from RAM. Only perform a cold boot if a warm boot does not solve the problem.
Caution: Cold boot resets the TPC7050 to the default settings. All added applications and all stored data are removed. Do not cold boot without support desk approval.
To perform a cold boot:
- Press the "Reset" and "Power" keys together. Do not hold down any other keys or buttons. As the TPC7050 initializes the POSline welcome screen appears for about a minute.
- Calib rate the touch screen. See instructions on calibrating the TPC7050 screen in chapter 3.
3.8 Disk on Chip
Flash memory is a re-writable location in which to store up to 128MB of programs and data files. The benefit of this feature is that files and programs saved in Flash Memory are unaffected by the TPC7050's power status.
Note: The DiskOnChip storage memory persists for all reset (warm/cold reboot) conditions and software/firmware updates. We strongly recommend installing all applications, applets, programs, and important data files to the DiskOnChip Flash location.
Caution: If an application or a data file is installed or saved in RAM, a cold reset will result in the loss of that application or data file.
3.8.1 DiskOnChip Location
To access the contents of DiskOnChip storage:
■ Double-tap the My Computer icon on the desktop
■ Double-tap the DiskOnChip icon to view DiskOnChip

Figure 3-12 DiskOnChip

3.8.2 Saving to Flash
To save an application or data to Flash Memory from your current application, select File → Save As → navigate to the DiskOnChip location and save it.

Figure 3-13 DiskOnChip
3.8.3 DiskOnChip Size
The size of the DiskOnChip varies depending on the size of the system firmware.
■ Inside the DiskOnChip directory, tap File > Properties
■ The DiskOnChip Properties dialog:
The number following Free is the amount of memory currently available on your device.

Figure 3-14 DiskOnChip
4. Scanning
The TPC7050 has an integrated CCD scanner that reads all major bar code labels with excellent performance. The trigger key is located in the middle of the unit. Press this key to activate the CCD scanner.
4.1 Scan Configuration
When it is necessary to change the default barcode symbology for a different application, use Scan Configuration to change default symbology, place delimiter characters behind scanned data, and save the settings.
Run this program from \Programs\Scanner\Scann Configuration.exe which is also accessible via "Setting\Control Panel" on the Start menu.


Figure 4-1 Scan Configuration
After you change settings, go to the "Setting" page and press the "Commit" button to configure, or press "Reset" to return to the scan default settings. The "Download" page allows you to update scan firmware.
4.2 Scan driver
Scan driver lets you put data into Microsoft Wordpad. Open scan driver and the scan module powers on the scanner. You can then scan barcode. To turn off the power, press "Exit" on the task bar.

Figure 4-2 Scan Driver

4.3 Scan test
The TPC7050 has a built-in Scan Test.exe program that allows you to test the barcode scan function. Scan Test.exe is located in directory \Programs\Scanner\Scan Test.exe.
This program shows barcode type and barcode data when pressing the "Scan" key.

Figure 4-3 Scan Test

4.4 Reading barcode
Note:
◆ Observe handling precautions.
Make sure the mobile computer is installed according to instructions.
◆ Never remove the main batteries or battery pack while the mobile computer is turned on. Doing so can cause loss of data in the mobile computer.
Avoid looking directly into the LED light beam emitter, or pointing the LED light beam directly into someone's eyes.
Position the LED light beam over the bar code from margin to margin and pass the scanner downward over the bar code, as shown in the scan position illustration
Good read scan position

Incorrect read scan positions


The scanning sequence is defined by the user's application. A typical sequence is:
■ Point the mobile computer at the barcode and press the Trigger key
■ Point the LED lightbeam at barcode as shown in the scan position illustration above.
■ The scanner reads the barcode and the results are indicated.
SCAN
A "Good Read" means that the scanner has effectively recognized and decoded the bar code. In most cases, the application program provides an indicator signal to indicate a good read.
If the read is incorrect, try again paying close attention to the instructions.
When reading a small bar code, decrease the distance between the mobile computer and the bar code. For larger bar codes, position the mobile computer so that the bar code fits into the LED light beam. When reading a very high density bar code, decrease the distance between the mobile computer and the bar code. For a low density bar code, increase the distance between the mobile computer and the bar code.
4.5 Barcode reading problems
When the barcode can not be read, try the following:
■ Change the angle between the bar code and the mobile computer.
■ Change the distance between the bar code and the mobile computer.
■ If the bar code is larger than the LED light beam, try moving the mobile computer a bit further away from the bar code.

5.1 Backlight Setting
Backlight setting is a tool for changing the LCD backlight. If you wish to save power use this program to change LCD backlight settings. This application supports battery power backlight and external power backlight.

5.2 Function Key Setting
AP Settings Tab
To assign your favorite application program to F1, F2, F3 and F4 hot keys:
- Choose F1, F2, F3 or F4 from pull-down list.
- Tap "Open" inside the "Assign program" applet.
- Select the application program you want from program list, and then choose "OK".
- Tap the Default tab to return to default setting.

Figure 5-1 Function Key Setting
5.3 Keypad LED Setting
Set the keypad LED for application requirements. This controls the keypad LED's timing.

Figure 5-2 Keypad LED Setting
5.4 System Restore
System Restore is a tool that lets you backup register keys. For any changes on TPC7050, you can backup changes via this program. The backup file will be deleted while you format DiskOnChip.

Figure 5-3 System Restore
Note: Please close all applications before running this program.
6. Software Applications
The TPC7050 includes software applications such as Internet Explore, Media player, Microsoft WordPad, Remote Connection, Transcriber, and Windows Explore.

6.1 Internet Explorer
With Internet Explorer, you can view Web or intranet Web pages on your device. You will need to use WLAN to connect to an Internet server provider (ISP) or network.

Figure 6-1 Internet Explorer
6.2 Media Player
The TPC7050 comes with Media Player for Windows CE.NET installed.
■ Open Media Player by selecting Start → Programs >Media Player from the desktop.
■ Select File → Open to open a new media file.
■ Please refer to www.microsoft.com for additional information and help with your Microsoft Windows Media Player.

Figure 6-2 Media Player
6.3 Microsoft WordPad
You can create and edit documents and templates in WordPad, using buttons and menu commands that are similar to those used in the desktop version of Microsoft Word. You can work with files Normal or Outline view.
WordPad documents are usually saved as .pwd files, but you can also save documents in other file formats, such as .rtf or .doc.

Figure 6-3 Microsoft Wordpad
6.4 Remote Desktop Connection
Using Remote Desktop Connection, you can log on to Windows Mobile computer Server and use all programs installed on this server. For example, instead of running Microsoft Pocket Word, you can run the desktop version of Microsoft Word.
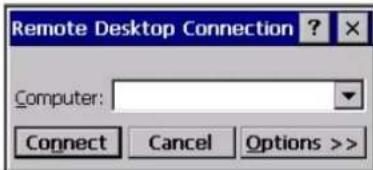
Figure 6-4 Remote Desktop Connection
6.5 Transcriber
Features:
■ Microsoft Transcriber is the natural handwriting recognition solution for your Windows CE device. It recognizes words from its integrated dictionary, and allows you to write in cursive, print or mixed handwriting.
■ The letter Shapes Selector (note 1) is for optimizing recognition to your own handwriting style
■ Transcriber works transparently in the background of all Windows CE applications providing handwriting input, while taking away no precious screen space.

Figure 6-5 Transcriber
6.6 Windows Explorer
Windows Explorer works almost the same on your PDA as it does on your PC. See the topics below for information about the difference in Windows Explorer on your device.

Figure 6-6 Windows Explorer
7. Communication
The POSline TPC7050 lets you link to a host computer via RS-232 or USB port for data communication. This chapter gives an overview of the TPC7050's communication capabilities.
7.1 ActiveSync
To exchange data between your desktop computer and the TPC7050, Microsoft ActiveSync must be installed on your desktop computer.
With Microsoft ActiveSync you can:
Transfer data
■ Back up and restore TPC7050 data.
■ Add programs to and remove programs from the TPC7050.
This chapter introduces Microsoft ActiveSync version 4.5 ActiveSync provides a user-friendly interface and it can be downloaded free of charge from Microsoft's Website.
7.2 Installing Microsoft ActiveSync
Before beginning installation, carefully read the following:
Because you will restart your computer during installation, save your work and quit all programs before you begin.
To set up your communication settings, a TPC7050 serial cable is required to connect the TPC7050 to your host computer.
If you run the Windows NT operating system with a service pack, you will be informed during setup that you may need to reinstall the service pack. Try connecting first, and if unsuccessful, reinstall the latest service pack.
Basic PC specifications for the installation of ActiveSync are as follows:
| OS Microsoft Windows XP/ 2000/ME/98, or higher version program than SP6 Windows NT Workstation 4.2 |
| Application To be able synchronize data such as email, calendar tasks and notes between OT-80 and a desktop or notebook, you need to have a higher version than Microsoft Outlook 2000 |
| Browser Microsoft Internet Explore 4.21 SP1 or higher |
| Hard disk Free hard disk space more than 65MB (Actual required space is according to selected functions and your current system configuration) |
| Communication port 9 pin or 25 pin communication port (for adapter, 25-pin port is needed) |
| USB port (available only for Windows 98/Me/2000/XP) |
| Graphic card VGA graphic card or compatible video graphic adapter supporting resolution of 256 colors or higher |
| Keyboard |
| Microsoft mouse or compatible input devices |
| CR-ROM drive |
Installation
Follow the installation procedure below to install Microsoft ActiveSync, connect your TPC7050 to your desktop computer, and establish a partnership for synchronization (if desired):
- Download the executable program "mswrd832.cnv" from CD. Execute this program.
- Select the folder into which Microsoft ActiveSync will be installed. If you choose not to download into the displayed default folder, click the Change button.
- After you've selected the folder, click Next to set up Microsoft ActiveSync. After you've installed Microsoft ActiveSync and restart your computer.
7.3 Connecting the TPC7050 to ActiveSync
Connect the TPC7050to a desktop PC using a USB cable. Make the partnership between the desktop PC and TPC7050 through ActiveSync, and then proceed with the synchronization of the desktop PC and TPC7050. Use a USB cable to link the TPC7050 to the desktop PC.
The table below shows available communication devices (USB, serial) according to operating system.
| Supporting operating system | ||||
| methods | Desktop PC OS Connection | |||
| Windows 95 Windows 98 Windows | 2000/XP | Windows NT | ||
| USB Not available | Available Available | Not available | ||
| Serial Not available | Available Available | Available | ||
Connect a desktop PC and the TPC7050 with a cable as follows:
- Connect a USB cable to the USB port of the desktop PC.
- Insert the cable into TPC7050 mobile computer. The TPC7050's PC connection program runs automatically and Microsoft ActiveSync in the desktop links them together.
- To set up a connection, the "New Connection" set-up wizard appears on the desktop computer. Set-up methods are discussed in the following section.
7.4 Setting up a Partnership
When you first connect the TPC7050 to the desktop computer, Microsoft ActiveSync asks if you are going to set up a partnership. Once the partnership set-up is finished, you can synchronize data with the TPC7050. While the TPC7050 can set up the partnership with two desktop computers, email messages can be received only through one computer.
To set-up a partnership:
- Insert the TPC7050 into the docking cradle connected to the desktop PC. It automatically starts the New Partnership wizard on the desktop PC screen. When it asks if you would like to set up the partnership, select Yes and click Next.

- Key in the name of the device (for instance, Windows CE1, MyPDA, etc.) then click Next.
- If the TPC7050 has already set up a partnership with another desktop computer but no longer uses it, select "Yes, I want to synchronize with only this computer" in the dialog box named "Select Number of Partnerships." It removes the other partnership set-up so that the TPC7050 no longer recognizes the previous desktop computer. Click Next.
- The window for setting up synchronization appears. To synchronize specific kinds of data, select the item then click Next. Most popular items include Calendar, Contacts, Tasks, and Inbox. We recommend you select and use these items. In the item list, two types of email items are available: Inbox and Inbox. While the inbox is an email program provided by Microsoft Corporation, Inbox is offered by a software provider. In the TPC7050, Inbox offers special functions such a connecting to "Today" set-up function button, etc.
- Complete the set-up process by clicking End.
When the partnership set-up between desktop PC and TPC7050 is completed, ActiveSync automatically synchronizes the selected data.
7.5 Connecting the TPC7050
7.5.1 Synchronizing Data
If the Microsoft ActiveSync window appears in the desktop PC, click the option icon and "Sync Options," "Sync Mode," and "Rules" appears.
“Sync Options” lets you select an item to synchronize. “Sync Mode” enables you to choose synchronization methods. According to the selected mode, there are 3 methods:
- Continuously while the device is connected: (Default) Connect the TPC7050 to the desktop computer. ActiveSync immediately starts synchronization and synchronizes according to the user's input of changes in the desktop computer or TPC7050.
- O nly upon connection: Connect the TPC7050 to the desktop computer. ActiveSync immediately starts synchronization. If you want to carry out the synchronization after the first synchronization on a manual basis, click Sync.
- Manually: ActiveSync will not run automatically. For synchronization, click Sync.
Synchronization is the process of updating TPC7050 and desktop PC after comparing data. Any files including personal organizer management data, email message, etc. in the TPC7050 can synchronize with files in the desktop PC.
7.5.2 Solving Problems during Synchronization
When a problem occurs during the synchronization process, it is marked as “Not completed” in both ActiveSync and the TPC7050. You can solve the problem at your convenience.
There are various reasons for failure of ActiveSync to carry out synchronization. For instance, if the computer cannot access Microsoft Outlook information due to a server failure, ActiveSync cannot synchronize items such as Calendar, Contacts, Tasks, and Inbox. Or else the problem stems from changed items in the TPC7050 and the desktop PC.
By modifying the problem-solving settings, you can have ActiveSync not register the problem as “not completed item” instead, if you select the TPC7050 or desktop PC as default version, ActiveSync automatically updates the information contained in the other computer. If you do not want to solve the problem manually, you can modify the problem-solving setting to have ActiveSync always use the TPC7050 or desktop PC version.
- Click Options then click tap Rules.
- Select the item of choice from Conflict Resolution.
For those items that cannot complete synchronization without user intervention, ActiveSync and portable device display them as “not completed”.
- Connect TPC7050 to the desktop computer and carry out synchronization.
- When there are no complete items, click Resolve in the Tools menu.
- Follow instructions on the screen. The dialog box differs depending on the problem.
7.5.3 Searching TPC7050 Contents from a Desktop PC
If the TPC7050 is connected to a desktop PC, you can use ActiveSync on the desktop PC to see the contents of the TPC7050. Click Explore from the file menu of ActiveSync. The content of the TPC7050 is displayed on the window of Mobile Device.
Use ActiveSync to see the files in the TPC7050 as follows:
- Connect the TPC7050 to the desktop PC
- Explore in ActiveSync. It open the Mobile Device folder in Windows Explorer
- Applying the same method, check the files in the device in other Windows Explorer
If you double click folders in Mobile Devices, it may take several seconds to open the folder.
While browsing the folders, you can carry out cut, paste, and copy by dragging file icons. In the desktop PC, you can get access to the content of the TPC7050 using Windows Explorer. If you choose Files during the partnership set-up, Windows CE My Documents is created in the My Documents folder. If you use Windows CE My Documents in the desktop PC, you can easily access the My Documents folder in the TPC7050.
8. Overview of Microsoft Windows CE 4.2
This chapter describes Microsoft Windows CE 4.2, the operating system for the TPC7050
This introduction to Microsoft Windows CE 4.2 includes:
■ How to use the main Windows
■ How to use a taskbar
■ How to use settings
8.1 Main Windows
When you turn on TPC7050, you will see the main Windows of Window CE 4.2, which is similar in appearance to Windows XP. The main window consists of a background screen and taskbar.
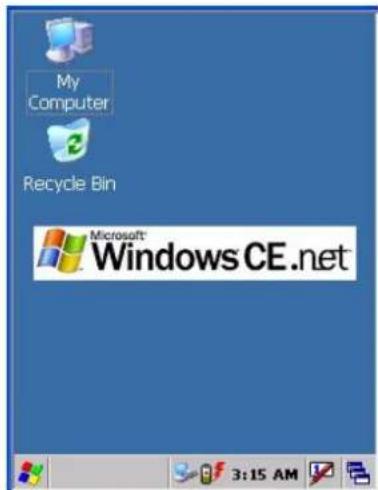
Figure 8-1 Main Window
The screen shows short cut icons for the main programs of Microsoft Windows CE 4.2. A description of the icons follows:
My Computer:
Shows the internal configuration of the TPC7050 and the folders and files it contains.

Figure 8-2 My Computer
Recycle bin:
Completely delete or restore files and data. This folder saves deleted files from Windows Explorer or the background screen. You can completely empty or restore files in the recycle bin.
Caution: Once you have emptied the recycle bin, you cannot restore the files and data previously in the recycle bin.
Internet Explorer:
Search the web or intranet. Microsoft Internet Explorer can search the web or a company's intranet. The TPC7050 uses Microsoft Pocket Internet Explorer 6.0.
Media player:
This application plays digital audio or video files. If you use Microsoft Windows Media player, you can enjoy a range of digital audio/video files. Media player supports files with ASF, WMA, MP3, WAV formats. For detailed information on the media player, refer to chapter 5 software applications.

Figure 8-3 Media Player
Microsoft WordPad:
The application lets you create and manage documents. Microsoft WordPad is compatible with Microsoft Word on the desktop PC, so it is easy to access your documents. For detailed information on Microsoft WordPad refer to chapter 5 software applications.
With the TPC7050 you can use the same functions such clicking the right button of the mouse on a desktop PC. If you press and hold the LCD touch panel with the stylus pen, the right button menu appears.
Using the right button menu, you can carry out various tasks such as icon arrangement, the renewal of the background screen, copy / cut / paste of files and data, creating new folders, set-up features.
Taskbar
Windows CE 4.2's taskbar is designed to be simple and user-friendly. The picture below shows the configuration of the taskbar.

Start Icon
Start icon is the starting point for the TPC7050 program. If you point at the start menu with the stylus pen, you can see various menus including program, bookmark, document, setting, help, and operation. If you choose each menu, detailed executable programs appear as in the picture below. If you choose and press, you can run the program of your choice. Windows CE 4.2's start menu is similar to that of Windows on a desktop PC.

Figure 8-4 Start Icon
8.2 Taskbar
Taskbar shows a variety of information including keying in characters, battery, network connection, status of running programs, etc.
If you press and hold the taskbar with the stylus, the right button function menu appears.
The right button function menu is composed of task manager and features. If you select the taskbar and start menu feature, general option menus such as “always place above, “automatic hiding,” “Watch display”, etc. You can choose the check box of desired options and use them.
The following explains the function of icons appearing on the taskbar.

Transcriber:
When you want to key in characters when making a document or setting, start Transcriber. Using the stylus to draw characters you want on the input panel, this program recognizes the characters and transform them into typeface characters. To start the Transcriber, run the program as the following order: start → program →Transcriber.
The picture below shows how the Transcriber works in keying in characters on Microsoft Word Pad. When Microsoft Transcriber is running, you will see the “hand with a pen” icon located in the taskbar. When Microsoft Transcriber is active the “hand with pen” icon shows a dark background.

Figure 8-5 Transcriber

Keyboard: Press this icon to activate the keyboard input
![Input Panel Esc 1 2 3 4 5 6 7 8 9 0 - = ◆ Tab q w e r t y u i o p [ ] CAP a s d f g h j k l ; ' Shift z x c v b n m , . / ← CtI äü ` \ ↓ ↑ ← →](/content/2026/07/1514205/images/c88c305de0ea065873809892945227800954edf6b49c2c70264a88a9338f9c98.jpg)

Upper / lower case Selection:
Press this icon to select upper and lower case letters. If you select upper case, capital letters and characters appear on the number key pad. It serves the same function with the Shift key.


Hot key Selection:
If you use hot key such as "z", "x", "c" and "v", you can carry out Cancel, Cut, Copy, and Paste, respectively. To change the features of the soft keyboard, select keyboard in Go to Start > Setting > Control Panel > Input Panel and click the option you wish to set up.
Input Method:
To carry out character key-in using [keyboard] input, press keyboard icon on the taskbar. You can also key in by activating Transcriber in the following order: Start > program > Transcriber. Press the keyboard once, it appears on the screen. Press again and it disappears.
Status Indicator Icon:
The following is a list of icons that appear in the taskbar's status area.
| Icon Description | |
| Battery capacity is low | |
| Battery is charging | |
| Linked to desktop PC through USB | |
| Show network connection status.Show Internet connection status via WLAN | |
8.3 Setting up the TPC7050
You can set up various configurations of the TPC7050 such as date/time, Network, Display, Volume, Power, System, etc. at the control panel.

If you press Start → Setting → Control Panel, the control panel window appears. In the View option in the menu, you can change the view mode into large icons, small icons, details or to arrange icons. The control panel appears as below:

Figure 8-6 Control Panel

8.3.1 Backlight Settings
Please refer to the previous section on Backlight Setting.
8.3.2 Certificates
Application programs use certificates to ensure reliability and safe communication.

Figure 8-7 Certificates
Authorized certificate providers issue certificates that are valid for a specified period. Windows CE.NET manages several certificate storages.
-
Select Go to Start → Setting → Control Panel.
-
Double click a certificate to run.
Select certificate storage for browsing or correcting through the storage tap list.
My certificate: This saves the user's personal certificate to identify the user.
Other certificate providers: Middle certificate providers establish chains of reliability. Reliable certificate providers: Includes the top quality certificates.
- To add certificates or secret keys in the selected storage, press the Bring button then select the way to bring certificates or keys. You can select them from files or a smart card.
- To see details of selected certificates such as extension, expiration date, etc. press the View button.
- To delete the selected certificate from storage, press Delete button.
8.3.3 Date/Time
This screen sets date, time, standard time zone, watch and alarm.

Figure 8-8 Date/Time
Date/Time
You can set standard time zone, year, day and time. Set as follows:
- Press the down arrow in the standard time zone until it reaches your location. If the previously set value is appropriate, move on to the following.
- Select year and month in the calendar. If the current year is not correct, press year and adjust. You can select the month using left and right arrows or the monthly tab that pops up when pressed.
- Press the correct date on the calendar.
- Set time by keying in correct time in the current time box. The box shows AM/PM: hour: minutes: second. Press each and adjust time with arrows on the right.
- Press Apply to save the changes. Confirm if the time is correct.
8.3.4 Dialing
Dialing Properties
- In the When dialing from list, select the "Location" where you want to change settings.
- To create a new location, select "New". Enter the name of the location, and then select "OK"
- Enter or edit the area code and local country code as needed.
- In Dial using, select "Tone dialing" or "Pulse dialing". Most phone lines are tone.
- To automatically disable call waiting, select "Disable call waiting by dialing," select the appropriate number sequence in the list, or enter a new sequence.
Editing dialing patterns
- Using the codes listed, revise the dialing patterns as needed.
Notes:
If you need to use characters other than the ones listed here, use manual dialing.
◆ Hyphens and spaces in dialing strings are ignored.
Some modems may not respond to the some characters, even though your device lets you add them to the dial string.


Figure 8-9 Dialing
8.3.5 Display
This screen lets you set the wallpaper image of the TPC7050, change the color of the background screen, or change the backlight setting. Call up the right button menu and select “properties” and you can check the Display Properties window.


Figure 8-10 Display Properties
Desktop
Change the desktop image of the background screen as follows:
- Select the desktop with a tap.
- Select an image to use for your background from the image list. The image list shows you image files in a Windows folder. If you want to use images from other folders, click Search.
- To arrange the desktop image in a checked format, choose a checkered pattern.
Setting
You can adjust the contrast and brightness of the LCD screen.
8.3.6 Hot Function Key
Please refer to Function Key Setting above.
8.3.7 Input Panel
You can set up the input method and options.

Figure 8-11 Input Panel Properties

- Select keyboard and press Options. The Soft Keyboard Options window appears.
- Select the size of the keys.
- To use gestures for Space, Backspace, Shift and Enter, click the gestures check box.
- Click OK to save the changes.
- Select the handwriting recognition as the current input method and click Options. The handwriting recognition features window appears.
- Set time needed to recognize handwriting.
- Click OK to save the setting.
8.3.8 Internet Options
To use the Internet Explorer program, make the following settings.


Figure 8-12 Internet Settings
General
Click the General tab.
- Enter a webpage for the Internet Explorer start page.
- Enter a Search Engine page.
- Set the cache size
- To clear the cache in the system, click Clear Cache.
- To clear opened web pages, click Clear History.
Connection
Click the connection tab and set Internet connection methods.
- To use a proxy server, click [Internet Connection by Proxy Server] check box and enter the proxy address and port.
- To ignore the proxy server when making access to local address, click [No proxy server for local address] check box. This option is available only for the proxy server use. If you use a wireless LAN card, click the [LAN User manual dial] check box.
Security
Click the security tab to set up a security option.
- To allow cookies, click the Cookies check box.
- Click an appropriate security option among TLS 1.0, SSL 2.0, SSL 3.0, etc.
- Click "When Switching to Secure and Non-Secure Area". If you select this option, Internet Explore issues a warning when you access non-secure websites.
8.3.9 Keyboard

Keyboard
Repeat Tab
- To change the amount of time between taps before repetition starts, adjust the Repeat delay slider
- To change the repeat rate, adjust the Repeat rate slider.
- Test your new setting.
- Tap "OK" to exit the "Keyboard" Tab.

Figure 8-13 Keyboard Properties
8.3.10 Keypad LED
Refer to the previous section on Keypad LED Setting.
8.3.11 LCD PWM Setting
Refer to the previous section on Power Management.

Figure 8-14 Power Properties
8.3.12 Mouse

Mouse
- Double-click the checkerboard grid at a comfortable speed.
- Double-click the Test icon to test your setting.
- Tap "OK" to exit the Mouse tab.

Figure 8-15 Mouse Properties
8.3.13 Network and Dial-up Connection
You can directly link to the network via network (Ethernet, LAN) or phone (modern) connection. You can send or receive emails or access available files on the network server or search the Internet or Intranet.

Figure 8-16 Network and Dial-up Connection
8.3.14 Owner
This function lets you set the TPC7050 to display user information at start up, add information on the user, and set up a network ID.

Figure 8-17 Owner Properties
Identification
Enter information such as name, company, address, company phone number, home phone number in the user information tab. To display the owner information on the start screen for system start, click the “Show User Information” check box.
Notes
Enter additional user information or other information in the Notes box. To show notes on the initial screen when the system starts, click "Show User Information" check box.
Network ID
Windows CE 4.2 gains access to Network resources using the owner information. Enter the information provided by Network manager such as user name, password, and domain.
8.3.15 Password
You can set a password to keep unauthorized users from using the TPC7050.

Figure 8-18 Password Properties
To set up a password:
- Select the password setting tab.
-
Enter the password in the password box.
-
Re-enter the password in the password confirmation box.
-
To enable the password protection when the system starts, click the "Use Password for While System starts" check box.
If you touch the screen with a stylus pen to input the password in the initial screen, a keyboard appears. After keying in the password, press enter on the keyboard to go to the main screen. You may encounter a request to enter the password again on the initial screen if you have turned off the TPC7050's power after activating password or have done a software reset. If you forget the password and cannot boot the system you may have to do a hardware reset. A hardware reset erases all files, data, as well as programs. Please consider using a password that is easy to remember and leave a record easy to access. To deactivate a password, delete the password in the password feature window.
8.3.16 PC Connection
You can set up a PC connection to synchronize the device with a desktop PC or other devices. You can set desktop USB and serial port connections. The following is the procedure required for changes in PC connection.
Begin with Windows CE.NET 4.2. The TPC7050 basically supports the Internet functions via USB. If you set up a partnership with PC during ActiveSync, it provides "USB@PocketPDA" link items that enable an Internet connection through the cradle:

Figure 8-19 Storage Properties
- Create a new connection in Go to Start > Setting > Network. Choose the direct connection as connection format. For detailed information, refer to the "Network and Dial-up Connections" section.
- Select Go to Start → Setting → Control Panel → PC connection.
- Select Connection Change icon.
- Select the connection mode.
- Connect to a desktop PC.
To connect the TPC7050 to a desktop PC, you must have Microsoft ActiveSync 3.7 or higher on your desktop PC.
8.3.17 Power
Please refer to the previous section on Power Management.
8.3.18 Regional Settings

Figure 8-20 Regional Setting Properties
You can set up region, numbers, currency, time, and date.
- Select Go to Start > Setting > Control Panel.
- Open regional setting icon.
- Select the tab for information to change.
- Select the preferred option. Available features are dependent on which region you have chosen in the region tab.
8.3.19 Remove Programs

Figure 8-21 Remove Programs
To remove installed programs:
- Select Go to Start → Setting → Control Panel.
- Open the Program removal icon.
- Select the program to delete from the program list.
- Click Delete.
Note: You can only remove programs installed in RAM. If you cannot delete a program, see detailed information in Windows CE Help on the TPC7050 or in the program documents.
8.3.20 Scan Configuration
Please refer to the previous section on Scan Configuration.
8.3.21 Storage Manager
The storage manager lets you manage flash ROM (Disk 1). Disk 1 is used to back up personal organizer management. You can create / eliminate disk partitions or format a disk. Disk 1 is installed as one of the basic options.

Figure 8-22 Storage Properties
- Select the built-in Disk 1 form the storage information dropdown list.
- To format the partitions of the selected disk, click Separate icon and choose Format icon. If you execute the format, the partition names in the partition list disappear.
- After clicking the Create New icon, key in the new partition names. The system automatically creates new partitions to set up.
- To dismount a partition, select a partition to delete then click the Separate icon and press the Delete button.
- To see the features of the selected partitions, click the Properties icon.
- You can back up personal organizer data in the partition.
Caution: Formatting a disk erases all data, files, and programs.
If you insert external extension memory CF or SD*MMC memory cards, CF memory shows as "Storage Card", while SD*MMC memory shows as "SDMMC Storage Card".
8.3.22 Stylus
This screen sets double-tap sensitivity and calibration.

Figure 8-23 Stylus Properties
Double Tap
To set double-tap sensitivity:
- Select Go to Start → Setting → Control Panel.
- Activate the stylus and select Double Touch-Tap. Tap the grid and the color of the grid changes.
- It automatically records the speed of the Double-Tap.
To test the sensitivity of double touch:
- Select Go to Start > Setting > Control Panel.
- Activate the stylus and select Double Touch-Tap.
-
Touch the icon twice. The icon changes.
-
If the icon does not change, adjust the setting using the grid above.
Calibration
If the TPC7050 screen does not respond properly, adjust the screen with the calibration function.
To start calibration:
- Select Go to Start > Setting > Control Panel.
- Activate the stylus and select calibration tap.
- Press calibration again and the adjustment process begins.
Caution: Sometimes touching the screen with the stylus triggers the right mouse function. You can solve this problem by adjusting the double touch sensitivity.
8.3.23 System
The system properties window displays device information such as system, memory, the names of devices, copyright and version details.
General information contained in the window includes operating system data such as software version, processor, memory, user information, etc.

Figure 8-24 System Properties
The memory of the TPC7050 is used for data storage and programs. Basic memory capacity is 128MB. You can set the size of the memory cache used for running programs or storing data.
To set the memory:
-
Select Go to Start > Setting > Control Panel.
-
Run the system and select the memory tab.
-
The blue part of the slider indicates the available memory capacity.
-
Move the slider. Left of the slider is storage memory while the right is program memory.
-
As memory storage capacity increases, you can save more data and files. If you find a program is running too slowly, move the slider to the left to secure more program memory capacity.
The device name indicates the TPC7050's partnership relation when linked to the desktop through ActiveSync.
To set up device ID:
- Select Go to Start > Setting > Control Panel.
- Run the system and select the name of the device.
- Enter the name of the device and its details.
8.3.24 System Restore
Please refer to the previous section on System Restore.
8.3.25 Volume and Sound
Adjust volume and select sound
Volume
To adjust the volume of the system:
- Select Go to Start > Setting > Control Panel.
- Open volume and sound icons and select the volume tab.
- Press the left / right arrow icon or move the slide bar to adjust a volume.
- Click all items to activate the sound such as event (warning, system events), application program, reminder (Alarm, notice).
Sound
To set the sound:
- Select go to Start -> Setting -> Control Panel.
- Open volume and sound icons and select volume tab.
- Select an event from the event list.
- Select a sound from the event sound list.
- To remove the sound from the selected event, choose (None).
- To save the changes in another scheme, select save in another name and name the sound scheme.
- To remove the sound scheme, select the scheme and then Delete.
9. Trouble Shooting
This chapter contains information on solving problems you may encounter when using the mobile computer and/or cradle. If problems occur, first carry out general checks before comparing the problem with the descriptions in this chapter.
9.1 General Checks
■ Make sure everything is installed properly
■ Check the power supply (including the main battery or battery pack in the mobile computer) of all devices
■ Is the reading window of the mobile computer clean?
■ Is the interface connector properly connected with the cable?
■ Are the bar code labels readable, e.g. not damaged or poorly printed?
If the problem persists after these checks are performed, please check the problem descriptions below. If the suggested solutions below do not resolve the problem, please contact your local supplier or POSline for technical support: http://www.posline.com.mx
If the TPC7050 mobile computer needs repair, please ensure that the label with the serial number is present. If sending the mobile computer or cradle back to your local supplier or POSline, please use the original package to minimize the chances of damage during shipping.
9.2 Read Operation Problems
If the mobile computer has a problem reading barcode labels
Barcode reading problems
◆ Make sure the scanning application is loaded and operational.
◆ Run “Scanning Setting” program to modify barcode read setting.
◆ Barcode may be distorted and should be replaced.
♦ Battery needs recharging or replacing
9.3 Mobile Computer Problems
Mobile computer does not power on.
◆ Battery needs recharging or replacement.
◆ Insure that battery is installed correctly.
Mobile computer shuts itself down
♦ Adjust “Power Properties”
♦ Battery needs recharging.
Mobile computer will not shut off
If the mobile computer is processing data, attach a charging cable to insure the battery isn't depleted.
◆ If the mobile computer is connected to AC power, disconnect.
◆ Perform a warm boot – WARNING – Unsaved data will be lost.
◆ Perform a cold boot – WARNING – The mobile computer is reset to default settings and data will be lost
Screen is blank
◆ Make sure mobile computer is powered on.
♦ Adjust screen brightness.
Mobile computer either doesn't respond, or responds inaccurately to touch screen input
♦ Calibrate touch screen.
◆ Perform a warm boot – WARNING – Unsaved data will be lost.
◆ Perform a cold boot – WARNING – The mobile computer is reset to default settings and data will be lost
Battery life is short
♦ Adjust “Power Properties” especially if peripherals are used.
♦ Adjust backlight of LCD or keypad.
♦ Replace battery pack if old (battery can be recharged approximately 500 cycles.)
"Low Backup Battery" message
◆ Charge mobile computer for 10 hours
10. Appendix: Updating the OS via CF Card
To upgrade or reinstall the TPC7050 OS via Compact Flash, you need the 420S.bin file (available from POSline Technical Support):
Note: The file name must be "420S.bin" – do not rename it.
Caution: Users files will be erased!
- Copy file "420S.bin" from the PC to the root directory of the Compact Flash card
- Insert the Compact Flash Card into the TPC7050
- Plug the power adapter into the TPC7050
- Please use hot key function to update (FN+Dot.)
- Press OK.
- The TPC7050 displays a screen
- Press the “2” key to select “OS Image Update”. FlashRom’s content is erased and the new OS is written to FlashRom. The system automatically runs the following steps.
(1). Image going to Flash
(2). Erasing Flash
(3). New programming Flash
After the OS successfully update, the TPC7050 automatically cold-starts with the new OS.


- USER'S MANUAL
- TPC7050 MOBILE COMPUTER
- COPYRIGHT 2007, POSLINE
- LIMITED WARRANTY AND DISCLAIMERS
- TABLE OF CONTENTS
- INTRODUCTION
- GETTING STARTED
- OPERATION OF THE MOBILE COMPUTER
- SCANNING
- UTILITIES
- SOFTWARE APPLICATIONS
- COMMUNICATION
- OVERVIEW OF MICROSOFT WINDOWS CE
- TROUBLE SHOOTING
- APPENDIX: UPDATING THE OS VIA CF CARD
- ABOUT THIS MANUAL
- USER AND PRODUCT SAFETY
- WARNINGS
- GENERAL USE
- CLEANING INSTRUCTIONS
- CLEANING THE MOBILE COMPUTER
- CLEANING THE CRADLE
- USING THE MOBILE COMPUTER
- USING THE CRADLE
- MAINTENANCE
- SPECIFICATIONS
- PERFORMANCE
- DISPLAY
- SCANNER
- KEYPAD
- COMMUNICATION INTERFACE
- POWER SUPPLY
- DEVELOPING TOOLS
- CHECK THE PACKAGE
- COMPACT PACKAGE
- DELUXE PACKAGE
- DETAILED VIEW
- TOUCH SCREEN
- RS232/ USB CHARGING PORT
- LED INDICATORS
- STYLUS
- CF COVER
- BATTERY COVER
- CCD SCANNER
- RESET SWITCH
- CRADLE
- MOBILE COMPUTER SLOT
- POWER LED INDICATOR
- CHARGING LED INDICATOR
- RS232 / USB AND CHARGING CONNECTOR
- CHARGING SLOT
- RS-232 C SOCKET
- USB SOCKET
- DC INPUT SOCKET
- INSTALLING, REPLACING AND CHARGING BATTERIES
- REQUIRED BATTERIES
- MAIN BATTERY
- BACKUP BATTERY
- HOW TO CHARGE THE POSLINE RECHARGEABLE BATTERY PACK IN THE CRADLE
- WHEN TO REPLACE OR RECHARGE THE MAIN BATTERY
- NOTES
- INSTALLING / REPLACING THE BATTERY PACK
- HOW TO INSTALL OR REPLACE THE MAIN BATTERY IN THE MOBILE COMPUTER
- CHARGING THE BATTERY PACK WITH A POWER ADAPTER
- USING A RS232/CHARGING CABLE OR USB/CHARGING CABLE
- USING A DC-IN CONVERTER
- CHARGING THE BATTERY PACK WITH CRADLE
- LEAVING THE BATTERY PACK INSIDE THE MOBILE COMPUTER
- NOTE
- PLACING THE SPARE BATTERY PACK INTO THE CRADLE'S SPARE BATTERY CHARGING SLOT
- CAUTION
- INSTALLING IN A SYSTEM
- SYSTEM CONNECTION (DATA COMMUNICATION)
- VIA USB CABLE
- VIA CRD-80 CRADLE
- KEYPAD DESCRIPTION
- ALPHA KEY
- FUNCTION KEY DESCRIPTION
- INSTALL CF AND SD CARD
- INSERTING A CF CARD INTO THE TPC
- INSERTING AN SD CARD INTO THE TPC
- CONFIGURING TPC7050 SETTINGS
- CALIBRATING TOUCH SCREEN ALIGNMENT
- PRESSING THE POWER KEY
- CALIBRATING THE TPC
- ADJUSTING BRIGHTNESS
- MUTING SOUND
- USING THE STYLUS
- ENTERING INFORMATION
- ENTERING INFORMATION USING A KEYPAD
- ENTERING INFORMATION USING THE KEYBOARD INPUT PANEL
- ENTERING DATA VIA THE BAR CODE SCANNER
- POWER MANAGEMENT
- POWER STATUS INDICATION
- ENTER "POWER PROPERTIES
- CHECK BATTERY STATUS
- SAVING BATTERY POWER
- AUTOMATIC SHUT-DOWN OF THE TPC
- BACKLIGHT SETTING
- AUTOMATICALLY TURN OFF THE BACKLIGHT WHEN USING BATTERY POWER
- AUTOMATICALLY TURN OFF THE BACKLIGHT WHEN USING EXTERNAL POWER
- SUSPEND MODE
- ENTERING SUSPEND MODE
- RESUME
- WAKING THE TPC
- RESETTING THE TPC
- PERFORMING A WARM BOOT
- TO PERFORM A WARM BOOT
- PERFORMING A COLD BOOT
- TO PERFORM A COLD BOOT
- DISK ON CHIP
- DISKONCHIP LOCATION
- SAVING TO FLASH
- DISKONCHIP SIZE
- SCAN CONFIGURATION
- SCAN DRIVER
- SCAN TEST
- READING BARCODE
- BARCODE READING PROBLEMS
- FUNCTION KEY SETTING
- AP SETTINGS TAB
- KEYPAD LED SETTING
- SYSTEM RESTORE
- INTERNET EXPLORER
- MEDIA PLAYER
- MICROSOFT WORDPAD
- REMOTE DESKTOP CONNECTION
- TRANSCRIBER
- FEATURES
- WINDOWS EXPLORER
- ACTIVESYNC
- INSTALLING MICROSOFT ACTIVESYNC
- INSTALLATION
- CONNECTING THE TPC7050 TO ACTIVESYNC
- SETTING UP A PARTNERSHIP
- CONNECTING THE TPC
- SYNCHRONIZING DATA
- SOLVING PROBLEMS DURING SYNCHRONIZATION
- SEARCHING TPC7050 CONTENTS FROM A DESKTOP PC
- MAIN WINDOWS
- MY COMPUTER
- RECYCLE BIN
- TASKBAR
- START ICON
- INPUT METHOD
- STATUS INDICATOR ICON
- SETTING UP THE TPC
- BACKLIGHT SETTINGS
- CERTIFICATES
- DATE/TIME
- DIALING
- DIALING PROPERTIES
- EDITING DIALING PATTERNS
- DESKTOP
- SETTING
- HOT FUNCTION KEY
- INPUT PANEL
- INTERNET OPTIONS
- GENERAL
- CONNECTION
- SECURITY
- KEYBOARD
- REPEAT TAB
- KEYPAD LED
- LCD PWM SETTING
- MOUSE
- NETWORK AND DIAL-UP CONNECTION
- OWNER
- IDENTIFICATION
- NETWORK ID
- PASSWORD
- PC CONNECTION
- POWER
- REGIONAL SETTINGS
- REMOVE PROGRAMS
- STORAGE MANAGER
- DOUBLE TAP
- CALIBRATION
- SYSTEM
- TO SET THE MEMORY
- TO SET UP DEVICE ID
- VOLUME AND SOUND
- VOLUME
- SOUND
- GENERAL CHECKS
- READ OPERATION PROBLEMS
- IF THE MOBILE COMPUTER HAS A PROBLEM READING BARCODE LABELS
- MOBILE COMPUTER PROBLEMS
- MOBILE COMPUTER DOES NOT POWER ON
- MOBILE COMPUTER SHUTS ITSELF DOWN
- MOBILE COMPUTER WILL NOT SHUT OFF
- SCREEN IS BLANK
- MOBILE COMPUTER EITHER DOESN'T RESPOND, OR RESPONDS INACCURATELY TO TOUCH SCREEN INPUT
- BATTERY LIFE IS SHORT
- LOW BACKUP BATTERY" MESSAGE
Brand : POSline
Model : TPC7050
Category : Barcode Reader