
BLZ-PROIR - Grill Blaze - Free user manual and instructions
Find the device manual for free BLZ-PROIR Blaze in PDF.


| Product Type | Grill |
| Brand | Blaze |
| Model | BLZ-PROIR |
| Dimensions (approx.) | 48 x 24 x 36 inches (121.9 x 61 x 91.4 cm) |
| Weight (approx.) | 90 lbs (40.8 kg) |
| Power Source | Propane gas |
| Cooking Area | 720 sq. in. (4645 sq. cm) |
| Burners | 4 stainless steel burners |
| BTU Output | 60,000 BTU total |
| Ignition Type | Electronic ignition |
| Material | Stainless steel body |
| Cooking Grates | Porcelain-coated cast iron |
| Temperature Gauge | Built-in lid thermometer |
| Side Burner | Integrated side burner |
| Storage | Enclosed cabinet with shelves |
| Cleaning | Removable drip tray and grease management system |
| Safety Features | Flame tamers and safety shut-off valve |
| Warranty | Limited lifetime warranty on burners and body |
Frequently Asked Questions - BLZ-PROIR Blaze
User questions about BLZ-PROIR Blaze
0 question about this device. Answer the ones you know or ask your own.
Ask a new question about this device
Download the instructions for your Grill in PDF format for free! Find your manual BLZ-PROIR - Blaze and take your electronic device back in hand. On this page are published all the documents necessary for the use of your device. BLZ-PROIR by Blaze.
USER MANUAL BLZ-PROIR Blaze
WARNING: This product can expose you to chemicals including Chromium (hexavalent compounds), which are known to the State of California to cause cancer and birth defects or other reproductive harm. For more information go to: www.P65Warnings.ca.gov
How to Replace a Conventional Burner with an Infrared Sear Burner
- To install the optional infrared burner, begin by first removing the far left cooking grid, flame stabilizing grid and heat zone divider. The Flame stabilizing grid will not be re-installed over the burner.
- Remove the conventional burner by removing the cotter pin that holds it in place. The pin is located on the bottom rear of the burner and is accessible from the outside rear of the grill. Use needle nose plyers to remove the cotter pin. Once removed, remove the conventional burner.

- Remove the crossfire panel. The crossfire panel is a downward U shaped channel located between the burners towards the rear of the burners. The crossfire panel is removed by unscrewing the fastener under the channel which holds it in place. The most commonly used fastener can be removed with a metric #4 Allen wrench included with the sear burner.


- Install the infrared burner into the grill in the same way that the conventional burner installed with the male post on the rear of the burner resting in the opening in the grill chassis and the cylindrical venture tube installing around the valve stem in the front. Note: IT IS CRITICAL THAT THE FRONT END OF THE INFRARED BURNER IS INSTALLED APPROPRIATELY ONTO THE GAS VALVE TO ENSURE THE GAS FLOWS SAFELY INTO THE BURNER.
Depending on which series of grill, the included spacer might be needed to allow the burner to mount into the grill body securely. (See figure below)
This is recognized by the burner not completely lowering into place where the male post seats at the opening in the grill chassis. If so, place the spacer as shown below and install the.


- With either of the above configurations, replace the cotter pin to hold the burner firmly in place.

-
Replace the heat zone divider and cooking grid BUT NOT THE FLAME STABALIZING GRID.
-
Burn off your sear burner on high before the first use. It is normal to see it smoke as it burns off the oils from manufacturing. Your burner will also discolor and the mesh plate on top will also flex slightly in certain areas. Burn off until it is finished smoking (roughly 5 minutes).
For additional information, contact your dealer or Blaze at 866-976-9510 or go to Blazegrills.com.
Preheating the infrared burner
Always preheat the entire grill before cooking. If the grill is already hot from cooking, you should still preheat the infrared burner for 3 minutes on high. Never place food over the burner until it is fully preheated to avoid clogging the small ports and damaging the burner from grease drippings and food particles.
Infrared Burner Cleaning
To keep your infrared burner operating at maximum performance, after each use turn the burner on high for 5-7 minutes with the lid open. This allows any food particles or grease drippings to burn away. Once your grill has cooled completely, use a soft brush or vacuum to remove any ash accumulation on the burner if necessary.
Sear Burner Tips:
- The sear burner has a series of ceramic tiles producing the infrared energy. Be careful when installing/removing and storing the burner as to not crack the tiles. Jarring of the burner could break the tiles.
- Avoid pouring marinades over the top of the meat positioned above the sear burner. The large volume of liquid pouring on the hot ceramic plates could damage the plates or clog the burner's gas ports.
- The sear burner is made for high temperature cooking and is best run in the high position. For thicker steaks or those cooked to a well-done temperature, it might be preferred to sear the meat over the infrared burner then move it to a cooler or finishing side of the grill to complete cooking. This can be accomplished by having a conventional main burner section of the grill running at a low setting. This technique can improve the crust of the steak.
Contact information
Blaze Outdoor Products:
6620 Greenwell Springs Road
Baton Rouge, LA 70805 USA
Phone: 866-976-9510
Email: Customerservice@blazegrills.com
Website: www.blazegrills.com

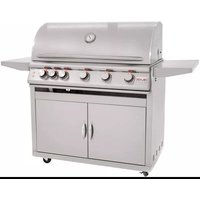
Brand : Blaze
Model : BLZ-PROIR
Category : Grill