
CPD-G220R - Computer accessory SONY - Free user manual and instructions
Find the device manual for free CPD-G220R SONY in PDF.


| Product Type | CRT Monitor |
| Brand | Sony |
| Model | CPD-G220R |
| Screen Size | 19 inches |
| Resolution | Up to 1600 x 1200 |
| Display Type | Trinitron CRT |
| Horizontal Frequency | 30 – 96 kHz |
| Vertical Frequency | 48 – 120 Hz |
| Power Supply | 100 – 240 V AC, 50/60 Hz |
| Power Consumption (Max) | 120 W |
| Dimensions (W x H x D) | 18.5 x 18.1 x 19.3 inches |
| Weight | 50.7 lbs |
| Input Signal | Analog RGB, D-sub 15-pin |
| On-Screen Display (OSD) | Yes, with multiple languages |
| Cleaning Instructions | Wipe with soft, dry cloth. Do not use liquids. |
| Safety Precautions | Do not open casing; high voltages inside. |
| Spare Parts | Power cord, VGA cable available |
| Repairability | Serviceable by qualified technician |
| Manufacturer | Sony Corporation |
| Manual Languages | English, French, Spanish, etc. |
Frequently Asked Questions - CPD-G220R SONY
User questions about CPD-G220R SONY
0 question about this device. Answer the ones you know or ask your own.
Ask a new question about this device
Download the instructions for your Computer accessory in PDF format for free! Find your manual CPD-G220R - SONY and take your electronic device back in hand. On this page are published all the documents necessary for the use of your device. CPD-G220R by SONY.
USER MANUAL CPD-G220R SONY
Trinitron® Color Computer Display
Operating Instructions US
Mode d'emploi FR
The model and serial numbers are located at the rear of the unit. Record these numbers in the spaces provided below. Refer to them whenever you call upon your dealer regarding this product. Model No. ____ Serial No. ____
WARNING
To prevent fire or shock hazard, do not expose the unit to rain or moisture.
Dangerously high voltages are present inside the unit. Do not open the cabinet. Refer servicing to qualified personnel only.
FCC Notice
This equipment has been tested and found to comply with the limits for a Class B digital device, pursuant to Part 15 of the FCC Rules. These limits are designed to provide reasonable protection against harmful interference in a residential installation. This equipment generates, uses, and can radiate radio frequency energy and, if not installed and used in accordance with the instructions, may cause harmful interference to radio communications. However, there is no guarantee that interference will not occur in a particular installation. If this equipment does cause harmful interference to radio or television reception, which can be determined by turning the equipment off and on, the user is encouraged to try to correct the interference by one or more of the following measures:
– Reorient or relocate the receiving antenna.
– Increase the separation between the equipment and receiver.
- Connect the equipment into an outlet on a circuit different from that to which the receiver is connected.
- Consult the dealer or an experienced radio/TV technician for help.
You are cautioned that any changes or modifications not expressly approved in this manual could void your authority to operate this equipment.
IMPORTADOR (Para Mexico unicamente/For Mexico only)
Sony Electronicos de Mexico, S.A. de C.V.
Henry Ford No.29
Fraccionamiento San Nicolas, Tlalnepantla
Estado de Mexico, CP54030
Tel.: 321-1000
R.F.C. SEM-941001-BJA
IMPORTANTE
This product complies with Swedish National Council for Metrology (MPR) standards issued in December 1990 (MPR II) for very low frequency (VLF) and extremely low frequency (ELF).
INFORMATION
This notice is applicable for USA/Canada only.
If shipped to USA/Canada, install only a UL LISTED/CSA
LABELLED power supply cord meeting the following specifications:
SPECIFICATIONS
Plug Type Nema-Plug 5-15p
Cord Type SVT or SJT, minimum 3 · 18 AWG
Length Maximum 15 feet
Rating Minimum 7 A, 125 V
NOTICE
As an ENERGY STAR Partner, Sony Corporation has determined that this product meets the ENERGY STAR guidelines for energy efficiency.

This monitor complies with the TCO'99 guidelines.
For questions regarding your product or for the Sony Service Center nearest you call:
The number below is for FCC related matters only.
Declaration of Conformity
Trade Name: Sony
Model No.: CPD-G220 *
Responsible Party: Sony Electronics Inc.
Address: 1 Sony Drive, Park Ridge, NJ. 07656 USA
Telephone No.: 201-930-6972
This device complies with Part 15 of the FCC Rules. Operation is subject to the following two conditions: (1) This device may not cause harmful interference, and (2) this device must accept any interference received, including interference that may cause undesired operation. * Can be replaced with any letter from A to Z.
Table of Contents
Precautions....4
Identifying parts and controls 5
Setup....6
Step 1: Connect your monitor to your computer ..... 6
Step 2: Connect the power cord....6
Step 3: Turn on the monitor and computer ..... 7
Selecting the on-screen menu language (LANGUAGE)....7
Customizing Your Monitor....8
Navigating the menu....8
Adjusting the brightness and contrast. 9
Adjusting the size and the centering of the picture (SIZE/CENTER) 9
Adjusting the shape of the picture (GEOMETRY) ..... 10
Adjusting the color of the picture (COLOR) 10
Adjusting the convergence (CONVERGENCE) 10
Changing the OSD language (LANGUAGE) ..... 10
Additional settings (OPTION) 11
Technical Features ....12
Preset and user modes....12
Power saving function....12
Troubleshooting....12
If thin lines appear on your screen (damper wires)....12
On-screen messages 12
Trouble symptoms and remedies 13
Self-diagnosis function 15
Specifications....15
Appendix....i
Preset mode timing table ....i
TCO'99 Eco-document ....i
- Tr i n and FD ä Trimitron are registered trademarks of Sony Corporation.
• Macintosh is a trademark licensed to Apple Computer, Inc., registered in the U.S.A. and other countries.
- Windows 15 and MS-DOS are registered trademarks of Microsoft Corporation in the United States and other countries.
- IBM PC/AT and VGA are registered trademarks of IBM Corporation of the U.S.A.
- VESA and DDC ™ are trademarks of the Video Electronics Standard Association.
• ENERGY STAR is a U.S. registered mark.
- All other product names mentioned herein may be the trademarks or registered trademarks of their respective companies.
- Further eTMramd "®"rare not "mentioned in each case in this manual.
Precautions
Warning on power connections
- Use the supplied power cord. If you use a different power cord, be sure that it is compatible with your local power supply.
For the customers in the U.S.A.
If you do not use the appropriate cord, this monitor will not conform to mandatory FCC standards.
Example of plug types
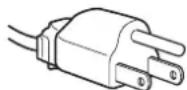
for 100 to 120 V AC

for 200 to 240 V AC
- Before disconnecting the power cord, wait at least 30 seconds after turning off the power to allow the static electricity on the screen's surface to discharge.
- After the power is turned on, the screen is demagnetized (degaussed) for about 5 seconds. This generates a strong magnetic field around the screen which may affect data stored on magnetic tapes and disks placed near the monitor. Be sure to keep magnetic recording equipment, tapes, and disks away from the monitor.
The equipment should be installed near an easily accessible outlet.
Installation
Do not install the monitor in the following places:
- on surfaces (rugs, blankets, etc.) or near materials (curtains, draperies, etc.) that may block the ventilation holes
- near heat sources such as radiators or air ducts, or in a place subject to direct sunlight
• in a place subject to severe temperature changes - in a place subject to mechanical vibration or shock
• on an unstable surface - near equipment which generates magnetism, such as a transformer or high voltage power lines
- near or on an electrically charged metal surface
• in a dusty or smoky environment - into a wall or enclosure
Protection
- Do not put foreign objects into the monitor.
- Disconnect the monitor if environment exceeds 60°C / 140°F .
- Ensure AC power cord is not trapped under furniture, TV, etc.
- Do not overload wall outlets, extension cords, or convenience receptacles beyond their capacity.
Maintenance
- Clean the screen with a soft cloth. If you use a glass cleaning liquid, do not use any type of cleaner containing an anti-static solution or similar additive as this may scratch the screen's coating.
- Do not rub, touch, or tap the surface of the screen with sharp or abrasive items such as a ballpoint pen or screwdriver. This type of contact may result in a scratched picture tube.
- Clean the cabinet, panel and controls with a soft cloth lightly moistened with a mild detergent solution. Do not use any type of abrasive pad, scouring powder or solvent, such as alcohol or benzene.
Transportation
When you transport this monitor for repair or shipment, use the original carton and packing materials.
Use of the tilt-swivel
This monitor can be adjusted within the angles shown below. To find the center of the monitor's turning radius, align the center of the monitor's screen with the centering line on the stand.
Hold the monitor at the bottom with both hands when you turn it horizontally or vertically. Be careful not to pinch your fingers at the back of the monitor when you tilt the monitor up vertically.

Centering line
Identifying parts and controls
See the pages in parentheses for further details.
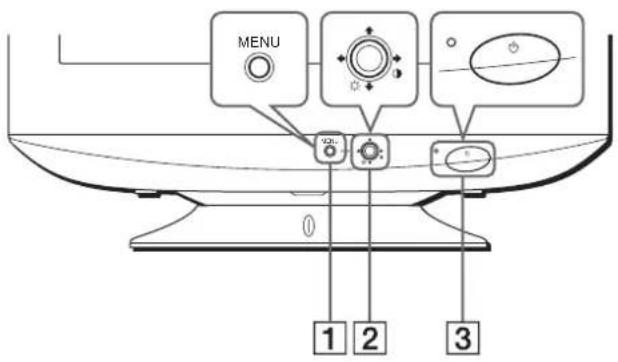
1 MENU/OK button (page 9)
The MENU/OK button is used to display the main MENU on your screen.
② Joystick (page 9)
The joystick is used to navigate the menu and make adjustments to the monitor, including brightness and contrast adjustments.
3 ⏻ (power) switch and indicator (pages 7, 12, 15)
This button turns the monitor on and off. The power indicator lights up in green when the monitor is turned on or lights up in orange when the monitor is in power saving mode.
Side
For CPD-G220S model only
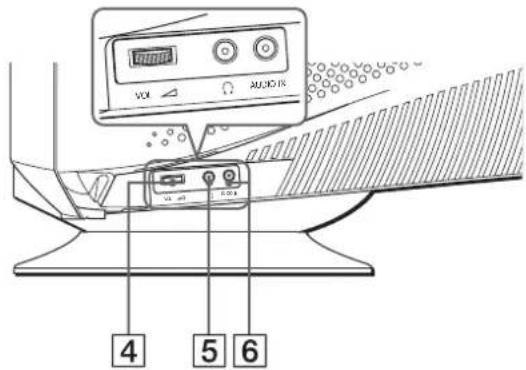
4 Volume (VOL) control
This control adjuster is used to adjust the volume. Move the adjuster to the right to increase the volume. Move the adjuster to the left to decrease the volume.
5Headset output
You can listen to the audio signals from your computer using headphones (not supplied). The speaker turns off when headphones are connected to the headphones jack. Adjust the volume using the volume control.
6 AUDIO IN input
You can listen to music, sounds, and other audio files using the speaker in your monitor.
Connect the AUDIO IN jack to the audio out jack of your computer's sound card using the miniplug cord (supplied).
RearFront

7 AC IN connector (page 6)
This connector provides AC power to the monitor.
8 Video input connector (HD15) (page 6)
This connector inputs RGB video signals (0.700 Vp-p, positive) and sync signals.

Pin No. Signal
| 1 | Red | |||
| 2 Green(Sync on Green) | ||||
| 3 | B | l | u | e |
| 4 ID (Ground) | ||||
| 5 DDC Ground* | ||||
| 6 Red Ground | ||||
| 7 Green Ground | ||||
| 8 Blue Ground | ||||
| 9 DDC Host 5V* | ||||
| 10 Ground | ||||
| 11 ID (Ground) | ||||
| 12 Bi-Directional Data (SDA)* | ||||
| 13 H. Sync | ||||
| 14 V. Sync | ||||
| 15 Data Clock (SCL)* | ||||
* DDC (Display Data Channel) is a standard of VESA.
Setup
Before using your monitor, check that the following accessories are included in your carton:
- Power cord (1)
• Audio miniplug cord (1) for CPD-G220S model only - Warranty card (1)
- Notes on cleaning the screen's surface (1)
• This instruction manual (1) - Notice of Macintosh adapter availability (1)
Step 1: Connect your monitor to your computer
Turn off the monitor and computer before connecting.
Note
- Do not touch the pins of the video cable connector as this might bend the pins.
■Connecting to an IBM PC/AT or compatible computer

IBM PC/AT or compatible computer
■Connecting to a Macintosh or compatible computer

Macintosh or compatible computer
* Please refer to the Notice of Macintosh adapter availability.
Step 2: Connect the power cord
With the monitor and computer switched off, first connect the power cord to the monitor, then connect it to a power outlet.
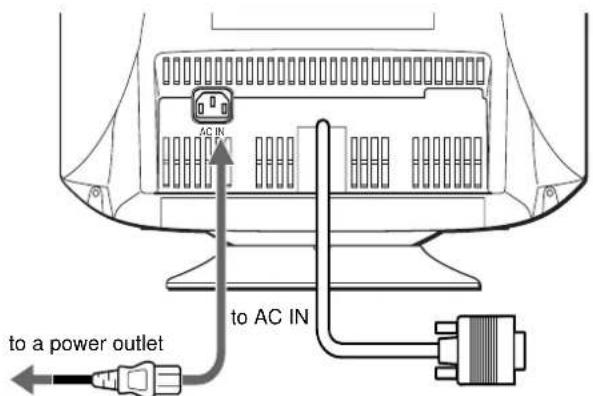
power cord (supplied)
Step 3: Turn on the monitor and computer
First turn on the monitor, then turn on the computer.

The installation of your monitor is complete.
If necessary, use the monitor's controls to adjust the picture.
If no picture appears on your screen
- Check that the monitor is correctly connected to the computer.
- If NO INPUT SIGNAL appears on the screen, confirm that the video signal cable is properly connected and all plugs are firmly seated in their sockets.
- If MONITOR IS IN POWER SAVE MODE appeared on the screen, try pressing any key on the computer keyboard.
- If you are replacing an old monitor with this model and OUT OF SCAN RANGE appears on the screen, reconnect the old monitor. Then adjust the computer's graphic board so that the horizontal frequency is between 30 – 85 kHz, and the vertical frequency is between 48 – 170 Hz.
For more information about the on-screen messages, see “Trouble symptoms and remedies” on page 13.
Setup on Various OS (Operating System)
This monitor complies with the "DDC" Plug & Play standard and automatically detects all the monitor's information. No specific driver needs to be installed to the computer.
If you connect the monitor to your PC, and then boot your PC for the first time, the setup Wizard may be displayed on the screen. Click on "Next" several times according to the instructions from the Wizard until the Plug & Play Monitor is automatically selected so that you can use this monitor.
Adjusting the monitor's resolution and color number
Adjust the monitor's resolution and color number by referring to your computer's instruction manual. The color number may vary according to your computer or video board. The color palette setting and the actual number of colors are as follows:
• High Color (16 bit) → 65,536 colors
• True Color (24 bit) → about 16.77 million colors
In true color mode (24 bit), speed may be slower.
Selecting the on-screen menu language (LANGUAGE)
English, French, German, Spanish, Italian, Dutch, Swedish, Russian and Japanese versions of the on-screen menus are available. The default setting is English.
1 Press the MENU/OK button.
See page 9 for more information on using the MENU/OK button.

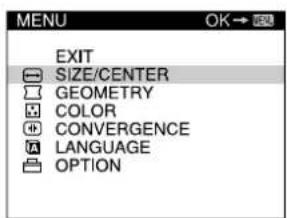
2 Move the joystick ↓/↑ to highlight 📄 LANGUAGE and press the MENU/OK button.
![graph TD A["Circular System"] --> B["Arrow"] B --> C["Menu"]](/content/2026/07/1494712/images/ecff3fba5f4b8d181ed6b1ee7c1819f558b658d9cb88e298b912c536da53f076.jpg)
3 Move the joystick ↓/↑ to select a language.

To close the menu
Press the MENU/OK once to return to the main MENU, and twice to return to normal viewing. If no buttons are pressed, the menu closes automatically after about 30 seconds.
Customizing Your Monitor
You can make numerous adjustments to your monitor using the on-screen menu.
Navigating the menu
Press the MENU/OK to display the main MENU on your screen. See page 9 for more information on using the MENU/OK button.
MENU


Use the joystick to select one of the following menus.
1 EXIT
Select EXIT to close the menu.
2SIZE/CENTER(page 9)
Select the SIZE/CENTER menu to adjust the picture's size, centering, or zoom.

3 GEOMETRY (page 10)
Select the GEOMETRY menu to adjust the picture's rotation and shape.

4 COLOR (page 10)
Select the COLOR menu to adjust the picture's color temperature. You can use this to match the monitor's colors to a printed picture's colors.

5 CONVERGENCE (page 10)
Select the CONVERGENCE menu to adjust the picture's horizontal and vertical convergence.

6 LANGUAGE (page 7, 10)
Select LANGUAGE to choose the on-screen menu's language.

7 OPTION (page 11)
Select OPTION to adjust the monitor's options. The options include:
- degaussing the screen
• adjusting the moire cancellation level
- resetting to factory settings
- locking the controls
■Displaying the current input signal
The horizontal and vertical frequencies of the current input signal are displayed in the main MENU. If the signal matches to one of the recommended VESA timing modes, the resolution is also displayed.

the resolution of the current input signal 60.0kHz/75Hz the horizontal and vertical frequencies of the current input signal
■Using the MENU/OK button
1 Display the main MENU.
Press the MENU/OK button to display the main MENU on your screen.

2 Select the menu you want to adjust.
Highlight the desired menu by moving the joystick towards the top to go up (↑), towards the bottom to go down (↓). Press the MENU/OK button to select the desired menu.
![graph TD A["UP"] --> B["Down"] B --> C["→"] C --> D["MENU"]](/content/2026/07/1494712/images/50043845805537525fa06e9fe692f5cada30642211d5788680ff2c024fbfd67a.jpg)
3 Adjust the menu.
Move the joystick left ( ← ) or right ( → ) to make the adjustment.

4 Close the menu.
Press the MENU/OK once to return to the main MENU, and twice to return to normal viewing. If no buttons are pressed, the menu closes automatically after about 30 seconds.

Adjusting the brightness and contrast
Brightness and contrast adjustments are made using a separate BRIGHTNESS/CONTRAST menu.
These settings are stored in memory for all input signals.
1 Move the joystick in any direction.
The BRIGHTNESS/CONTRAST menu appears on the screen.

2 Move the joystick ↓/↑ to adjust the brightness (○), and ←/→ to adjust the contrast (○).
If no adjustments are made, the menu disappears automatically after about 3 seconds.
Adjusting the size and the centering of the picture (SIZE/CENTER)
This setting is stored in memory for the current input signal.
1 Press the MENU/OK button.
The main MENU appears on the screen.
2 Move the joystick ↓/↑ to highlight ➕ SIZE/CENTER and press the MENU/OK button.
The SIZE/CENTER menu appears on the screen.
3 First move the joystick ↓/↑ to select the desired adjustment item. Then move the joystick ←/→ to adjust the setting.
| Select To | |
| shift the picture to the left or right | |
| shift the picture up or down | |
| enlarge or reduce the picture width | |
| enlarge or reduce the picture height | |
| enlarge or reduce the picture width and height proportionally | |
Note
Adjustment stops when either the horizontal or vertical size reaches its maximum or minimum value.
Adjusting the shape of the picture (GEOMETRY)
The GEOMETRY settings allow you to adjust the rotation and shape of the picture.
The (rotation) setting is stored in memory for all input signals. All other settings are stored in memory for the current input signal.
1 Press the MENU/OK button.
The main MENU appears on the screen.
2 Move the joystick ↓/↑ to highlight GEOMETRY and press the MENU/OK button.
The GEOMETRY menu appears on the screen.
3 First move the joystick ↓/↑ to select the desired adjustment item. Then move the joystick ←/→ to adjust the setting.
| Select To | |
| rotate the picture | |
| expand or contract the picture sides | |
| shift the picture sides to the left or right | |
| adjust the picture width at the top or bottom of the screen | |
| shift the picture to the left or right at the top or bottom of the screen | |
Adjusting the color of the picture (COLOR)
The COLOR settings allow you to adjust the picture's color temperature by changing the color level of the white color field. Colors appear reddish if the temperature is low, and bluish if the temperature is high. This adjustment is useful for matching the monitor's colors to a printed picture's colors.
This setting is stored in memory for all input signals.
1 Press the MENU/OK button.
The main MENU appears on the screen.
2 Move the joystick ↓/↑ to highlight ☐ COLOR and press the MENU/OK button.
The COLOR menu appears on the screen.
3 Move the joystick ↓/↑ to select a color temperature.
The preset color temperatures are 5000K and 9300K. Since the default setting is 9300K, the whites will change from a bluish hue to a reddish hue as the temperature is lowered to 5000K.
4 If necessary, fine tune the color temperature.
You can select your own color temperature between 9300K and 5000K.
First move the joystick ↓/↑ to select ☐. Then move the joystick ←/→ to adjust the color temperature.

Adjusting the convergence (CONVERGENCE)
The CONVERGENCE settings allow you to adjust the quality of the picture by controlling the convergence. The convergence refers to the alignment of the red, green, and blue color signals. If you see red or blue shadows around letters or lines, adjust the convergence.
These settings are stored in memory for all input signals.
1 Move the MENU/OK button.
The main MENU appears on the screen.
2 Move the joystick ↓/↑ to highlight
CONVERGENCE and press the MENU/OK button.
The CONVERGENCE menu appears on the screen.
3 First move the joystick ↓/↑ to select 🏠 for
horizontal adjustment, or for vertical adjustment. Then move the joystick ↔/→ to adjust the convergence.
Changing the OSD language (LANGUAGE)
This setting is stored in memory for the current input signal.
1 Press the MENU/OK button.
The main MENU appears on the screen.
2 Move the joystick ↓/↑ to highlight
A LANGUAGE and press the MENU/OK button.
The LANGUAGE menu appears on the screen.
3 Press the joystick ↓/↑ to select the language you prefer.
The OSD automatically disappears after about 30 seconds. To close the OSD, press the MENU/OK button again.
For more information about the on-screen languages, see "Changing the OSD language (LANGUAGE)" on page 7.
Additional settings (OPTION)
You can manually degauss (demagnetize) the monitor, adjust the moire cancellation level, reset to factory setting, and lock the controls.
1 Press the MENU/OK button.
The main MENU appears on the screen.
2 Move the joystick ↓/↑ to highlight ☐ OPTION and press the MENU/OK button.
The OPTION menu appears on the screen.
3 Move the joystick ↓/↑ to select the desired adjustment item.
Adjust the selected item according to the following instructions.
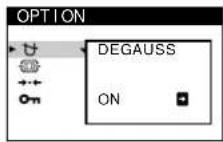
Degaussing the screen
The monitor is automatically demagnetized (degaussed) when the power is turned on.
To manually degauss the monitor, first move the joystick ↓/↑ to select ⊕ (DEGAUSS). Then move the joystick →.
The screen is degaussed for about 5 seconds. If a second degauss cycle is needed, allow a minimum interval of 20 minutes for the best result.
Adjusting the moire*
If elliptical or wavy patterns appear on the screen, adjust the moire cancellation level.
To adjust the amount of moire cancellation, first move the joystick ↓/↑ to select Ⓞ (MOIRE ADJUST). Then move the joystick ←/→ until the moire effect is at a minimum.
* Moire is a type of natural interference which produces soft, wavy lines on your screen. It may appear due to interference between the pattern of the picture on the screen and the phosphor pitch pattern of the monitor.
Example of moire

Resetting the adjustments
The RESET option erases your customized setting.
To restore your monitor to the factory setting, first move the joystick ↓/↑ to select →← (RESET). Then move the joystick →, to reset the adjustment for current input signal. Hold the joystick → for 2 seconds to reset the adjustment for all input signals.
Note
When “reset the adjustment for all input signal” is activated, the customized language selection goes back to the default language of English.
Locking the controls
To protect adjustment data by locking the controls, first move the joystick ↓/↑ to select ON (CONTROL LOCK). Then move the joystick →, to select ON.
Only the ⏻ (power) switch, EXIT, and ⓄONTROL LOCK) of the ⏻PTION menu will operate. If any other items are selected, the ⏻mark appears on the screen.
To cancel the control lock
Repeat the procedure above and set (CONTROL LOCK) to OFF.
Technical Features
Preset and user modes
When the monitor receives an input signal, it automatically matches the signal to one of the factory preset modes stored in the monitor's memory to provide a high quality picture at the center of the screen. (See Appendix for a list of the factory preset modes.) For input signals that do not match one of the factory preset modes, the digital Multiscan technology of this monitor ensures that a clear picture appears on the screen for any timing in the monitor's frequency range (horizontal: 30 – 85 kHz, vertical: 48 – 170 Hz). If the picture is adjusted, the adjustment data is stored as a user mode and automatically recalled whenever the same input signal is received.
Note for Windows users
For Windows users, check your video board manual or the utility program which comes with your graphic board and select the highest available refresh rate to maximize monitor performance.
Power saving function
This monitor meets the power-saving guidelines set by VESA, ENERGY STAR, and NUTEK. If no signal is received by the monitor from the connected computer, the monitor will automatically reduce power consumption as shown below.
| Power mode Power consumption ⏻ (power) indicator | |
| normal operation | ≤ 115 W green |
| active off* ≤ 3 W orange** | |
| power off 0 W (Approx.) off | |
* When your computer is in active off mode, MONITOR IS IN POWER SAVE MODE appears on the screen if you press any button on the monitor. After a few seconds, the monitor enters the power saving mode again.
** If the horizontal or vertical sync signal is received by the monitor, the power indicator lights in orange.
Troubleshooting
Before contacting technical support, refer to this section.
If thin lines appear on your screen (damper wires)
The lines you are experiencing on your screen are normal for the Trinitron monitor and are not a malfunction. These are shadows from the damper wires used to stabilize the aperture grille and are most noticeable when the screen's background is light (usually white). The aperture grille is the essential element that makes a Trinitron picture tube unique by allowing more light to reach the screen, resulting in a brighter, more detailed picture.

On-screen messages
If no picture appears on the screen, one of the following messages appears on the screen. To solve the problem, see “Trouble symptoms and remedies” on page 13.
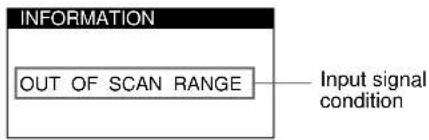
The input signal condition OUT OF SCAN RANGE
indicates that the input signal is not supported by the monitor's specifications.
NO INPUT SIGNAL
indicates that no input signal is present.
MONITOR IS IN POWER SAVE MODE
indicates that the computer is in power saving mode. This message is displayed only when your computer is in a power saving mode and you press any one of the buttons on the monitor.
Trouble symptoms and remedies
If the problem is caused by the connected computer or other equipment, please refer to the connected equipment's instruction manual.
Use the self-diagnosis function (page 15) if the following recommendations do not resolve the problem.
| Symptom Check these items | |
| No picture | |
| If the ⏻ (power) indicator is not lit | Check that the power cord is properly connected.Check that the ⏻ (power) switch is in the “on” position. |
| If the NO INPUT SIGNAL message appears on the screen, or if the ⏻ (power) indicator is orange | Check that the video signal cable is properly connected and all plugs are firmly seated in their sockets (page 6).Check that the HD15 video input connector’s pins are not bent or pushed in.■Problems caused by the connected computer or other equipmentCheck that the computer’s power is “on.”Check that the graphic board is completely seated in the proper bus slot. |
| If the MONITOR IS IN POWER SAVE MODE message appears on the screen, or if the ⏻ (power) indicator is orange | ■Problems caused by the connected computer or other equipmentThe computer is in power saving mode. Try pressing any key on the computer keyboard.Check that the computer’s power is “on.”Check that the graphic board is completely seated in the proper bus slot. |
| If the OUT OF SCAN RANGE message appears on the screen | ■Problems caused by the connected computer or other equipmentCheck that the video frequency range is within that specified for the monitor. If you replaced an old monitor with this monitor, reconnect the old monitor and adjust the frequency range to the following.Horizontal: 30 – 85 kHzVertical: 48 – 170 Hz |
| If no message is displayed and the ⏻ (power) indicator is green or flashing orange | Use the Self-diagnosis function (page 15). |
| If using a Macintosh system | Check that the Macintosh adapter and the video signal cable are properly connected (page 6). |
| Picture flickers, bounces, oscillates, or is scrambled | Isolate and eliminate any potential sources of electric or magnetic fields such as other monitors, laser printers, electric fans, fluorescent lighting, or televisions.Move the monitor away from power lines or place a magnetic shield near the monitor.Try plugging the monitor into a different AC outlet, preferably on a different circuit.Try turning the monitor 90° to the left or right.■Problems caused by the connected computer or other equipmentCheck your graphics board manual for the proper monitor setting.Confirm that the graphics mode (VESA, Macintosh 16" Color, etc.) and the frequency of the input signal are supported by this monitor (Appendix). Even if the frequency is within the proper range, some video boards may have a sync pulse that is too narrow for the monitor to sync correctly.Adjust the computer’s refresh rate (vertical frequency) to obtain the best possible picture. |
| Picture is fuzzy | Adjust the brightness and contrast (page 9).Degauss the monitor* (page 11).Select MOIRE ADJUST and adjust the moire cancellation effect (page 11). |
| Picture is ghosting | Eliminate the use of video cable extensions and/or video switch boxes.Check that all plugs are firmly seated in their sockets. |
| Picture is not centered or sized properly | Adjust the size (page 9) or centering (page 9). Note that some video modes do not fill the screen to the edges. |
| Edges of the image are curved | Adjust the geometry (page 10). |
| Wavy or elliptical pattern (moire) is visible | Select MOIRE ADJUST and adjust the moire cancellation effect (page 11).■Problems caused by the connected computer or other equipmentChange your desktop pattern. |
| Color is not uniform | Degauss the monitor* (page 11). If you place equipment that generates a magnetic field, such as a speaker, near the monitor, or if you change the direction the monitor faces, color may lose uniformity. |
| White does not look white | Adjust the color temperature (page 10). |
| Letters and lines show red or blue shadows at the edges | Adjust the convergence (page 10). |
| Monitor buttons do not operate | If the control lock is set to ON, set it to OFF (page 11). |
| A hum is heard right after the power is turned on | This is the sound of the auto-degauss cycle. When the power is turned on, the monitor is automatically degaussed for five seconds. |
* If a second degauss cycle is needed, allow a minimum interval of 20 minutes for the best result. A humming noise may be heard, but this is not a malfunction.
Displaying this monitor's name, serial number, and date of manufacture.
While the monitor is receiving a video signal, press and hold the center of the MENU/OK button for more than five seconds to display this monitor's information box.
If the problem persists, call your authorized Sony dealer and give the following information.
• Model name: CPD-G220 *
- Serial number
- Name and specifications of your computer and graphics board.


Example
INFORMATION
MODEL : CPD-G220
SER NO:1234567
MANUFACTURED: 200 0 - 52
Self-diagnosis function
This monitor is equipped with a self-diagnosis function. If there is a problem with your monitor or computer, the screen will go blank and the ⏻ (power) indicator will either light up green or flash orange. If the ⏻ (power) indicator is lit in orange, the computer is in power saving mode. Try pressing any key on the keyboard.

(●) (power) indicator
If the screen is blank and the ⏻ (power) indicator is green
1 Disconnect the video input cable or turn off the connected computer.
2 Press the ⏻(power) button twice to turn the monitor off and then on.
3 Move the joystick → for 2 seconds.

If all four color bars appear (white, red, green, blue), the monitor is working properly. Reconnect the video input cable and check the condition of your computer.
If the color bars do not appear, there is a potential monitor failure. Inform your authorized Sony dealer of the monitor's condition.
If the ⏻ (power) indicator is flashing orange
Press the ⏻ (power) button twice to turn the monitor off and then on.
If the ⏻ (power) indicator lights up green, the monitor is working properly.
If the ⏻ (power) indicator is still flashing, there is a potential monitor failure. Count the number of seconds between orange flashes of the ⏻ (power) indicator and inform your authorized Sony dealer of the monitor's condition. Be sure to note the model name and serial number of your monitor. Also note the make and model of your computer and video board.
Specifications
CRT 0.24 mm aperture grille pitch (center)
17 inches measured diagonally
90-degree deflection
FD Trinitron
Viewable image size Approx. 328 · 242 mm (w/h)
(13 · 9 5/8 inches)
Viewing image 408 mm (16.1 inches)
Resolution
Maximum Horizontal: 1600 dots
Vertical: 1200 lines
Recommended Horizontal: 1024 dots
Vertical: 768 lines
Standard image area Approx. 312 · 234 mm (w/h)
(123 / 8· 91 / 4 inches)
Deflection frequency* Horizontal: 30 to 85 kHz
Vertical: 48 to 170 Hz
AC input voltage/current 100 to 240 V, 50/60 Hz, Max. 1.7 A
Power consumption 115 W
Dimensions Approx. 402 · 418 · 421 mm (w/h/d)
(157/8 · 161/2 · 165/8 inches)
Monitor weight Approx. 19 kg (41.9 lb)
Plug and Play DDC2B/DDC2Bi/GTF
Supplied accessories See page 6
For CPD-G220S model only
Audio Input Input Impedance: 47 kΩ
Input Level: 0.5 Vrms (typical)
(RL: 16 W/Input: 0.5 Vrms)
* Recommended horizontal and vertical timing condition
• Horizontal sync width should be more than 1.0 µ sec.
• Horizontal blanking width should be more than 3.0 μsec.
• Vertical blanking width should be more than 500 μsec.
Design and specifications are subject to change without notice.
Appendix
Preset mode timing table
| No. | Resolution (dots · lines) | Horizontal Frequency | Vertical Frequency | Graphics Mode | ||
| 1 | 6 | 4 | 0 | · 480 | 31.5 kHz 60 Hz VGA-G | |
| 2 | 6 | 4 | 0 | · 480 | 43.3 kHz 85 Hz VESA | |
| 3 | 7 | 2 | 0 | · 400 | 31.5 kHz 70 Hz VGA-Text | |
| 4 | 8 | 0 | 0 | · 600 | 53.7 kHz 85 Hz VESA | |
| 5 | 8 | 3 | 2 | · 624 | 49.7 kHz 75 Hz Macintosh 16" Color | |
| 6 | 1024 · | 768 | 60.0 kHz | 75 Hz VESA | ||
| 7 | 1024 · | 768 | 68.7 kHz | 85 Hz VESA | ||
| 8 | 1280 · | 1024 | 80.0 kHz | 75 Hz VESA | ||
If the input signal does not match one of the factory preset modes above, the Generalized Timing Formula feature of this monitor will automatically provide an optimal image for the screen as long as the signal is GTF compliant.
TCO'99 Eco-document

■Congratulations!
You have just purchased a TCO'99 approved and labelled product! Your choice has provided you with a product developed for professional use. Your purchase has also contributed to reducing the burden on the environment and also to the further development of environmentally adapted electronics products.
■Why do we have environmentally labelled computers?
In many countries, environmental labelling has become an established method for encouraging the adaptation of goods and services to the environment. The main problem, as far as computers and other electronics equipment are concerned, is that environmentally harmful substances are used both in the products and during their manufacture. Since it is not so far possible to satisfactorily recycle the majority of electronics equipment, most of these potentially damaging substances sooner or later enter nature.
There are also other characteristics of a computer, such as energy consumption levels, that are important from the viewpoints of both the work (internal) and natural (external) environments. Since all methods of electricity generation have a negative effect on the environment (e.g. acidic and climate-influencing emissions, radioactive waste), it is vital to save energy. Electronics equipment in offices is often left running continuously and thereby consumes a lot of energy.
■What does labelling involve?
This product meets the requirements for the TCO'99 scheme which provides for international and environmental labelling of personal computers. The labelling scheme was developed as a joint effort by the TCO (The Swedish Confederation of Professional Employees), Svenska Naturskyddsforeningen (The Swedish Society for Nature Conservation) and Statens Energimyndighet (The Swedish National Energy Administration).
Approval requirements cover a wide range of issues: environment, ergonomics, usability, emission of electric and magnetic fields, energy consumption and electrical and fire safety.
(continued)
The environmental demands impose restrictions on the presence and use of heavy metals, brominated and chlorinated flame retardants, CFCs (freons) and chlorinated solvents, among other things. The product must be prepared for recycling and the manufacturer is obliged to have an environmental policy which must be adhered to in each country where the company implements its operational policy.
The energy requirements include a demand that the computer and/or display, after a certain period of inactivity, shall reduce its power consumption to a lower level in one or more stages. The length of time to reactivate the computer shall be reasonable for the user.
Labelled products must meet strict environmental demands, for example, in respect of the reduction of electric and magnetic fields, physical and visual ergonomics and good usability.
Below you will find a brief summary of the environmental requirements met by this product. The complete environmental criteria document may be ordered from:
TCO Development
SE-114 94 Stockholm, Sweden
Fax: +46 8 782 92 07
Email (Internet): development@tco.se
Current information regarding TCO'99 approved and labelled products may also be obtained via the Internet, using the address: http://www.tco-info.com/
■Environmental requirements
Flame retardants
Flame retardants are present in printed circuit boards, cables, wires, casings and housings. Their purpose is to prevent, or at least to delay the spread of fire. Up to 30% of the plastic in a computer casing can consist of flame retardant substances. Most flame retardants contain bromine or chloride, and those flame retardants are chemically related to another group of environmental toxins, PCBs. Both the flame retardants containing bromine or chloride and the PCBs are suspected of giving rise to severe health effects, including reproductive damage in fish-eating birds and mammals, due to the bio-accumulative* processes. Flame retardants have been found in human blood and researchers fear that disturbances in foetus development may occur.
The relevant TCO'99 demand requires that plastic components weighing more than 25 grams must not contain flame retardants with organically bound bromine or chlorine. Flame retardants are allowed in the printed circuit boards since no substitutes are available.
Cadmium**
Cadmium is present in rechargeable batteries and in the colour-generating layers of certain computer displays. Cadmium damages the nervous system and is toxic in high doses. The relevant TCO'99 requirement states that batteries, the colour-generating layers of display screens and the electrical or electronics components must not contain any cadmium.
Mercury**
Mercury is sometimes found in batteries, relays and switches. It damages the nervous system and is toxic in high doses. The relevant TCO'99 requirement states that batteries may not contain
any mercury. It also demands that mercury is not present in any of the electrical or electronics components associated with the labelled unit.
CFCs (freons)
The relevant TCO'99 requirement states that neither CFCs nor HCFCs may be used during the manufacture and assembly of the product. CFCs (freons) are sometimes used for washing printed circuit boards. CFCs break down ozone and thereby damage the ozone layer in the stratosphere, causing increased reception on earth of ultraviolet light with e.g. increased risks of skin cancer (malignant melanoma) as a consequence.
Lead**
Lead can be found in picture tubes, display screens, solders and capacitors. Lead damages the nervous system and in higher doses, causes lead poisoning. The relevant TCO'99 requirement permits the inclusion of lead since no replacement has yet been developed.
* Bio-accumulative is defined as substances which accumulate within living organisms.
** Lead, Cadmium, and Mercury are heavy metals which are Bio-accumulative.
- TRINITRON® COLOR COMPUTER DISPLAY
- WARNING
- FCC NOTICE
- IMPORTANTE
- INFORMATION
- NOTICE
- DECLARATION OF CONFORMITY
- TABLE OF CONTENTS
- SETUP
- CUSTOMIZING YOUR MONITOR
- TECHNICAL FEATURES
- TROUBLESHOOTING
- SPECIFICATIONS
- APPENDIX....I
- PRECAUTIONS
- WARNING ON POWER CONNECTIONS
- INSTALLATION
- PROTECTION
- MAINTENANCE
- TRANSPORTATION
- USE OF THE TILT-SWIVEL
- IDENTIFYING PARTS AND CONTROLS
- SIDE
- STEP 1: CONNECT YOUR MONITOR TO YOUR COMPUTER
- NOTE
- CONNECTING TO AN IBM PC/AT OR COMPATIBLE COMPUTER
- CONNECTING TO A MACINTOSH OR COMPATIBLE COMPUTER
- STEP 2: CONNECT THE POWER CORD
- STEP 3: TURN ON THE MONITOR AND COMPUTER
- IF NO PICTURE APPEARS ON YOUR SCREEN
- SETUP ON VARIOUS OS (OPERATING SYSTEM)
- ADJUSTING THE MONITOR'S RESOLUTION AND COLOR NUMBER
- SELECTING THE ON-SCREEN MENU LANGUAGE (LANGUAGE)
- PRESS THE MENU/OK BUTTON
- MOVE THE JOYSTICK ↓/↑ TO HIGHLIGHT 📄 LANGUAGE AND PRESS THE MENU/OK BUTTON
- MOVE THE JOYSTICK ↓/↑ TO SELECT A LANGUAGE
- TO CLOSE THE MENU
- NAVIGATING THE MENU
- EXIT
- SIZE/CENTER(PAGE 9)
- GEOMETRY (PAGE 10)
- COLOR (PAGE 10)
- CONVERGENCE (PAGE 10)
- LANGUAGE (PAGE 7, 10)
- OPTION (PAGE 11)
- DISPLAYING THE CURRENT INPUT SIGNAL
- USING THE MENU/OK BUTTON
- DISPLAY THE MAIN MENU
- SELECT THE MENU YOU WANT TO ADJUST
- ADJUST THE MENU
- CLOSE THE MENU
- ADJUSTING THE BRIGHTNESS AND CONTRAST
- MOVE THE JOYSTICK IN ANY DIRECTION
- MOVE THE JOYSTICK ↓/↑ TO ADJUST THE BRIGHTNESS (○), AND ←/→ TO ADJUST THE CONTRAST (○)
- ADJUSTING THE SIZE AND THE CENTERING OF THE PICTURE (SIZE/CENTER)
- MOVE THE JOYSTICK ↓/↑ TO HIGHLIGHT ➕ SIZE/CENTER AND PRESS THE MENU/OK BUTTON
- FIRST MOVE THE JOYSTICK ↓/↑ TO SELECT THE DESIRED ADJUSTMENT ITEM. THEN MOVE THE JOYSTICK ←/→ TO ADJUST THE SETTING
- ADJUSTING THE SHAPE OF THE PICTURE (GEOMETRY)
- MOVE THE JOYSTICK ↓/↑ TO HIGHLIGHT GEOMETRY AND PRESS THE MENU/OK BUTTON
- ADJUSTING THE COLOR OF THE PICTURE (COLOR)
- MOVE THE JOYSTICK ↓/↑ TO HIGHLIGHT ☐ COLOR AND PRESS THE MENU/OK BUTTON
- MOVE THE JOYSTICK ↓/↑ TO SELECT A COLOR TEMPERATURE
- IF NECESSARY, FINE TUNE THE COLOR TEMPERATURE
- ADJUSTING THE CONVERGENCE (CONVERGENCE)
- MOVE THE MENU/OK BUTTON
- MOVE THE JOYSTICK ↓/↑ TO HIGHLIGHT
- FIRST MOVE THE JOYSTICK ↓/↑ TO SELECT 🏠 FOR
- CHANGING THE OSD LANGUAGE (LANGUAGE)
- PRESS THE JOYSTICK ↓/↑ TO SELECT THE LANGUAGE YOU PREFER
- ADDITIONAL SETTINGS (OPTION)
- DEGAUSSING THE SCREEN
- ADJUSTING THE MOIRE
- RESETTING THE ADJUSTMENTS
- LOCKING THE CONTROLS
- TO CANCEL THE CONTROL LOCK
- PRESET AND USER MODES
- NOTE FOR WINDOWS USERS
- POWER SAVING FUNCTION
- IF THIN LINES APPEAR ON YOUR SCREEN (DAMPER WIRES)
- ON-SCREEN MESSAGES
- THE INPUT SIGNAL CONDITION OUT OF SCAN RANGE
- NO INPUT SIGNAL
- MONITOR IS IN POWER SAVE MODE
- TROUBLE SYMPTOMS AND REMEDIES
- DISPLAYING THIS MONITOR'S NAME, SERIAL NUMBER, AND DATE OF MANUFACTURE
- EXAMPLE
- SELF-DIAGNOSIS FUNCTION
- IF THE SCREEN IS BLANK AND THE ⏻ (POWER) INDICATOR IS GREEN
- IF THE ⏻ (POWER) INDICATOR IS FLASHING ORANGE
- FOR CPD-G220S MODEL ONLY
- APPENDIX
- CONGRATULATIONS
- WHY DO WE HAVE ENVIRONMENTALLY LABELLED COMPUTERS
- WHAT DOES LABELLING INVOLVE
- TCO DEVELOPMENT
- ENVIRONMENTAL REQUIREMENTS
- FLAME RETARDANTS
- CADMIUM
- MERCURY
- CFCS (FREONS)
- LEAD
Brand : SONY
Model : CPD-G220R
Category : Computer accessory