HBF205E - Fridge HAIER - Free user manual and instructions
Find the device manual for free HBF205E HAIER in PDF.
Download the instructions for your Fridge in PDF format for free! Find your manual HBF205E - HAIER and take your electronic device back in hand. On this page are published all the documents necessary for the use of your device. HBF205E by HAIER.
USER MANUAL HBF205E HAIER
se this appliance only for its intended purpose as described in this operation manual.
2. This appliance must be properly installed in accordance with the installation
instructions before it is used. See the installation section for more details.
3. This appliance must be connected to a proper electrical outlet with the
correct electrical supply.
4. Proper grounding must be ensured to reduce the risk of shock and fire. Do
not cut or remove the grounding plug! If you do not have a three-prong electric receptacle outlet in the wall, have a certified electrician install the proper outlet. The wall receptacle must be properly grounded.
5. Never unplug your appliance by pulling on the power cord. Always grasp the
plug firmly and pull straight out from the outlet.
6. Immediately replace worn power cords, loose plugs and power outlets.
7. To reduce the risk of electric shock or fire, do not use extension cords or
adapters to connect the unit to an electrical power source.
8. Unplug your appliance before cleaning or making any repairs.
9. We suggest that a certified technician perform the service if for any reason
this product requires service. 10.If your old appliance is being discarded, we recommend that you remove the door and leave the shelves in place. This will reduce the possibility of danger to children.
his appliance should not be recessed or built into an enclosed cabinet. It is designed for freestanding installation only. 12.Do not operate your appliance in the presence of explosive fumes. 13.Do not tamper with the controls.
o not operate this appliance unless all enclosure panels are properly in place.
15. Do not operate this appliance when parts are missing or broken.
16. Do not use this appliance for commercial use.
his appliance is designed for indoor use only and should not be used outdoors.
o reduce the risk of injury, do not allow children to play in or on the appliance. Close supervision is necessary when the appliance is used near children.
he appliance door must be closed during operation. Do not leave the door open when children are near the dispenser. Important Safety Precautions of CO2 (Carbon Dioxide) Gas
O2 gas can be dangerous! CO2 cylinders contain high-pressure compressed gas, which can be hazardous if not handled properly. Make sure you read and understand all the procedures for the CO2 cylinders before installation.
2. Always connect the CO2 cylinder to a regulator! Failure to do so may cause
an explosion resulting in possible death or injury when the cylinder valve is opened.
3. Never connect the CO2 cylinder directly to the product container.
4. Always follow the correct procedures when changing cylinders.
5. Never drop or throw a CO2 cylinder.
lways keep CO2 cylinders away from heat. Store extra cylinders in a cool place (preferably 70˚ F). Securely fasten with a chain in an upright position when storing.
7. Always ventilate and leave the area immediately if CO2 leakage has
8. Always check the D.O.T. (Department of Transport) test date on the cylinder
neck before installation. If it has been over 5 years, do not use. Return the cylinder to your gas supplier.
9. Never connect a product container unless there are at least two safety
devices in the pressure system: one on the CO2 regulator and the other on the product container or in the pressure gas line.
SAVE THESE INSTRUCTIONS
For Future Use DANGER! Risk of child entrapment! Before throwing away your old appliance, remove the door so that children may not easily become trapped inside. Thank you for purchasing our Haier product. This easy-to-use manual will guide you in getting the best use of your beer dispenser. Remember to record the model and serial number. They are on a label in back of the unit. Model number Serial number Date of purchase
English Table Of Contents Page
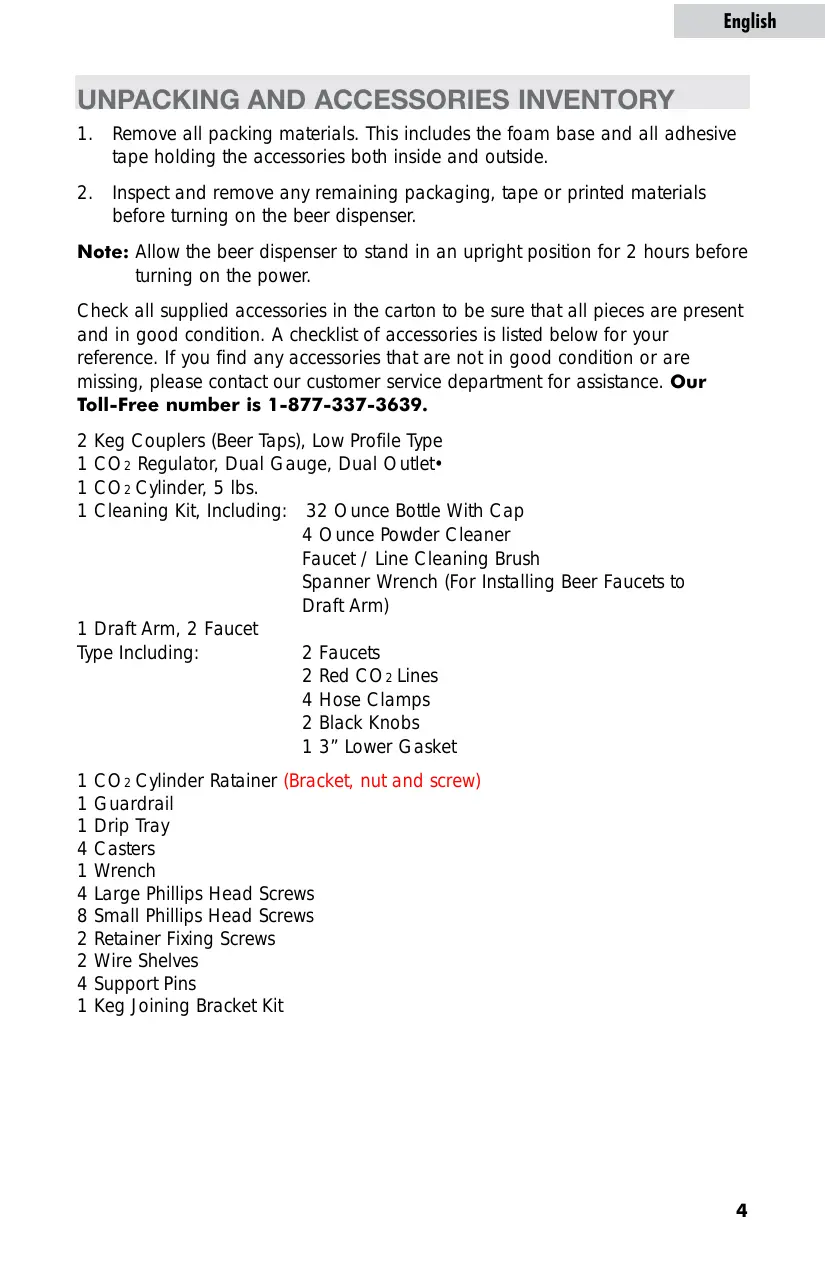
English Unpacking and Accessories Inventory
1. Remove all packing materials. This includes the foam base and all adhesive
tape holding the accessories both inside and outside.
2. Inspect and remove any remaining packaging, tape or printed materials
before turning on the beer dispenser. Note: A llow the beer dispenser to stand in an upright position for 2 hours before turning on the power. Check all supplied accessories in the carton to be sure that all pieces are present and in good condition. A checklist of accessories is listed below for your reference. If you find any accessories that are not in good condition or are missing, please contact our customer service department for assistance. Our Toll-Free number is 1-877-337-3639. 2 Keg Couplers (Beer Taps), Low Profile Type 1 CO2 Regulator, Dual Gauge, Dual Outlet• 1 CO2 Cylinder, 5 lbs. 1 Cleaning Kit, Including: 32 Ounce Bottle With Cap 4 Ounce Powder Cleaner Faucet / Line Cleaning Brush Spanner Wrench (For Installing Beer Faucets to Draft Arm) 1 Draft Arm, 2 Faucet Type Including: 2 Faucets 2 Red CO2 Lines 4 Hose Clamps 2 Black Knobs 1 3” Lower Gasket
CO2 Cylinder Ratainer (Bracket, nut and screw) Guardrail Drip Tray Casters Wrench Large Phillips Head Screws Small Phillips Head Screws Retainer Fixing Screws Wire Shelves Support Pins Keg Joining Bracket Kit
English Parts and Features
1. Casters (Total 4)
7. Dual Chrome Beer Tap
2. Interior Keg Support
djustable Thermostat (Located in the rear)
10. 1/4 Barrel Kegs (Not included
shown for illustration purpose only)
11. Keg joining Bracket
English Proper Location o ensure that your beer dispenser works at the maximum efficiency it was designed for, install it in a location where there is proper air circulation, plumbing and electrical connections. hoose a location where the beer dispenser will be away from heat and will not be exposed to direct sunlight. his beer dispenser is designed for indoor use only and should not be used outdoors. his beer dispenser is a freestanding design and should not be placed in a built-in or recessed area. he following dimensions are the recommended clearances around the beer dispenser.
Back.............................1" (25mm) ELECTRICAL CONNECTIONS Grounding Instructions This appliance must be grounded. In the event of an electrical short circuit, grounding reduces the risk of electric shock by providing an escape wire for the electric current. This appliance is equipped with a cord containing a grounding wire and a grounded plug. The plug must be inserted into an outlet that is properly installed and grounded.
- Improper use of the plug may result in the risk of electric shock. onsult a qualified electrician or service technician if the grounding instructions are not completely understood or if in doubt as to whether the appliance has been properly grounded. Wiring Requirements This appliance must be plugged into a 15Amp, 115 Volt, 60Hz GROUNDED OUTLET. Note: W here a standard two-prong outlet is encountered, it is the personal responsibility and obligation of the consumer to have it replaced with a properly grounded three-prong outlet. Extension Cords We do not recommend the use of an extension cord with this unit. Power Interruptions Occasionally, there may be power interruptions due to thunderstorms or other causes. Remove the power cord from wall outlet when a power outage occurs. When power has been restored, re-plug the power cord into wall outlet.
English Assembly Instructions Read carefully and understand all installation instructions before installing the beer dispenser. If after completing the process you are still unsure whether the beer dispenser has been properly installed, we recommend that you contact a qualified installer. Installing the Casters Nut Follow the steps below to install the casters.
mpty the inside of the cabinet completely and lay the beer dispenser down sideways. We recommend that you place a piece of cardboard or cloth underneath the cabinet to prevent dents or scratches to the cabinet. Wrench Caster
2. Insert the casters into the holes on the bottom
corners of the cabinet. Tighten each caster by turning the nut clockwise with the wrench provided.
nce all four casters have been tightened evenly, stand the cabinet in an upright position. Installing the Beer Tap Follow the steps below to install the beer tap. Handle
irst, remove the cabinet tap hole cover located on the worktop. Firmly grasp cover, twist and pull upward. Note: S tore this plug in a safe place as it will be required when converting the beer dispenser into a beverage center.
lace the gasket over the hoses on the bottom of the draft arm.
ass the beer tubes through the gasket to the base of the draft arm.
ush both the hoses and the beer hose through the hole in the worktop until the draft arm is resting on top of the cabinet. Large Philip Head Draft Arm Assemble AssemblyY Small Phillips Head Gasket Beer Hose Guard Rail pilot holes
lign the holes of the draft arm with the gasket and pilot holes on the worktop of cabinet. Make sure that the faucets are facing the front.
ecure the draft arm to the cabinet by inserting four large Phillips Head screws into the holes and tightening.
English Installing the Guardrail Follow the steps below to install the guardrail on the worktop.
1. Place the guardrail on top of the cabinet.
lign all holes of the guardrail with the holes of the cabinet.
ecure the guardrail to the cabinet with eight small Phillips-Head screws. Installation Instructions Note: Y our CO2 cylinder is shipped empty to avoid any possible accidents during transportation. When you purchase the first keg of beer, have your CO2 cylinder filled by your local compressed gas supplier. (See Welding Supply in Yellow Pages) WARNING! CO2 can be dangerous! CO2 cylinders contain high-pressured gas, which can be hazardous if handled improperly. They must be handled with care. Tapping the Beer Keg (American Sankey Type Barrel) Your beer dispenser comes with “Lo-Boy Sankey Coupler American Type.” This brand name is the most widely used in the United States. Before purchasing a keg, check with your beer distributor to make sure that an American Sankey Tap can be used. (Replacement and other taps are available at www.draughttech.com) Remove and identify the following components from the parts box:
1. (1) CO2 Regulator – dual gauge – dual outlet
2. (1) CO2 Tank – 5 pound - EMPTY
3. (2) Keg couplers – low profile type (Lo-Boy Sankey Coupler American
4. (4) White plastic squeeze clamps
Connect the CO2 regulator to tank by screwing regulator nut onto threaded C02 Regulator tank valve. HAND TIGHTEN ONLY – it is not necessary to use a wrench to tighten this nut. At this point make sure that both the shut off (black) valves are in the off (sideways) position. C02 Cylinder STEP 2 Attach one red gas hose to each of the shut off valve outlets on the bottom of the regulator and clamp tight using two of the white squeeze clamps provided. Clamp Red Hose
Attach the other end of each red gas hose to the LARGER of the two hose barbs on the keg coupler and secure with the remaining two white squeeze clamps. Large Barb STEP 4 Locate the two clear hoses from the draft arm installed previously. (These should be inside the refrigerator at this point). Attach one clear beer hose to the SMALLER hose barb on each keg coupler being certain to push the hose completely onto the barb. This connection does not require a white squeeze clamp. Small Barb
Clear Hose Keg Coupler English STEP 5 Note: Make sure the body of the keg coupler is in the closed (up) position before installing it on the beer keg. Install keg joining bracket to the first 1⁄4 barrel keg. Place one of the two keg couplers onto the first (bottom) keg and turn clockwise to engage. To activate push down the coupler and turn clockwise. BE SURE THAT THE HOSES ARE OVER THE KEG JOINING BRACKET. It is normal to have some beer spray from the keg during this process. PUSH DOWN Keg Joining Bracket
1/4 Barrel Keg STEP 6 Place the second (top) keg into the top of the keg joining bracket and tighten side screws. Place the remaining keg coupler onto the top keg and turn clockwise to engage. To activate push down the coupler and turn clockwise. It is normal to have some beer spray from the keg during this process. IMPORTANT: T he red and white hose of the bottom keg should be routed over the split of the joining bracket as shown in the picture. Note: B e sure keg couplers are engaged completely prior to inserting kegs in to the beer dispenser. STEP 7 YOU MAY NOW TURN ON THE GAS AT THE TANK AND OPEN BOTH BLACK HANDLES TO THE UP/DOWN POSITION. With a flat head screw driver, turn screw on top of regulator clockwise until the top gauge reads 8 PSI. STEP 8 At this time check the flow of beer by pulling each of the taps forward. Make sure you use a container so as not to spill the beer on the unit. STEP 9 Remove the nut from the retainer bolt. Use two retainer fixing screws to secure the retainer to the holes on the back of the cycliner. Then slide the cylinder through the retainer and place it in the cabinet. Then tighten the retainer nut.
English Carefully tilt the two beer kegs combination and rest the edge on the stainless steel keg floor support on the bottom of the interior cabinet. Slide the kegs in slowly, ensuring that it is properly located. THIS MAY REQUIRE 2 PEOPLE TO COMPLETE Note: If only one keg is to be dispensed you must still complete all the above steps. Simply leave one keg coupler disconnected in the upright / locked position. Please make sure that the black shut off valves are on the C02 regulator are in the off position. When stacking 2 kegs be certain to securely install the included keg joining bracket with the supplied hardware. Make sure the hoses are not damaged by the kegs. Wing Nut Fixing Screws Retainer Screw Lift Upright Beer Keg C02 Retainer Important Safety Message for Draft Beer Dispensing Keg Support When CO2 is used for draft beer dispensing, the system must be adequately protected against excessive pressure build-up. This is accomplished by the already installed two safety devices with adequate relief capacity in the system. Safety devices are installed in the following places: A. On or immediately downstream from the CO2 regulator. B. On the keg coupler.
English Operating Your Beer Dispenser Dispensing Beer Follow the steps below to dispense beer.
ake sure that the beer dispenser is plugged in properly to a 120V, 60Hz, 15 Amp grounded AC outlet.
2. Place the drip tray under the beer faucet.
pen the beer faucet by pulling the tap towards you quickly and completely to dispense the beer. Note: If for any reason the beer does not come out of the tap, refer to the trouble-shooting guide on page 17.
4. Increase the pressure if the beer runs too slowly. At the correct pressure and
temperature, a 10oz. glass should be filled in 5 seconds.
old the glass steady at a 45˚ angle. When it is 2/3 full, start straightening the glass. Proper foam should be a tight creamy head and the collar on an average glass should be 3/4" to 1" high. Note: It is normal to see condensation forming on the outer surface of the faucet. It is caused by the difference in temperature between the cold beer and the inner surfaces of the faucet when beer is flowing through the line.
English Understanding Beer Temperature he recommended temperature for serving chilled beer is between 34˚ and 38˚F. To maintain this temperature in average room conditions of 70˚F, set the thermostat to "Normal." Note: D uring the summertime when temperatures are warmer, we recommend that you adjust the control to a cooler setting accordingly. elect and maintain the proper temperature inside the refrigerator cabinet. This is necessary for maintaining the flavor freshness of beer.
- The best temperature for storing a keg is between 38˚ and 40˚F. xcessively cold or warm temperatures inside the refrigerator cabinet may cause a loss of flavor. Understanding the Temperature Control Setting The temperature control is located at the rear of the unit on the bottom left-hand corner. After turning the unit on, you must wait 24 hours for the unit to cool properly. You may then adjust the temperature setting based on your needs and preferences. Automatic Defrosting It is not neccessary to defrost the beer dispenser/refrigerator. Ice that has deposited on the evaporator is automatically defrosted when the compressor cycles off. The defrosted water collects in the water collection tray at the rear of the unit and evaporates. Understanding Normal Operating Sounds
ubbling or gurgling sounds and slight vibrations are the result of the refrigerant circulating through the cooling coils.
- Sizzling or popping sounds occur during the automatic defrost cycle. ripping sounds occur as ice melts from the evaporator and flows into the water collection tray during the automatic defrost cycle. racking or popping sounds are caused by the expanding and/or contracting of the cooling coils during the automatic defrost cycle.
English Beer Serving Guide Beer Serving Tips The following tips will help you serve the perfect beer. Before serving beer from the tap, check for the following:
Two 1/4 barrel kegs Two 1/6 barrels kegs (narrow) One 1/4 barrel (slim) keg One 1/6 barrel (narrow) keg One 1/2 barrel keg Tips for Cleaning Beer Glasses For the freshest flavor, it is important to serve beer in clean glasses. For your convenience, the following tips explain how to properly clean beer glasses before serving beer. o not wash beer glasses together with glasses that have contained milk or any other fatty substance. n excessive amount of germicide build-up will also leave a fatty film on the glasses, which may cause flat beer. ash glasses thoroughly with a good detergent to remove all fatty substances (i.e. lipstick).
- Do not use soap. o not wipe glasses dry. Allow glasses to air-dry by placing them on a wire rack or on corrugated metal. inse in fresh cold water just before serving beer. It is best to serve beer in a wet glass. Two Simple Tests for Clean Beer Glasses
ash the glasses using your usual method. Immerse the glass heel first in clean water. Empty the glass. If water droplets cling to the glass or if spots appear on the glass while pouring, the glass has not been cleaned properly. A clean glass should air-dry crystal clear.
gain, wash the glass using your usual method. Pour out the water and then shake salt into the wet glass. If salt does not cling to the entire inside wall of the glass and clear unsalted spots remain, the glass is not clean.
English Converting the Beer Dispenser to an Beverage Cooler Application For your convenience, this beer dispenser can be converted to a beverage cooler application. Simply follow the steps below for a quick and easy conversion. Note: W hen using as a beverage cooler, we do not recommend the use of casters, as stored items may fall off the shelves when the unit is in motion.
1. Close the main valve on the CO2 cylinder.
2. Close the connection between the beer keg and the keg coupler by pulling
and lifting the handle of the keg coupler into an upright position.
3. Disconnect both the beer line and the CO2 gas line from the keg coupler.
4. Remove the beer keg from the cabinet.
5. Disconnect the gas line from the CO2 cylinder.
6. Remove the CO2 cylinder from the cabinet.
7. Remove the beer tower from the cabinet.
8. Pull the beer line through the top of the cabinet.
9. Install the cabinet tap hole cover on the worktop.
10. Lay the unit down sideways. We recommend that you place a piece of
cardboard or cloth underneath the cabinet to avoid dents or scratches to the cabinet. Remove the casters and install leveling legs.
11. Install the two wire shelves.
A. Insert one end of each support pin into the holes on the right side of the cabinet. B. P lace one end of the wire shelf into the left side of the cabinet and rest the other end onto the exposed support pins on the right side. C. Repeat the same with the second shelf.
he conversion process is now complete. Store all the removed accessories in a safe place for future use.
13. Adjust the temperature of the unit as required for food storage.
English Energy Saving Tips Follow the energy-saving tips below for optimum efficiency.
- L imit the opening and closing of the door on hot and humid days. When you open the door, close it quickly to prevent hot air from entering. heck regularly for proper air circulation around the unit to make sure that the unit receives sufficient airflow. eep the door gasket clean and straight to ensure a proper seal. If the door gasket is not sealed properly, hot air may easily enter into the unit, making the interior temperature warmer. The compressor must then run continuously to keep the unit cool, thus making the energy consumption very high and inefficient. Note: Replace a damaged door gasket to restore energy efficiency.
English Proper Care and Cleaning of the Beer Dispenser Instructions for Using Cleaning Kit
1. Mix one gallon of warm water and one ounce of
cleaner in a bucket. DO NOT USE SOAP.
2. Remove the cleaner cap assembly, fill the jar and
reassemble. Leave the remaining solution in the bucket.
3. Turn off the air cock on the regulator and turn off
the valve on the CO2 tank.
4. Disconnect the keg coupler from the keg and then
disconnect the beer line from the tap.
5. Remove the faucet from the draft tower with the wench provided and attach
the fitting from the end of the cleaning bottle in its place. Make sure there is a washer in the back of the fitting.
Hold the cleaning jar upside down until the solution runs through to the bucket. DO NOT SQUEEZE THE JAR. THIS WILL CAUSE THE SOLUTION TO LEAK.
Fill the jar with clean cool water and repeat the process until clear water flows into the bucket.
Rinse the keg couple in the bucket with the remaining solution and then in the bucket with the clean water.
Remove the cleaning fitting from the tower and replace the faucet. Make sure the washer is in the back of the faucet.
eattach the beer hose to the keg coupler and attach the keg coupler to the keg. Repeat the process for the additional tap system.
English Cleaning and General Maintenance General Interior and Exterior Cabinet Cleaning
repare a cleaning solution of 3-4 tablespoons of baking soda mixed with warm water. Use a sponge or soft cloth dampened with the cleaning solution to wipe down the interior and exterior surfaces of the cabinet.
2. Rinse with clean, warm water and dry with a soft cloth.
Note: Do not use harsh chemicals, abrasives, ammonia, chlorine bleach, concentrated detergents, solvents or metal scouring pads. Some of these products may dissolve, damage and/or discolor the cabinet finish. Door Gasket Cleaning
lean the door gasket with a damp cloth every three months. The gasket must be kept clean and pliable to ensure a proper seal.
etroleum jelly applied lightly to the hinge side of the gaskets will keep the gasket pliable and ensure a good seal. Cleaning Behind the Beer Dispenser
1. We recommend that you clean the rear of the refrigerator at least twice a year.
Note: Some operating environments may require more frequent cleaning.
2. Use a vacuum or a brush to clean the coils.
WARNING! To avoid electric shock, always unplug your beer dispenser before cleaning. Failure to do so may result in possible death or injury. CAUTION! Before using cleaning products, always read and follow the manufacturer’s instructions and warnings to avoid personal injury and product damage.
1. Close tank drum valve by turning clockwise.
nscrew adjustment Set Screw (counter-clockwise) as far as it will go and close shut off valve.
3. Remove regulator from empty tank.
emove dust cap from the new full tank. Open and close drum valve quickly to blow of the dust from the outlet.
ith drum valve in closed position, reattach regulator to the tank. Be sure to check the washer, which is pre-installed on the C02 regulator.
pen drum valve all the way. (This is important because this drum valve seals in two places.)
7. Readjust regulator pressure by turning set screw and open shut off valve.
Tank Information: T ank must always be fastened in the upright position. It takes about 1/2 lb. of C02 to dispense 1/2 barrel keg of beer. A 5 lb. C02 tank should dispense between 8-10 1/2 barrel kegs or 18-20 1/4 barrel kegs. Full weight of 5 lb. tank is appx. 17-1/2 lbs.
English Troubleshooting Guide When dispensing beer into the glass, if you find that the beer is Cloudy, Flat, Bubbly, Off-Taste, Sour, Wild or Tail-End Beer, refer to some of the following hints. Beer Condition: Cloudy Beer The beer in the glass appears hazy, and not clear. Cause 1 Excessively low temperatures may cause hazy or cloudy beer, particularly when the beer lies in the cold coil for long periods of time. Correction
- Make certain that the lines are thoroughly cleaned and then raise the temperature slightly. Cause 2 The beer faucet was only opened partially. Correction
- Open the faucet quickly and completely.
- Replace any worn washers and parts in the faucet when necessary to allow the faucet to be fully opened. Beer Condition: Flat Beer Beer lacks its usual brewery-fresh flavor. The foamy head disappears quickly. Cause 1 The glass is greasy. Correction
- Do not wash beer glasses together with glasses that have contained milk or any other fatty substance. An excessive amount of germicide build-up may also leave a fatty film, which will cause beer to go flat.
- It is preferable to steam and sterilize glasses where health laws permit.
- Wash glasses thoroughly with a good detergent to remove all fatty substances (i.e. lipstick).
- Do not wipe the glasses dry. Permit glasses to air-dry by placing them on a wire rack or on corrugated metal.
- Rinse the glasses in fresh cold water just before serving beer. It is best to serve beer in a wet glass. Cause 2 Improper drawing of beer into the glass. Correction
- Open the faucet quickly and completely.
- Proper foam should be a tight creamy head. The collar on the average glass should be 3/4" to 1" high. Beer drawn without head has the appearance of being flat.
English Cause 3 Not enough pressure. Correction
- Increase the pressure if beer runs too slowly. The correct flow should fill a 10oz. glass in 5 seconds.
- Check the pressure source to determine whether there are obstructions in the air line.
- Replace a sluggish air source or the CO2 regulator and gauge.
- The tank pressure must always be higher than the pressure used on the keg.
- Always apply pressure to the keg before drawing beer. Beer Condition: Loose Foam Large soap-like bubbles that settle quickly. Cause 1 This is generally the same as the Flat Beer condition. See the Flat Beer causes above. Beer Condition: Off-Taste Beer Often bitter and bitey; sometimes completely lacking in flavor and zest. May also have an oily or foul odor, which carries an unpleasant taste. Cause 1 Improper cleaning of the tap. Correction
- Brush and clean the tap properly. It should be scoured using a detergent, then rinsed clean. Cause 2 Contaminated gas line. Correction
- Gas line should be examined. If contaminated, it should be replaced. Cause 3 Improper type of gas line Correction
- A rubber hose will absorb and retain odors. Be sure you are using the hoses supplied with your unit. General Recommendations for Off-Taste Beer: Beer lines should be flushed after each keg is emptied. Maintain fresh, clean, sanitary conditions around the dispenser. Smoke, cooking odors and disinfectants will harm the taste and flavor of beer. These conditions, as described, may come from an air source or from actual contact with the glass when drawing beer.
English Beer Condition: Sour Beer Beer tastes and smells extremely yeasty or moldy. Cause 1 Improper transporting of beer kegs. Beer that is delivered on an open truck during high summer temperatures may start a secondary fermentation process. Correction
- If possible, have beer kegs delivered in a closed, refrigerated truck. If an open truck is used, cover beer kegs with tarpaulin for protection against summer heat and warm air. Beer Condition: Wild Beer Beer that is either all foam, or too much foam and not enough liquid. Cause 1 Improper drawing of beer into the glass. Correction
- Open the faucet quickly and completely.
- Proper foam should be a tight, creamy head, and the collar on the average glass should be 3/4" to 1" high. Cause 2 Yeast growth or other obstructions in the faucet, which is usually caused by a non-refrigerated faucet. Worn faucet parts and worn faucet washers. Correction
- Check for, and replace any kinked, dented, or twisted lines from the barrel to the faucet.
- Examine for frayed coupling washers behind the faucet that may cause an obstruction. Cause 3 The beer was stored in an area that is not cold enough and has thus become warm. Correction
- Keep kegs of beer refrigerated at all times at 40°F or below all year round! Cause 4 Too much pressure. Correction
- First, check the source of pressure to make sure it is working. Then adjust the pressure to suit a properly balanced system. The correct beer flow should fill a 10oz. glass in 5 seconds at the proper temperature.
English Cause 5 Excessive amounts of CO2. Correction
- Adjust the CO2 pressure to as low as possible. However, the applied pressure must remain slightly higher than the internal pressure of the beer. No more than 18 lbs. should be applied. The proper amount should be between 6 - 9 psi/lbs.
- The colder the beer and the higher the applied CO2 pressure, the more rapid the absorption of CO2 by the beer. This over-carbonates the beer, causing Wild Beer.
- Check the pressure regulators periodically to ensure that the operating pressures remain constant. Cause 6 Not enough pressure or no pressure at all. Correction
- Check for defective air vents.
- Always turn the pressure on before drawing beer. Cause 7 An old keg of beer which has not been stored in cool temperatures has been used. Correction
- If beer has been allowed to stand in warm temperatures beyond 45°F for an excessive length of time, it may begin a secondary fermentation. Store beer at 40°F or below all year round. Beer Condition: Tail-End Beer Beer draws well at the beginning of the keg. Towards the bottom, it becomes flat. This is more likely to occur when beer turnover is slow. Cause 1 Where air is used as a pressure source, air replaces the CO2 in beer, causing flat beer. This problem is not evident when beer is being drawn rapidly. Correction
- Whenever possible, use CO2 Gas as a pressure source.
English Limited Warranty In-Home Service What is covered and for how long? This warranty covers all defects in workmanship or materials for a period of: 12 months labor 12 months parts 5 years sealed system(parts only) The warranty commences on the date the item was purchased and the original purchase receipt must be presented to the authorized service center before warranty repairs are rendered. EXCEPTIONS: Commercial or Rental Use warranty 90 days labor (carry-in only) 90 days parts No other warranty applies What is covered?
1. The mechanical and electrical parts,
which serve as a functional purpose of this appliance for a period of 12 months. This includes all parts except finish and trim.
he components of the sealed system e.g. hermetic compressor, condenser and evaporator from manufacturing defects for a period of 5 years from the date of purchase. Any damages to such components caused by mechanical abuse or improper handling or shipping will not be covered. What will be done?
1. We will repair or replace, at our discretion any mechanical or electrical
part which proves to be defective in normal usage during the warranty period so specified.
here will be no charge to the purchaser for parts and labor on any covered items during the initial 12 month period. Beyond this period only parts are covered in the remaining warranty. Labor is not provided and must be paid by the customer.
ontact your nearest authorized service center. For the name of the nearest service center please visit our website at www.HaierAmerica. com or call 1-877-337-3639 for more information.
THIS WARRANTY COVERS
APPLIANCES WITHIN THE
CONTINENTAL UNITED STATES, PUERTO RICO AND CANADA.
THE FOLLOWING: Damages from improper installation. Damages in shipping. Defects other than manufacturing. Damage from misuse, abuse, accident, alteration, lack of proper care and maintenance or incorrect current or voltage. Damage from other than householduse. Damage from service by other than an authorized dealer or service center. Decorative trims. Transportation and shipping. Labor (after the initial 12 months).
THIS LIMITED WARRANTY IS GIVEN
IN LIEU OF ALL OTHER WARRANTIES,
EXPRESSED OR INCLUDING THE
WARRANTIES OF MERCHANTABILITY
AND FITNESS FOR A PARTICULAR
PURPOSE The remedy provided in this warranty is exclusive and is granted in lieu of all other remedies. This warranty does not cover incidental or consequential damages, so the above limitations may not apply to you. Some States do not allow limitations on how long an implied warranty lasts, so the above limitations may not apply to you. This warranty gives you specific legal rights, and you may have other rights, which vary, from state to state. Haier America New York, NY 10018
THEN Keg Joining Bracket