SWNVK-889806 - Surveillance Camera SWANN - Free user manual and instructions
Find the device manual for free SWNVK-889806 SWANN in PDF.


| Brand | Swann |
| Model | SWNVK-889806 |
| Product Type | Surveillance Camera |
| Resolution | 1080p Full HD (1920 x 1080) |
| Field of View | 90° horizontal |
| Night Vision | Up to 30 meters (98 ft) with IR LEDs |
| Weatherproof Rating | IP66 |
| Power Supply | 12V DC, 1A (adapter included) |
| Power Consumption | 5W (typical) |
| Dimensions (H x W x D) | 70 x 70 x 120 mm (2.8 x 2.8 x 4.7 in) |
| Weight | 320 g (11.3 oz) |
| Mounting Type | Wall or ceiling mount (bracket included) |
| Connectivity | RJ45 Ethernet, Wi-Fi optional |
| Video Compression | H.264 |
| Motion Detection | Yes, with customizable zones |
| Two-Way Audio | Built-in microphone and speaker |
| Storage | MicroSD card (up to 128 GB) or NVR |
| Operating Temperature | -20°C to 50°C (-4°F to 122°F) |
| Compatibility | Swann Security App (iOS/Android) |
| Certifications | CE, FCC |
Frequently Asked Questions - SWNVK-889806 SWANN
User questions about SWNVK-889806 SWANN
0 question about this device. Answer the ones you know or ask your own.
Ask a new question about this device
Download the instructions for your Surveillance Camera in PDF format for free! Find your manual SWNVK-889806 - SWANN and take your electronic device back in hand. On this page are published all the documents necessary for the use of your device. SWNVK-889806 by SWANN.
USER MANUAL SWNVK-889806 SWANN
Installing the Swann Security App 4
Creating your Swann Security Account 5
Pairing the Device 7
Scanning the QR Code 8
About the App Interface
App Navigation 10
App Menu 11
Live View Tab 12
Single View Mode 13
Single View Mode: Pan and Tilt Panel 14
Single View Mode: Tracker Panel 14
Adding Camera Presets 15
Playback Tab 16
Video Playback Screen 17
Modes Tab 18
Configuring Modes 19
Schedules 20
Creating Schedules 20
Schedules Setup (Basic) 20
Add Schedules (Advanced) 21
Creating Additional Schedules 22
Editing or Deleting Schedules 23
Activity Tab 24
Device Settings
Managing your Devices 26
Personal Alarm Settings 27
DVR/NVR Settings 28
MaxRanger4K Settings 29
MaxRanger4K - Camera Settings 30
Pairing additional cameras 30
Wi-Fi Camera Settings 31
Camera Settings 32
Detection Settings 33
Motion Detection Mask 34
Facial Recognition 35
Advanced Settings 36
Wi-Fi Sensor / Siren Settings 37
Appendix
Updating your Swann Security Account Profile 39
Changing the Camera's Wi-Fi Network 40
Factory Resetting the Camera 41
Finding your CCTV System Password 44
FAQs: General 45
FAQs: Wi-Fi Cameras 46
Troubleshooting: Pairing Issues 48
Additional Support 50

Getting Started
INSTALLING THE SWANN SECURITY APP

- Search and download the latest version of the Swann Security app from the App store.
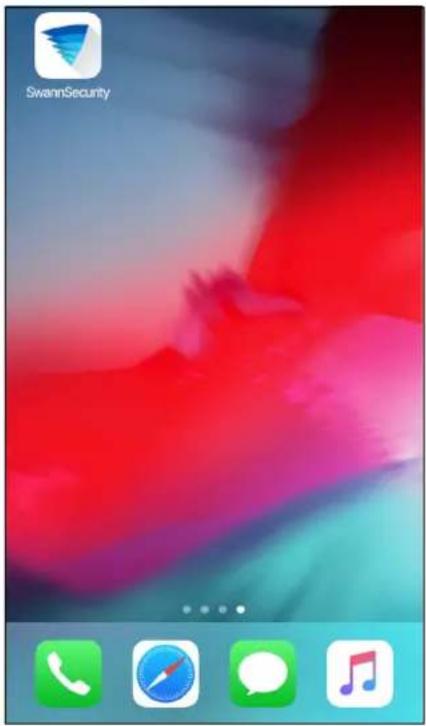
- After the Swann Security app is installed, tap the Swann Security icon on the Home screen to launch the app.
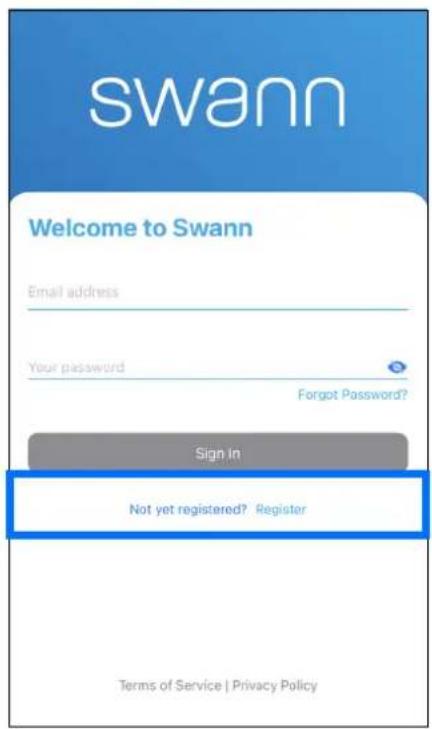
- Open the Swann Security app and tap "Not yet registered? Register".

- Enter your first and last names, email address, desired password (between 8 - 32 characters), and confirm the password. Tap Next to continue. This helps us verify your identity if you contact us for assistance with your account or device

- Enter your address or tap Use my current location to allow the app to automatically determine your street address based on your phone's current location. Your location allows us to personalize your experience on Swann Security and other Swann services. Tap Next to continue.

- Check the details you've provided are correct, then tap the Register button to create your account. Note: If you need to correct any details, tap Back in the top left corner.
(Continued on the next page)
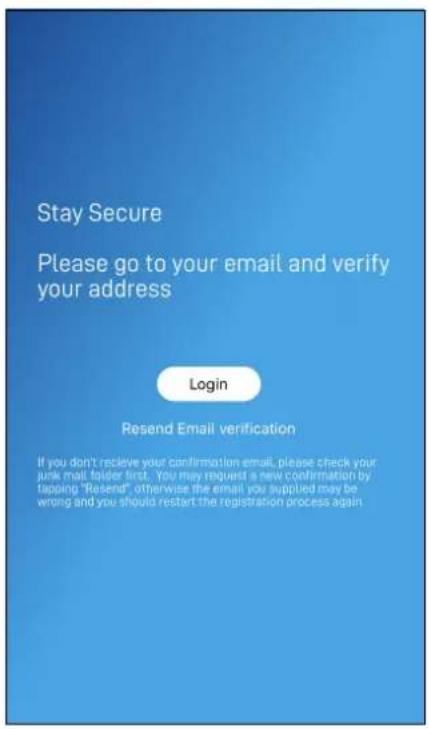
- Go to your email inbox and open the link in the verification email from Swann Security to activate your account. If you can't find the verification email, try checking the Junk folder. If needed, you can also request a new verification email by tapping the Resend Email Verification option. Once verified, tap the Login button to return to the Sign In screen.

- Enter the email address and password you used to set up your Swann Security account, then tap the Sign In button.


- When signing in to the app for the first time, you will be prompted to grant permissions for the app to access services such as notifications, microphone, location, local network, and more. To make the most of the app's features, including alerts and device pairing capabilities, please grant the necessary permissions following the on-screen instructions.
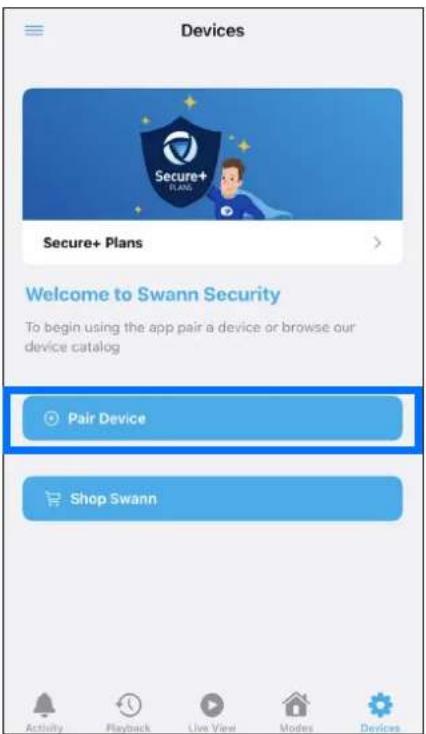
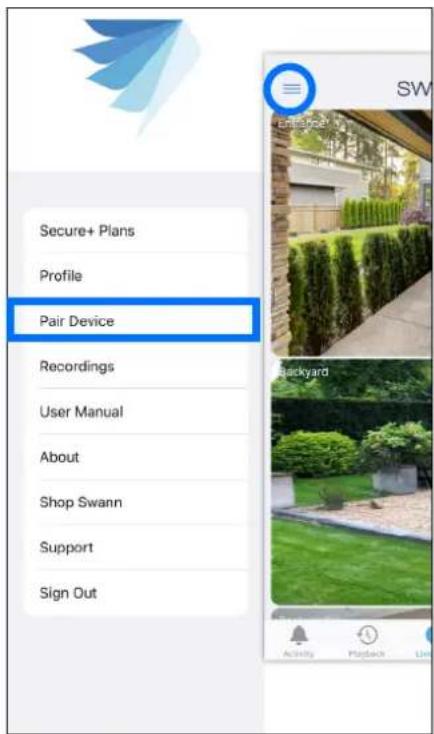
- After signing in to the app, if your Swann Security account has no devices associated with it, simply tap the Pair Device button to pair your first Swann device.
-
You can also add Swann devices to your Swann Security account via the:
-
App menu > Pair Device
• Devices tab > Pair Device

- To pair and set up your new Swann device, simply follow the Pair Device on-screen instructions. Once the pairing process is complete, your device will be displayed on the Live View tab.
Note:
- If you need help with the device's QR code, see "Scanning the QR Code" on page 8.
- It may take a few minutes for the entire pairing process to finish as the app will also automatically upgrade your Swann device to the latest firmware.
- For a detailed walk-through of the pairing process, you can download the pairing guide specific to your device from: support.swann.com.

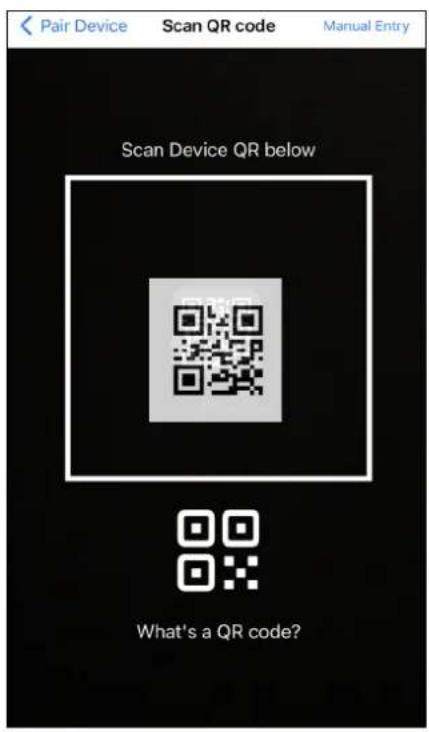
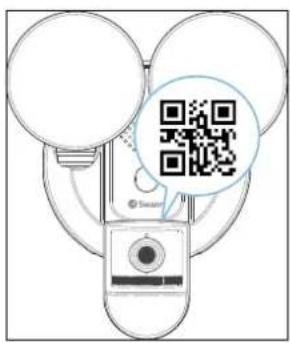
During the pairing process, you'll need to scan the device's QR code which can be generally found on the top, bottom, or back of the device. Check out the figures below for examples of where the QR code is located.



If your phone can't scan the QR code
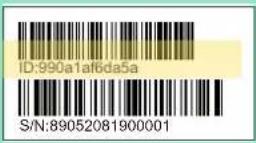
- You can tap Manual Entry at the top right of the QR code scanning screen, select the device you want to pair from the product menu, and type in the device's ID/MAC (consists of 12 alphanumeric characters) listed on a sticker located on the back, top, bottom or base of the device, as shown below:

About the App Interface

1 App Menu: Tap to open the menu where you can edit your account profile, pair a new device, download the app manual, contact technical support, and more. See "App Menu" on page 11.
2 Activity Tab: Tap to obtain a detailed report of the current day and past week's device activities. When there is a dot displayed next to the icon, this indicates the number of new activities since the app was last opened. Double-tap the Activity tab to clear the dot. You can also turn on or off the Do Not Disturb feature, which is helpful when you want to stop receiving push notifications from the app at certain times, such as when you're sleeping or in a meeting. For more information, see "Activity Tab" on page 24.
3 Playback Tab: Tap to access and playback the event recordings from your devices. For more information, see "Playback Tab" on page 16.
4 Live View Tab: Tap to view live video feed from all your connected devices in multi-view screen as well as in single-view where you can operate various camera functions if available. For more information, see "Live View Tab" on page 12.
5 Modes Tab: Displays the icon of the currently active mode. Tap to manage modes and configure the behavior of your devices for the Home, Night, and Away modes. You can also set up schedules to automate mode changes. For more information, see "Modes Tab" on page 18.
6 Devices Tab: Tap to view and manage settings for your devices, check device status and perform general maintenance. For more information, see "Device Settings" on page 25.

1 Secure+ Plans
2 Profile
3 Pair Device
4 Recordings
5 User Manual
6 About
7 Shop Swann
8 Support
9 Sign Out

1 Add and manage the Secure+ plan subscriptions for your Swann Security devices.
2 Manage your Swann Security account profile. You can update your profile name, account password, and address. See "Updating your Swann Security Account Profile" on page 39.
3 Pair a new Swann device to your Swann Security account or re-pair an existing Swann device (for example, after the device has been factory reset).
4 View and manage manual (i.e., recording of the camera live view) and downloaded camera recordings.
5 Download the app user manual (PDF file) to your phone. For best viewing experience, open the user manual using Acrobat Reader (available on the App Store).
6 Display the application version information and access the terms of service and privacy policy relating to the Swann Security app.
7 Open the Swann.com website on your phone's web browser where you can find and purchase the latest products to integrate with your Swann Security system.
8 Obtain technical support for your Swann Security devices. See "Additional Support" on page 50.
9 Sign out of the Swann Security app.


1 Toggle the layout of camera tiles in the viewing area between list and two-column grid views. You can customize the order of camera tiles according to your preferences via the Devices tab. See "Managing your Devices" on page 26.
2 The device name. You can easily change the name of your device via the Devices tab. See "Managing your Devices" on page 26.
3 Tap the tile to display live view of the selected camera in single view mode and access additional camera options (device-dependent) such as quick snapshots/clips, 2-way talk, pan and tilt controls, spotlight, siren, and more. For detailed information, see "Single View Mode" on page 13.

Note: If "Offline" is displayed, it may indicate that the camera has been disconnected from your network. Try turning the power to the camera off for a minute, then back on to reconnect. Additionally, check to make sure that your internet connection is working properly. You can try rebooting your Wi-Fi router to quickly resolve any network connectivity issues.
(Battery-powered camera only) The battery charging icon is displayed when the camera is being charged via the USB wall charger or the solar panel.
5 (Personal Alarm only) Tap the tile to display the device settings screen. For more information, see "Personal Alarm Settings" on page 27.
6 (Indoor Siren only) You can manually turn the siren on/off by tapping the Siren tile then selecting the desired action from the context menu, as shown on the right.
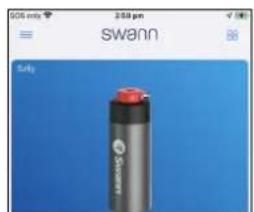
Single View Mode


SwannBuddy Video Doorbell
"Pre-recorded Messages" feature

1 Tap to go back to multi camera view on the Live View tab.
2 Tap to go directly to the camera's settings overview screen.
The camera's live video window.
- You can zoom in or out on the video. Use two fingers to pinch and spread out to zoom in on an area, and pinch back to zoom out.
- You can turn your phone sideways to view the video window in landscape (fullscreen) mode.
4 The icons shown depend on the device and will only be visible if the function is supported. Refer to the table below for details on the icon functions.
| IconDescription | |
 | Tap to take a snapshot of the live video. The snapshot will be saved to your phone. Open your phone'sPhotoapp to view the snapshot. |
 | Tap to start recording of the live video. Icon turns red■to indicate the camera is recording. Tap again to stop the recording. Depending on the camera model, manual live recordings can be viewed in either thePlaybacktab or App Menu > Recordings. |
 | Activate or deactivate the camera's 2-way talk mode. Press and hold thePTT(Push to Talk) button to talk then release the PTTbutton to listen. |
| [307Z] | Tap to turn on or off the camera's built-in floodlight/spotlight. Icon turns red♥when the camera's floodlight/spotlight is on. On certain models, you can also adjust the brightness (%) by sliding left or right on the .Light Intensity100% |
 | Tap to turn on or off the camera's red and blue enforcer lights. |
 | Tap to turn on or off the camera's built-in siren. |
 | Tap to mute or unmute the live video. |
| [46ZY] | Tap to display the list of pre-recorded messages (see above right screenshot) which you can quickly select to play as a response to visitors when you are unable to answer the door. |
 | Tap to display the on-screen pan and tilt / tracker panel which will allow you to control the camera's view. See "Single View Mode: Pan and Tilt Panel" and "Single View Mode: Tracker Panel" on page 14. |
| [243D] | Tap to select different video aspect ratios. Options available: Stretched(expand to fill the entire video window),Original (match the camera's aspect ratio), 16:9, 4:3. |
 | Indicates the current live video quality. Tap to change the live video quality. The HD quality setting provides the clearest and sharpest video, but will require a higher bandwidth high-speed internet at both ends of the connection to stream video. Lower video quality settings are recommended if you have slow cellular/internet speed or limited data allowance as they use less bandwidth to stream video and may result in a smoother live video experience. |
Single View Mode: Pan and Tilt Panel

1 Tap to display the on-screen pan and tilt panel.
2 To pan and tilt the camera, drag the control box in the desired direction within the control area. Note: You can adjust the pan and tilt speeds in the camera's settings (Pan & Tilt Settings).
3 Tap to auto-rotate the camera and scan the scene once.
4 Tap to toggle Privacy mode on or off. While Privacy mode is enabled, the camera will temporarily disable the motion sensor, preventing any recordings from being captured to ensure privacy.
5 Tap to open the Presets menu (see above right figure). Camera presets enable you to quickly point the camera at pre-defined viewpoints. For instructions on how to add camera presets, see "Adding Camera Presets" on page 15.
6 Tap to close the on-screen pan and tilt panel.
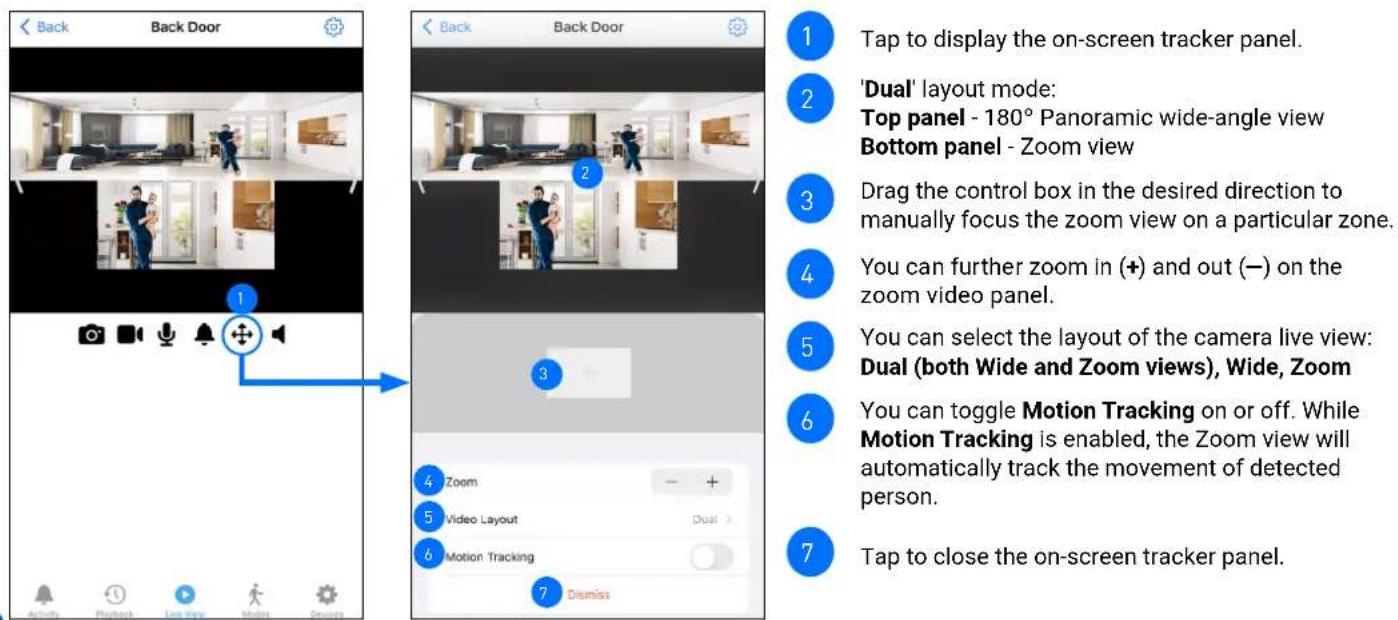
Single View Mode: Tracker Panel
Adding Camera Presets
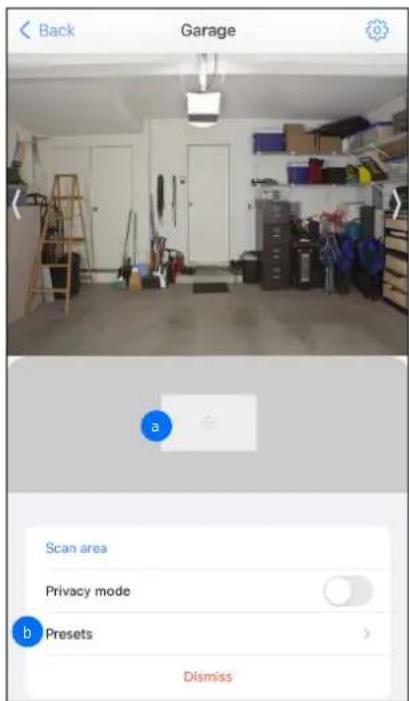
- From the Pan and Tilt panel, using the control box, rotate the camera view to the desired preset position, then tap Presets.

- Tap + Add. 3. Tap on the Name field.

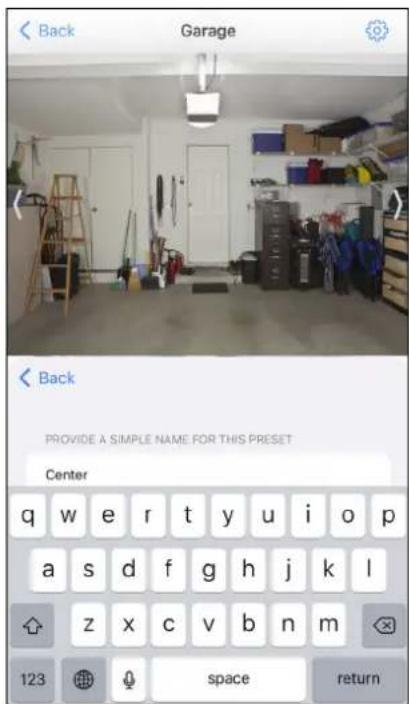
- Enter the name for the camera preset, for example 'Center', then press "return" on the onscreen keyboard.

- Tap A+d to save the preset. 6. The newly added preset appears

in the Presets section. To create more camera presets, tap Back and repeat steps 1 - 5. You can add up to 5 preset positions for the camera. To "Call" or "Delete" an existing preset, tap the preset and select the desired action from the context menu.

1 By default, the list of today's camera recordings is displayed. Depending on the type of devices paired, this may include recordings stored in the cloud, live recordings, as well as those located on the DVR/NVR. For SWIFI camera models that only have microSD card storage, such as the TrackCam, please refer to 6. You can also view camera recordings from a different date, simply tap here and select the desired date using the calendar or tap the left or right arrow to view the previous or next day's recordings.
Note: Cloud recordings will be displayed on the Playback tab for the length of time determined by the Secure+ cloud plan associated with the camera. You can find out more about the Secure+ cloud plans available for your cameras and as well as subscribe to a plan at any time, simply tap Menu □> Secure+ Plans.
2 Tap to access the playback filter options, as shown above right. You can sort recordings in chronological (AM-PM) or reverse chronological (PM-AM) order, and filter recordings by device type, event type, and time range.
3 The camera name (or channel number), the start time, and the length of the recording. Please note that thumbnails are not available for DVR/NVR recordings. To watch the recording, simply tap on the video thumbnail. See "Video Playback Screen" on page 17.
4 You can delete the recording, which will remove it from the video history and cloud storage. Make sure to download it first if you want to keep it.
Note: The ☐ Delete icon will not appear for DVR/NVR camera recordings.
5 Tap to refresh the screen and check for new camera recordings.
6 Tap to access recordings stored on your camera's local microSD memory card, if available.
Video Playback Screen

1 Tap to go back to the Playback tab.
2 Tap to delete the recording, which will remove it from the video history and cloud storage. Make sure to download it first if you want to keep it.
Note: The Delete icon will not appear for DVR/NVR recordings.
3 Tap to select a different playback speed.
4 Tap to share the video via popular email/messaging apps or save the video to your phone's cloud or local storage.
5 You can turn your phone sideways to view the video window in landscape (fullscreen) mode.
6 Video playback controls. You can pause/play, fast-forward/rewind (with the seekbar), mute the audio, and capture a snapshot. For DVR/NVR recordings, HD SD also appears to enable you to change the video quality of the recording between SD (substream) and HD (mainstream).
MODES TAB
The Modes feature provides you with the ability to monitor your home in three modes: Home, Night and Away. You can customize the detection sensitivity settings and actions of your Swann devices according to these scenarios.
For example,
Home: When you're home and awake.
Night: When you're home and heading to bed or asleep.
Away: When you're at work or out.
For your convenience, each mode comes pre-configured with default "typical use" settings, but they are fully configurable to suit your daily security needs. You can easily switch between modes with a simple button press on this screen.

1 Modes panel. The highlighted icon with a red bubble indicates the current active mode and number of devices. You can change the mode by tapping the icon of the mode you'd like to change to. Apply different modes (Home/Night/Away) to suit different situations and customize how devices respond and alert you to events such as motion detection, sound detection, doorbell presses, etc. (device-dependent). Note: You can also use the Modes panel to manually override the scheduled mode that is currently activated.
2 Tap to configure the modes. For each mode (Home, Night, Away), you can independently customize each individual camera's detection settings (device-dependent) and whether to receive push notifications. To learn more, see "Configuring Modes" on page 19.
3 Tap to display a popup window providing a general introduction to the Modes feature.
4 Tap to display the Schedules screen where you can create schedules to automate mode changes for your devices. For more information, see "Schedules" on page 20.
Configuring Modes
- From the Modes tab, tap Edit in the top right corner.

- Tap the > of the device to reveal the available settings.

- Select the mode that you want to configure by tapping on the icon.

- The settings that can be configured depend on the capabilities of the paired device. You may adjust the sensitivity of motion and sound detection, choose to enable or disable push notifications for various detection types, and trigger the add-on siren (if an add-on siren is paired) when a corresponding event occurs.

- Tap Save in the top right corner of the screen to save any changes you have made. The changes will take effect immediately.
Schedules
Your Swann Security devices can change modes automatically at various times of the day or days of the week using Schedules. For example, you can use schedules to set your devices in Night mode every day around bedtime, Away mode on the weekdays just before everyone leaves for work or school, or Home mode when you are back at home relaxing after work and during the weekends. Simply create a schedule whenever you want a mode change to occur and as many as needed—it's a convenient and flexible way to control your Swann Security devices.
Creating Schedules
There are two ways you can choose to create schedules. You can quickly create a set of schedules based on your typical weekday and weekend routines via Schedules Setup (Basic), or you can choose Add Schedule (Advanced) to create individual custom schedules.
• Schedules Setup (Basic)
- From the Modes tab, tap


- Tap the Schedules Setup (Basic) button.

- Set the start times for mode schedules on weekdays (Monday to Friday) and weekends (Saturday and Sunday) based on your typical morning wake-up time, departure time from home, return time to home, and bedtime, as shown below.

- Once finished, tap the Apply Schedules button on the bottom of the screen. The Schedules screen displays a color-coded overview of your weekly modes schedule, as shown below.

Tap to set the time the schedule will start
-
You can make changes to your schedules or create additional schedules by tapping Edit in the top right corner of the screen. For more information, see:
-
"Creating Additional Schedules" on page 22
— "Editing or Deleting Schedules" on page 23
- Add Schedules (Advanced)
- From the Modes tab, tap

- Set the mode, the start time, and the day(s) for the schedule you are creating, as shown below.

-
For your devices to be able to automatically switch to different modes with schedules, a minimum of two schedules must be created. See "Creating Additional Schedules" on page 22.
-
Tap the + Add Schedules (Advanced) button.

- When you have finished customizing your new mode schedule, tap the Apply Schedules button on the bottom of the screen. The Schedules screen displays a color-coded overview of your weekly modes schedule, as shown below.

Creating Additional Schedules
You can create additional schedules, one at a time, for your devices to change modes.
- From the Modes tab, tap


- Tap Edit in the top right corner.

- Tap + in the top right corner.
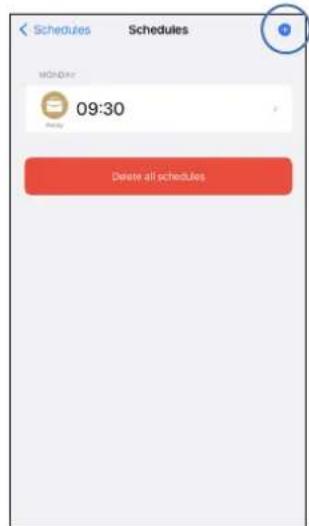
- Set the mode, the start time, and the day(s) for the schedule you are creating, as shown below.
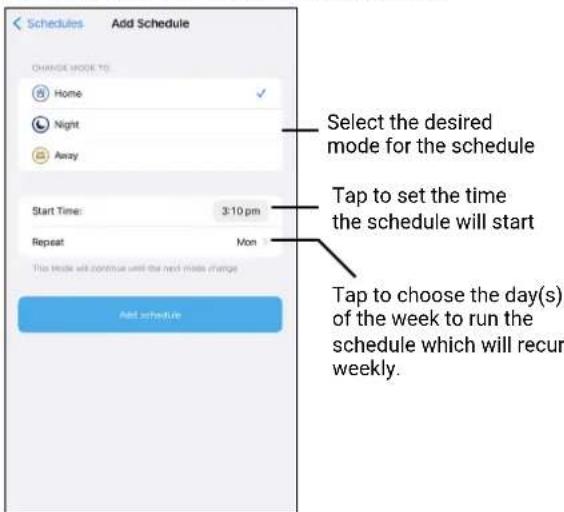
- When you have finished, tap the Add Schedule button on the bottom of the screen. The new schedule is added to your list of schedules. Repeat the steps 3-4 above to add more schedules.

Note: You can make changes to your schedules if necessary. See "Editing or Deleting Schedules" on page 23.
Editing or Deleting Schedules
- From the Modes tab, tap 📋. The Schedules screen is displayed.

- Tap Edit in the top right corner. The list showing the times and days of the week modes are scheduled to change is displayed. You can scroll all the way to the bottom to delete all the schedules by tapping the Delete all schedules button.

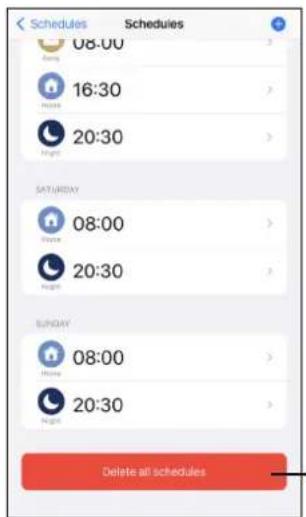
You can manually override the mode after the schedule has started using the Modes panel. This is useful for any situation where the mode set by the schedule is no longer appropriate.
Delete all existing schedules
- Tap the schedule you want to edit. You can adjust the start time, disable the schedule temporarily, change the scheduled mode or delete the schedule, as shown below.
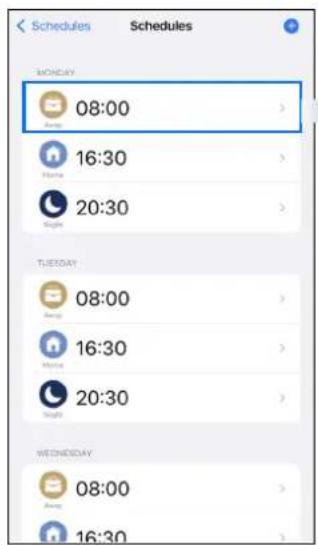

You can change the mode that will take effect for the schedule if necessary
Adjust the schedule's start time.
Note: If the start time conflicts with an existing schedule, this schedule will override and delete the other schedule automatically.
Occasionally, you might want to turn the schedule off temporarily, for example, when you have something else planned for the day. You can turn the schedule off/on by tapping the toggle switch. If disabled, the schedule will be removed from the graphical weekly view and won't run until it is re-enabled.
Delete the schedule.
Save any changes you've made to the schedule.
The Activity tab provides a consolidated view of all the detection alerts generated today and the past week by your Swann Security devices.
![graph TD A["Activity"] --> B["Day 3am to 12am"] B --> C{Daily Event Details} C --> D["Color-coded Bars: Use to Represent: e.g., event types such as motion, ring, sound, person, pet, vehicle, and package detection events. Detection of package, pet, and vehicle requires a Secure+ plan subscription and…](/content/2026/07/1491197/images/05cde238652a51b30aa7545b28753ec2a0574e89e3fcea29d5b333c4b79dbbb5.jpg)

Device Settings
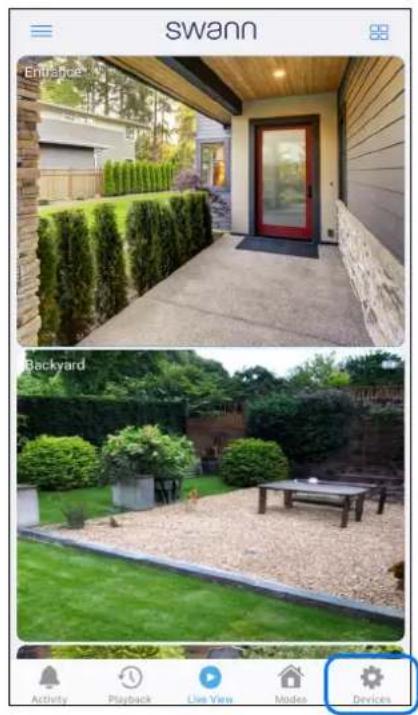
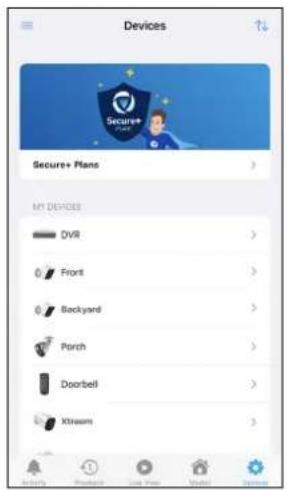
- From the navigation bar, tap the Devices tab.
- Tap the device for which you would like to view details or change settings.
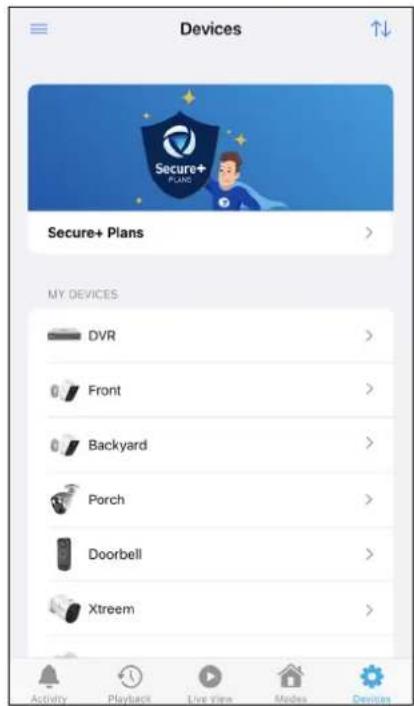
You can also do the following:
- Tap ↑↓ in the top right corner to rearrange the order of the device tiles on the Live View tab. Tile positions in grid and list views are arranged in the following order, as shown below.
Grid View List View
| Position 1 | Position 2 |
| Position 3 | Position 4 |
| Position 5 | Position 6 |
| Position 7 | Position 8 |
- Tap the Pair Device button on the bottom of the screen to pair a new Swann Security device to your account.
- Tap the Shop Swann button on the bottom of the screen to visit the official Swann online store and browse for Swann Security products.


In addition to professional monitoring, the ActiveResponse plan allows you to locate misplaced keys and designate up to five emergency contacts. To learn more about the benefits and to subscribe, navigate to the App Menu > Secure+ Plans.
1 The name of the Personal Alarm. You can tap to change it.
2 The connection status of the Personal Alarm.
Note: If the device is not connected, check your phone settings to ensure that Bluetooth is turned on.
3 Shows the current battery level (%).
4 Shows the firmware version of the Personal Alarm.
5 You can enter Test Mode at any time to familiarize yourself with how your Personal Alarm works without risking false alarms.
Triggering the Personal Alarm during the test mode will display your current location on the screen and result in one of the following actions:
- a test SMS sent to your emergency contact, or
- (Only available to ActiveResponse plan subscribers) a test alarm sent to the professional monitoring center. You will receive a call to validate the test alarm. Please ensure you have your personal 4-digit pin code ready for identity verification. You can manage your pin code in the App Menu > Profile. (See "Updating your Swann Security Account Profile" on page 39.)


6 You can manage the details of your emergency contacts, including their 4-digit pin code (this option is only available to ActiveResponse plan subscribers).
Note: Be sure to inform your designated contacts about their 4-digit pin code, which will be used to verify their identity when the monitoring center calls.
7 You can toggle 'Disconnection Alert' on or off. When this is enabled, your Personal Alarm will emit a 20-second beep when it's out of Bluetooth range of your phone. This feature is useful if you want to ensure that your Personal Alarm always stays with you when you leave the house.
8 You can unpair the Personal Alarm from your Swann Security account. For example, if you plan to give it away to a family member, you will need to unpair it first.

1 The name of the DVR/NVR. You can tap to change it.
2 Shows the 'Online' status of the DVR/NVR. If the status is "No", please check your Wi-Fi/internet connection and make sure the Ethernet and power cables are securely connected at both ends.
3 The timezone (GMT format) set on the DVR/NVR. Please ensure that the timezone matches your current location. Incorrect timezone settings can prevent mode schedules from running as scheduled and may also result in incorrect timestamps on recordings.
4 Shows the username currently logged into the DVR/NVR.
5 In case you've forgotten the password to access the DVR/NVR locally, tap on the Password field then authenticate yourself to reveal the password. See "Finding your CCTV System Password" on page 44.
6 When the app is launched, you can choose how the Live View tab starts the DVR/NVR camera live streams. You can select 'Always' to automatically start the live streams, 'Wi-Fi only' to start the live streams only when your phone is connected to Wi-Fi, or 'Never' to never start the live streams - you'll need to tap the Play icon on the camera tile to manually start live view.
7 Check for firmware updates. New firmware may from time to time be available for your DVR/NVR to improve the performance, fix bugs, or roll out new features and enhancements.
8 Link your Dropbox account to your Swann Security account. This feature allows you to save recordings using Dropbox as an external cloud storage.
Refer to your DVR/NVR system's instruction manual for more information on activating the Dropbox feature.
9 View technical information about the DVR/NVR such as the model code, software (firmware) version, device ID, MAC address, and network IP address.
10 Shows the list of camera channels available on the DVR/NVR. You can change the camera channel name by tapping >. If you rename the camera channel through the app, it will be automatically updated on your system as well.
Note: Any unused channel will appear as 'Offline'. This indicates that the channel is available for a camera connection on the rear of the DVR/NVR.
11 You have the option to remove (unpair) the DVR/NVR from your Swann Security account. There may be instances where you need to unpair your DVR/NVR. For example, if you plan to use your DVR/NVR with a different Swann Security account or give it away to a family member, unpairing it first is necessary.

Devices
MaxRanger4K
MaxRanger4K


Name
MaxRanger4K


Online
Yes

Time Zone
+1100 >

User name
admin

Password
• • • • • •

Automatically Start Live View
Always >
Swann Security will attempt to start the live view preview automatically

Camera Status


Check for Updates


Dropbox


Reboot

CAMERAS

Deck


Driveway


Front


Backyard


Shed


Side


Channel 7
Offline >

Channel 8
Offline >

Technical Details


How to pair a camera?


Remove this device

The name of the MaxRanger4K system. You can tap to change it.

Shows the 'Online' status of the MaxRanger4K system. If the status is "No", please check your internet connection and make sure the Ethernet and power cables are securely connected at both ends.

The timezone (GMT format) set on the MaxRanger4K system. Please ensure that the timezone matches your current location. Incorrect timezone settings can prevent mode schedules from running as scheduled and may also result in incorrect timestamps on recordings.

Shows the username currently logged into the MaxRanger4K system.

In case you've forgotten the password to access the MaxRanger4K system locally, tap on the Password field then authenticate yourself to reveal the password. See "Finding your CCTV System Password" on page 44.

When the app is launched, you can choose how the Live View tab starts the MaxRanger4K camera live streams. You can select 'Always' to automatically start the live streams, 'Wi-Fi only' to start the live streams only when your phone is connected to Wi-Fi, or 'Never' to never start the live streams - you'll need to tap the Play icon on the camera tile to manually start live view.

View the current battery level and signal strength of all your paired MaxRanger4K cameras.


Check for firmware updates. New firmware may from time to time be available for your MaxRanger4K system to improve the performance, fix bugs, or roll out new features and enhancements.

Link your Dropbox account to your Swann Security account. This feature allows you to save recordings using Dropbox as an external cloud storage. Refer to your MaxRanger4K system's instruction manual for more information on activating the Dropbox feature.

You can reboot the MaxRanger4K system.

Shows the camera channels available on the MaxRanger4K system. Note: Any unused channel will appear as 'Offline'. This indicates that the channel is available for pairing with a camera. Tap > to view and configure various settings for the camera. You can also pair a camera to an unused channel. For more information, see "MaxRanger4K - Camera Settings" on page 30.

Selecting the 'How to pair a camera?' option provides in-app help on how to pair an additional camera with the MaxRanger4K system. Follow the step-by-step instructions provided to seamlessly add a new camera to your system and expand your surveillance capabilities.

View technical information about the MaxRanger4K such as the model code, software (firmware) version, device ID, MAC address, and network IP address.

You have the option to remove (unpair) the MaxRanger4K system from your Swann Security account. There may be instances where you need to unpair your MaxRanger4K system. For example, if you plan to use your MaxRanger4K system with a different Swann Security account or give it away to a family member, unpairing it first is necessary.

1 The name of the camera. You can tap to change it.
2 Shows the Online status of the camera. If the status is "No", please check the following:
- The camera may have lost connection to the power hub. Try bringing the camera closer to reestablish the connection.
- The camera battery may be completely empty and require charging.
- Ensure that the power switch on the back of the camera is set to ON.
3 You can verify the camera channel's pairing status.
Pair State : Paired
Unpair
Pair State : Not Paired
Pair
- If a camera is already paired, it can be unpaired by tapping the Unpair button.
- Additional MaxRanger4K cameras can be paired with unused ('Not Paired') camera channels by tapping the Pair button. Follow the on-screen instructions (see below) to link any additional camera to the MaxRanger4K system
4 You can toggle on or off the camera's built-in spotlights when an event is detected during night time.
5 You can toggle on or off the camera's built-in siren when an event is detected. Note: Please exercise discretion and good judgment when deciding to activate the siren, and ensure compliance with all local noise regulations.
6 You can adjust the sensitivity level of the camera's motion detection.
Please note, this setting is associated with the 'Motion Sensitivity' setting found under the 'PIR and Motion' mode in the Alarm menu of your MaxRanger4K system.

Pairing additional cameras
You can easily connect a camera to an available camera channel on the MaxRanger4K system via the app. Follow the steps below.
- From the MaxRanger4K Settings screen, select an unused camera channel > Pair State 'Tap to check' > Pair button. The Pair Camera screen is displayed, as shown on the left.
- Attach the antenna to the camera, ensuring it points upwards.
- Open the rear rubber cover of the camera and power it on using the Power switch.
- Press and hold the SET button for 5 seconds. The camera's status LED will start blinking to indicate it is in pairing mode.
- Ensure that the rubber cover is snugly closed with no gaps to prevent water and dust ingress once pairing is done.
- Initiate pairing by tapping the Pair button on the bottom of the screen. If successful, the camera appears on the MaxRanger4K Settings screen, and you can view the camera via the Live View tab. If pairing wasn't successful, repeat the steps above.
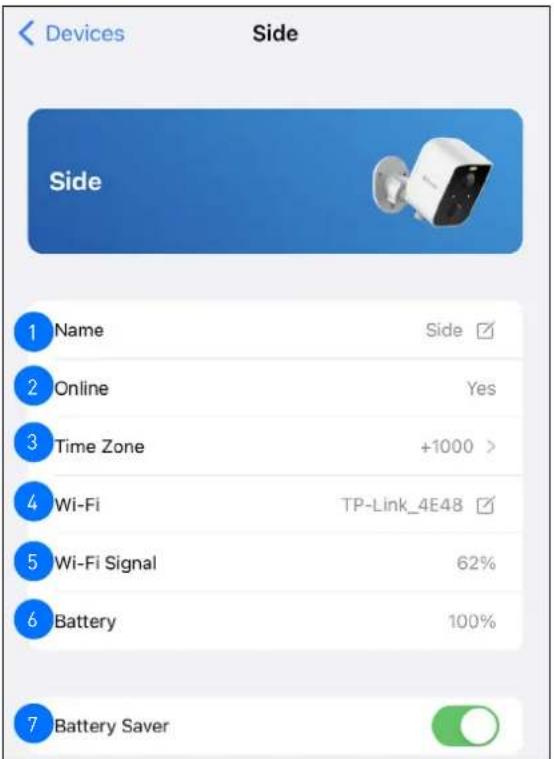


The settings available vary depending on the device and will only appear if the feature is supported.
1 The name of the camera. You can tap to change it.
2 The connection status of the camera. Note: If the device is not "Online", check your Wi-Fi/internet connection and the device's battery level/power connection.
3 The timezone (GMT format) of the camera. The date and time stamp of camera recordings will be based on the selected timezone. You can tap > to change the timezone. There is also the option to sync the camera to your phone's timezone.
The name (SSID) of the Wi-Fi network to which the camera is connected. If you have multiple Wi-Fi networks in your home, you can tap ☑ to change the Wi-Fi connection the camera is using. For more information, see "Changing the Camera's Wi-Fi Network" on page 40.
5 The signal strength of the Wi-Fi network the camera is currently connected to. The signal strength is represented as a percentage, and the closer the camera is to your Wi-Fi router or access point, the higher the percentage and the more reliable and faster the wireless connection between devices. A camera located far from the router or access point, without a strong wireless connection, may drop off the network from time to time, resulting in problems with video streaming.
6 Shows the current battery level (%).
7 This setting is enabled by default to optimize power consumption, which helps prolong the camera's battery life. Disabling this setting may result in faster performance but higher battery drain.
8 When the app is launched, you have the option to choose whether or not the camera should be automatically woken up from sleep.
9 When the app is launched, you can choose how the Live View tab starts the camera's live stream. You can select 'Always' to start the live stream all the time, select 'Wi-Fi only' to start the live stream only when your phone is connected to Wi-Fi, or select 'Never' to never start the live stream.
10 Adjust the camera's video and audio settings such as the live view quality and mic volume. See "Camera Settings" on page 32.
11 Adjust the camera's detection settings such as the motion detection sensitivity and light duration. See "Detection Settings" on page 33.
12 Set up motion detection mask to reduce false motion triggers. See "Motion Detection Mask" on page 34.
13 Perform general maintenance such as rebooting the camera, resetting camera settings, formatting the internal storage, and factory reset. See "Advanced Settings" on page 36.
14 Access recordings stored on the camera's local microSD card.
15 Check for firmware updates. New firmware may from time to time be available for your camera to improve the performance, fix bugs, or roll out new features and enhancements.
16 View technical information about the camera such as the model code, firmware version, installation date, and MAC address.
17 Remove (unpair) the camera from your Swann Security account. In some cases, you might need to unpair your camera, for example, if you give away your camera to a family member, you need to unpair it first.
18 Adjust the camera's pan and tilt speeds.
19 Set up and manage face recognition profiles on the camera. See "Facial Recognition" on page 35.
Camera Settings

The settings available vary depending on the device and will only appear if the feature is supported.
1 Select the live view quality. If you find that it's taking a while for the camera live view to stream, it is usually due to slow internet speed on your phone, caused by poor Wi-Fi or cellular coverage, or limited home internet bandwidth. Additionally, concurrent video streaming activities on your Wi-Fi network can cause congestion, which can affect your internet upload and download speeds. To improve loading times and ensure smoother video streaming, try using the Low setting.
Note: This setting does not affect the video quality of camera events, which are always recorded in HD.
2 Select the video environment according to where your camera is physically located. If your camera is used in Indoor mode, you must set the camera's environment to match with your country's electrical frequency. This can help prevent video flicker caused by fluorescent lights.
- 50Hz (Australia/UK)
- 60Hz (North America)
3 You can change how the date is displayed in the camera recordings. Options available: DD/MM/YYYY, YYYY/MM/DD, MM/DD/YYYY
4 You can enable Color Night Vision, which disables the camera's infrared LEDs, allowing the camera image to appear in color at night when there is sufficient ambient lighting.
5 You can enable Image Mirror to horizontally reverse the orientation of the camera's video display.
6 You can enable Image Flip to turn the camera's video display upside down. This is useful if the camera has been mounted upside down.
7 Adjust the camera's speaker volume. You can also mute the camera's speaker by sliding the level all the way left to 0%.
8 Adjust the camera's microphone volume. The higher the microphone volume, the more background noise the camera will pick up. You can also mute the camera's microphone by sliding the level all the way left to 0%.
9 Select the volume of the chime speaker linked to your SwannBuddy Video Doorbell. You can completely turn the volume off by selecting the Mute option.
10 Save any changes made to the camera settings.
11 Discard any changes and return to the previous screen.
Detection Settings
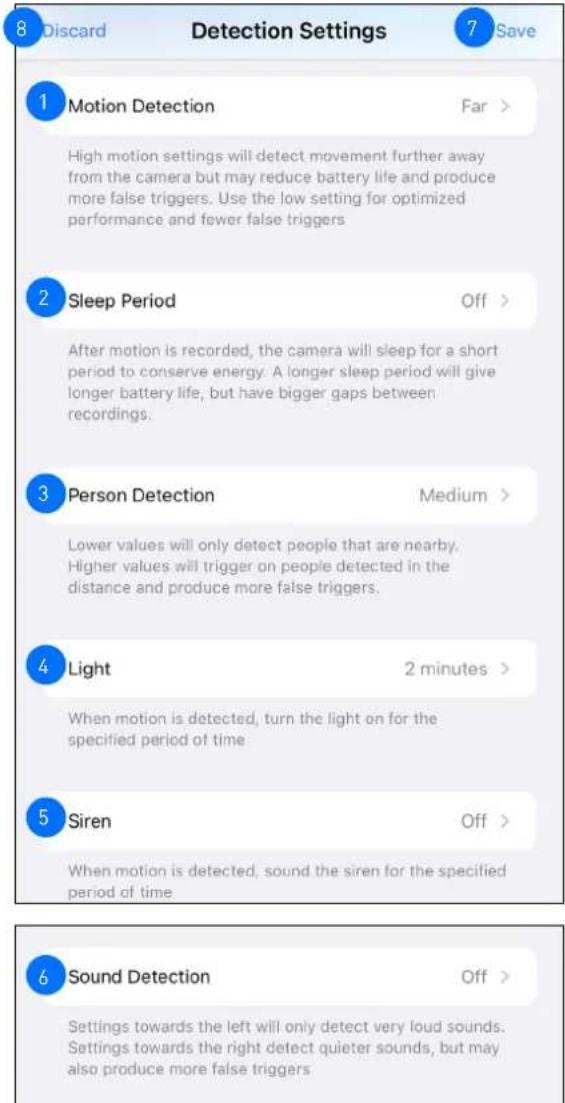
The settings available vary depending on the device and will only appear if the feature is supported.
1 MOTION DETECTION – Adjust the motion detection sensitivity level of the camera for the current mode. To adjust the motion detection sensitivity for other modes, go to the Modes tab screen instead.
- Higher sensitivity settings will increase the distance motion events can be detected.
- Use lower settings to reduce detection range and minimize unwanted recordings.
- Experiment with different sensitivity levels to find the setting that works best for your specific needs.
• To disable motion detection, select Off. - Selecting Max will disable any motion detection mask that has been set up for the camera.
2 SLEEP PERIOD – Select the period of time that must elapse before the camera can be triggered again by another motion activity.
Note: If you know that there's continuous activity happening around the camera, such as someone mowing the grass in the backyard or people walking in and out, it is recommended that you temporarily set a longer sleep period. This will prevent unnecessary recordings and conserve battery life.
3 PERSON DETECTION – Receive person detection alerts when the camera detects the presence of a person during the motion event or live view. The higher the person detection sensitivity, the more sensitive the camera is in distinguishing between human shapes and other motion objects further away. Selecting Off turns off person detection alerts.
Note: To receive person detection alerts, the Motion Detection sensitivity setting (see above) must not be set to Off.
4 LIGHT - Select how long the camera's spotlight/floodlight will stay on when motion or sound is detected during night time.
5 SIREN – Select how long the camera's built-in siren will sound when motion is detected.
Note: Please exercise discretion and good judgment when deciding to activate the siren. Make sure to comply with all local noise regulations.
6 SOUND DETECTION – Adjust the sound detection sensitivity level of the camera for the current mode. To adjust the sound detection sensitivity for other modes, go to the Modes tab screen instead.
- The highest sensitivity level (Quietest) will detect most ambient sounds—even the faintest of sounds such as whispers or keyboard typing.
- The lowest sensitivity level (Loudest) will only detect very loud noises like vacuum cleaners or smoke alarms.
- If you're getting too many sound detection alerts even on the lowest sensitivity, try lowering the camera's microphone volume level in Camera Settings > Audio > Mic Volume. This will further reduce the camera's microphone sensitivity to background noise.
- Since every home environment is unique, we recommend experimenting with the sound detection sensitivity settings to find out which works best for you.
• To disable sound detection, select Off.
7 Save any changes made to the detection settings.
8 Discard any changes and return to the previous screen.
Motion Detection Mask
NOTE: THE MOTION DETECTION MASK FEATURE MAY NOT BE AVAILABLE ON ALL WI-FI CAMERA MODELS.
IMPORTANT: Please note that if the camera's motion detection sensitivity level is currently set to MAX, the Motion Detection Mask set here will not take effect. To apply the Motion Detection Mask, ensure the camera's motion detection sensitivity level is any level below MAX, such as CLOSE, MED or FAR. You can adjust the camera's motion detection sensitivity by going to the Devices tab > [your camera] > Detection Settings or the Modes tab > Edit.

The Motion Detection Mask can reduce unwanted motion triggers. It does this by excluding certain areas from detection, such as nearby bushes or trees swaying in the wind, the road where people or vehicles regularly pass by, and high traffic areas
Tap 'Add Mask' then use your finger to highlight the areas of the camera view that you want to exclude from motion detection. All areas highlighted in blue will be excluded from motion detection. If movement is detected in those areas, the camera will not trigger and record video.
2 Tap 'Remove Mask' then use your finger to erase currently highlighted areas of the camera view.
3 Tap 'Fill' to highlight the entire camera view. This will exclude all areas from motion detection.
4 Tap 'Clear' to completely remove all highlighted areas from the camera view.
5 Tap to save the Motion Detection Mask setting.
6 Tap to discard any changes and return to the previous screen.
The Face Recognition video analytics feature uses pro-les to represent individuals, such as family members. Each pro-le will require enrollment of multiple face images (ve different face views) of an individual that you want the camera to recognize. When the camera detects and identi-es an individual matching a pro-le, you'll receive a Face Recognition alert notification from the app.
To register a new Facial Recognition pro le, tap the "Enroll face" button and follow the on-screen instructions (as shown on the right gure) to capture the face images of the individual that you want to associate with the pro le. You can enter a name for the pro le once all of the required face images have been taken.
NOTE:
- It is recommended that you register the Facial Recognition profiles at the camera location.
- Keep a distance of about 30cm to 70cm from the camera during the registration process.
- Ensure the face is centered and directly in front of the camera. The green dot that is displayed in the video window indicates where the face should look towards.
- If glasses are worn, ensure the frame of the glasses does not obscure the eyes and there is no re ection from the lens.
- If the individual occasionally switches between wearing glasses and not wearing glasses (for example, contact lens may be worn), simply register two separate Facial Recognition pro-les (i.e., with and without glasses) for the individual and name the pro-les accordingly.
- To replace an existing Facial Recognition pro le, simply tap the pro le and start the Facial Recognition registration process again.
- You can store up to 10 Facial Recognition pro les on the camera.
- To enable the Facial Recognition feature, ensure the camera's Person Detection setting (on the Detection Settings screen) is not turned Off.
- Facial recognition results may vary depending on many factors (distance, facial expressions, lighting, etc)

The settings available vary depending on the device and will only appear if the feature is supported.
1 Tap to reboot the camera. If you are having difficulties with the camera, try rebooting it. A simple reboot can often fix connectivity issues quickly.
2 Tap to reset camera settings such as the name, timezone, audio, video, and detection settings to default values.
3 Tap to format the camera's internal memory (or installed microSD memory card) and permanently erase all recordings on it.
Tap to reset the camera to factory defaults. This is usually only necessary for troubleshooting. It isn't something to do lightly as it will format the internal memory, wipe the current Wi-Fi information, and return all of the camera settings (camera name, timezone, etc) to factory defaults. If your camera is already offline, you can factory reset the camera using the physical Reset button located on the device. See "Factory Resetting the Camera" on page 41.
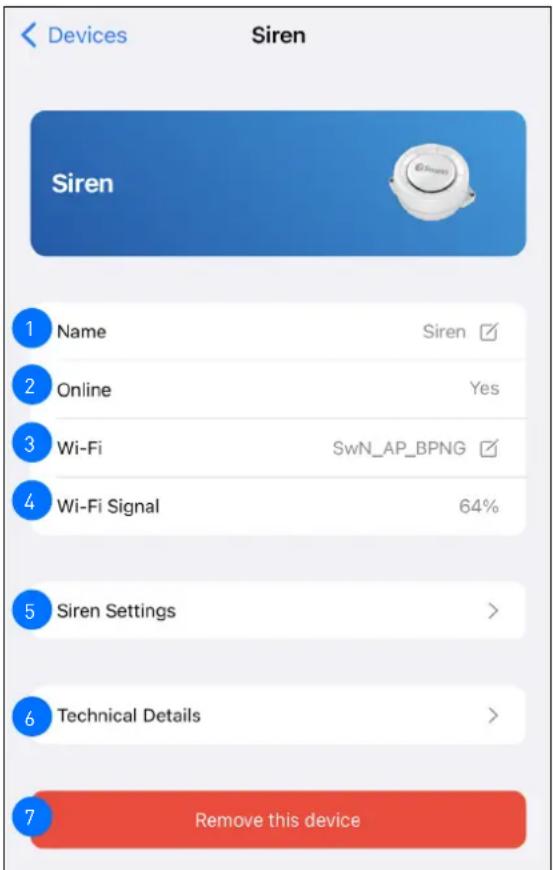
The settings available vary depending on the device and will only appear if the feature is supported.
1 The name of the device. You can tap to change it.
2 The connection status of your device. Note: If the device is not "Online", check your Wi-Fi/internet connection and the device's battery level/power connection.
3 The name (SSID) of the Wi-Fi network to which your camera is connected. If you have multiple Wi-Fi networks in your home, you can tap ☑ to change the Wi-Fi connection the device is using.
4 The signal strength of the Wi-Fi network the device is currently connected to. The signal strength is represented as a percentage, and the closer the device is to your Wi-Fi router or access point, the higher the percentage and the more reliable and faster the wireless connection between devices.
5 You can change the settings for the siren such as the volume, duration, and sound effect. See below for more information.
6 View technical information about the device such as the model code, firmware version, installation date, and IP address.
7 Remove (unpair) the device from your Swann Security account. Note: In some cases, you might need to unpair your device. For example, if you want to use your device with a different Swann Security account or if you give away your device to a family member, it must be unpaired first.
SIREN SETTINGS
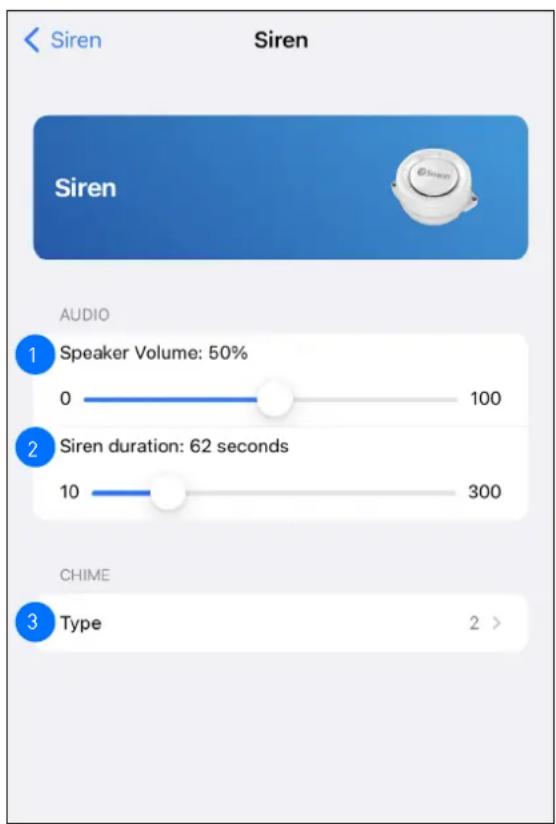
1 Slide left or right to decrease or increase the volume of the siren. You can also completely mute the siren when triggered and only flash the red and blue LED light ring by setting the Speaker Volume to 0%.
2 Use the slider to set how long the siren will sound when triggered.
3 You can change the siren alarm tone. There are four alarm tones to choose from:
- Siren
— 'Ding Dong' Chime
- 'Beep Beep' Alert
— Human Voice "Sensor Triggered"

Appendix
UPDATING YOUR SWANN SECURITY ACCOUNT PROFILE
You can update your Swann Security account profile information at any time. Tap Menu > Profile.

1 Shows the name associated with your Swann Security account. Tap EDIT to update the name.
2 Shows your Swann Security account's timezone. Tap EDIT to change the timezone.
3 Shows the email address registered to your Swann Security account.
(Only available to ActiveResponse plan subscribers) Tap EDIT to manage your personal 4-digit pin code. This will be used by the professional monitoring center to contact and verify your identity in the event of an emergency.
5 Shows your Swann Security account's timezone. Tap EDIT to change the timezone.
6 Shows the address associated with your Swann Security account. Tap EDIT to update the address.
(Only available to Personal Alarm users) Tap EDIT to update the details of your emergency contacts, including their 4-digit pin code (this option is only available to ActiveResponse plan subscribers). Remember to tap the Save button after making any changes.
8 Optional. This can be turned off.
9 Tap> to change your Swann Security account password.
10 Tap to permanently delete all cloud recordings stored in your Swann Security account. Please ensure you have saved a copy of any cloud recording you want to keep via the Playback tab before performing this action.
11 Tap to delete your Swann Security account. A confirmation link will be sent to your registered email address. Open the link to confirm that you want to permanently delete your Swann Security account.
12 Tap to save any changes made to your Swann Security account profile.
CHANGING THE CAMERA'S WI-FI NETWORK
You can easily change the Wi-Fi network that your camera is using, if your home has multiple Wi-Fi access points or if you have installed a new router.
- Tap the Devices tab > Select your camera > Wi-Fi ☑.

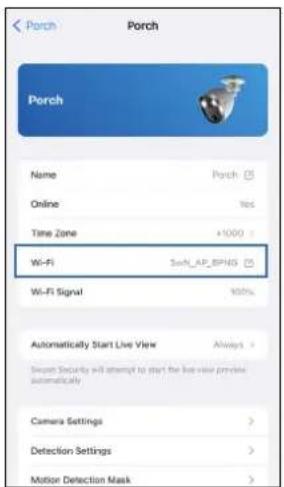
- Tap 'Pair Device' on the Change Network confirmation box that is displayed.
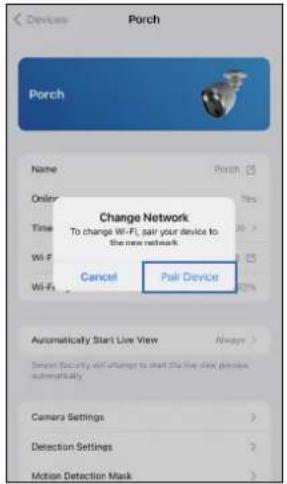
If your previous Wi-Fi network has been disconnected and the camera is no longer online, simply go to App Menu > Pair Device and follow the on-screen instructions to pair the camera to the new Wi-Fi network.
- Follow the on-screen instructions to pair your camera to the new Wi-Fi network.

FACTORY RESETTING THE CAMERA
Factory resetting your camera is usually only necessary for troubleshooting. It isn't something to do lightly as it will format the internal memory/microSD card (i.e., erase all locally stored clips), wipe the current Wi-Fi pairing information, and return all of the camera settings to the original factory defaults.
Note: Factory resetting your camera does not remove (unpair) it from your Swann Security account. If you're giving your camera to somebody else, make sure to remove it from your account first via the Advanced Settings.
Depending on whether your camera status is online or offline, you can perform a factory reset via the app Factory Reset button or the physical Reset button located on the camera.
METHOD A - VIA ADVANCED SETTINGS (IF CAMERA STATUS IS ONLINE)
- Tap the Devices tab > Select your camera > Advanced.
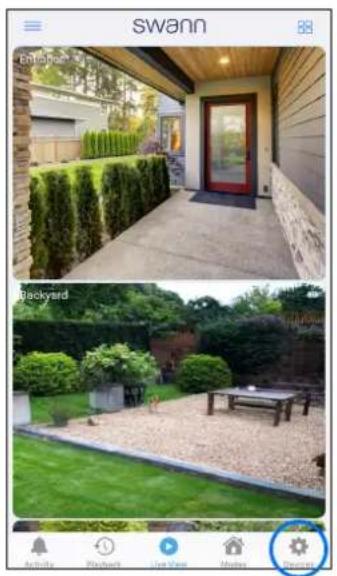


- Tap the Factory Reset button.
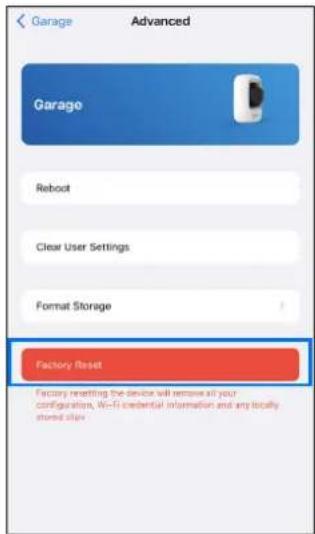
- The camera will reset to factory defaults and restart automatically. When factory reset is complete, the LED indicator/ring on the camera will blink blue slowly to indicate that it is in pairing mode (on certain models, you will also hear the device say "Ready for pairing").
IMPORTANT: After factory resetting your device, you'll have to pair it with your Wi-Fi network again. See "Pairing the Device" on page 7.
SEE NEXT PAGE FOR METHOD B - VIA PHYSICAL RESET BUTTON
METHOD B - VIA PHYSICAL RESET BUTTON (IF CAMERA STATUS IS OFFLINE)
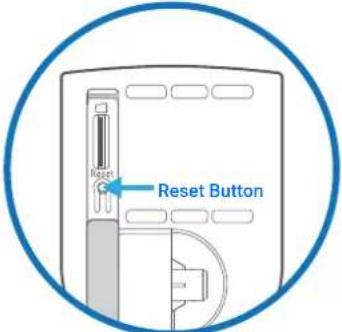
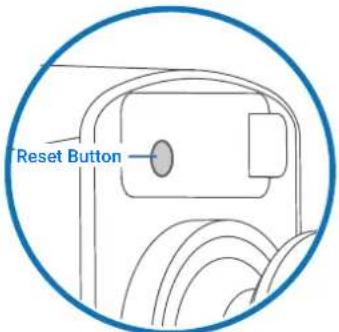
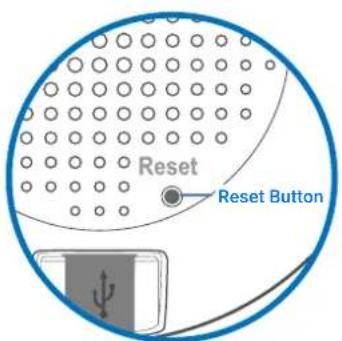
- Locate the Reset, SET and/or Pair button (see below figures) on the camera. Make sure the camera is plugged into the power supply or USB charger.
| SWIFI-XTRCAM/4KXTRM SWIFI-BUDDY/BUDDY4K SWIFI-CORECAM/COREPRO | ||
 |  |  |
| SWIFI-2KOCAM/SPOTCAM SWIFI-4KFLOCAM SWIFI-FLOCAM | ||
 |  |  |
| SWIFI-CAM | SWIFI-TRACKCAM | SWIFI-FOURTIFY4 |
 |  |  |
| SWIFI-2KICAM | SWIFI-PTCAM2 SWIFI-ALERTCAM | 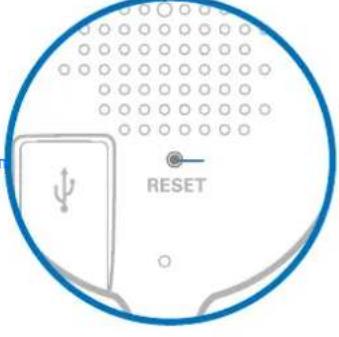 |
 |  | |
- Find the factory reset procedures for your device below:
2a. For (SWIFI-2KICAM/2KOCAM/ALERTCAM/SPOTCAM/4KFLOCAM/FLOCAM/TRACKCAM/PTCAM2 models)
Press and hold the Reset button for 20 seconds until the blue LED indicator on the camera turns off. Release the Reset button. The camera will start the factory reset process which can take up to 2 minutes.
2b. For (SWIFI-XTRCAM/4KXTRM) / (SWIFI-BUDDY/BUDDY4K)
Press and hold the SET and RST buttons simultaneously, then release the RST button and continue holding the SET button until the LED starts blinking red. Release the SET button. The camera will start the factory reset process which can take up to 2 minutes.
2c. For (SWIFI-CORECAM/COREPRO)
Make sure the Power switch is in the ON position. Press and hold the Reset button (for about 10 seconds) until the LED indicator on the camera turns off. Release the Reset button. The camera will start the factory reset process which can take up to 2 minutes.
2d. For (SWIFI-FOURTIFY)
Press and hold the Reset button for 10 seconds. Release the Reset button. You'll hear the camera say "Restore factory settings and format SD card". The camera will start the factory reset process which can take up to 2 minutes.
2e. For (SWIFI-CAM)
Press and hold the Reset and Pair buttons simultaneously, then release the Reset button and continue to hold only the Pair button for another 35 seconds. Release the Pair button. The camera will start the factory reset process which can take up to 2 minutes.
- When factory reset is complete, the LED indicator/ring on the camera will blink blue slowly to indicate that it is in pairing mode (on certain models, you will also hear the device say "Ready for pairing").
IMPORTANT: After factory resetting your device, you'll have to pair it with your WI-FI network again. See "Pairing the Device" on page 7.
FINDING YOUR CCTV SYSTEM PASSWORD
You can easily find the password for any DVR/NVR associated with your Swann Security account. This can be particularly helpful when you need to log into your DVR/NVR locally but have forgotten the password.
- Tap the Devices tab > Select your DVR/NVR.
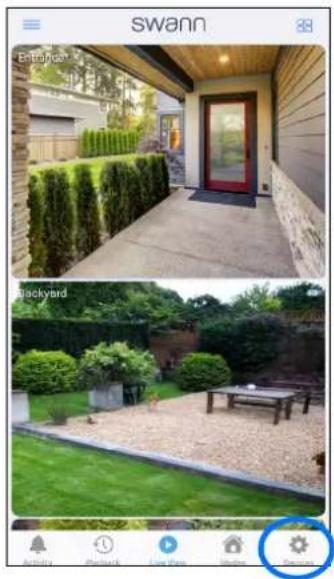

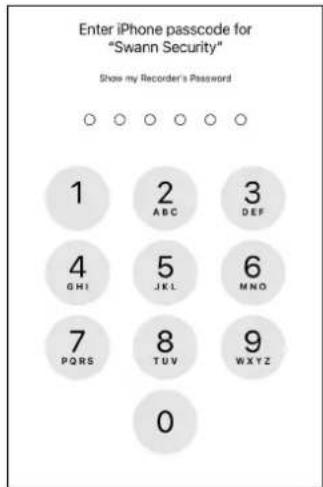
- Tap on the Password field. This will trigger a security challenge on your phone.

-
Depending on the type of screen lock you have set on your phone, you'll be prompted to use your phone's biometrics (passcode, fingerprint, etc) or your Swann Security account password for authentication. This is to make sure that it is actually you who is wanting to view the stored password.
-
Your DVR/NVR password is revealed in the Password field.


I have forgotten my Swann Security account password. How do I reset it?
Tap the "Forgot Password" link on the Sign In screen of the Swann Security app and submit the email address that you used to create your account. You'll shortly receive an email with instructions on how to reset your account password.
Can I access my device with another phone?
Yes. Just install the Swann Security app on your other phone and sign in using the same Swann Security account credentials. For privacy, make sure to sign out of the app on any secondary devices before switching back to your primary phone.
Can I register my device to another Swann Security account?
A device can be registered to a single Swann Security account only. If you want to register the device to a new account (for example, if you want to give the device to a friend), you'll first need to remove the device (i.e., unpair) from your account. Once removed, the device can be registered to another Swann Security account.
How do I find my device's ID?
For CCTV systems: The device's ID is listed on a sticker located on the top of the device.
For SWIFI cameras: The device's ID (or MAC address) is listed on a sticker located on the back, bottom or base of the device.
If the device is already paired to your account, you can find the device's ID in the app: Device tab > Select the device > Technical details
Why am I not receiving push notifications?
Ensure that the "Do Not Disturb" toggle on the Activity tab has not been enabled in the app, as this will suppress all push notifications from Swann Security.
Will I be able to stream live video if I'm travelling overseas?
As long as your mobile phone and the Swann Security devices are both connected to the internet, you can conveniently check in on your devices via the Swann Security app from anywhere in the world.
Why is live video slow to load?
Camera streaming issues may be caused by any of the following:
- Poor internet/Wi-Fi connection (e.g., weak spots in your cellular/wireless network coverage) is the most common reason. Test your internet speed at speedtest.net. We recommend internet speeds of at least 2 Mbps for optimal streaming performance. You can also install a Wi-Fi extender to improve the Wi-Fi coverage throughout your home and ensure the camera receives a strong Wi-Fi signal where it is located.
- Limited internet bandwidth at home, for example, other video streaming services running at the same time on your network can cause congestion slowing down the internet upload and download speeds. As a general rule, the more devices you have connected to your Wi-Fi router, the more internet bandwidth you'll need. Contact your Internet Service Provider (ISP) and ask about upgrading your plan to get more bandwidth.
Why is the video event history not loading in the Playback tab?
After launching the Swann Security app, please allow a moment for camera tiles to load live video before trying to retrieve the video event history of your cameras from the Playback tab.
I cannot connect the camera to my Wi-Fi network. How do I fix this?
- Make sure the Wi-Fi network that you want the camera to join is not an unencrypted (open) network or 5GHz band network.
- Test your Wi-Fi network with other devices such as smart TV to make sure it is operating properly. Bring your phone to the location where your camera will be installed and check the Wi-Fi icon on your phone—at least 2 bars is recommended for the Wi-Fi signal to be considered reliable.
- Wi-Fi quality can vary significantly at different locations around the home due to environmental factors such as home construction type (e.g., metal objects are generally known to block Wi-Fi signals. A camera mounted on a metal surface may experience more Wi-Fi problems) and wireless interference from other electronic devices.
- If you're getting a weak Wi-Fi signal or can't connect to Wi-Fi at the installation site, try moving your router closer (to provide a stronger signal), installing a Wi-Fi extender (to increase signal coverage) or selecting another location with better Wi-Fi coverage. Be mindful of the physical barriers located between the camera and router. Ideally, try to place your camera within a clear line of sight to your router.
- The Wi-Fi connection may not be stable during pairing. Try moving the camera closer to your WI-Fi router.
- The Wi-Fi network password is case sensitive, so make sure to enter it exactly the same as it was created or as found on your Wi-Fi router.
- Check whether your Wi-Fi router is using MAC filtering. MAC filtering provides an extra level of security by ensuring that no unknown devices can connect to your Wi-Fi network without prior authorization. If you cannot disable MAC filtering, you will need to add the camera's MAC address to the router's white-list of allowed devices. You can find the camera's MAC address printed on a label at the bottom of the device.
Can I use my camera without an internet connection?
No, your camera requires a Wi-Fi network connection with internet access so you can stream live video to your phone and manage the camera's settings.
Why is my camera offline?
Occasionally you might get a notification that your camera is offline. When your camera can't be reached by the Swann Security server, you'll get a notification that it is offline. This could mean your internet is down, the internet connection between your camera and our server is unstable, or your camera has been moved out of range from your Wi-Fi router. Normally, your camera should come back online by itself once your internet access is available again. If your camera stays offline for an extended period of time, try turning the power to the camera off for 10 seconds before turning it back on. You might also want to make sure that your internet connection is working properly. You can try rebooting your Wi-Fi router to resolve any network connectivity issue.
Why am I getting false motion alerts?
Moving cars, passersby, direct sunlight or reflection may cause unwanted motion detection. To minimize false motion detections, adjust the camera angle slightly downward and ensure the field of view is focused only on the immediate area of concern and excludes as much background activity as possible. If placed outdoors, avoid locations where your camera will be directly exposed to sunlight during the day. Also, take note of shiny surfaces in the vicinity, such as house or car windows, which can reflect sunlight and trigger your camera's motion sensor. You can also try lowering the motion detection sensitivity to suit the environment.
Can my camera still record events if my internet connection goes down?
Your camera continues to detect and record events locally to its internal memory even if your home Wi-Fi network or internet is having issues, as long as your camera is not powered off. Once your camera comes back online, it will attempt to upload any event clips that were recorded during the downtime to your cloud storage which you can later view from the Playback tab.
If I set my camera's live view quality to Low, will it also affect the video quality of event clips?
No, event recordings will always be captured in the highest camera resolution available.
(Continued on the next page)
(For Battery-powered cameras) What can I do to maximize the battery performance on my camera?
Here are some simple and practical tips to get more battery life out of your camera:
- Make sure your camera's firmware is the latest version.
- Your camera will last longer when you stream at a lower resolution. The fewer pixels that your camera has to stream, the less power it uses.
- Lower the motion sensor sensitivity or turn off motion detection to conserve battery life when activity monitoring is not needed.
- Make sure your camera is properly positioned to eliminate any false motion triggering. The more events the camera records, the faster the battery life will drain.
- As a general rule, the nearer your camera is to your router, the better the wireless connection quality and battery performance. Your camera will work harder and use more power trying to maintain wireless connection the further it is away from your router. Consider installing a Wi-Fi range extender if your camera has poor Wi-Fi reception where it is located.
- Your camera can operate over a wide temperature range, however, in freezing conditions, the battery discharges more quickly and will not hold a charge for as long as it normally would in more moderate climates.
(For Wi-Fi camera models with cloud storage) How far back can I access my camera's cloud recordings?
Note: Please check the product specifications to find out if the cloud storage feature is available on your camera. For Wi-Fi cameras with cloud storage, event recordings displayed on the Playback tab will be available for the length of time determined by the cloud subscription plan associated with the camera. To find out more about the cloud storage subscription plans available for your cameras, go to App Menu > Secure+ Plans.
Can I disable the siren so it doesn't sound when my camera is triggered?
Yes, you can easily set your camera not to activate its built-in siren when an event is detected. Go to your camera's Devices tab > Select the camera > Detection Settings, and under the Siren setting, select OFF.
How long is a camera event clip?
Event clips can be as short as 10 seconds and up to 1 minute in length, depending on how long the sound or motion activity lasts. The camera will begin recording an event when sound or motion is first detected, and continue to record until there is completely no sound or motion. If the camera continues to detect sound or motion for longer than a minute, a new recording will be created as a separate event in the camera's event timeline.
How long does it take for camera recordings to appear on the Playback tab?
Depending on the size of the video and the strength of your network, this can be highly variable. In normal circumstances, an event should be displayed in the Playback tab video timeline a few minutes after it has been recorded.
Why doesn't the camera event clip have sound?
Make sure that the camera's microphone volume level is not set to 0% or the volume level set too low—the camera will not be able to pick up any sound in the background when it is recording the event.
(For devices with local microSD card storage feature) Can my camera record events without a microSD card installed?
No. Events are first recorded to the camera's local storage (i.e., microSD card) and then uploaded to your cloud storage. If the camera doesn't have a microSD memory card installed, it can still detect events but will not be able to record video. The camera will also not be able to download and perform firmware updates without a microSD card.
(For devices with local microSD card storage feature) Why has my camera stopped recording events?
If you've recently removed your microSD card from the camera (for example, to copy files to your computer) and then re-inserted the card, the camera might not have recognized and mounted the microSD card properly. Try restarting your camera. From the app, go the Devices tab > Select the camera > Advanced and tap the Reboot button.
(For devices with local microSD card storage feature) What is the maximum microSD card size that can be used?
The maximum microSD card size supported is 128GB (class 10 or higher recommended).
If you're having trouble pairing your device with the Swann Security app, here are some tips may help you solve the issue. Note: Screenshots are for reference only and may vary depending on device.
• PAIRING ISSUE - "UNABLE TO JOIN THE NETWORK SWANN-SWIFI-XXXXXX"
![graph LR A["4K Floodlight Security Camera"] --> B{Unable to join the network "Swann-SWIFI-b00d2d"} B -->|OK| C["Join Device's Wi-Fi Network"] B -->|No| D["Setup Manually Setup Manually"] E["Cancel"] --> F["4K Floodlight Security Camera"] F --> G{Join Device's Wi-Fi Network} G -->|Yes| H["4K Floodlig…](/content/2026/07/1491197/images/6ebe0fce5c3d18de3bf3717e9efd648f6cab56c9728c45df5e6708d1ac6b6c1b.jpg)
- Make sure the camera is in pairing mode—check the LED indicator on the camera is blinking blue slowly. If the camera is not in pairing mode yet, the app will not be able to proceed with the pairing process.
- If you need to enable pairing mode on the camera, just tap the Try again button and follow the on-screen instructions on how to put the camera in pairing mode. In most cases, you will just need to press and hold the camera's Pair or Reset/RST button for 5 seconds until the LED indicator starts blinking blue.
- Something might be preventing the Swann Security app from connecting to the camera's Wi-Fi hotspot automatically. To fix this issue, you'll have to perform a manual connection to the device. Just tap "Setup Manually" and follow the on-screen instructions (see below figure) on how to manually connect to the camera's Wi-Fi network (SWANN-SWIFI-XXXXXX where XXXXXX is the last six characters of the device MAC ID) via your phone's Wi-Fi Settings.

- If the advice above did not resolve the issue, you can try the following:
- Reset the camera to factory settings. For information on how to factory reset the camera, see "Factory Resetting the Camera" on page 41.
- Restart your phone.
- Open the Swann Security app on your phone and try pairing the camera again. Move the camera closer to your phone to make sure that it's in range.
- PAIRING ISSUE - "FAILED TO ESTABLISH INITIAL CONNECTION"
Connection Failed
4K Floodlight Security Camera

Failed to establish initial connection
Please ensure
Your device is powered on
The network you are connecting your device to has access to the internet
That the network and credentials are correct
Dismiss
- Make sure you know your Wi-Fi network password and that you have entered it correctly. When entering the password, toggle the Ⓞ icon on the screen to show the password so you can double-check that you've entered the correct password. Wi-Fi passwords are case-sensitive, so make sure lowercase, uppercase and special characters have been accounted for.
• Make sure your Wi-Fi network uses the 2.4GHz band (Not 5GHz). If your Wi-Fi router broadcasts separate 2.4GHz and 5GHz networks, make sure to choose the 2.4GHz network. If your router broadcasts the 5GHz network only, contact your Internet Service Provider for information about your router and how to switch it to dual-band (2.4GHz/5GHz). - The Wi-Fi connection may not be stable during pairing. Make sure the camera is within range of your Wi-Fi router. Try moving the camera closer to your Wi-Fi router or use a Wi-Fi range extender to improve the Wi-Fi signal throughout your home.
- Test your Wi-Fi network with other devices such as a smart TV to make sure it is working properly.
- Check whether your Wi-Fi router is using MAC filtering. MAC filtering provides an extra level of security by ensuring that no unknown devices can connect to your Wi-Fi network without prior authorization. If you cannot disable MAC filtering, you will need to add the camera's MAC address to the router's white-list of allowed devices. You can find the camera's MAC address printed on a label at the top or bottom of the device.
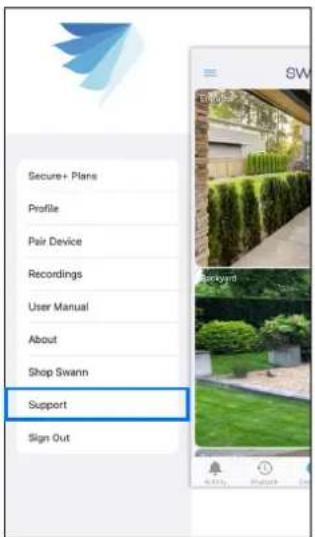
If you need further assistance, you can get in touch with us through the app's built-in contact feature.
1. From the app menu, tap Support.
2. Choose from one of the following options:

Open the link to the Swann Help Center website where you can find the latest product FAQs, video tutorials, pairing guides, and more.
B Call Swann Tech Support. Please have your unique 8-digit support code displayed on the screen ready. This will enable our support agent to quickly identify your Swann Security account and assist you in troubleshooting your device.
The content in this manual is for information purposes only and is subject to change without notice. While every effort is made to ensure that this manual is accurate and complete at the time of publication, no liability is assumed for any errors and omissions that may have occurred. For the latest version of this user manual, please visit: support.swann.com
Apple and iPhone are trademarks of Apple Inc., registered in the U.S. and other countries.
- ABOUT THE APP INTERFACE
- DEVICE SETTINGS
- APPENDIX
- GETTING STARTED
- INSTALLING THE SWANN SECURITY APP
- NOTE
- IF YOUR PHONE CAN'T SCAN THE QR CODE
- SINGLE VIEW MODE
- VIDEO PLAYBACK SCREEN
- MODES TAB
- CONFIGURING MODES
- SCHEDULES
- CREATING SCHEDULES
- SCHEDULES SETUP (BASIC)
- ADD SCHEDULES (ADVANCED)
- CREATING ADDITIONAL SCHEDULES
- EDITING OR DELETING SCHEDULES
- MAXRANGER4K
- PAIRING ADDITIONAL CAMERAS
- DETECTION SETTINGS
- MOTION DETECTION MASK
- UPDATING YOUR SWANN SECURITY ACCOUNT PROFILE
- CHANGING THE CAMERA'S WI-FI NETWORK
- FACTORY RESETTING THE CAMERA
- METHOD A - VIA ADVANCED SETTINGS (IF CAMERA STATUS IS ONLINE)
- METHOD B - VIA PHYSICAL RESET BUTTON (IF CAMERA STATUS IS OFFLINE)
- FINDING YOUR CCTV SYSTEM PASSWORD
- I HAVE FORGOTTEN MY SWANN SECURITY ACCOUNT PASSWORD. HOW DO I RESET IT
- CAN I ACCESS MY DEVICE WITH ANOTHER PHONE
- CAN I REGISTER MY DEVICE TO ANOTHER SWANN SECURITY ACCOUNT
- HOW DO I FIND MY DEVICE'S ID
- WHY AM I NOT RECEIVING PUSH NOTIFICATIONS
- WILL I BE ABLE TO STREAM LIVE VIDEO IF I'M TRAVELLING OVERSEAS
- WHY IS LIVE VIDEO SLOW TO LOAD
- WHY IS THE VIDEO EVENT HISTORY NOT LOADING IN THE PLAYBACK TAB
- I CANNOT CONNECT THE CAMERA TO MY WI-FI NETWORK. HOW DO I FIX THIS
- CAN I USE MY CAMERA WITHOUT AN INTERNET CONNECTION
- WHY IS MY CAMERA OFFLINE
- WHY AM I GETTING FALSE MOTION ALERTS
- CAN MY CAMERA STILL RECORD EVENTS IF MY INTERNET CONNECTION GOES DOWN
- IF I SET MY CAMERA'S LIVE VIEW QUALITY TO LOW, WILL IT ALSO AFFECT THE VIDEO QUALITY OF EVENT CLIPS
- (FOR BATTERY-POWERED CAMERAS) WHAT CAN I DO TO MAXIMIZE THE BATTERY PERFORMANCE ON MY CAMERA
- (FOR WI-FI CAMERA MODELS WITH CLOUD STORAGE) HOW FAR BACK CAN I ACCESS MY CAMERA'S CLOUD RECORDINGS
- CAN I DISABLE THE SIREN SO IT DOESN'T SOUND WHEN MY CAMERA IS TRIGGERED
- HOW LONG IS A CAMERA EVENT CLIP
- HOW LONG DOES IT TAKE FOR CAMERA RECORDINGS TO APPEAR ON THE PLAYBACK TAB
- WHY DOESN'T THE CAMERA EVENT CLIP HAVE SOUND
- (FOR DEVICES WITH LOCAL MICROSD CARD STORAGE FEATURE) CAN MY CAMERA RECORD EVENTS WITHOUT A MICROSD CARD INSTALLED
- (FOR DEVICES WITH LOCAL MICROSD CARD STORAGE FEATURE) WHY HAS MY CAMERA STOPPED RECORDING EVENTS
- (FOR DEVICES WITH LOCAL MICROSD CARD STORAGE FEATURE) WHAT IS THE MAXIMUM MICROSD CARD SIZE THAT CAN BE USED
- CONNECTION FAILED
- 4K FLOODLIGHT SECURITY CAMERA
- FAILED TO ESTABLISH INITIAL CONNECTION
- FROM THE APP MENU, TAP SUPPORT
- CHOOSE FROM ONE OF THE FOLLOWING OPTIONS
Brand : SWANN
Model : SWNVK-889806
Category : Surveillance Camera