
Dragon 4 Pro TRDX40615E.G - Heating DELONGHI - Free user manual and instructions
Find the device manual for free Dragon 4 Pro TRDX40615E.G DELONGHI in PDF.
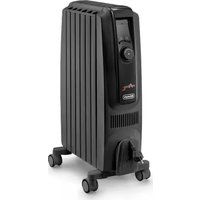


| Product Type | Oil-filled radiator |
| Model | Dragon 4 Pro TRDX40615E.G |
| Brand | DeLonghi |
| Dimensions (HxWxD) | 850 x 200 x 500 mm |
| Weight | 16 kg |
| Power Supply | 230V ~ 50Hz |
| Power Output | 1500W |
| Heating Elements | 15 |
| Thermostat | Adjustable |
| Power Settings | 3 (min, med, max) |
| Freeze Protection | Yes |
| Noise Level | Silent operation |
| Maintenance | Wipe with damp cloth |
| Safety Features | Thermal cut-off, tip-over switch |
| Spare Parts Availability | Contact DeLonghi service center |
| Reparability Index | Above average |
| Energy Efficiency Class | A |
Frequently Asked Questions - Dragon 4 Pro TRDX40615E.G DELONGHI
User questions about Dragon 4 Pro TRDX40615E.G DELONGHI
0 question about this device. Answer the ones you know or ask your own.
Ask a new question about this device
Download the instructions for your Heating in PDF format for free! Find your manual Dragon 4 Pro TRDX40615E.G - DELONGHI and take your electronic device back in hand. On this page are published all the documents necessary for the use of your device. Dragon 4 Pro TRDX40615E.G by DELONGHI.
USER MANUAL Dragon 4 Pro TRDX40615E.G DELONGHI
Proudly distributed by
De'Longhi Australia Pty Limited
P.O. BOX 4540
CASULA MALL NSW 2170
Customer Service Ph: 1800 126 659
Fax: 1800 706932
www.delonghi.com.au
e-mail: info.au@delonghigroup.com
De'Longhi New Zealand Limited
99 Khyber Pass Road
Grafton 1023
Auckland, New Zealand
P.O. Box 58-056 Botany
MANUKAU 2163
Customer Service Ph: 0508 200 300
Fax: 0508 200 301
www.delonghi.co.nz
e-mail: info.nz@delonghigroup.com
Register Now
www.delonghi.com/register

OIL FILLED RADIATOR



Danger!
Failure to observe the warning may result in life threatening injury by electric shock.
- Do not use this heater in the immediate surroundings of a bath, a shower or a swimming pool;
- Never use the heater to dry laundry.
- If the power cable has been damaged, it must be replaced by the manufacturer or the technical service centre or by a qualified person so as to avoid all risks.

Important!
Failure to observe the warning could result in injury or damage to the appliance.
- This appliance can be used by children aged from 8 years and above and persons with reduced physical, sensory or mental capabilities or lack of experience and knowledge if they have been given supervision or instruction concerning use of the appliance in a safe way and understand the hazards involved.
Children shall not play with the appliance. Cleaning and user maintenance shall not be made by children without supervision.
- Children of less than 3 years should be kept away unless continuously supervised.
- Children aged from 3 years and less than 8 years shall only switch on/off the appliance provided that it has been placed or installed in its intended normal operating position and they have been given supervision or instruction concerning use of the appliance in a safe way and understand the hazards involved. Children aged from 3 years and less than 8 years shall not plug in, regulate and clean the
appliance or perform user maintenance.
CAUTION — Some parts of this product can become very hot and cause burns. Particular attention has to be given where children and vulnerable people are present.
- WARNING: Do not use this heater in small rooms when they are occupied by persons not capable of leaving the room on their own, unless constant supervision is provided.
- The body of this radiator is filled with a precise quantity of special oil, so that repairs requiring the opening of the oil body must only be made by the service agent. Any oil leakage must be reported to the Customer Experience, see enclosed guarantee for details.
- When scrapping the heater, follow the regulations concerning the disposal of oil.
- The appliance must not be located immediately below a fixed socket-outlet.
- CAUTION: in order to avoid any danger caused by an accidental resetting of the safety system, this appliance must not be powered through an external timer.
- Do not obstruct the air intake and outlet area (danger of overheating).

Danger of burns!!
Failure to observe the warning could result in burns or scalds.
- WARNING: In order to avoid overheating, never under any circumstances cover the appliances during operation, as this would I dangerous overheating.
- The use of an extension lead is not recommended, as overheating of the extension lead may occur during the operation of the heater.

- Never place the power cable on top of the heater while it is hot.
- Do not rest anything on the appliance.
- WARNING: To reduce the risk of fire, keep textiles, curtains, or any other flammable material a minimum distance of 1 m from the air outlet.

Please note:
This symbol indicates recommendations and important information for the user.
- We recommend that you not place the heater in a draught, because strong draughts of air may adversely affect the equipment's operational efficiency.
- Only use this heater on a horizontal and stable surface.
- Always use the appliance in an upright position.
- Do not use this heater if it has been dropped.
- Do not use if there are visible signs of damage to the heater.
- In order to eliminate the radiator's "new" smell, set it to maximum power for at least two hours when used for the first time. During this operation, the room in which the radiator is located must be ventilated. A little smoke due to the protective substances applied to the heating element before transport may be given off.
- Position the appliance so that the plug and the outlet can be easily reached.
- Do not use the appliance in rooms less than 4 m2 in area.
- The appliance is fitted with a safety device which will switch off it in case of accidental overheating.
To reset, please contact Customer Experience, see enclosed guarantee.
- Before putting the appliance away, make sure it is completely cooled and unplugged from the mains socket.
Do not store in dusty atmospheres.
- The appliance must not be hung.
Fundamental safety warnings
Dear customer - the plug on the appliance heats up during use. This is completely normal. This HIGH POWER HEATING APPLIANCE complies with our usual high standards. You should, however, make sure that your power socket is in good condition and that the plug on the appliance is plugged into the socket correctly to avoid accidental overheating. If the appliance is used for long periods of time, we recommend checking the plug and mains socket regularly. If in doubt, consult an electrician.
For non-EU countries only:
This appliance is not intended for use by persons (including children) with reduced physical, sensory or mental capabilities, or lack of experience and knowledge, unless they have been given supervision or instruction concerning use of the appliance by a person responsible for their safety.
Children should be supervised to ensure that they do not play with the appliance.
DESCRIPTION
A ON/STAND-BY button
B timer button
C control dial/dial button
D display
E wheel
F cord holder
| Symbols shown on the unit's display |
| key-lock |
| power supply |
| 88:88 temperature/clock |
| ECO selected power levels |
| ECO working power levels |
| Anti-frost symbol |
| timer function |
| (green) Temperature 1 (T1) indicator |
| (red) Temperature 2 (T2) indicator |
FIRST USE
"Easy wheel" system
Turn the radiator upside down on a rug or a soft surface in order to prevent damaging the paint finish.
Fully unfold the wheels by turning them outwards (Fig. 1). Turn the radiator back to its upright position.


Important! Wait a minute before turning on the one so the oil returns to the normal level.
The radiator must never and for any reason be overturned when it is in operation.
Location
The heater must not be placed immediately below a power outlet. Do not use this radiator in rooms having a surface area of less than 43 square feet (4 sq.m.).
Power connection
Before using the appliance check that your supply voltage is the same of that shown on the rating label of the unit and that the power socket and power supply line correspond to the load specified. After plugged in the appliance will shows the symbol in red colour.
Setting the time
When using for the first time or after it has been unplugged for a long time, you need to set the current time:
- Plug the appliance into the mains. The display will show 00 blinking.
- Turn the control dial to select the current hour.
- When the correct hour is set, press the dial and the minutes digits will blink.
- Turn the control dial to set the minutes then press the dial to confirm.
Example of display:
![graph TD A["① 00:00"] --> B["② 10:00"] B --> C["③ 10:00"] C --> D["④ 10:15"]](/content/2026/07/1490958/images/1a26d8501304fbab1b95dd4fa1f60716cb2eceac92d4394ad270ab741e2aa691.jpg)
Changing the time
If you need to reset the time, in manual operation mode press the control dial for 5 seconds, then proceed as explained above. After setting the clock, the unit will return in manual operation mode.
Turn the appliance on pressing the button (!)
The unit will start operating in manual operation mode with the following default settings:
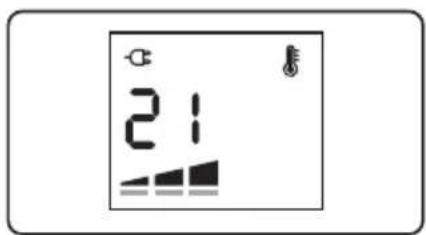
Setting the temperature
To modify the temperature set point, turn the dial clockwise to increase and anticlockwise to decrease the temperature.
Temperature settings available are 5°C, and 10°C through to 28°C. Setting to 5°C turns the unit to the antifrost function. (see Antifrost function at page 6).
Selected power levels and working power levels
There are 3 power levels (min/med/max) as well as ECO mode.
![graph LR A["min"] --> B["med max max + eco"] B --> C["eco"]](/content/2026/07/1490958/images/2ff82c8ce4cd05337471f87d1295fd9ca337622c4c65517799b0ed5f5cdac2b7.jpg)
Depending on the selected power level, the working power level may be less or equal to the selected power level.
The working heating power is always shown by the unit's display by means of the thin bars below the selected power level.

Selected power level
Working power level
- If the current room temperature is much lower than the selected temperature, the appliance will start to heat the room as rapidly as possible at the selected power level.
- If the current room temperature is close to the selected temperature, the appliance will heat the room using a heating power lower than the selected power level.
- When the selected temperature is reached, the unit stops heating.
Example: Operation is started at room temperature 18° C, the set temperature is 25° C, and the selected power level is Max.
Example of display:
![graph TD A["Room temperature 18°"] --> B["Working power level: Max"] C["Room temperature 22°"] --> D["Working power level: Med"] E["Room temperature 24°"] --> F["Working power level: Min"] G["Room temperature 25°"] --> H["The room temperature is reached the appliance stops heating"]](/content/2026/07/1490958/images/0436d5221de26a48a467997f32014835eccfc2d199deadc67f901957fba67ae4.jpg)
Setting the power level
- Press the dial twice during heating operation.
- The power level will blink.
- Choose one of the available power levels by turning the dial.
- Press the dial once to confirm.
Example of display:
![graph TD A["1: 25°C"] --> B["2: 25°C"] B --> C["3: 25°C eco"] C --> D["4: 25°C eco"]](/content/2026/07/1490958/images/675c4b3f5b9728b69ed4ee6458d789e26496ccb59baf15f75a605a2a86801676.jpg)
Eco mode _ eco
When the eco mode is activated, the unit will automatically select the most convenient working power level from Max to Min, and will also control the set temperature in order to achieve energy saving while guaranteeing optimum comfort.
Anti-frost function
This function is useful to prevent freezing.
To activate this function, in manual operation when temperature is set to 10° C turn the dial anticlockwise till the set point 5 is displayed and a *will appear.

In this operation mode the working power can not be set.
The appliance will automatically set to Max power level.
If you turn the dial clockwise, you will restore the same power setting as before being switched to anti-frost.
In Timer operation mode the unit works according to a pre-set daily timer program that can be altered to suit your needs.
Turn on the unit by pressing the button and then press the button to activate the timer operation mode.
The symbol ⓦ will appear on the display together with the pre-set temperature and power level assigned to the current time interval.

Daily Timer program
The daily timer program consists of a 24 hour timeline that can be divided into 96 time intervals of 15 minutes each. It is possible to associate one of the 2 timer temperature settings to each time interval, T1 or T2. The time intervals and the temperatures T1 and T2 can be changed to suit your needs.
Pre-set daily timer program
The default pre-set daily timer program is the following:
T1=21°C
● T2= heating off

How to change the daily timer temperatures
It is possible to change the temperature settings for T1 and T2 to better suit your needs. T1 is associated to Green light (●) and can be set at any temperature from 10 to 28°C; T2 is associated to Red light (●) and can be set from off to anti-frost 5° or to any temperature from 10° to less than T1.

To change the timer temperature setting, from manual operation mode:
- Press the control dial.
- The power level will blink.
- Turn the dial till you see the clock icon blinking and press the dial.
- A green light will appear on the display blinking. Turn the dial to choose between green light (T1) or red light (T2) and press to confirm.
- The temperature digits will blink. Turn the dial to adjust the temperature according to your needs and press the dial to confirm.
- The unit will exit the menu and the display will show the manual operation settings.
Example of display:
![graph TD A["1: 21h"] --> B["2: Light"] B --> C["3: Weather icon with sun, moon, moonlight"] C --> D["4: Weather icon with sun, moon, moonlight"] D --> E["5: Hourlight icon with light, moon, moonlight"] E --> F["6: Night light icon with moon, moon, moonlight"]](/content/2026/07/1490958/images/e534537084ac9e7adf8657639c8108dab5f18ee30d97514437243a50c06c1b3e.jpg)
Note: Follow same 6 steps above to set the other daily timer temperature not previously set.
How to change the daily timer program
- To change the pre-set daily timer program the unit must be turned into stand-by mode.
Press the Timer button for approx. 5 seconds.
- The unit will emit a beep and 00.00 and the blinking green light symbol will be displayed.
Turn the dial to select the Temperature T1=green light, or T2=red light, that you would like to have in the room at 00:00 hours and press the dial to confirm.
- The time digits will start blinking to enable setting the
length of the time interval.
- Turn the dial clockwise till you reach the desired ending time for this program interval.
You will be able to choose any time intervals of minutes.
- Press the dial to confirm the end of the time interval, and the temperature light will start blinking to enable you to set the next program interval.
Set the desired program intervals along the 24 hours till 23:45 to complete the daily timer program following the same procedure described from points 3 to 5.
Example of display:
![graph TD A["① 09:30"] --> B["② 00:00"] B --> C["③ 00:00"] C --> D["④ 06:15"] D --> E["⑤ 06:15"]](/content/2026/07/1490958/images/106bcee7cb7c70abb808e43f8c904c4831cd5b4d7c9308a7ab691735c6fa5e45.jpg)
How to display the daily timer program
You may need to check the settings of the daily timer program.
-
From timer operation mode, press the timer button for approx. 5 seconds.
-
The display will show 00:00, the temperature indicator light (T1=green or T2=red) and the clock icon blinking.
-
Turn the dial clockwise to display the daily timer program from 00:00 till 23:45.
-
Press the dial to exit.
Example of display:
![graph TD A["1: 21"] --> B["2: 00:00"] B --> C["3: 23:45"] C --> D["4: 21"]](/content/2026/07/1490958/images/f7b20f39affabae8fd724ef153d4a4966353c94198426144e4ad27e6fef530e4.jpg)
Power level setting in timer operation mode
In timer operation mode, the unit works by default at max power level. It is possible to change the power level as follows:
-
In timer operation mode, press the control dial and the power level icon will blink.
-
Turn the dial to choose between min / med / max / max- +eco.
-
Press the dial to confirm.
Example of display:
![graph TD A["Step 1: 21°C"] --> B["Step 2: min med max max + eco"] B --> C["Step 3: 21°C + eco"]](/content/2026/07/1490958/images/5207cf24362843359bd5cbd47c706792e35eeaf8749683219d07216ecf0fca77.jpg)
i Please note: If a procedure to modify or monitor the unit settings is interrupted and no button is pressed for two minutes, the settings shown on the display will not be maintained and the appliance will go back to the settings previously displayed.
EXTRA FUNCTIONS
Key-lock
To prevent accidental button activation, it is possible to lock the keys. To activate this function press the timer button and the control dial together for at least 3 seconds. The display shows the symbol and an acoustic signal will be emitted.
When the appliance is ON and the key lock is activated:
- buttons and dial are blocked
- pressing the ON/STAND-BY button 1 time: the unit comes on in stand by, and the appliance remains in stand-by even if the ON/STAND-BY button is pressed again.
- to turn the appliance on again it will be necessary to unlock the key lock.
When the appliance is OFF and the key lock is activated:
- all buttons and dial are blocked
- it's not possible turn on the appliance
To deactivate the function press the timer button and control dial together, for at least 3 seconds.
Display brightness regulation
After a few seconds of inactivity the display brightness is automatically reduced. The brightness level during inactivity can be adjusted to the desired level choosing from 3 levels available. When the appliance is in stand-by press and hold the control dial for about 5 seconds, the current level of brightness appears.
Turn the dial till the desired brightness is reached, then press the dial to confirm.

Buzzer sound on/off
When the appliance is in stand-by press the control dial for about 5 seconds, the current level of brightness appears: press the timer button and turn the dial to modify the status of the buzzer from On (● green) to Off (● red) and viceversa.
Press the dial to confirm.


Please note: only for ON/STAND-BY button the sound ns active.
Memory
After an interruption to the power supply, when the power returns, the appliance will resume in stand-by mode. When the unit is switched on again by pressing the on-standby button, the operating conditions will be same as previously set in manual operation mode.
Alarms
The appliance has a diagnostic system that makes it possible to signal malfunctions. In case of problems, the display will show an alarm message with a red square light:
- (Probe failure 1) + beep
Ambient temperature probe failure. Please contact De'Longhi Customer Service.
- (Probe failure 2) + beep
Probe failure internal security. Please contact De'Longhi Customer Service.
- (High temperature)
When the product internal temperature is too high, the heating element will automatically be turned off. The display shows for two seconds, cycling. To remove the cause of this alarm check that the unit is not covered.
- (Tip over safety device)
A tip over safety device turns the appliance off if it falls over or is positioned inappropriately in such a way as to jeopardise safety.
The appliance emits a beep and a TOS on the display.
The appliance resumes operation a few seconds after being placed in an upright position again in stand-by mode.
MAINTENANCE
Always remove the plug from the power outlet and allow the radiator to cool. Wipe radiator with a soft damp cloth, do not use detergents and abrasives. Should the radiator not be in use over a certain length of time, wind the cord around the cord holder and store it in a dry place. This appliance has been built to give many years of trouble free service. In case of malfunction or doubt, do not try to repair the heater by yourself: this may result in a fire hazard or electric shock. Call De'Longhi Customer Service (see attached list of De'Longhi Customer Service).
TECHNICAL CHARACTERISTICS
Supply voltage
See rating plate
Absorbed power
it
TROUBLESHOOTING
| PROBLEM CAUSE SOLUTION | ||
| The display doesn't work Be sure it is plugged in and that the electrical outlet is workingThe safety device may have switched off the appliance | Plug into the power outletRemove the obstruction and let the appliance cool down. If the appliance doesn't work please contact De'Longhi Customer Service | |
| The appliance doesn't warm up The temperature may be set too low | Set the temperature to a higher value | |
| The display shows: PF-unit off (Probe failure 1) | It indicates that the room temperature sensor has failed | Please contact De'Longhi Customer Service |
| The display shows: PF-unit off (Probe failure 2) | It indicates that the probe of the internal safety of the device has failed | Please contact De'Longhi Customer Service |
| The display shows: Ht (High temperature) | The unit has reached a too high internal temperature | Check that the unit is not covered and let the appliance cool down. When the product internal temperature decreases, the alarm will disappear.If the appliance doesn't work please contact De'Longhi Customer Service |
| The display shows: Land unit is off | The tip-over switch has been activated | Make sure the appliance is standing upright on a flat surface. If the appliance doesn't work please contact De'Longhi Customer Service |
- DE'LONGHI AUSTRALIA PTY LIMITED
- DE'LONGHI NEW ZEALAND LIMITED
- DANGER
- IMPORTANT
- CAUTION — SOME PARTS OF THIS PRODUCT CAN BECOME VERY HOT AND CAUSE BURNS. PARTICULAR ATTENTION HAS TO BE GIVEN WHERE CHILDREN AND VULNERABLE PEOPLE ARE PRESENT
- DANGER OF BURNS
- PLEASE NOTE
- FUNDAMENTAL SAFETY WARNINGS
- DESCRIPTION
- FIRST USE
- EASY WHEEL" SYSTEM
- LOCATION
- POWER CONNECTION
- SETTING THE TIME
- CHANGING THE TIME
- SETTING THE TEMPERATURE
- SELECTED POWER LEVELS AND WORKING POWER LEVELS
- SETTING THE POWER LEVEL
- ECO MODE _ ECO
- ANTI-FROST FUNCTION
- DAILY TIMER PROGRAM
- PRE-SET DAILY TIMER PROGRAM
- HOW TO CHANGE THE DAILY TIMER TEMPERATURES
- HOW TO CHANGE THE DAILY TIMER PROGRAM
- HOW TO DISPLAY THE DAILY TIMER PROGRAM
- POWER LEVEL SETTING IN TIMER OPERATION MODE
- EXTRA FUNCTIONS
- KEY-LOCK
- DISPLAY BRIGHTNESS REGULATION
- BUZZER SOUND ON/OFF
- MEMORY
- ALARMS
- MAINTENANCE
- TECHNICAL CHARACTERISTICS
Brand : DELONGHI
Model : Dragon 4 Pro TRDX40615E.G
Category : Heating