HY20CPHT - Hedge Trimmers HYUNDAI - Free user manual and instructions
Find the device manual for free HY20CPHT HYUNDAI in PDF.


| Product Type | Hedge Trimmer |
| Brand | Hyundai |
| Model | HY20CPHT |
| Power Source | Petrol (2-stroke engine) |
| Engine Displacement | 20 cc |
| Blade Length | 55 cm (approx.) |
| Cutting Capacity | Up to 23 mm branch thickness |
| Weight | 5.0 kg (approx.) |
| Idle Speed | 3000 rpm |
| Max. Engine Speed | 9000 rpm |
| Fuel Tank Capacity | 0.5 L |
| Noise Level (LpA) | 95 dB(A) (approx.) |
| Vibration Level (ah) | 8.0 m/s² (approx.) |
| Safety Features | Two-hand operation, blade guard, anti-vibration system |
| Maintenance | Clean air filter, sharpen blades, check spark plug |
| Warranty | 2 years (standard) |
Frequently Asked Questions - HY20CPHT HYUNDAI
User questions about HY20CPHT HYUNDAI
0 question about this device. Answer the ones you know or ask your own.
Ask a new question about this device
Download the instructions for your Hedge Trimmers in PDF format for free! Find your manual HY20CPHT - HYUNDAI and take your electronic device back in hand. On this page are published all the documents necessary for the use of your device. HY20CPHT by HYUNDAI.
USER MANUAL HY20CPHT HYUNDAI
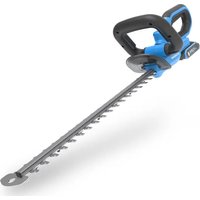
CORDLESS POLE HEDGE TRIMMER HY20CPHT
INSTRUCTION MANUAL

GENYINE PRODUCT OF HYUNDAI CORPORATION


CE
Contents
Introduction....3
Safety Information....4
Unboxing....15
In The Box....16
Features....17
Assembly....19
Operation....25
Maintenance & Care....28
Technical Data....30
Recycling & Disposal....31
EU Declaration Of Conformity....33
Notes......34
Useful Information....35
Product Record....36
Contact Us....37
Introduction
Thank You For Purchasing Your HYUNDAI Product
We work very hard to give all of our customers the best possible service. If you have any problems, before leaving negative feedback, please contact us to give us a chance to resolve the issue. We would be delighted if you left us positive feedback! Thank you for purchasing this product.

Important!

WARNING: READ THE INSTRUCTION BOOKLET THOROUGHLY BEFORE USING THE MACHINE. Keep for future reference and pass it on if the machine is loaned or sold to another user.
This manual has been produced by Hyundai Power Products and should be kept with the product. Please read and understand these instructions before you use your product. Failure to do this may result in personal injury or damage to the product.
The safety precautions and warnings are to ensure your safety and protect you from harm or damage to the product.
The information contained in this manual was accurate at the time of production, however HYUNDAI Power Products may make modifications to the product without notification.
Safety Information
General Power Tool Safety Warnings
WARNING: Read all safety warnings, instructions, illustrations and specifications provided with this power tool. Failure to follow all instructions listed below may result in electric shock, fire and/or serious injury.
Save all warnings and instructions for future reference.
The term "power tool" in the warnings refers to your mains-operated (corded) power tool or battery-operated (cordless) power tool.
Work Area Safety
a) Keep work area clean and well lit. Cluttered or dark areas invite accidents.
b) Do not operate power tools in explosive atmospheres, such as in the presence of flammable liquids, gases or dust. Power tools create sparks which may ignite the dust or fumes.
c) Keep children and bystanders away while operating a power tool. Distractions can cause you to lose control.
Electrical Safety (When Using the Charger)
a) Power tool plugs must match the outlet. Never modify the plug in any way. Do not use any adapter plugs with earthed (grounded) power tools. Unmodified plugs and matching outlets will reduce risk of electric shock.
b) Avoid body contact with earthed or grounded surfaces, such as pipes, radiators, ranges and refrigerators. There is an increased risk of electric shock if your body is earthed or grounded.
c) Do not expose power tools to rain or wet conditions. Water entering a power tool will increase the risk of electric shock.
d) Do not abuse the cord. Never use the cord for carrying, pulling or unplugging the power tool. Keep cord away from heat, oil, sharp edges or moving parts. Damaged or entangled cords increase the risk of electric shock.
e) When operating a power tool outdoors, use an extension cord suitable for outdoor use. Use of a cord suitable for outdoor use reduces the risk of electric shock.
f) If operating a power tool in a damp location is unavoidable, use a residual current device (RCD) protected supply. Use of an RCD reduces the risk of electric shock.
Safety Information
Personal Safety
a) Stay alert, watch what you are doing and use common sense when operating a power tool. Do not use a power tool while you are tired or under the influence of drugs, alcohol or medication. A moment of inattention while operating power tools may result in serious personal injury.
b) Use personal protective equipment. Always wear eye protection. Protective equipment such as a dust mask, non-skid safety shoes, hard hat, or hearing protection used for appropriate conditions will reduce personal injuries.
c) Prevent unintentional starting. Ensure the switch is in the off-position before connecting to power source and/or battery pack, picking up or carrying the tool. Carrying power tools with your finger on the switch or energising power tools that have the switch on invites accidents.
d) Remove any adjusting key or wrench before turning the power tool on. A wrench or a key left attached to a rotating part of the power tool may result in personal injury.
e) Do not overreach. Keep proper footing and balance at all times. This enables better control of the power tool in unexpected situations.
f) Dress properly. Do not wear loose clothing or jewellery. Keep your hair and clothing away from moving parts. Loose clothes, jewellery or long hair can be caught in moving parts.
g) If devices are provided for the connection of dust extraction and collection facilities, ensure these are connected and properly used. Use of dust collection can reduce dust-related hazards.
h) Do not let familiarity gained from frequent use of tools allow you to become complacent and ignore tool safety principles. A careless action can cause severe injury within a fraction of a second.
Power Tool Use and Care
a) Do not force the power tool. Use the correct power tool for your application. The correct power tool will be more effective and safer at the rate for which it was designed.
b) Do not use the power tool if the switch does not turn it on and off. Any power tool that cannot be controlled with the switch is dangerous and must be repaired.
c) Disconnect the plug from the power source and/or remove the battery pack, if detachable, from the power tool before making any adjustments, changing accessories, or storing power tools. Such preventive safety
Safety Information
measures reduce the risk of starting the power tool accidentally.
d) Store idle power tools out of the reach of children and do not allow persons unfamiliar with the power tool or these instructions to operate the power tool. Power tools are dangerous in the hands of untrained users.
e) Maintain power tools and accessories. Check for misalignment or binding of moving parts, breakage of parts and any other condition that may affect the power tool's operation. If damaged, have the power tool repaired before use. Many accidents are caused by poorly maintained power tools.
f) Keep cutting tools sharp and clean. Properly maintained cutting tools with sharp cutting edges are less likely to bind and are easier to control.
g) Use the power tool, accessories and tool bits etc. in accordance with these instructions, taking into account the working conditions and the work to be performed. Use of the power tool for operations different from those intended could result in a hazardous situation.
h) Keep handles and grasping surfaces dry, clean and free from oil and grease. Slippery handles and grasping surfaces do not allow for safe handling and control of the tool in unexpected situations.
⚠️ Battery Tool Use and Care
a) Recharge only with the charger specified by the manufacturer. A charger that is suitable for one type of battery pack may create a risk of fire when used with another battery pack.
b) Use power tools only with specifically designated battery packs. Use of any other battery packs may create a risk of injury and fire.
c) When battery pack is not in use, keep it away from other metal objects, like paper clips, coins, keys, nails, screws or other small metal objects, that can make a connection from one terminal to another. Shorting the battery terminals together may cause burns or a fire.
d) Under abusive conditions, liquid may be ejected from the battery; avoid contact. If contact accidentally occurs, flush with water. If liquid contacts eyes, additionally seek medical help. Liquid ejected from the battery may cause irritation or burns.
e) Do not use a battery pack or tool that is damaged or modified. Damaged or modified batteries may exhibit unpredictable behaviour resulting in fire, explosion or risk of injury.
f) Do not expose a battery pack or tool to fire or excessive temperature. Exposure to fire or temperature above 130 °C may cause explosion.
g) Follow all charging instructions and do not charge the battery pack or
Safety Information
tool outside the temperature range specified in the instructions. Charging improperly or at temperatures outside the specified range may damage the battery and increase the risk of fire.

Service
a) Have your power tool serviced by a qualified repair person using only identical replacement parts. This will ensure that the safety of the power tool is maintained.
b) Never service damaged battery packs. Service of battery packs should only be performed by the manufacturer or authorised service providers.

Hedge Trimmer Safety Warnings (With Charger)
a) Do not use the hedge trimmer in bad weather conditions, especially when there is a risk of lightning. This decreases the risk of being struck by lightning.
b) Keep all power cords and cables away from cutting area. Power cords or cables may be hidden in hedges or bushes and can be accidentally cut by the blade.
c) Wear ear protection. Adequate protective equipment will reduce the risk of hearing loss.
d) Hold the hedge trimmer by insulated gripping surfaces only, because the blade may contact hidden wiring. Blades contacting a "live" wire may make exposed metal parts of the hedge trimmer "live" and could give the operator an electric shock.
e) Keep all parts of the body away from the blade. Do not remove cut material or hold material to be cut when blades are moving. Blades continue to move after the switch is turned off. A moment of inattention while operating the hedge trimmer may result in serious personal injury.
f) When clearing jammed material or servicing the hedge trimmer, make sure all power switches are off and the battery pack is removed or disconnected. Unexpected actuation of the hedge trimmer while clearing jammed material or servicing may result in serious personal injury.
g) Carry the hedge trimmer by the handle with the blade stopped and taking care not to operate any power switch. Proper carrying of the hedge trimmer will decrease the risk of inadvertent starting and resultant personal injury from the blades.
h) When transporting or storing the hedge trimmer, always use the blade
Safety Information
cover. Proper handling of the hedge trimmer will decrease the risk of personal injury from the blades.
i) Check the hedges and bushes for foreign objects, e.g. wire fences and hidden wiring.
j) Hold the hedge trimmer properly, e.g. with both hands if two handles are provided.
k) The hedge trimmer is intended to be used by the operator at ground level and not on ladders or any other unstable support.
I) Before operating the hedge trimmer, the user should make sure the locking device(s) of any moving elements (e.g. the extended shaft and pivoting element), if any, are in the locked position.
▲ Extended-reach Hedge Trimmer Safety Warnings
a) Always use head protection when operating the extended-reach hedge trimmer overhead. Falling debris can result in serious personal injury.
b) Always use two hands when operating the extended-reach hedge trimmer. Hold the extended-reach hedge trimmer with both hands to avoid loss of control.
c) To reduce the risk of electrocution, never use the extended-reach hedge trimmer near any electrical power lines. Contact with or use near power lines may cause serious injury or electric shock resulting in death.
Safety Warnings for Lithium Battery Pack
WARNING: DO NOT use these batteries if they become damaged, swollen or hot during charging or use.
WARNING: DO NOT charge these batteries overnight when unattended.
a) Do not dismantle, open or shred cells or battery pack.
b) Do not short-circuit a battery pack. Do not store battery packs haphazardly in a box or drawer where they may short-circuit each other or be short-circuited by conductive materials. When battery pack is not in use, keep it away from other metal objects, like paper clips, coins, keys, nails, screws or other small metal objects, that can make a connection from one terminal to another. Shorting the battery terminals together may cause burns or a fire.
c) Do not expose battery pack to heat or fire. Avoid storage in direct sunlight.
d) Do not subject battery pack to mechanical shock.
Safety Information
e) In the event of battery leaking, do not allow the liquid to come into contact with the skin or eyes. If contact has been made, wash the affected area with copious amounts of water and seek medical advice.
f) Keep battery pack clean and dry.
h) Wipe the battery pack terminals with a clean dry cloth if they become dirty.
g) Battery pack needs to be charged before use. Always refer to this instruction and use the correct charging procedure.
h) Do not maintain battery pack on charge when not in use.
i) After extended periods of storage, it may be necessary to charge and discharge the battery pack several times to obtain maximum performance.
j) Recharge only with the charger specified by Hyundai. Do not use any charger other than that specifically provided for use with the equipment.
k) Do not use any battery pack which is not designed for use with the equipment.
I) Keep battery pack out of the reach of children.
m) Retain the original product literature for future reference.
n) Remove the battery from the equipment when not in use.
o) Dispose of properly.
p) Do not mix cells of different manufacturer, capacity, size or type within a device.
q) Keep the battery away from microwaves and high pressure.
r) Warning! Do not use non-rechargeable batteries.
SAFETY WARNINGS FOR CHARGER
⚠ WARNING! Read all safety warnings and all instructions. Failure to follow all instructions listed below may result in electric shock, fire and/or serious injury.
Save all warnings and instructions for future reference.
WARNING! Never allow children or people unfamiliar with these instructions to use the product. Local regulations can restrict the minimum age of the operator.
Keep children, pets, and other people not using the unit a sensible distance away from the work area. Be alert and shut off the unit if anyone enters work area. Keep children under the watchful care of a responsible adult.
If the supply cord is damaged, it must be replaced by the manufacturer, its service agent or similarly qualified persons in order to avoid a hazard.
Safety Information
a) Before charging, read the instructions.
b) Do not charge a leaking battery.
c) Do not use chargers for works other than those for which they are designed.
d) Before charging, ensure your charger is matching the local AC supply.
e) For indoor use, or do not expose to rain.
f) The charging device must be protected from moisture.
g) Do not use the charging device outdoors.
h) Do not short out the contacts of battery or charger.
i) Respect the polarity “+/-” when charging.
j) Do not open the unit and keep it out of the reach of children.
k) Do not charge the batteries of other manufactures or ill-suited models.
I) Ensure that the connection between the battery charger and battery is correctly positioned and is not obstructed by foreign bodies.
m) Keep battery charger's slots free of foreign objects and protect against dirt and humidity. Store in a dry and frost-free place.
n) When charging batteries, ensure that the battery charger is in a well-ventilated area and away from inflammable materials. Batteries can get hot during charging. Do not overcharge any batteries. Ensure that batteries and chargers are not left unsupervised during charging.
o) Do not recharge non-rechargeable batteries, as they can overheat and break.
p) Longer life and better performance can be obtained if the battery pack is charged when the air temperature is between 18° C and 24° C. Do not charge the battery pack in air temperatures below 0° C, or above 40° C. This is important as it can prevent serious damage to the battery pack.
q) Charge only battery pack of the same model provided by manufacturer and of models recommended by manufacturer.

Noise & Vibrations (Where Applicable)
The declared vibration total value and the declared noise emission value have been measured in accordance with a standard test method and may be used for comparing one tool with another.
The declared vibration total value and the declared noise emission value may also be used in a preliminary assessment of exposure.
⚠ WARNING: The vibration and noise emissions during actual use of the power tool can differ from the declared value depending on the ways in which the tool is used especially. Please consider the following the
Safety Information
factors:
- How the tool is used and the materials being cut.
- The tool being in good condition and well maintained.
- The use of the correct accessory for the tool and ensuring it is sharp and in good condition.
- The tightness of the grip on the handles and if any anti vibration and noise accessories are used.
- The tool is being used as intended by its design and these instructions.
This tool may cause hand-arm vibration syndrome if its use is not adequately managed.
⚠ WARNING: For an accurate estimation of exposure level during normal working conditions, please consider all parts of the operating cycle such when the tool is switched off or running idle. This may significantly reduce the exposure level over the total working period.
Best practices to minimise your exposure:
• Always use sharp chisels, drills and blades (where applicable).
- Maintain this tool in accordance with these instructions and keep well lubricated (where applicable).
- If the tool is to be used regularly then invest in anti vibration and noise accessories.
- Plan your work schedule to spread any high vibration tool use across a number of days.

Residual Risks
Even when tool is used as prescribed it is not possible to eliminate all residual risk factors. The following hazards may arise in connection with the tool's construction and design:
- Damage to lungs if an effective dust mask is not worn.
- Damage to hearing if effective hearing protection is not worn.
Health defects resulting from vibration emission if the power tool is being used over longer period of time or not adequately managed and properly maintained.
⚠ WARNING: This machine produces an electromagnetic field during operation. This field may under some circumstances interfere with active or passive medical implants. To reduce the risk of serious or fatal injury, we recommend persons with medical implants to consult their physician and the medical implant manufacturer before operating this machine.
Safety Information

Intended Use
The HY20CPHT is an battery powered pole hedge trimmer from HYUNDAI.
This machine is a garden tool. The machine is manufactured according to the latest safety requirements. Every precaution is only effective when it is followed exactly.
Intended Use
The product is intended for cutting and trimming of hedges, bushes and shrubs in domestic gardens.
User Types
This product is for personal domestic DIY use only.
It is not suitable for commercial, industrial, or trade use.
Improper Use
The maximum cutting capacity must be observed. Do not cut branches exceeding the stated maximum capacity. The use of this product in case of rain or humid environment is prohibited.
Safety Information
Symbol
Appropriate Personal Protective Equipment (PPE), MUST be worn at all times when operating or repairing the machine. No protective equipment can ensure 100% protection.
When selecting PPE, make sure it's CE marked and it suits the user in terms of size, fit, etc. If more than one item of PPE is worn at the same time, make sure they can be used together, e.g. wearing safety glasses may disturb the seal of a respirator, causing air leaks.

Read the operating instructions and store them in a safe place.

Warning

Wear eye protection

Wear ear protection

Wear dust mask

Keep hands away from blade

Do not expose to rain

Keep sufficient distance away from electrical power lines
Safety Information
Wear head protection
Wear protective gloves.
Do not burn
Batteries may enter water cycle if disposed improperly, which can be hazardous for ecosystem. Do not dispose of waste batteries as unsorted municipal waste.
Li-Ion battery This product has been marked with a symbol relating to ‘separate collection’ for all battery packs and battery pack. It will then be recycled or dismantled in order to reduce the impact on the environment. Battery packs can be hazardous for the environment and for human health since they contain hazardous substances.
Read operator's manual
For indoor use only
Positive terminal
Negative terminal
Double insulation
Fuse
Waste electrical products must not be disposed of with household waste. Please recycle where facilities exist. Check with your local authorities or retailer for recycling advice.
Unboxing
⚠ WARNING: Unboxing and assembling the machine should be done on a flat, surface with enough room. Disposal of the packaging should be done in accordance with the local regulations in force.
⚠ WARNING: Some of the packaging material may be harmful to children. Keep out of reach of children.
- Carefully remove the product from the packaging and examine it for any sign of damage caused during shipping.
- Lay the contents out and check them. If any part is damaged or missing, you must not use the machine. Contact HYUNDAI POWER PRODUCTS immediately.
- You must keep the packaging material in case the machine needs to be returned or repaired.
- Ensure that you have all the accessories and tools you need for assembly and operation including the suitable personal protective equipment.
In The Box
*Not To Scale
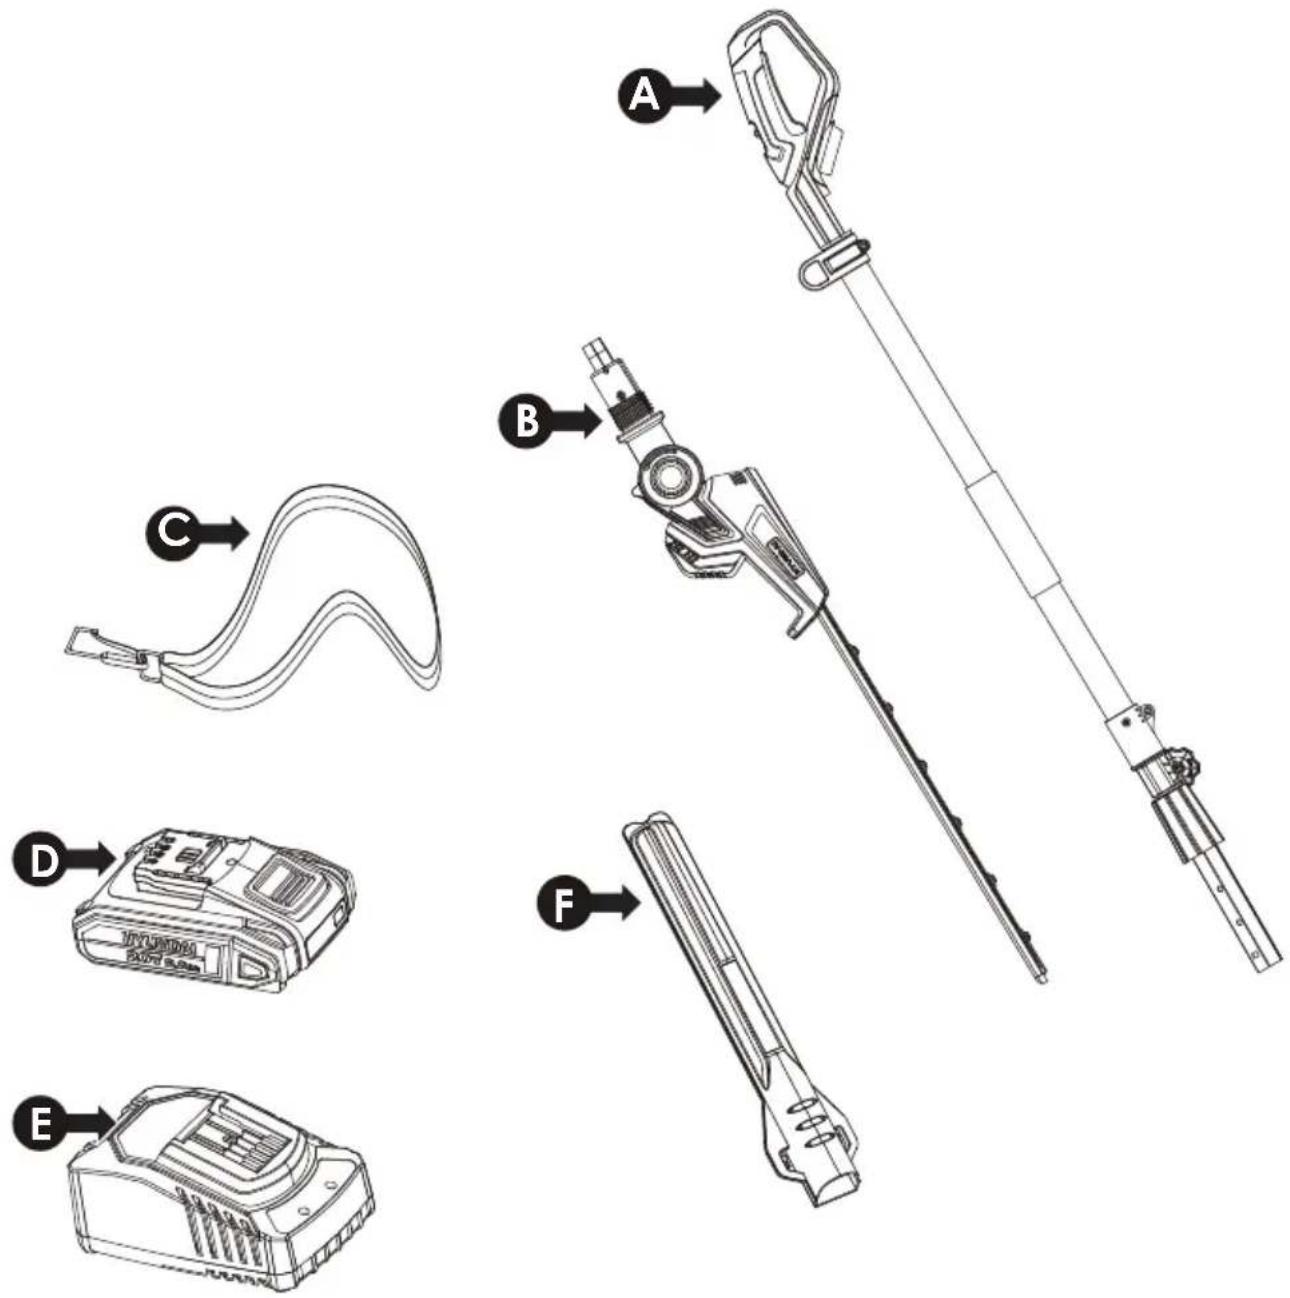
A Rear handle assembly
B Cutting blade assembly
C Shoulder strap
D Battery pack
E Charger
F Blade sheath
Features

Features
A Rear handle
B Lock-off switch
C On/off switch
D Shoulder strap loop
Blade sheath
F Cutting blade
G Motor head
H Locking button (for angle adjustment)
I Pole support
Locking sleeve
K Locking knob (for pole length adjustment)
L Upper pole
M Battery pack
N Battery pack release button
Shoulder strap
Assembly
Assembly Overview
There are 5 steps to the assembly:
STEP 1. Assembling the Pole
STEP 2. Assembling the Shoulder strap
STEP 3. Battery Charging
STEP 4. Removing/Installing the Battery Pack
STEP 5. Removing the Blade Sheath
WARNING: Always take care when removing the packaging to prevent risk of injury or damage to the pole hedge trimmer.
WARNING: Before assembling the pole hedge trimmer, check all the parts indicated in the manual are in the box. Inspect all the parts for signs of damage. Do not assemble the pole hedge trimmer if you find any damaged components when unboxing the product for the first time.
WARNING: Before using the tool, read the instruction book carefully. Remove all parts of the pole hedge trimmer from the box and carefully remove all packaging. Take care not to lose any instructions which may be attached to the tool, these provide important information which will be required while assembling the pole hedge trimmer.
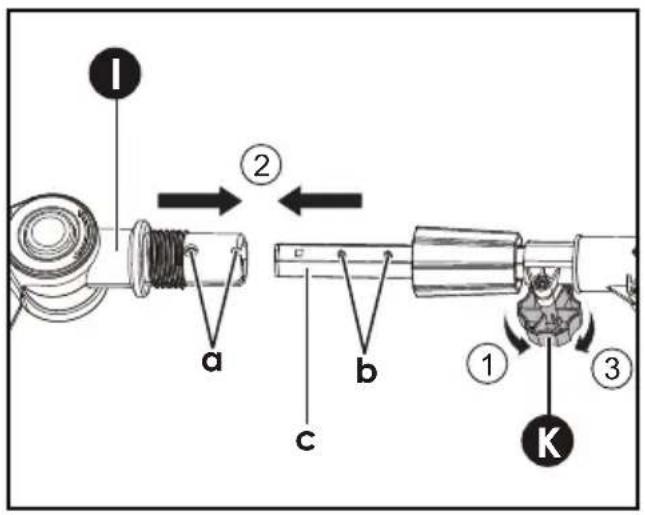
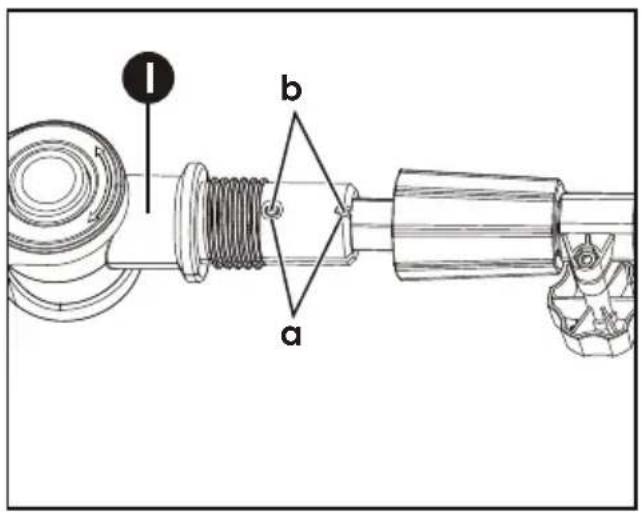
STEP 1 : Assembling the Pole
- Loosen the locking knob (K) by turning it anti-clockwise. Extend the pole extension (c) to expose the two small cylinders (b). Turn the locking knob (K) in a clockwise direction to lock the pole extension (c) to avoid movement while assembling.
- Align and insert the pole extension (c) into the pole support (l).
- Tighten the locking sleeve (J) securely by turning clockwise.
NOTE: Make sure that the locking sleeve (J) is firmly tightened in place.
Assembly


STEP 2 : Assembling the Shoulder Strap
Your pole hedge trimmer is supplied with a shoulder strap (O). The shoulder strap (O) is supplied with a quick release hook. Connect the hook to the shoulder strap loop (D) of machine body located before the handle.

Assembly
STEP 3 : Battery Charging
1. Charge the battery pack
Use only the charger specifically provided for use with this equipment. If the battery pack becomes very hot you must remove your battery pack from the charger and allow time for the battery to cool down before recharging.
Fully charge the battery before storing it. For prolonged storage, recharge the battery every three months to maintain its performance
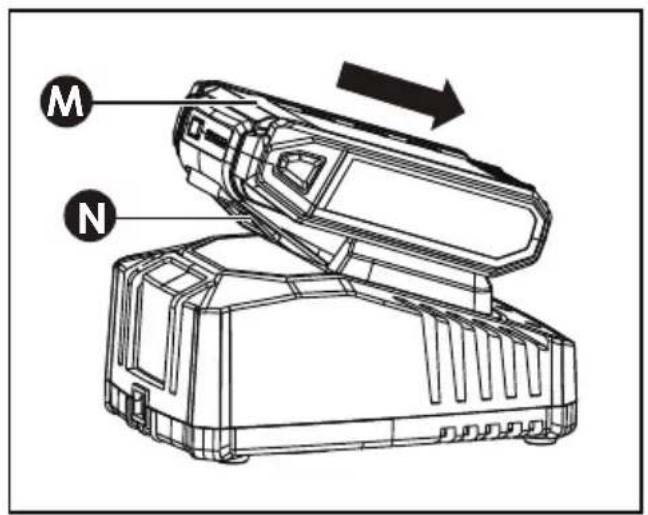
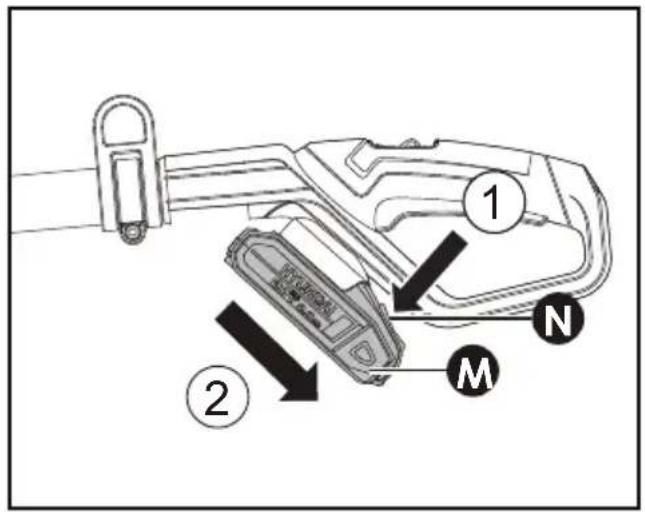
2. To remove or install the battery pack
- Depress the battery pack release button (N) and then slide the battery pack (M) out from your tool.
- After recharging, slide the battery pack back into tool's battery port. A simple push with light pressure will be sufficient to secure it into place.

3. Charging procedure
1) Plug the charger into the correct power supply. The green light will illuminate.
2) Slide the battery pack into the charger, ensuring it is securely positioned in the correct charging orientation. The green light will turn off, and the red light will illuminate to indicate that charging has begun.
3) Once charging is complete, the red light will turn off, and the green light will illuminate.
4) After the battery is fully charged, unplug the charger and remove the battery pack.
NOTE: If the battery pack is locked in the charger, press the battery pack release button to release and remove it.
Assembly
WARNING: If the battery charge is depleted after continuous use or exposure to direct sunlight or heat, allow the tool to cool down before recharging to ensure a full charge is achieved.

4. Charging indicator
This charger is equipped to detect potential issues with battery packs. Indicator lights signal any problems (refer to the table below). If a problem arises, insert a new battery pack to verify if the charger is functioning properly.
- If the new battery charges correctly, the original battery pack is defective and should be returned to a service centre or recycling facility.
- If the new battery pack exhibits the same issue as the original, have the charger inspected and tested at an authorised service centre.
| Light ON/OFF flash Status | ||
| Red on [IMAGE] | — | Charging |
| Red flash [IMAGE] | - - - - - Defective battery | |
| Green on [IMAGE] | — | Fully charged |
| Green flash [IMAGE] | - - - - - Battery too hot/cold | |
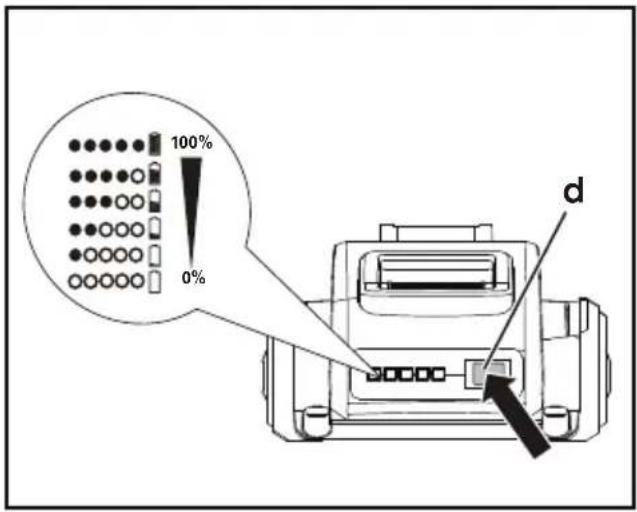
5. Checking the power condition of battery pack
The battery level can be known from the battery indicator light by pressing the button (d) beside the lights.
Assembly
STEP 4 : Removing/Installing the Battery Pack
- Press the battery pack release button (N) and slide the battery pack (M) out from your tool.
- Slide the fully charged battery pack (M) onto the tool with sufficient force until it clicks into position.

Assembly
STEP 5 : Removing the Blade Sheath
Remove blade sheath (E) as shown below.

Operation
Switching On and Off
- Your trimmer is equipped with a lock-off switch. Push the lock-off switch (B) backwards, while, simultaneously pressing the on/off switch (C) to start you trimmer.
- Release the on/off switch (C) to stop your trimmer.

Adjusting the Pole Length
- To extend the pole, loosen the locking knob (K) by turning it anticlockwise. Then the pole extension (c) will slide freely.
- To lock the pole extension (c) to the required length, tighten the locking knob (K) by turning clockwise.

Operation
Adjusting the Motor Head to the Required Angle
- Push the locking button (H) of the motor head and then rotate the motor head to the desired position.
- Release the locking button (H) again and check whether the button is locked in place.
NOTE: The Machine head can be locked on 5 positions (-30°, 0°, 30°, 60°, 90°).

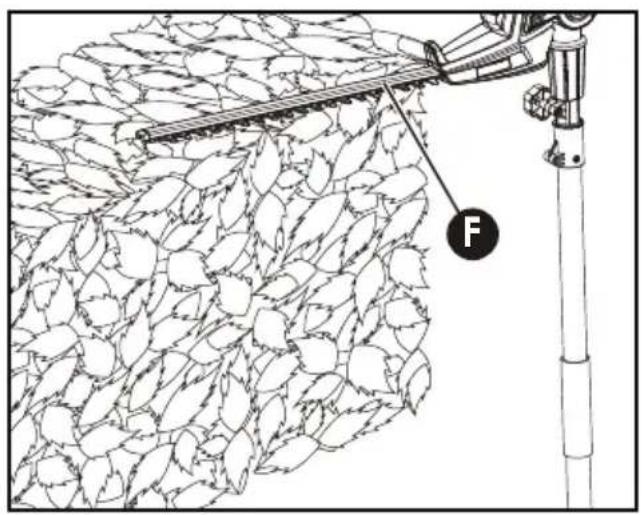
Operating the Pole Hedge Trimmer
NOTE: Always hold the trimmer with both hands and with the blade (F) away from you before turning it on.
- When trimming new growth, use a wide sweeping action so that the stems are fed directly into the blade (F).
- Allow the cutting blades (F) to reach full speed before cutting. When operating, keep the cutting blades away from people and objects such as walls, large stones, trees, vehicles, etc.
- If the blade (F) jams, immediately stop the trimmer. Release the switch before attempting to clear jammed things from the cutting blades. Do not attempt to cut stems that are too thick for the cutting blade.
Operation


Maintenance & Care
Cleaning
Do not use cleaning agents, solvents or water to clean the blade rail. These may cause severe damage to the tool. The blade rail should be cleaned and treated with fine oil after each use. Brush the blade using a stiff nylon brush to remove any debris. Keep clean the ventilation slots, motor housing and handles of the device.
Maintenance
Regular maintenance of your equipment extends the lifespan of the equipment. You will also achieve optimum cutting performances and avoid accidents. Inspect the hedge trimmer before each use. The blade rail should be cleaned and treated with fine lubricating oil after each use. Have the unit professionally repaired if any damage occurs.
For battery tools
The ambient temperature range for tool and battery use and storage is 32° F - 113° F ( 0° C - 45° C).
The recommended ambient temperature range for the charging system during charging is 32° F - 104° F ( 0° C - 40° C).
Storage & Transport
- Clean the equipment before putting it away.
- Store the device in a dry, frost-free, and dust-protected place, and out of reach of children.
- Do not place other objects on top of the machine.
- Use the blade sheath for transportation and storage.
- Store the battery only in a partially charged state. The state of charge should be 40 – 60 % over a longer storage period. (Two LED lights of the state of charge display light up green).
- During longer storage periods, check the state of charge of the battery and recharge if necessary (every 2 to 3 months).
- In order to keep the battery well charged, avoid exposing the device to extreme heat or cold in storage.
- Store the equipment between 50°F (10°C) and 77°F (25°C). During storage, avoid extreme cold or heat so the battery does not lose power.
Maintenance & Care
Troubleshooting
NOTE: All corrective actions should be carried out by suitably qualified person/s.
| Problem Possible | cause Fault correction | |
| Pole hedge trimmer does not operate | Battery discharged. Recharge | be battery. Refer to “Battery charging”. |
| Battery too hot/cold. Allow to cool/warm. | ||
| Motor is broken. Contact Customer Service. | ||
| Machine head not assembled well with the pole | Contact Customer Service. | |
| Pole hedge trimmer operates intermittently | Internal wiring damaged | Contact Customer Service. |
| Battery not fully charged. Recharge battery. | ||
| On/off switch defective. Contact Customer Service. | ||
| Motor runs but blades remain stationary | Internal fault Contact Customer Service. | |
| Cutting blade hot | Cutting blade dull Have blade sharpened | |
| Cutting blade is damaged | Have blade inspected/overhauled | |
| Too much friction, due to lack of lubricant | Apply lubricant spray | |
| Cutting time per battery charge too low | Too much friction, due to lack of lubricant | Apply lubricant spray |
| Blade needs cleaning Clean blade | ||
| Battery not fully charged | Recharge battery. | |
| The blades are running slow | Battery discharged | Recharge battery. |
| Battery stored outside of battery temperature | Allow to cool/warm. | |
| Battery charge indicator does not light up. | Plug of battery charger not plugged in (properly). | Insert mains plug (fully) into the socket outlet. |
| Outlet or mains cable defective. | Check the mains voltage. | |
| Battery charger defective. | Replace the charger. | |
Technical Data
Specification
| Rated voltage: | 20 V = Max. |
| No load speed: 2200 /min | |
| Cutting length: 450mm (18 in.) | |
| Tooth spacing: 16mm (0.6 in.) | |
| Battery capacity (BI20-2): 2.0 Ah | |
| Charger input (C20-2): | 100-240V~50/60Hz, 55W |
| Charger output (C20-2): | 20V = 2.0A |
| Charging time: 1 Hour | |
| Charger protection class: | ☐ /II |
| Machine weight (with battery): 3.93 kg | |
| A weighted sound pressure LpA : (KpA = 3\ dB(A)) | 79 dB(A) |
| A weighted sound pressure LwA : (KwA = 3\ dB(A)) | 87 dB(A) |
| Typical weighted vibration ah :(uncertainty K= 1,5 m/s2) | ≤ 2,5 m/s2 |
Recycling & Disposal
Recycling & Disposal
We do not offer a takeback scheme for the recovery of Waste Electrical Electronic Equipment (WEEE) & Batteries. Instead the responsibility to dispose of WEEE and/or Batteries is passed onto you by us.
So when it becomes necessary to dispose of your machine you must take it to your local Civic Amenity Site. For further information please contact your local Authority for disposal advice.
You MUST make sure that all unused oil and fuel is disposed of correctly either beforehand or at your local Civic Amenity Site.
- Under NO circumstances must any fuel or oil be put down any drains.
- Certain products contain WEEE waste which should not be disposed of in your domestic waste.
- You MUST recycle WEEE in accordance with your local authority or recycling centre.
- Certain products contain batteries which should not be disposed of in your domestic waste.
- You MUST recycle batteries in accordance with your local authority or recycling centre.
- Unwanted packaging and materials should be stored and taken to a recycling centre so it can be disposed of in a manner which is compatible with the environment.
We are a Member of the VALPAK National Compliance Scheme and our registration number is RM08660. For further information about disposal please contact your Local Authority.
You can also get more advice and guidance about recycling at the following website http://www.recycle-more.co.uk
Should you pass this product on to another user either sold or loaned, you MUST pass on this user manual. This will make sure that all other users can use and maintain this machine safely.
Recycling & Disposal
Environmental Protection
- Environmental protection should be a priority of considerable importance when using the machine, for the benefit of both social coexistence and the environment in which we live. Try not to cause any disturbance to the surrounding area.
- You must comply with local regulations and provisions for the disposal of packaging, oils, fuel, filters, damaged parts or any elements which have a strong impact on the environment. This waste must not be disposed of as normal waste. It needs to be separated and taken to specified waste disposal centres where the material will be recycled.
- You must comply with local regulations for the disposal of waste materials after mowing.
- When disposing, do not pollute the environment with the machine, but hand it over to a disposal centre, in accordance with the local laws in force.
EU Declaration Of Conformity
| Importer and Authorised Representative |
| Genpower LtdIsaac Way, Pembroke Dock, SA72 4RWCountry of Origin: ChinaDescription: 20V Pole hedge trimmerSKU Code: HY20CPHTDate of Issue: 20/12/2024 |
| Regulations and Directives of Compliance |
| 2006/42/EC, 2014/30/EU, 2011/65/EU&(EU)2015/863, 2000/14/ECamended by 2005/88/EC, (EU)2023/1542, 2014/35/EU |
| The notified body involved |
| 2000/14/EC amended by 2005/88/EC:- Conformity Assessment Procedure as per Annex V- Measured Sound Power Level 87 dB(A)- Declared Guaranteed Sound Power Level 90 dB(A) |
| Statement of Declaration |
| We the importer and authorised representative of the product described confirm conformity within the provisions of applicable regulations and directives listed within this document. |
| Standards conform to |
| EN 62841-1, EN 62841-4-2, EN ISO 3744, EN IEC 55014-1, EN IEC 55014-2, EN IEC 63000, EN 60335-1, EN 60335-2-29, EN 62233, EN IEC 61000-3-2, EN 61000-3-3 |
| Signed on Behalf of Genpower Ltd |
| Place of Issue: Genpower LtdSignatory Name: Roland LlewellinPosition: Managing DirectorRJLevelnCE |
Notes
Useful Information
Check Out Our YouTube Channel
Our videos on YouTube include:
Unboxing
Assembly of your machine
How to service your machine
Products in use
'How To' videos
Product features
Go to YouTube and search 'Hyundai Power Products'.
Warranty
Proof of purchase will be required before you make a warranty claim. Full warranty terms and conditions can be found on the HYUNDAI POWER PRODUCTS website:
www.hyundaipowerproducts.co.uk
Manual Updates
Our manuals are constantly being reviewed and updated. Should you find an error, omission or something unclear, please contact us for assistance. We reserve the right to make any modifications without prior notice whenever necessary.
Our latest manuals are also placed online. All our manuals can be downloaded at: www.hyundaipowerproducts.co.uk
Returning Your Product
If you are returning your product, please contact the dealer for their returns policy.
Leaving A Review
We work very hard to give all of our customers the best possible service. If you have any problems, before leaving negative feedback, please contact us to give us a chance to resolve the issue. We would be delighted if you left us positive feedback! To leave a review, please go to: uk.trustpilot.com/review/hyundaipowerequipment.co.uk
Ordering Spare Parts
You can find the spare part you are looking for at power-shares.co.uk
Product Record
Information
As soon as you have purchased the machine, we recommend that you fill out the following. If you need to contact an authorised dealer or customer service for information on servicing, you may need to provide the following information.
Date Of Purchase:
Dealer Name:
Dealer Phone:
Model Number:
Serial / Batch Number:
Contact Us
Need Help? Talk To Our Experts
Our friendly aftersales team will be more than happy to help you.

Phone
Call our team on 01646 687 880

aftersales@genpower.co.uk

Online Live Chat
Go to www.hyundaipowerproducts.co.uk

Post
Genpower Ltd, Isaac Way, Pembroke Dock, Pembrokeshire, SA724RW.

Hyundai Support Website
Go to hyundaisupport.co.uk

GENUINE PRODUCT OF HYUNDAI CORPORATION
For Inquiries, Please Contact:
GENPOWER LTD
Isaac Way, London Road,
Pembroke Dock, UK, SA72 4RW.
T: +44 (0) 1646 687 880
E: info@hyundaipowerproducts.co.uk
www.hyundaipowerproducts.co.uk

- CORDLESS POLE HEDGE TRIMMER HY20CPHT
- CONTENTS
- INTRODUCTION
- THANK YOU FOR PURCHASING YOUR HYUNDAI PRODUCT
- IMPORTANT
- SAFETY INFORMATION
- GENERAL POWER TOOL SAFETY WARNINGS
- WORK AREA SAFETY
- ELECTRICAL SAFETY (WHEN USING THE CHARGER)
- PERSONAL SAFETY
- POWER TOOL USE AND CARE
- ⚠️ BATTERY TOOL USE AND CARE
- SERVICE
- HEDGE TRIMMER SAFETY WARNINGS (WITH CHARGER)
- ▲ EXTENDED-REACH HEDGE TRIMMER SAFETY WARNINGS
- SAFETY WARNINGS FOR LITHIUM BATTERY PACK
- SAFETY WARNINGS FOR CHARGER
- SAVE ALL WARNINGS AND INSTRUCTIONS FOR FUTURE REFERENCE
- NOISE & VIBRATIONS (WHERE APPLICABLE)
- FACTORS
- THIS TOOL MAY CAUSE HAND-ARM VIBRATION SYNDROME IF ITS USE IS NOT ADEQUATELY MANAGED
- RESIDUAL RISKS
- INTENDED USE
- USER TYPES
- IMPROPER USE
- SYMBOL
- UNBOXING
- IN THE BOX
- FEATURES
- ASSEMBLY
- ASSEMBLY OVERVIEW
- STEP 1 : ASSEMBLING THE POLE
- STEP 2 : ASSEMBLING THE SHOULDER STRAP
- STEP 3 : BATTERY CHARGING
- CHARGE THE BATTERY PACK
- TO REMOVE OR INSTALL THE BATTERY PACK
- CHARGING PROCEDURE
- CHARGING INDICATOR
- CHECKING THE POWER CONDITION OF BATTERY PACK
- STEP 4 : REMOVING/INSTALLING THE BATTERY PACK
- STEP 5 : REMOVING THE BLADE SHEATH
- OPERATION
- SWITCHING ON AND OFF
- ADJUSTING THE POLE LENGTH
- ADJUSTING THE MOTOR HEAD TO THE REQUIRED ANGLE
- OPERATING THE POLE HEDGE TRIMMER
- MAINTENANCE & CARE
- CLEANING
- MAINTENANCE
- FOR BATTERY TOOLS
- STORAGE & TRANSPORT
- TROUBLESHOOTING
- TECHNICAL DATA
- RECYCLING & DISPOSAL
- ENVIRONMENTAL PROTECTION
- EU DECLARATION OF CONFORMITY
- NOTES
- USEFUL INFORMATION
- CHECK OUT OUR YOUTUBE CHANNEL
- WARRANTY
- MANUAL UPDATES
- RETURNING YOUR PRODUCT
- LEAVING A REVIEW
- ORDERING SPARE PARTS
- PRODUCT RECORD
- INFORMATION
- CONTACT US
- NEED HELP? TALK TO OUR EXPERTS
- PHONE
- ONLINE LIVE CHAT
- POST
- HYUNDAI SUPPORT WEBSITE
Brand : HYUNDAI
Model : HY20CPHT
Category : Hedge Trimmers