Ceramic+Steel Diamond Hone 702 - Knife sharpener Chef's Choice - Free user manual and instructions
Find the device manual for free Ceramic+Steel Diamond Hone 702 Chef's Choice in PDF.


| Product Type | Knife Sharpener |
| Brand | Chef's Choice |
| Model | Ceramic+Steel Diamond Hone 702 |
| Material | Ceramic and steel diamond hones |
| Dimensions (L x W x H) | 7.5 x 2.4 x 2 inches (19 x 6 x 5 cm) |
| Weight | 0.44 lbs (200 g) |
| Power Source | Manual (no electricity required) |
| Sharpening Stages | 2 stages (ceramic for fine honing, diamond for initial sharpening) |
| Compatible Blade Types | Straight edge and serrated knives |
| Safety Features | Non-slip base, finger guard |
| Maintenance | Wipe with damp cloth; do not submerge in water |
| Replacement Parts | Replacement hones available (model #702H) |
| Warranty | Limited lifetime warranty |
| Country of Origin | USA |
| Color | Black/White |
| Usage | Household kitchen use |
| Ease of Use | Simple pull-through design |
| Additional Features | Diamond abrasive for long life |
Frequently Asked Questions - Ceramic+Steel Diamond Hone 702 Chef's Choice
User questions about Ceramic+Steel Diamond Hone 702 Chef's Choice
0 question about this device. Answer the ones you know or ask your own.
Ask a new question about this device
Download the instructions for your Knife sharpener in PDF format for free! Find your manual Ceramic+Steel Diamond Hone 702 - Chef's Choice and take your electronic device back in hand. On this page are published all the documents necessary for the use of your device. Ceramic+Steel Diamond Hone 702 by Chef's Choice.
USER MANUAL Ceramic+Steel Diamond Hone 702 Chef's Choice
Read these instructions before use.
It is essential that you follow these instructions to achieve optimum results.
IMPORTANT SAFEGUARDS
When using electrical appliances, basic safety precautions should always be followed including the following:
- Read all instructions. Every user should read this manual.
- To protect against electrical hazards, do not immerse the Chef's Choice® Ceramic + Steel Model 702 sharpener in water or other liquid.
- Make sure that only clean knife blades are inserted in Chef'sChoice® Ceramic + Steel Model 702.
- Disconnect the appliance from its power source when not in use, before cleaning, during service and when replacing parts.
- Avoid contacting moving parts.
- Do not operate any appliance with a damaged cord or plug or after the appliance malfunctions, or is dropped or damaged in any manner.
U.S. customers: You can return your sharpener to EdgeCraft's factory for service where the cost of repair or electrical or mechanical adjustment can be estimated. When the electrical cord on this appliance is damaged, it must be replaced by the Chef's Choice® distributor or other qualified service to avoid the danger of electrical shock.
Outside U.S.: Please return your sharpener to your local distributor where the cost of repair or electrical or mechanical adjustment can be estimated. If the supply cord of this appliance is damaged, it must be replaced by a repair facility appointed by the manufacturer because special tools are required. Please consult your Chef's Choice® distributor. - CAUTION! This appliance may be fitted with a polarized power plug (one blade is wider than the other). To reduce the risk of electric shock, this plug will fit in a polarized outlet only one way. If the plug does not fit fully in the outlet, reverse the plug. If it still does not fit, contact a qualified electrician. Do not modify the plug in anyway.
- The use of attachments not recommended or sold by EdgeCraft Corporation may cause fire, electric shock or injury.
- The Chef's Choice® Ceramic + Steel Model 702 is designed to sharpen both Ceramic and Steel knives. Do not attempt to sharpen scissors, ax blades or any blade that does not fit freely in the slots.
- Do not let the cord hang over edge of table or counter or touch hot surfaces.
- When in the “ON” position (Red flash on switch is exposed when “ON”), the Chef’s Choice® sharpener should always be on a stable countertop or table.
- WARNING: KNIVES PROPERLY SHARPENED ON YOUR Chef's Choice® Ceramic + Steel Model 702 WILL BE SHARPER THAN YOU EXPECT. TO AVOID INJURY, USE AND HANDLE THEM WITH EXTREME CARE. DO NOT CUT TOWARD ANY PART OF YOUR FINGERS, HAND OR BODY. DO NOT RUN FINGER ALONG EDGE. STORE IN A SAFE MANNER.
- Do not use outdoors.
- Appliance is not intended to be used or cleaned by children or persons with reduced physical, sensory or mental capabilities or lack of experience and knowledge of the hazards involved.
- Do not use honing oils, water or any other lubricant with the Chef's Choice® Ceramic + Steel Model 702.
- For household use only.
- SAVE THESE INSTRUCTIONS.
YOU MADE AN EXCELLENT CHOICE
Congratulations! As an owner of the highly versatile Chef'sChoice® Ceramic + Steel Model 702 you will appreciate how easy it is to maintain all of your Ceramic and Steel knives in factory sharp condition. A precise guide system is provided to position each style knife automatically at the optimum sharpening angle as customized diamond abrasive disks quickly restore a fresh edge. The edge is then polished and finished with the Chef'sChoice® revolutionary polishing disks to astonishingly sharpness. You will appreciate the joy of effortless cutting and the unmatched presentation of each flawless slice.
The Chef's Choice® Ceramic + Steel Model 702 is designed to sharpen both, your Ceramic and Steel knives to match or exceed the factory sharpness and edge quality of the highest quality knives.
Uniquely the Chef'sChoice® Ceramic + Steel Model 702 is designed to create a precise primary angle on the blade followed by a second small microbevel along that edge facet that adds significant strength, sharpness and durability to that already very sharp edge.
Thus you will realize the extra advantages in sharpness and durability that have made Chef'sChoice® sharpeners the choice of professionals, worldwide.
We strongly encourage you to read the following sections that detail optimum sharpening procedures for each type of blade.
Enjoy!
GETTING ACQUAINTED WITH THE MODEL 702 SHARPENER
The Model 702 (Figure 1) is a unique sharpener designed to sharpen both Steel knives and Ceramic knives. The Stropping/Finishing Stage 2 contains the proprietary Chef'sChoice® ultrafine abrasive stropping disks designed to create a microscopic bevel along the edge and to polish it to astonishing sharpness. Both steel and ceramic knives are first sharpened with fine diamond abrasives in the Stage 1, followed by stropping and polishing with Diamond UltraFlex™ abrasives in the Stropping/Finishing Stage 2.
The Chef'sChoice® Ceramic + Steel Model 702 is equipped with a manually activated diamond dressing system that can be used, when necessary, to remove any accumulated food or sharpening debris from the surface of the ultrafine abrasive Stropping/Finishing Stage 2 disks. We strongly urge that you always thoroughly clean your knives before sharpening them. Unless you are a heavy user of the sharpener, you will be able to sharpen for months or even a year or more before you need to clean the stropping/finishing disks. Only if you sense a distinct decrease in polishing efficiency in the Stropping/Finishing Stage 2 is there any need to use this convenient feature.
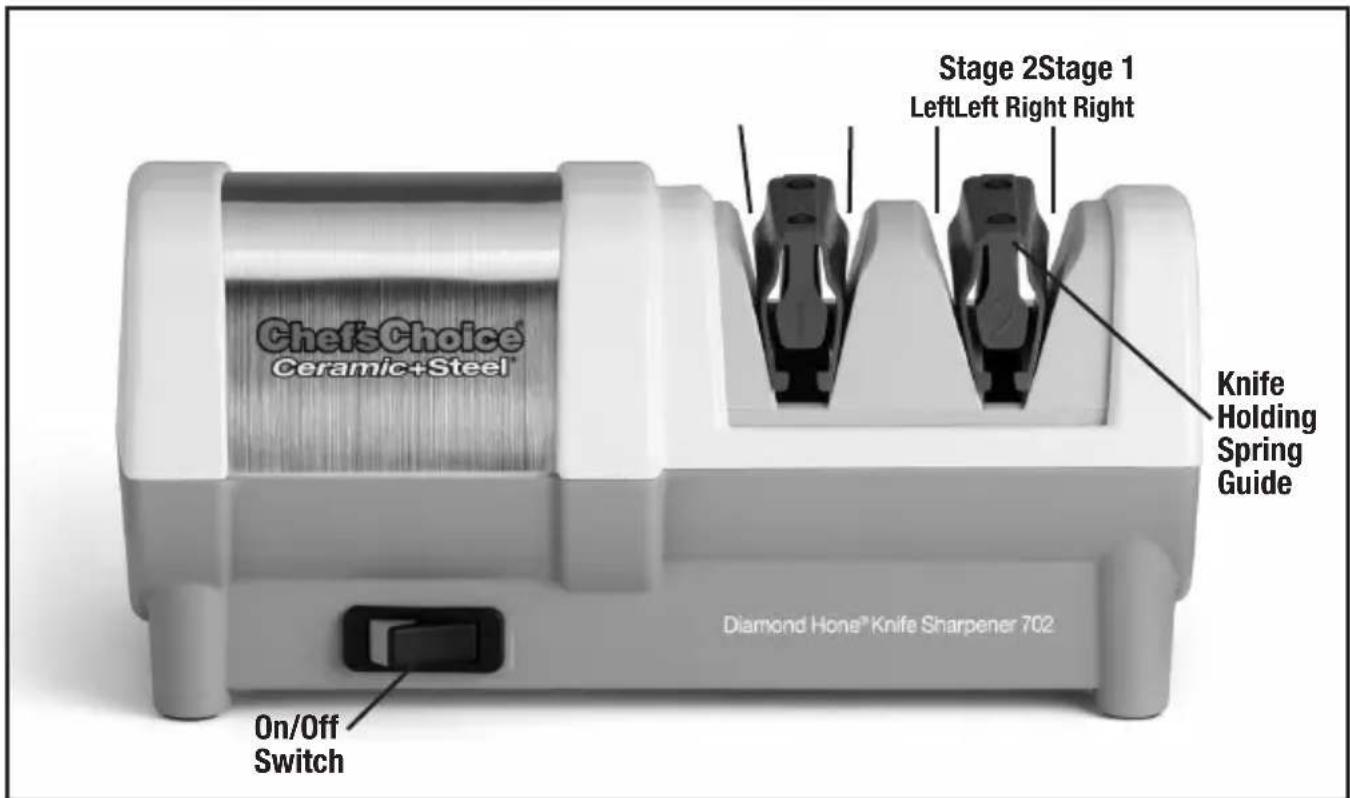
Figure 1. Chef'sChoice® Sharpener Model 702 designed to sharpen both steel and the ceramic knives.
Never operate the sharpener from the back side. Use just enough downward pressure when sharpening to ensure uniform and consistent contact of the blade edge with the abrasive disks on each stroke
Additional pressure is unnecessary and will not speed the sharpening process. Avoid excessive cutting into the plastic enclosure. Accidental cutting into the enclosure however will not functionally impact operations of the sharpener or damage the edge.
Try a practice pull through the sharpener with the power “OFF”. Slip the knife blade smoothly into the left slot between the left angle guide of the Stage 1 and the plastic knife holding spring (Figure 4). Do not twist the knife. Move the blade down in the slot until you feel it contact the diamond disk. Pull it towards you lifting the handle slightly as you approach the tip. This practice pull will give you a feel for the spring tension. Remove the knife and read the following instructions specific to the type of knife you will be sharpening.

Figure 2. A typical ceramic kitchen knife.
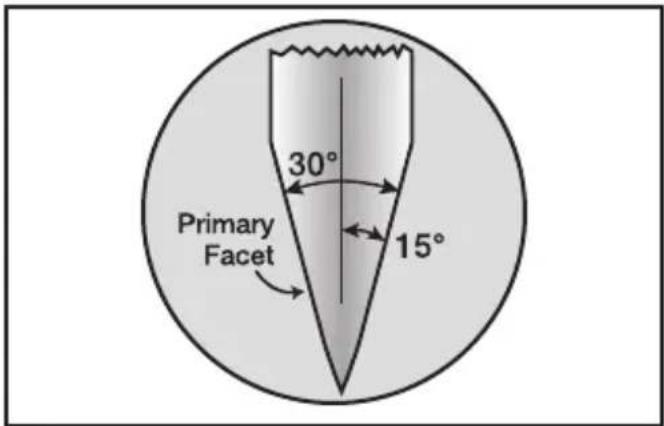
Figure 3. Typical edge cross section, illustrating the 15° primary facet.
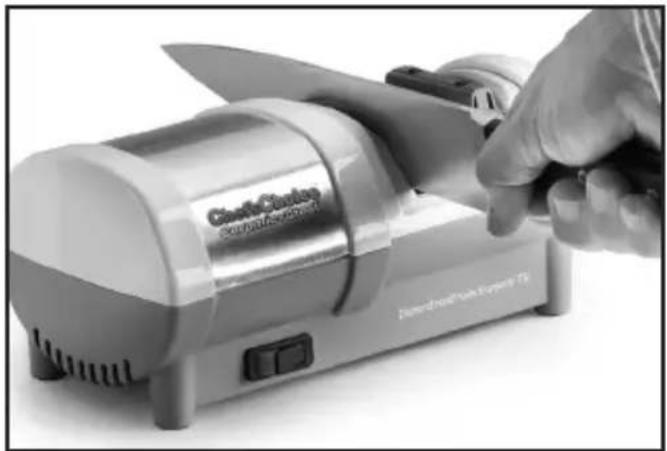
Figure 4. Stage 1 sharpening of a metal knife.
SHARPENING THE CERAMIC KNIFE
SHARPENING THE EDGE IN STAGE 1
Turn ON the power and pull the CERAMIC blade thru the left slot of the Stage1 (Figure 5), then thru the adjacent right slot of Stage 1. Repeat pairs of pulls in Stage 1 using the left and right slots on alternate pulls. Take about 5-6 seconds for each pull for a 5" long blade (1 second or more per inch of blade).
The first time you sharpen a knife it may take up to 2-3 pair of pulls (alternating left and right slots) to fully re-angle the edge of a thin blade. Thicker blades will require more pulls. After 3 pairs of pulls check to see if blade will cut paper). It may require more pulls for a blade that is severely worn or chipped. For those familiar with metal knife sharpening Ceramic knives will not develop a burr. Therefore a gradual approach of pre-sharpening followed by testing for sharpness is the suggested method. Some Ceramic knives can vary widely from the industry standard edges and even vary from one side of the knife to the other. The Chef'sChoice® Ceramic + Steel Model 702 will sharpen to a precise edge, angle and may require multiple pairs of sharpening strokes in the Stage 1 to form the ideal angle. If you are sharpening an established brand name Ceramic blade you will find that only a few (2-3) pairs of alternating pulls (alternating left and right slots) will be needed in Stage 1 to prepare it for Stropping and Finishing in Stage 2.
STROPPING/FINISHING THE EDGE IN STAGE 2
The Chef'sChoice® Model 702 has been developed with an advanced and proprietary blend of materials to Strop/Finish both ceramic and metal knives. This final stage of sharpening creates a sharper-than-factory edge unsurpassed by any other brand sharpener on the market.
Upon completion of proper sharpening in Stage 1 perform 8-10 slow even passes; on alternating sides of Stage 2 of the sharpener (Figure 6) (take approximately 1 second or more per inch of blade length). We suggest beginning with 8 pairs of slow (consistent speed) alternating passes and then testing for sharpness. If the knife is still not sufficiently sharp, try another 2-3 more pairs. The knife should be paper cutting sharp.
Ceramic knives are inherently more brittle at their edge than conventional metal knives. This final Stage 2 with its unique diamond abrasive composition is critical to obtain razor sharp ceramic knives.

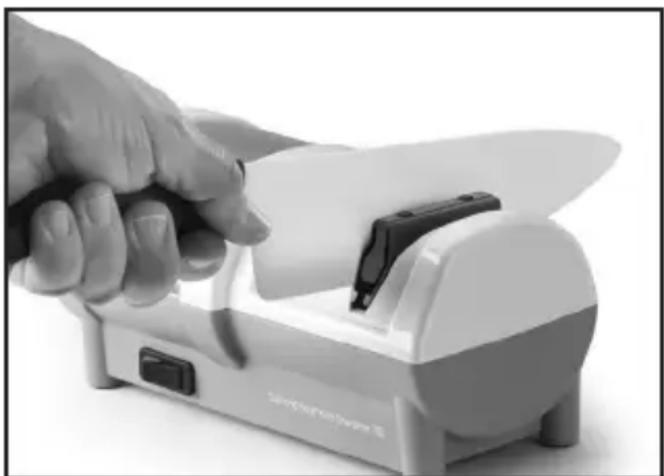
Figure 6. Stage 2 Stropping/finishing a ceramic knife. Figure 5.
RESHARPENING CERAMIC KNIVES
In order to freshen up the edge of your ceramic knives, it is not necessary to sharpen in stage 1. Simply use Stage 2 Polish/Finish with 4-5 pairs of slow alternating passes (take about 2 seconds per inch of blade) and then test for sharpness. If the knife is still not sufficiently sharp, try another 2-3 pairs of alternating pulls. The knife should be paper-cutting sharp.
The “resharpening” process should not be used if the ceramic knife edge is chipped or very dull. In that case, see page 6 for a complete sharpening.
SHARPENING A STEEL KNIFE
Steel knives with double edge facets, will have both facets sharpened to create a super sharp edge.
SHARPENING THE EDGE OF A STEEL KNIFE IN STAGE 1
Turn ON the power and pull the blade thru the left slot of Stage 1 (Figure 7), then thru the adjacent right slot of Stage 1. Repeat pairs of pulls in Stage 1 using the left and right slots on alternate pulls. Take about 4-5 seconds for each pull for a 5" long blade. Take longer for longer blades and slightly less if shorter. The first time you sharpen a dull knife it may take up to 6-8 pair of pulls (alternating left and right slots) to fully re-angle the edge of a blade. Thicker blades will require more pulls. After 4 pairs of pulls check for a burr as described below and as necessary continue to make more pairs of pulls until you create a small burr along the entire length of the blade (Figure 9).
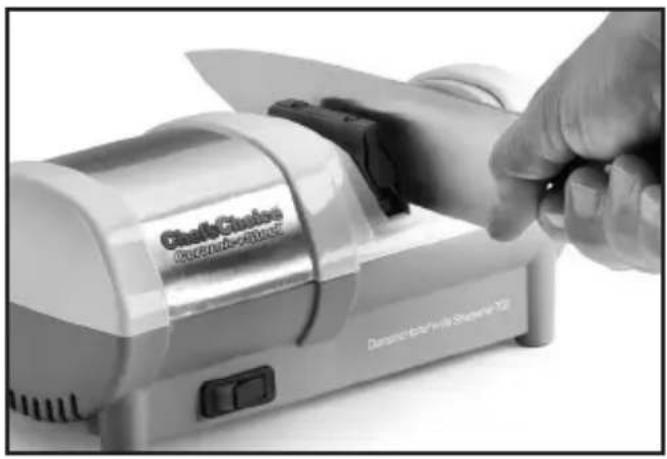
Figure 7. Stage 1 sharpening of steel knife.
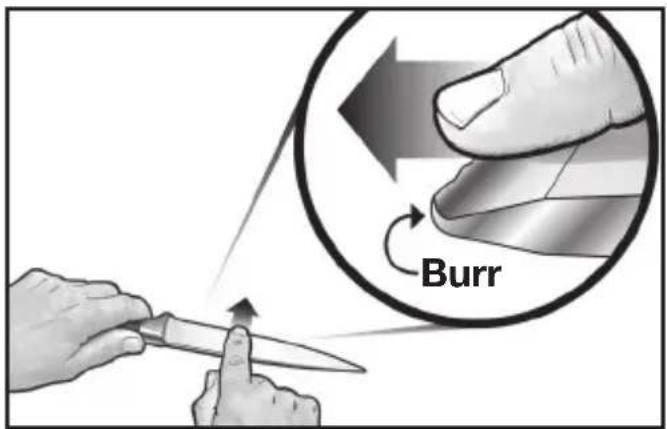
Figure 8. When you create a distinct burr along the blade edge, it can be detected by sliding finger across and away from the edge. Caution! See text on page 8.
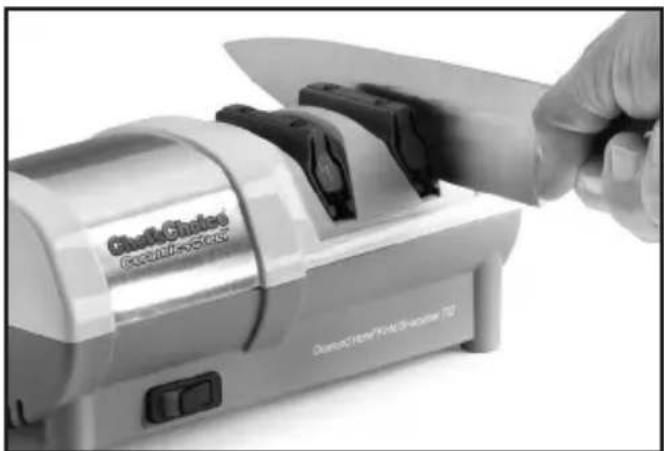
Figure 9. Stropping/Finishing of metal knife in Stage 2.
Do not over sharpen. When you have developed a burr along the full blade length proceed to the Stropping/Finishing Stage (Stage 2).
DETECTING THE BURR
To confirm the presence of a burr move your forefinger carefully across the edge in the direction shown (Figure 8). Do not move your finger along the edge – to avoid cutting your finger. If the last pull was in the right slot, the burr will appear only on the right side of the blade as you normally hold the knife when cutting and vice versa. The burr, when present, feels like a rough and bent extension of the edge; the opposite side of the edge feels very smooth by comparison. If there is no burr continue sharpening in the Stage 1, alternating left and right slots until a full burr develops. When a burr is present along the entire blade length, proceed as described below, to the Stage 2.
STROPPING/FINISHING A STEEL KNIFE IN STAGE 2
Pull the blade through the left slot and then through the right slot of the Stage 2. Make 2 pairs of pulls, (each pull 4-5 seconds) alternating each pull in the left and right slots of Stage 2.
Check the blade for sharpness. For a sharper edge, make one or more pairs of fast pulls in Stage 2 and check for sharpness. Repeat this procedure as needed to create an exceedingly sharp edge. Using a piece of paper to test sharpness is useful for reference.
RESHARPENING STEEL KNIVES
Resharpen/recondition straight edge steel knives whenever practical using stage 2 of the Model 702 sharpener. If after using your straight edged steel knife and notice that it becomes less sharp you may return to stage 2 for 1 to 2 pairs of pulls to recondition the knives edge. If this fails to bring the edge back to the sharpness desired, than repeat the full sharpening process starting in stage 1.
SHARPENING A STEEL SERRATED KNIFE
PROCEDURE FOR SHARPENING SERRATED BLADES
Serrated blades are available in multiple sizes and shapes and can include full length and partial length serrations. Serrations are formed by the manufacturers based on their design criteria, by grinding scalloped depressions, or grooves on only one side of the blade.
The Model 702 sharpener will restore the pointed teeth of the serrations, which do most of the cutting, and develop sharp microblades along the edge of these teeth.

Figure 10. Sharpening a serrated knife in Stage 2. Follow instructions carefully.
If your serrated blade edge has light wear, then only minimal effort is required to re-sharpen the edge, using only Stage 2 (Figure 10). First you need to establish on which side of the blade the serrations are formed. If the serrations are on the right side of the blade (as you would hold the knife when cutting) then re-sharpen the blade in the right slot of Stage 2. Slowly pull the knife (about 4-5 seconds per pull for an 8" blade, less for shorter blades and more for longer ones) through the sharpener. The stropping/polishing disk in Stage 2 will only sharpen the non-grooved side of the blade.
After 2 to 3 slow pulls through the right slot, finish by slowly pulling the knife through left slot of Stage 2, one times. Then check the edge for sharpness. The above process may be repeated 2 to 3 times to get the desired results.
If the serrations are ground on the left side of the blade, then start by re-sharpening the blade in the left slot of Stage 2, with 5 to 6 slow pulls, finishing with two slow pulls in the right side of Stage 2.
Traditional Japanese knives such as the sashimi blade are single sided and have a large factory bevel (Bevel A, Figure 11) on the one side of the blade. There are a large number of manufacturers of knives of this type used widely to prepare sashimi. The factory bevel (Bevel A) is commonly ground at about 10 degrees, but there are exceptions as that angle is not standardized at the factories. Designs of the traditional Japanese knives and the detailed structure of the cutting edges likewise varies widely from one manufacturer to the next, however there are some similarities. The cutting edge consists of a small primary facet on the front face of the blade below the large factory bevel and includes a much smaller secondary microfacet along the back face. Commonly the back side microfacet (Figure 12) can be easily seen only with a hand magnifier. The back face is ground flat at the factory or more commonly it is slightly hollow ground to ensure that an effective microfacet can be formed there as part of the cutting edge. Because of the lack of standardization, commonly, the manual approach is used to sharpen these knives. However, doing so has proven to be difficult, laborious and time consuming. The Chef's Choice® Model 702 Sharpener is designed to sharpen virtually all traditional, single sided, Asian blades and to create a factory-quality edge.

Figure 11. Cross-section of a single beveled traditional Asian blades are thinner and sharpened primarily on one side.

Figure 12. Cross-section of a typical factory traditional Asian knife edge, magnified 50x (right-handed).
Before you start to sharpen a traditional Japanese blade, examine it carefully in order to confirm that you have the traditional single bevel blade and to determine whether you have a right or left handed type as described in Figure 11. It is essential that you follow carefully the sharpening procedure and sequence as described below in order to achieve the optimum edge on your traditional blade.
Confirm which side of the blade has the large factory Bevel A. Hold the blade in your hand (as when you are cutting) and if the large factory bevel is on the right side of the blade, the blade is right handed. For the right handed blades sharpen only in the left slot of Stage 1 so that only the beveled side (right side) of the edge will contact the sharpening wheel. Proceed as described below.
SHARPENING TRADITIONAL JAPANESE KNIVES IN STAGE 1 (RIGHT HANDED BLADES)
In this example which assumes your traditional blade is right handed, you must sharpen only in the left slot of Stage 1. The number of pulls that you will need to make depends on the factory angle of Bevel A (Figure 11 and 12) and how dull your blade may be. Make five (5) to ten (10) pulls (1-2 seconds per inch) in only the left slot of Stage 1 and then check for a burr along the entire back side of the blade edge. (The burr created in Stage 1 will be small but can be felt as shown in Figure 8). Make certain the burr is present along the entire length of the edge. If there is no burr or only a partial burr, continue to make additional pulls all in the left slot about five (5) at a time and check for a burr after each group of five (5) pulls. In general 10-20 total pulls in the left slot will be adequate to raise a burr; it is unlikely to take more than 20 left slot pulls to create the burr. When a burr is confirmed, proceed to Stage 2 Stropping/Finish.
STROPPING/FINISHING THE FINAL EDGE ON TRADITIONAL JAPANESE BLADE IN STAGE 2 (RIGHT HANDED BLADES)
a. Make two to three (2-3) slow pulls, 3-4 seconds each, only in the left slot of Stage 2 Stropping/Finish and then proceed to remove the burr in step below.
b. Make one (1) regular pull in right slot of Stage 2 along the back side of the edge. (about 3-4 seconds.)
c. Make 1-2 pair of fast pulls (1-2 seconds each) alternating in left and right slots of Stage 2. Test blade for sharpness using a thin sheet of paper or a tomato. It should be razor sharp but if not repeat steps a, b and c above.
RESHARPENING THE TRADITIONAL JAPANESE BLADE (RIGHT HANDED)
In general you will be able to re-sharpen quickly by following the sequence of Steps a, b, c above. Repeat this if necessary to obtain a razor sharp edge. When re-sharpening only in Stage 2 fails to develop a sharp edge or if the edge has been substantially dulled you will need to re-sharpen the edge in Stage 1. Use only the left slot of Stage 1. Generally you will find that about five (5) pulls in the left slot of Stage 1 will be sufficient. In any event develop a burr before moving again to Stage 2. Finish the edge in Stage 2 following Steps a, b and c, above.
SHARPENING LEFT HANDED TRADITIONAL JAPANESE BLADES
The procedure you must use with left handed blades is similar to that procedure for right handed blades as detailed above – Except in all cases the slots you must use are reversed. Where the sharpening procedure for right handed blades calls for use of just the left slot, you must use only the right slot when sharpening a left-handed blade. Likewise use the left slot where ever the right handed instructions call for using the right slot.
DRESSING OF STROPPING/FINISHING DISKS
The Chef's Choice® Ceramic + Steel Model 702 is equipped with a built-in system to manually clean/dress the stropping/finishing disks in Stage 2. In the event these disks become glazed with grease, food or sharpening debris, they can be refreshed and reshaped by actuating the manual lever on the rear of the sharpener. This lever is located at the rear of the sharpener as shown in Figure 13 on the lower left corner as you face the rear of the sharpener. To actuate the cleaning/dressing tool, make sure the power is “ON” and follow these procedures:
- Press the lever to the RIGHT, hold 3-4 seconds
- Press the lever to the LEFT, hold 3-4 seconds
When the lever is moved in one direction, the dressing tool cleans and reshapes the active surface of one stropping/polishing disk. By moving the lever in the opposite direction you clean the other disk.
Use this clean/dress mechanism ONLY if the Stage 2 disks are seriously diminished in their sharpening effectiveness and they appear to not be stropping/finishing well. Using this tool removes material from the surface of the Stage 2 disks and hence, if used excessively, it will unnecessarily remove too much of the abrasive surface – wearing the disks prematurely. If that should occur, factory replacement of the disks will become necessary. If you clean your knives regularly before sharpening you will likely need to clean or dress the Stage 2 disks no more than once a year.

Figure 13. Use dressing tools sparingly.
- Always clean all food, fat and foreign materials from the blade surfaces before sharpening or resharpening. If badly soiled, use detergent and water to clean then dry knife thoroughly.
- Always pull the blades at the recommended speed and at a constant rate over length of blade. Never interrupt or stop the motion of the blade when in contact with abrasive disks.
- Carefully follow the detailed procedures for each type blade for best results and to extend the useful life of your knives.
4 The edge of the knife blade, while sharpening, should remain in contact with the abrasive disks as the knife is withdrawn from the guiding slot. To sharpen the blade near the tip of a curved blade, lift the handle up slightly as you approach the tip of the blade but just enough so that the edge as it is being sharpened maintains audible contact with the sharpening or polishing disk. - To increase your proficiency with the Chef's Choice® Ceramic + Steel Model 702, learn how to detect a burr along the edge of a steel knife (as described on page 7 and 8). While you might be able to sharpen well without using this technique, it is the fastest way to determine when you have sharpened sufficiently in the preliminary steps. This will help you avoid oversharpening and ensure incredibly sharp edges every time. Cutting a tomato or a piece of paper is a convenient method of checking for finished blade sharpness.
- Use only light downward pressure when sharpening – just enough to establish secure contact with the abrasive disk.
- If your knife has a significant choil you may find it helpful to place your index finger within or just behind the choil (see Figure 14) as you insert the blade in the sharpener. (Be careful, the tip of the choil may be sharp!) Your finger can act as a “stop” and prevent you from inserting the blade so far that the choil area will catch on the front stop-bar of the sharpener as you withdraw the blade. A little practice will help you perfect this technique. As you insert the blade let your finger slide down the front of the sharpener.

Figure 14. If your blade has a significant choil it may be helpful to place a finger behind it as shown when sharpening.
- Used correctly, you will find you can sharpen the entire blade to within 1/8" of the bolster or the knife handle. This is a major advantage of the Chef's Choice® Ceramic + Steel Model 702 compared to other sharpening methods—especially important when sharpening chef's knives where you need to sharpen the entire blade length in order to maintain the curvature of the edge line. If your chef's knives have a heavy, thick bolster near the handle extending to the edge, a commercial grinder can modify or remove the lower portion of the bolster so it will not interfere with the sharpening action, allowing you to sharpen the entire blade length.
- Sharpening ceramic knives will create a light white or black dust depending on the type of ceramic knife. This is normal. It is recommended that the user clean this dust from the sharpening slots and guide springs while the sharpener is turned off and disconnected from its power source (see “Cleaning The Sharpener” below).
- Clean all knives with mild soap and water after sharpening/stropping/finishing to remove debris from the knife PRIOR to using on food.
- Do not attempt to use this sharpener to sharpen scissors.
NORMAL MAINTENANCE
No lubrication is required for any moving parts, motor, bearings, or sharpening surfaces. There is no need for water on abrasives. The exterior of the sharpener may be cleaned by carefully wiping with a damp cloth. Do not use detergents or abrasives.
CLEANING THE SHARPENER
First, turn off the sharpener and disconnect it from its power source. The Chef's Choice Model 702 sharpener collects the metal swarf (dust) generated during the sharpening of steel knives using a magnetic clean-outcover located under Stage 1. Once a year or so as needed you should remove metal swarf that will accumulate inside the sharpener from repeated sharpening. Remove the small rectangular clean-out cover (Figure 15) that covers an opening on the underside Stage 1, of the sharpener. You will find metal particles adhered to a magnet attached to the inside of that cover. Simply rub off or brush off accumulated filings from the magnet with a paper towel or tooth brush and reinsert the cover in the opening. If larger amounts of metal or other dust have been crated you can shake out any remaining dust through the bottom opening when the cover is removed. After cleaning, replace the cover securely with its magnet in place.

Figure 15. Removing cover under base to clean out metal dust (see Normal Maintenance section).
However, ceramic knives are not magnetic, and therefore the ceramic swarf generated during the sharpening of ceramic knives needs to be cleaned out by different methods. The Model 702 has been designed with removable spring guides in Stages 1 and 2 (see Figures 16 and 17). To remove the spring guides, first turn off the sharpener and unplug it from the electric receptacle or power source. Press the latch at the back of the spring guide (Figure 16) and while pressing on the latch, pull up and remove the spring guide assembly. The spring guide assemblies can be rinsed under warm water, and then dried with a paper towel, or air dried (never put them in a dishwasher.)
The remaining Stages 1 and 2 sharpening module, exposed after removal of the spring guide assemblies, (see Figure 17) can be effectively cleaned with a vacuum cleaner attachment used for smaller jobs. Any remaining ceramic swarf, after vacuuming, can be removed with a moist paper towel.
After completing the cleaning of the spring guide assemblies, they should be reinserted into the sharpener by placing them into the provided open channel (see Figure 17) and snapping them into place, securely.
Please make sure that spring guide assemblies 1 and 2 are reinserted into their correct, corresponding stage.
It is particularly important to clean out the ceramic swarf prior to sharpening steel knives, since both ceramic and steel knives share Stages 1 and 2 for sharpening the knife. Ceramic swarf is harder than the metal used in steel knives, therefore, any remaining ceramic swarf in Stages 1 and 2 guides may put burnishing marks on the steel blade. Although these marks would not affect the performance of the steel knife, some people may find their appearance objectionable.
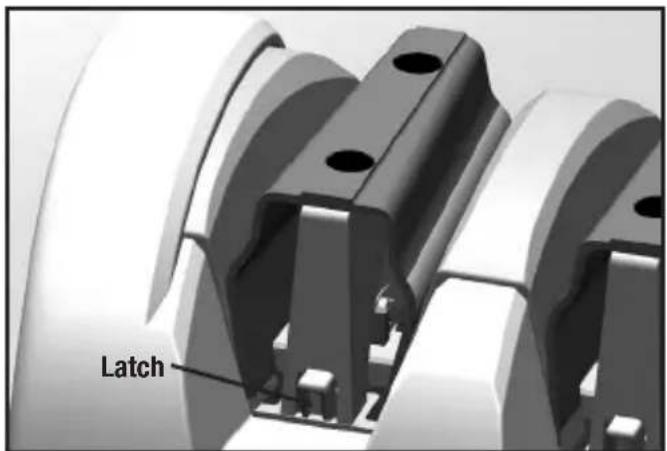
Figure 16. Removable spring guides.

Figure 17. Stage 2 spring guide removed from its channel.
SERVICE
In the event post-warranty service is needed, return your sharpener to the EdgeCraft factory where the cost of repair can be estimated before the repair is undertaken. Outside the USA, contact your retailer or national distributor.
Please include your return address, daytime telephone number and a brief description of the problem or damage on a separate sheet inside the box. Insure the shipment and retain a shipping receipt as evidence of shipment and as your protection against loss in shipment.
EdgeCraft
World Leader in Cutting Edge Technology®
EdgeCraft Corporation
825 Southwood Road, Avondale, PA 19311 U.S.A.
Customer Service (800) 342-3255 or 610-268-0500
Assembled in the U.S.A. www.chefschoice.com
This product may be covered by one or more EdgeCraft patents and/or patents pending as marked on the product.
Chef'sChoice ® , EdgeCraft ® , and the overall design of this product are registered trademarks of
EdgeCraft Corporation, Avondale, PA.
Conforms to UL Std. 982 Certified to CAN/CSA Std. C22.2 No. 64
Certified to EN 60335-1, EN 60335-2, EN 55014-1+A1, EN 61000-3-2, EN 61000-3-3
© EdgeCraft Corporation 2017
G17
C708203



- IMPORTANT SAFEGUARDS
- WHEN USING ELECTRICAL APPLIANCES, BASIC SAFETY PRECAUTIONS SHOULD ALWAYS BE FOLLOWED INCLUDING THE FOLLOWING
- YOU MADE AN EXCELLENT CHOICE
- GETTING ACQUAINTED WITH THE MODEL 702 SHARPENER
- SHARPENING THE CERAMIC KNIFE
- SHARPENING THE EDGE IN STAGE 1
- STROPPING/FINISHING THE EDGE IN STAGE 2
- RESHARPENING CERAMIC KNIVES
- SHARPENING A STEEL KNIFE
- SHARPENING THE EDGE OF A STEEL KNIFE IN STAGE 1
- DETECTING THE BURR
- STROPPING/FINISHING A STEEL KNIFE IN STAGE 2
- RESHARPENING STEEL KNIVES
- SHARPENING A STEEL SERRATED KNIFE
- PROCEDURE FOR SHARPENING SERRATED BLADES
- SHARPENING TRADITIONAL JAPANESE KNIVES IN STAGE 1 (RIGHT HANDED BLADES)
- STROPPING/FINISHING THE FINAL EDGE ON TRADITIONAL JAPANESE BLADE IN STAGE 2 (RIGHT HANDED BLADES)
- RESHARPENING THE TRADITIONAL JAPANESE BLADE (RIGHT HANDED)
- SHARPENING LEFT HANDED TRADITIONAL JAPANESE BLADES
- DRESSING OF STROPPING/FINISHING DISKS
- NORMAL MAINTENANCE
- CLEANING THE SHARPENER
- PLEASE MAKE SURE THAT SPRING GUIDE ASSEMBLIES 1 AND 2 ARE REINSERTED INTO THEIR CORRECT, CORRESPONDING STAGE
- SERVICE
- EDGECRAFT
Brand : Chef's Choice
Model : Ceramic+Steel Diamond Hone 702
Category : Knife sharpener