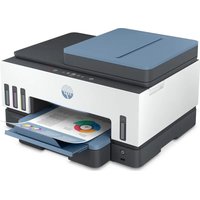
USER MANUAL Smart Tank 7602 HP
HP Smart Tank 7600 series
HP company notices
Copyright and License
THE INFORMATION CONTAINED HEREIN IS SUBJECT TO CHANGE WITHOUT NOTICE.
ALL RIGHTS RESERVED. REPRODUCTION, ADAPTATION, OR TRANSLATION OF THIS MATERIAL IS PROHIBITED WITHOUT PRIOR WRITTEN PERMISSION OF HP, EXCEPT AS ALLOWED UNDER THE COPYRIGHT LAWS. THE ONLY WARRANTIES FOR HP PRODUCTS AND SERVICES ARE SET FORTH IN THE EXPRESS WARRANTY STATEMENTS ACCOMPANYING SUCH PRODUCTS AND SERVICES. NOTHING HEREIN SHOULD BE CONSTRUED AS CONSTITUTING AN ADDITIONAL WARRANTY. HP SHALL NOT BE LIABLE FOR TECHNICAL OR EDITORIAL ERRORS OR OMISSIONS CONTAINED HEREIN.
© Copyright 2021 HP Development Company, L.P.
Trademark Credits
Microsoft and Windows are either registered trademarks or trademarks of Microsoft Corporation in the United States and/or other countries.
Mac, OS X, macOS, and AirPrint are trademarks of Apple Inc., registered in the U.S. and other countries.
ENERGY STAR and the ENERGY STAR mark are registered trademarks owned by the U.S. Environmental Protection Agency.
Android and Chromebook are trademarks of Google LLC.
iOS is a trademark or registered trademark of Cisco in the U.S. and other countries and is used under license.
Always follow basic safety precautions when using this product to reduce risk of injury from fire or electric shock.
- Read and understand all instructions in the documentation that comes with the printer.
- Observe all warnings and instructions marked on the product.
- Unplug this product from wall outlets before cleaning.
- Do not install or use this product near water, or when you are wet.
- Install the product securely on a stable surface.
- Install the product in a protected location where no one can step on or trip over the line cord, and the line cord cannot be damaged.
- If the product does not operate normally, see Solve a problem in this guide.
- There are no user-serviceable parts inside. Refer servicing to qualified service personnel.
Table of contents
1 Get started .... 1
Printer views .... 1
Printer front views....1 Printer rear view 2 Printer inner view....3
Control panel features....4
Overview of buttons and lights 4 Control panel display icons....5
Interpret status lights....5
Status lights overview 6 Status lights patterns....6 Wi-Fi status and Status light patterns 7
Print reports from the printer control panel....8
Change printer settings....9
To change printer settings from the printer control panel 9 To change printer settings from the embedded web server (EWS)....9 To change printer settings from HP Smart (iOS, Android, and Windows 10)....9
Use the HP printer software 9
To install HP printer software and open the software....10
Use the HP Smart app to print, scan, and manage 10
To install HP Smart and open the app....10 Get more information about HP Smart 11
2 Connect your printer 12
Before you begin....12
Connect your printer to a Wi-Fi network using HP Smart....12
Connect your printer to a Wi-Fi network with a router ....13
Connect your printer to a Wi-Fi network using HP printer software 13 Connect your printer to a Wi-Fi network using the printer control panel....13
Connect your printer to a Wi-Fi network using Wi-Fi Protected Setup (WPS) 14
Connect your printer to an Ethernet network....14
Connect your printer using a USB cable 15
Change the connection type....15
USB to a wireless connection....15 Wireless to a USB connection 16
Load paper 17
To load standard paper....17 To load legal paper....20
To load an envelope....21
To load cards and photo paper 22
Load original 23
To load an original on the scanner glass....24
To load an original in the document feeder 25
Change the paper settings 26
To change the paper settings from the embedded web server (EWS) 26
Paper basics....26
Recommended papers for printing 27
Order HP paper supplies 28
4 Print....29
Print from a Windows computer....29
Print from a Mac computer 29
Print with mobile devices 29
Print while connected to same Wi-Fi network 30
Print without connecting to same Wi-Fi network (Wi-Fi Direct) 30
5 Copy, Scan, and Mobile Fax 32
Copy from the printer 32
Copy an identification (ID) card....32
Scan from the printer control panel 33
Scan using the HP Smart app (iOS, Android, Windows 10, and macOS)....34
Scan using the HP printer software....34
Scan from a computer 34
Change scan settings (Windows)....35
Create a new scan shortcut (Windows) 35
Scan using Webscan 36
To enable Webscan 36
To scan using Webscan 36
Tips for successful scanning and copying 36
Mobile Fax 37
Use Mobile Fax in the HP Smart app 37
6 Fax....38
Send a fax....38
Send a standard fax 38
Send a standard fax from the computer 39
Send a fax from a phone....39
Send a fax using monitor dialing....39
Send a scheduled fax 40
Send a fax using printer memory 40
Send a fax to multiple recipients....41
Receive a fax 41
Receive a fax manually 42
Reprint received faxes from memory....42
Forward faxes to another number....43
Block unwanted fax numbers....43
Receive faxes using HP Digital Fax....43
Change fax settings 44
Manage fax settings 44
Basic fax settings....45
Advanced fax settings 45
Fax and digital phone services 48
Fax on Voice over Internet Protocol 49
View or print fax reports....49
Print fax confirmation reports....50
View or print the fax log 50
Additional fax setup....51
Set up faxing 51
Test fax setup....71
7 Configure your printer....72
Configure the printer using the embedded web server (EWS)....72
To access and use EWS 72
Configure IP network settings....73
Assign or change the system password using the embedded web server (EWS) 74
Update the printer 74
To change the settings for printer update from the printer control panel....75
To update the printer from the printer control panel 75
Use Web Services....75
Set up Web Services....75
Remove Web Services....76
8 Manage ink and printheads 77
Check the ink levels 77
To check the estimated ink levels from the printer control panel....77
To check the estimated ink levels from the printer software (Windows)....77
Refill ink tanks 77
To refill ink tanks....78
Order ink supplies 80
Print with black ink only (Windows) 81
Improve print quality 81
To print a print quality diagnostics page (Windows) 81
Understand the print quality diagnostics page....82
Align and clean printheads 82
To align or clean the printheads from the printer control panel 83
To align or clean the printheads from the embedded web server (EWS) 83
To align or clean the printheads (Windows) 83
Clean printer....83
To clean the printer from the printer software (Windows) 83
Tips for working with ink and printheads....84
Printhead tips....84
Ink tips....84
Move printer 84
9 Solve a problem 86
Jams and paper-feed issues 86
Clear a paper or print carriage jam 86
Learn how to avoid paper jams....92
Solve paper-feed problems 92
Printhead problem....95
To verify the printheads are installed properly....95
To clean printhead contacts....96
Printing issues 98
To resolve print issues (macOS)....98
To resolve print issues (Windows) 99
Copy and scan issues ....101
Fax issues....101
Run a fax test....101
What to do if the fax test failed....102
Troubleshoot fax problems 105
Network and connection issues....108
Fix network connection issues 108
Fix Wi-Fi Direct connection issues....109
Fix Ethernet connection issues....109
Restore original factory defaults and settings 109
To restore the printer to the original factory defaults from the printer control panel 110
To restore the printer network settings from the printer control panel 110
To restore the printer network settings from the printer....110
Solve Web Services problems....110
Printer hardware issues....111
Maintain the printer 112
Clean the scanner glass....112
Clean the document feeder glass area....113
Clean the exterior 113
Clean the document feeder 114
HP support 115
Contact HP....115
Register printer 116
Additional warranty options....116
10 HP EcoSolutions (HP and the Environment)....117
Power Management....117
Sleep mode 117
Auto-Off 117
To change the time for Sleep mode and Auto-Off from the embedded web server (EWS)....118
Schedule On and Off....118
Quiet Mode....118
To turn Quiet mode on or off or change the settings from the embedded web server (EWS) 119
Appendix A Technical information....120
Specifications....120
Regulatory notices....122
Regulatory Model Number....122
FCC statement....122
Power cord instructions....122
VCCI (Class B) compliance statement for users in Japan....123
Notice to users in Japan about the power cord....123
Visual display workplaces statement for Germany 123
Noise emission statement for Germany....123
European Union and United Kingdom Regulatory Notice 123
Declaration of conformity....123
Regulatory wireless and wired statements....124
Accessibility 130
Environmental product stewardship program....130
HP tips for reducing environmental impact 130
Eco-Tips....130
European Union Commission Regulation 1275/2008....130
Paper 131
Plastics....131
Safety data sheets....131
Recycling program....131
HP inkjet supplies recycling program....131
Power consumption....131
Disposal of waste equipment by users ....131
Waste disposal for Brazil 132
Chemical substances 132
The Table of Hazardous Substances/Elements and their Content (China)....132
Declaration of the Presence Condition of the Restricted Substances Marking (Taiwan) 133
Restriction of hazardous substance (India)....134
Restriction on hazardous substances statement (Turkey)....134
EPEAT 134
SEPA Ecolabel User Information (China)....135
China Energy Label for Printer, Fax and Copier 135
Battery disposal in Taiwan....136
European Union Battery Directive 136
Battery notice for Brazil....136
California Perchlorate Material Notice 136
Get started 1
This section describes the printer parts, control panel features, and other printer functionalities.
Printer views
This topic describes the printer parts.
Printer front views
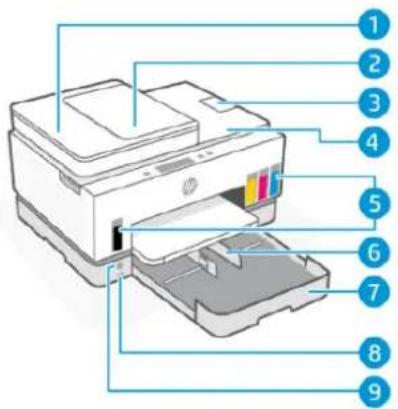
Table 1-1 Printer front view - 1
| Feature Description |
| 1 Document feeder cover |
| 2 Document feeder input tray |
| 3 Document feeder output extender |
| 4 Scanner lid |
| 5 Ink tanks |
| 6 Paper-width guides |
| 7 Input tray |
| 8 Front USB port |
| 9 Power button |
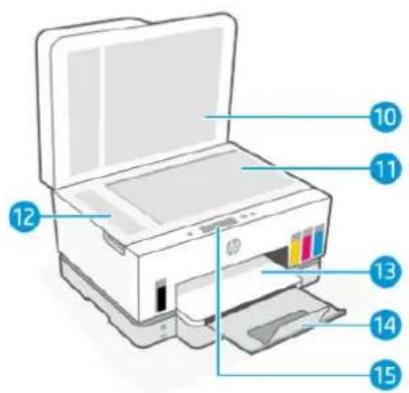
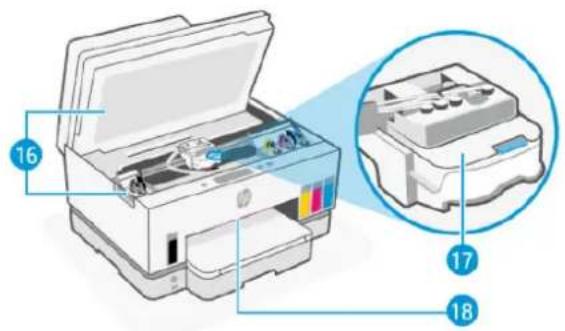
Table 1-2 Printer front views - 2
| Feature Description |
| 10 Scanner lid |
| 11 Scanner glass |
| 12 Document feeder glass |
| 13 Output tray |
| 14 Output tray extender |
| 15 Control panel |
| 16 Ink access door |
| 17 Print carriage |
| 18 Status light bar (See Interpret status lights.) |
Printer rear view
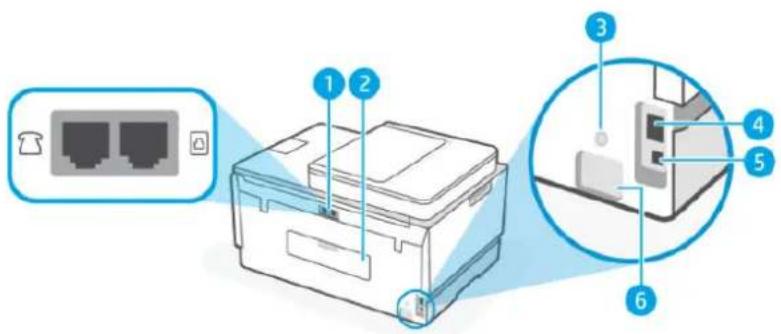
Table 1-3 Printer rear view
| Feature Description |
| 1 Fax ports |
| 2 Rear door |
| 3 Wi-Fi button |
| 4 Ethernet port |
| 5 USB port |
| 6 Power connection |
Printer inner view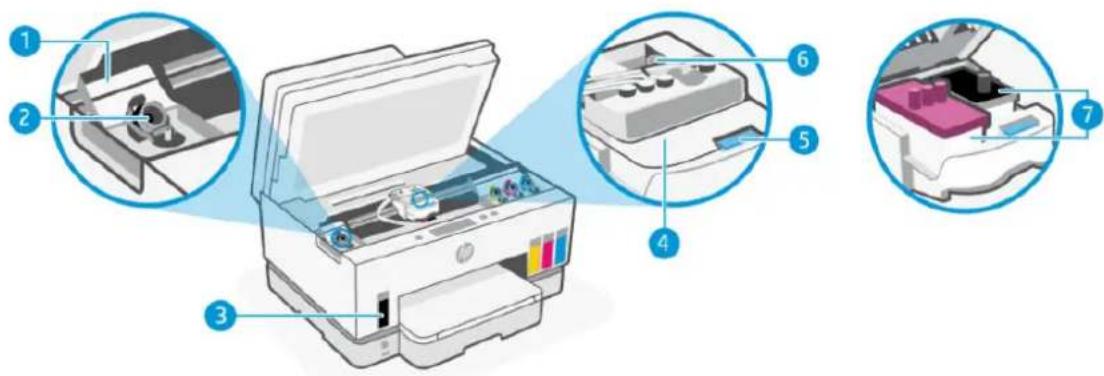
Table 1-4 Printer inner view
| Feature Description |
| 1 Tank covers | Tank covers enclose the ink tanks on both sides of the printer. |
| 2 Tank caps | Tank caps are plugs to seal the opening of the ink tanks. |
| 3 Ink tanks | There are four ink tanks. Each tank contains a different colored ink: black, yellow, magenta, and cyan. |
| 4 Printhead cover | The printhead cover on the print carriage secures the printheads in the carriage. Make sure the printhead cover is properly closed to avoid problems such as carriage jams.CAUTION: After you have set up the printer, do not open the printhead cover unless instructed to do so. |
| 5 Printhead cover button | Press to open the printhead cover.CAUTION: After you have set up the printer, do not open the printhead cover unless instructed to do so. |
| 6 Ink tubes button | Press to disconnect the ink tubes. To prevent ink leaks or printer damage, you must disconnect the ink tubes when moving the printer to a different location outside of your home or office after initial setup. |
| 7 Printheads | The printheads are the components in the print mechanism that apply ink to the paper. There are two printheads: a color printhead and a black printhead. |
| Printheads alignment is a process of aligning the printheads to improve print quality. See Improve print quality. |
Control panel features
This topic describes the printer control panel features.
The following diagram and related table provide a quick reference to the printer control panel features.

Table 1-5 Control panel overview
| Feature Button Description |
| 1 Back button |  | Returns to the previous screen. |
| 2 Control panel display | 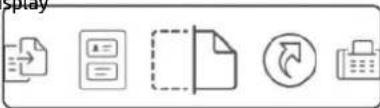 | Touch the screen to select options or functions, or scroll through menu items. |
| 3 Help button |  | Get more information for a feature or current operation. |
| 4 Cancel button |  | Stops the current operation. |
Control panel display icons
Table 1-6 Control panel display icons
| Icon Description |
 | CopyChange the document type or settings. |
| [5K2x] | ID Card CopyPlace a card or small-size document anywhere on the scanner glass to copy both sides onto the same page.SeeCopy an identification (ID) card. |
| [6WYS] | ScanSelect a destination for your scan. |
| [4XZS] | ShortcutsAccess a list of frequently used tasks. Use the HP Smart app to create and save the list in the printer.For more information on using HP Smart, go to:iOS/Android:www.hp.com/go/hpsmart-helpWindows 10:www.hp.com/go/hpsmartwin-helpmacOS:www.hp.com/go/hpsmartmac-help |
 | FaxSend or reprint faxes. |
 | MenuView printer information, settings, estimated ink levels, reports, and so on, and also access help information or videos. |
Interpret status lights
This section helps you interpret the status lights of the printer.
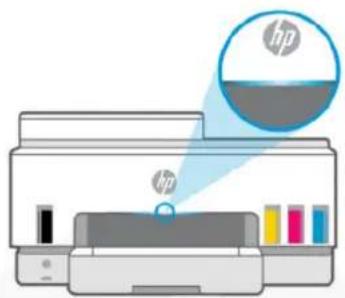
Status lights overview
Table 1-7 Overview
| Status light Description |
 | Amber The printer needs attention, an error might have occurred. |
 | Blue Shows the Wi-Fi network connection status. SeeWi-Fi statusand Status light patterns. |
 | Light blue The printer is either idle or in sleep mode, while connected to a Wi-Fi network. SeeWi-Fi status and Status light patterns. |
 | Green The printer is busy, doing an update, or turning on or off. |
 | Purple The printer is in Wi-Fi setup mode. SeeWi-Fi status andStatus light patterns. |
 | White Printer is idle, sleeping, or processing a job. |
Status lights patterns
Table 1-8 Amber
| Light behavior Description |
| Solid amber light appears on the bar. An error has occurred and is blocking the job. Check the printer display or HP Smart app for troubleshooting information. |
 |
| Solid amber light fast blinks. A serious error has occurred. Turn the printer off, and then on. |
 |
| Solid blue light pulses, and then flashes amber, repeating. | The printer is unable to connect to a Wi-Fi network. |
 | To resolve wireless connection issues, seeNetwork and connection issues. |
 | To connect the printer to a Wi-Fi network, seeConnect your printer to a Wi-Fi network using HP Smart or Connect your printer to a Wi-Fi network using Wi-Fi Protected Setup (WPS). |
| Solid purple light fast blinks, and then flashes amber, repeating. | Indicates Wi-Fi Protected Setup (WPS) error. |
 | SeeConnect your printer to a Wi-Fi network using Wi-Fi Protected Setup (WPS). |
Table 1-9 Green
 | |
| Green light pulses. | The printer is turning on or off, or doing a firmware update. |
 | SeeUpdate the printer. |
 | The printer is identifying itself, when triggered by an iOS device through Printer Settings. |
 | |
Table 1-10 White
| Light behavior Description |
| Solid white light appears on the bar. The printer is idle, and is not connected to a Wi-Fi network. |
| To connect the printer to a Wi-Fi network, seeConnect your printer to a Wi-Fi network using HP Smart or Connect your printer to a Wi-Fi network using Wi-Fi Protected Setup (WPS). |
| A small splash of white light in the center of the bar. The printer is in sleep mode, and is not connected to a Wi-Fi network. |
| White light grows from center to the edges and shrinks back, repeating. | The printer is processing a job, it could be printing, copying, scanning or faxing. |
Wi-Fi status and Status light patterns
To turn on or off the wireless capability of the printer
- On the Home screen of the printer display, touch

- Scroll down to touch Settings.
- Touch Network, and then touch Wi-Fi.
- Touch the toggle button next to Wi-Fi to turn the wireless capability on or off.
Table 1-11 Wi-Fi status and Status light patterns
| Status light Wi-Fi status |
| Solid white light appears on the bar. The printer is idle, and is not connected to a Wi-Fi network. |
 | To connect the printer to a Wi-Fi network, seeConnect your printer to a Wi-Fi network using HP Smart or Connect your printer to a Wi-Fi network using Wi-Fi Protected Setup (WPS). |
| Solid light blue appears on the bar. The printer is idle, and is connected to a Wi-Fi network. |
 | |
| A small splash of light blue in the center of the bar. | The printer is in sleep mode, and is connected to a Wi-Fi network. |
 | |
| Blue light pulses at the center, grows outward, and then shrinks back in, repeating. | The printer is trying to connect to a Wi-Fi network. |
 | |
| Solid blue light pulses, and then flashes amber, repeating. | The printer is unable to connect to a Wi-Fi network. |
 | To resolve wireless connection issues, seeNetwork and connection issues. |
| To connect the printer to a Wi-Fi network, seeConnect your printer to a Wi-Fi network using HP Smart or Connect your printer to a Wi-Fi network using Wi-Fi Protected Setup (WPS). |
Purple light pulses on the bar, repeating. | The printer is in Wi-Fi setup mode. Lasts for 2 hours after first turning on the printer.SeeConnect your printer and To restore the printer network settings from the printer control panel. |
Solid purple light fast blinks, and then flashes amber, repeating. | Indicates Wi-Fi Protected Setup (WPS) error.SeeConnect your printer to a Wi-Fi network using Wi-Fi Protected Setup (WPS). |
Print reports from the printer control panel
This topic describes the printer reports and how to print.
To print a report or an information page
- On the Home screen of the printer display, touch (Menu).
- Touch Info.
- Select the desired information to print and touch the print icon.
For other information or reports, see the following instructions.
Table 1-12 Print reports
| Printer report Description How to print |
| Printer Status Report | The page provides a summary of the printer information, current status, and settings, including connectivity settings, as well as print, scan, or fax settings and usage. | 1. In Menu, scroll down to touch Tools.2. Touch Reports.3. Touch Status Reports, and then select Printer Status Report. |
| Wi-Fi Network Test Report and Network Configuration Page | Wi-Fi Network Test Report shows the diagnostics results for the status of the Wi-Fi network, Wi-Fi signal strength, detected networks, and more.Network Configuration Page shows the network status, hostname, network name, and more. | 1. In Menu, scroll down to touch Tools.2. Touch Reports.3. Touch Status Reports, and then select the desired option. |
| Wi-Fi Quick Start Guide | Provides instructions to help you connect your printer to a Wi-Fi network. | 1. In Menu, scroll down to touch Settings.2. Touch Network, touch Wi-Fi, and then select the option to print the guide. |
| Print Quality Diagnostic Report | You can print a diagnostics page to determine if cleaning or aligning the printheads is recommended to improve print quality. SeeTo print a print quality diagnostics page (Windows). | 1. In Menu, scroll down to touch Tools.2. Touch Troubleshooting, and then touch Print Quality. |
Table 1-12 Print reports (continued)
| Printer report Description How to print |
| 3. Select the report, and then follow the onscreen instructions to print. |
| Fax Reports You can print a log of faxes that have been sent and received by the printer.The Last Fax Transaction report prints the details of the last fax transaction. Details include the fax number, number of pages, and the fax status. | 1. In Menu, scroll down to touch Tools.2. Touch Reports.3. Touch Fax Reports, and then select the desired option to print. |
Change printer settings

NOTE: You can also view or change the printer settings using the HP printer software. See Use the HP printer software.
To change printer settings from the printer control panel
You can change printer settings such as date, time, sleep or shutdown time, and volume from the control panel.
- On the Home screen of the printer display, touch (Menu).
- Scroll down to touch Settings.
- Touch General.
- Select the desired option and make the necessary changes.
To change printer settings from the embedded web server (EWS)
- Open EWS. See To access and use EWS.
- Search for a setting. Or click the desired function or tab, and then select a setting from the left menu.
- Make the necessary changes.
To change printer settings from HP Smart (iOS, Android, and Windows 10)
- Open the HP Smart app on your computer or mobile device. See Use the HP Smart app to print, scan, and manage.
- Select your printer, and then click or tap Printer Settings.
- Select the desired option and make the necessary changes.
Use the HP printer software
You can use the HP printer software to change the printer settings, check estimated ink levels, order printing supplies, maintain the printer, resolve printing issues, and more.
- If you are using the HP Smart app instead of the printer software, see Use the HP Smart app to print, scan, and manage.
- Each device must have the app or software installed in order to print.
- Windows 7 Service Pack 1 (SP1) is required to install HP printer software.
To install HP printer software and open the software
- Visit To install HP printer software and open the software to download the software and install on your computer.
- Open the software.
- Windows 10: From the computer desktop, click Start, select HP from the app list, and then select the icon with the printer name.
- Windows 7: From the computer desktop, click Start, select All Programs, click HP, click the folder for the printer, and then select the icon with the printer name.
Use the HP Smart app to print, scan, and manage
The HP Smart app can help you perform many different printer tasks, including the following:
- Set up and connect your printer.
- Print and scan documents and photos.
- Share documents through email and other applications.
- Manage printer settings, check printer status, print reports, and order supplies.

NOTE:
- HP Smart is supported on mobile devices and computers running on iOS, Android, Windows 10, and macOS (versions 10.14, 10.15, and 11.0).
- The HP Smart app might not be available in all languages. Some features might not be available with all printer models.
To install HP Smart and open the app
- Visit 123.hp.com to download and install HP Smart on your device.

NOTE: iOS, Android, Windows 10, and macOS devices: You can also download HP Smart from the respective app stores for the device.
- Open HP Smart after installation.
- iOS/Android: From the mobile device desktop or app menu, tap HP Smart.
- Windows 10: From the computer desktop, click Start, and then select HP Smart from the app list.
- macOS: From the Launchpad, select HP Smart.
- Connect your printer wirelessly using HP Smart. See Connect your printer to a Wi-Fi network using HP Smart.
- When prompted, create an HP account and register the printer.
If prompted for a password during the process, enter the PIN which is available from a label in the ink access area or cartridge access area.
To learn how to connect, print, and scan using HP Smart, visit the website for your device:
- iOS/Android: www.hp.com/go/hpsmart-help • Windows 10: www.hp.com/go/hpsmartwin-help • macOS: www.hp.com/go/hpsmartmac-help
Connect your printer
This section describes different ways to connect your printer.
Before you begin

NOTE:
- To turn on or off the wireless capability of the printer, see Wi-Fi status and Status light patterns. • To resolve network connection issues, see Fix network connection issues.
Ensure the following:
- The Wi-Fi network is set up and working properly.
- The printer and the computers that use the printer are on the same network (subnet).
While connecting the printer, you might be prompted to enter the Wi-Fi network name (SSID) and a Wi-Fi password.
- The Wi-Fi network name is the name of your Wi-Fi network.
- The Wi-Fi password prevents other people from connecting to your Wi-Fi network without your permission. Depending on the level of security required, your Wi-Fi network might use either a WPA passphrase or WEP key.
If you have not changed the network name or the security passkey since setting up your Wi-Fi network, you can sometimes find them on the back or side of the wireless router.
If you cannot find the network name or the security password or cannot remember this information, see the documentation provided with your computer or with the wireless router. If you still cannot find this information, contact your network administrator or the person who set up the Wi-Fi network.
Connect your printer to a Wi-Fi network using HP Smart
Install the HP Smart app on your computer or mobile device and use the app to set up or connect the printer to your Wi-Fi network.
For information about HP Smart including where to download the app, see Use the HP Smart app to print, scan, and manage.
- Make sure your computer or mobile device is connected to your Wi-Fi network. On your mobile device, turn on Bluetooth and location services.

NOTE: HP Smart uses Bluetooth for printer setup. It does not support print using Bluetooth.
- If your printer Wi-Fi was previously turned off, make sure to turn it on. See Wi-Fi status and Status light patterns.
- If the printer is no longer in Wi-Fi setup mode, restore the printer network settings. See To restore the printer network settings from the printer control panel.

NOTE: For some printers or models, the purple light will start pulsing on the status light bar or the Wi-Fi light will blink when the printer is in Wi-Fi setup mode. See Wi-Fi status and Status light patterns.
- Open the HP Smart app on your computer or mobile device. See Use the HP Smart app to print, scan, and manage.
- Click or tap ⊕ (the Plus icon) or Add Printer, and then choose the option to select or add a printer.
Follow the instructions to add the printer to your network.
- When prompted, create an HP account and register the printer.
If prompted for a password during the process, enter the PIN which is available from a label in the ink access area or cartridge access area.
Connect your printer to a Wi-Fi network with a router
This topic describes how to connect your printer to a Wi-Fi network using a router.
Connect your printer to a Wi-Fi network using HP printer software
To connect the printer to an integrated wireless WLAN 802.11 network, make sure you have the following:
- A wireless 802.11a/b/g/n/ac network that includes a wireless router or access point.

NOTE: The printer supports connections using 2.4GHz and 5GHz.
- A computer that is already connected to the Wi-Fi network that you want to use to connect your printer. • Network name (SSID).
- WEP key or WPA Passphrase (if needed).
To connect your printer using HP printer software (Windows)
If connecting the printer wirelessly using HP software, place the printer in Wi-Fi setup mode by restoring the printer network settings. See Restore original factory defaults and settings.
- In the HP printer software (available from the Start menu), click Tools. For information about the software, see Use the HP printer software.
- Click Device Setup & Software.
- Click Connect a new device.
- Select Manual Setup, select the wireless option, and then follow the onscreen instructions.
Connect your printer to a Wi-Fi network using the printer control panel
Use the Wi-Fi Setup Wizard from the printer control panel display to set up Wi-Fi communication.

NOTE: Before you proceed, go through the list at Before you begin.
- On the Home screen of the printer display, touch (Menu).
- Scroll down to touch Settings.
- Touch Network, and then touch Wi-Fi.
- Scroll down to touch Wi-Fi Setup or Wi-Fi Protected Setup.
- Follow the onscreen instructions to complete the setup.
Connect your printer to a Wi-Fi network using Wi-Fi Protected Setup (WPS)
This Wi-Fi setup method can be used if your router has a WPS button.
If the router does not have this button, it is recommended that you connect the printer using the HP Smart app. See Connect your printer to a Wi-Fi network using HP Smart.
- Make sure your router and printer are not too far from each other.
- To set up WPS, see Connect your printer to a Wi-Fi network using the printer control panel.
- Press the WPS button on your router.
NOTE:
- Be sure to press the WPS button on the router within 2 minutes.
- When the printer is connected successfully, the Wi-Fi light stops blinking and remains lit.
- Open the HP Smart app on your computer or mobile device. See Use the HP Smart app to print, scan, and manage.
- Click or tap ⊕ (the Plus icon) or Add Printer, and then choose the option to select or add a printer.
Follow the instructions to add the printer to your network.
- When prompted, create an HP account and register the printer.
If prompted for a password during the process, enter the PIN which is available from a label in the ink access area or cartridge access area.
Connect your printer to an Ethernet network
If your Ethernet network does not have an Internet connection, connect the printer wirelessly to the HP Smart app. See Connect your printer to a Wi-Fi network using HP Smart.
- Make sure your computer is connected to the router.
- Connect your printer and router using an Ethernet cable. (Ethernet cable sold separately.)
NOTE:
- The Wi-Fi connection is automatically disabled when you connect the Ethernet cable.
- To connect the printer wirelessly, disconnect the Ethernet cable and connect the printer to your Wi-Fi network using HP Smart. See Connect your printer to a Wi-Fi network using HP Smart.
- Open the HP Smart app on your computer. See Use the HP Smart app to print, scan, and manage.
- Click or tap ⊕ (the Plus icon) or Add Printer, and then choose the option to select or add a printer.
Follow the instructions to add the printer to your network.
- When prompted, create an HP account and register the printer.
If prompted for a password during the process, enter the PIN which is available from a label in the ink access area or cartridge access area.
Connect your printer using a USB cable
- If necessary, remove the label covering the USB port at the back of the printer.
- Connect the printer and computer using a USB cable.
- Open the HP Smart app on your computer. See Use the HP Smart app to print, scan, and manage.
- Click or tap the Plus icon ⊕ or Add Printer, and then choose the option to select or add a printer.
Follow the instructions to add the printer.
- When prompted, create an HP account and register the printer.
If prompted for a password during the process, enter the PIN which is available from a label in the ink access area or cartridge access area.
Change the connection type
This topic describes how to change the way to connect your printer.
USB to a wireless connection
Windows 10/macOS
- Unplug the USB cable from the printer.
- Make sure your computer or mobile device is connected to your Wi-Fi network. On your mobile device, turn on Bluetooth and location services.
- If your printer Wi-Fi was previously turned off, make sure to turn it on. For more information about Wi-Fi status, see Wi-Fi status and Status light patterns.
- If the printer is no longer in Wi-Fi setup mode, restore the printer network settings. See To restore the printer network settings from the printer control panel.
- Open the HP Smart app on your computer or mobile device. See Use the HP Smart app to print, scan, and manage.
- When prompted, create an HP account and register the printer.
If prompted for a password during the process, enter the PIN which is available from a label in the ink access area or cartridge access area.
- Follow the on-screen instructions to connect the printer to your Wi-Fi network.
Windows 7
- Open the HP printer software.
If you have not installed the HP printer software on your computer, visit 123.hp.com to download and install the printer software.

NOTE: Windows 7 Service Pack 1 (SP1) is required to install HP printer software.
- In the printer software, click Tools, and then click Device Setup & Software.
- Select Convert a USB connected device to wireless. Follow the on-screen instructions.
Wireless to a USB connection
Windows/macOS
- If necessary, remove the label covering the USB port at the back of the printer.
- Connect the printer and computer using a USB cable.
- Open the HP Smart app on your computer. See Use the HP Smart app to print, scan, and manage.
- Click or tap the Plus icon ⊕ or Add Printer, and then choose the option to select or add a printer.
Follow the instructions to add the printer.
- When prompted, create an HP account and register the printer.
If prompted for a password during the process, enter the PIN which is available from a label in the ink access area or cartridge access area.
This section describes how to change paper settings and to load different media into the printer.
Load paper
This topic describes how to load paper into the input tray.

NOTE:
- Do not load paper while the printer is printing.
- If there is other paper in the input tray, remove the paper before loading a different paper type or size.
- When prompted after loading paper, change the paper settings on the printer control panel to match the paper you are using.
- For the media supported by your printer, refer to the printer software or the embedded web server (EWS). To open EWS, see To access and use EWS.
To load standard paper
- Open the input tray.

- Press and hold the button on the paper-width guide, and then slide the guides to the edges of the tray.

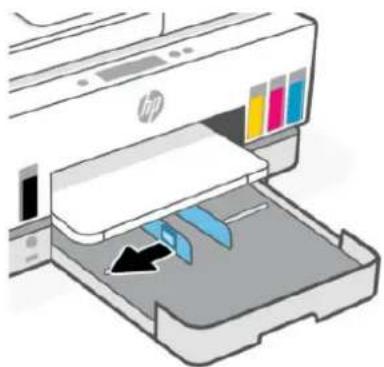
- Insert the paper in portrait orientation and with the side to be printed facing down.
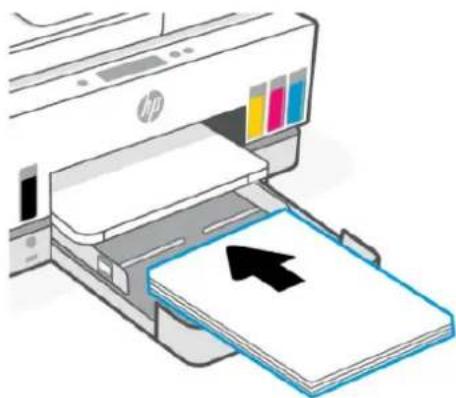
Make sure the stack of paper is aligned with the appropriate paper size lines in the tray. Also, make sure the stack of paper does not exceed the stack-height marking in the tray.

- Adjust the paper-width guides until they touch the edges of the stack of paper.
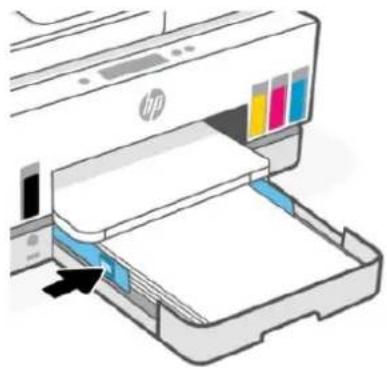
- Close the input tray.
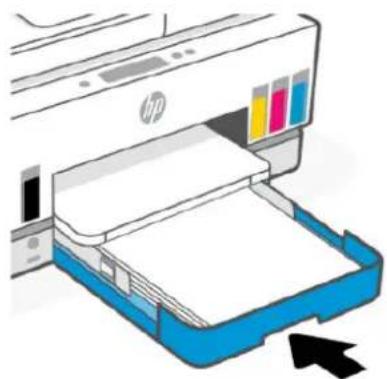
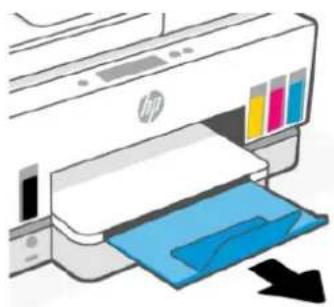
- Pull out the output tray extender.
To load legal paper
- Open the input tray.
- Press and hold the button on the paper-width guide, and then slide the guides to the edges of the tray.
- Press and hold the button on the front edge of the input tray and extend the input tray.


- Insert the paper in portrait orientation and with the side to be printed facing down.
Make sure the stack of paper is aligned with the appropriate paper size lines in the tray. Also, make sure the stack of paper does not exceed the stack-height marking in the tray.

- Adjust the paper-width guides until they touch the edges of the stack of paper.

- Close the input tray.

NOTE: When you reinsert the tray, the extended part is expected to remain outside the printer.
- Pull out the output tray extender.

To load an envelope
- Open the input tray.
- Press and hold the button on the paper-width guide, and then slide the guides to the edges of the tray.
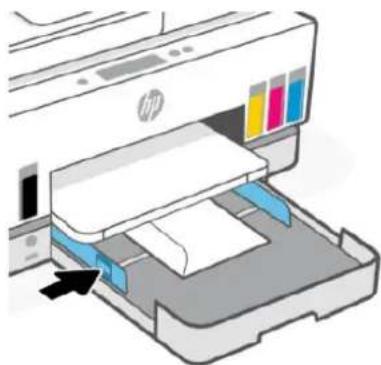
- Insert the envelope in portrait orientation and with the side to be printed facing down.

Make sure the stack of paper is aligned with the appropriate paper size lines in the tray. Also, make sure the stack of paper does not exceed the stack-height marking in the tray.

- Adjust the paper-width guides until they touch the edges of the stack of paper.
- Close the input tray.
- Pull out the output tray extender.
To load cards and photo paper
- Open the input tray.
- Press and hold the button on the paper-width guide, and then slide the guides to the edges of the tray.
- Insert the cards or photo paper in portrait orientation and with the side to be printed facing down.
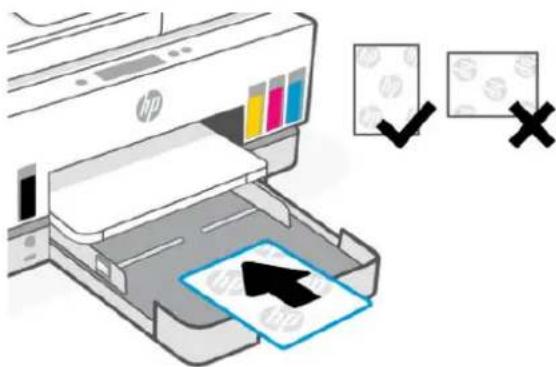
Make sure the stack of paper is aligned with the appropriate paper size lines in the tray. Also, make sure the stack of paper does not exceed the stack-height marking in the tray.
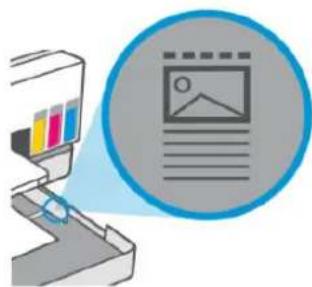
- Adjust the paper-width guides until they touch the edges of the stack of paper.
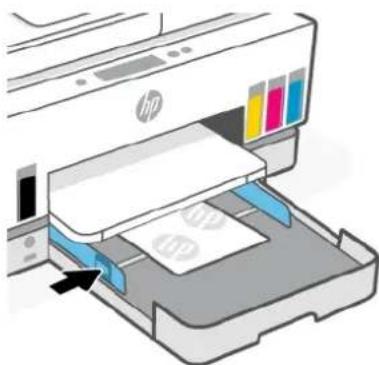
- Close the input tray.
- Pull out the output tray extender.
Load original
This topic describes how to load an original into the printer.
To load an original on the scanner glass
- Lift the scanner lid.
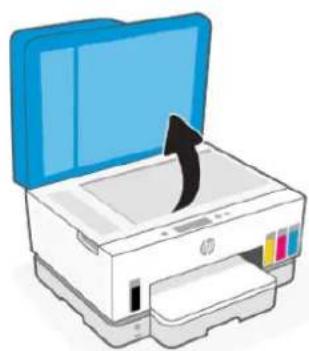
- Load the original print-side down on the scanner glass (aligned to the indicated corner).

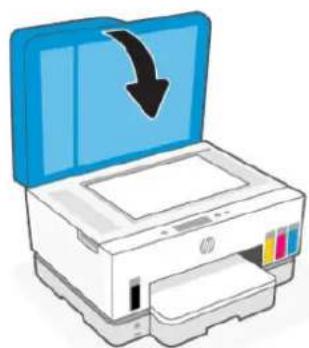
- Close the scanner lid.
To load an original in the document feeder
- Open the document feeder output tray extender.
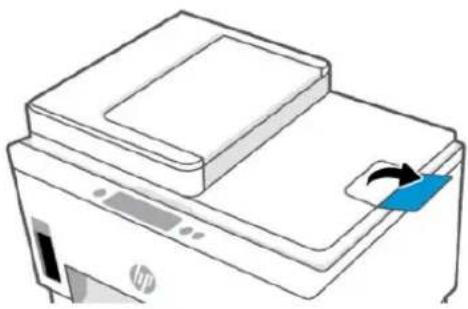
- Open the document feeder input tray.

- Slide the paper-width guides outwards.
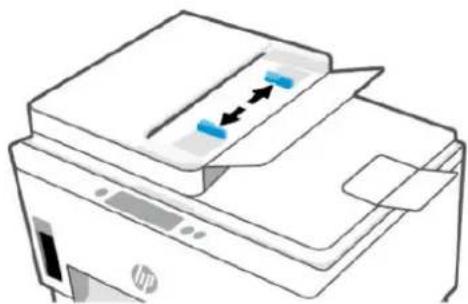
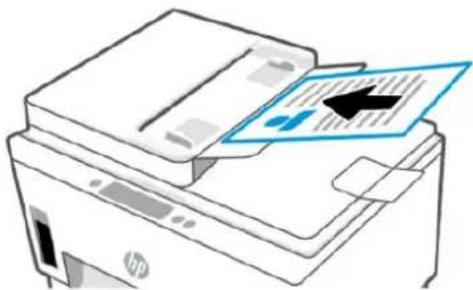
- Load original print-side up in the document feeder.
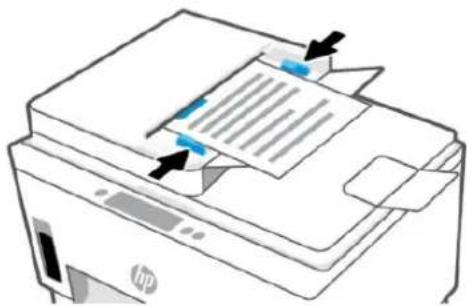
- Slide the paper-width guides inward until they stop at the edge of the paper.
Change the paper settings

NOTE:
- When prompted after loading paper, change the paper settings on the printer control panel to match the paper you are using.
- For your security, some settings in the embedded web server (EWS) are password-protected. Enter the password if prompted. This is the password you have set in the EWS or the default PIN on a label in the ink access area.
To change the paper settings from the embedded web server (EWS)
- Open EWS. See To access and use EWS.
- Click the Settings tab.
- From the left menu, click Preferences.
- Click Tray and Paper Management, and then make the necessary changes.
- Click Apply.
Paper basics
The printer is designed to work well with most types of office paper. It is best to test a variety of print paper types before buying large quantities.
Use HP paper for optimum print quality. Visit the HP website at www.hp.com for more information about HP paper.

HP recommends plain papers with the ColorLok logo for printing everyday documents. All papers with the ColorLok logo are independently tested to meet high standards of reliability and print quality, and produce documents with crisp, vivid color, bolder blacks, and that dry faster than ordinary plain papers. Look for papers with the ColorLok logo in a variety of weights and sizes from major paper manufacturers.
Recommended papers for printing
If you want the best print quality, HP recommends using HP papers that are specifically designed for the type of project you are printing. Depending on your country/region, some of these papers might not be available.
Photo printing
• HP Advanced Photo Paper
This glossy photo paper features an instant-dry finish for easy handling without smudging. It resists water, smears, fingerprints, and humidity. Your prints have a look and feel comparable to a store-processed photo. It is available in several sizes, including A4, 8.5 x 11 inches, 10 x 15 cm (4 x 6 inches), 13 x 18 cm (5 x 7 inches). It is acid-free for longer lasting documents.
• HP Everyday Photo Paper
Print colorful, everyday snapshots at a low cost, using paper designed for casual photo printing. This affordable photo paper dries quickly for easy handling. Get sharp, crisp images when you use this paper with any inkjet printer. It is available in glossy finish in several sizes, including A4, 8.5 x 11 inches, 5 x 7 inches, and 4 x 6 inches (10 x 15 cm). It is acid-free for longer lasting documents.
• HP Photo Value Packs
HP Photo Value Packs conveniently package original HP ink cartridges and HP Advanced Photo Paper to save you time and take the guesswork out of printing affordable, lab-quality photos with your HP printer. Original HP inks and HP Advanced Photo Paper have been designed to work together so your photos are long lasting and vivid, print after print. Great for printing out an entire vacation's worth of photos or multiple prints to share.
Business documents
• HP Enhanced Laser Matte Paper 150g
This paper is a heavy matte laser paper, ideal for printing professional-color marketing materials including brochures.
HP Brochure Paper 180g Glossy or HP Professional Paper 180 Glossy
These papers are glossy-coated on both sides for two-sided use. They are the perfect choice for near-photographic reproductions and business graphics for report covers, special presentations, brochures, mailers, and calendars.
Everyday printing
All the papers listed for everyday printing feature ColorLok Technology for less smearing, bolder blacks, and vivid colors.
• HP Bright White Inkjet Paper
HP Bright White Inkjet Paper delivers high-contrast colors and sharp text. It is opaque enough for two-sided color usage with no show-through, which makes it ideal for newsletters, reports, and flyers.
- HP Printing Paper
HP Printing Paper is a high-quality multifunction paper. It produces documents that look and feel more substantial than documents printed on standard multipurpose or copy paper. It is acid-free for longer lasting documents.
• HP Office Paper
HP Office Paper is a high-quality multifunction paper. It is suitable for copies, drafts, memos, and other everyday documents. It is acid-free for longer lasting documents.
• HP Office Recycled Paper
HP Office Recycled Paper is a high-quality multifunction paper made with 30% recycled fiber.
Order HP paper supplies
The printer is designed to work well with most types of office paper. Use HP paper for optimum print quality.
To order HP papers and other supplies, go to www.hp.com. At this time, some portions of the HP website are available in English only.
HP recommends plain papers with the ColorLok logo for printing and copying of everyday documents. All papers with the ColorLok logo are independently tested to meet high standards of reliability and print quality, and produce documents with crisp, vivid color, bolder blacks and shorter dry-time than ordinary plain papers. Look for papers with the ColorLok logo in a variety of weights and sizes from major paper manufacturers.
Print
This section describes how to print from different devices.
This printer is designed to work with the HP Smart app, a software application that makes it easy to print, scan, and manage your printer from a smartphone, laptop, desktop computer, or other devices.
You can print and manage the printer from all of your devices by installing the app on each device. For more information about the app, see Use the HP Smart app to print, scan, and manage.
Print from a Windows computer
- Make sure you have installed the HP Smart app. See Use the HP Smart app to print, scan, and manage.
- Open the document you wish to print.
- From the File menu in your software program, select the Print option.
- Click the button that opens the Properties dialog box.
Depending on your software application, this button might be called Properties, Options, Setup, or Preferences.
- Make sure your printer is selected.
- Change any print settings, and click OK.
- Click Print or the OK button to print.
Print from a Mac computer
- Make sure you have installed the HP Smart app. See Use the HP Smart app to print, scan, and manage.
- From the computer, open System Preferences, and select Printers and Scanners.
- Click the Add button/icon +, select the printer from the printer list, and then click Add.
- Once connected, open the document you wish to print and use the Print command.
- Make sure the desired printer is selected.
- Change any print settings.
- Click Print to print the document.
Print with mobile devices
You can use the HP Smart app to print documents and photos from your mobile device, social media account, or cloud storage.
See Use the HP Smart app to print, scan, and manage.
You can also print directly from your mobile devices using AirPrint (iOS) or HP Print Service Plugin (Android):
- iOS: Devices running iOS 4.2 or later have AirPrint pre-installed.
- Android: Download the HP Print Service Plugin from the Google Play Store or your favorite app store, and then enable it on your device.

NOTE: You can print using HP Smart or AirPrint/HP Print Service Plugin when the mobile device is on the same network as the printer or a different network (using Wi-Fi Direct).
Print while connected to same Wi-Fi network
You can print documents and photos from your mobile device when the device is on the same Wi-Fi network as the printer.
Visit www.hp.com/go/mobileprinting for more information on mobile printing.

NOTE: Make sure your mobile device and printer are connected to the same Wi-Fi network. See Connect your printer to a Wi-Fi network using HP Smart.
Print without connecting to same Wi-Fi network (Wi-Fi Direct)
With Wi-Fi Direct, you can directly connect your computer or mobile device to the printer and print wirelessly —without connecting your computer or mobile device to an existing wireless network.
Visit www.hp.com/go/mobileprinting for more information on Wi-Fi Direct.

NOTE:
- Make sure Wi-Fi Direct on your printer is turned on.
- Up to 5 computers and mobile devices can connect to the printer using Wi-Fi Direct connection.
To turn on or off Wi-Fi Direct
- On the Home screen of the printer display, touch (Menu).
- Scroll down to touch Settings.
- Touch Network.
- Scroll down to touch Wi-Fi Direct.
- Touch the toggle button next to Wi-Fi Direct to turn it on or off.
- Touch View Details to see the status and details.

TIP: You can also turn on Wi-Fi Direct from the EWS. For more information about using the EWS, see To access and use EWS.
To find the Wi-Fi Direct name or password
- On the Home screen of the printer display, touch (Menu).
- Touch Info, scroll down, and then touch Wi-Fi Direct.
The Wi-Fi Direct name and password are displayed onscreen.

NOTE: For other network details, print the network configuration page. See Print reports from the printer control panel.
To change connection method
- On the Home screen of the printer display, touch
- Scroll down to touch Settings.
- Touch Network.
- Scroll down to touch Wi-Fi Direct.
- Touch Connection Method, and then select Automatic or Manual.

Copy, Scan, and Mobile Fax
This section describes the copy, scan, and mobile fax features.
Copy from the printer

NOTE: All documents are copied in normal quality print mode. You cannot change the print mode quality when copying.
- Load paper in the input tray. See Load paper.
- Place the original print-side up in the document feeder or print-side down on the scanner glass (aligned to the corner with an icon). See Load original.
- On the Home screen of the printer display, touch (Copy).
- Change the desired copy settings, and then touch Copy.
- For 2-sided copying, place the second page on the scanner glass, and then proceed to copy.

Copy an identification (ID) card
The ID Copy feature allows you to place a card or small-size document anywhere on the scanner glass to copy both sides onto the same page.
- Load paper in the input tray.
See Load paper.
- On the Home screen of the printer display, touch

(ID Card Copy).
- Change the desired copy settings, and then touch Copy.
- Follow the onscreen instructions to place the card anywhere on the scanner glass, away from the edges or corners of the glass. Then, close the scanner lid and proceed.
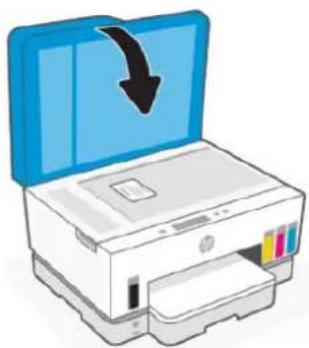
- When prompted, open the scanner lid, flip the card, and then follow the onscreen instructions to print the page.


Scan from the printer control panel
- Place the original print-side up in the document feeder or print-side down on the scanner glass (aligned to the corner with an icon).
- On the Home screen of the printer display, touch (Scan).
- Touch the desired option to scan.
- Follow the onscreen instructions to scan or save.
Scan using the HP Smart app (iOS, Android, Windows 10, and macOS)
You can use the HP Smart app to scan documents or photos from the printer's scanner, and you can also scan using your device camera. HP Smart includes editing tools that allow you to adjust the scanned image before saving or sharing. You can print, save your scans locally or in cloud storage, and share them via email, SMS, Facebook, Instagram, etc. To scan with HP Smart, follow the instructions provided in the appropriate URLs below, depending on the type of device you are using.
- iOS/Android: www.hp.com/go/hpsmart-help • Windows 10: www.hp.com/go/hpsmartwin-help • macOS: www.hp.com/go/hpsmartmac-help
Scan using the HP printer software
This topic describes how to scan using the HP printer software.
Scan from a computer
Before scanning from a computer, make sure you have already installed the HP recommended printer software. The printer and computer must be connected and turned on.
To scan a document or photo to a file (Windows)
- Place the original print-side up in the document feeder or print-side down on the scanner glass (aligned to the corner with an icon).
- In the HP printer software (available from the Start menu), click Scan, and then click Scan a Document or Photo.
- Select the type of scan you want, and then click Scan.
Choose the file format to save the document (or photo).

NOTE:
- Click the More link at the top right corner of the Scan dialog to review and modify settings for any scan. See Change scan settings (Windows).
- If Show Viewer After Scan is selected, you can make adjustments to the scanned image in the preview screen.
To scan a document or photo to email (Windows)
- Place the original print-side up in the document feeder or print-side down on the scanner glass (aligned to the corner with an icon).
- In the HP printer software, available from the Start menu, click Scan, and then click Scan a Document or Photo.
- Select the type of scan you want, and then click Scan.

NOTE:
- Click the More link at the top right corner of the Scan dialog to review and modify settings for any scan. See Change scan settings (Windows).
- If Show Viewer After Scan is selected, you can make adjustments to the scanned image in the preview screen.
Change scan settings (Windows)
You can modify any of the scan settings either for a singular use or save the changes to use permanently. These settings include options such as page size and orientation, scan resolution, contrast, and the folder location for saved scans.
- Place the original print-side up in the document feeder or print-side down on the scanner glass (aligned to the corner with an icon).
- In the HP printer software, available from the Start menu, click Scan, and then click Scan a Document or Photo.
- Click the More link in the top right corner of the HP Scan dialog. The detailed settings pane appears on the right. The left column summarizes the current settings for each section. The right column allows you to change the settings in the highlighted section.
- Click each section at the left of the detailed settings pane to review the settings in that section.
You can review and change most settings using drop-down menus.
Some settings allow greater flexibility by displaying a new pane. These are indicated by a + (plus sign) at the right of the setting. You must either click OK to accept or click Cancel to cancel any changes on this pane to return to the detailed settings pane.
- When you have finished changing settings, do one of the following:
- Click Scan. You are prompted to save or reject the changes to the shortcut after the scan is finished.
- Click the save icon to the right of the shortcut, and then click Scan.
Create a new scan shortcut (Windows)
You can create your own scan shortcut to make scanning easier. For example, you might want to regularly scan and save photos in PNG format, rather than JPEG.
- Place the original print-side up in the document feeder or print-side down on the scanner glass (aligned to the corner with an icon).
- In the HP printer software, available from the Start menu, click Scan, and then click Scan a Document or Photo.
- Click Create New Scan Shortcut.
- Enter a descriptive name, choose an existing shortcut on which to base your new shortcut, and then click Create.
- Change the settings for your new shortcut to meet your needs, and then click the save icon to the right of the shortcut.

NOTE: Click the More link at the top right corner of the Scan dialog to review and modify settings for any scan.
For more information, see Change scan settings (Windows).
Scan using Webscan
Webscan is a feature of the EWS that lets you scan photos and documents from your printer to your device using a web browser.

NOTE: For your security, some settings in the EWS are password-protected. Enter the password if prompted. This is the password you have set in the EWS or the default PIN on a label in the ink access area.
To enable Webscan
- Open EWS. For more information, see To access and use EWS.
- Click the Settings tab.
- From the left menu, click Security, and then select Administrator Settings.
- Select the option to enable Webscan.
- Click Apply.
To scan using Webscan
Scanning using Webscan offers basic scan options. For additional scan options or functionality, scan from the HP printer software.
- Place the original print-side up in the document feeder or print-side down on the scanner glass (aligned to the corner with an icon). See Load original.
- Open EWS. For more information, see To access and use EWS.
- Click the Scan tab.
- From the left menu, click Webscan.
- Select the desired options, and then click Start Scan.
Tips for successful scanning and copying
Use the following tips to copy and scan successfully:
- Keep the glass and the back of the lid clean. The scanner interprets anything it detects on the glass as part of the image.
- Load the original print-side down on the scanner glass (aligned to the corner with an icon).
- To make a large copy of a small original, scan the original into the computer, resize the image in the scanning software, and then print a copy of the enlarged image.
- To avoid incorrect or missing scanned text, make sure the brightness is set appropriately in the software. • Make sure to select the correct source (for example, scanner glass) for scanning when using HP software.
- When the document feeder is properly loaded with an original, the control panel display will indicate so.
Mobile Fax
Use the HP Smart app to quickly scan and fax multiple pages at once from your mobile device or computer.
For more information about Mobile Fax, visit the HP Smart website.
Use Mobile Fax in the HP Smart app
- Make sure your mobile device or computer are connected to a network. Launch the HP Smart app and sign into or create your HP account.
- Select the Mobile Fax tile.
If you do not see the Mobile Fax tile, enable it as follows:
- On a mobile device: Tap Personalize Tiles, tap the Mobile Fax toggle to enable the tile, and then go back to the Home screen.
- On a Windows 10 device: Click the Settings, select Personalize Tiles, and click the Mobile Fax toggle to enable the tile. Then, go back to the Home screen.
- On a Mac device: From the menu bar, select HP Smart >Personalize Tiles. Set the Mobile Fax option to On.

NOTE: Mobile Fax is available in specific countries/regions. If you do not see a Mobile Fax option in the Personalize Menu, Mobile Fax might not be available in your country/region.
- Fill out the necessary mobile fax information.
- To add a cover page, tap the Add a cover page toggle, and then type a subject and message.
- Scan the item you want to fax using your printer or mobile device camera, or attach a supported file type. Send the fax when ready.
Your fax will be securely delivered and you can track the status in the HP Smart app.
6 Fax
You can use the printer to send and receive faxes, including color faxes. You can schedule faxes to be sent at a later time and set up phone book contacts to send faxes quickly and easily to frequently used numbers.

NOTE: Before you begin faxing, make sure you have set up the printer correctly for faxing. You can verify the fax is set up correctly by running the fax setup test from the printer control panel. See Run a fax test.
Send a fax
You can send a fax in a variety of ways, depending on your situation or need.
Send a standard fax
You can easily send a single- or multiple-page black-and-white or color fax by using the printer control panel.

NOTE:
- Send single-page faxes by placing the original on the glass. Send multiple page faxes using the document feeder.
- If you need printed confirmation that your faxes were successfully sent, fax confirmation must be enabled.
To send a standard fax from the printer control panel
- Place the original print-side up in the document feeder or print-side down on the scanner glass (aligned to the corner with an icon).
- On the Home screen of the printer display, touch (Fax).
- Touch Send Now.
- Touch Send to Contacts. Select an address book or phone book, and then select one or more contacts.
Alternatively, touch Enter Fax Number, and then enter the fax number using the screen keypad when prompted.

TIP:
- To add a pause in the fax number you are entering, touch * (asterisk), and then select - (dash) from the display.
- If the recipient reports issues with the quality of the fax, try changing the resolution of your fax.
- Touch Options to change the resolution or color.
- Touch Send.
Send a standard fax from the computer
You can fax a document directly from your computer without printing it first.
To use this feature, make sure you have installed the HP printer software on your computer, the printer is connected to a working telephone line, and the fax function is set up and functioning correctly.
To send a standard fax from the computer (Windows)
- Open the document on your computer that you want to fax.
- On the File menu in your software application, click Print.
- From the Name list, select the printer that has "fax" in the name.
- To change settings (such as selecting to send the document as a black fax or a color fax), click the button that opens the Properties dialog box. Depending on your software application, this button might be called Properties, Options, Printer Setup, Printer, or Preferences.
- After you have changed any settings, click OK.
- Click Print or OK.
- Enter the fax number and other information for the recipient, change any further settings for the fax, and then click Send Fax. The printer begins dialing the fax number and faxing the document.
Send a fax from a phone
You can send a fax using your telephone extension. This allows you to talk with the intended recipient before sending the fax.
To send a fax from an extension phone
- Place the original print-side up in the document feeder or print-side down on the scanner glass (aligned to the corner with an icon).
- Dial the number by using the keypad on the phone that is connected to the printer.
If the recipient answers the telephone, inform the recipient that they should receive the fax on their fax machine after they hear fax tones. If a fax machine answers the call, you will hear fax tones from the receiving fax machine.
- On the Home screen of the printer display, touch (Fax).
- When you are ready to send the fax, follow the onscreen instructions to proceed.
You will hear fax tones during fax transmission. If you want to speak to the recipient after, remain on the line until the transmission is complete. If you were finished talking to the recipient, you can hang up the telephone as soon as the fax begins transmitting.
Send a fax using monitor dialing
When you send a fax using monitor dialing, you can hear the dial tones, telephone prompts, or other sounds through the speakers on the printer. This enables you to respond to prompts while dialing, as well as control the pace of your dialing.

TIP: If you are using a calling card and do not enter your PIN fast enough, the printer might start sending fax tones too soon and cause your PIN not to be recognized by the calling card service. If this is the case, create a phone book contact to store the PIN for your calling card.

NOTE: Make sure the volume is turned on to hear a dial tone.
To send a fax using monitor dialing from the printer control panel
- Place the original print-side up in the document feeder or print-side down on the scanner glass (aligned to the corner with an icon).
- On the Home screen of the printer display, touch (Fax).
- Touch Send Now.
- Touch Send to Contacts or Enter Fax Number.
- Touch Options to change the resolution or color.
- Touch Send to activate monitor dialing.
- Follow any prompts that might occur. Your fax is sent when the receiving fax machine answers.
Send a scheduled fax
You can schedule faxes to be sent at a later time using the Send Later option from the printer control panel.
To send a scheduled fax from the printer control panel
- Place the original print-side up in the document feeder or print-side down on the scanner glass (aligned to the corner with an icon).
- On the Home screen of the printer display, touch (Fax).
- Touch Send Later.
- Set the time to send the fax.
- Touch Send to Contacts or Enter Fax Number.
- Follow the onscreen instructions, and then touch Send.
Send a fax using printer memory
You can scan a black-and-white fax into memory and then send the fax from memory. This feature is useful if the fax number you are trying to reach is busy or temporarily unavailable. The printer scans the originals into memory and sends them once it is able to connect to the receiving fax machine. After the printer scans the pages into memory, you can immediately remove the originals from the document feeder input tray or scanner glass.

NOTE: You can only send a black-and-white fax from memory.
To send a fax using printer memory
- Ensure that Scan and Fax Method is turned on.
- On the Home screen of the printer display, touch (Fax).
- Touch Send Now.
- Touch Send to Contacts or Enter Fax Number.
- Select a previously used number, or a contact from the address book or phone book, or enter the fax number using the screen keypad that appears.

TIP: To add a pause in the fax number you are entering, touch * (asterisk), and then select - (dash) from the display.
- Touch Options to change the resolution or color.

TIP: The printer sends the fax when the receiving fax machine is available.
Send a fax to multiple recipients
You can send a fax to multiple recipients by creating a phone book or an address book made up of two or more individual recipients.
To send a fax to multiple recipients
- Place the original print-side up in the document feeder or print-side down on the scanner glass (aligned to the corner with an icon).
- On the Home screen of the printer display, touch (Fax).
- Touch Send Now, and then touch Send to Contacts.
- Select an address book or a phone book, and then select multiple contacts from the list.
- Touch Send.

TIP: If the recipient reports issues with the quality of the fax, try changing the resolution or contrast of your fax.
Receive a fax
You can receive faxes automatically or manually. If you turn off the Auto Answer option, you must receive faxes manually. If you turn on the Auto Answer option (the default setting), the printer automatically answers incoming calls and receives faxes after the number of rings specified by the Rings to Answer setting. (The default Rings to Answer setting is five rings.)
If you receive a Legal-size or larger fax and the printer is not currently set to use Legal-size paper, the printer reduces the fax so that it fits on the paper that is loaded. If you have disabled the Auto Reduction feature, the printer prints the fax on two pages.

NOTE: If you are copying a document when a fax arrives, the fax is stored in the printer memory until the copying finishes.
Receive a fax manually
When you are on the phone, the person you are speaking with can send you a fax while you are still connected. You can pick up the handset to talk or listen for fax tones.
You can receive faxes manually from a phone that is directly connected to the port on the printer.
To receive a fax manually
- Make sure the printer is turned on and you have paper loaded in the main tray.
- Remove any originals from the document feeder input tray.
- Set the Rings to Answer setting to a high number to allow you to answer the incoming call before the printer answers. Or, turn off the Auto Answer setting so that the printer does not automatically answer incoming calls.
- If you are currently on the phone with the sender, instruct the sender to start sending from their fax machine.
- When you hear fax tones from a sending fax machine, follow the onscreen instructions to receive the fax.
Reprint received faxes from memory
The received faxes that are not printed out are stored in memory.

NOTE: After the memory becomes full, the printer cannot receive new faxes until you print or delete the faxes from memory. You might also want to delete the faxes in memory for security or privacy purposes.
You can reprint up to 30 of the most recently printed faxes, if they are still in memory. For example, you might need to reprint your faxes if you lost the copy of your last printout.
To reprint faxes in memory from the printer control panel
- Make sure you have paper loaded in the main tray. See Load paper.
- On the Home screen of the printer display, touch (Fax).
- Scroll down to touch Reprint. The faxes are printed in the reverse order from which they were received, with the most recently received fax printed first, and so on.
- Touch the desired fax to print.
Forward faxes to another number
You can set up the printer to forward your faxes to another fax number. All faxes are forwarded in black and white, regardless of how they were originally sent.
HP recommends that you verify the number you are forwarding to is a working fax line. Send a test fax to make sure the fax machine is able to receive your forwarded faxes.
To change fax forwarding settings from the embedded web server (EWS)
- Open EWS. See To access and use EWS.
- Click the Fax tab.
- From the left menu, click Settings, and then click Fax Forwarding.
- Select the desired settings, and then click Apply.
Block unwanted fax numbers
If you subscribe to a caller ID service through your phone provider, you can block specific fax numbers so the printer does not receive faxes received from those numbers. When an incoming fax call is received, the printer compares the number to the list of junk fax numbers to determine if the call should be blocked. If the number matches a number in the blocked fax numbers list, the fax is not received. (The maximum number of fax numbers you can block varies by model.)

NOTE:
- This feature is not supported in all countries/regions. If it is not supported in your country/region, Junk Fax Blocking does not appear in the Preferences menu.
- If no phone numbers are added in the Caller ID list, it is assumed that you are not subscribed to a Caller ID service.
You can block specific fax numbers by adding them to the junk fax list, unblock these numbers by removing them from the junk fax list, and print a list of blocked junk fax numbers.
To add or remove unwanted fax numbers from the embedded web server (EWS)
- Open EWS. See To access and use EWS.
- Click the Fax tab.
- From the left menu, click Settings.
- Click Junk Fax Blocker, and then follow the onscreen instructions to make the necessary changes.
- Click Apply.
Receive faxes using HP Digital Fax
You can use HP Digital Fax to automatically receive faxes and save them directly to your computer. This saves paper and ink.
Received faxes are saved as TIFF (Tagged Image File Format) or PDF (Portable Document Format).
The files are named in the following method: XXXX_YYYYYYYY_ZZZZZZ.tif, where X is the sender's information, Y is the date, and Z is the time that the fax was received.

NOTE: Fax to Computer is available for receiving black-and-white faxes only. Color faxes will be printed.
HP Digital Fax requirements
- The destination folder of the computer must be available at all times. Faxes will not be saved if the computer is asleep or in hibernate mode.
- Paper must be loaded in the input tray. See Load paper.
To set up or modify HP Digital Fax (Windows)
- Open the HP printer software. See Use the HP printer software.
- In the printer software, under Print, Scan & Fax, and then click Digital Fax Setup Wizard.
- Follow the onscreen instructions.
Change fax settings
After completing the steps in the getting started guide that came with the printer, use the following steps to change the initial settings or to configure other options for faxing.
Manage fax settings
To manage fax settings (Windows)
From the HP printer software, you can manage fax settings, such as junk fax blocking and answer options, as well as view fax history.
- In the HP printer software (available from the Start menu), click Print, Scan & Fax at the top of the window.
- In the Fax section, click Manage Fax Settings.
- Click the desired options and then follow the onscreen instructions.
You can set up frequently used fax numbers as phone book contacts. This lets you quickly dial those numbers from the printer control panel.
- Open EWS. See To access and use EWS.
- Click the Scan tab.
- From the left menu, click Address Book, and then click Contacts.
- Click the option (+ icon) to add contacts or groups.
- To delete, select the desired contacts or groups, and then click the option (x icon) to delete.
- In the HP printer software (available from the Start menu), click Print, Scan & Fax at the top of the window.
- In the Fax section, click Manage Fax Settings.
- If prompted, enter the PIN or password. This could be the password previously set in the embedded web server (EWS) or the default PIN on a label in the ink access area.
- From the left menu, click Fax Phonebook, and then add or delete contacts or groups.
Basic fax settings
- Fax Header: The fax header prints your name and fax number on the top of every fax you send.

NOTE: In some countries/regions, the fax header information is a legal requirement.
- Auto Answer: The answer mode determines whether the printer answers incoming calls.
- Turn on the Auto Answer setting if you want the printer to answer faxes automatically. The printer answers all incoming calls and faxes.
- Turn off the Auto Answer setting if you want to receive faxes manually. You must be available to respond in person to the incoming fax call or else the printer does not receive faxes.
- Rings-to-answer
- 2-sided Printing
- Fax Prefix
- Fax Sound Volume: You can change the volume of fax sounds.
- Tone or Pulse Dialing: Use this procedure to set tone-dialing or pulse-dialing mode. The factory-set default is Tone. Do not change the setting unless you know that your phone line cannot use tone dialing.

NOTE: The pulse-dialing option is not available in all countries/regions.
- Scan and Fax Method
To change basic fax settings from the embedded web server (EWS)
- Open EWS. See To access and use EWS.
- Click the Fax tab.
- From the left menu, click Settings, and then click Basic Fax Settings.
- Make the necessary changes, and then click Apply.
Advanced fax settings
- Fax Confirmation
- Image on Fax Send
- Fax Error Report
- Busy Redial
- No Answer Redial
- Communication Error Redial
- Error Correction Mode
- Backup Fax Reception
- Fax Speed
• Automatic Reduction • Distinctive Ring
To change advanced fax settings from the embedded web server (EWS)
- Open EWS. See To access and use EWS.
- Click the Fax tab.
- From the left menu, click Settings, and then click Advanced Fax Settings.
- Make the necessary changes, and then click Apply.
Set the redial options
If the printer was unable to send a fax because the receiving fax machine did not answer or was busy, the printer attempts to redial based on the settings for the redial options. Use the following procedure to turn the options on or off.
- Busy Redial: If this option is turned on, the printer redials automatically if it receives a busy signal. The default is On.
- No Answer Redial: If this option is turned on, the printer redials automatically if the receiving fax machine does not answer. The default is Off.
- Communication Error Redial: If this option is turned on, the printer redials automatically if there has been a problem connecting with the receiving fax machine. Connection problem redial works only for sending faxes from memory. The default is On.
Send a fax in Error Correction Mode
Error Correction Mode (ECM) prevents loss of data due to poor phone lines by detecting errors that occur during transmission and automatically requesting retransmission of the erroneous portion. Phone charges are unaffected, or might even be reduced, on good phone lines. On poor phone lines, ECM increases sending time and phone charges, but sends the data much more reliably. The default setting is On. Turn ECM off only if it increases phone charges substantially, and if you can accept poorer quality in exchange for reduced charges.
If you turn ECM off:
- The quality and transmission speed of faxes you send and receive are affected. The speed is automatically set to Medium.
- You can no longer send or receive faxes in color.
Set up backup fax
Depending on your preference and security requirements, you can set up the printer to store all the faxes it receives, only the faxes it receives while the printer is in an error condition, or none of the faxes it receives.
Set the fax speed
You can set the fax speed used to communicate between your printer and other fax machines when sending and receiving faxes.
If you use one of the following, setting the fax speed to a slower speed might be required:
• An Internet phone service • A PBX (private branch exchange) system • Fax on Voice over Internet Protocol (VoIP) • An integrated services digital network (ISDN) service
If you experience problems sending and receiving faxes, try using a slower speed. The following table provides the available fax speed settings.
Table 6-1 Set the fax speed
| Fax speed setting Fax speed |
| Fast v.34 (33600 baud) |
| Medium v.17 (14400 baud) |
| Slow v.29 (9600 baud) |
Set automatic reduction for incoming faxes
The Auto Reduction setting determines what the printer does if it receives a fax that is too large for the loaded paper size. This setting is turned on by default, so the image of the incoming fax is reduced to fit on one page, if possible. If this feature is turned off, information that does not fit on the first page is printed on a second page. Auto Reduction is useful when you receive a Legal-size fax and Letter-size paper is loaded in the main tray.

NOTE: Turning off automatic reduction also turns off 2-sided fax printing.
Change the answer ring pattern for distinctive ring
Many phone companies offer a distinctive ring feature that allows you to have several phone numbers on one phone line. When you subscribe to this service, each number is assigned a different ring pattern. You can set up the printer to answer incoming calls that have a specific ring pattern.
If you connect the printer to a line with distinctive ring, have your telephone company assign one ring pattern to voice calls and another ring pattern to fax calls. HP recommends that you request double or triple rings for a fax number. When the printer detects the specified ring pattern, it answers the call and receives the fax.

TIP: You can also use the Ring Pattern Detection feature in the printer control panel to set distinctive ring. With this feature, the printer recognizes and records the ring pattern of an incoming call and, based on this call, automatically determines the distinctive ring pattern assigned by your telephone company to fax calls.
If you do not have a distinctive ring service, use the default ring pattern, which is All Rings.

NOTE: The printer cannot receive faxes when the main phone number is off the hook.
To change the answer ring pattern for distinctive ring
- Ensure that the printer is set to answer fax calls automatically.
a. From the embedded web server (EWS), click the Fax tab, and then click Settings from the left menu. b. Click Basic Fax Settings, and then enable auto answer. c. Click Fax Setup Wizard. Enable distinctive ring for fax calls, and also select the option to receive voice calls on your phone line.
- To change the answer ring pattern from EWS, click Advanced Fax Settings, and then select the desired option under Distinctive Ring.
- To change the answer ring pattern from the printer control panel:
a. On the Home screen, touch ☐ (Menu), and then scroll down to touch Settings.
b. Touch Distinctive Fax Ring, and then select the desired option.
- If a message appears stating that this setting should not be changed unless you have multiple numbers on the same telephone line, select Yes to continue.
- Select the ring pattern assigned by your telephone company for fax calls.
If you do not know your assigned ring pattern or if it is not listed, select Ring Pattern Detection, and then follow the onscreen instructions.

NOTE:
- If the Ring Pattern Detection feature cannot detect the ring pattern or if you cancel the feature before it finishes, the ring pattern is automatically set to the default, which is All Rings.
- If you are using a PBX phone system that has different ring patterns for internal and external calls, you must call the fax number from an external number.
Fax and digital phone services
Many telephone companies provide their customers with digital phone services, such as the following:
- DSL: A Digital subscriber line (DSL) service through your telephone company. (DSL might be called ADSL in your country/region.)
- PBX: A private branch exchange (PBX) phone system.
- ISDN: An integrated services digital network (ISDN) system.
- VoIP: A low-cost phone service that allows you to send and receive faxes with your printer by using the Internet. This method is called Fax on Voice over Internet Protocol (VoIP). For more information, see Fax on Voice over Internet Protocol.
HP printers are designed specifically for use with traditional analog phone services. If you are in a digital phone environment (such as DSL/ADSL, PBX, or ISDN), you might need to use digital-to-analog filters or converters when setting up the printer for faxing.

NOTE: HP does not guarantee that the printer will be compatible with all digital service lines or providers, in all digital environments, or with all digital-to-analog converters. It is always recommended that you discuss with the telephone company directly for the correct setup options based on their line services provided.
Fax on Voice over Internet Protocol
You might be able to subscribe to a low-cost phone service that allows you to send and receive faxes with your printer by using the Internet. This method is called Fax on Voice over Internet Protocol (VoIP).
The following are indications you probably use a VoIP service.
- Dial a special access code along with the fax number.
- Have an IP converter box that connects to the Internet and provides analog phone ports for the fax connection.

NOTE: You can only send and receive faxes by connecting a phone cord to the port on the printer. This means that your connection to the Internet must be done either through a converter box (which supplies regular analog phone jacks for fax connections) or your telephone company.

TIP: Support for traditional fax transmission over any Internet protocol telephone systems is often limited. If you experience problems faxing, try using a slower fax speed or disabling the fax error-correction mode (ECM). However, if you turn off ECM, you cannot send and receive color faxes.
If you have questions about Internet faxing, contact your Internet faxing services support department or your local service provider for further assistance.
View or print fax reports
You can set up the printer to print error reports and confirmation reports automatically for each fax you send and receive. You can also manually print system reports as required; these reports provide useful system information about the printer.
By default, the printer is set to print a report only if there is a problem sending or receiving a fax. A confirmation message that indicates whether a fax was successfully sent appears briefly on the control panel display after each transaction.

NOTE:
- If the reports are not legible, you can check the estimated ink levels from the control panel or the HP software. For more information, see Check the ink levels.
- Ink level alerts and indicators provide estimates for planning purposes only. Refill an ink tank that is low on ink to avoid any printing delay or print quality issue.
- Ensure that the printheads are installed properly, and the ink tanks are filled. For more information, see Manage ink and printheads.
Print fax confirmation reports
You can print a confirmation report either when a fax is sent or when a fax is received. The default setting is On (Fax Send). When turned off, a confirmation message appears briefly on the control panel after each fax is sent or received.
Table 6-2 Print fax confirmation reports
| Fax status Description | |
| Off | Does not print a fax confirmation report when you send and receive faxes successfully. This is the default setting. |
| On (Fax Send) | Prints a fax confirmation report for every fax you send successfully. |
| On (Fax Receive) | Prints a fax confirmation report for every fax you receive successfully. |
| On (Fax Send and Receive) | Prints a fax confirmation report for every fax you send and receive successfully. |
View or print the fax log
You can print a log of faxes that have been sent and received by the printer.
To print the fax log or the last fax transaction report from the printer control panel
- On the Home screen of the printer display, touch (Menu).
- Scroll down to touch Tools.
- Touch Reports.
- Touch Fax Reports, and then select the desired option to print.
To view the fax log from the embedded web server (EWS)
- Open EWS. See To access and use EWS.
- Click the Fax tab.
- From the left menu, click Information, and then click Fax Log.
To clear the fax log
Clearing the fax log also deletes all faxes stored in memory.
- On the Home screen of the printer display, touch (Menu).
- Scroll down to touch Tools.
- Touch Troubleshooting, touch Fax Troubleshooting, and then select the option to clear.
Additional fax setup
In this section, you learn how to set up the printer so that faxing works successfully with equipment and services you might already have on the same phone line.

TIP: You can also use the Fax Setup Wizard (Windows) to quickly set up some important fax settings such as the answer mode and fax header information. You can access these tools through the HP software you installed with the printer. After you run these tools, follow the procedures in this section to complete your fax setup.
This section contains the following topics:
- Set up faxing
- Test fax setup
Set up faxing
This section contains the following topics:
- Select the correct fax setup for your home or office
- Case A: Separate fax line (no voice calls received)
- Case B: Set up the printer with DSL
- Case C: Set up the printer with a PBX phone system or an ISDN line
- Case D: Fax with a distinctive ring service on the same line • Case E: Shared voice/fax line
- Case F: Shared voice/fax line with voice mail
- Case G: Fax line shared with computer modem (no voice calls received)
- Case H: Shared voice/fax line with computer modem
- Case I: Shared voice/fax line with answering machine
- Case J: Shared voice/fax line with computer modem and answering machine
- Case K: Shared voice/fax line with computer dial-up modem and voice mail
Select the correct fax setup for your home or office
To fax successfully, you need to know what types of equipment and services (if any) share the same phone line with the printer. This is important because you might need to connect some of your existing office equipment directly to the printer, and you might also need to change some fax settings before you can fax successfully.
- Select the combination of equipment and services sharing your fax line.
- DSL: A Digital subscriber line (DSL) service through your telephone company. (DSL might be called ADSL in your country/region.)
- PBX: A private branch exchange (PBX) phone system.
- ISDN: An integrated services digital network (ISDN) system.
- Distinctive ring service: A distinctive ring service through your telephone company provides multiple telephone numbers with different ring patterns.
- Voice calls: Voice calls are received at the same phone number you use for fax calls on the printer.
- Computer dial-up modem: A computer dial-up modem is on the same phone line as the printer. If you answer Yes to any of the following questions, you are using a computer dial-up modem:
—Do you send and receive faxes directly to and from your computer software applications through a dial-up connection?
—Do you send and receive email messages on your computer through a dial-up connection?
—Do you access the Internet from your computer through a dial-up connection?
- Answering machine: An answering machine that answers voice calls at the same phone number you use for fax calls on the printer.
- Voice mail service: A voice mail subscription through your telephone company at the same number you use for fax calls on the printer.
- From the following table, select the combination of equipment and services applicable to your home or office setting. Then look up the recommended fax setup. Step-by-step instructions are included for each case in the sections that follow.

NOTE: You might need to connect the phone cord to your country/region adapter.
Table 6-3 Combination of equipment and services sharing your fax line
| Recommended fax setup Combinations sharing your fax line |
| Case B: Set up the printer with DSL DSL |
| Case C: Set up the printer with a PBX phone system or an ISDN line PBX |
| Case D: Fax with a distinctive ring service on the same line Distinctive ring service |
| Case E: Shared voice/fax line Voice calls |
| Case F: Shared voice/fax line with voice mail Voice calls and/or voice mail service |
| Case G: Fax line shared with computer modem (no voice calls received) Computer dial-up modem |
| Case H: Shared voice/fax line with computer modem Voice calls and/or computer dial-up modem |
| Case I: Shared voice/fax line with answering machine Voice calls and/or answering machine |
| Case J: Shared voice/fax line with computer modem and answering machine | Voice calls, computer dial-up modem, and/or answering machine |
| Case K: Shared voice/fax line with computer dial-up modem and voice mail | Voice calls, computer dial-up modem, and/or voice mail service |
Case A: Separate fax line (no voice calls received)
If you have a separate phone line on which you receive no voice calls, and you have no other equipment connected on this phone line, set up the printer as described in this section.
Figure 6-1 Back view of the printer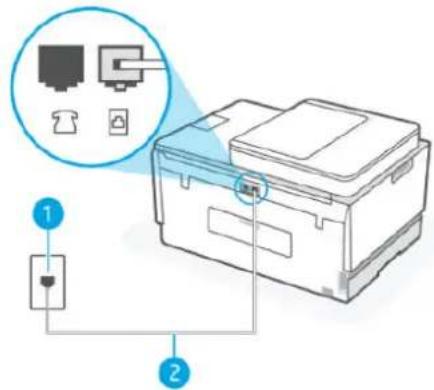
Table 6-4 Case A: Separate fax line (no voice calls received)
| Port number Description | |
| 1 Telephone wall jack. | |
| 2 | Use a minimum 26 AWG phone cord to connect to the port on the printer.You might need to connect the phone cord to your country/region adapter. |
To set up the printer with a separate fax line
- Using the phone cord, connect one end to your telephone wall jack, then connect the other end to the port on the back of the printer.


NOTE: You might need to connect the phone cord to your country/region adapter.
- Turn on the Auto Answer setting.
- (Optional) Change the Rings to Answer setting to the lowest setting (two rings).
- Run a fax test.
When the phone rings, the printer answers automatically after the number of rings you set in the Rings to Answer setting. The printer begins emitting fax reception tones to the sending fax machine and receives the fax.
Case B: Set up the printer with DSL
If you have a DSL service through your telephone company, and do not connect any equipment to the printer, use the instructions in this section to connect a DSL filter between the telephone wall jack and the printer. The DSL filter removes the digital signal that can interfere with the printer, so the printer can communicate correctly with the phone line. (DSL might be called ADSL in your country/region.)

NOTE: If you have a DSL line and you do not connect the DSL filter, you cannot send and receive faxes with the printer.
Figure 6-2 Back view of the printer
Table 6-5 Case B: Set up the printer with DSL
| Port number Description | |
| 1 Telephone wall jack. | |
| 2 DSL (or ADSL) filter and cord supplied by your DSL provider. | |
| 3 | Use a minimum 26 AWG phone cord to connect to the port.You might need to connect the phone cord to your country/region adapter. |
To set up the printer with DSL
- Obtain a DSL filter from your DSL provider.
- Using the phone cord, connect one end to the open port on the DSL filter, and then connect the other end to the port on the printer.

NOTE: You might need to connect the phone cord to your country/region adapter.
Get additional phone cords for this setup if needed. You can purchase phone cords from electronics stores that sell phone accessories.
- Connect an additional phone cord from the DSL filter to the telephone wall jack.
- Run a fax test.
If you encounter problems setting up the printer with optional equipment, contact your local service provider or vendor for further assistance.
Case C: Set up the printer with a PBX phone system or an ISDN line
If you are using either a PBX phone system or an ISDN converter/terminal adapter, make sure you do the following:
- If you are using either a PBX or an ISDN converter/terminal adaptor, connect the printer to the port that is designated for fax and phone use. Also, make sure that the terminal adapter is set to the correct switch type for your country/region, if possible.

NOTE: Some ISDN systems allow you to configure the ports for specific phone equipment. For example, you might have assigned one port for telephone and Group 3 fax and another port for multiple purposes. If you have problems when connected to the fax/phone port of your ISDN converter, try using the port designated for multiple purposes; it might be labeled "multi-combi" or something similar.
- If you are using a PBX phone system, set the call waiting tone to "off."

NOTE: Many digital PBX systems include a call-waiting tone that is set to "on" by default. The call waiting tone interferes with any fax transmission, and you cannot send or receive faxes with the printer. Refer to the documentation that came with your PBX phone system for instructions on how to turn off the call-waiting tone.
- If you are using a PBX phone system, dial the number for an outside line before dialing the fax number.
- You might need to connect the phone cord to your country/region adapter.
If you encounter problems setting up the printer with optional equipment, contact your local service provider or vendor for further assistance.
Case D: Fax with a distinctive ring service on the same line
If you subscribe to a distinctive ring service (through your telephone company) that allows you to have multiple phone numbers on one phone line, each with a different ring pattern, set up the printer as described in this section.
Figure 6-3 Back view of the printer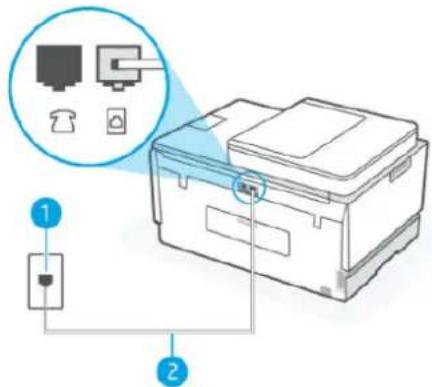
Table 6-6 Case D: Fax with a distinctive ring service on the same line
| Port number Description | |
| 1 Telephone wall jack. | |
| 2 | Use a minimum 26 AWG phone cord to connect to the port.You might need to connect the phone cord to your country/region adapter. |
To set up the printer with a distinctive ring service
- Using the phone cord, connect one end to your telephone wall jack, then connect the other end to the port on the printer.

NOTE: You might need to connect the phone cord to your country/region adapter.
- Turn on the Auto Answer setting.
- Change the Distinctive Ring setting to match the pattern that the telephone company assigned to your fax number.

NOTE: By default, the printer is set to answer all ring patterns. If you do not set the Distinctive Ring to match the ring pattern assigned to your fax number, the printer might answer both voice calls and fax calls or it might not answer at all.

TIP: You can also use the Ring Pattern Detection feature in the printer control panel to set distinctive ring. With this feature, the printer recognizes and records the ring pattern of an incoming call and, based on this call, automatically determines the distinctive ring pattern assigned by your telephone company to fax calls. For more information, see Change the answer ring pattern for distinctive ring.
- (Optional) Change the Rings to Answer setting to the lowest setting (two rings).
- Run a fax test.
The printer automatically answers incoming calls that have the ring pattern you selected (Distinctive Ring setting) after the number of rings you selected (Rings to Answer setting). The printer begins emitting fax reception tones to the sending fax machine and receives the fax.
If you encounter problems setting up the printer with optional equipment, contact your local service provider or vendor for further assistance.
Case E: Shared voice/fax line
If you receive both voice calls and fax calls at the same phone number, and you have no other office equipment (or voice mail) on this phone line, set up the printer as described in this section.
Figure 6-4 Back view of the printer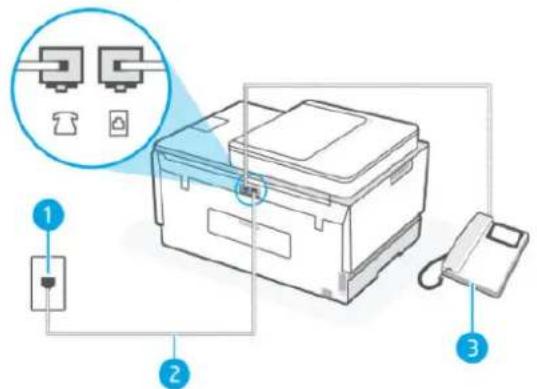
Table 6-7 Case E: Shared voice/fax line
| Port number Description | |
| 1 Telephone wall jack. | |
| 2 | Use a minimum 26 AWG phone cord to connect to the port.You might need to connect the phone cord to your country/region adapter. |
| 3 Telephone (optional). | |
To set up the printer with a shared voice/fax line
- Using the phone cord, connect one end to your telephone wall jack, then connect the other end to the port on the printer.


NOTE: You might need to connect the phone cord to your country/region adapter.
- Now you need to decide how you want the printer to answer calls, automatically or manually:
- If you set up the printer to answer calls automatically, it answers all incoming calls and receives faxes. The printer cannot distinguish between fax and voice calls in this case; if you suspect the call is a voice call, you need to answer it before the printer answers the call. To set up the printer to answer calls automatically, turn on the Auto Answer setting.
- If you set up the printer to answer faxes manually, you must be available to respond in person to incoming fax calls or the printer cannot receive faxes. To set up the printer to answer calls manually, turn off the Auto Answer setting.
3. Run a fax test.
If you pick up the phone before the printer answers the call and hear fax tones from a sending fax machine, you need to answer the fax call manually.
If you encounter problems setting up the printer with optional equipment, contact your local service provider or vendor for further assistance.
Case F: Shared voice/fax line with voice mail
If you receive both voice calls and fax calls at the same phone number, and you also subscribe to a voice mail service through your telephone company, set up the printer as described in this section.

NOTE: You cannot receive faxes automatically if you have a voice mail service at the same phone number you use for fax calls. You must receive faxes manually; this means you must be available to respond in person to incoming fax calls. If you want to receive faxes automatically instead, contact your telephone company to subscribe to a distinctive ring service, or to obtain a separate phone line for faxing.
Figure 6-5 Back view of the printer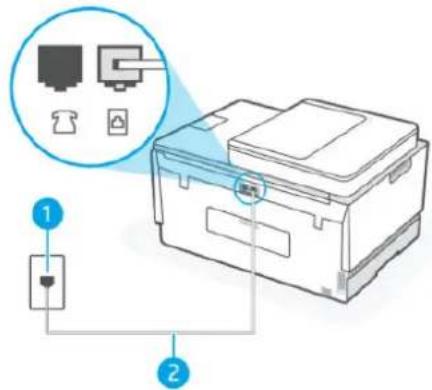
Table 6-8 Case F: Shared voice/fax line with voice mail
| Port number Description | |
| 1 Telephone wall jack. | |
| 2 | Use a minimum 26 AWG phone cord to connect to the port on the printer.You might need to connect the phone cord to your country/region adapter. |
To set up the printer with voice mail
- Using the phone cord, connect one end to your telephone wall jack, then connect the other end to the port on printer. NOTE: You might need to connect the phone cord to your country/region adapter.
- Turn off the Auto Answer setting.
- Run a fax test.
You must be available to respond in person to incoming fax calls, or the printer cannot receive faxes. You must initiate the manual fax before voicemail picks up the line.
If you encounter problems setting up the printer with optional equipment, contact your local service provider or vendor for further assistance.
Case G: Fax line shared with computer modem (no voice calls received)
If you have a fax line on which you receive no voice calls, and you also have a computer modem connected on this line, set up the printer as described in this section.

NOTE: If you have a computer dial-up modem, your computer dial-up modem shares the phone line with the printer. You cannot use both your modem and the printer simultaneously. For example, you cannot use the printer for faxing while you are using your computer dial-up modem to send an email or access the Internet.
Set up the printer with a computer dial-up modem
If you are using the same phone line for sending faxes and for a computer dial-up modem, follow these directions for setting up the printer.
Figure 6-6 Back view of the printer.
Table 6-9 Set up the printer with a computer dial-up modem
| Port number Description | |
| 1 Telephone wall jack. | |
| 2 | Use a minimum 26 AWG phone cord to connect to the port on the printer.You might need to connect the phone cord to your country/region adapter. |
| 3 Computer with modem. | |
To set up the printer with a computer dial-up modem
- Find the phone cord that connects from the back of your computer (your computer dial-up modem) to a telephone wall jack. Disconnect the cord from the telephone wall jack and plug it into the port on the printer.
- Using the phone cord, connect one end to your telephone wall jack, then connect the other end to the port on the printer.

NOTE: You might need to connect the phone cord to your country/region adapter.

- If your modem software is set to receive faxes to your computer automatically, turn off that setting.

NOTE: If you do not turn off the automatic fax reception setting in your modem software, the printer cannot receive faxes.
- Turn on the Auto Answer setting.
- (Optional) Change the Rings to Answer setting to the lowest setting (two rings).
- Run a fax test.
When the phone rings, the printer automatically answers after the number of rings you set in the Rings to Answer setting. The printer begins emitting fax reception tones to the sending fax machine and receives the fax.
If you encounter problems setting up the printer with optional equipment, contact your local service provider or vendor for further assistance.
Set up the printer with a computer DSL/ADSL modem
If you have a DSL line and use that phone line to send faxes, follow these instructions to set up your fax.
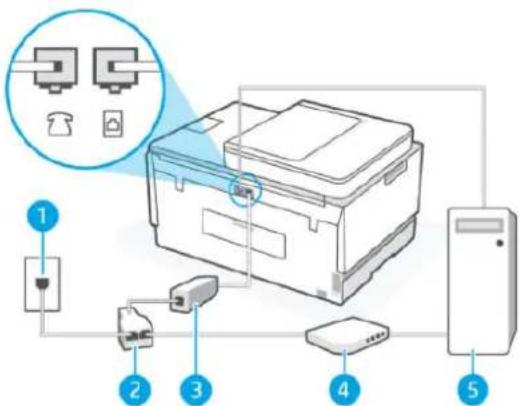
Table 6-10 Set up the printer with a computer DSL/ADSL modem
| Port number Description | |
| 1 Telephone wall jack. | |
| 2 Parallel splitter. | |
| 3 DSL/ADSL filter. | Connect one end of the phone cord to the port on the printer.Connect the other end of the cord to the DSL/ADSL filter.You might need to connect the phone cord to your country/region adapter. |
| 4 Computer DSL/ADSL modem. | |
| 5 Computer. | |

NOTE: You need to purchase a parallel splitter. A parallel splitter has one RJ-11 port on the front and two RJ-11 ports on the back. Do not use a 2-line phone splitter, a serial splitter, or a parallel splitter which has two RJ-11 ports on the front and a plug on the back.
Figure 6-7 Example of a parallel splitter
To set up the printer with a computer DSL/ADSL modem
- Obtain a DSL filter from your DSL provider.
- Using the phone cord, connect one end to the DSL filter, and then connect the other end to the port on the printer.

NOTE: You might need to connect the phone cord to your country/region adapter.
- Connect the DSL filter to the parallel splitter.
- Connect the DSL modem to the parallel splitter.
- Connect the parallel splitter to the wall jack.
- Run a fax test.
When the phone rings, the printer automatically answers after the number of rings you set in the Rings to Answer setting. The printer begins emitting fax reception tones to the sending fax machine and receives the fax.
If you encounter problems setting up the printer with optional equipment, contact your local service provider or vendor for further assistance.
Case H: Shared voice/fax line with computer modem
There are two different ways to set up the printer with your computer based on the number of phone ports on your computer. Before you begin, check your computer to see if it has one or two phone ports.
Shared voice/fax with computer dial-up modem
If you use your phone line for voice, fax, and your computer dial-up modem, follow these directions to set up your fax.
There are two different ways to set up the printer with your computer based on the number of phone ports on your computer. Before you begin, check your computer to see if it has one or two phone ports.

NOTE: If your computer has only one phone port, you need to purchase a parallel splitter (also called a coupler), as shown in the illustration. (A parallel splitter has one RJ-11 port on the front and two RJ-11 ports on the back. Do not use a two-line phone splitter, a serial splitter, or a parallel splitter which has two RJ-11 ports on the front and a plug on the back.)
Figure 6-8 Example of a parallel splitter
Figure 6-9 Back view of the printer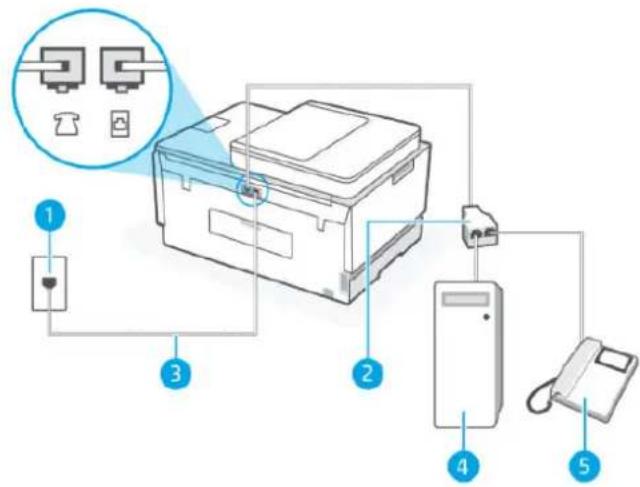
Table 6-11 Shared voice/fax with computer dial-up modem
| Port number Description | |
| 1 Telephone wall jack. | |
| 2 Parallel splitter | |
| 3 | Use a minimum 26 AWG phone cord to connect to the port on the printer. |
| 4 Computer with modem. | |
| 5 Telephone. | |
To set up the printer on the same phone line as a computer with two phone ports
- Find the phone cord that connects from the back of your computer (your computer dial-up modem) to a telephone wall jack. Disconnect the cord from the telephone wall jack and plug it into the port on the printer.
- Connect a phone to the "OUT" port on the back of your computer dial-up modem.
- Using the phone cord, connect one end to your telephone wall jack, then connect the other end to the port on the printer.

NOTE: You might need to connect the phone cord to your country/region adapter.
- If your modem software is set to receive faxes to your computer automatically, turn off that setting.

NOTE: If you do not turn off the automatic fax reception setting in your modem software, the printer cannot receive faxes.
- Now you need to decide how you want the printer to answer calls, automatically or manually:
- If you set up the printer to answer calls automatically, it answers all incoming calls and receives faxes. The printer cannot distinguish between fax and voice calls in this case; if you suspect the call is a voice call, you need to answer it before the printer answers the call. To set up the printer to answer calls automatically, turn on the Auto Answer setting.
- If you set up the printer to answer faxes manually, you must be available to respond in person to incoming fax calls or the printer cannot receive faxes. To set up the printer to answer calls manually, turn off the Auto Answer setting.
- Run a fax test.
If you pick up the phone before the printer answers the call and hear fax tones from a sending fax machine, you need to answer the fax call manually.
If you encounter problems setting up the printer with optional equipment, contact your local service provider or vendor for further assistance.
Shared voice/fax with computer DSL/ADSL modem
If you use your phone line for voice, fax, and your computer DSL/ADSL modem, follow these directions to set up your fax.
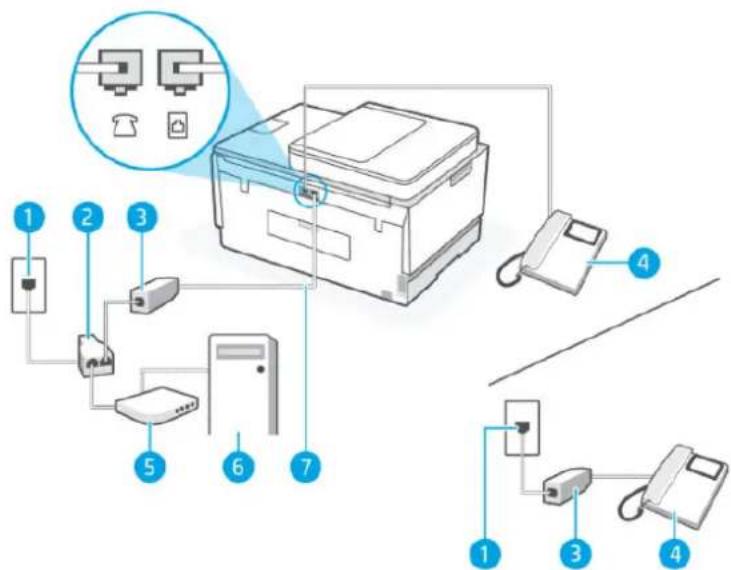
Table 6-12 Shared voice/fax with computer DSL/ADSL modem
| Port number Description | |
| 1 Telephone wall jack | |
| 2 Parallel splitter | |
| 3 DSL/ADSL filter | |
| 4 Telephone | |
| 5 DSL/ADSL modem | |
| 6 Computer | |
| 7 | Use a minimum 26 AWG phone cord to connect to the port on the printer.You might need to connect the phone cord to your country/region adapter. |

NOTE: You need to purchase a parallel splitter. A parallel splitter has one RJ-11 port on the front and two RJ-11 ports on the back. Do not use a 2-line phone splitter, a serial splitter, or a parallel splitter which has two RJ-11 ports on the front and a plug on the back.
Figure 6-10 Example of a parallel splitter
To set up the printer with a computer DSL/ADSL modem
- Obtain a DSL filter from your DSL provider.

NOTE: Phones in other parts of the home/office sharing the same phone number with DSL service need to be connected to additional DSL filters to avoid noise when making voice calls.
- Using the phone cord, connect one end to the DSL filter, then connect the other end to the port on the printer.

NOTE: You might need to connect the phone cord to your country/region adapter.
- If you have a parallel-type phone system, connect a phone to the port on the printer.
- Connect the DSL filter to the parallel splitter.
- Connect the DSL modem to the parallel splitter.
- Connect the parallel splitter to the wall jack.
- Run a fax test.
When the phone rings, the printer automatically answers after the number of rings you set in the Rings to Answer setting. The printer begins emitting fax reception tones to the sending fax machine and receives the fax.
If you encounter problems setting up the printer with optional equipment, contact your local service provider or vendor for further assistance.
Case I: Shared voice/fax line with answering machine
If you receive both voice calls and fax calls at the same phone number, and you also have an answering machine that answers voice calls at this phone number, set up the printer as described in this section.
Figure 6-11 Back view of the printer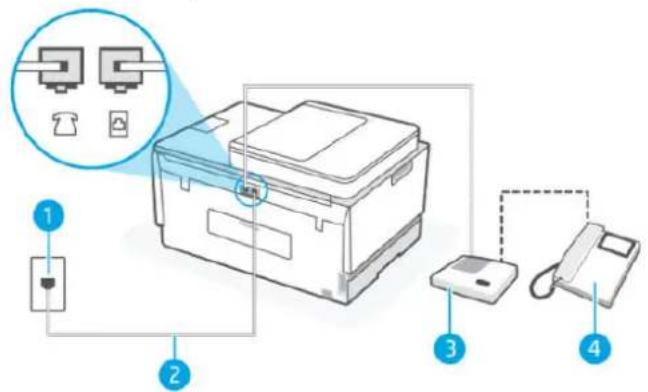
Table 6-13 Case I: Shared voice/fax line with answering machine
| Port number Description | |
| 1 Telephone wall jack. | |
| 2 | Use a minimum 26 AWG phone cord to connect to the port on the printer.You might need to connect the phone cord to your country/region adapter. |
| 3 Answering machine. | |
| 4 Telephone (optional). | |
To set up the printer with a shared voice/fax line with answering machine
- Unplug your answering machine from the telephone wall jack, and connect it to the phone port on the printer.
- Using the phone cord, connect one end to your telephone wall jack, then connect the other end to the port on the printer.

NOTE: You might need to connect the phone cord to your country/region adapter.
- (Optional) If your answering machine does not have a built-in phone, for convenience you might want to connect a phone to the back of your answering machine at the "OUT" port.

NOTE: If your answering machine does not let you connect an external phone, you can purchase and use a parallel splitter (also known as a coupler) to connect both the answering machine and telephone to the printer. You can use standard phone cords for these connections.
- Turn on the Auto Answer setting.
- Set your answering machine to answer after a low number of rings.
- Change the Rings to Answer setting on the printer to the maximum number of rings supported by your printer. (The maximum number of rings varies by country/region.)
- Run a fax test.
When the phone rings, your answering machine answers after the number of rings you have set, and then plays your recorded greeting. The printer monitors the call during this time, "listening" for fax tones. If incoming fax tones are detected, the printer emits fax reception tones and receives the fax; if there are no fax tones, the printer stops monitoring the line and your answering machine can record a voice message.
If you encounter problems setting up the printer with optional equipment, contact your local service provider or vendor for further assistance.
Case J: Shared voice/fax line with computer modem and answering machine
If you receive both voice calls and fax calls at the same phone number, and you also have a computer modem and answering machine connected on this phone line, set up the printer as described in this section.

NOTE: Since your computer dial-up modem shares the phone line with the printer, you cannot use both your modem and the printer simultaneously. For example, you cannot use the printer for faxing while you are using your computer dial-up modem to send an email or access the Internet.
- Shared voice/fax line with computer dial-up modem and answering machine
- Shared voice/fax line with computer DSL/ADSL modem and answering machine
Shared voice/fax line with computer dial-up modem and answering machine
There are two different ways to set up the printer with your computer based on the number of phone ports on your computer. Before you begin, check your computer to see if it has one or two phone ports.

NOTE: If your computer has only one phone port, you need to purchase a parallel splitter (also called a coupler), as shown in the illustration. (A parallel splitter has one RJ-11 port on the front and two RJ-11 ports on the back. Do not use a two-line phone splitter, a serial splitter, or a parallel splitter which has two RJ-11 ports on the front and a plug on the back.)
Figure 6-12 Example of a parallel splitter
Figure 6-13 Back view of the printer
Table 6-14 Shared voice/fax line with computer dial-up modem and answering machine
| Port number Description | |
| 1 Telephone wall jack | |
| 2 "IN" phone port on your computer | |
| 3 "OUT" phone port on your computer | |
| 4 | Use a minimum 26 AWG phone cord to connect to the port on the printer.You might need to connect the phone cord to your country/region adapter. |
| 5 Computer with modem | |
| 6 Answering machine | |
| 7 Telephone (optional) | |
To set up the printer on the same phone line as a computer with two phone ports
- Find the phone cord that connects from the back of your computer (your computer dial-up modem) to a telephone wall jack. Disconnect the cord from the telephone wall jack and plug it into the port on the printer.
- Unplug your answering machine from the telephone wall jack, and connect it to the port labeled "OUT" on the back of the computer (the computer dial-up modem).
- Using the phone cord, connect one end to your telephone wall jack, then connect the other end to the port on the printer.

NOTE: You might need to connect the phone cord to your country/region adapter.
- (Optional) If your answering machine does not have a built-in phone, for convenience you might want to connect a phone to the back of your answering machine at the "OUT" port.

NOTE: If your answering machine does not let you connect an external phone, you can purchase and use a parallel splitter (also known as a coupler) to connect both the answering machine and telephone to the printer. You can use standard phone cords for these connections.
- If your modem software is set to receive faxes to your computer automatically, turn off that setting.

NOTE: If you do not turn off the automatic fax reception setting in your modem software, the printer cannot receive faxes.
- Turn on the Auto Answer setting.
- Set your answering machine to answer after a low number of rings.
- Change the Rings to Answer setting on the printer to the maximum number of rings supported by the product. (The maximum number of rings varies by country/region.)
- Run a fax test.
When the phone rings, your answering machine answers after the number of rings you have set, and then plays your recorded greeting. The printer monitors the call during this time, "listening" for fax tones. If
incoming fax tones are detected, the printer emits fax reception tones and receives the fax; if there are no fax tones, the printer stops monitoring the line and your answering machine can record a voice message.
If you encounter problems setting up the printer with optional equipment, contact your local service provider or vendor for further assistance.
Shared voice/fax line with computer DSL/ADSL modem and answering machine
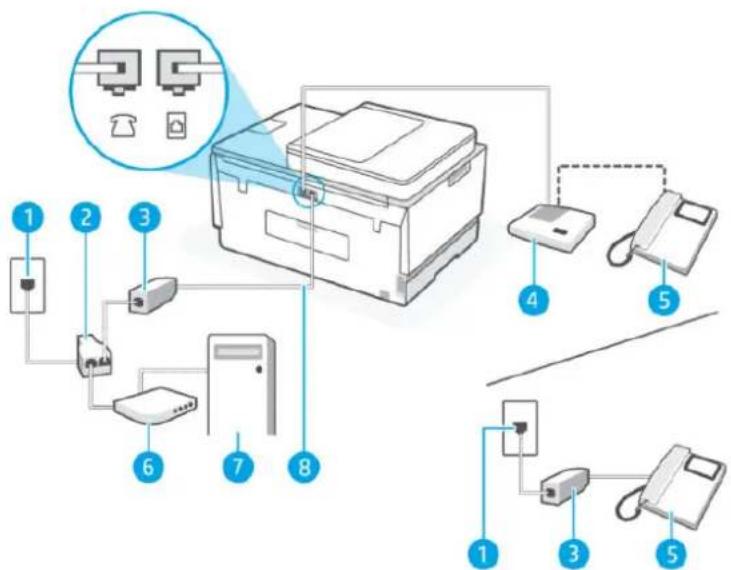
Table 6-15 Shared voice/fax line with computer DSL/ADSL modem and answering machine
| Port number Description | |
| 1 Telephone wall jack | |
| 2 Parallel splitter | |
| 3 DSL/ADSL filter | |
| 4 Answering machine | |
| 5 Telephone (optional) | |
| 6 DSL/ADSL modem | |
| 7 Computer | |
| 8 | Use a minimum 26 AWG phone cord to connect to the port on the printer.You might need to connect the phone cord to your country/region adapter. |

NOTE: You need to purchase a parallel splitter. A parallel splitter has one RJ-11 port on the front and two RJ-11 ports on the back. Do not use a 2-line phone splitter, a serial splitter, or a parallel splitter which has two RJ-11 ports on the front and a plug on the back.
Figure 6-14 Example of a parallel splitter
To set up the printer with a computer DSL/ADSL modem
- Obtain a DSL/ADSL filter from your DSL/ADSL provider.
NOTE: Phones in other parts of the home/office sharing the same phone number with DSL/ADSL service need to be connected to additional DSL/ADSL filters, to avoid noise when making voice calls.
- Using the phone cord, connect one end to the DSL/ADSL filter, then connect the other end to the port on the printer.
NOTE: You might need to connect the phone cord to your country/region adapter.
- Connect the DSL/ADSL filter to the splitter.
- Unplug the answering machine from the telephone wall jack, and connect it to the 7 port on the printer.
NOTE: If you do not connect your answering machine directly to the printer, fax tones from a sending fax machine might be recorded on your answering machine, and you might not receive faxes with the printer.
- Connect the DSL modem to the parallel splitter.
- Connect the parallel splitter to the wall jack.
- Set your answering machine to answer after a low number of rings.
- Change your Rings to Answer setting on the printer to the maximum number of rings supported by the printer.
NOTE: The maximum number of rings varies by country/region.
- Run a fax test.
When the phone rings, your answering machine answers after the number of rings you have set, and then plays your recorded greeting. The printer monitors the call during this time, "listening" for fax tones. If incoming fax tones are detected, the printer emits fax reception tones and receives the fax; if there are no fax tones, the printer stops monitoring the line and your answering machine can record a voice message.
If you use the same phone line for telephone, fax, and have a computer DSL modem, follow these instructions to set up your fax.
If you encounter problems setting up the printer with optional equipment, contact your local service provider or vendor for further assistance.
Case K: Shared voice/fax line with computer dial-up modem and voice mail
If you receive both voice calls and fax calls at the same phone number, use a computer dial-up modem on the same phone line, and subscribe to a voice mail service through your telephone company, set up the printer as described in this section.

NOTE: You cannot receive faxes automatically if you have a voice mail service at the same phone number you use for fax calls. You must receive faxes manually; this means you must be available to respond in person to incoming fax calls. If you want to receive faxes automatically instead, contact your telephone company to subscribe to a distinctive ring service, or to obtain a separate phone line for faxing.
Since your computer dial-up modem shares the phone line with the printer, you cannot use both your modem and the printer simultaneously. For example, you cannot use the printer for faxing if you are using your computer dial-up modem to send an email or access the Internet.
There are two different ways to set up the printer with your computer based on the number of phone ports on your computer. Before you begin, check your computer to see if it has one or two phone ports.
- If your computer has only one phone port, you need to purchase a parallel splitter (also called a coupler), as shown in the illustration. (A parallel splitter has one RJ-11 port on the front and two RJ-11 ports on the back. Do not use a two-line phone splitter, a serial splitter, or a parallel splitter which has two RJ-11 ports on the front and a plug on the back.)

- If your computer has two phone ports, set up the printer as follows:
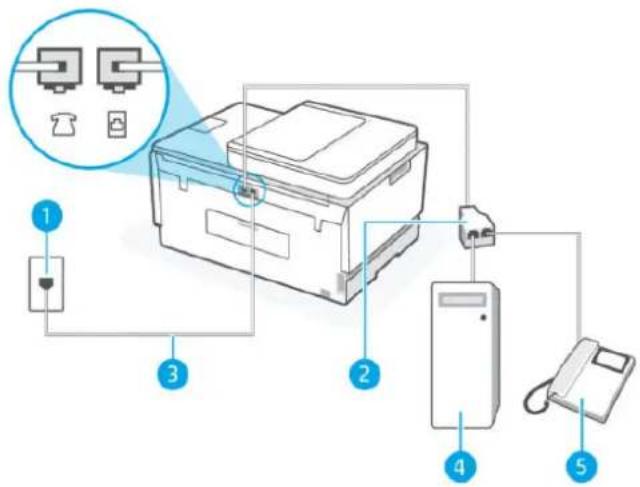
Table 6-16 Case K: Shared voice/fax line with computer dial-up modem and voice mail
| Port number Description | |
| 1 Telephone wall jack. | |
| 2 Parallel splitter. | |
| 3 | Use a minimum 26 AWG phone cord to connect to the port on the printer.You might need to connect the phone cord to your country/region adapter. |
| 4 Computer with modem. | |
| 5 Telephone. | |
To set up the printer on the same phone line as a computer with two phone ports
- Find the phone cord that connects from the back of your computer (your computer dial-up modem) to a telephone wall jack. Disconnect the cord from the telephone wall jack and plug it into the port on the printer.
- Connect a phone to the "OUT" port on the back of your computer dial-up modem.
- Using the phone cord, connect one end to your telephone wall jack, then connect the other end to the port on the printer.

NOTE: You might need to connect the phone cord to your country/region adapter.

- If your modem software is set to receive faxes to your computer automatically, turn off that setting.

NOTE: If you do not turn off the automatic fax reception setting in your modem software, the printer cannot receive faxes.
- Turn off the Auto Answer setting.
- Run a fax test.
You must be available to respond in person to incoming fax calls, or the printer cannot receive faxes.
If you encounter problems setting up the printer with optional equipment, contact your local service provider or vendor for further assistance.
Test fax setup
You can test your fax setup to check the status of the printer and to make sure it is set up correctly for faxing. Perform this test after you have completed setting up the printer for faxing. The test does the following:
• Tests the fax hardware - Verifies the correct type of phone cord is connected to the printer - Checks that the phone cord is plugged into the correct port - Checks for a dial tone - Checks for an active phone line • Tests the status of your phone line connection
The printer prints a report with the results of the test. If the test fails, review the report for information on how to fix the problem and rerun the test.
This section describes how to configure your printer.
Use the embedded web server (EWS) to manage printing functions from your computer.
• View printer status information - Check the information and status of the printing supplies - Receive notification of printer and supplies events - View and change the network and the printer settings
To access and use EWS
You can open EWS using one of the following:
- HP Smart app
- HP printer software • Web browser using IP address
- Web browser using Wi-Fi Direct connection
Things to note when accessing EWS
- If the web browser displays a message indicating that the website is unsafe, select the option to continue. Accessing the website will not harm your device.
- The default username is "admin".
- For your security, some settings in the printer home page or EWS are password-protected.
- When accessing the EWS for the first time, enter the PIN if prompted. This personal identification number (PIN) is available from a label in the printer. — Open the ink access door or cartridge access door to locate the label. —Once you have access to EWS, you can change the password from EWS.
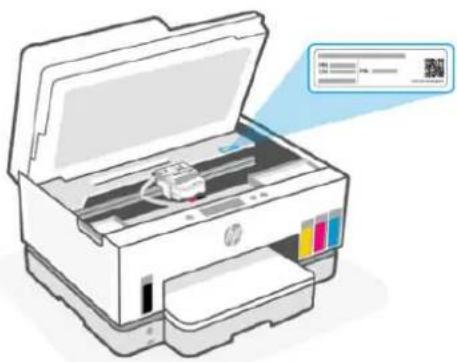
- Depending on how the printer is connected, some features in EWS might not be available.
- EWS is not accessible beyond the network firewall.
To open EWS using HP Smart (iOS, Android, and Windows 10)
- Open the HP Smart app on your computer or mobile device. See Use the HP Smart app to print, scan, and manage.
- From HP Smart, select your printer, and then click or tap Advanced Settings.
To open EWS using an IP address (Wi-Fi or Ethernet connection)
- Find out the IP address or hostname of the printer from the network configuration page. To print a network configuration page, see Print reports from the printer control panel.
- Open a web browser, type the IP address or hostname in the address bar, and then click or tap Enter.
To open EWS using an IP address (Wi-Fi Direct connection)
- Make sure your device and the printer are connected using Wi-Fi Direct. See Print while connected to same Wi-Fi network.
- Open a web browser, type the following IP address or hostname of the printer in the address bar, and then click or tap Enter.
IP Address: 192.168.223.1
To open EWS using HP Printer software (Windows 7)
- From the computer desktop, click Start, select All Programs, click HP, click the folder for the printer, select the icon with the printer's name, and then open HP Printer Assistant.

NOTE: Windows 7 Service Pack 1 (SP1) is required to install HP printer software.
- In the HP Printer Assistant, select Print tab.
- Select Printer Home Page (EWS).
Use the following sections to configure the printer network settings.
If prompted for a password, enter the PIN which is available from a label in the cartridge access area. See Things to note when accessing EWS.
View or change network settings
Use the embedded web server (EWS) to view or change IP configuration settings.
- Open EWS. See To access and use EWS.
- Click the Network tab to obtain network information. Change settings as needed.
Rename the printer on a network
To rename the printer on a network so that it can be uniquely identified, use the embedded web server (EWS).
- Open EWS. See To access and use EWS.
- Click the Network tab.
- From the left menu, click General.
- Click Network Identification.
- Make the necessary changes, and then click Apply.
Use the embedded web server (EWS) to manually set an IPv4 address, subnet mask, and default gateway.
- Open EWS. See To access and use EWS.
- Click the Network tab.
- From the left menu, click Wired.
- Click IPv4 Configuration.
- Make the necessary changes, and then Apply.
Assign or change the system password using the embedded web server (EWS)
Assign an administrator password for access to the printer and EWS so that unauthorized users cannot change the printer settings.
- Open EWS. See To access and use EWS.
- Click the Settings tab.
- From the left menu, click Security.
- Click Password Settings.
- Make the necessary changes, and then click Apply.

NOTE: Make note of the password and store it in a safe place.
Update the printer
This topic describes how to update the printer firmware.
HP periodically releases firmware updates to enhance product functionality and fix issues. By default, if the printer is connected to the Internet, the printer automatically checks for updates at regular intervals.
To change the settings for printer update from the printer control panel
- On the Home screen of the printer display, touch (Menu).
- Scroll down to touch Settings.
- Touch Printer Update, and then select the desired option.
To update the printer from the printer control panel
- On the Home screen of the printer display, touch (Menu).
- Scroll down to touch Tools.
- Touch Maintenance.
- Touch Firmware, and then select the option to update printer.
Use Web Services
This topic describes how to use Web services.

NOTE: For your security, some settings in the embedded web server (EWS) are password-protected. Enter the password if prompted. This is the password you have set in the EWS or the default PIN on a label in the ink access area.
Set up Web Services
This topic describes how to set up Web services.
To set up Web Services using the embedded web server (EWS)
- Open EWS. See To access and use EWS.
- Click the Web Services tab.
- From the left menu, click Web Services Settings.
- Click Setup, select the relevant option or button to continue, and follow the on-screen instructions to accept the terms of use.

NOTE: If prompted for proxy settings and if your network uses proxy settings, follow the on-screen instructions to set up a proxy server. If you do not have the proxy details, contact your network administrator or the person who set up the network.
- When the printer is connected to the server, the printer prints an information page. Follow the instructions on the information page to finish the setup.
Remove Web Services
This topic describes how to remove Web services.

NOTE: For your security, some settings in the embedded web server (EWS) are password-protected. Enter the password if prompted. This is the password you have set in the EWS or the default PIN on a label in the ink access area.
To remove Web Services using the embedded web server (EWS)
- Open EWS. See To access and use EWS.
- Click the Web Services tab.
- From the left menu, click Web Services Settings, click Remove Web Services, and then follow the on-screen instructions.
Manage ink and printheads
This section describes how to manage ink and printheads.
Check the ink levels
You can check the ink levels from the ink tanks on the printer. You can also check the HP printer software or printer control panel to determine when the tanks need to be refilled.
If you are using the HP Smart app, the estimated ink levels of the selected printer are displayed on the Home screen.
To check the estimated ink levels from the printer control panel
- On the Home screen of the printer display, touch

- Scroll down to touch Ink levels.
To check the estimated ink levels from the printer software (Windows)
- In the HP printer software (available from the Start menu), click Estimated Levels at the top of the window.
- In the Toolbox, click the Estimated Levels tab.
Refill ink tanks

NOTE: Product service or repairs required as a result of filling the ink tanks improperly and/or using non-HP ink will not be covered under warranty.
To refill ink tanks
- Open the ink access door and tank covers.
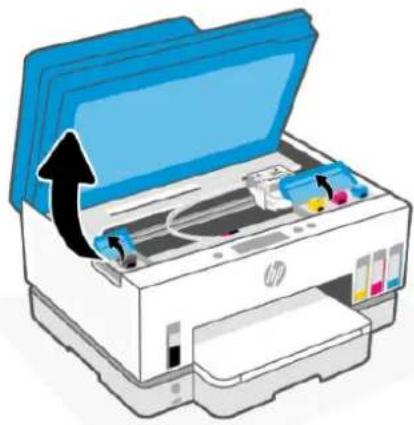
- Open the cap of the ink tank you plan to refill.

- Depending on the type of ink bottles you have, do one of the following:
- Screw-cap bottles: Twist open the cap on the ink bottle.
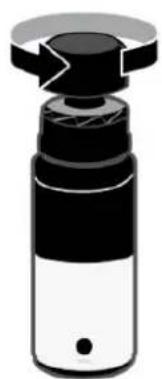
- Flip-cap bottles: Twist open the cap on the ink bottle, remove the seal from the bottle, screw back the cap and tighten it. Then, flip open the top of the cap.
![graph LR A["Initial state"] --> B["Step 1: Insert or Remove the component"] B --> C["Step 2: Insert or Remove the component"] C --> D["Step 3: Insert or Remove the component"] D --> E["Final state"]](/content/2026/07/1462480/images/bbeb96ccd4e8d80c5e668b5e38a6e33b6cf9a663dda4662d0e1edb6434be54b5.jpg)
- Match the color of the ink bottle with the color of the ink tank.
Place the bottle upside down on the tank, making sure the tip of the bottle fits properly over the tank nozzle.

NOTE:
- For screw-cap bottles, the tip of the bottle should click into place when pressed down gently over the tank nozzle.
- Do not squeeze the ink bottles when filling ink. The ink bottles you have might vary.
- If there is leftover ink in the bottle, store the bottle in an upright position in a cool and dry location.
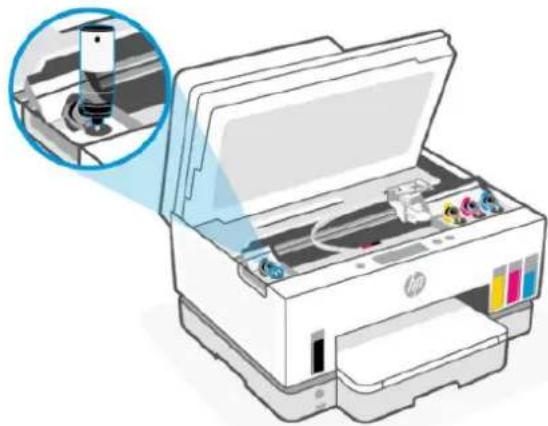
- Let the ink drain into the tank until the tank is full.
If the ink does not drain immediately, remove the bottle and properly reinsert it on the tank.
- Close the tank cap securely.
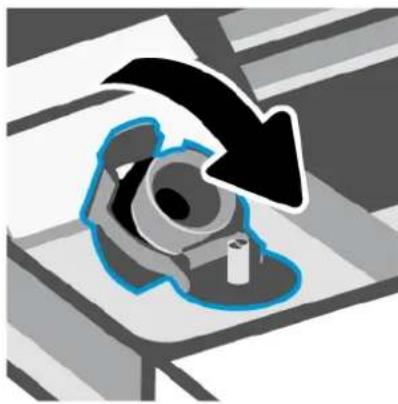
- Repeat steps 2 to 6 to refill other ink tanks.
- Close the tank covers and ink access door.
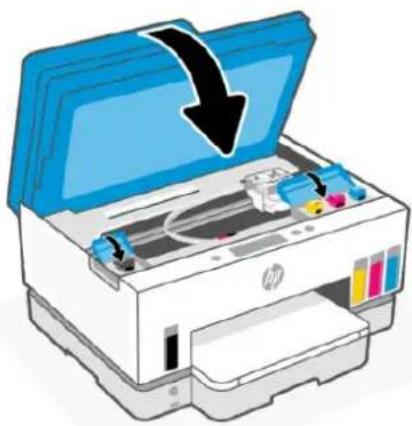
Precautions for working with ink bottles
Use the following tips to work with ink bottles:
- Keep the ink bottles beyond the reach of children.
- Open the ink bottles only when you plan to fill the ink tanks.
- Do not tilt, shake, or squeeze the ink bottle when it is open to prevent ink leaks.
- Store the ink bottles in a cool, dark place.
- Do not drink or place in mouth.
Order ink supplies
Before ordering ink bottles, visually check the labels on the ink bottles to locate the ink bottle numbers. You can also find this information on a label in the ink access area.
To order original HP supplies for the printer, go to www.hp.com/buy/supplies. If prompted, choose your country/region, and then follow the prompts to find the right ink bottles for your printer.

NOTE: Ordering ink bottles online is not supported in all countries/regions. If it is not available in your country/region, you may still view supplies information and print a list for reference when shopping at a local HP reseller.
Print with black ink only (Windows)
- From your software, select Print.
- Make sure your printer is selected.
- Click the button that opens the Properties dialog box.
Depending on your software application, this button might be called Properties, Options, Printer Setup, Printer Properties, Printer, or Preferences.
- Select the appropriate options.
- Windows 10
- Click the Paper/Quality tab. Under Print in Grayscale, select Black Ink Only from the list, and then click OK.
- Windows 7
- On the Layout or Paper/Quality tab, click the Advanced button to open the Advanced Options dialog box. From the Print in Grayscale drop-down list, select Black Ink Only, and then click OK.
Improve print quality
You can print a diagnostics page to determine if cleaning or aligning the printheads is recommended to improve print quality.
To print a print quality diagnostics page, see Print reports from the printer control panel.
You can also use the HP Smart app to improve the print quality. For information about this app, see Use the HP Smart app to print, scan, and manage.
To print a print quality diagnostics page (Windows)
- Load Letter or A4 unused plain white paper into the input tray.
- In the HP printer software (available from the Start menu), click Print, Scan & Fax at the top of the window.
- In the Print section, click Maintain Your Printer to access the Toolbox.
- In the Toolbox, click the Device Services tab, and then click the option to print the page.
Understand the print quality diagnostics page
- Review the black, cyan, magenta, and yellow boxes along with the other content on the diagnostics page.
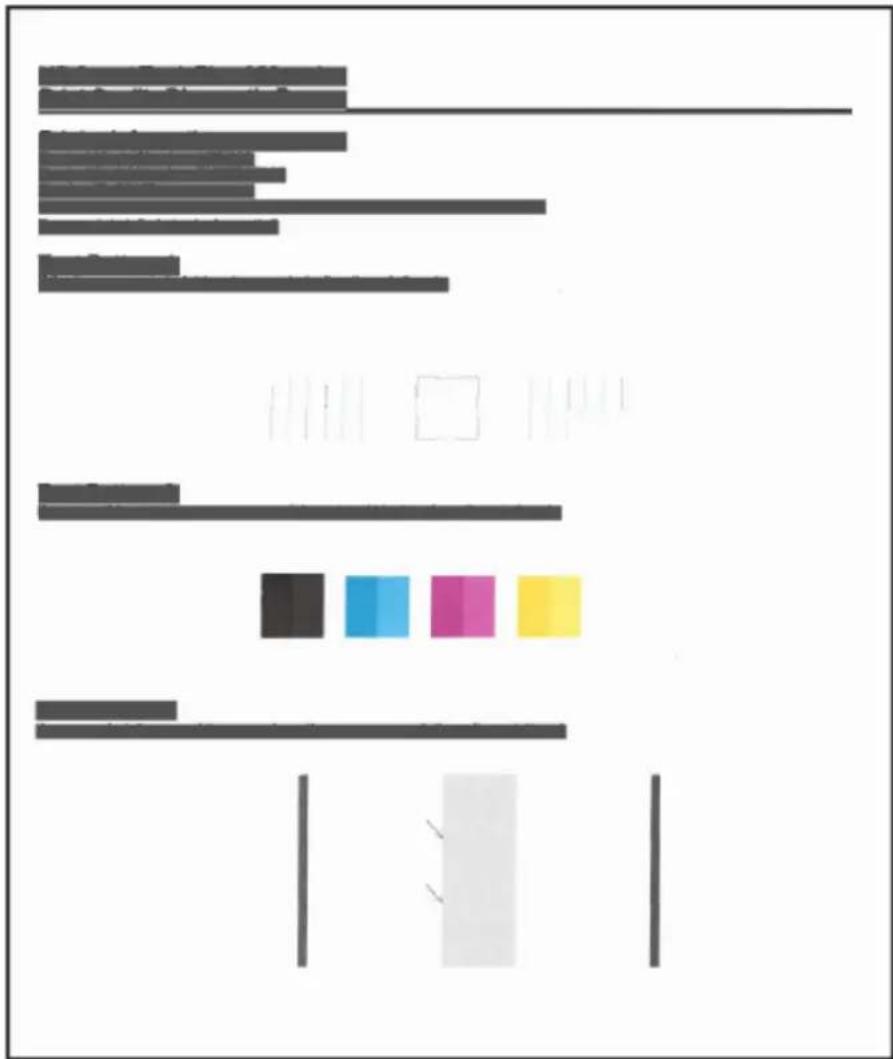
- If the diagnostic page shows streaks or missing portions of the color and black boxes, then automatically clean the printheads.
See Align and clean printheads.
- If straight lines appear jagged on printouts, or the diagnostic page indicates to align the printheads, then automatically align the printheads.
See Align and clean printheads.
- If print quality problems persist after cleaning and aligning printheads, contact HP support.
Align and clean printheads
The printer has a feature to automatically align or clean the printheads.
You can check the print quality diagnostics page to determine if aligning or cleaning is recommended. See Understand the print quality diagnostics page.
- Align printheads: Aligning the printheads can improve print quality. If you notice misaligned colors or lines in your printouts or on the print quality diagnostics page, you should perform an alignment.
- Clean printheads: If your prints are streaked or have incorrect or missing colors, the printheads might need to be cleaned.

NOTE:
The cleaning process prints one page to attempt to clean the printheads.
Clean the printheads only when necessary. Unnecessary cleaning wastes ink and shortens the life of the printheads.
To align or clean the printheads from the printer control panel
- Load Letter or A4 unused plain white paper into the input tray.
- On the Home screen of the printer display, touch (Menu).
- Scroll down to touch Tools.
- Touch Troubleshooting, touch Print Quality, and then select the option to align or clean printheads.
To align or clean the printheads from the embedded web server (EWS)
- Open EWS. See To access and use EWS.
- Click the Tools tab.
- From the left menu, click Utilities, and select Print Quality Toolbox.
- Click the button next to the option to align or clean printheads.
To align or clean the printheads (Windows)
- Load Letter or A4 unused plain white paper into the input tray.
- In the HP printer software (available from the Start menu), click Print, Scan & Fax at the top of the window.
- In the Print section, click Maintain Your Printer to access the Toolbox.
- In the Toolbox, click the Device Services tab, click the desired option, and then follow the on-screen instructions.
Clean printer
You can run a cleaning routine from the printer software to prevent back of page smearing.
To clean the printer from the printer software (Windows)
- Load Letter or A4 unused plain white paper into the input tray.
- In the HP printer software (available from the Start menu), click Print, Scan & Fax at the top of the window.
- In the Print section, click Maintain Your Printer to access the Toolbox.
- In the Toolbox, click the Device Services tab, click the desired option, and then follow the on-screen instructions.
Tips for working with ink and printheads
Printhead tips
Use the following tips to work with printheads:
- Use original HP printheads.
- Handle printheads with care. Do not drop the printheads, and do not touch the electric contacts or print nozzles on any surface.
- To protect the printheads from drying out, always turn the printer off using the Power button, and wait until the Power button light goes out.
- Do not open or untape printheads until you are ready to install them, as this can lead to print quality issues. Leaving tape on the printheads reduces ink evaporation. • Install both the black and color printheads correctly. See To verify the printheads are installed properly. • After you have set up the printer, do not open the printhead cover unless instructed to do so.
- You can align the printheads to improve the print quality. See Improve print quality for more information.
- If you remove a printhead from the printer for any reason, try to replace it again as soon as possible. If left unprotected outside the printer, the printhead may begin to dry out.
Ink tips
Use the following tips to work with ink:
• Make sure the ink tanks are not low on ink before printing. See Check the ink levels. - Refill the ink tanks when they are low on ink. Printing with the ink tanks low on ink may cause damage to your printer. - Do not tilt the printer.

NOTE: Original HP printheads and ink are designed and tested with HP printers and papers to help you easily produce great results, time after time.
HP cannot guarantee the quality or reliability of non-HP supplies. Product service or repairs required as a result of using a non-HP supply will not be covered under warranty.
Move printer
To prevent damage to the printer or ink leakage, follow these instructions.
If you are moving the printer within your home or office, keep the printhead cover closed, and keep the printer horizontal.
To move the printer to a different location outside of your home or office, see the instructions provided in the box for moving the printer, or visit hp.com/support.
Solve a problem
This section suggests solutions to common problems.
If the suggestions do not solve the problems, try getting help using one of the support services, see Solve a problem.
You can also get help from the HP Smart app and printer control panel.
- HP Smart: Provides alerts for printer issues (jams and other problems), links to help content, and options to contact support for additional assistance. See Use the HP Smart app to print, scan, and manage.
- Printer control panel: On the Home screen, touch Menu and scroll down to select Help. Or if the Help button ? appears, touch to get more information for a feature or current operation.
Jams and paper-feed issues
This topic helps you troubleshoot jams and paper-feed issues.
Clear a paper or print carriage jam
Paper jams can occur in several locations. For print carriage jams, remove any objects, including paper, that are blocking the print carriage in the ink access area.

NOTE: Do not use any tools or other devices to remove jammed objects. Always use caution when removing jammed objects from inside the printer.
To clear paper jams from the tray
- Remove the input tray.

- Remove the output tray.
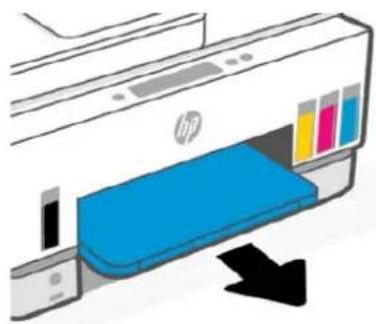
- Remove the duplexer plate. Do this by carefully reaching inside the gap where the trays were and pulling out the plate.
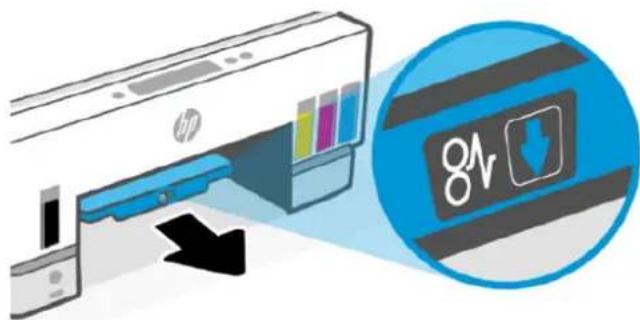
- Remove any jammed paper.
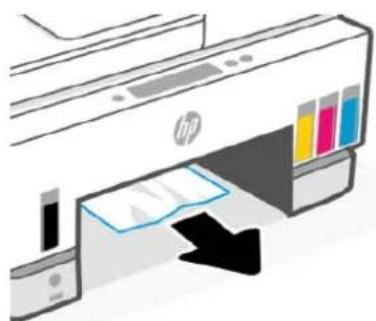
- Reinsert the duplexer plate, the output tray, and then the input tray.


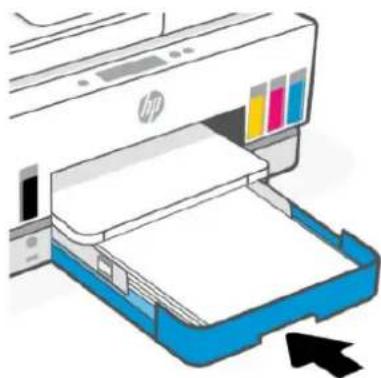
To clear paper jams from the inside of the printer
- Lift the ink access door.

- Remove any jammed paper.

- Close the ink access door.
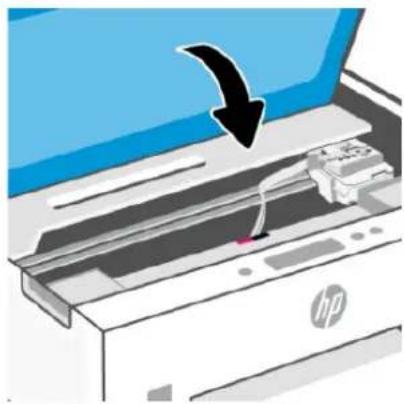
To clear paper jams from the rear of the printer
- Open the door at the rear of the printer.
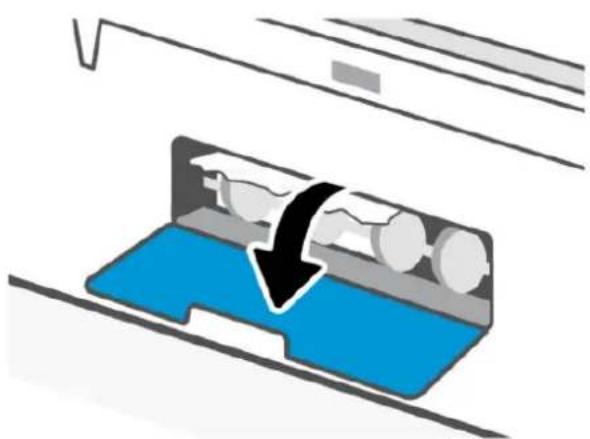
- Remove any jammed paper.
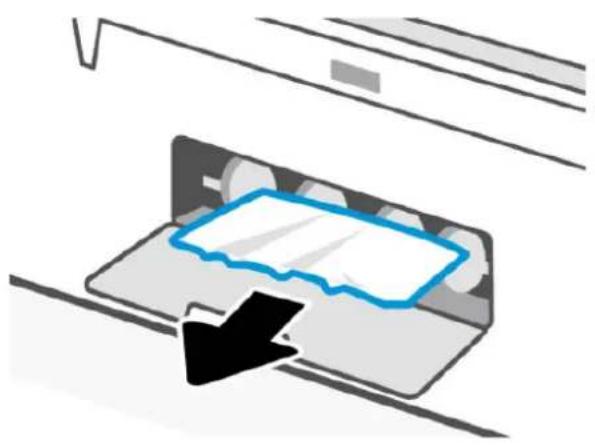
- Close the rear door.

To clear paper jams from the document feeder

NOTE: If paper jams keep occurring when using the document feeder, and other means to avoid document feeder jams do not help, try cleaning the document feeder glass area using a dry, lint-free cloth. See Clean the document feeder glass area.
- Open the document feeder cover.
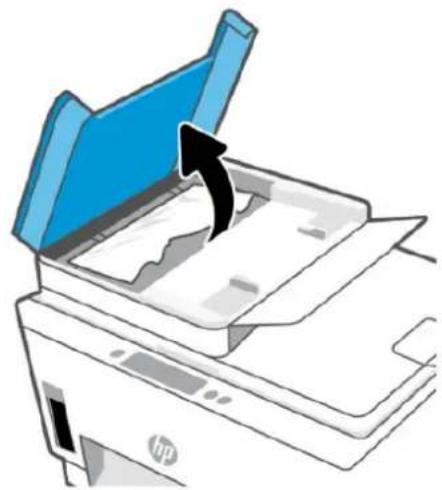
- Remove any jammed paper.
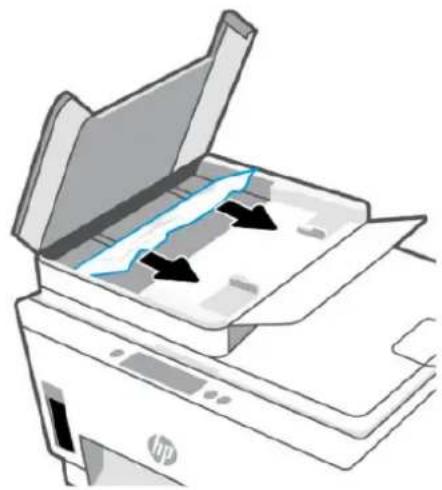
- Close the document feeder cover.
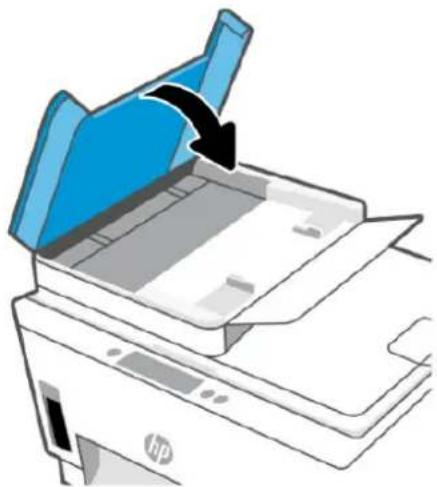
Learn how to avoid paper jams
To avoid paper jams, follow these guidelines.
- Do not overfill the input tray, but make sure that you have at least 5 pages loaded, for best results.
- Keep your printer free of dust and debris by removing paper and closing the input tray when not in use.
- Remove printed papers from the output tray frequently.
- Ensure that paper loaded in the input tray lays flat, and the edges are not bent or torn.
- Do not combine different paper types and paper sizes in the input tray; the entire stack of paper in the input tray must be the same size and type.
Use HP paper for optimum performance. See Paper basics for more information about HP paper.
- Adjust the paper-width guides in the input tray to fit snugly against all paper. Make sure the paper-width guides do not bend the paper in the input tray.
- Do not force paper too far down in the input tray.
- Do not add paper while the printer is printing. Wait for the printer to prompt before loading paper.
Solve paper-feed problems
What kind of problem are you having?
• Paper is not picked up from the input tray
—Make sure paper is loaded in the input tray. See Load paper.
- Adjust the paper-width guides in the input tray to fit snugly against all paper. Make sure the paper-width guides do not bend the paper in the input tray.
- Make sure paper in the input tray is not curled. Uncurl paper by bending it in the opposite direction of the curl.
Prevent curled or wrinkled paper by storing all unused paper flat in a resealable bag.
After printing is finished, remove unused photo paper from the input tray. Store the photo paper so it does not start to curl, which could reduce the quality of your printout.
Clean the paper rollers.
Pages are skewing
Make sure the paper loaded in the input tray is aligned to the paper-width guides. If needed, pull out the input tray from the printer and reload the paper correctly, making sure that the paper guides are aligned correctly.
Load paper into the printer only when it is not printing.
Make sure the rear access door is securely shut.
Multiple pages are being picked up
Adjust the paper-width guides in the input tray to fit snugly against all paper. Make sure the paper-width guides do not bend the paper in the input tray.
Make sure the input tray is not overloaded with paper.
Make sure the pieces of the loaded paper are not sticking together.
Use HP paper for optimum performance and efficiency.
Clean the paper rollers.
To clean the paper rollers manually
- Gather the following materials:
●A long, lint-free cotton swab
• Distilled, filtered, or bottled water (tap water might damage the printer)
- Press the Power button to turn off the printer.
- Disconnect the power cord from the rear of the printer.
- Disconnect any other cable from the printer.
- Remove the input tray.
- Remove the output tray.
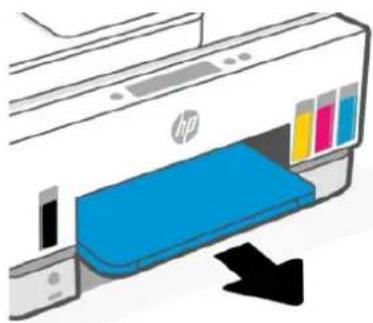
- Look inside the gap where the trays were and find the gray paper pick rollers. You might need a flashlight to illuminate the area.
- Dampen a long cotton swab with bottled or distilled water, and then squeeze any excess water from the cloth.
- Press the swab against the rollers, and then rotate them away from you with your fingers. Apply a moderate amount of pressure to remove dust or dirt buildup.
- Allow the rollers to dry for 10 or 15 minutes.
- Reinsert the output tray and the input tray.
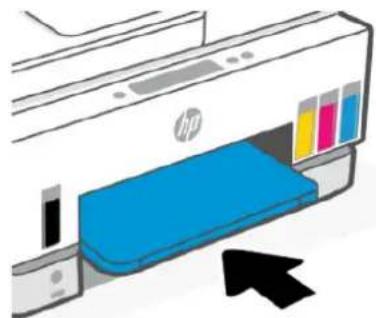
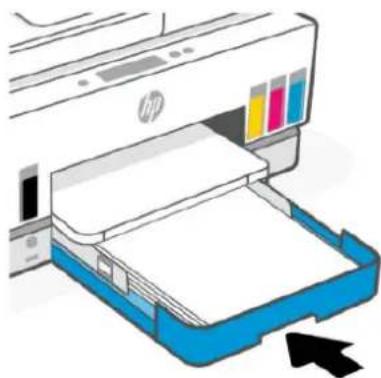
- Reconnect the power cord to the rear of the printer.
- Reconnect any other cable to the printer if necessary.
- Press the Power button to turn on the printer.
Printhead problem
This topic helps you troubleshoot printhead problems.
- Verify that the indicated printhead is correctly installed.
- Clean the printhead contacts.
- Contact HP support for assistance. Go to hp.com/support.
To verify the printheads are installed properly

NOTE:
- The instructions here are only applicable in this section. After you have set up the printer, do not open the printhead cover unless instructed to do so.
- Handle printheads with care. Do not drop the printheads, and do not touch the electric contacts or print nozzles on any surface.
- Make sure the printer is turned on.
- Lift the ink access door. Wait for the print carriage to move to the center and stop.

NOTE: After you have set up the printer, do not open the printhead cover unless instructed to do so.
- Remove and reinsert the printhead.
a. Press the blue button to open the printhead cover. b. Remove the printhead from the carriage.

c. If you find any orange cap or tape on the printhead, remove it.

CAUTION: Do not touch the electric contacts or print nozzles.
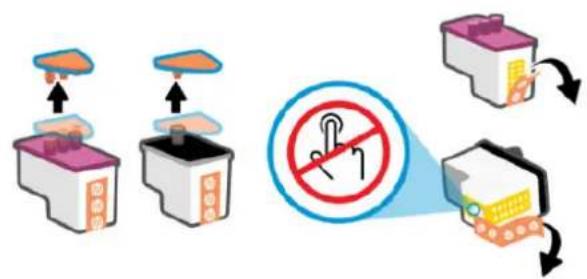
d. Insert the printhead into the slot until it clicks into place.

e. Close the printhead cover.
Make sure it is properly closed to avoid problems such as carriage jams.
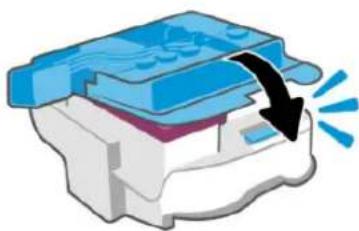
- Close the ink access door.

NOTE:
- Open the printhead cover and clean printhead contacts only when necessary; for example, if a printhead cannot be detected. The instructions here are only applicable in this section. After you have set up the printer, do not open the printhead cover unless instructed to do so.
- The cleaning procedure should take only a few minutes. Make sure that the printheads are reinstalled in the printer as soon as possible. It is not recommended to leave the printheads outside of the printer longer than 30 minutes. This could result in damage to the printheads.
- Handle printheads with care. Do not drop the printheads, and do not touch the electric contacts or print nozzles on any surface.
- Make sure the printer is turned on.
- Lift the ink access door.

NOTE: After you have set up the printer, do not open the printhead cover unless instructed to do so.
- Press the blue button to open the printhead cover.
- Remove the printhead indicated in the error message.

- Clean the printhead contacts and printer contacts.
a. Hold the printhead by its sides and locate the electrical contacts on the printhead.
The electrical contacts are the small gold-colored dots on the printhead.

NOTE: Do not touch the electric contacts or print nozzles.
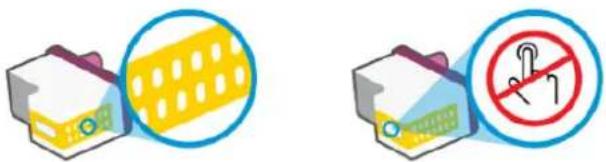
b. Wipe only the contacts with a dry swab or lint-free cloth.

NOTE: Be careful to wipe only the contacts, do not smear any ink or other debris on the contacts.
c. On the inside of the printer, locate the contacts for the printhead.
The printer contacts are the set of gold-colored bumps positioned to meet the contacts on the printhead.
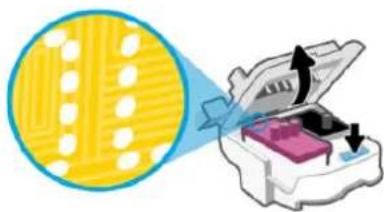
d. Use a dry swab or lint-free cloth to wipe the contacts.

NOTE: Be careful to wipe only the contacts, do not smear any ink or other debris on the contacts.
- Insert the printhead into the slot until it clicks into place.
![graph TD A["Printer Printing"] --> B["Packaging"] B --> C["Product Packaging"]](/content/2026/07/1462480/images/5d20816616aee79e65e0f90ee376c055ed31d3f3fa928b5bcdb17141a6415455.jpg)
- Close the printhead cover.
Make sure it is properly closed to avoid problems such as carriage jams.

- Close the ink access door.
- Check if the error message has gone away.
If you still receive the error message, turn the printer off, and then on.
Printing issues
This topic helps you troubleshoot printing issues.
• Use the HP Print and Scan Doctor to help diagnose and fix issues automatically.

NOTE: This tool is for the Windows operating system, and is only available in some languages.
- To avoid print quality problems, always turn the printer off using the Power button, and wait until the Power button light goes out before you pull the plug or turn off a power strip. This allows the printer to move the printheads to a capped position, where they are protected from drying out.
To improve print quality, see Improve print quality.
To resolve print issues (macOS)
- Check for error messages and resolve.
- Disconnect and reconnect the USB cable.
- Verify that the product is not paused or offline.
a. In System Preferences, click Printers & Scanners.
b. Click the Open Print Queue button.
c. Click a print job to select it.
Use the following buttons to manage the print job:
- Delete: Cancel the selected print job.
- Hold: Pause the selected print job.
- Resume: Continue a paused print job.
- Pause Printer: Pause all print jobs in the print queue.
d. If you made any changes, try to print again.
4. Restart the computer.
To resolve print issues (Windows)
Make sure that the printer is turned on and that there is paper in the input tray. If you are still unable to print, try the following in order:
- Check for error messages from the printer software and resolve them by following the on-screen instructions.
- If your computer is connected to the printer with a USB cable, disconnect and reconnect the USB cable.
If your computer is connected to the printer with a wireless connection, confirm that the connection is working.
- Verify that the printer is not paused or offline.
To verify that the printer is not paused or offline:
a. Depending on your operating system, do one of the following:
- Windows 10: From the Windows Start menu, select Windows System from the app list, select Control Panel, and then click View devices and printers under Hardware and Sound.
- Windows 7: From the Windows Start menu, click Devices and Printers.
b. Either double-click or right-click the icon for your printer and select See what's printing to open the print queue.
c. On the Printer menu, make sure there are no check marks next to Pause Printing or Use Printer Offline. d. If you made any changes, try to print again.
- Verify that the printer is set as the default printer.
To verify that the printer is set as the default printer:
a. Depending on your operating system, do one of the following:
- Windows 10: From the Windows Start menu, select Windows System from the app list, select Control Panel, and then click View devices and printers under Hardware and Sound.
- Windows 7: From the Windows Start menu, click Devices and Printers.
b. Make sure the correct printer is set as the default printer.
The default printer has a check mark in a black or green circle next to it.
c. If the wrong printer is set as the default printer, right-click the correct printer and select Set as Default Printer.
d. Try using your printer again.
- Restart the print spooler.
To restart the print spooler
a. Depending on your operating system, do one of the following:
- Windows 10: From the Windows Start menu, click Windows System, and then click Control Panel.
- Windows 7: From the Windows Start menu, click Control Panel.
b. Click System and Security, and then click Administrative Tools.
c. Double-click Services.
d. Right-click the Print Spooler, and then click Properties.
e. On the General tab, make sure Automatic is selected from the Startup type drop-down list.
f. Under Service status, check the status.
- If the service is not running, click Start.
- If the service is running, click Stop, and then click Start to restart the service.
Then click OK.
- Restart the computer.
- Clear the print queue.
To clear the print queue
a. Depending on your operating system, do one of the following:
- Windows 10: From the Windows Start menu, click Windows System, and then click Control Panel. Under Hardware and Sound, click View devices and printers.
- Windows 7: From the Windows Start menu, click Devices and Printers.
b. Right-click the printer, and then select the option to see what is printing.
c. On the Printer menu, click Cancel all documents or Purge Print Document, and then click Yes to confirm.
d. If there are still documents in the queue, restart the computer and try printing again after the computer has restarted.
e. Check the print queue again to make sure it is clear, and then try to print again.
Copy and scan issues
This topic helps you troubleshoot copy and scan issues.
• See Tips for successful scanning and copying. - Use the HP Print and Scan Doctor to help diagnose and fix issues automatically.

NOTE: This tool is for the Windows operating system, and is only available in some languages.
Fax issues
Run or print a fax test report first to see if there is a problem with your fax setup. If the test passes and you are still having problems faxing, check the fax settings listed in the report to verify that the settings are correct.
Run a fax test
You can test your fax setup to check the status of the printer and to make sure it is set up correctly for faxing. Perform this test only after you have completed fax setup on the printer. The test does the following:
• Tests the fax hardware • Verifies that the correct type of phone cord is connected to the printer - Checks that the phone cord is plugged into the correct port - Checks for a dial tone - Tests the status of your phone line connection - Checks for an active phone line
To test fax setup via the printer control panel
- Set up the printer for faxing according to your particular home or office setup instructions.
- Make sure the ink tanks are filled and that full-size paper is loaded in the input tray before starting the test.
- On the Home screen of the printer display, touch (Menu).
- Scroll down to touch Tools.
- Touch Troubleshooting, touch Fax Troubleshooting, and then select the option to run a fax test.
The printer displays the status of the test on the display and prints a report.
- Review the report.
- If the fax test failed, review the solutions in the following sections.
- If the fax test passed and you are still having problems faxing, verify that the fax settings listed in the report are correct.
What to do if the fax test failed
If you ran a fax test and the test failed, review the report for basic information about the error. For more detailed information, check the report to see which part of the test failed, and then review the appropriate topic in this section for solutions to try.
The "Fax Hardware Test" failed
- Turn the printer off by pressing the Power button located on the printer control panel and then unplug the power cord from the back of the printer. After a few seconds, plug the power cord in again, and then turn the power on. Run the test again. If the test fails again, continue reviewing the troubleshooting information in this section.
- Try to send or receive a test fax. If you can send or receive a fax successfully, there might not be a problem.
- If you are running the test from the Fax Setup Wizard (Windows), make sure the printer is not busy completing another task, such as receiving a fax or making a copy. Check the display for a message indicating that the printer is busy. If it is busy, wait until it is finished and in the idle state before running the test.
- If you are using a phone splitter, this can cause faxing problems. (A splitter is a two-cord connector that plugs into a telephone wall jack.) Try removing the splitter and connecting the printer directly to the telephone wall jack.
After you resolve any problems found, run the fax test again to make sure it passes and the printer is ready for faxing. If the Fax Hardware Test continues to fail and you experience problems faxing, contact HP support. Go to The "Fax Hardware Test" failed. This website provides information and utilities that can help you correct many common printer problems. If prompted, select your country/region, and then click All HP Contacts for information on calling for technical support.
The "Fax Connected to Active Telephone Wall Jack" test failed
- Check the connection between the telephone wall jack and the printer to make sure the phone cord is secure.
- Make sure you have correctly connected the printer to the telephone wall jack. Using the phone cord, connect one end to your telephone wall jack, then connect the other end to the port on the printer.
- If you are using a phone splitter, this can cause faxing problems. (A splitter is a two-cord connector that plugs into a telephone wall jack.) Try removing the splitter and connecting the printer directly to the telephone wall jack.
- Try connecting a working phone and phone cord to the telephone wall jack that you are using for the printer and check for a dial tone. If you do not hear a dial tone, contact your telephone company and have them check the line.
- Try to send or receive a test fax. If you can send or receive a fax successfully, there might not be a problem.
After you resolve any problems found, run the fax test again to make sure it passes and the printer is ready for faxing.
The "Phone Cord Connected to Correct Port on Fax" test failed
If you are using a phone splitter, this can cause faxing problems. (A splitter is a two-cord connector that plugs into a telephone wall jack.) Try removing the splitter and connecting the printer directly to the telephone wall jack.
Plug the phone cord into the correct port
- Using the phone cord, connect one end to your telephone wall jack, then connect the other end to the port on the printer.
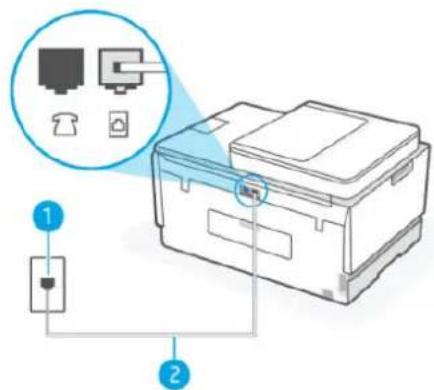
Feature Description
1 Telephone wall jack
2 Use a minimum 26 AWG phone cord to connect to the port on the printer.
- After you have connected the phone cord to the port, run the fax test again to make sure it passes and the printer is ready for faxing.
- Try to send or receive a test fax.
The "Using Correct Type of Phone Cord with Fax" test failed
SHORT DESCRIPTION
- One end of the phone cord should be connected to the port on the printer, and the other end to your telephone wall jack, as shown in the illustration.

Table 9-1 Fax test
| Feature Description |
| 1 Telephone wall jack |
| 2 | Use a minimum 26 AWG phone cord to connect to the port on the printer. |
Use a longer phone cord if needed. You can purchase phone cords from electronics stores that sell phone accessories.
- Check the connection between the telephone wall jack and the printer to make sure the phone cord is secure.
- If you are using a phone splitter, this can cause faxing problems. (A splitter is a two-cord connector that plugs into a telephone wall jack.) Try removing the splitter and connecting the printer directly to the telephone wall jack.
The "Dial Tone Detection" test failed
- Other equipment, which uses the same phone line as the printer, might be causing the test to fail. To find out if other equipment is causing a problem, disconnect everything from the phone line, and then run the test again. If the Dial Tone Detection Test passes without the other equipment, then one or more pieces of the equipment is causing problems; try adding them back one at a time and rerunning the test each time, until you identify which piece of equipment is causing the problem.
- Try connecting a working phone and phone cord to the telephone wall jack that you are using for the printer and check for a dial tone. If you do not hear a dial tone, contact your telephone company and have them check the line.
- Make sure you have correctly connected the printer to the telephone wall jack. Using the phone cord, connect one end to your telephone wall jack, then connect the other end to the port on the printer.
- If you are using a phone splitter, this can cause faxing problems. (A splitter is a two-cord connector that plugs into a telephone wall jack.) Try removing the splitter and connecting the printer directly to the telephone wall jack.
- If your telephone system is not using a standard dial tone, such as some private branch exchange (PBX) systems, this might cause the test to fail. This does not cause a problem sending or receiving faxes. Try sending or receiving a test fax.
- Check to make sure the country/region setting is set appropriately for your country/region. If the country/region setting is not set or is set incorrectly, the test might fail and you might have problems sending and receiving faxes.
- Make sure you connect the printer to an analog phone line or you cannot send or receive faxes. To check if your phone line is digital, connect a regular analog phone to the line and listen for a dial tone. If you do not hear a normal sounding dial tone, it might be a phone line set up for digital phones. Connect the printer to an analog phone line and try sending or receiving a fax.
After you resolve any problems found, run the fax test again to make sure it passes and the printer is ready for faxing. If the Dial Tone Detection test continues to fail, contact your telephone company and have them check the phone line.
The "Fax Line Condition" test failed
- Make sure you connect the printer to an analog phone line or you cannot send or receive faxes. To check if your phone line is digital, connect a regular analog phone to the line and listen for a dial tone. If you do not hear a normal sounding dial tone, it might be a phone line set up for digital phones. Connect the printer to an analog phone line and try sending or receiving a fax.
- Check the connection between the telephone wall jack and the printer to make sure the phone cord is secure.
- Make sure you have correctly connected the printer to the telephone wall jack. Using the phone cord, connect one end to your telephone wall jack, then connect the other end to the port on the printer.
- Other equipment, which uses the same phone line as the printer, might be causing the test to fail. To find out if other equipment is causing a problem, disconnect everything from the phone line, and then run the test again.
- If the Fax Line Condition Test passes without the other equipment, then one or more pieces of the equipment is causing problems; try adding them back one at a time and rerunning the test each time, until you identify which piece of equipment is causing the problem.
- If the Fax Line Condition Test fails without the other equipment, connect the printer to a working phone line and continue reviewing the troubleshooting information in this section.
- If you are using a phone splitter, this can cause faxing problems. (A splitter is a two-cord connector that plugs into a telephone wall jack.) Try removing the splitter and connecting the printer directly to the telephone wall jack.
After you resolve any problems found, run the fax test again to make sure it passes and the printer is ready for faxing. If the Fax Line Condition test continues to fail and you experience problems faxing, contact your telephone company and have them check the phone line.
Troubleshoot fax problems
The display always shows Phone Off Hook
- Use a longer phone cord if needed. You can purchase phone cords from electronics stores that sell phone accessories.
- Other equipment that uses the same phone line as the printer might be in use. Make sure extension phones (phones on the same phone line, but not connected to the printer) or other equipment are not in use or off the hook. For example, you cannot use the printer for faxing if an extension phone is off the hook, or if you are using a computer dial-up modem to send email or access the Internet.
The printer is having problems sending and receiving faxes
- Make sure the printer is turned on. Look at the display on the printer. If the display is blank and the Power button light is not lit, the printer is turned off. Make sure the power cord is firmly connected to the printer and plugged into a power outlet. Press the Power button to turn on the printer.
After turning on the printer, HP recommends you wait five minutes before sending or receiving a fax. The printer cannot send or receive faxes while it is initializing after being turned on.
- One end of the phone cord should be connected to the port on the printer and the other end to your telephone wall jack, as shown in the illustration.

Feature Description
1 Telephone wall jack
2
Use a minimum 26 AWG phone cord to connect to the port on the printer.
Use a longer phone cord if needed. You can purchase phone cords from electronics stores that sell phone accessories.
- Try connecting a working phone and phone cord to the telephone wall jack that you are using for the printer and check for a dial tone. If you do not hear a dial tone, call your local telephone company for service.
- Other equipment, which uses the same phone line as the printer, might be in use. For example, you cannot use the printer for faxing if an extension phone is off the hook, or if you are using a computer dial-up modem to send an email or access the Internet.
- Check to see if another process has caused an error. Check the display or your computer for an error message providing information about the problem and how to solve it. If there is an error, the printer cannot send or receive a fax until the error condition is resolved.
- The phone line connection might be noisy. Phone lines with poor sound quality (noise) can cause faxing problems. Check the sound quality of the phone line by plugging a phone into the telephone wall jack and listening for static or other noise. If you hear noise, turn Error Correction Mode (ECM) off and try faxing again. For information about changing ECM, see Send a fax in Error Correction Mode. If the problem persists, contact your telephone company.
- If you are using a digital subscriber line (DSL) service, make sure that you have a DSL filter connected or you cannot fax successfully.
- Make sure the printer is not connected to a telephone wall jack that is set up for digital phones. To check if your phone line is digital, connect a regular analog phone to the line and listen for a dial tone. If you do not hear a normal sounding dial tone, it might be a phone line set up for digital phones.
- If you are using either a private branch exchange (PBX) or an integrated services digital network (ISDN) converter/terminal adapter, make sure the printer is connected to the correct port and the terminal adapter is set to the correct switch type for your country/region, if possible.
- If the printer shares the same phone line with a DSL service, the DSL modem might not be grounded correctly. If the DSL modem is not grounded correctly, it can create noise on the phone line. Phone lines with poor sound quality (noise) can cause faxing problems. You can check the sound quality of the phone line by plugging a phone into the telephone wall jack and listening for static or other noise. If you hear noise, turn off your DSL modem and completely remove power for at least 15 minutes. Turn the DSL modem back on and listen to the dial tone again.

NOTE: You might notice static on the phone line again in the future. If the printer stops sending and receiving faxes, repeat this process.
If the phone line is still noisy, contact your telephone company. For information on turning your DSL modem off, contact your DSL provider for support.
- If you are using a phone splitter, this can cause faxing problems. (A splitter is a two-cord connector that plugs into a telephone wall jack.) Try removing the splitter and connecting the printer directly to the telephone wall jack.
The printer cannot receive faxes, but can send faxes
- If you are not using a distinctive ring service, check to make sure that the Distinctive Ring feature on the printer is set to All Rings. For more information, see Change the answer ring pattern for distinctive ring.
- If Auto Answer is set to Off, you need to receive faxes manually; otherwise, the printer cannot receive the fax. For information on receiving faxes manually, see To receive a fax manually.
- If you have a voice mail service at the same phone number you use for fax calls, you must receive faxes manually, not automatically. This means that you must be available to respond in person to incoming fax calls.
- If you have a computer dial-up modem on the same phone line with the printer, check to make sure that the software that came with your modem is not set to receive faxes automatically. Modems that are set up to receive faxes automatically take over the phone line to receive all incoming faxes, which prevents the printer from receiving fax calls.
- If you have an answering machine on the same phone line with the printer, you might have one of the following problems:
- Your answering machine might not be set up correctly with the printer.
- Your outgoing message might be too long or too loud to allow the printer to detect fax tones, and the sending fax machine might disconnect.
- Your answering machine might not have enough quiet time after your outgoing message to allow the printer to detect fax tones. This problem is most common with digital answering machines.
The following actions might help solve these problems:
- When you have an answering machine on the same phone line you use for fax calls, try connecting the answering machine directly to the printer.
- Make sure the printer is set to receive faxes automatically. For information on setting up the printer to receive faxes automatically, see Receive a fax.
- Make sure the Rings to Answer setting is set to a greater number of rings than the answering machine.
- Disconnect the answering machine and then try receiving a fax. If faxing is successful without the answering machine, the answering machine might be causing the problem.
- Reconnect the answering machine and record your outgoing message again. Record a message that is approximately 10 seconds in duration. Speak slowly and at a low volume when recording your message. Leave at least 5 seconds of silence at the end of the voice message. There should be no background noise when recording this silent time. Try to receive a fax again.

NOTE: Some digital answering machines might not retain the recorded silence at the end of your outgoing message. Play back your outgoing message to check.
- If the printer shares the same phone line with other types of phone equipment, such as an answering machine, a computer dial-up modem, or a multi-port switch box, the fax signal level might be reduced. The signal level can also be reduced if you use a splitter or connect extra cables to extend the length of your phone. A reduced fax signal can cause problems during fax reception. To find out if other equipment is causing a problem, disconnect everything except the printer from the phone line, and then try to receive a fax. If you can receive faxes successfully without the other equipment, one or more pieces of the other equipment is causing problems; try adding them back one at a time and receiving a fax each time, until you identify which equipment is causing the problem.
- If you have a special ring pattern for your fax phone number (using a distinctive ring service through your telephone company), make sure that the Distinctive Ring feature on the printer is set to match. For more information, see Change the answer ring pattern for distinctive ring.
The printer cannot send faxes, but can receive faxes
- The printer might be dialing too fast or too soon. You might need to insert some pauses in the number sequence. For example, if you need to access an outside line before dialing the phone number, insert a pause following the access number. If your number is 95555555, and 9 accesses an outside line, you might insert pauses as follows: 9-555-5555. To enter a pause in the fax number you are typing, touch the * repeatedly, until a dash (-) appears on the display.
You can also send the fax using monitor dialing. This enables you to listen to the phone line as you dial. You can set the pace of your dialing and respond to prompts as you dial. For more information, see To send a fax using monitor dialing from the printer control panel.
- The number you entered when sending the fax is not in the proper format or the receiving fax machine is having problems. To check this, try calling the fax number from a telephone and listen for fax tones. If you cannot hear fax tones, the receiving fax machine might not be turned on or connected, or a voice mail service could be interfering with the recipient's phone line. You can also ask the recipient to check the receiving fax machine for any problems.
Network and connection issues
This topic helps you troubleshoot network and connection issues.
Fix network connection issues
Choose one of the following troubleshooting options:
- Restore network settings and reconnect the printer. See Restore original factory defaults and settings.
- Print and check the wireless network test report and network configuration page to assist in diagnosing network connection issues. See Print reports from the printer control panel.
- Ensure that firewalls and security software (including anti-virus, anti-spyware programs) are not affecting the printer connection to your network.
For more information, visit www.hpsmart.com/wireless-printing.
- Use the HP Print and Scan Doctor (Windows only) to help diagnose and automatically fix network connection issues.
You can also use this tool to find network settings, such as the network name (SSID) and password (network key).
Fix Wi-Fi Direct connection issues
- See Print without connecting to same Wi-Fi network (Wi-Fi Direct).
- Make sure that the Wi-Fi Direct is on. To turn on Wi-Fi Direct, see To turn on or off Wi-Fi Direct.
- From your wireless computer or mobile device, turn on the wireless (Wi-Fi) connection, and then search for and connect to the Wi-Fi Direct name of your printer.
- Enter the Wi-Fi Direct password when prompted.
- If you are using a mobile device, make sure you have installed a compatible printing app. For more information about mobile printing, visit the Mobile printing website for more information on Wi-Fi Direct.
Fix Ethernet connection issues
Check the following:
- The network is operational and the network hub, switch, or router is turned on.
- The Ethernet cable is properly connected between the printer and the router. The Ethernet cable is plugged into the Ethernet port on the printer and the light near the connector lights up when connected.
- Ensure that firewalls and security software (including anti-virus, anti-spyware programs) are not affecting the printer connection to your network. For more information, visit www.hpsmart.com/wireless-printing.
- Use the HP Print and Scan Doctor (Windows only) to help diagnose and automatically fix connection issues.
Restore original factory defaults and settings
This topic describes how to restore original factory defaults and settings.
- If you have made changes to the printer or network settings, you can restore the printer to the original factory settings or network settings.
- If more than 2 hours have passed since you first turned on the printer and you have not set up the printer wirelessly, place the printer in Wi-Fi setup mode by restoring the printer Wi-Fi network settings. The setup mode will last for 2 hours.
- You can also troubleshoot network connection issues by restoring the printer network settings.
- If you restore the printer network settings, you will need to reconnect the printer to the network using the HP Smart app. See Connect your printer to a Wi-Fi network using HP Smart.
To restore the printer to the original factory defaults from the printer control panel
- On the Home screen of the printer display, touch (Menu).
- Scroll down to touch Tools.
- Touch Maintenance.
- Touch Restore Settings, and then select the option to restore factory defaults.
To restore the printer network settings from the printer control panel

- On the Home screen of the printer display, touch
- Scroll down to touch Settings.
- Touch Network.
- Scroll down to touch Reset Network Settings, and then follow the onscreen instructions.

NOTE:
- You can print the network configuration page and verify that the network settings have been reset. See Print reports from the printer control panel.
- When you reset the printer network settings, previously configured network settings (such as the link speed or IP address) are removed. The IP address is set back to the Automatic mode.
- Use the HP Print and Scan Doctor (Windows only) to help diagnose and automatically fix connection issues.
To restore the printer network settings from the printer
- On the back of the printer, press and hold the Wi-Fi button for 5 seconds, or until the printer display shows a prompt.
- When prompted, touch OK to restore original network settings. The status light on the front of the printer will pulse purple.
Solve Web Services problems
If you are having problems using Web Services, check the following:
- Make sure the printer is connected to the Internet using a supported network connection.
- Make sure the latest product updates have been installed on the printer.
• Make sure Web Services is enabled on the printer. See Use Web Services. - Make sure the network hub, switch, or router is turned on and working correctly. - If you are connecting the printer using a wireless connection, make sure the Wi-Fi network is functioning properly. For more information, see Network and connection issues. - If your network uses proxy settings when connecting to the Internet, make sure the proxy settings you are entering are valid:
- Check the settings being used by the web browser you are using (such as Internet Explorer, Firefox, or Safari).
—Check with the IT administrator or person who set up your firewall.
If the proxy settings used by your firewall have changed, you must update these settings in either the printer control panel or the embedded web server (EWS). If these settings are not updated, you will not be able to use Web Services.
For more information, see Use Web Services.
Printer hardware issues
This topic helps you troubleshoot printer hardware issues.
Close all covers and doors
- Make sure the tank covers, printhead cover, and ink access door are properly closed.
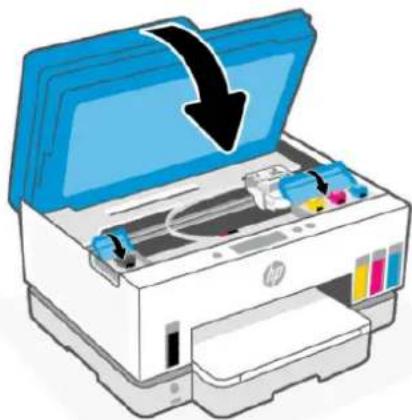
The printer shuts down unexpectedly
- Check the power and power connections. • Make sure the printer's power cord is connected firmly to a functioning power outlet.

NOTE: When Auto-Off is enabled, the printer will automatically turn off after 2 hours of inactivity to help reduce energy use. For more information, see Auto-Off.
Resolve printer failure
- Turn the printer off, then on. If that does not resolve the problem, contact HP.
Maintain the printer
This topic describes how to maintain the printer.
Clean the scanner glass
Dust or dirt on the scanner glass, scanner lid backing, or scanner frame can slow down performance, degrade the quality of scans, and affect the accuracy of special features such as fitting copies to a certain page size.
To clean the scanner glass
△
WARNING! Before cleaning the printer, turn the printer off by pressing the Power button ⏻, and unplug the power cord from the electrical socket.
- Lift the scanner lid.
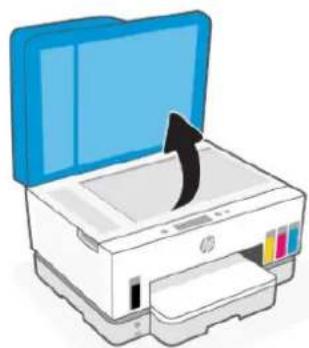
- Clean the scanner glass and lid backing by using a dry and soft, lint-free cloth.
Spray the cloth with a mild glass cleaner and clean only the glass.
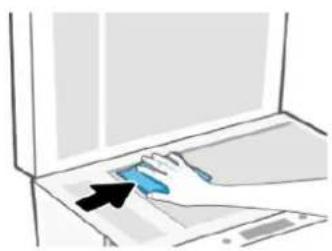
CAUTION:
- Do not clean the scanner lid backing with anything wet to avoid damaging the protection layer.
- Use only glass cleaner to clean the scanner glass. Avoid cleaners that contain abrasives, acetone, benzene, and carbon tetrachloride, all of which can damage the scanner glass. Avoid isopropyl alcohol because it can leave streaks on the scanner glass.
- Do not spray the glass cleaner directly on the scanner glass. If too much glass cleaner is applied, the cleaner could leak under the scanner glass and damage the scanner.
- Close the scanner lid, and turn on the printer.
Clean the document feeder glass area
If paper jams keep occurring when using the document feeder, and other means to avoid document feeder jams do not help, try cleaning the document feeder glass area using a dry, lint-free cloth.
- Lift the scanner lid.
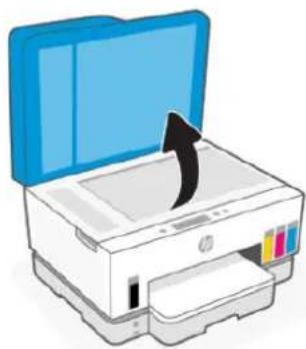
- Using a dry and soft, lint-free cloth, clean the document feeder glass and the indicated area on the scanner lid.

Clean the exterior
WARNING! Before cleaning the printer, turn the printer off by pressing the power button, and unplugging the power cord from the electrical socket.
Use a soft, damp, lint-free cloth to wipe dust, smudges, and stains off of the case. Keep fluids away from the interior of the printer, as well as from the printer control panel.
Clean the document feeder
If the document feeder picks up multiple pages or if it does not pick up plain paper, you can clean the rollers and separator pad.

NOTE: If you encounter paper jams or poor outcome when copying or scanning using the document feeder, you might need to clean the document feeder glass, see Clean the document feeder glass area.
To clean the rollers or separator pad

WARNING! Before cleaning the printer, turn the printer off by pressing the Power button ⏻, and unplug the power cord from the electrical socket.
- Remove all originals from the document feeder input tray.
- Open the document feeder cover.

This provides easy access to the rollers (1) and separator pad (2).
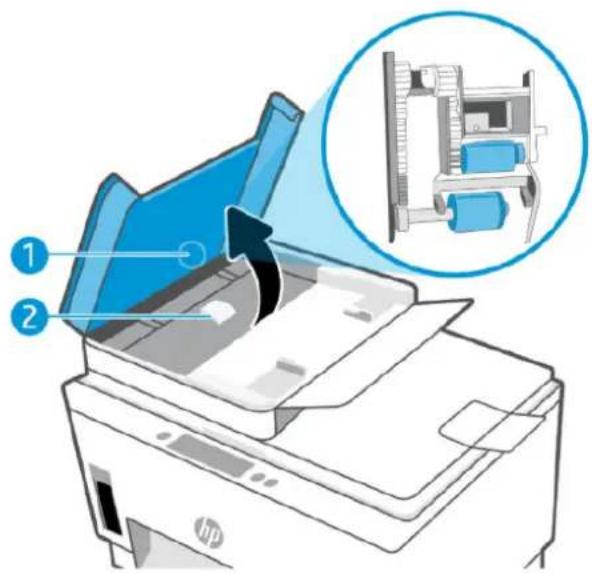
Table 9-2 Rollers and separators
| Feature Description |
| 1 Rollers. |
| 2 Separator pad. |
- Lightly dampen a clean lint-free cloth with distilled water, then squeeze any excess liquid from the cloth.
- Use the damp cloth to wipe any residue off the rollers or separator pad.

NOTE: If the residue does not come off using distilled water, try using isopropyl (rubbing) alcohol.
- Close the document feeder cover.
HP support
HP online support provides a variety of options for help with your printer. For the latest product updates and support information, visit hp.com/support.

NOTE: You can also use the HP Smart app to check printer errors and get troubleshooting assistance. For information about this app, see Use the HP Smart app to print, scan, and manage.
If you need help from an HP technical support representative to solve a problem, visit the Contact Support website. The following contact options are available at no cost for in-warranty customers (HP agent-assisted support for out-of-warranty customers may require a fee):
- Chat with an HP support agent online.
- Call an HP support agent.
When contacting HP support, be prepared to provide the following information:
• Product name (located on the printer) • Product number and serial number (on a label in the ink access area)
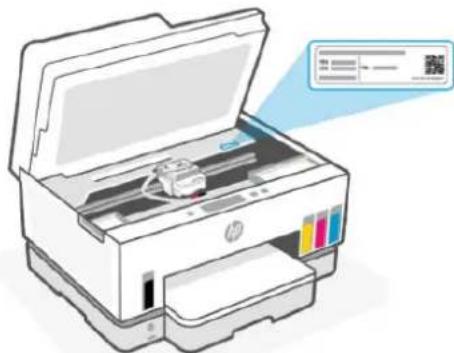
Register printer
By taking just a few quick minutes to register, you can enjoy quicker service, more efficient support, and product support alerts.
If you did not register your printer while installing the software, you can register now at register.hp.com.
Additional warranty options
Extended service plans are available for the printer at additional costs. Go to hp.com/support, select your country/region and language, then explore the extended warranty options available for your printer.
HP EcoSolutions (HP and the Environment)10
For more detailed information about environmental guidelines that HP follows during the manufacturing process, see Environmental product stewardship program. For more information about HP's environmental initiatives, visit HP EcoSolutions.
Power Management
This topic describes the power management features of the printer.
Sleep mode
● Power usage is reduced while in Sleep mode. • After initial setup of the printer, the printer will enter Sleep mode after 5 minutes of inactivity. - You can change the time the printer goes to sleep after a period of inactivity. - The Power button light is dimmed and the printer control panel display is off in Sleep mode. - To wake the printer from sleep, touch anywhere on the printer control panel.
To change the time for Sleep mode from the printer control panel
- On the Home screen of the printer display, touch (Menu).
- Scroll down to touch Settings.
- Touch General, and then select Energy.
- Touch Sleep, and then select the desired time.
Auto-Off
This feature turns the printer off after 2 hours of inactivity to help reduce energy use. Auto-Off turns the printer off completely, so you must use the Power button to turn the printer back on.
If your printer supports this energy saving feature, Auto-Off is automatically enabled or disabled depending on printer capabilities and connection options. Even when Auto-Off is disabled, the printer enters Sleep mode after 5 minutes of inactivity to help reduce energy use.
- Auto-Off is enabled when the printer is turned on, if the printer does not have network, fax, or Wi-Fi Direct capability, or is not using these capabilities.
- Auto-Off is disabled when a printer's Wi-Fi or Wi-Fi Direct capability is turned on or when a printer with fax, USB, or Ethernet network capability establishes a fax, USB, or Ethernet network connection.

TIP: To conserve battery power, you can enable Auto-Off, even when the printer is connected or Wi-Fi is turned on.
To change the Auto-off time from the printer control panel
- On the Home screen of the printer display, touch (Menu).
- Scroll down to touch Settings.
- Touch General, and then select Energy.
- Touch Shutdown, and then select the desired time.
To change the time for Sleep mode and Auto-Off from the embedded web server (EWS)
- Open EWS. See To access and use EWS.
- Click the Settings tab.
- From the left menu, click Power Management.
- Click Energy Save Mode or Auto-Off.
- Select the desired time, and then click Apply.
Schedule On and Off
Use this feature to automatically turn the printer on or off on selected days. For example, you can schedule the printer to turn on at 8 a.m. and turn off at 8 p.m. from Monday to Friday. In this way, you save energy during the night and weekends.
To schedule the days and time to turn the printer on or off
- Open EWS. See To access and use EWS.
- Click the Settings tab.
- From the left menu, click Power Management.
- Click Schedule On/Off, and specify the desired time and days to automatically turn on or off the printer.
- Click Apply.
Quiet Mode
Quiet Mode slows down printing to reduce overall noise without affecting print quality. Quiet Mode only works when printing on plain paper with normal print quality.
To reduce printing noise, turn on Quiet Mode. To print at normal speed, turn Quiet Mode off. Quiet Mode is off by default.

NOTE:
- You can specify the time to automatically turn on the feature.
- To change the setting from HP Smart, open HP Smart on your device, select your printer, and then click Printer Settings.
To turn Quiet mode on or off or change the settings from the embedded web server (EWS)
- Open EWS. See To access and use EWS.
- Click the Settings tab.
- From the left menu, click Preferences.
- Click Quiet Mode and make the necessary changes.
- Click Apply.
The information contained herein is subject to change without notice. Some statements might not be applicable for your printer or all countries/regions.
Specifications
For more information about the product specifications (including acoustic information, print resolutions, system requirements), visit hp.com/support.
Environmental specifications
- Recommended operating temperature range: 15°C to 30°C (59°F to 86°F)
- Recommended and operating humidity range: 20% to 80% relative humidity (RH), non-condensing
- Operating temperature range: 5°C to 40°C (41°F to 104°F)
- Non-operating (storage) temperature range: -40°C to 60°C (-40°F to 140°F)
- In the presence of high electromagnetic fields, it is possible the output from the printer may be slightly distorted
- HP recommends using a USB cable less than or equal to 3 m (10 feet) in length to minimize injected noise due to potential high electromagnetic fields
- Plain paper sheets (75 g/m2 [20 lb]): Up to 250 • Envelopes: Up to 30
- Index cards: Up to 50 • Photo paper sheets: Up to 50
Output tray capacity
- Plain paper sheets (75 g/m² [20 lb]): Up to 100 • Envelopes: Up to 30
- Index cards: Up to 30 • Photo paper sheets: Up to 30
Document feeder capacity
Plain paper sheets (60 to 90 g/m² [16 to 24 lb]): Up to 35
Paper type and size
For a complete list of supported media, see the printer software or the embedded web server (EWS). To open EWS, see To access and use EWS.
Paper weights
- Plain Paper: 60 to 105 g/m² (16 to 28 lb) • Envelopes: 75 to 90 g/m² (20 to 24 lb) • Cards: Up to 200 g/m² (110 lb) • Photo Paper: Up to 250 g/m² (66 lb)
Print specifications
- Print speeds vary according to the complexity of the document • Method: drop-on-demand thermal inkjet • Language: PCL3 GUI
- For the print resolutions and margins, visit the product support website for details.
Copy specifications
Resolution: up to 600 dpi • Digital image processing - Copy speeds vary according to the complexity of the document and model
Scan specifications
Resolution: up to 1200 x 1200 ppi optical. For more information about ppi resolution, see the scanner software.
• Color: 24-bit color, 8-bit grayscale (256 levels of gray) • Maximum scan size from glass: 21.6 x 29.7 cm (8.5 x 11.7 inches)
Fax speed
- Up to 33.6 kbps
Power specifications
- Input voltage: 100-240 Vac (+/- 10%)
- Input frequency: 50/60 Hz (+/- 3 Hz)
Regulatory notices
The printer meets product requirements from regulatory agencies in your country/region.
Regulatory Model Number
For regulatory identification purposes, your product is assigned with a Regulatory Model Number. The regulatory model number should not be confused with the marketing names or product numbers.
FCC statement
The United States Federal Communications Commission (in 47 CFR 15.105) has specified that the following notice be brought to the attention of users of this product.
This equipment has been tested and found to comply with the limits for a Class B digital device, pursuant to Part 15 of the FCC Rules. These limits are designed to provide reasonable protection against harmful interference in a residential installation. This equipment generates, uses and can radiate radio frequency energy and, if not installed and used in accordance with the instructions, may cause harmful interference to radio communications. However, there is no guarantee that interference will not occur in a particular installation. If this equipment does cause harmful interference to radio or television reception, which can be determined by turning the equipment off and on, the user is encouraged to try to correct the interference by one or more of the following measures:
- Reorient or relocate the receiving antenna.
- Increase the separation between the equipment and the receiver.
- Connect the equipment into an outlet on a circuit different from that to which the receiver is connected.
- Consult the dealer or an experienced radio/TV technician for help.

NOTE: If the product has an Ethernet / LAN port with metallic casing then use of a shielded interface cable is required to comply with the Class B limits of Part 15 of FCC rules.
Modifications (part 15.21)
Any changes or modifications made to this device that are not expressly approved by HP may void the user's authority to operate the equipment.
For further information, contact: Manager of Corporate Product Regulations, HP Inc. 1501 Page Mill Road, Palo Alto, CA 94304, U.S.A.
This device complies with Part 15 of the FCC Rules. Operation is subject to the following two conditions: (1) this device may not cause harmful interference, and (2) this device must accept any interference received, including interference that may cause undesired operation.
Power cord instructions
Make sure your power source is adequate for the product voltage rating. The voltage rating is on the product. The product uses either 100-240 Vac (+/- 10%) or 200-240 Vac and 50/60 Hz (+/- 3 Hz).

CAUTION: To prevent damage to the product, use only the power cord that is provided with the product.
VCCI (Class B) compliance statement for users in Japan
Notice to users in Japan about the power cord
Visual display workplaces statement for Germany
Noise emission statement for Germany
Noise emission
European Union and United Kingdom Regulatory Notice


Products bearing the CE marking and UK marking comply with applicable EU Directives and the equivalent UK Statutory Instruments and can operate in at least one EU Member State and in Great Britain. The full EU and UK Declaration of Conformity can be found at the following website: hp.eu/certificates (Search with the product model name or its Regulatory Model Number (RMN), which may be found on the regulatory label.)
The point of contact for regulatory matters:
For EU: HP Deutschland GmbH, HP HQ-TRE, 71025 Boeblingen, Germany
For GB: HP Inc UK Ltd, Regulatory Enquiries, Earley West, 300 Thames Valley Park Drive, Reading, RG6 1PT
Email: techregshelp@hp.com
Declaration of conformity can be found at www.hp.eu/certificates.
Regulatory wireless and wired statements
This section contains regulatory information pertaining to wireless and wired products.
Products with wireless functionality
EMF
This product meets international guidelines (ICNIRP) for exposure to radio frequency radiation.
If it incorporates a radio transmitting and receiving device that in normal use, a separation distance of 20 cm ensures that radio frequency exposure levels comply with EU requirements.
Wireless functionality in Europe
For products with 802.11 b/g/n or Bluetooth radio:
- Radio frequency band: 2400-2483.5 MHz, with transmit power of 20 dBm (100 mW) or less. For products with 802.11 a/b/g/n/ac radio:
- Radio frequency band: 2400-2483.5 MHz, with transmit power of 20 dBm (100 mW) or less.
- Radio frequency band: 5170-5330 MHz, with transmit power of 23 dBm (200 mW) or less.
- Radio frequency band: 5490-5730 MHz, with transmit power of 23 dBm (200 mW) or less.
- Radio frequency band: 5735-5835 MHz, with transmit power of 13.98 dBm (25 mW) or less.
| AT | BE | BG | CY | CZ |
| DE | DK | EE | EL | ES |
| FI | FR | HR | HU | IE |
| IT | LT | LU | LV | MT |
| NL | PL | PT | RO | SE |
| SI | SK | IS | LI | NO |
| CH | TR | UK(NI) | |
| AL | BA | MD | ME | MK |
| RS | UK | XK | | |

IMPORTANT: IEEE 802.11x wireless LAN with 5.17-5.33 GHz frequency band is restricted for indoor use only in all countries reflected in the matrix. Using this WLAN application outdoor might lead to interference issues with existing radio services.
Exposure to radio frequency radiation
CAUTION: The radiated output power of this device is far below the FCC radio frequency exposure limits. Nevertheless, the device shall be used in such a manner that the potential for human contact during normal operation is minimized. This product and any attached external antenna, if supported, shall be placed in such a manner to minimize the potential for human contact during normal operation. In order to avoid the possibility of exceeding the FCC radio frequency exposure limits, human proximity to the antenna shall not be less than 20 cm (8 inches) during normal operation.
Notice to users in Canada
Under Innovation, Science and Economic Development Canada regulations, this radio transmitter may only operate using an antenna of a type and maximum (or lesser) gain approved for the transmitter by Innovation, Science and Economic Development Canada. To reduce potential radio interference to other users, the antenna type and its gain should be so chosen that the equivalent isotropically radiated power (e.i.r.p.) is not more than that necessary for successful communication.
This device complies with Innovation, Science and Economic Development Canada licence-exempt RSS standard(s). Operation is subject to the following two conditions: (1) this device may not cause interference, and (2) this device must accept any interference, including interference that may cause undesired operation of the device.
WARNING! Exposure to Radio Frequency Radiation. The radiated output power of this device is below the Innovation, Science and Economic Development Canada radio frequency exposure limits. Nevertheless, the device should be used in such a manner that the potential for human contact is minimized during normal operation.
To avoid the possibility of exceeding the Innovation, Science and Economic Development Canada radio frequency exposure limits, human proximity to the antennas should not be less than 20 cm (8 inches).
Notice to users in Japan
Notice to users in Taiwan
Notice to users in Thailand (Wi-Fi)
Radio Communication Act B.E. 2498

Notice to users in Brazil
Notice to users in Mexico
Notice to users in Ukraine
Table A-1 Notice to users in Ukraine
Notice to users in Canada (5 GHz)
CAUTION: When using IEEE 802.11a wireless LAN, this product is restricted to indoor use, due to its operation in the 5.15- to 5.25-GHz frequency range. The Innovation, Science and Economic Development Canada requires this product to be used indoors for the frequency range of 5.15 GHz to 5.25 GHz to reduce the potential for harmful interference to co-channel mobile satellite systems. High-power radar is allocated as the primary user of the 5.25- to 5.35-GHz and 5.65- to 5.85-GHz bands. These radar stations can cause interference with and/or damage to this device.
Notice to users in Taiwan (5 GHz)
Operation should be avoided to prevent interference with nearby radar systems.
Notice to users in Thailand (5 GHz)
Notice to users in Serbia (5 GHz)
Notice to users of the German telephone network
Notice to users of the U.S. telephone network: FCC requirements
This equipment complies with Part 68 of the FCC rules and the requirements adopted by the ACTA. On the rear (or bottom) of this equipment is a label that contains, among other information, a product identifier in the format US:AAAEQ##TXXXX. If requested, this number must be provided to the telephone company.
Applicable connector jack Universal Service Order Codes ("USOC") for the Equipment is: RJ-11C.
A telephone cord, plug and jack used to connect this equipment to the premises wiring and telephone network must comply with the applicable FCC Part 68 rules and requirements adopted by the ACTA. HP recommends a compliant plug, jack and 2-wire telephone cord to connect this product to the premises wiring and telephone network. See installation instructions for details.
The REN is used to determine the quantity of devices, which may be connected to the telephone line. Excessive RENs on the telephone line may result in the devices not ringing in response to an incoming call. In most, but not all, areas, the sum of the RENs should not exceed five (5.0). To be certain of the number of devices that may be connected to the line, as determined by the total RENs, contact the telephone company to determine the maximum REN for the calling area. For products approved after July 23, 2001, the REN for this product is part of the product identifier that has the format US-AAAEQ##TXXXX. The digits represented by ##are the REN without a decimal point (e.g., 01 is a REN of 0.1).
If this equipment causes harm to the telephone network, the telephone company will notify you in advance that temporary discontinuance of service may be required. If advance notice is not practical, the telephone company will notify the customer as soon as possible. Also, you will be advised of your right to file a complaint with the FCC if you believe it is necessary.
The telephone company may make changes in its facilities, equipment, operations, or procedures that could affect the operation of the equipment. If this happens, the telephone company will provide advance notice in order for you to make the necessary modifications in order to maintain uninterrupted service.
If trouble is experienced with this equipment, please contact the manufacturer, or look elsewhere in this manual, for repair and (or) warranty information. If the equipment is causing harm to the telephone network, the telephone company may request that you disconnect the equipment from the network until the problem is resolved.
Connection to Party Line Service is subject to state tariffs. Contact the state public utility commission, public service commission, or corporation commission for information.

CAUTION: If your home has specially wired alarm equipment connected to the telephone line, ensure the installation of this equipment does not disable your alarm equipment. If you have questions about what will disable alarm equipment, consult your telephone company or a qualified installer.
WHEN PROGRAMMING EMERGENCY NUMBERS AND (OR) MAKING TEST CALLS TO EMERGENCY NUMBERS:
- Remain on the line and briefly explain to the dispatcher the reason for the call.
- Perform such activities in the off-peak hours, such as early morning or late evening.

NOTE: The FCC hearing aid compatibility rules for telephones are not applicable to this equipment.
The Telephone Consumer Protection Act of 1991 makes it unlawful for any person to use a computer or other electronic devices, including FAX machines, to send any message unless such message clearly contains in a margin at the top or bottom of each transmitted page or on the first page of the transmission, the date and time it is sent and an identification of the business or other entity, or other individual sending the message and the telephone number of the sending machine or such business, other entity, or individual. (The telephone number provided may not be a 900 number or any other number for which charges exceed local or long-distance transmission charges.)
In order to program this information into your FAX machine, you should complete the steps described in the software.
Notice to users of the Canadian telephone network
This equipment meets the applicable Innovation, Science and Economic Development Canada Terminal Equipment Technical Specifications. This is confirmed by the registration number. The abbreviation ISED before the registration number signifies that registration was performed based on a Declaration of Conformity indicating that Innovation, Science and Economic Development Canada technical specifications were met. It does not imply that Innovation, Science and Economic Development Canada approved the equipment.
Users should ensure for their own protection that the electrical ground connections of the power utility, telephone lines and internal metallic water pipe system, if present, are connected together. This precaution might be particularly important in rural areas.
NOTE: The Ringer Equivalence Number (REN) assigned to each terminal device provides an indication of the maximum number of terminals allowed to be connected to a telephone interface. The termination on an interface might consist of any combination of devices subject only to the requirement that the sum of the Ringer Equivalence Numbers of all the devices does not exceed 5.
The REN for this product is 0.1, based on FCC Part 68 test results.
Australia wired fax statement
In Australia, the HP device must be connected to Telecommunication Network through a line cord which meets the requirements of the Technical Standard AS/ACIF S008.
The grant of a Telepermit for any item of terminal equipment indicates only that Telecom has accepted that the item complies with minimum conditions for connection to its network. It indicates no endorsement of the product by Telecom, nor does it provide any sort of warranty. Above all, it provides no assurance that any item will work correctly in all respects with another item of Telepermitted equipment of a different make or model, nor does it imply that any product is compatible with all of Telecom's network services.
This equipment shall not be set up to make automatic calls to the Telecom "111" Emergency Service.
Accessibility
Learn more about our efforts to create accessible products, share your story, or connect with customer support for accessibility help—all at hp.com/accessibility.
For more information about the accessibility of your printer, please visit Accessibility for HP inkjet printers.
Environmental product stewardship program
HP is committed to providing quality products in an environmentally sound manner. Design for recycling has been incorporated into this product. The number of materials has been kept to a minimum while ensuring proper functionality and reliability. Dissimilar materials have been designed to separate easily. Fasteners and other connections are easy to locate, access, and remove using common tools. High priority parts have been designed to access quickly for efficient disassembly and repair. For more information, visit HP's Commitment to the Environment website at:
hp.com/sustainableimpact
HP tips for reducing environmental impact
- Choose from a wide variety of HP papers with FSC® or PEFC™ certification, which indicates that the paper pulp came from a reputable and well-managed source. 1
- Conserve resources—look for paper made with recycled content.
- Recycle your Original HP cartridges—it's easy and free with the HP Planet Partners program, available in 47 countries and territories worldwide. 2
- Save paper by printing on both sides of the page.
- Conserve energy by choosing ENERGY STAR® certified HP products.
- Lower your carbon footprint—all HP printers include power management settings that help you control energy use.
- Discover more ways HP and our customers are reducing environmental impact at HP EcoSolutions.
1 HP papers certified under FSC® C017543 or PEFC™ TMPEFC/29-13-198.
2 Program availability varies. Original HP cartridge return and recycling is currently available in more than 50 countries, territories, and regions in Asia, Europe, and North and South America through the HP Planet Partners program. For more information, visit: hp.com/recycle.
Eco-Tips
HP is committed to helping customers reduce their environmental footprint. Please visit the HP Eco Solutions website for more information on HP's environmental initiatives.
hp.com/sustainableimpact
European Union Commission Regulation 1275/2008
For product power data, including the power consumption of the product in networked standby if all wired network ports are connected and all wireless network ports are activated, please refer to section P15 'Additional Information' of the product IT ECO Declaration at hp.com/hpinfo/globalcitizenship/environment/productdata/itecodesktop-pc.html.
Paper
This product is suited for the use of recycled paper according to DIN 19309 and EN 12281:2002.
Plastics
Plastic parts over 25 grams are marked according to international standards that enhance the ability to identify plastics for recycling purposes at the end of product life.
Safety data sheets
Safety Data Sheets, product safety and environmental information are available at hp.com/go/ecodata or on request.
Recycling program
HP offers an increasing number of product return and recycling programs in many countries/regions, and partners with some of the largest electronic recycling centers throughout the world. HP conserves resources by reselling some of its most popular products. For more information regarding recycling of HP products, please visit: hp.com/recycle
HP inkjet supplies recycling program
HP is committed to protecting the environment. The HP Inkjet Supplies Recycling Program is available in many countries/regions, and lets you recycle used print cartridges and ink cartridges free of charge. For more information, go to the following website: hp.com/recycle
Power consumption
HP printing and imaging equipment marked with the ENERGY STAR® logo is certified by the U.S. Environmental Protection Agency. The following mark will appear on ENERGY STAR certified imaging products:

Additional ENERGY STAR certified imaging product model information is listed at: www.hp.com/go/energystar
Disposal of waste equipment by users

This symbol means do not dispose of your product with your other household waste. Instead, you should protect human health and the environment by handing over your waste equipment to a designated collection point for the recycling of waste electrical and electronic equipment. For more information, please contact your household waste disposal service, or go to hp.com/recycle.
Waste disposal for Brazil

HP is committed to providing our customers with information about the chemical substances in our products as needed to comply with legal requirements such as REACH (Regulation EC No 1907/2006 of the European Parliament and the Council). A chemical information report for this product can be found at: hp.com/go/reach.
The Table of Hazardous Substances/Elements and their Content (China)
Name and content of hazardous substances or elements in the product
Table A-2 The Table of Hazardous Substances/Elements and their Content (China)
Declaration of the Presence Condition of the Restricted Substances Marking (Taiwan)
Taiwan Declaration of the Presence Condition of the Restricted Substances Marking
Taiwan Declaration of the Presence Condition of the Restricted Substances Marking
| 單元unit | 限用物質及其化學符號Restricted sub tance and chemical symbols |
| 鉛(Pb) | 汞(Hg) | 鎘(Cd) | 六價鉻( Cr+6 ) | 多溴聯苯(PBB) | 多溴二苯醚(PBDE) |
| 列印引擎Print engine | — | O | O | O | O | O |
| 外殼和紙匣ExternalCasing andTrays | O | O | O | O | O | O |
| 電源供應器Power Supply | — | O | O | O | O | O |
| 電線Cables | O | O | O | O | O | O |
| 印刷電路板Print printedcircuit board | — | O | O | O | O | O |
| 控制面板Control panel | — | O | O | O | O | O |
| 墨水匣Cartridge | O | O | O | O | O | O |
| 掃描器組件Scannerassembly | — | O | O | O | O | O |
| 備考1.“超出0.1wt%”及“超出0.01wt%”係指限用物質之百分比含量超出百分比含量基準值。Note 1: “Exceeding 0.1 wt %” and “exceeding 0.01 wt %” indicate that the percentage content of the restricted substance exceeds the reference percentage value of presence condition.備考2. “O”係指該項限用物質之百分比含量未超出百分比含量基準值。Note 2: “O” indicates that the percentage content of the restricted substance does not exceed the percentage of reference value of presence.備考3. “—”係指該項限用物質為排除項目Note 3: “—” indicates that the restricted substance corresponds to the exemption. |
To access the latest user guides or manuals for your product, go to hp.com/support. Select Find your product, and then follow the on-screen instructions.
Restriction of hazardous substance (India)
This product, as well as its related consumables and spares, complies with the reduction in hazardous substances provisions of the "India E-waste (Management and Handling) Rule 2016." It does not contain lead, mercury, hexavalent chromium, polybrominated biphenyls or polybrominated diphenyl ethers in concentrations exceeding 0.1 weight % and 0.01 weight % for cadmium, except for where allowed pursuant to the exemptions set in Schedule 2 of the Rule.
Restriction on hazardous substances statement (Turkey)
Most HP products are designed to meet EPEAT. EPEAT is a comprehensive environmental rating that helps identify greener electronics equipment. For more information on EPEAT go to epeat.net.
Click here for information on HP's EPEAT registered products.
China Environmental Labeling Certification Product User Information
China Energy Label for Printer, Fax and Copier
Battery disposal in Taiwan

Please recycle waste batteries
European Union Battery Directive

This product contains a battery that is used to maintain data integrity of real time clock or product settings and is designed to last the life of the product. Any attempt to service or replace this battery should be performed by a qualified service technician.
Battery notice for Brazil
California Perchlorate Material Notice
Perchlorate material - special handling may apply. See: dtsc.ca.gov/hazardouswaste/perchlorate
This product's real-time clock battery or coin cell battery may contain perchlorate and may require special handling when recycled or disposed of in California.