HD02 - Electric heating LUXBIRD - Free user manual and instructions
Find the device manual for free HD02 LUXBIRD in PDF.


| Product Type | Electronic Device |
| Brand | LUXBIRD |
| Model | HD02 |
| Dimensions (approx.) | 120 x 80 x 30 mm |
| Weight (approx.) | 150 g |
| Power Supply | 5V DC via USB cable (not included) |
| Main Functions | Basic operation, connectivity features |
| Usage | Indoor use only |
| Operating Temperature | 0°C to 40°C |
| Storage Temperature | -10°C to 60°C |
| Humidity | 20% to 80% non-condensing |
| Material | Plastic casing |
| Cleaning Instructions | Wipe with a dry, soft cloth. Do not use liquids. |
| Safety Warnings | Keep away from water and heat sources. Not for children under 3 years. |
| Spare Parts Availability | Contact manufacturer for parts |
| Repair Information | Only qualified personnel should attempt repairs |
| Warranty | 1 year limited warranty |
| Compliance | CE, FCC |
Frequently Asked Questions - HD02 LUXBIRD
User questions about HD02 LUXBIRD
0 question about this device. Answer the ones you know or ask your own.
Ask a new question about this device
Download the instructions for your Electric heating in PDF format for free! Find your manual HD02 - LUXBIRD and take your electronic device back in hand. On this page are published all the documents necessary for the use of your device. HD02 by LUXBIRD.
USER MANUAL HD02 LUXBIRD
Please keep this manual properly for future reference. You can also scan the QR code to visit our official website for multi-language manuals. For any usage issues, please feel free to contact us at cs@luxbird.com.
OVERVIEW
This germination heating mat kit is designed to optimize seedling germination and accelerate seedling growth by providing steady, even heat. The main heating mat adopts an advanced one-to-multiple design, and up to 5 identical heating mats can be connected. With this heating kit, we can improve our indoor micro garden and make it easier to grow fruits and vegetables.
SPECIFICATION
| Model Number | LB-HD02 |
| Product Name | Heating Mat + Controller |
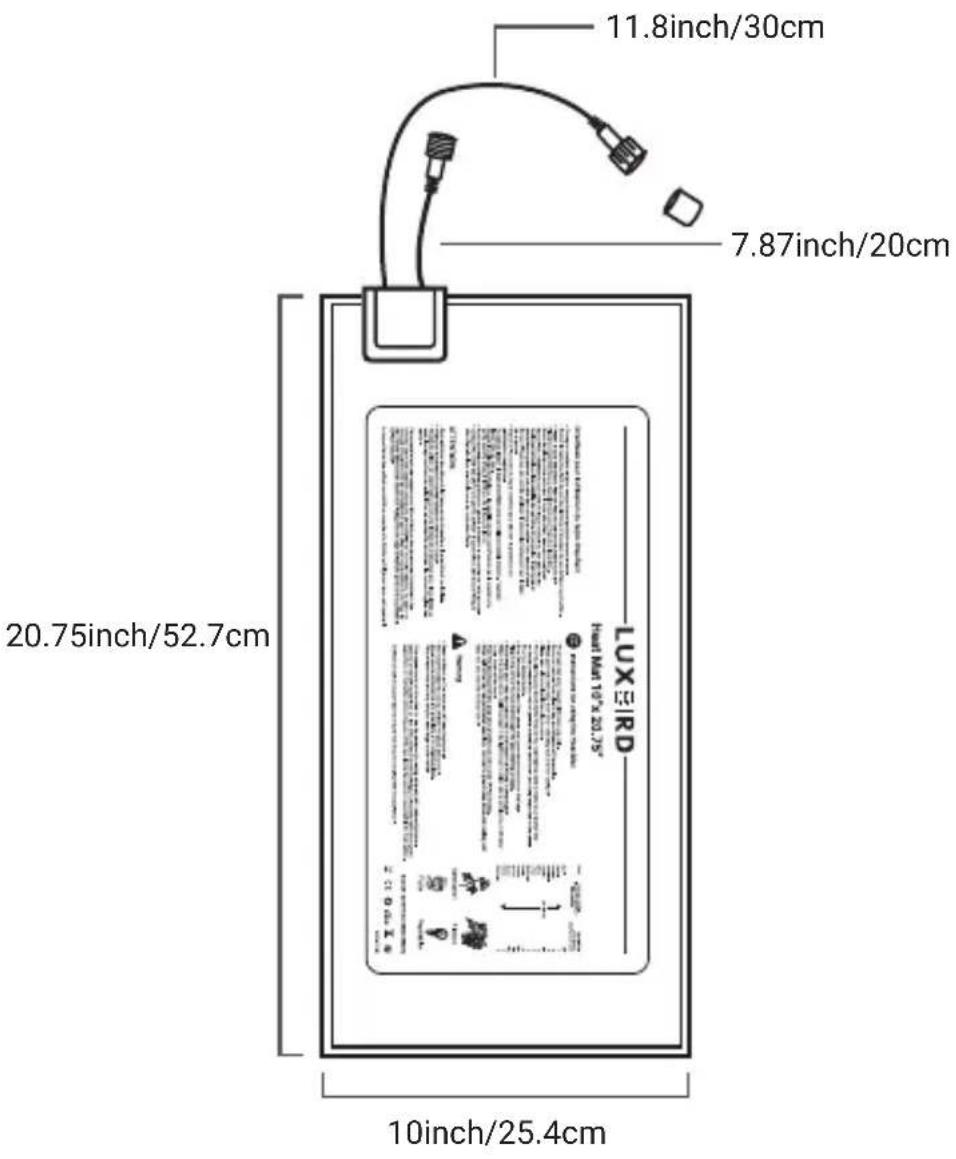
| Heating Mat Dimensions | 10" x 20.75" (527*254mm) |
| Voltage | AC 230V 50Hz/AC 120V 60Hz |
| Controller Wattage | 200W |
| Heating Mat Wattage | 30W each |
| Temperature Range | 0°C~42°C/ 32°F~108°F |
| Time Range | 0-24H |
| Target Temperature | Settable (default=30°C) |
| Screen | NTC real-time temperature display |
| Waterproof Rated | IP67 |
OPERATION INSTRUCTIONS
- Heating Mat
- Place the heating mat on a well-drained surface (no standing water).
- Placing the mat on an insulated surface rather than a cold floor will raise the temperature of the mat, and covering the plant tray with a moisture shield or dome will help raise the temperature in the root area and keep the roots moist.
-
Plug the mat into a 230 volt power source.
-
Maintain the temperature of the root area at around 20° C\~ 30° C (68–86°F), which will effectively improve the germination rate.
- Heating Controller

① Startup/Shutdown: When the product is connected to a power supply, the controller screen will light up for 3 seconds. Wait 3 seconds for the screen to dim, then press the ⏻ button to turn on the controller.
② Set Target Temperature:
Step 1: Press the + button to enter the setting of the target temperature.
Step 2: Press the + or - button to increase or decrease the temperature, ranging from 0°C to 42°C. Long press the + or - button to make a quick adjustment.
Step 3: Wait for 3 seconds with no operation, and the product will automatically save the settings and return to the working mode.
Tip for use: In the working mode, you can press the + or - button to view the target temperature you have recently set.
③ °C/°F Selection: Press the SET button to switch between °C and °F. You will see the corresponding °C or °F indicator light turn red.
④ Put the thermostat NTC probe into soil or demo to detect temperature.
⑤ Set the Timer:
Step 1: Press the SET button to enter the timer setting.
Step 2: Press the + or - button to set the time, ranging from 1 to 24 hours. Note that if the time is set to 000H, this means that the heating will never stop.
Step 3: Wait for 3 seconds of no operation, and the device will automatically save and exit the setting.
Please be assured that all settings will be saved in the controller even in the event of a power outage.
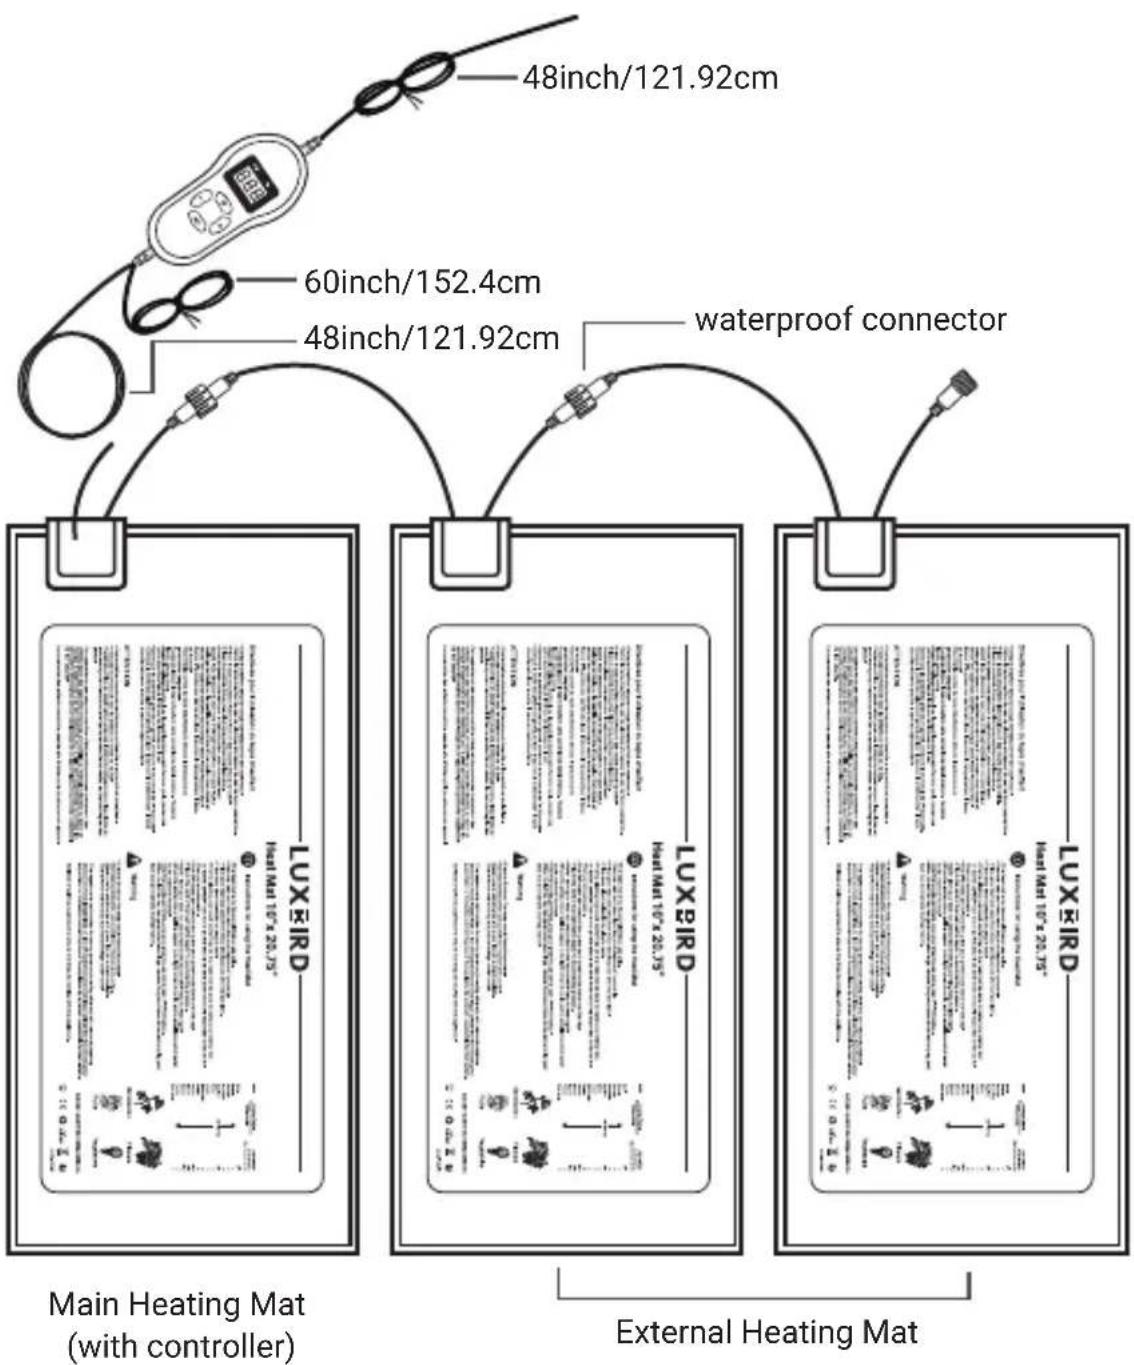
- How To Connect External Heating Mats

Step 1: Insert the male connector of the external heating mat into the female connector of the main heating mat (with the controller).

Step 2: Rotate the nut on the male connector of the external heating mat clockwise to secure the connection. Please note, do not remove the waterproof cap on the female connector of the external heating mat if not in use.

Step3: Repeat steps 1 and 2 to connect more heating mats.
The controller can control up to 6 seedling heating mats (1 main mat + 5 external mats) at the same time, as shown in the picture below. Please note that this product only contains one external heating mat. For more external heating mats, please purchase them separately.

WARNINGS
- Fire or electric shock may result from improper use.
- Please keep the heating mat away from sharps.
- Do not place the mat inside the tray or cover it directly with soil or growing medium.
- Do not place any heat-insulating materials over the heating mat, as it may cause it to overheated.
- Do not immerse the heating mat in water.
Office address: Room 1803, Guowei Building, NO.68 Guowei Road, Xianhu Community, Liantang, Luohu District, Shenzhen, China
| EC REP |
XDH Tech
goalservice@hotmail.com





MADE IN CHINA
Brand : LUXBIRD
Model : HD02
Category : Electric heating