
RENV-B - Binoculars RIX - Free user manual and instructions
Find the device manual for free RENV-B RIX in PDF.


| Product Type | Binoculars |
| Brand | RIX |
| Model | RENV-B |
| Magnification | 8x |
| Objective Lens Diameter | 42 mm |
| Field of View | 135 m at 1000 m |
| Eye Relief | 19 mm |
| Close Focus | 2.5 m |
| Prism Type | Roof |
| Lens Coating | Fully multi-coated |
| Focus System | Center focus |
| Diopter Adjustment | Right eyepiece |
| Waterproof | Yes, nitrogen filled |
| Dimensions (L x W x H) | 145 x 125 x 55 mm |
| Weight | 680 g |
| Power Supply | None (manual operation) |
| Main Functions | Observation, outdoor activities, birdwatching |
| Care and Cleaning | Clean lenses with soft brush and microfiber cloth; store in dry place |
| Safety | Never look directly at the sun through binoculars |
| Spare Parts and Repairability | Eyecups, lens caps, and focus knob available; professional repair recommended |
| General Information | Includes carrying case, neck strap, and lens covers |
Frequently Asked Questions - RENV-B RIX
User questions about RENV-B RIX
0 question about this device. Answer the ones you know or ask your own.
Ask a new question about this device
Download the instructions for your Binoculars in PDF format for free! Find your manual RENV-B - RIX and take your electronic device back in hand. On this page are published all the documents necessary for the use of your device. RENV-B by RIX.
USER MANUAL RENV-B RIX
TABLE OF CONTENTS
01
SUMMARY
02
SUMMARY
03
PRODUCT APPEARANCE
04
INSTALLATION AND
CONTROLS
05
STATUS BAR
06
STORAGE AND
TRANSPORTATION
07
STATUS BAR

ACTIC/L

SUMMARY
Fusion night vision technology combines image intensification and thermal imaging to provide users with enhanced situational awareness. This cutting-edge system offers low imaging delay, allowing for real-time target tracking and identification.
Additionally, the digital information enhancement algorithms and thermal target display functions aid in rapidly recognizing potential threats, even in extreme environments.

Battery Module Power Supply & Transmission Cable Transmission RENV-B
| SPECIFICATIONS Category RENV-B | ||
| Optics | Magnification, x 1 | |
| Exit Pupil Diameter, mm 14 | ||
| Exit Pupil Distance, mm 25 | ||
| Adjustment, D -3°+2 | ||
| P | Generation Gen 2+ | |
| Resolution, lp/mm 64 | ||
| FOV, ° 40 | ||
| Lens System, mm F/1.2 | '25 | |
| Range Of Focus, yd 0.27 to Infinity | ||
| Brightness Control Yes | ||
| Bright Source Protection Yes | ||
| Infrared Illuminator Built-in | ||
| Thermal Image | Type VOx Uncooled | |
| Resolution, pixels | 640x512 | |
| Pixel Pitch, μm | 12 | |
| NETD, mK | <30 | |
| Frame Rate, Hz | 60 | |
| Thermal Image | Lens System, mm | F1.1.16 |
| FOV, ° | 25.8x19.1 | |
| Brightness Control | Yes | |
| Polarity | White hot, Black hot | |
| Enhanced Mode | Outline | Hightins, Breathing |
| Sensor | Azimuth Indication | Yes |
| Display | Type | OLED |
| Resolution, pixels | 800x600 | |
| Range Performance | Detection Range, m/yd | 1500m/1640yd |
| Environmental Characteristics | Degree of Protection, IP code | IP67 |
| Operating Temperature Range, °F | -40 to 122 | |
| Battery Type | 18650*2 | |
| Operating Time on Battery Pack (at t=72°F), h | Enhanced Display ≥ 8 hoursI up to 100 hours | |
| Weight & Size | Dimensions, inch | 4.2×4.6×3.3 |
| Weight & Size | Man Body:1.26lbBattery Holders:0.23lb (without battery) |
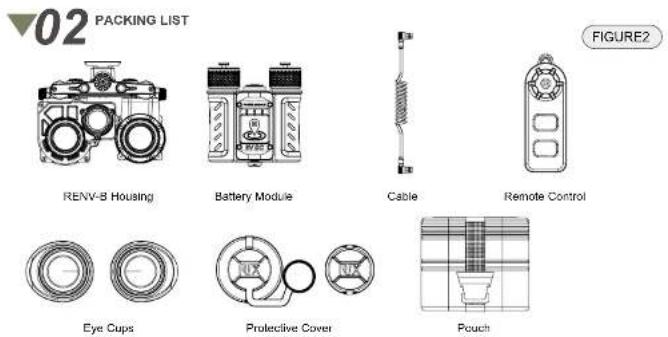
NOTE: The set also includes instructions, quick start guide, warranty card, Velcro, PVC stickers, and two spare 69mm battery covers.
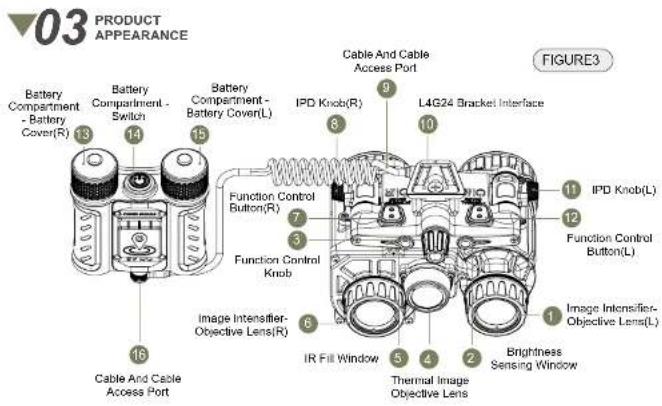

NOTE: All images used in this instruction manual are for illustrative purposes only. Actual product condition may vary. The product components and functional descriptions are shown in Figures 3 and 4.

INSTALLATION AND CONTROLS

Refer to Figures 5 and 6 to complete the installation of the battery and cable connectors. Please use a standard 18650 battery (it is recommended to use a standard 18650 battery with a length of 65mm and a diameter of 18mm. If the battery length is 69mm, please replace it with the long specification battery cap in the attachment). Incorrect installation can cause electrical short circuits and equipment damage.

To turn the battery compartment on or off, simply long press the power button as shown in the image. When the battery compartment is powered on, it will display the current charge level of the 18650 battery, and allow you to easily monitor the remaining power supply: Green: Full capacity, Blue: 60%, Red: 30% or less.
0404 INSTALLATION AND CONTROLS
FIGURE 8

Bluetooth controller

The external Bluetooth controller can connect to and control the night vision instrument. Please set and adjust the remote controller through the "MENU-SENSOR-BT" menu. When the controller is not operated, it will automatically enter low-power sleep mode. Please click the middle button on the controller to wake it up.
The Bluetooth remote control uses a CR2032 battery, but it does not come with a battery when it leaves the factory. Please use a Phillips screwdriver to remove the cover and install the battery to use it.

INSTALLATION AND CONTROLS
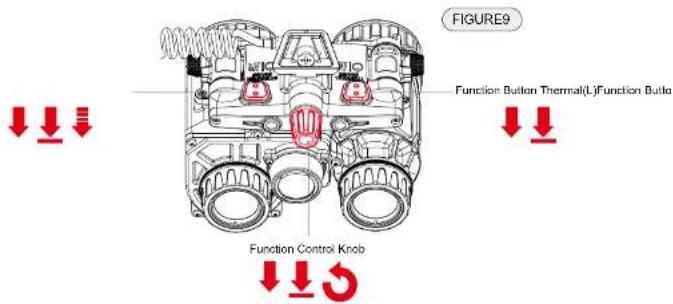
Please control and adjust the whole machine as shown in the figure.
INITIATION AND CONTROLS
| POSITION | FUNCTION CONTROL BUTTON(R) | FUNCTION CONTROL KNOB | FUNCTION CONTROL BUTTON(L) |
| Long Press Image Intensifier Switch Enter menu TI Switch | |||
| Short Press TI Refresh Adjustment Switching TI Mode Switching | |||
| Three-Strikes Fill light switch / / | |||
| Rotate / Gear Adjustment / | |||
(TI: Thermal Image)

STATUS BAR
STATUS BAR
STATUS BAR
The equipment interface contains the above contents:
• Image Intensifier: Provides 40° FOV
- Location: Displays the current positioning position (the positioning information will be automatically output when the machine is turned on. Please use it in an open place).
• Infrared Mode: Switch between Thermal mode and Outline mode as shown in Figure 10.
Thermal mode: The target is displayed in full infrared. The threshold can be adjusted from 0% to 100%, and the image will switch from thermal image to highlight. (Please adjust the threshold according to the actual use environment to achieve the best use effect.)
Outline mode: The target is displayed in outline. The threshold can be adjusted from 0% to 100%, and the image will change the target details. (Please adjust the threshold according to the actual use environment to achieve the best use effect.)

- Parameter Adjustment: Adjust brightness, gain, frequency and threshold (100-0%)
Adjustment Brightness: Adjust the thermal image brightness (0-100%)
Gain: Adjust the gain of the NVG image tube (0-100%)
Frequency: When the "Twinkle" mode is active, the blinking speed can be adjusted through options.
Threshold: Adjust the threshold function (0-100%) These controls allow you to fine-tune the various settings to optimize the performance of the night vision system.
-Menu: Adjust menu functions
| SENSOR | COMP | STD Full status display of compass information | |
| NO. Digital simplified display of compass information | |||
| AC | With DASD and FASD kept off, complete compass calibration according to the operation tips | ||
| NAV | W-X"XX"N-X"XX" | Set the first navigation point information and input the location information | |
| W-X"XX"N-X"XX" | Set the second navigation point information and input the location information | ||
| OFF/ON | After the navigation switch is activated, the real-time target status will be displayed in the lower right corner of the main pageWhen the positioning information is normal, the destination distance and direction will be updated in real time (distance accuracy ± 20 m ) | ||
| EXIT | |||
| BT | OFF/ON | The Bluetooth remote control switch is in position. After it is turned on, it can be operated by an external remote control | |
| SET Bluetooth connection settings, you can set the Bluetooth connection after entering | |||
| EXIT | |||
STATUS BAR
| THERMAL | DORMANCY OFF/ON | The infrared thermal image sleep function will hide the infrared image and retain the sensor information when it is started | |
| TWINKLE OFF/ON Infrared image twinkle function, supporting frequency adjustment | |||
| BRIGHT OFF/ON Infrared bright color display to further enhance the target | |||
| EXIT | |||
| SET | OLED 5 Screen backlight brightness, suitable for different environments | ||
| CAL | It is used for the coincidence calibration function of infrared and low light level, and can be used for translation calibration and saving | ||
| INFO Display ▶duct status and batch number | |||
| UTC 0 Adjust the time according to the local time zone | |||
| RESET | |||
| EXIT | |||
| FASD OFF | F/ON | The power-off function switch for up turning and side turning can automatically realize the power-off function of image tube and thermal image after the product is turned up. | |
| DASD OFF | F/ON | The external strong light protection switch turns off the power supply function of the image tube when the intensity is higher than a certain value. | |
| EXIT |
- Time: Display current time (output current information through positioning function) • Compass: Display current orientation • Battery Level: Display current power • Navigation: Display navigation information. It supports dual target navigation indication (8 directional navigation and maximum 999km distance display), and can set target points and start functions through navigation.
- Altitude: Display current altitude (output current information through positioning function)

TRANSPORTATION
- Before storing it, clean the device (if on its surface there are moisture, dust or traces of dirt)
- Make sure that there are no traces of moisture, and the battery compartment is empty!
- The location in which the device is stored long term must be dry, enclosed, unheated, and ventilated. Temperature between -40 to 122 °F, avoid direct sunlight
- Before each transportation, the product should be neatly packed in its original packaging! Night vision device and all other items and accessories should be carefully placed in the bag.
▼07 TROUBLESHOOTING
The table below outlines common issues and troubleshooting steps for the RENV-B.
If these corrective actions cannot eliminate the issue, please contact RIX maintenance for further assistance.
| SN ABNORMAL SITE TEST | OR INSPECTION METHOD CORRECTIVE ACTIONS | ||
| 1 | Battery compartment battery cover cannot be properly installed or opened | Check whether the installation direction of the battery is correct.Check for debris or debris around the battery cover.Check the battery cover for damage, wear or deformation. | Clean the threads of the battery cover and the battery compartment.Go to high level maintenance. |
| 2 Abnormal startup | Check whether the battery is installed, whether the battery direction is correct, and whether the power is sufficient. Check whether the battery compartment power supply switch is on. | Replace the battery with a new one and install the battery correctly according to the instructions. Turn on the main power supply of the battery compartment and confirm that the power supply interface is installed normally. |
| 3 Low light level image cannot be displayed | Confirm whether the low light level is used under the completely dark condition. Confirm whether the low light level objective lens cover is opened. Confirm whether to turn on the main power switch of the battery compartment. Try adjusting the low light level. | Ensure that 18650 batteries have been installed in the battery compartment and power on according to the process, Ensure that the cable connection is normal and there is no looseness Check if the objective lens cover is obstructed |
| 4 Infrared image cannot be displayed | Confirm whether the infrared objective lens cover is open. Confirm whether the battery compartment switch is on. Try adjusting the infrared brightness. Check whether there is any object blocking the infrared lens. | When using infrared imaging, please open the objective lens cover and confirm that the battery compartment and host are in an open state At the same time, the image brightness can be adjusted through the infrared brightness control knob |


YEAR
WARRANTY
Thermal & Fusion Devices
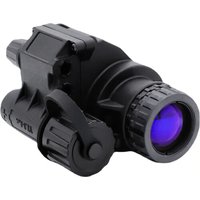

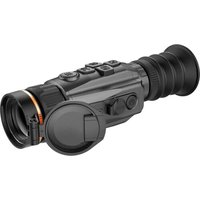

Brand : RIX
Model : RENV-B
Category : Binoculars