
WTL 20610-90 - Washing machine GRAM - Free user manual and instructions
Find the device manual for free WTL 20610-90 GRAM in PDF.
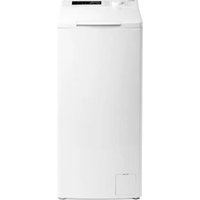


| Product Type | Freestanding Washing Machine |
| Brand | Gram |
| Model | WTL 20610-90 |
| Capacity | 6 kg |
| Maximum Spin Speed | 1400 rpm |
| Energy Class | A+++ |
| Noise Level (Wash/Spin) | 52 dB / 74 dB |
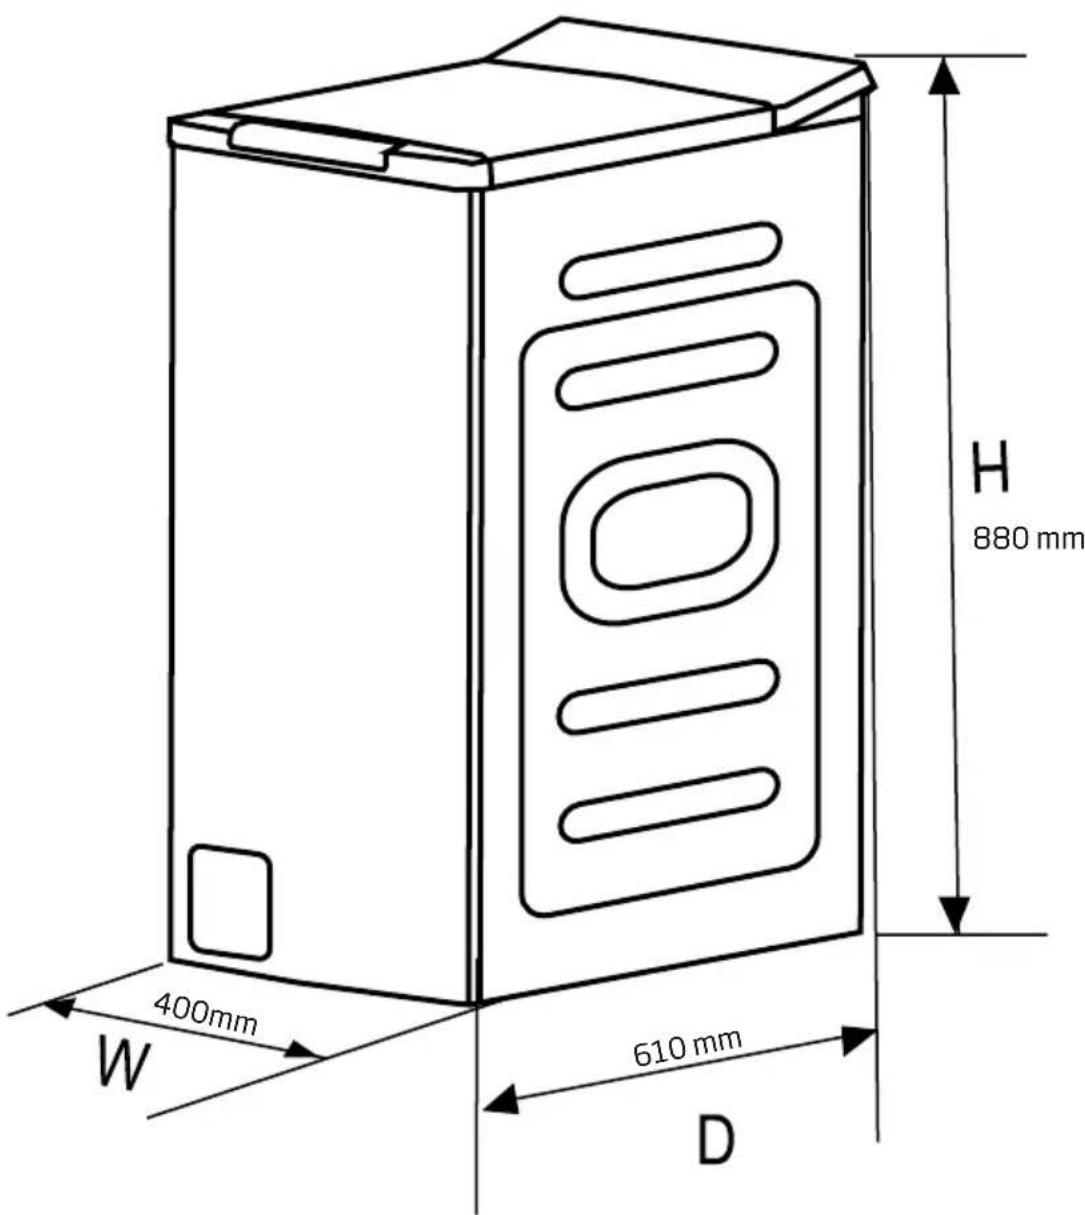
| Dimensions (H x W x D) | 85 cm x 60 cm x 55 cm |
| Weight | 62 kg |
| Power Supply | 220-240 V, 50 Hz, 10 A |
| Programs | 15 including Cottons, Synthetics, Delicates, Wool, Quick 15 min, Eco 40-60, etc. |
| Key Features | Inverter Motor, Steam Function, Child Lock, Delay Start, Anti-Allergy, Drum Clean |
| Water Consumption per Cycle | 49 L (Eco 40-60) |
| Annual Energy Consumption | 148 kWh |
| Annual Water Consumption | 9400 L |
| Spin Efficiency Class | B |
| Maintenance | Clean detergent drawer and pump filter regularly; drain cleaning every 2 months |
| Safety Features | Overflow protection, unbalanced load detection, door lock indicator |
| Spare Parts Availability | Door seal, belts, motor brushes, control board, pump, heater |
| Repairability Index | 8.2/10 |
Frequently Asked Questions - WTL 20610-90 GRAM
User questions about WTL 20610-90 GRAM
0 question about this device. Answer the ones you know or ask your own.
Ask a new question about this device
Download the instructions for your Washing machine in PDF format for free! Find your manual WTL 20610-90 - GRAM and take your electronic device back in hand. On this page are published all the documents necessary for the use of your device. WTL 20610-90 by GRAM.
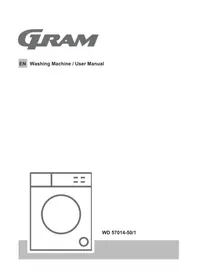
USER MANUAL WTL 20610-90 GRAM

ONLY USE THE APPLIANCE WHEN YOU HAVE READ AND UNDERSTAND THE OPERATING INSTRUCTIONS
WASHING MACHINES
UNPACKING

During transportation, protective packaging was used to protect the appliance against any damage. After unpacking, please dispose of all elements of packaging in a way that will not cause damage to the environment.
All materials used for packaging the appliance are environmentally friendly; they are
100% recyclable and are marked with the appropriate symbol.
Important! Packaging materials (bags, polyethylene, polystyrene, etc.) should be kept away from children during unpacking.
DISPOSAL OF OLD APPLIANCE

In accordance with European Directive 2012/19/EU and local legislation regarding used electrical and electronic goods, this appliance is marked with the symbol of the crossed-out waste container. This marking indicates that the appliance must not be disposed of together with other household waste after it has been used.
The user is obliged to hand it over to waste collection centre collecting used electrical and electronic goods. The collectors, including local collection points, shops and local authority departments provide recycling schemes.
Proper handling of used electrical and electronic goods helps avoid environmental and health hazards resulting from the presence of dangerous components and the inappropriate storage and processing of such goods.
CONTENTS
ECOLOGY IN PRACTICE 3
BASIC INFORMATION 5
SAFETY AND GERMENT CARE LABELS 6
INSTALL THE APPLIANCE 11
PRODUCT DESCRIPTION 15
TROUBLESHOOTING 24
PRACTICAL TIPS ON WASHING 26
ECOLOGY IN PRACTICE
For many years, Gram has consistently pursued a pro-ecological policy.
Concern for the environment is as important to us as the use of modern technology.
The development of technology has enabled our factories to become more environmentally friendly - we use less and less water, electricity, and less wastewater and solid waste is generated in production.
A lot of attention is paid to the materials used in production. We strive to use only those that do not contain harmful substances and make recycling and safe disposal possible after use.
Dear customer!
Thank you for choosing a Gram product. For years we have delivered high-quality appliances, so that household chores become a real pleasure. Before being packaged and leaving the manufacturer, the appliance was thoroughly checked with regard to safety and functionality. We also endeavour to make sure that modern technology in Gram products always goes hand in hand with a unique design.
Before using the appliance, please carefully read these Operating Instructions. Follow these instructions to avoid improper use and ensure long and reliable operation of the appliance. Learn the principles of safe use to avoid accidents.
Store these operating instructions in a safe place to use them for reference whenever needed. These Operating Instructions contain all the necessary information that will make the use of your Gram appliance simple and fun. We also encourage you to find out more about other Gram appliances.
We hope using your new appliance is a pleasure.

BASIC INFORMATION

This washing machine is intended for domestic use only to wash textiles and clothes designed to be machine washed in a detergent bath.
Before plugging the washing machine into the mains, remove the safety packaging and ensure the machine is level. The manufacturer reserves the right to introduce changes, which do not affect operation of the appliance.
USAGE
- Carefully read the instructions below before using the appliance.
- Never use the appliance outdoors or anywhere the temperature may fall below freezing.
The machine should not be operated by children or anyone who has not read the instructions.

Temperatures below 0°C can damage the washing machine! In the event of the machine being stored or transported in sub-zero temperatures, it should be left to acclimatise in a temperature above 0°C for 8 hours before being used.
Manufacturer's Declaration
The manufacturer hereby declares that this product meets the requirements of the following European directives:
• Low Voltage Directive 2014/35/EU • Electromagnetic Compatibility (EMC) Directive 2014/30/EU • ErP Directive 2009/125/EC • Directive RoHS 2011/65/EU
and has thus been marked with the C€ symbol and been issued with a declaration of compliance made available to market regulators.
| The risk of death! This appliance should not be used by children under 8 years of age, persons with reduced physical or mental capabilities, and persons who do not have sufficient skills to use this type of appliance. Such persons should be offered proper supervision or instructions on safe handling of appliance and related risks. Children must not play with the appliance or perform any maintenance-related activities. Children under 3 years of age must be kept away from the appliance unless continuously supervised. |
| Children could get caught inside the appliance and get into a life-threatening situation. |
| Animals and children may climb into the machine. Check the machine before every operation. |
| Kids should be supervised that they do not play with the appliance. |
| Glass door may be very hot during the operation. Keep kids and pets far away from the machine during the operation very wet rooms as well as in the rooms with explosive or caustic gas. |
| Remove all packages and transport bolts before using the appliance. Otherwise, serious damage may result. |
| Plug must be accessible after installation. | |
| Risk of explosion! Do not wash | h or dry articles that have been cleaned in, washed in, soaked in, or dabbed with combustible or explosive substances (such as wax, oil, paint, gasoline, degreasers, dry-cleaning solvents, kerosene, etc.) This may result in fire or explosion. |
| Before hand thoroughly rinse items of washing by hand. | |
| Installing the product! This wash | washing machine is for indoor use only. |
| It isn't intended to be built-in using. | |
| The openings must not be obstructed by a carpet. | |
| Washing machine shall not be installed in bath room or very wet rooms as well as in the rooms with explosive or caustic gases. | |
| The washing machine with single inlet valve only can be connected to the cold water supply. The product with double inlet valves should be correctly connected to the hot water and cold water supply. |
SAFETY AND GARMENT CARE LABELS
| Installing the product! Plug | must be accessible after installation. |
| Remove all packages and transport bolts before using the appliance. Otherwise, serious damage may result. | |
| Risk of damaging appliance! | Your product is only for home use and is only designed for the textiles suitable for machine washing. |
| Do not climb up and sit on top cover of the machine. | |
| Do not lean against machine door. | |
| Cautions during Handling Machine:1. Transport bolts shall be reinstalled to the machine by a specialized person.2. The accumulated water shall be drained out of the machine.3. Handle the machine carefully. Never hold each protruded part on the machine while lifting. Machine door can not be used as the handle during the conveyance.4. This appliance is heavy. Transport with care. | |
| Please do not close the door with excessive forces. If it is found difficult to close the door, please check if the clothes are put in or distributed well. |
SAFETY AND GARMENT CARE LABELS
| Risk of damaging appliance! | It is forbidden to wash carpets. |
| Operating the appliance! Before washing the clothes at first time, the product shall be operated in one round of the whole procedures without the clothes inside. | |
| Please check whether the water inside the drum has been drained before opening its door. Please do not open the door if there is any water visible. | |
| Be careful of burning when the product drains hot washing water. | |
| Never refill the water by hand during washing. | |
| After the program is completed, Please wait for two minutes to open the door. | |
UNDERSTANDING THE SYMBOLS ON CLOTHES LABELS
| Washing |  |  |  |  |
| boil at 90°C normal wash at 60°C normal wash at 40°C Do NOT wash! | ||||
 |  |  | ||
| delicate handwash | ||||
| Chemical cleaning |  |  |  |  |
| all solvents all except TRI petrol only NO | Dry clean! | |||
| Tumble dryer |  |  |  |  |
| normal low high Do NOT dry! | ||||
| Ironing |  |  |  |  |
| 110°C 150°C 200°C Do NOT Iron | ||||

Always pay attention to the symbols on garment labels when choosing a washing programme.
INSTALL THE APPLIANCE
1
Remove the transit bolts
(keep the bolts for future use, e.g. when moving house).
■ unscrew the 4 transit bolts with a spanner, ■ remove the rubber and plastic transport brackets from the sockets along with the washers and bolts. - stop up the holes with the stoppers enclosed in the accessories bag.


Before use, remove the polystyrene support under the motor.

2
Position and level the washing machine
- place the washing machine on a solid, level surface. ■ loosen the plastic washer. Level the appliance by adjusting the legs. lock with washers.


After positioning and levelling the appliance, check that it is stable by pressing down each corner and ensuring it does not move!
Protection / sound insulation panels

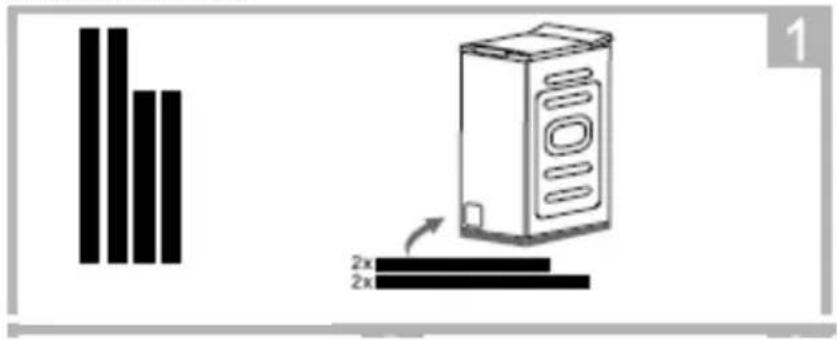
The protective plates are used for additional soundproofing of the device. The plates must be attached before removing the shipping braces. At least two people are required for assembly. Lay the device on the back wall. Place a soft material, e.g. sponge or cloth, underneath to protect the device. Peel off the protective tape and stick the soundproofing on the lower opening under the washing machine. And you can enjoy the quiet washing.

1

2
3
Connect the water supply
Use only the new hoses supplied with the machine. Do not re-use hoses.

A supply hose with seals is inside the drum of the machine. Water pressure min 0.1 MPa (1 bar), max 1 MPa (10 bar).
1) After connecting, make sure the hose is not twisted. 2) After connecting the hose and the valve, check they are sealed tight. 3) Regularly check the condition of the hose.

Supply the machine with cold water only.
Water drain
The drain hose is at the back of the machine. Fix the drain hose so that it does not move while the washing machine is in operation.


Connect to power supply
The electrical wall outlet where the appliance is connected must be in a visible and accessible place. Only plug the appliance into a properly installed socket with an earthing pin. Do not use an extension cord to connect the appliance. In the event of the power cord being damaged, it must be replaced by an authorized service technician. The electrical system to which the appliance is to be connected must be protected with a 10 A fuse.
Prepare to wash:
Small items such as coins, paper clips, needles, etc., may damage the laundry and the washing machine. You should therefore follow a few important recommendations:
1) Empty pockets. 2) Remove all metal items. 3) Delicate items such as bras or stockings should be washed in a protective mesh laundry bag. 4) Close zippers and fasten buttons. 5) Remove any foreign objects from the appliance.
FEATURES AND COMPONENTS
DESCRIPTION OF THE APPLIANCE
Accessories:
QUICK START
Warning!
- Before starting the washing machine, make sure it is properly installed.
1. Before washing
connect to the power supply, open the valve, put in the laundry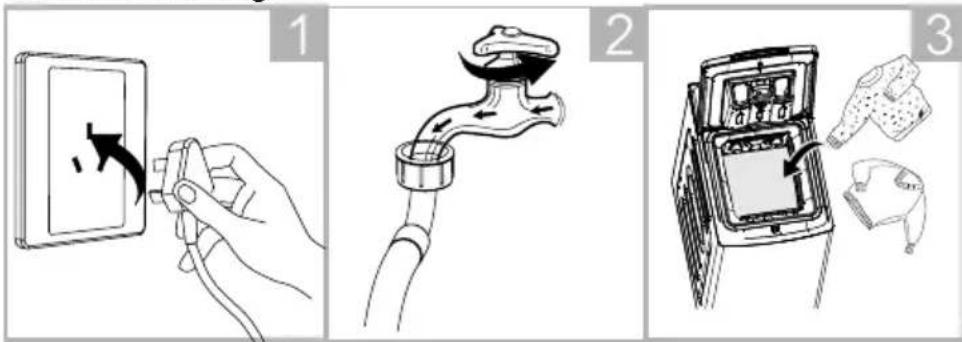
Note!
- Only add detergent to drawer I if prewash has been selected in washing machines with this function. - Make sure that the drum door closure hooks are properly closed.
add detergent, close the drum door, close the appliance door.
the drum door, close the appliance door.
• The tailgate latches must be properly secured.
• Each time before washing, check the roller, it must turn freely.

2. Washing
Select a programme, select the function or default programme, start the appliance
3. After washing is finished
"End" is shown on the display.
DISPLAY AND CONTROL PANEL

- Programme selector dial
- Display
- Delay End button
- Temperature button / Sound on / off
- Spin button
- Options button
- Soil level button
- Extra Rinse button
- Start/Pause button
- OptiTime button 5+6 Drum self-cleaning 7+8 Child Lock
1
Programme selector dial
- Choose the appropriate wash programme as required, depending on the soil level, and type and amount of laundry loaded, which ensures better results and more effective washing. Once the wash programme is started, turning the programme selector knob to another position is indicated by a beep, however it does not change the previously selected programme.
2
Display
Large and easy to read display provides instant access to information about each programme.

Prewash

SteamPower PRO

Child Lock

Washing

Prewash

Door lock

Rinse

SilentWash


Soil level

Spin

CleanReminder


Extra Rinse

Energy indicator

Eco Wash

Water indicator

Rapid Wash
3
Time Remaining button
When you select Time Remaining, the display will show time remaining until the end of the programme 0H, 1H, 2H... 24H. With this option the user selects the time remaining until the end of the programme and the washing machine will fit the entire wash cycle in this time entered by the user.
Press the button to set the time remaining until wash cycle must end.
4
Temperature selector button
This button allows the washing temperature to be set in different programmes. Press this button to display water temperature settings available for a given programme or an option for washing in cold water (no heating). Depending on the selected programme, the display will show the following settings: - - °C (cold water), 20°C, 30°C, 40°C, 60°C, 90°C.
Acoustic Signal On/Off
■ Turn the Acoustic Signal On/Off by pressing and holding: Temperature for about 3 seconds.
5
Spin speed selector button
Press this button to set the spin speed when water is being pumped out of the washing machine. Press the Spin button to change the settings. Depending on the programme selected, the display shows the following values: 0 (spin off), 400, 600, 800, 1000.
6
Options button SteamPower PRO
- Steam penetrates deep into the bacterial cells, effectively eliminating bacteria and germs as well as unpleasant odours. ■ Steam washing system:
1). Increases the efficiency of difficult stain removal, 2). Conditions laundry for ironing – it is less wrinkled, 3). Removes harmful bacteria and dust mites – this is a great option for people with sensitive skin and allergies, 4). Tackles the causes of odour – not only neutralizes but removes them.
Steam is generated during the wash cycle – it penetrates the fibres while straightening, cleaning and loosening them. Steam disinfects the fabric, kills germs and tackles even the toughest stains, while not destroying the laundry.
Steam helps remove stubborn stains, and laundry becomes even softer. The use of steam is safe and does not compromise the washed laundry.
Prewash
The Pre-wash function extends the wash cycle by approximately 20 minutes. The laundry is prewashed before the main wash cycle begins. Use the Pre-wash to achieve excellent washing results without the need to soak the laundry. Pre-wash is recommended when washing heavily soiled laundry. Prewash takes place at up to 40°C.
SilentWash - night wash
When this function is selected, the spin speed does not exceed 800 rpm.
7
Soil level
This feature allows you to wash laundry in accordance with your needs – quickly and efficiently, in a standard or intensive wash cycle. For any selected programme (see table) you can select one of three levels of soil: slightly soiled, heavily soiled and very heavily soiled. This allows you to:
1). Make clean, ecological and economic wash. 2). Select washing options depending on your current needs.

Level 1 – for lightly soiled laundry. By default, this option is enabled. With each level, wash programmes become more intensive. Main wash is extended by 2 to 10 minutes to make it more effective.

Level 2 – standard wash cycle, whose algorithm cannot be modified, designed for moderately soiled garments.

Level 3 – designed for heavily soiled laundry. The same amount of water is drawn as in level 2, but the duration of the wash cycle is extended by about 10 minutes.
8
Extra Rinse
The function is especially useful when washing underwear and also clothes for people with sensitive skin. Select this option to add an extra rinse to wash cycle.
9
Start/Pause button
Press Start/Pause to start or pause a programme. During the washing cycle, the corresponding programme phase symbol is flashing. In Pause mode, the symbols do not flash and are lit up continuously.
10
OptiTime
Press the OptiTime button to select the ECO function or rapid wash programme. ECO function: When you select this function, the temperature drops by one level in relation to the set temperature. The washing cycle takes 20 minutes longer and the energy consumption is reduced (does not apply to cold water). Quick wash: Change settings to reduce washing time. Energy consumption increases by one level.
5+6
CleanReminder – the drum Auto Clean
The appliance counts the wash cycles (after 25 cycles). After a number of the washing cycles have been completed, the Drum Clean LED blinks at the end of the washing programme, reminding the user to start the drum cleaning programme. During drum cleaning, the temperature is 90°C. Do NOT wash laundry using this programme. When the programme is completed, the Drum Cleaning indicator turns off. The appliance is now counting down the next 25 wash cycles. Select the desired wash programme. Press [Spin] and [Options] for 3 seconds until you hear a beep.
7+8
Child Lock
This function locks the function buttons to prevent settings from being changed or operation interrupted by children. Press and hold the Soil Level and Extra Rinse buttons for 3 seconds to activate the Child Lock during a washing cycle. To release Child Lock during the cycle, press and hold the same buttons for approximately 3 seconds.

When the Child Lock function is activated, the display will show the symbol.
When you turn off or unplug the washing machine or the washing cycle ends, the Child Lock function will not deactivate.
SPECIAL PROGRAMMES
1
Antiallergic
This programme is designed for washing clothes of children and people with sensitive skin or skin allergy. Virtually all allergens, dust mites, bacteria, microbes or fungi are removed from the washed clothes. It also removes stubborn stains. It will not damage clothing and is suitable for washing delicate laundry such as children's garments. Washing with the anti-allergic program takes place at a temperature of 60°C (temperature cannot be changed), followed by 4 rinses, all with heated water.
2
Eco 40-60 (reference programme in accordance with EN 60456)
The "Eco 40-60" programme is used to wash normally soiled cotton fabrics, which can be washed at 40°C or 60°C in the same cycle.
3
Express 15'
Use this programme to refresh clothes. Includes all three wash stages: 1) main wash, 2) rinse, 3) spin.
4
Dark
- Provide better protection for when washing coloured laundry.
5
Hygiene+
This programme is used to remove some bacteria from fabrics in order to achieve a sanitizing effect.
6
Shirts
Use this programme to wash clothes such as shirts. After the final spin cycle, the washing machine drum makes an additional anti-crease motion for a few minutes.
USING THE APPLIANCE
1
Select Programme
- Set the programme selector turning it left or right.
- Customize the programme to your needs – you can change the temperature, spin speed, or enable additional features (see table of wash programmes). Press the Start/ Pause button
2
Time Remaining
To set the Time Remaining:
- Close the appliance door.
- Set the programme selector dial to the desired programme.
- Select additional functions or wash cycle parameters as required – according to your needs (see Table of wash programmes). Press the Time Remaining button. Select time remaining ranging from 0 to 24 hours. Press the Start/Pause button. The appliance will be set in delay mode. The wash programme will be automatically terminated.

When you set the Time Remaining option, the display will show the time remaining to the end of the programme.
End of the wash cycle
End of the wash cycle is indicated by an acoustic signal (if active). 30 seconds after the end of the wash programme, END appears on the display, the appliance turns off automatically, the display turns off, the door is unlocked and the appliance will be in off mode. Close the water valve. Unplug the appliance from the wall outlet. Open the door and remove laundry.
Cancel or modify programme
Press and hold the Pause button for 3 seconds to reset a programme.
TROUBLESHOOTING
| Description Reason Solution | ||
| Washing machine does not start | The door is not closed properly. | Restart after closing the door.Make sure that laundry is not blocking the door. |
| The door cannot be opened | The appliance protection function is active. | Disconnect the power, restart the appliance |
| Water Leakage The connection between the water supply hose or drain hose and the tap or washing machine is leaking. | Check and properly install attach water hoses.Clean the water drain hose. | |
| Detergent residue in the drawer | The detergent is damp or lumpy | Clean and wipe the detergent drawer. |
| The indicator or display does not light up | There is no connection to the electronics or the wires do not connect properly. | Check that the power is not turned off and that the power cord plug is properly inserted into the socket. |
| Abnormal noise Make sure that the shipping bolts have been removed.Make sure the appliance is placed on a solid, level floor. | ||
MAINTENANCE AND CLEANING

Never clean the appliance body or plastic parts using solvents or harsh, abrasive detergents (e.g. washing powders or creams)! Use mild liquid detergents and soft cloths only. Do not use sponges.
1
Clean the pump filter
Clean the pump filter every 20 washes or so. Neglecting to clean the filter may result in problems with draining water from the appliance!


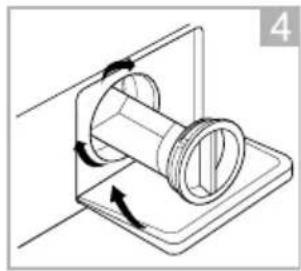
1). Open the filter cover using hand or flat screwdriver, 2). Open the filter by turning it counterclockwise
Drain the remaining water into the shallow vessel
3). Remove any foreign objects from the appliance. 4). Screw on the filter and close the bottom cap.
2
Clean the water supply valve
- Replace the filter following the procedure in reverse order.


1). Unscrew on the water supply hose, 2). Use forceps to grasp the filter mesh pin, 3). Remove and clean the filter.
3
Clean the detergent drawer
■ Should be cleaned at least once a month.

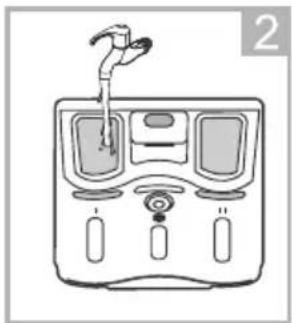

1). Pull out the detergent drawer. 2). Rinse under running water, clean with a brush or a piece of fabric, 3). Push the drawer back in.
PRACTICAL TIPS ON WASHING
DETERGENTS AND LAUNDRY ADDITIVES

It is recommended to use a general-purpose laundry detergent powder for the full range of temperatures according to the manufacturer's instructions on the detergent packaging. Only powder detergent should be used.
1
Detergents
Pour the detergent into the drawer compartment marked . Pour the pre-wash detergent into the drawer compartment marked .

2
Fabric softeners added to the rinse
Pour the fabric softener into the drawer compartment marked . Do not exceed the maximum level marked on the drawer compartment. This detergent will be used for the final rinse.

For washing whites it is recommended to use the washing powder.
FIRST WASH
Before washing for the first time, put the appliance through one high temperature cycle without a load, according to the following procedure:
1). connect the washing machine to the power supply, 2). open the water valve, 3). set the programme selector dial to washing at high temperature, add a suitable detergent and press Start/Pause.
SOIL
1
Stubborn stains
Before washing underwear, apply an additional stain remover according to the instructions for use.
2
Heavy soil
In order to achieve a better result, wash less laundry and add more detergent. Rinse the washing machine after washing heavily soiled garments (e.g., work clothes) or clothing that loses fibers. To do this, run the wash cycle at 60°C, for example, Cotton or Synthetics without any load.
3
Light soil
See Conservation.
CONSERVATION
Reduce energy and water consumption
Garments which are only lightly soiled should be washed on the Express 15' setting. For most programmes, the washing machine detects load. For partial load, when using the Express 15' programme, the appliance will reduce water and energy consumption and shorten the wash cycle. The most energy and water efficient wash programmes are generally those that run at lower temperature and for a long time. Loading the washing machine to the full capacity indicated by the manufacturer for the respective wash programmes will save energy and water.
WATER HARDNESS
Hard water causes scale deposition. Information about water hardness is available from the nearest water works. We recommend that you use water softener for each washing.
POWER OUTAGE (PROGRAMME MEMORY)
Power outage or unplugging the appliance does not cancel the set programme. The programme is memorised and resumes when power is restored. Do not open the appliance doors during a power outage.
LOAD
■ Maximum drum capacity 6 kg. - Load the laundry into the drum according to the following instructions:
1). cotton, denim, children's clothes – max full drum (do not force clothes into the drum as this will reduce the quality of the wash), 2). Synthetics - max 1/2 of the drum, 3). Delicates fabrics - 1/3 of the drum.

Do not overload the appliance. Overloading the appliance may damage the clothes being washed! If you overload the appliance the OVL is shown appears on the display – remove excess laundry from the drum and restart the washing machine. The maximum load amounts depending on the programme are given in table of programmes.
LOAD DISTRIBUTION CONTROL
The appliance features load distribution control system.
Before spinning, this checks the distribution of clothes inside the drum. In the event that too great an imbalance is detected, the system makes several attempts to rearrange the clothes inside the appliance. Sometimes these attempts to distribute the load are not successful. Problems may be caused by terrycloth robes washed together with other types of laundry, such as bed sheets that formed a bundle around other items of laundry.
The system may then respond in two ways:
1). accept the uneven distribution of garments and reduce spin speed, 2). cancel the spinning.
In either case, after washing cycle is finished open the appliance door, remove the laundry by hand, close the door and select the spin setting again.
DOOR LOCK
The washing machine is equipped with a lock which prevents the door from being opened during wash cycle. Once a wash cycle is complete, the door lock is automatically released. In order to open the door during the wash program, press PAUSE button and wait to unlock the door.

If the temperature inside the drum is high, the door may remain blocked until the water temperature has dropped below 60°C.

Before opening the door of the washing machine check whether there is water in the drum.
DELICATE FABRICS
1
Select Programme
- Select the appropriate wash programme: Synthetics, Wool.
2
Load
- Avoid overloading the washing machine – the maximum load is 1/3 kg for delicate fabrics, see "Loading."
ADD DETERGENT
1
Not enough detergent
the laundry turns grey, lumps of fat form, lime scale is deposited.
2
Too much detergent
A lot of foam, ineffective washing, detergent incompletely rinsed from fabrics.
For more information about the product, please refer to the EU EPREL Product Database at https://eprel.ec.europa.eu. For more information, please use your mobile device to scan the QR code on the energy label or enter the product model listed on the energy label in the EPREL search engine https://eprel.ec.europa.eu/
WARRANTY AND AFTER SALES SERVICE
Warranty
Warranty service as stated on the warranty card. The manufacturer shall not be held liable for any damage caused by improper use of the product.
Service
- The manufacturer recommends that all repairs and adjustments be carried out by the Factory Service Technician or the Manufacturer's Authorized Service Point. For safety reasons, repairs should be referred to professionals.
- Repairs carried out by unqualified persons may seriously endanger the appliance user.
- Pursuant to Commission Regulation (EU) 2019/2023, the minimum availability period for spare parts necessary to repair the appliance is 7 or 10 years depending on the type and purpose of the spare part.
- The list of spare parts and the ordering procedure are available on the websites of the manufacturer, importer or an authorized representative.
- The minimum warranty period for the appliance offered by the manufacturer, importer or authorized representative is given in the warranty card.
- The warranty shall be void if you make any independent adaptations or alterations, tamper with seals or other appliance safety devices or its parts or interfere with the appliance contrary to operating instructions.
In the event of appliance malfunction, request assistance or repair.
If your appliance needs repair, please contact the service centre. Please see warranty card for address and contact details of our service centre. Before contacting us, please have ready the appliance serial number, which can be found on the identification sticker: For your convenience, please write it down below:

GRAM
Gram A/S
Gejlhavegård 2B
DK-6000 Kolding
www.gram.dk
- UNPACKING
- DISPOSAL OF OLD APPLIANCE
- CONTENTS
- ECOLOGY IN PRACTICE
- DEAR CUSTOMER
- BASIC INFORMATION
- USAGE
- MANUFACTURER'S DECLARATION
- UNDERSTANDING THE SYMBOLS ON CLOTHES LABELS
- INSTALL THE APPLIANCE
- REMOVE THE TRANSIT BOLTS
- POSITION AND LEVEL THE WASHING MACHINE
- PROTECTION / SOUND INSULATION PANELS
- CONNECT THE WATER SUPPLY
- WATER DRAIN
- CONNECT TO POWER SUPPLY
- PREPARE TO WASH
- FEATURES AND COMPONENTS
- QUICK START
- WARNING
- BEFORE WASHING
- NOTE
- WASHING
- AFTER WASHING IS FINISHED
- PROGRAMME SELECTOR DIAL
- DISPLAY
- TIME REMAINING BUTTON
- TEMPERATURE SELECTOR BUTTON
- ACOUSTIC SIGNAL ON/OFF
- SPIN SPEED SELECTOR BUTTON
- OPTIONS BUTTON STEAMPOWER PRO
- PREWASH
- SILENTWASH - NIGHT WASH
- SOIL LEVEL
- EXTRA RINSE
- START/PAUSE BUTTON
- OPTITIME
- CLEANREMINDER – THE DRUM AUTO CLEAN
- CHILD LOCK
- SPECIAL PROGRAMMES
- ANTIALLERGIC
- ECO 40-60 (REFERENCE PROGRAMME IN ACCORDANCE WITH EN 60456)
- EXPRESS
- DARK
- HYGIENE
- SHIRTS
- USING THE APPLIANCE
- SELECT PROGRAMME
- TIME REMAINING
- END OF THE WASH CYCLE
- CANCEL OR MODIFY PROGRAMME
- TROUBLESHOOTING
- MAINTENANCE AND CLEANING
- CLEAN THE PUMP FILTER
- CLEAN THE WATER SUPPLY VALVE
- CLEAN THE DETERGENT DRAWER
- PRACTICAL TIPS ON WASHING
- DETERGENTS AND LAUNDRY ADDITIVES
- DETERGENTS
- FABRIC SOFTENERS ADDED TO THE RINSE
- FIRST WASH
- SOIL
- STUBBORN STAINS
- HEAVY SOIL
- LIGHT SOIL
- CONSERVATION
- REDUCE ENERGY AND WATER CONSUMPTION
- WATER HARDNESS
- POWER OUTAGE (PROGRAMME MEMORY)
- LOAD
- LOAD DISTRIBUTION CONTROL
- DOOR LOCK
- DELICATE FABRICS
- ADD DETERGENT
- NOT ENOUGH DETERGENT
- TOO MUCH DETERGENT
- WARRANTY AND AFTER SALES SERVICE
- WARRANTY
- SERVICE
- IN THE EVENT OF APPLIANCE MALFUNCTION, REQUEST ASSISTANCE OR REPAIR
- GRAM
Brand : GRAM
Model : WTL 20610-90
Category : Washing machine