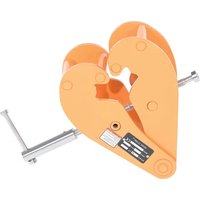
BC-8 - Serre-joint industriel Vestil - Free user manual and instructions
Find the device manual for free BC-8 Vestil in PDF.


| Product Type | Battery Charger |
| Brand | Vestil |
| Model | BC-8 |
| Input Voltage | 120 V AC, 60 Hz |
| Output Voltage | 12 V DC |
| Output Current | 8 A |
| Battery Type | Lead-acid (flooded, AGM, Gel) |
| Charging Mode | Automatic (constant current/constant voltage) |
| Safety Features | Overcharge protection, reverse polarity protection, short circuit protection |
| Dimensions (L x W x H) | 8.5 x 6.5 x 4.25 inches |
| Weight | 5.5 lbs |
| Cable Length (AC) | 6 ft |
| Cable Length (DC) | 4 ft with alligator clips |
| Housing Material | Steel with powder coat finish |
| Cooling | Natural convection (no fan) |
| Operating Temperature Range | 0°C to 40°C (32°F to 104°F) |
| Certifications | UL listed, cUL listed |
| Maintenance | Keep clean and dry; check cables for damage |
| Repairability | Replaceable AC cord and DC clips; internal components not user-serviceable |
Frequently Asked Questions - BC-8 Vestil
User questions about BC-8 Vestil
0 question about this device. Answer the ones you know or ask your own.
Ask a new question about this device
Download the instructions for your Serre-joint industriel in PDF format for free! Find your manual BC-8 - Vestil and take your electronic device back in hand. On this page are published all the documents necessary for the use of your device. BC-8 by Vestil.
USER MANUAL BC-8 Vestil
URL: WWW.VESTILMFG.COM
EMAIL: SALES@VESTIL.COM
NOTE: COMPLIANCE WI TH REGULAT IONS, CODES , AND /OR ST ATUTORY (NON-VOLUNTARY) ST ANDARDS ENFORCED IN THE LOCATION WHERE THE DEVICE IS USED IS EXCLUSIVELY THE RESPONSIBILITY OF THE END-USER. IF LAW ENFORCED WHERE THE BEAM CLAMP IS USED CONTRADICTS AN INSTRUCTION(S) OR PART OF AN INSTRUCTION(S), VESTIL IS NOT RESPONSIBLE FOR ANY CONSEQUENTIAL DAMAGES SUSTAINED AS A RESULT.
Table of Contents
Product Introduction.... 2
Safety Principles....2
Safety Guidelines.... 3 Fig.
Use Instructions.... 5-8
Maintenance Recommendations.... 9-10
Table of Figures
Fig. 1A "Labeled photograph: side view"......4
Fig. 1B "Labeled photograph: top view"...... 5
2 "Product label placement"......10
[Non-Text]
[Non-Text]
PRODUCT INTRODUCTION

Thank you for purchasing a BC-2, -4, -6, or -8 mod el beam clamp ("beam clamp," "BC," or "clamp"). These beam clamps are durable, high-quality products rigorously engineered for both dependability and simplicity. Although use and maintenance procedures are relatively intuitive, any person who might use or mainta in this product must be familiar with the instructions provided in this manual. Dimensi ons and other p roduct specifications appear in the following table:
| Model | Beam Flange Width in Inches (~cm) | Uniform Max. Rated Load in Pounds (~kg) | Net Weight in Pounds (~kg) |
| BC-2 | 31⁄4 in. to 91⁄2 in. ~(8.2 to 24)cm | 2,000 (~909kg) | 18 (~8kg) |
| BC-4 | 31⁄4 in. to 91⁄2 in. ~(8.2 to 24)cm | 4,000 (~1,818kg) | 20 (~9kg) |
| BC-6 | 31⁄2 in. to 121⁄4in. ~(9 to 31)cm | 6,000 (~2,727kg) | 28 (~13kg) |
| BC-8 | 31⁄2 in. to 121⁄4in. ~(9 to 31)cm | 8,000 (~3,636kg) | 40 (~18kg) |
Vestil Manufacturing Corp. created this manual to acquaint persons a authorized to use and/or maintain this be am clamp with safe use and maintenance procedures. Employers are responsible for instructing employees to use the product properly. Each person(s), who might use or perform maintenance on the beam clamp, must read and understand every instruction BEFORE using or performing maintenance activities. Users should have access to the manual at all times and should routinely review the directions.
Although Vestil diligently strives to identify foreseeable hazardous situations, this manual cannot address every conceivable danger. The end-user is ultimately responsible for exercising sound judgment at all times.
SAFETY PRINCIPLES This manual add resses provides specifications and describes recommended use and maintenance practices. Each beam clamp conforms to the generalized specifications disclosed in this manual and fulfills our demanding standards for quality, safety and durability.
Vestil Manuf acturing Corp. recognizes the critical importance of workplace safety. Each person who might participate in the use or maintenance of the product must read this manual and fully understand the directions BEFORE using or performing maintenance on the beam clamp. If you do not understand an instruction, ask your supervisor or employer for assistance. Failure to adhere to the directions in this manual might result in serious personal injury or even death.
Vestil is not liable for any injury or property damage that occurs as a consequence of failing to apply either: 1) the instructions that appear in this manual; or 2) the information provided on labels affixed to the product. Furthermore, failure to exercise good judgment and common sense might result in property damage, serious personal injury or death. Such injury or damage is solely the fault of the person(s) who fail to exercise good judgment; it is not another responsibility delegated to manufacturers.
This manual uses SIGNAL WORDS to classify personal injury risks and situations that might lead to property damage, as well as to draw attention to safety message(s). The reader must understand that each signal word indicates the seriousness of the described hazard.

Identifies a hazardous situation which, if not avoided, WILL result in DEATH or SERIOUS INJURY. Use of this signal word is limited to the most extreme situations.

Identifies a hazardous situation which, if not avoided, COULD result in DEATH or SERIOUS INJURY.

Indicates a hazardous situation which, if not avoided, COULD result in MINOR or MODERATE injury.

Identifies practices likely to result in product/property damage, such as operation that might damage the beam clamp.
SAFETY GUIDELINES
Failure to read and understand the instructions included in this manual before using or servicing the beam clamp constitutes misuse of the product. Study the entire manual before you install the product. Read the manual to refresh your understanding of the safe use and maintenance procedures explained on p. 5-10. DO NOT attempt to resolve any problem(s) with the device unless you are both authorized to do so and certain that it will be safe to use afterwards.
DANGER
Electrocution might result if any part of the beam clamp, hoist, or the object supported by the clampified wires. Reduce the likelihood of electrocution by applying common sense:
➢ DONOT contact electrified wires with any part of the clamp, hoist, crane or the object grasped by the clamp;
➢DO NOT use or store the beam clamp in an area where contact with electrified wires is likely or possible;
Before connecting the clamp to a hoi st, inspect the usage area for unusual conditions and implement precautions that account for those conditions.
WARNING
If this product is used improperly or carelessly, the operator and/or bystander(s) might sustain serious issues or could be killed. To reduce the likelihood of injury:
- Consult the safety messages included in the manual(s) for your crane, trolley, hoist, and any other device used in conjunction with the clamp.
- DO NOT open the clamp while lifting and/or moving material. BEFORE opening the clamp p, be certain that the beam is fully supported by the ground or other surface, and is fully immobilized (can't fall over, roll, slide, or move in an uncontrolled manner). If a second person is needed to immobilize the load, find someone to help you. To open the clamp, turn the handle counterclockwise (see FIG. 1 on p. 6). DO NOT open the clamp while using it to lift and/or move material.
- ALWAYS inspect the beam clamp before each use according to the inspection procedures described in the most recent edition of ASME B30.20. B30.20 also recommends “frequent” and “periodic” inspections.
- Properly maintain the beam clamp according to the maintenance procedures on p. 11-12 of the manual. Vestil developed these procedures to supplement the maintenance practices of ASME B30.20.
- ALWAYS attach the beam clamp to a safety hook (e.g. a hoi st that has a safety hook atta ched to the end of the chain or rop e), or to a connection that at includ es safety mechanisms to pre vent unintended detachment from the hoist. DO NOT use the device on a hoist hook that might a ccidentally or unintentionally release the clamp. DO NOT connect the clamp to a safety hook that does not function properly or that is damaged.
- DO NOT grip a beam that has any debris or surface contamination on it that might affect the quality of the connection between the clamp and the load. Rem over the debris, such as oil, grease, water and dirt BEFORE clamping the beam.
- Clear all debris, including fluids, from the path of travel if the job requires moving the load to a new location BEFORE picking up the load. If moisture is present in the path of travel, absorb it before using the clamp.
- Make sure that no person is in the travel path.
- DO NOT remove or obscure any label. Verify the placement and legibility of all labels as shown in FIG. 2 on p. 12. If a label is damaged or unreadable, immediately contact Vestil for a replacement. DO NOT use the clamp UNLESS all labels are securely attached and readable.
- DO NOT attempt an unbalanced lift. Before performing the lift, attach enough clamps to properly balance the load. (See "Use Instructions," p. 7-10).
- DO NOT sit on or apply any weight/pressure to a beam held by the clamp.
- DO NOT attempt to lift material that weighs more than the rated load of the clamp. ALWAYS make sure that the load weighs no more than the rated load.
- DO NOT lift a load higher than necessary. (See "Use Instructions" on p. 7-10).
- DO NOT raise the load over your feet or any other part of your body.
- DO NOT use the clamp to lift material over people or to lift a ny apparatus that supports people, such as a work platform. The clamp is designed ONLY to lift beams.
- DO NOT get in front of or behind a suspended load while moving it. Always orient yourself so that at the beam is visible to you. You are less likely to be injured if the load remains within sight at all times. Stand to one side of the beam and hold onto the hoist's safety hook with one hand to stabilize the load as you move it to the desired location.
- DO NOT leave a suspended load unattended. An unattended, suspended load creates a risk of injury to yourself and other rs. Always move the beam to its desired location, set it down and properly immobilize it, and then disengage the clamp from the beam. Disconnect the clamp from the hoist BEFORE leaving the work area.
Labeled Photographs
**Note: Vestil does NOT provide replacement parts for this product. The following diagram is solely intended to clarify terms that appear in the Use (p. 5-8) and Maintenance Instructions (p. 9-10).**
FIG. 1A: Side View

FIG. 1B: Top View

Use Instructions:
NOTICE
The operating in structions in this m anual are meant to supplement the operations of ASME standard B30.20.
Only trained, designated persons should use the beam clamp. "De signated person" means someone selected by his or her employer, or by a representative of the employer, as competent to use the beam clamp. Trainees under the direct supervision of a designated person may use the clamp. Maintenance persons and personnel who perform tests also may use the beam clamp when necessary for the performance of their employment duties.
Step 1: Perform a proper, "Every Lift" in spection as described in the most recent revision of ASME B30.20, BEFORE you connect the clamp to a hoisting device. Proceed to the next step ONLY IF the clamp passes the inspection and is deemed safe to use by designated inspection personnel.
Step 2: Connect the clamp to the hoisting device. Only connect the clamp to the hoist via a safety hook to prevent accidental detachment from the hoist.


Properly functioning safety latch
Safety Hook
Step 3: Open the clamp by rotating the handle counterclockwise. Move the trolley to position the clamp above a beam as shown in photo 1. The beam must balance when lifted, and as a first approximation of the balance point, position the clamp above the center of the beam.
WARNING
DO NOT push or pull the clamp so that the hoist chain/rope is not vertical. All horizontal the position of the clamp must be accomplished by moving the trolley. This is important reflection of the chain/rope from straight up-and-down will cause the load to swing when load may cause serious personal injuries.


Step 4: Engage the beam with the ton gs. Turn the handle clockwise until the clamp firmly grasps the beam. Each clamping arm is formed to include an interior notch. These notches receive the top of an I-beam. Tighten the clamp until the top of the beam contacts all four of the clamping arms within the notches as shown in photos 3 and 4. The angled teeth (circled in photo 5) allow the clamping arms to engage the underside of the top of an I-beam. Adjust the position of the tongs to allow all 4 teeth to make solid contact with the beam.

Step 5: Test the balan ce of the beam i n the clam p. Gra sp the h oist hook to stabili ze the l ift (see ph oto 6), and raise the beam just a few inches from the ground (or other supporting surface). The beam is improperly balanced if it slides or hang s lower on one side If improperly balanced, return the beam to the grou nd/supporting surface and immobilize it. Repo sition the clam p to improve balance by moving the cl amp slightly towards the e nd that hung lower during the test; then raise the obj ect again to see if the be am is balanced. DO NOT proceed to the next step unt il the load i s properly balanced and stabilized. DO NOT use the cl amp if you cannot achieve a balanced hold of the beam; use a different device to lift and move the beam.
If a single clamp cannot balance the beam, use a combination of two or more clamps. For instance, you could connect a chain sling to the hoist hook, and attach a beam hook to each end of the sling via safety hooks. Afterwards, retest the balance of the beam according to the process described in Step 5. Raise the beam ONLY after achieving proper balance.
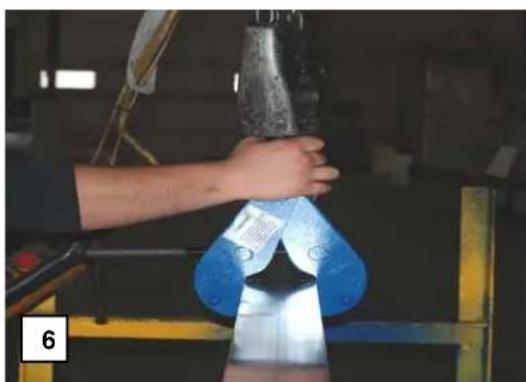

This end of the beam ha ngs lower than the other. Return the beam to the g round or supporting s urface and rep osition the tongs by moving them closer to this s end.
Step 6: Lift the beam. To raise the beam, steady the clamp and load by grasping [one of] the hoist hook[s]. The photo graphs demonstrate the proce dure as it applies to a lift using a single b eam clamp. combinations of two or more cl amps, grasp the safe ty hook of the clam p attached to the back end of the beam (as shown in the diagram next to photograph 8).
Lift the load to approximately waist height. Continue to grasp the hook. Dire ct the load to a position a bove the desired location. Refer to the "Warning" messages and follow the lifting rules below.
For
WARNING
Review all "Safety Guide lines" on p.5 and always follow these "Lifting Rules" when using the
- NEVER lift material over yourself or other persons. Inform persons in the area that you are going to use the clamp and make sure that no one is in the starting point, path of travel, or end point.
- DO NOT press down on the beam. Grasp ONLY the hoist hook to stabilize the load while raising, lowering and/or moving to a new location.
- Always stand at arm's length to the side of the load and hold onto the safety hook as shown in photo 8. Make sure that your clothing, feet, and all other body parts stay out from underneath the load. This stance allows the operator to exercise some control of the load while maximizing safety.
- The beam must remain level during movement. Walk slowly to keep the beam level. If the object has to be removed from a container or be lifted over an obstacle, continue to grasp the hoist hook. Use a different device if you will not be able to maintain the safe stance described in Rule 3.
If you use a motorized trolley:
- DO NOT push or pull the clamp or the beam. Allow the trolley to provide all movement. Your hold on the hook is a means ONLY for stabilizing the load.
If you use a manual trolley,
- Grasp the hoist hook with one hand. DO NOT pull the beam in the direction of travel. Use the hand that grasps the hoist hook to move the trolley in the intended direction.
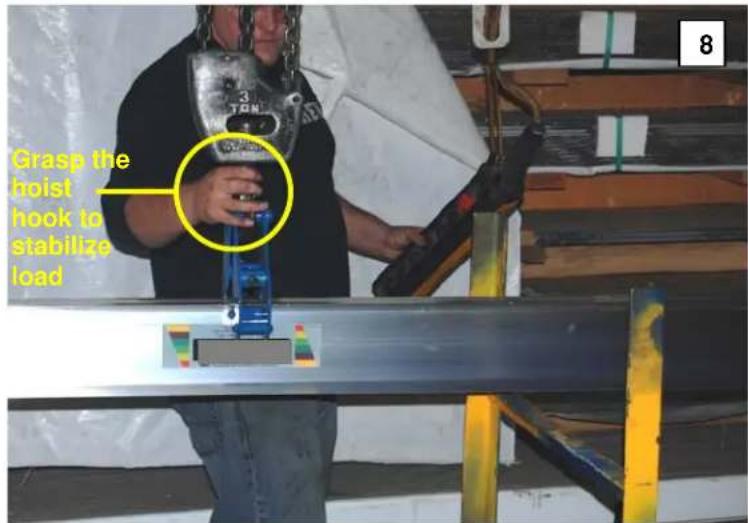
Step 6 Diagram


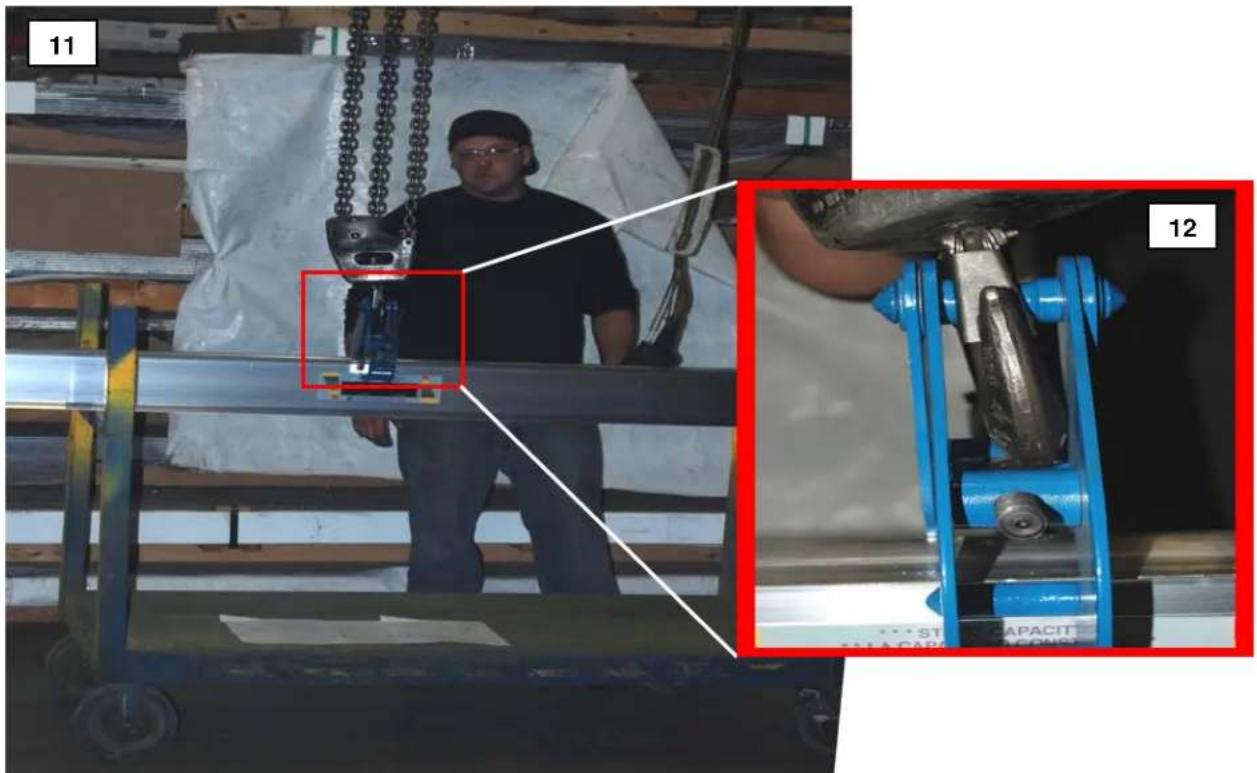
Step 8: Lower the beam. Make sure that the beam is not swinging or rotating, and then slowly lower the hoist until the beam contacts the ground or other supporting surface; lower the load sufficiently to create slack in the
hoist chain (or rope) so that the interior of the hoist hook and the attachment spacer are no longer in contact (see Photos 11 and 12). DO NOT disconnect the clamp from the beam until you appropriately immobilize the beam to prevent it from rolling, falling over, or moving in an uncontrolled manner.
In the following photographs, the beam weighs little and lacks dangerous projections that could cause injury. It can easily be controlled by the operator. If you can not control BOTH the clamp and beam without difficulty, find someone to help you. However, despite these suggestions you should always use the procedures developed by your employer for safely handling beams.
Step 9: Disengage the clamp. Turn the handle counterclockwise to open the clamp and release the beam. Raise the hoist high enough that the clamp no longer contacts the beam, and then disconnect the clamp from the hoist.
NOTICE
You should fully open the clamp to prevent accidental or partial engagement of the beam.


Maintenance and Inspections:
A designated person must verify that the clamp complies with all regulations, codes, and standards that apply to "Under-the-Hook Lifting Devices" in the location where the clamp is used. The person(s) designated to conduct inspections must do so before the clamp is used for the first time, and EACH time it is installed for use.
Inspections:
NOTICE The end-user is responsible for performing inspections as recommended in ASME B30.20. The standard categorizes examinations based on regularity of performance. Highlights of the recommended inspection procedures a ppear below. However, the full procedures (in the published standard) should be followed.
WARNING
WARNING DO NOT use a clamp that is structurally damaged. Structural damage includes, but is not limited to, bending, warping, cracking or other deformation of one or more of the spacers, clamping arms, or of the threaded shaft (see FIG. 1A on p.4). Restore the clamp to normal operating condition BEFORE using it again.
Inspections Before & During EVERY lift : visual examination must be performed by the operator prior to AND during each lift. In particular, the operator should inspect for:
- Debris on the load surfaces; AND
- Condition and operation of the controls.
Frequent Inspections: the specific meaning of “frequent” varies from daily to monthly depending on the service classification (normal, heavy, severe, and special/infrequent) of the clamp. Definitions of the service classifications appear in ASME B30.20. The operator or other designated person(s) should visually inspect the clamp for:
- Deformation, cracking, or excessive wear of any part of the clamp;
- Operating mechanisms for conditions that interfere with proper function; AND/OR
- Loose or missing fasteners, stops or nameplates.
Periodic Inspections: complete visual inspections performed AND recorded by a qualified person. The inspection should specifically look for:
- Loose bolts or fasteners;
- Excessive wear of friction pads, linkages, and other mechanical parts; AND/OR
- Excessive wear at the points where the clamp connects to the hoist hook, and load support clevises or pins.
Maintenance: the end-user must implement a maintenance program to ensure the proper function and safety of the clamp. A qualified person may establish a program that is used in preference to the maintenance procedures described below. However, if you apply the procedure that follows, complete EVERY step each time maintenance is performed.
NOTICE
Vestil DOES NOT provide replacement parts for the beam clamp. Any condition on which requires parts can ONLY be corrected by purchasing a new clamp.
WARNING
ONLY qualified persons may perform maintenance on the clamp. A qualified person is someone session of a recognized degree in an applicable field or certificate of professional training, and it is successfully demonstrated the ability to solve or resolve problems relating to the subject matter and work [use of the beam clamp]." See ASME B30.20-0.2-2003.
Step 1: All sources of power must be disconnected, locked out and tagged, "Out of Service."
Step 2: Disconnect the clamp from the hoist hook and tag it, "Out of Service."
Step 3: Perform all adjustments indicated as necessary during any inspection (every lift, frequent, or periodic).
Step 4: If other conditions exist which require new/replacement parts to repair, contact Vestil to order a new clamp. Deformity, corrosion, rusting, or excessive wear of fasteners, clamping arm(s), and/or the attachment spacer or any other spacer warrants immediate replacement of the clamp).
WARNING
The reader should understand the significant difference between "Adjustments" and "Re pairs," ns".
An adjustment or repair refers to a simple correction that restores the clamp to normal operating condition, such as tightening loose fasteners, or removing debris from the surface of the clamp. DO NOT use the clamp if adjustments and/or repairs are incomplete! Return the clamp to service ONLY after finishing all necessary repairs and adjustments.
A modification is a change that alters the clamp from normal operating condition, like bending the structural members. NEVER modify the clamp without the express, written approval of Vestil. Modifications may render the clamp unsafe to use.
Step 5: Perform a periodic inspection, as recommended in ASME B30.20.
Step 6: Make a dated record of the repairs, adjustments and/or replacements made.
Markings:
Only use the clamp if both labels are readable and undamaged.
FIG. 2: Product label placement

Hanging tag attached to spacer:
Label #675 on one side
| ⚠WARNING | ⚠ ADVERTENCIA |
| DO NOT exceed rated capacityDO NOT use if damaged, malfunctioning, or missing partsDO NOT lift people OR lift loads over peopleDO NOT raise load higher than necessaryDO NOT leave a suspended load unattendedDO NOT use lifter unless you read and understand the owner's manualDO NOT alter OR modify lifterDO NOT remove OR obscure any labelSTAY CLEAR of suspended loads | NO excedala capacidad tasadaNO USE is las partes están dañadas, no funcionan correctamente o faltan partes.NO eleve al personal o eleve cargas sobre el personalNO eleve la carga mas alto de lo necesarioNO deje desatendida una carga que este suspendidaNO use el elevador a no ser que haya leido y entendido las instrucciones del manual del propietarioNO altere o modifique el elevadorNO quite uobscurezcaninguna etiqueta 675MANTENGASE alejado de las cargas suspendidas ###0708 |
Label #023 on opposite side
Vestil Manufacturing Corporation ("Vestil") warrants this product to be free of defects in material and workmanship during the warranty period. Our warranty obligation is to provide a replacement for a defective original part if the part is covered by the warranty, after we receive a proper request from the warrantee (you) for warranty service.
Who may request service?
Only a warrantee may request service. You are a warrantee if you purchased the product from Vestil or from an authorized distributor AND Vestil has been fully paid.
What is an "original part"?
An original part is a part used to make the product as shipped to the warrantee.
What is a "proper request"?
A request for warranty service is proper if Vestil receives: 1) a photocopy of the Customer Invoice that displays the shipping date; AND 2) a written request for warranty service including your name and phone number. Send requests by any of the following methods:
Vestil Manufacturing Corporation
2999 North Wayne Street, PO Box 507
Angola, IN 46703
Fax
(260) 665-1339
Phone
(260) 665-7586
sales@vestil.com
In the written request, list the parts believed to be defective and include the address where replacements should be delivered.
What is covered under the warranty?
After Vestil receives your request for warranty service, an authorized representative will contact you to determine whether your claim is covered by the warranty. Before providing warranty service, Vestil may require you to send the entire product, or just the defective part or parts, to its facility in Angola, IN. The warranty covers defects in the following original dynamic components: motors, hydraulic pumps, electronic controllers, switches and cylinders. It also covers defects in original parts that wear under normal usage conditions (“wearing parts”): bearings, hoses, wheels, seals, brushes, batteries, and the battery charger.
How long is the warranty period?
The warranty period for original components is 30 days. The warranty period begins on the date when Vestil ships the product to the warrantee. If the product was purchased from an authorized distributor, the period begins when the distributor ships the product. Vestil may extend the warranty period for products shipped from authorized distributors by up to 30 days to account for shipping time.
If a defective part is covered by the warranty, what will Vestil do to correct the problem?
Vestil will provide an appropriate replacement for any covered part. An authorized representative of Vestil will contact you to discuss your claim.
What is not covered by the warranty?
- Labor;
-
Freight;
-
Occurrence of any of the following, which automatically voids the warranty:
-
Product misuse;
- Negligent operation or repair;
• Corrosion or use in corrosive environments; - Inadequate or improper maintenance;
- Damage sustained during shipping;
- Collisions or other incidental contacts causing damage to the product;
- Unauthorized modifications: DO NOT modify the product IN ANY WAY without first receiving written authorization from Vestil. Modification(s) might make the product unsafe to use or might cause excessive and/or abnormal wear.
Do any other warranties apply to the product?
Vestil Manufacturing Corp. makes no other express warranties. All implied warranties are disclaimed to the extent allowed by law. Any implied warranty not disclaimed is limited in scope to the terms of this Limited Warranty.


- TABLE OF CONTENTS
- TABLE OF FIGURES
- PRODUCT INTRODUCTION
- SAFETY GUIDELINES
- DANGER
- WARNING
- LABELED PHOTOGRAPHS
- USE INSTRUCTIONS
- NOTICE
- MAINTENANCE AND INSPECTIONS
- INSPECTIONS
- MARKINGS
- HANGING TAG ATTACHED TO SPACER
- WHO MAY REQUEST SERVICE
- WHAT IS AN "ORIGINAL PART
- WHAT IS A "PROPER REQUEST
- WHAT IS COVERED UNDER THE WARRANTY
- HOW LONG IS THE WARRANTY PERIOD
- IF A DEFECTIVE PART IS COVERED BY THE WARRANTY, WHAT WILL VESTIL DO TO CORRECT THE PROBLEM
- WHAT IS NOT COVERED BY THE WARRANTY
- DO ANY OTHER WARRANTIES APPLY TO THE PRODUCT
Brand : Vestil
Model : BC-8
Category : Serre-joint industriel