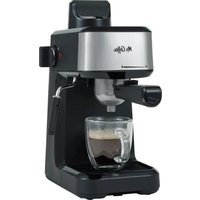
Steam Espresso Maker BVMCECM-STMMN-BL - Coffee maker Mr. Coffee - Free user manual and instructions
Find the device manual for free Steam Espresso Maker BVMCECM-STMMN-BL Mr. Coffee in PDF.


| Product Type | Steam Espresso Maker |
| Brand | Mr. Coffee |
| Model | BVMCECM-STMMN-BL |
| Dimensions (W x D x H) | 10.5 x 8 x 12 inches |
| Weight | 6.5 lbs |
| Power | 1050W |
| Water Reservoir Capacity | 40 oz |
| Pump Type | Steam Pressure |
| Brewing Capacity | Up to 4 cups |
| Frothing Wand | Swiveling Steam Wand for Frothing Milk |
| Brew Pause Feature | Yes |
| Auto Shut-Off | Yes, after 2 hours |
| Removable Drip Tray | Yes |
| Cleaning Indicator | No |
| Descaling Required | Periodically, every 3 months |
| Material | Stainless Steel Boiler, Plastic Housing |
| Voltage | 120V, 60Hz |
| Color | Black and Blue |
| Warranty | 1 Year Limited |
| Replaceable Parts | Carafe, Filter Basket, Steam Wand Tip |
Frequently Asked Questions - Steam Espresso Maker BVMCECM-STMMN-BL Mr. Coffee
User questions about Steam Espresso Maker BVMCECM-STMMN-BL Mr. Coffee
0 question about this device. Answer the ones you know or ask your own.
Ask a new question about this device
Download the instructions for your Coffee maker in PDF format for free! Find your manual Steam Espresso Maker BVMCECM-STMMN-BL - Mr. Coffee and take your electronic device back in hand. On this page are published all the documents necessary for the use of your device. Steam Espresso Maker BVMCECM-STMMN-BL by Mr. Coffee.
USER MANUAL Steam Espresso Maker BVMCECM-STMMN-BL Mr. Coffee
Traditional LATTES, CAPPUCCINOS and MORE!

User Manual
MR. COFFEE® STEAM ESPRESSO, CAPPUCCINO AND LATTE MAKER
BVMCECM-STMMN-BL
MRCOFFEE.COM
Introduction Important Safeguards
Congratulations! You're the proud new owner of a Mr. Coffee® Steam Espresso, Cappuccino and Latte Maker. Soon you'll be brewing espresso drinks just like your favorite coffee shop.
Espresso is used as a base for many rich and delicious beverages such as Cappuccinos and Lattes. A latte is a combination of espresso and steamed milk with a small layer of foam on top. A Cappuccino, on the other hand, is made with about one third espresso, one third steamed milk and one third foam.

When using electrical appliances, basic safety precautions should always be followed to reduce the risk of fire, electric shock, and/or injury to persons including the following:
- Read all instructions before using this appliance.
- Do not touch hot surfaces. Use handles or knobs.
- To protect against electric shock, do not place or immerse cord, plugs, or appliance in water or other liquid.
- This appliance is not intended for use by children or by persons with reduced physical, sensory, or mental capabilities, or lack of experience and knowledge. Close supervision is necessary when any appliance is used near children. Children should be supervised to ensure that they do not play with the appliance. Keep the appliance and its cord out of reach of children.
- Unplug from outlet when either the appliance or display clock (if provided) is not in use, and before cleaning. Allow to cool before putting on or taking off parts, and before cleaning the appliance.
- Do not operate any appliance with a damaged cord or plug or after the appliance malfunctions, or has been damaged in any manner. Do not attempt to replace or splice a damaged cord. Return appliance to an Authorized Service Center for examination, repair or adjustment.
- The use of an accessory not recommended by the appliance manufacturer for use with this appliance may result in fire, electric shock or injury to persons.
- Do not use outdoors or for commercial purposes.
Important Safeguards (continued)
- Do not let cord hang over edge of table or counter, or touch hot surfaces.
- Do not place on or near a hot gas or electric burner, or in a heated oven.
- Always attach plug to appliance first, then plug cord into the wall outlet (for appliances with detachable cords). To disconnect, turn any control to the off position, then remove plug from wall outlet.
- Do not use appliance for other than intended use. Misuse can cause injuries.
- WARNING: To avoid the risk of injury, never open or disengage the brew chamber (portafilter) during the brew cycle. Always properly engage the filter holder to the locking mechanism. Failure to do so may disengage the filter holder during the brew cycle and cause injuries.
- Models intended to be used with sealed capsules: Only use capsules intended for this appliance. If the capsule does not fit, do not force the capsule into the appliance.
- Models with coffee grinders: Check hopper for presence of foreign objects before using.
For appliances with service panels:
- WARNING: TO REDUCE THE RISK OF FIRE OR ELECTRIC SHOCK, DO NOT REMOVE THIS COVER. NO USER-SERVICEABLE PARTS INSIDE. REPAIR SHOULD BE DONE BY AUTHORIZED SERVICE PERSONNEL ONLY.
Save These Instructions
4
Household Use Only
North American models with polarized plugs:

Polarized plug
This appliance has a polarized plug. (one blade is wider than the other). As a safety feature to reduce the risk of electrical shock, this plug is intended to fit in a polarized outlet only one way. If the plug does not let, reverse the plug, if it still does not fit, contact a qualified electrician. To defeat this safety feature or modify the plug in any way. If the plug fits AC outlet or if the AC outlet looks warm do not use that outlet.
POWER CORD INSTRUCTIONS:
A short power-supply cord (or detachable power-supply cord) may be provided to reduce risks resulting from becoming entangled in or tripping over a longer cord. Longer detachable power-supply cords or extension cords are available and may be used if care is exercised in their use. If a long detachable power-supply cord or extension cord is used:
a. The marked electrical rating of the detachable power-supply cord or extension cord should be at least as great as the electrical rating of the appliance;
b. If the appliance is of the grounded type, the extension cord should be a grounding type 3-wire cord; and
c. The longer cord should be arranged so that it will not drape over the counter top or table top where it can be pulled on by children or tripped over unintentionally.
Do not pull, twist or otherwise abuse the power cord.
PRODUCT NOTICES
- Place the appliance on a hard, flat, level surface to avoid interruption of airflow underneath the espresso maker.
- Do not operate the appliance with an empty water tank.
- Keep the area above the appliance clear during use, as hot steam will escape the appliance.
5
Table of Contents
2 Introduction
3 Important Safeguards
5 Power Cord Instructions
7 Parts Diagram
8 How To Release Pressure
9 Before First Use
12 How To Make Espresso
15 How To Make a Cappuccino or Latte
21 How To Froth Milk
23 Cleaning and Maintenance
27 Helpful Hints
29 Troubleshooting
32 Recipe Ideas
35 Warranty Information
Replacement parts available at www.ereplacementparts.com
IMPORTANT! Always Release Pressure Before Removing Water Reservoir Cap

Step 1: Unplug machine
Unplug the machine. Place a mug or frothing pitcher under the frothing wand.
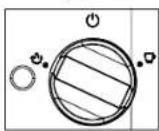
Step 2: Turn knob to steam
Turn control knob on the left side of the machine to steam and let the steam or water exit the frothing wand to release the pressure. When there is no longer steam or water exiting the frothing wand, move to step 3.
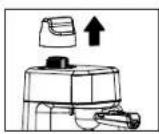
Step 3: Remove water reservoir cap
Remove the water reservoir cap.
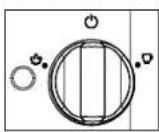
Step 4: Turn control knob to off
Turn control knob back to "⏻".

Step 5: Slowly remove portafilter
Slowly remove the portafilter.
8
Before First Use
WHAT YOU NEED ON HAND:
- A mug, water measuring pitcher (included) and a stainless-steel frothing pitcher (included).
- Coffee should be ground to a fine espresso grind. We recommend using a quality grinder or burr mill, such as a Mr. Coffee® Burr Mill. If you're using a burr mill, select the finest grind setting. If you are purchasing pre-ground coffee, use espresso ground coffee.
- Your choice of milk for making cappuccinos or lattes.
- Clean, fresh water that is filtered and free of impurities - avoid soft water or well water. The type of water that you brew with greatly affects the final taste.
9
CLEAN YOUR MACHINE:
NOTE: Portafilter is not dishwasher safe, hand wash only.
Wash the water pitcher, filter, measuring scoop, portafilter and stainless steel frothing pitcher with mild detergent and a soft sponge or cloth.
CAUTION! Make sure the control knob is set to "OFF" before using the machine.
- Remove the water reservoir cap.
- Fill the water measuring pitcher with filtered water to the 4 mark (Figure 1) and pour into water reservoir. Screw cap back onto the water reservoir.
- Insert empty portafilter (without coffee grounds) into the machine from left and turn to the right to lock in place (Figure 2). To securely lock the portafilter in place:
i. Look at the shape of the top of the portafilter.
ii. Insert the portafilter by placing it into the holder from the left.
Figure 1
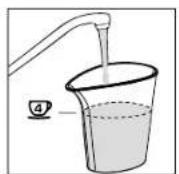
Figure 2

iii. Turn to the right to lock in place. This may require some force. Hold the top of the unit to keep the unit from shifting.
iv. The handle must be aligned with the lock symbol 🔒 and pointing directly at you when you are standing in front of the machine.
- Place mug under the portafilter (Figure 3).
- Turn the control knob on the right side of the machine to brew ☐. Keep the control knob on brew until there is no longer water exiting the portafilter.
- Be sure to turn the control knob to the "position and unplug the appliance.
CAUTION! Do not immerse the power cord, power plug or espresso maker in water or in any other liquid. Do not remove the water reservoir cap or portafilter until you release pressure in the unit.
Figure 3

How to Make Espresso
CAUTION! Do not remove water reservoir cap or portafilter until you release the pressure in the unit. Follow directions on page 8 before proceeding.
CAUTION! Make sure the unit is unplugged and the control knob is set to "☐" before using the machine.
NOTE: This is a manual machine without auto shut-off. You control how much espresso is brewed by turning the control knob.
WATER PREP:
-
Remove the water reservoir cap.
-
For 2 shots of espresso, fill the water measuring pitcher with water to the 2 cup mark (2) and pour into water reservoir (Figure 4).
-
For 4 shots of espresso, fill the water measuring pitcher with water to the 4 cup mark (4) and pour into water reservoir (Figure 4).
-
Screw cap back onto water reservoir.
12 13
Figure 4

ESPRESSO GROUNDS PREP:
-
Scoop your finely ground espresso into the portafilter.
-
For 2 shots of espresso, fill filter to the 2 shots line located inside the portafilter.
-
For 4 shots of espresso, fill filter to the 4 shots line located inside the portafilter. NOTE: Do not fill the filter basket past the 4-shot line.
-
Lightly level/press down the espresso grounds in the portafilter by pushing down with the back of the measuring scoop (Figure 5). (If coffee is pressed down too much, the water will not go through the espresso grounds.)
- Insert the portafilter into machine from left and turn to the right until the handle is aligned with the lock symbol 🔒.
NOTE: Ensure the portafilter is turned to the fully locked position before beginning brew cycle. The handle must be facing out directly to you; not at an angle.
Figure 5

HOW TO BREW:
- Place a mug onto the drip tray, under the portafilter (Figure 6).
- Plug in the machine and turn control knob on the right side of the machine to brew ☐ (Figure 7).
- When the espresso is finished brewing, turn the control knob to the "OFF" ⏻ position and unplug the machine.
- Follow directions on page 8 to release the pressure in the unit.
- Enjoy!
Figure 6
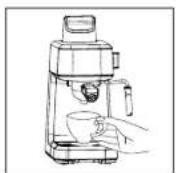
Figure 7

How to Make a Cappuccino or Latte
CAUTION: Do not remove water reservoir cap or portafilter until you release the pressure in the unit. Follow directions on page 8 before proceeding.
CAUTION! Make sure the unit is unplugged and the control knob is set to "OFF" before using the machine.
NOTE: This is a manual machine without auto shut-off. You control how much espresso is brewed and how long milk is frothed by turning the control knob.
WATER PREP:
- Remove the water reservoir cap.
- To make a cappuccino or latte with 2 shots of espresso, fill the water measuring pitcher with water to the 2 cup with steam mark (②) for brewing and frothing milk
and pour into water reservoir (Figure 8).
Figure 8

- To make a cappuccino or latte with 4 shots of espresso, fill the water measuring pitcher with water to the 4 cup mark (4) for brewing and pour into water reservoir. Then fill again to the steam mark (5) and pour into water reservoir for frothing milk (Figure 9).
- Screw cap back onto water reservoir.
ESPRESSO GROUNDS PREP:
-
Scoop your finely ground espresso into the portafilter.
-
For 2 shots of espresso, fill filter to the 2 shots line located inside the portafilter.
- For 4 shots of espresso, fill filter to the 4 shots line located inside the portafilter. NOTE: Do not fill the filter basket past the 4-shot line.
- Lightly press down the espresso grounds in the portafilter by pushing down with the back of the measuring scoop. (If coffee is pressed down too much, the water will not go through the espresso grounds.)
Figure 9

- Insert the portafilter into machine from left and turn to the right until the handle is aligned with the lock symbol 🔒.
NOTE: Ensure the portafilter is turned to the fully locked position before beginning brew cycle. The handle must be facing out directly to you; not at an angle.
HOW TO BREW AND FROTH:
- Place a mug onto the drip tray and under the portafilter.
- Plug in the machine and turn control knob on the left side of the machine to brew ☐.
- Fill a mug or frothing pitcher with cold milk, allowing for enough room for expansion of the foam. When frothing is complete the volume of milk will almost double.
NOTE: Frothing texture is highly dependent upon the milk type used. 2% is recommended; whole milk creates finer bubbles while skim milk creates larger bubbles.
-
Once the coffee begins to brew into the mug, interrupt the brewing process by turning the control knob to "OFF". Place your mug or frothing pitcher so that the frothing wand is submerged about 1/2 -1" into the milk (Figure 10 on next page).
-
Turn the knob to steam

(Figure 11). This will take a few seconds to heat up before bubbling. You should hear the steam coming out. If it is silent, it may mean you are out of water and no steam is coming out. You may need to add additional water. When you hear steam coming out, follow position in figure 10 and allow the steam to move the milk in a circular motion. It takes about 2 1/2 minutes to froth 4 oz. of whole/2%/ skim milk to 150°F heat. You can use a thermometer for precise results. (See Frothing Tips on page 20).
-
Before removing mug or frothing pitcher from underneath the frothing wand, turn the control knob back into the brew □ position to complete the brewing process.
-
When the espresso is finished brewing, turn the control knob to the "OFF" ⏻ position and unplug the machine.
Figure 10

Insert arm into spout at 12 o'clock and place tip at 3 o'clock. Keep arm and edge of spout at finger width distance apart
Figure 11

If brewing 4 shots and frothing, you may need to add additional water.
IMPORTANT: Refer to directions on how to release pressure on page 8 before removing the reservoir cap or portafilter.
- Pour your espresso and frothed milk into a mug, then stir and enjoy!
NOTE: A latte has less foam and more steamed milk than a cappuccino. A cappuccino has 1/3 of espresso, 1/3 of steamed milk and 1/3 milk foam whereas a latte has 1/3 espresso, 2/3 steamed milk topped with milk foam.

Frothing Tips
- If you hear a gurgling sound then the steam wand tip is not deep enough. If you hear a screeching sound the tip is too deep. Adjust the pitcher position accordingly.
- Ideal frothing should make a smoothing hissing noise, and whirlpool motion created in pitcher. *It takes about 2½ minutes to froth 4 oz. of whole/2%/skim milk to 150°F heat. You can use a thermometer for precise results.
- Milk frothed correctly has thick rich micro foam with silky shade. Tap pitcher to release large air bubbles and swirl to blend milk for silky texture.
- Wipe wand clean after every use.
- Optimal milk temperature chart for reference:
| MILK | ERATURE |
| Full & Skim | 0°F |
| Almond | F |
| Soy | |
| Coconut | F |
Temperature might vary according to milk type. Use a thermometer for precise results.
How To Froth Milk Only
CAUTION: Do not remove water reservoir cap or portafilter until you release the pressure in the unit. Follow directions on page 8 before proceeding.
CAUTION! Make sure the unit is unplugged and the control knob is set to "OFF" before using the machine.
WATER PREP:
- Remove the water reservoir cap.
- Fill the water measuring pitcher to the steam line 🌐 with filtered water (Figure 12) and pour into reservoir.
- Screw cap back onto water reservoir.
TIME TO FROTH:
- Fill 1/3 of a mug or frothing pitcher with cold milk, allowing for enough room for expansion of the foam. When frothing is complete the volume of milk will almost double.
NOTE: Frothing texture is highly dependent upon the milk type used. 2% is recommended; whole milk creates finer bubbles while skim milk creates larger bubbles.
Figure 12

- Place your mug or frothing pitcher so that the frothing wand is submerged into the milk. About 1/2 -1" into the milk (Figure 13).
- Turn the knob to steam ⏻ . This will take a few seconds to heat up before bubbling. You should hear the steam coming out. If it is silent, it may mean you are out of water and no steam is coming out.
- When you hear steam coming out, follow position in figure 13 and allow the steam to move the milk in a circular motion. It takes a 4 oz. of whole/2%/ skim milk to 1 a thermometer for precise results page 20).
- Before removing the mug or frothing pitcher from underneath the frothing wand, turn the knob to the "OFF" position.
NOTE: It is extremely important to clean the frothing wand after every use. Refer to page 25 for cleaning instructions.
Figure 13

Insert arm into spout at 12 o'clock and place tip at 3 o'clock. Keep arm and edge of spout at finger width distance apart
Cleaning Your Machine After Each Use
Keep your Mr. Coffee® Steam Espresso, Cappuccino and Latte Maker running smoothly by taking care of it after every use. Follow these easy steps to clean your machine:
CAUTION: Do not remove water reservoir cap or portafilter until you release the pressure in the unit. Follow directions on page 8 before proceeding.
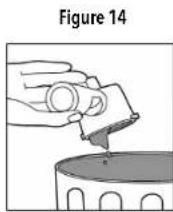
- Remove portafilter to discard coffee grounds. Lift filter retainer clip so that it's placed over the filter edge and hold in place as you discard coffee grounds (Figure 14). This helps keep filter secured in place.
NOTE: Leaving the portafilter in the machine after brewing can cause an improper lock which could result in leaking and damage to the seal.
- Rinse portafilter with fresh water. Please note that the portafilter is NOT dishwasher safe. Handwash only!
NOTE: If you did not froth milk, skip steps 3-8.
- Fill water measuring pitcher to the steam mark ⚠️ (Figure 15 on next page) with water and pour into the water reservoir.
- Screw cap back onto the water reservoir and plug in the machine.
- Fill a mug or frothing pitcher half way with water and place so that the frothing wand is submerged into the water.
- Turn the knob to steam and steam with water instead of milk for 30 seconds. This will help rinse the internal parts of the machine.
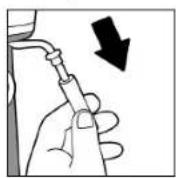
- Once the frothing wand is cool, remove and rinse frothing wand cover. The frothing wand cover is the black plastic piece on the frothing wand. Simply pull from the bottom to remove (Figure 16).
- Wipe down frothing wand with a damp cloth.
- Remove the drip tray cover and empty water or coffee from drip tray. Dry with a clean cloth. Wipe the exterior of the machine with a damp cloth. Do not use metal scouring pads or abrasive cleansers.
CAUTION: To protect against electric shock, do not immerse cord, plug or appliance in water or other liquids.
Figure 15

Figure 16
Cleaning And User Maintenance
Once every 1 to 3 months, depending on usage and the type of water, we recommend that you delime your machine to keep it working properly.
DELIME INTERNAL PARTS
- Make sure the control knob is in the "OFF" position.
CAUTION: Do not remove water reservoir cap or portafilter until you release the pressure in the unit. Refer to directions on page 8.
- Fill water reservoir to the top with undiluted white household vinegar (Figure 17).
- Brew just enough to get some vinegar to come out.
- Steam just enough to get some vinegar to come out.
- Unplug the machine.
- Allow appliance to sit overnight with the vinegar solution in the water reservoir.
- Discard vinegar through the top opening of the espresso
Figure 17

maker by turning the machine upside down over the sink.
- Rinse the water reservoir thoroughly with tap water by filling tank half full with water (Figure 18) and then pouring the water back out into the sink, repeating this step twice.
- Brew and steam with fresh water at least 4 times or until you do not smell any vinegar.
USER MAINTENANCE:
This appliance has no user serviceable parts. Any servicing beyond that described in the Cleaning Section should be performed by an Authorized Service Representative only. See warranty available online.
Figure 18

Helpful Hints
- Make sure the control knob is set to "OFF" ⏻ before using the machine.
- Filter retainer clip should be in the back position (Figure 19) when installing the portafilter into the unit.
- Ensure the portafilter is turned to the fully locked position 📁 before beginning brew cycle. The handle must be facing out directly to you, not at an angle.
- Do not overfill the filter with ground coffee (Figure 20), as this will cause an improper lock of the portafilter, which could result in leaking and damage to the seal.
- For best results, only use high-quality espresso ground coffee.
- Do not leave excess coffee grounds on the edge of the portafilter. Excess grounds on the edge will cause an
Figure 19

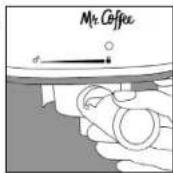
Figure 20

improper lock which could result in leaking and damage to the seal.
- Do not turn knob to "Brew" o? "Steam" without water in the water reservoir.
- Do not leave water in the water reservoir between uses.
- Make sure the frothing wand is submerged in your milk or milk substitute (Figure 21) before turning the knob to steam.
- Do not store portafilter in the brew head. Remove portafilter after brewing. Leaving the portafilter in the machine can cause an improper lock which could result in leaking and damage to the seal.
- Do not fill water to the top of the water reservoir.
- This is a manual machine without auto shut-off. You control how much espresso is brewed by turning the control knob.
- Cord storage is under the unit.
• 2% milk creates better froth than milk substitutes.
Figure 21

Problems, Causes and Solutions
Your Mr. Coffee® Steam Espresso, Cappuccino and Latte Maker has been carefully designed to give you many years of trouble-free service. In the unlikely event that your new espresso machine does not operate satisfactorily, please review the following potential problems and try the steps recommended BEFORE you call Mr. Coffee Service Center.

Problem: Portafilter does not turn to fully locked position Possible Causes:
- Portafilter is overpacked
- Excess espresso grounds on edge or rubber grouphead seal
Solution:
- Ensure the filter basket is not packed past the max fill line (4 cups)
- Ensure the edge of filter basket is clear of any ground coffee. Wipe down rubber grouphead seal to ensure no grounds remain after previous brew cycle.

Problem: Unable to steam Possible Causes:
• Water reservoir is empty
- Unit is not turned on
- Frothing wand is clogged
Solution:
- Fill water reservoir with 2 oz (the steam icon on the water measuring pitcher) of water and pour into water reservoir.
- Plug in power cord and slowly turn control knob to Steam position.
- Remove frothing wand cover and check if metal frothing wand is clogged with a needle or paper clip. Then, following cleaning instructions on page 24.

Problem: Espresso does not come out
Possible Causes:
• No water in water reservoir
• Coffee grind is too fine
• Too much coffee in the filter
• Appliance not turned on or plugged in
• Coffee has been compressed too much
Solution:
- Add water to water reservoir.
- Grind coffee less fine.
- Fill portafilter following instructions on "espresso grounds prep".
- Plug in power cord.
- Refill portafilter with espresso ground coffee and GENTLY press down.

Problem: Espresso comes out too quickly
Possible Causes:
• Coffee is ground too coarse
• Not enough coffee in the portafilter
Solution:
• Use a finer grind of espresso coffee.
- Follow How to Brew Espresso instructions carefully paying close attention to measurements for coffee.

Problem: Milk is not foamy after frothing
Possible Causes:
• Not enough water in water reservoir to steam
- Milk is not cold
• Using whole milk
Solution:
- Follow the "How to Froth" instructions (starting on page 21) paying close attention to the water measurements.
• Use cold milk to froth.
• For best results, use 2% or skim milk.
30 31

Problem: Coffee comes out around the edge of the portafilter
Possible Causes:
- Portafilter not rotated to lock position
• Coffee grounds around edge of filter
• Too much coffee in the filter
• All pressure was not released - Portafilter removed too fast
Solution:
- Rotate portafilter to lock position.
- Wipe off excess grounds from rim of portafilter.
- Put less coffee in the filter
• Follow instructions on how to release pressure on page 8 - Slowly remove portafilter

Problem: Portafilter changed color
Possible Causes:
- Dishwasher
Solution:
- It is still safe to use. We do not recommend putting it in the dishwasher.

Problem: Milk sucked in the machine through the frothing wand
Possible Causes:
• Not enough water to froth / steam in the water reservoir
Solution:
- You should hear the steam coming out. If it is silent, remove the frothing wand from the milk. Then, follow frothing instructions on "how to froth milk" (Starting on page 21).
Do you still have questions? You can call us toll-free at the MR. COFFEE® Consumer Service Department, 1-800-MR COFFEE (1-800-672-6333) or you can visit us at www.mrcoffee.com.
Espresso Recipes
Café Cubano
Place in a small cup: 1/2 teaspoon sugar
Brew in the cup: Small espresso
Stir to dissolve sugar.

Café Bombon
Place in a small heavy glass: 1-1/2 to 2 tablespoons sweetened condensed milk
Brew in the glass: Small espresso
Serve with a spoon to stir just before drinking.

Espresso con Panna
If desired, place in a cup: 1/2 teaspoon sugar
Brew in the cup: Small espresso
Stir to dissolve sugar, then fill cup with: Sweetened whipped cream
Latte Recipes Iced Latte
Place in a large cup: 1 tablespoon sugar
Brew in the cup: Large espresso
Stir in: 1 cup ice cubes 1/2 cup whole or other milk

Pumpkin Spice Latte
Place in a cup: 2 teaspoons brown sugar Pinch of pumpkin pie spice
Brew in the cup: Small latte
Stir to blend.


Nutella Latte
Place in a cup: 1 tablespoon Nutella (chocolate hazelnut spread)
Brew in the cup: Small latte
Stir to blend.
Cappuccino Recipes
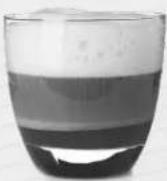
Café Mocha
Place in a cup:
2 teaspoons chocolate syrup
1/2 teaspoon sugar
Brew in the cup:
Small cappuccino
Stir to blend.
Top with additional foam if desired.
Sweet Cappuccino
Place in a cup:
1/2 teaspoon sugar
Brew in the cup:
Small cappuccino
Stir to dissolve sugar.
Top with additional foam
if desired.
Caramel Cappuccino
Place in a cup:
1 tablespoon caramel syrup
1/4 teaspoon sugar
Brew in the cup:
Small cappuccino
Stir to blend.
Top with additional foam if desired.

Warranty Information
1-YEAR LIMITED WARRANTY
Sunbeam Products, Inc. ("Sunbeam") warrants that for a period of one year from the date of purchase, this product will be free from defects in material and workmanship. Sunbeam, at its option, will repair or replace this product or any component of the product found to be defective during the warranty period.
Replacement will be made with a new or remanufactured product or component. If the product is no longer available, replacement may be made with a similar product of equal or greater value. This is your exclusive warranty from Sunbeam.
This warranty is valid for the original retail purchaser from the date of initial retail purchase and is not transferable. Keep the original sales receipt. Proof of purchase is required to obtain warranty performance. Sunbeam dealers, service centers, or retail stores selling Sunbeam products do not have the right to alter, modify or any way change the terms and conditions of this warranty.
This warranty does not cover normal wear of parts or damage resulting from any of the following: negligent use or misuse of the product, use on improper voltage or current, use contrary to the operating instructions, disassembly, repair or alteration
by anyone other than Sunbeam or an authorized Sunbeam service center. Further, the warranty does not cover: Acts of God, such as fire, flood, hurricanes and tornadoes.
What are the Limits on Sunbeam's Liability?
Sunbeam shall not be liable for any incidental or consequential damages caused by the breach of any express, implied or statutory warranty or condition.
Except to the extent prohibited by applicable law, any implied warranty or condition of merchantability or fitness for a particular purpose is limited in duration to the duration of the above warranty.
Sunbeam disclaims all other warranties, or conditions or representations, express, implied, statutory or otherwise.
Sunbeam shall not be liable for any damages of any kind resulting from the purchase, use or misuse of, or inability to use the product including incidental, special, consequential or similar damages or loss of profits, or for damages arising from any tort, including negligence or gross negligence, or fault committed by Sunbeam, its agents or employees or for any breach of contract, fundamental or otherwise, or for any claim brought against purchaser by any other party.
Some states or jurisdictions do not allow the exclusion or limitation of incidental or consequential damages or limitations on how long an implied warranty lasts, so the above limitations or exclusions may not apply to you.
This warranty gives you specific legal rights, and you may also have other rights that vary from state to state or jurisdiction to jurisdiction.
How to Obtain Warranty Service in the U.S.A.
If you have any question regarding this warranty or would like to obtain warranty service, please call 1-800-672-6333 and a convenient service center address will be provided to you.
Mr. Coffee
espresso
© 2024 Sunbeam Products, Inc. All rights reserved. Distributed by Sunbeam Products, Inc.
6655 Peachtree Dunwoody Rd.
Atlanta, GA 30328.
Made in China.
P.N. NWL0001514639 Rev. B
SAP#2191913
BVMCECM-STMMN-BL_24EM1 (US)_GCDS-LD
- TRADITIONAL LATTES, CAPPUCCINOS AND MORE
- USER MANUAL
- INTRODUCTION IMPORTANT SAFEGUARDS
- IMPORTANT SAFEGUARDS (CONTINUED)
- SAVE THESE INSTRUCTIONS
- HOUSEHOLD USE ONLY
- POLARIZED PLUG
- POWER CORD INSTRUCTIONS
- PRODUCT NOTICES
- TABLE OF CONTENTS
- IMPORTANT! ALWAYS RELEASE PRESSURE BEFORE REMOVING WATER RESERVOIR CAP
- STEP 1: UNPLUG MACHINE
- STEP 2: TURN KNOB TO STEAM
- STEP 3: REMOVE WATER RESERVOIR CAP
- STEP 4: TURN CONTROL KNOB TO OFF
- STEP 5: SLOWLY REMOVE PORTAFILTER
- BEFORE FIRST USE
- WHAT YOU NEED ON HAND
- CLEAN YOUR MACHINE
- HOW TO MAKE ESPRESSO
- WATER PREP
- ESPRESSO GROUNDS PREP
- HOW TO BREW
- HOW TO MAKE A CAPPUCCINO OR LATTE
- HOW TO BREW AND FROTH
- FROTHING TIPS
- HOW TO FROTH MILK ONLY
- TIME TO FROTH
- CLEANING YOUR MACHINE AFTER EACH USE
- CLEANING AND USER MAINTENANCE
- DELIME INTERNAL PARTS
- USER MAINTENANCE
- HELPFUL HINTS
- PROBLEMS, CAUSES AND SOLUTIONS
- PROBLEM: PORTAFILTER DOES NOT TURN TO FULLY LOCKED POSITION POSSIBLE CAUSES
- SOLUTION
- PROBLEM: UNABLE TO STEAM POSSIBLE CAUSES
- POSSIBLE CAUSES
- ESPRESSO RECIPES
- CAFÉ CUBANO
- CAFÉ BOMBON
- ESPRESSO CON PANNA
- LATTE RECIPES ICED LATTE
- PUMPKIN SPICE LATTE
- NUTELLA LATTE
- CAPPUCCINO RECIPES
- CAFÉ MOCHA
- PLACE IN A CUP
- BREW IN THE CUP
- STIR TO BLEND
- SWEET CAPPUCCINO
- STIR TO DISSOLVE SUGAR
- CARAMEL CAPPUCCINO
- WARRANTY INFORMATION
- 1-YEAR LIMITED WARRANTY
- WHAT ARE THE LIMITS ON SUNBEAM'S LIABILITY
- HOW TO OBTAIN WARRANTY SERVICE IN THE U.S.A
- MR. COFFEE
- ESPRESSO
Brand : Mr. Coffee
Model : Steam Espresso Maker BVMCECM-STMMN-BL
Category : Coffee maker